Fresh globe beetroot

Fresh_beetroot
Fresh beetroot. Image: Kathryn Hawkins

Apart from the glorious colour of fresh beetroot, if you’ve never tried this root vegetable fresh, it is well worth checking out. The texture is firm, almost meaty, and the flavour of the fresh root is delicately earthy and sweet – sadly both characteristics get lost once it is pickled or soaked in vinegar.

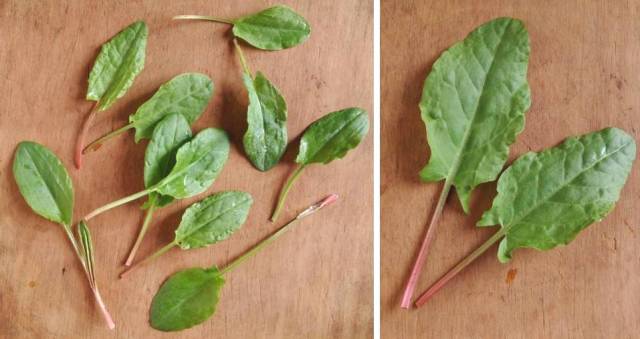
The dense texture does mean it requires a lot of cooking, but you can enjoy small, raw slivers in salads – it bleeds into other ingredients so is best added at the last-minute. Small beet leaves are also good as salad leaves, and have a slight flavour of the vegetable itself; the larger, red-veined leaves can be cooked like spinach or chard but sadly they lose much of the red colour once cooked.

Freshly_picked_baby_beetroot_leaves
Baby beet leaves. Image: Kathryn Hawkins

Preparing and cooking fresh beetroot

Beetroot juice is very strongly coloured. To prevent staining your hands, you might want to wear thin latex gloves. Slice off the leaves, wash the roots thoroughly, peel thinly, and grate coarsely. Alternatively, slice thinly and then into fine strips for salads, or pare pieces directly into a salad using a vegetable peeler.

For boiling, remove the leaves, wash the whole roots and then place unpeeled in a saucepan. Cover with water, bring to the boil and cook for 1 to 2 hours depending on the size – golf ball sized beetroot are best for boiling and will be ready easily within an hour. If you cut the beetroot before cooking, you will lose much of the colour to the cooking water – although this is fine for making soups or casseroles when you will eat the cooking juices as part of the dish. Drain and refresh in cold water before rubbing away the skin. Serve as a hot vegetable or leave to go cold for other uses.

Beetroot bake well. Choose medium-sized roots and wash as above. Leave unpeeled and wrap individually in foil. Place the parcels on a baking tray and bake in a preheated oven at 200°C(180°C fan oven, 400°G, gas mark 6) for about 1 ¼ hours until the beetroot feels tender when slightly squeezed. Serve straight from the foil, split, and lightly seasoned.

Serving suggestions

  • Beetroot goes well with orange, apple, watercress, rocket, dill, caraway, cumin, horseradish, smoked fish, pickled herring, and goat’s cheese and other soft dairy cheeses or creams.
  • Toss thick slices of cooked beetroot in seasoned flour and shallow fry in vegetable oil for a few minutes on each side until golden. Drain well and serve with a sweetened balsamic vinegar and wholegrain mustard dressing.
  • You can make an instant beetroot “chutney” by grating or chopping cooked roots and mixing with finely chopped raw red onion, grated carrot, black onion seeds and seasoning. Mix in balsamic vinegar and sugar (or honey) to taste. Keep sealed in a jar in the fridge for 24 hours to allow the flavours to develop. Great with Indian food. Will keep for about a week, sealed in the fridge.
  • Peel and chunk raw beetroot and mix with chopped onion, carrot, garlic, cumin and ground coriander. Place in the bottom of a casserole dish, season and sprinkle with a little sugar. This makes a great base for slow cooking lamb on top – seal with a tight-fitting lid so that everything cooks in its own juices.
  • Shred raw beet leaves and add to a stir fry for the last-minute of cooking.
  • One of my favourite winter salads from yesteryear is Russian salad: a combination of cooked diced beetroot, mixed with cooked diced potatoes and carrot, some cooked peas, chopped fresh cucumber and some chopped pickled gherkins. Tossed in mayonnaise. Often topped with sliced hardboiled egg for more of a main meal. Also good with pickled herring.
  • Replace grated carrot in a cake or loaf recipe with grated cook beetroot. You’ll end up with a pretty pink bake with a deliciously moist texture. Note: sadly I’ve been too busy with work to bake this week, but I do have a great recipe which I’ll be posting once I get back in the kitchen again 🙂

    Single_globe_beetroot
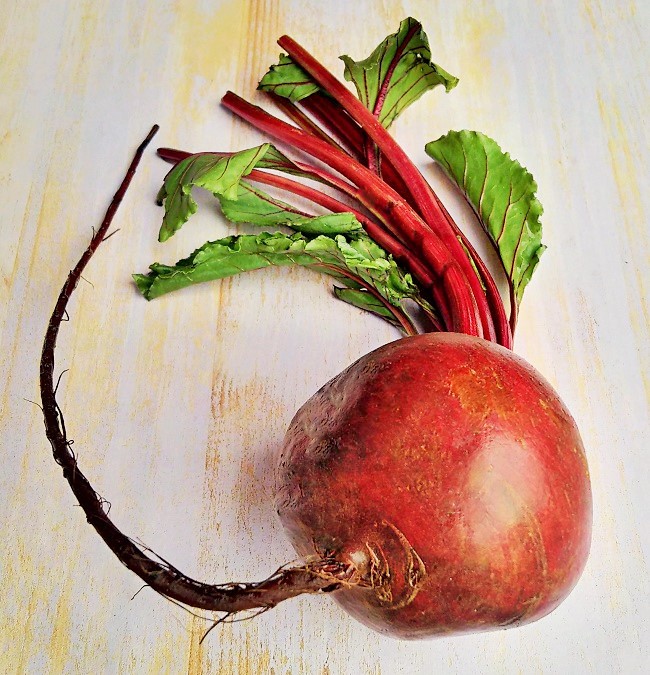
    Globe beetroot. Image: Kathryn Hawkins


Tutti frutti loaf cakes (gluten-free, dairy-free, vegan, no added sugar)

Mini_gluten-free_vegan_fruit_loaf_cakes
Tutti frutti loaf cakes. Images: Kathryn Hawkins

No eggs, no added fat nor added sugar, gluten-free and dairy-free, these loaf cakes will probably sound either a bit boring, or too good to be true, depending on your point of view. Actually, they are extremely tasty and a wee bit too eatable for my liking!

This recipe is a great way to use up all those odds and ends of dried fruit you often have leftover. You can add nuts and seeds to the mix too if you like. Just after Christmas, I made up a bag of dried and candied fruit that was getting towards its use-by date, and put it in a tub the freezer, where it stayed until this week, when a craving for fruit cake came upon me. Combined with a recently opened bag of dried cranberries I had in the fridge, the frozen mix of chopped dried apricots, red and green glacé cherries and golden sultanas made up a colourful addition to my cake mix.

Combination_of_sultanas_candied_cherries_and_apricots
Post-Christmas homemade tutti frutti mix. Image: Kathryn Hawkins

The recipe below will fill 8 mini loaf tins or 1 large (1kg) loaf tin. The cakes taste better if left until the day after baking – the flavour and texture improves on keeping. You will be rewarded if you can leave it alone for a few hours! They also freeze well. I find that the lower content of fat in this recipe means that after 3 or 4 days, the cakes begin to lose their freshness; it is well worth freezing any that you’re not going to eat within a couple of days of baking, in order to enjoy them at their best.

8_individual_loaf_tins
Mini loaf tins. Image: Kathryn Hawkins


Makes: 8 minis or 1 x 1kg loaf

  • 250g stoned dried dates, chopped
  • 2 tsp good quality vanilla extract
  • 150g gluten-free plain flour blend (such as Dove’s Farm)
  • 15g gluten-free baking powder (such as Dr Oetker)
  • 10g arrowroot
  • 2 tsp chai masala or ground mixed spice
  • 75g ground almonds
  • 500g mixed dried and candied fruit
  1. Preheat the oven to 170°C (150°C fan oven, gas mark 3). Grease 8 x mini loaf tins or 1 x 1kg loaf tin, or line with paper loaf tin liners, if preferred. Put the chopped dates in a saucepan and pour over 350ml water. Bring to the boil, simmer for 2 minutes, then turn off the heat and leave to cool completely. Blitz with a hand blender or in the food processor to make a smooth purée. Stir in the vanilla extract.
  2. Sieve the flour, baking powder, arrowroot and chai masala or spice into a bowl and stir in the ground almonds and dried fruit. Add the date purée and then mix until well blended.
  3. Divide equally between the prepared tins and smooth over the tops. Place on a baking tray and bake for about 35 minutes for the individual cakes or about 1 hour for a larger loaf cake – a skewer inserted into the centre will come out clean when the cake mixture is cooked. Cool for 10 minutes, then turn onto a wire rack to cool completely.  For best results, wrap the cakes well or store in an airtight container until the next day before serving.
Tutti_frutti_cake_mix_divided_between_8_mini_loaf_tins
Tutti frutti cake mix ready for baking. Image: Kathryn Hawkins
Inside_a_tutti_frutti_loaf_cake
Packed full of colour and flavour. Image: Kathryn Hawkins


Asparagus and sesame sushi rice bars (gluten-free, dairy-free; vegan)

Sushi_rice_bars_topped_with_fresh_asparagus

Asparagus is my favourite vegetable. It has been highly prized since Roman times, and it is peak asparagus season at the moment. I had my first taste of the new season’s crop a couple of weeks ago when I was on holiday in Sussex, and I have consumed quite a lot more since then!

The season here in the UK is brief: just  6 short weeks in late spring. In my mind, asparagus is one of the vegetables that tastes noticeably different when locally grown and freshly picked. The flavour is sweeter, fresher and nuttier than the varieties that are flown in all year round. I think it is well worth the wait each year and I am taking every opportunity to savour and enjoy it whilst these magnificent steams are available.

Freshly_harvested_British_asparagus
New season British asparagus. Image: Kathryn Hawkins
Fresh_asparagus_spears_in_a_glass_of_water
Keeping asparagus fresh. Image: Kathryn Hawkins

As with any vegetable, buy and eat asparagus as soon as possible after picking to enjoy the freshest flavour and juiciest texture. But if you do end up with more than you can eat, trim away the woody ends as you would with fresh flowers and pop the stems in a vase or jug of cold water. Either store in a cool place or put in the fridge. This way, the stems will stay fresh for at least 48 hours. You can freeze it, but I really don’t like the softer texture of frozen asparagus once it is cooked – I think it over-cooks too easily – however it makes the perfect base for soup-making or blending with mayonnaise or very ripe avocado for a dip, so it is worth freezing a few stems for this purpose alone.

Trimming_away_the_woody_end_from_fresh_asparagus_stems
Preparing fresh asparagus for cooking and keeping. Image: Kathryn Hawkins

I like my asparagus best when it has been griddled or roasted. Thin spears cook very quickly in a hot, lightly oiled frying pan or on a griddle pan brushed with oil. Larger stems are good for roasting –  brush with oil and spread out on a lined baking tray, and bake in a moderately hot oven for 10-15 minutes. If you prefer to use water, try to cook the stems so that the tips stay out of the water. You can buy tall upright asparagus steamers if you’re a big asparagus fan – these enable you to stand the stems upright in bunches – only the stalks are in the water whilst the tops cook in the steam. Otherwise, steaming, covered, over a saucepan of water is the next best way – keep the cooking water to add to your recipe as stock if you’re making a soup or risotto.

Here’s my recipe for sushi rice bars topped with asparagus tips – a delicious light snack for a spring lunch. If you need to trim away lots of stalk to make this recipe, keep the leftovers, and either use them to make stock or soup, or slice them into thin rounds and add to a stir fry.

Sushi_rice_bars_topped_with_fresh_asparagus
Homemade asparagus and sesame sushi bars. Image: Kathryn Hawkins

Makes: 12

  • 150g sushi rice
  • 25g piece root ginger
  • 1 large clove garlic
  • 1 tsp vegetable oil
  • 2 tbsp toasted sesame seeds
  • 3 tbsp freshly chopped chives
  • 4 tsp mirin, sweet sherry or white balsamic vinegar (Agredolce)
  • ¼ tsp salt
  • 12 fine asparagus spears
  • Fresh chives and flowers to garnish

1. Double line a shallow 18cm square cake tin with cling film so that the film overhangs the sides. Rinse the rice in cold running water. Put in a small saucepan and pour over 200ml cold water. Bring to the boil, reduce to a simmer, cover and cook for 10 minutes undisturbed. Turn off the heat and leave to stand with the lid on for 20 minutes. It is worth checking the manufacturer’s cooking instructions for the particular rice you are using as timings and water quantities may vary between brands.

2. Meanwhile, peel the ginger and garlic and chop finely. Heat the vegetable oil in a small frying pan and gently fry for 2-3 minutes until softened but not browned. Leave aside.

3. When the rice is ready, scrape it into a heat-proof bowl and fork through to break up the grains. Add the ginger and garlic along with the seeds, chives, wine, sherry or vinegar and salt. Mix well.

4. Pile into the prepared tin, press down with the back of a spoon and leave to cool completely, then fold over the cling film and chill for 2 hours until firm.

Ingredients_and_preparation_of_seasoned_sticky_rice
Making seasoned sushi rice. Images: Kathryn Hawkins

5. Bring a saucepan of water to the boil. Trim the asparagus to approx. 8cm lengths and place in a steaming compartment over the water. Cover and cook for 2-3 minutes until just tender – insert the tip of a sharp knife into the end of the stalk is a good way to check it is perfectly tender. Cool under cold running water, then drain, place on damp kitchen paper and chill until required.

6. To serve, remove the rice cake from the tin and remove the cling film. Place on a board, cut into 12 bars and arrange asparagus on top of each bar. If liked, wrap a length of chive stem around each piece and arrange on a serving platter. Sprinkle with chive flowers, and serve with wasabi paste if liked.

Spears_of_fresh_British_asparagus
New season fresh, British asparagus spears. Image: Kathryn Hawkins


May bluebells and blossoms

Bluebells_blossom_and_Welsh_poppies
My Perthshire garden in May. Image: Kathryn Hawkins

It’s May! My favourite month of the year. I’m so excited, I hardly know where to start. The weather has been fine and dry for several days and there is so much going on in the garden, I am utterly spoilt for choice. So here goes….

There are bluebells everywhere, ranging in height and depth of colour, and not just blue ones, white and lilac-pink stems as well. When the sun is up, the fragrance is quite intoxicating.

Blubells_and_pink_and_white_varieties
Bluebells, lilac and white varieties. Image: Kathryn Hawkins
Tall_white_bluebells
Tall, white variety of bluebell. Image: Kathryn Hawkins

The golden glow of daffodils has been replaced by the vibrant yellow of Welsh poppies which are blooming all over the garden now and will continue to do so throughout the coming months. The petals are so delicate yet the poppies withstand all sorts of random weather that a Scottish spring and summer has to offer.

Sunny_yellow_Welsh_poppies
Vibrant and bold Welsh poppies. Image: Kathryn Hawkins

I have high hopes for an abundant fruit crop this year. All the trees, especially the Morello cherry, have been laden with blossom. To me, the prettiest of all fruit blossom is the apple blossom, I love the deep pink buds which burst open into hint-of-pink flower petals. Pear blossom comes a close second with its intricate and prominent stamens.

Morello_cherry_tree_in_blossom
Morello cherry tree in full blossom. Image: Kathryn Hawkins
Pink-white_apple_blossom
Lord Derby apple blossom. Image: Kathryn Hawkins
Pear_tree_blossom
Concorde pear blossom. Image: Kathryn Hawkins

The weather here in Perthshire is set fair for another few days, with no rain in the forecast for the foreseeable future. Whilst I enjoy the sunshine and blue sky, this is one of the worst times of the year for there to be little water for the plants. It looks like I will be busy with the watering can over the next few days. Until next month, I’m heading outside 🙂

Garden_bluebells_in_the_May_sunshine
Bluebells under a May Perthshire blue sky. Image: Kathryn Hawkins
Bluebell_close_up
May bluebell, up close and personal. Image: Kathryn Hawkins

Cherry almond amarettis (Gluten-free, dairy-free, vegan)

Cherry_almond_vegan_amaretti_cookies
Vegan cherry almond amaretti cookies. Image: Kathryn Hawkins

For several weeks, every now and again, I have been trying to make eggless meringues. The meringues I prefer are the large, pillow-like ones made with brown sugar and lots of chopped nuts and a drizzle of dark chocolate, and not the plain white, dainty variety. Sadly, I haven’t been successful so far. However, my experimentation has led me to find other uses for vegan “egg white”, hence, I come to this week’s post.

Next time you open a can of cooked white beans or chickpeas in water, keep the canning liquid, for this is vegan “egg white”. Amazing as it sounds, the liquid whips up into a thick foam and can be used (with care) as a substitute for fresh egg whites. You may find it referred to as aqua fava for after all, that is what it is: bean water!

Vegan_egg_white_(aqua_fava)
Bowls of butter bean and chickpea canning water. Images: Kathryn Hawkins

The drained liquid content of a 400g can is approx. 140ml which equates to 3 medium egg whites. It freezes well so you don’t need to use all of it in one recipe – an ice cube tray is perfect for individual egg-sized amounts, but don’t forget to label it otherwise your G&T may taste a little strange! As with fresh egg white, place in a clean, grease-free bowl and whisk in the same way. I add a pinch of cream of tartar to assist the volume when whisking up.

Freshly_whsked_vegan_egg_white_(aqua_fava)
Whipped butter bean and chickpea canning water. Images: Kathryn Hawkins

Once I have cracked a decent meringue recipe and got my sugar and nut quantities correct, I look forward to sharing it with you. Until then, here is my recipe for Italian amaretti cookies. These are the soft variety, and are truly delicious (and very moreish). They make a lovely gift too.

Makes: 18

  • A few sheets of gluten-free edible paper (optional)
  • 45ml chickpea or white bean canning water
  • Pinch of cream of tartar
  • 225g ground almonds
  • 100g glacé cherries, chopped
  • 125g + 2 tsp icing sugar
  • 2 tsp natural almond extract
  1. Preheat the oven to 180°C (160°C fan oven, gas mark 4). Line 2 large baking trays with baking parchment. Using a 4cm diameter round cookie cutter, trace and cut out 18 rounds of edible paper if using, and place on the trays, spaced a little apart.
  2. Put the canning water in a clean, grease-free bowl and whisk until softly foaming. Add the cream of tartar and continue whisking until the beaters leave an impression in the foam – this takes about 3-4 minutes of whisking.
  3. Put the almonds and cherries in a bowl. Sift 125g icing sugar on top. Mix well and then add the almond extract and whisked foam. Carefully mix together to make a softish dough.
  4. Divide into 18 portions and form each into a ball. Place one on top of each paper circle and press down gently to flatten slightly – if you’re not using the paper, just space them out directly on the lined trays.

    Edible_paper,_amaretti_dough_and_shaped_cookies
    Amaretti making. Images: Kathryn Hawkins
  5. Bake in the oven for 15-20 minutes until lightly golden and firm to the touch. Cool for 5 minutes then transfer to a wire rack to cool completely. The biscuits will store for up to 2 weeks in an airtight container. Serve lightly dusted with icing sugar.
Board_of_cherry_amarettis_duted_with_icing_sugar
Sugar-dusted cherry amarettis. Image: Kathryn Hawkins

For gifting, wrap each amaretti cookie in a small, clean square of tissue paper, and twist the ends on each side to seal the wrapping. Arrange in a shallow box and tie with ribbon to present. Perfect for serving with coffee.

Cherry_almond_amarettis_individually_wrapped_in_tissue_paper
Gift-wrapped amarettis. Image: Kathryn Hawkins


Marsh samphire

Stems_of_fres_marsh_samphire
Fresh marsh samphire Image: Kathryn Hawkins

Also known as glasswort, marsh samphire is a vegetable that I associate with this time of year. I’m not entirely sure why, but the texture is succulent and crisp, and goes well with the lighter, brighter dishes I yearn for at this time of year. The vibrant green colour makes it look fresh and very appealing.  Samphire is definitely one of the ingredients and flavours that marries perfectly with this vibrant season.

Samphire_cooked_in_a_griddle_pan
Griddled samphire. Image: Kathryn Hawkins

The thin, green succulent stems of marsh samphire remind me of fine, young asparagus stalks and can be eaten and cooked in the same way. However, the flavour is completely different; you won’t need to turn to the salt-cellar  or any other salted ingredients when you come to cooking and serving samphire, it is naturally salty and is, therefore, best served in small portions. I like to griddle a handful of stems in a very hot pan, brushed with a little oil. They wilt in a couple of minutes and take on a slightly charred flavour. You can also toss stems in oil, spread them out on a baking tray and blast them in a hot oven for a few minutes to get a similar effect.

Two_stems_of_marsh_samphire
Fine, young samphire stems. Image: Kathryn Hawkins

Young, fine, very fresh stems can be eaten raw. Just give them a thorough rinse in cold running water, chop them into small bits and toss them into your salad greens for a salty crunch. Larger stems are best briefly cooked in boiling water or lightly steamed, and can be a stir-fried.

Salmon_samphire_and_rice_noodles
Smoked Salmon and samphire noodles Image: Kathryn Hawkins

Because of the “sea-salt” flavour, samphire is perfect served with fish, but it is also good with roast lamb. I like to add some sweetness in a dressing, or add a splash of vinegar or lemon juice to temper the taste of the salt. Samphire is a vegetable that is traditionally pickled (although I haven’t tried this); I can imagine a sweet, spicy pickling liquid would work well and make a great accompaniment to go with smoked mackerel or ham. My current favourite combination of ingredients with griddled samphire is freshly cooked plain rice noodles, flakes of hot smoked salmon and a dressing of Thai sweet chilli sauce – so simple and yet utterly delicious!

Chai masala biscuits for Easter (gluten-free, dairy-free, vegan)

Chai_masala_spiced_Easter_biscits
Marzipan-topped chai masala biscuits for Easter. Image: Kathryn Hawkins

Rich, short, lightly fruited biscuits with a hint of spice, this is a spring bake that takes me back to my childhood. Easter just wouldn’t be Easter without them. Traditionally the biscuits are dusted with white sugar before baking to give them a crusty top, but I love marzipan and it makes a delicious topping for these biscuits. Using a chai masala mix instead of the usual ground spice blends adds a delicate citrus note to the flavour. I think this Indian spice mix tastes lighter and more fragrant than the more familiar blends used in baking.

Jar_of_ready_mixed_chai_masala
Ready blended chai masala mix. Image: Kathryn Hawkins

You can buy ready mixed chai masala for putting in your bakes (or tea!) (Steenbergs organic chai masala), but if you have selection of traditional spices, it is easy enough to put together your own blend. Making your own means that you can experiment by adding more of your favourite spice to personalise your mix.

Selection_of_whole_spices_that_make_up_a_chai_masala_blend
Whole spices: root ginger, nutmeg, cinnamon, black pepper, cloves and cardamom. Image: Kathryn Hawkins

To make your own chai masala, mix together 4 level teaspoons ground cinnamon, 2 level teaspoons ground cardamom, 1 level teaspoon ground ginger and ½ level teaspoon each ground nutmeg, ground cloves and finely ground black pepper. As with all spices, store in a sealed jar out of direct sunlight, in a cool, dry place. I keep small vitamin supplement jars for keeping spice mixes in as the glass is often brown or dark green, and so perfect for keeping out the light. Make up the blend in small batches  to insure fresh flavour every time you use it. Chai masala can be used in any recipe where a ground mixed spice is called for.

Making_homemade_chai_masala_spice_mix
Blending together ground spices for chai masala. Image: Kathryn Hawkins

Here’s the recipe for my Easter biscuits.

Makes: 14

  • 100g vegan margarine, softened (use butter if you prefer)
  • 75g caster sugar
  • 3 tbsp non dairy milk
  • 200g gluten-free plain flour blend + extra for dusting (such as Dove’s Farm)
  • 1 ½ to 2 tsp chai masala
  • 65g mixed currants and chopped cranberries
  1. Line 2 large baking trays with baking parchment. Put the margarine  and sugar in a bowl and whisk together until smooth and creamy. Whisk in the milk.
  2. Sift the flour and spice on top and add the fruit. Mix all the ingredients together until well combined, then bring the mixture together with your hands to make a softish dough.
  3. Dust the work surface with flour and knead the dough gently until smooth. Roll out thinly to a thickness of approx. ½ cm. Using a 7cm crinkle-edge round cutter, stamp out 14 rounds, re-rolling the dough as necessary. Arrange the rounds on the baking trays, spaced a little apart. Prick with a fork, and chill for 30 minutes.

    Biscuit_dough_rolling_and_shaping
    Preparation of the biscuit dough. Images: Kathryn Hawkins
  4. Preheat the oven to 200°C (160°C fan oven, gas mark 6). Bake the biscuits for about 15 minutes until lightly golden round the edges. Cool on the trays for 5 minutes, then transfer to a wire rack to cool completely.

    Baked_chai_spiced_Easter_biscuits
    Freshly baked chai spiced Easter biscuits. Image: Kathryn Hawkins
  5. The biscuits are delicious left plain but if you are a marzipan fan, dust the work surface with icing sugar and roll out 200g marzipan thinly. Using a 6cm diameter crinkle-edged cutter, stamp out 14 rounds, re-rolling the marzipan as necessary. Brush each biscuit with a little smooth apricot jam and secure a marzipan disc on top of each. Score the marzipan with a knife and lightly toast the tops with a cook’s blow-torch if liked. Happy Easter eatings!

Chai_masala_spiced_Easter_biscuits_with_marzipan_top
Marzipan-topped Easter biscuits. Image: Kathryn Hawkins


April flowers

White_Pieris
White Pieris in April sunshine. Image: Kathryn Hawkins

There is a multitude of colours in the garden this month. A combination of warmer, sunnier days, a few showers here and there, and cool nights, has brought glorious technicolor to the beds and borders. The Pieris shrubs have been in flower for a couple of weeks already, and are now fully laden with bunches of droplet-like blossoms. Their aroma is spicy and fresh, and the bees are buzzing all over them.

The zesty colours of the Euphorbia are showing now. In my garden, the plant grows most prolifically in the dappled, shadier parts, and has become quite a forest, as the stems self-seed each year.

Fresh_new_growth_on_ Euphorbia
Bright, fresh and green, Euphorbia. Image: Kathryn Hawkins

Growing in little groups in the flower-beds and alongside the paths, are the tiny, clustered flowers of the grape hyacinth. Sweet-scented,  dainty in stature, with bold, blue bell-shaped petals, they stand out prominently amidst all the fresh greenery.

Muscari_or_grape_hyacinth
Muscari (grape hyacinth). Image: Kathryn Hawkins

I planted anemones for the first time last autumn, and they seem to be thriving. The colour of the pink and red varieties is particularly dazzling in the sunshine.

Pink_anemone
Fuschia-pink anemone. Image: Kathryn Hawkins
Dazzlingly_bright_red_anemone_flower
Scarlet-coloured anemone. Image: Kathryn Hawkins

The warmth of the sun has opened up the blossom buds on several of the fruit trees this past week. The Morello cherry is always one of the first to flower. I have high hopes for a bumper crop this year as there are blossoms up and down every stem. The small tree is an espalier and grows against a south-facing wall. It is about 6 years old and for the past couple of years, has produced a fair crop of fruit.

Morello_cherry_blossom
Morello cherry blossom. Image: Kathryn Hawkins

One of the more unusual-looking flowers at this time of year is the Snakeshead Fritillay. Immediately you can see how it gets its name. The striking flower heads grow on tall, spindly stems with grass-like leaves; they are almost camouflaged in amongst the new shoots in the flowerbeds and the back-drop of the beech hedge.

A_few_stems_of_snakeshead_fritillay
Snakeshead fritillary. Image: Kathryn Hawkins

Another flowering plant that is unremarkable from a distance, is this tiny yellow violet. It grows in a single clump in the back garden. The petals are so pale and delicate, the blooms are easily over-looked because it grows so close to the ground. If you can get close enough, the flowers have the faint aroma of vanilla.

Tiny_pale_yellowviolet_with_vanilla_scented_flowers
Tiny pale-yellow violet. Image Kathryn Hawkins

My final plant this month, is another aromatic: Ribes sanguineum. At this time of the year, the flowers and foliage smell of blackcurrants and, to me, its flowering means that spring is well under way with the promise of summer not too far off. Until next month, enjoy the sights and smells of the season.

Blackurrant_scented_leaves_and_flowers_of_theRibes_sanguinum
Ribes sanguineum. Image: Kathryn Hawkins


Garden Sorrel (Rumex acetosa)

New_season_spring_garden_sorrel
New season garden sorrel. Image: Kathryn Hawkins

I have more books on the subject of herbs and spices than on any other. I love growing my own herbs and experimenting with new flavours. It’s lovely to see that my herb garden is coming back to life again, now that the days are getting lighter and the sun is slowly warming up.

One of the best culinary friends from the herb garden is garden sorrel. A hardy perennial – I’ve noticed that even in the depths of a Scottish winter, there are always a few leaves poking their way through the earth – it is easy to grow and is very versatile. Related to spinach and the wild, leafy plant, Dock, garden sorrel is a real favourite with cooks and chefs alike.

A_small_garden_trug_of_fresh_sorrel_leaves
Freshly picked sorrel leaves. Image: Kathryn Hawkins

Spring is the time to start picking a few leaves here and there – the more you pick, the more the plant will regenerate, and you’ll have a succession of young leaves right through until autumn. At this time of year, the new leaves are juicy and fresh tasting. Larger leaves have more of the classic, astringent lemony flavour associated with the herb. As the season progresses, tougher, red flowering stems will form with clusters of tiny red flowers at the end, and a few of the leaves will become very large. Whilst the flowering stem should be cut down,  the large leaves, which are too coarse to eat, make perfect wrappings for tenderising meat and flavouring fish during cooking.

Very_young_tender_leaves_ and_more_mature_sorrel_leaves
Baby sorrel and larger sorrel leaves. Image: Kathryn Hawkins

If you fancy growing your own, buy some seed now and get sowing. You may also find potted clumps at the garden centre. Garden sorrel likes rich, moist soil, and the sun or semi-shade. And that’s about it; it will look after itself. If you want a supply for winter, either cover the clump with a cloche, or split the roots in autumn and pot some up – I usually keep a pot in my unheated greenhouse over the winter months to tide me over until the next spring.

Growing_garden_sorrel
New season sorrel in my herb garden. Image: Kathryn Hawkins

Garden sorrel serving suggestions and tips

  • Sorrel is best picked as required. Treat like spinach if you do need to store it: place in a plastic bag and keep in the fridge for a couple of days maximum. It can be frozen successfully, but loses its flavour if dried.
  • Because of the acid content, sorrel is affected by cast iron cookware and will discolour. Use a stainless steel knife blade for cutting, and only shred just before using to avoid discolouration and flavour loss.

    Chopping_fresh_sorrel_with_a_stainless_steel_blade
    Garden sorrel preparation. Image: Kathryn Hawkins
  • Young garden sorrel leaves are delicious mixed with other green salad leaves and soft-leaved herbs; they add a tangy lemony flavour to the plate, and reduce the need for vinegar or lemon juice in a salad dressing.
  • Used by the Greeks and Romans as an aid to digestion, garden sorrel is the perfect accompaniment to rich foods such as soft cheese (especially goat’s and sheep’s cheeses), oily fish, lamb and pork.

    Pork_and_pancetta_patties_flavoured_with_garden_sorrel
    Patties of minced pork and pancetta mixed with salt, pepper, garlic, freshly chopped chives and shredded garden sorrel. Image: Kathryn Hawkins
  • Garden sorrel is commonly used in egg dishes. Try adding to pancake batter, or a quiche filling; stir into scrambled eggs, or add as an ingredient to an omelette fines herbes. Pep up an egg mayonnaise sandwich filling by adding a few fresh leaves – much zingier than mustard and cress!
  • Add some chopped leaves to soft butter or margarine along with some black pepper and a little salt. Melt over hot grilled fish, barbecued chicken or steaks. See my recipe for chive butter if you fancy making some  Homegrown courgettes with chive butter (gluten-free)
  • As well as all the culinary uses, sorrel leaves are rich in potassium and the vitamins A, B1 and C.

    Bright_green_lance_shaped_leaves_of_garden_sorrel
    Broad, arrow-shaped leaf of garden sorrel. Image: Kathryn Hawkins

Spring blues

Chionodoxa_growing_in_gravel_path
Chionodoxa. Image: Kathryn Hawkins

Long before the bluebells flower, my garden is swathed in the electric-blue colour from the blooms of hundreds of Chionodoxa. Every spring these hardy, yet very tiny, bulbs sprout up everywhere: in the flower beds, up through the gravel in the paths, all over the rockery, and in the barren earth where nothing much else is growing yet. They seed themselves and seem to appear in greater numbers each March.

Flowerbed_ and_pathways_covered_in_Chionodoxa
Blue carpet of Chionodoxa. Image: Kathryn Hawkins

This weekend, the sun shone brightly and the Chionodoxa were in full bloom. I expect that by next weekend the blooms will have begun to fade and the bulbs will begin their retreat back into the ground where they will lay dormant until next year.

Chionodoxa_growing_in_gravel_path
Chionodoxa growing up through the gravel paths. Image: Kathryn Hawkins
Chionodoxa_in_a_sunny_spot
Chionodoxa basking in the spring sunshine. Image: Kathryn Hawkins

Whilst Chionodoxa like the open space and bright locations in the garden, Scilla prefer the shady parts which don’t get any direct sunshine. I found this newly opened little group growing amongst the roots of the Japanese Maple tree in the back garden. Scilla flowers lack the dazzling white star shape of the Chionodoxa petals, but they have an almost luminous quality, glowing from the shadows. Up close, you can see the tiny, glowing yellow centres; they were a true delight to discover.

Scilla
Scilla. Image: Kathryn Hawkins
Single_Scilla_flower_in_bloom
Single Scilla flower. Image: Kathryn Hawkins

One more spring flower that was at its peak this week is the Dogtooth Violet (Erythronium Dens Cannis). So pretty and dainty when it first opens with its hanging head of delicate pinky-lilac petals, but after a few days, it raises its head, turns up its petals and transforms into a slightly sinister-looking, upright bloom, revealing just how it gets its name. In my garden, it grows in a cluster on the rockery amidst all the Chionodoxa. These unusual looking “violets” with their strange spotty foliage make a striking contrast in amongst the bright blue and green of the tiny Chionodoxa.

Eythronium_Dens_cannis
Dogtooth violet newly opened and in full bloom. Images: Kathryn Hawkins
A_group_of_dogtooth_violets_growing_on_a_rockery
Striking blooms and foliage of the Dogtooth violet. Image: Kathryn Hawkins

One final image for this post: I saw my favourite insect in the garden today, also enjoying the sunshine. The first one this year, tucking into some aphids on a geranium leaf.

Ladybird_on_geranium_leaf
My first ladybrid of spring. Image: Kathryn Hawkins