Rhubarb ruminations and recipe ideas

Homegrown_forced_spring_rhubarb
Spring rhubarb. Image: Kathryn Hawkins

At last, my forced rhubarb was ready to pick this week! Now I feel the season of Spring has begun. Long before all other fruits in the garden are even formed,  forced rhubarb gives us a flavour of all the sweet delights yet to come.

To me, rhubarb is associated with fond memories of my childhood. My grandparents used to grow “forests” of the thick, leafy stems in the summer – no summer holiday was complete without one of Grannie’s rhubarb crumbles.

If you fancy having a go at growing your own, now is the best time of year to buy yourself a  rhubarb plant (or “crown”) and get it in the ground ready for next year.

Forced_rhubarb_ready_for_picking
My first rhubarb harvest of 2017. Image: Kathryn Hawkins

Rhubarb grows best in an open site, ideally in the sun, but it will grow anywhere. It likes a good mulching and needs plenty of soil depth as the roots, once established, run deep. Give it a good feed once in a while and it will do well. It is very easy to grow and a single plant will provide a good yield for a small family. Rhubarb is really a vegetable, but most of us regard it as a fruit because we serve it mostly for pudding. Only the stalks are edible – the leaves are high in oxalic acid and are, subsequently, very toxic.

Hold yourself back and avoid picking any stems in the first year of planting a new crown. In the second year, pull a few stems, leaving about half of the plant untouched. Once a plant is established – after 3 years – you can pick as many stems as you want. A rhubarb plant can be “forced” at this age, ready for an early crop in spring. You can buy special rhubarb forcers – very tall, slim, terracotta pots – which go over the crown in late winter. These are very expensive; I use the tallest pot I have and this works fine – as you can see in the image above. Although the pot covering doesn’t produce really long stems, they are good enough for me. I’ve put the pot back over the crown again, ready for the next batch of stems to grow – usually the plant produces four good batches of stems before I leave it to recover and rejuvenate for next year.

I have 3 rhubarb plants in the garden now. Each year, I rotate a plant for forcing, and the other 2 are left for summer eating rhubarb, and for freezing. Here are a few tips and ideas for cooking and serving rhubarb:

  • High in acidity, there are a few flavours that help temper the tartness of rhubarb: ginger, cinnamon, orange rind and juice, coconut, banana, angelica and liquorice.
  • Trim the leaves from spring rhubarb and discard, then rinse the stems well and slice off the base. Cut into 3cm pieces for really quick cooking, but leave in longer pieces for gentle poaching and using to top tarts or desserts. Spring rhubarb takes barely 4-5 minutes to cook. I usually place the pieces in a frying pan and sprinkle with sugar and add 1 – 2 tablespoons of water. Once it begins to steam, cover with a lid and cook gently.

    Chopped_fresh_rhubarb
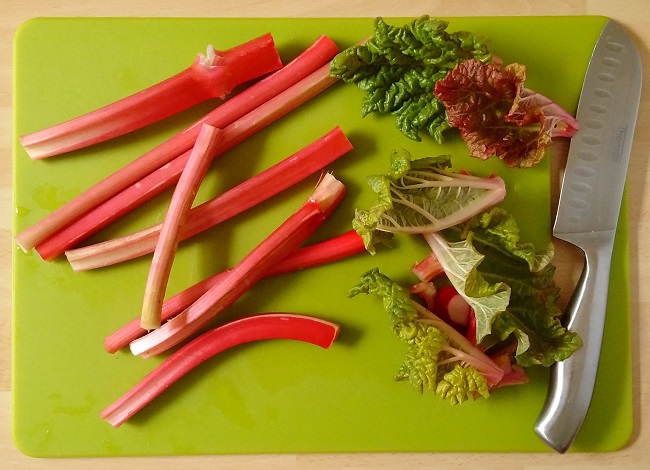
    Preparing spring rhubarb. Image: Kathryn Hawkins
  • For a tangy sweet and sour sauce, cook rhubarb in a little water with sufficient sugar to make it edible, then add a dash of raspberry or balsamic vinegar. Served cold, it goes well with roast duck, smoked mackerel or pan-fried herring.
  • A favourite simple dessert of mine is to mix mashed banana, coconut (non-dairy) yogurt and vanilla extract together and layer in glasses with poached, vanilla sugar-sweetened rhubarb. It is absolute deliciousness guaranteed!

    Poached_rhubarb_with_banana_coconut_yogurt_and_vanilla
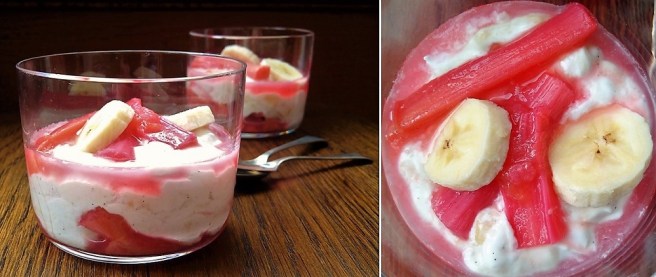
    Rhubarb, banana and coconut pots. Images: Kathryn Hawkins
  • For an easy pastry, bake-off a sheet of (gluten-free) puff pastry and allow to cool, then top with thick (dairy-free) custard and lightly poached stems of sweetened rhubarb. Always a winning combination…..rhubarb and custard.
    Rhubarb_and_custard_tart
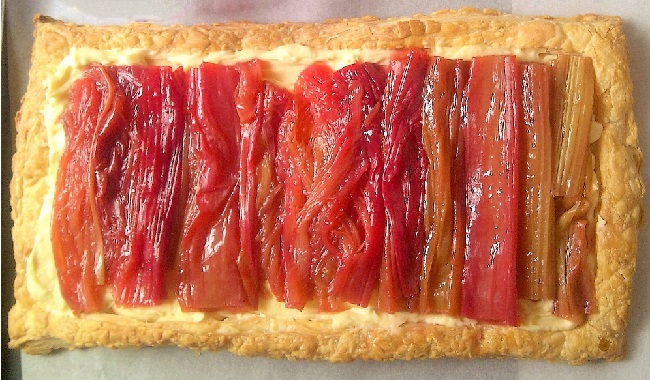
    Rhubarb and custard tart. Image: Kathryn Hawkins

    I have posted a couple of other rhubarb recipes in my blog over the months, here are the links Rhubarb, raspberry and custard crump (gluten-free, dairy-free, vegan) and Rhubarb and custard ice lollies (gluten-free)

    3_stems_fresh_spring_rhubarb
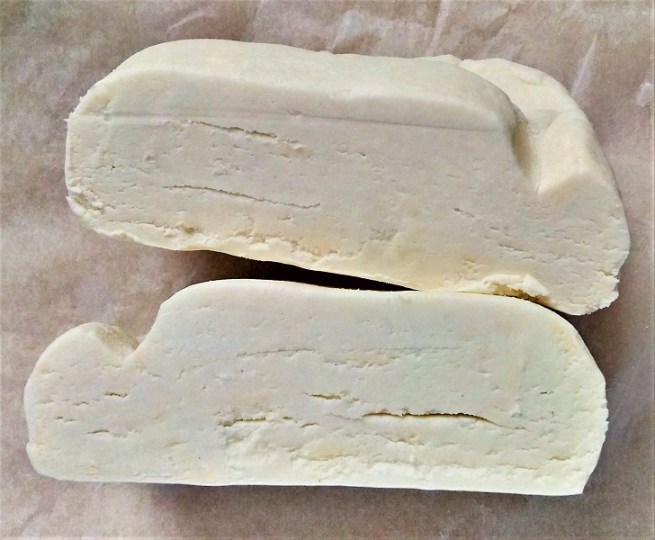
    Tender pink stems of forced rhubarb. Image: Kathryn Hawkins

My hellebore heaven

Dark_red_purple_hellebores
Helleborus. Image: Kathryn Hawkins

The weather has been kind these past few days and the spring flowers are really coming on. I spent a couple of hours in the garden yesterday afternoon and was delighted to see that all 4 varieties of hellebore are now in full bloom. Hidden away in different parts of the garden, they don’t stand out from a distance, but when you get up close, they are magnificent and unlike anything else in the garden at this time of year.

Single_dark_purple_red_hellebore_bloom
Dark purple-red bloom. Image: Kathryn Hawkins

I don’t know the names of any of the hellebore in the garden, but I do know that the plants are hardy, evergreen and deciduous, and they bring dramatic colour and structure to the borders in early spring, just when I’m wondering whether there will ever be life in the garden again. The large blooms last around 4 to 6 weeks and then they will fade gracefully into the foliage, leaving the glossy, bold leaves behind for another year.

Light_purple_hellebore_bloom
Light purple with a ruffled centre. Image: Kathryn Hawkins

Helleborus grow well in the shade or partial shade, and they like moist soil; they are a perfect plant for the Scottish climate. All mine are growing beside walls or fences. New plants take a couple of years to get established, and once they are embedded, they don’t like being moved, although you can divide clumps in the autumn.

White_hellebore_blooms
A white variety with a hint of green. Image: Kathryn Hawkins

Best of all, Helleborus are a low maintenance plant. Once they have flowered, just remove any fading foliage; give the plants a mulch, and allow them to hunker down for another year.

White_and_burgundy_hellebores
A group of white, burgundy-speckled, Helleborus. Image: Kathryn Hawkins

Savoury oat and seed crunchies (gluten-free, dairy-free, vegan)

Pieces_of_savoury_oat_and_seed_crunchies
Oat and seed crunchies. Image: Kathryn Hawkins

Every now and then I try very hard to cut back on the amount of sugar I eat. I find it challenging to find something to stave off the cravings. and I usually turn to seeds to do the job. This week, I started my latest “health-kick” and I found that I had built up quite a collection of different seed varieties from the last time. Many of the seeds are in half-opened bags stored in the fridge and are now coming up to the “best before” date; it seemed the perfect time for a healthy, and very much savoury, baking session. Bursting with  nutrition and flavour, and with super crunchy textures, seeds are one of the best foods to snack on without feeling too guilty.

Chia_sunflower_pumpkin_sesame_and_flax_seeds
Some of my current seed collection. Image: Kathryn Hawkins

You can use any seeds in this recipe, but a mixture of different sizes works the best. Introduce your own flavourings if you like; I kept mine plain and simple this time, but black pepper, smoked paprika, cumin, chilli, thyme and rosemary are good flavours to try if you like to experiment. I use the thicker milled, porridge  (or Scottish Porage) oats, the finer milled varieties seem to go a bit mushy and give a less crisp texture to the final bake. There is a small amount of gram (chickpea) flour added to the mix to help bind the ingredients together but the recipe works fine with other gluten-free blends if you prefer.

Thick_or_coarse_milled_porridge_oats
Thick milled Scottish porridge oats. Image: Kathryn Hawkins

These crunchies are very easy to make and will keep for a week or so in an airtight container. Enjoy them broken into large shards as a crispbread, or crumble them on to soups or salads for extra nutty flavour. Here’s what to do…….

Makes at least 10 big pieces

  • 90g thick or coarse milled oats
  • 175g assorted seeds – I used chia, sunflower, pumpkin, sesame and flax seeds
  • 25g gram (chickpea) flour
  • ½ tsp salt
  • 2 tsp soft dark brown sugar or maple syrup
  • 1 tbsp sunflower oil
  • Approx. 100ml warm water
  1. Preheat the oven to 190°C (170°C fan oven, gas mark 5) Line a large baking tray with baking parchment. Put the oats and seeds in a large bowl and mix well. Stir in the remaining ingredients until thoroughly combined.
  2. Gradually pour and stir in approx. 100ml warm water to make a clumpy mixture. Leave aside to soak for 15 minutes, then squeeze the ingredients together with your hands to make a ball. Add a little more water if the mixture is still a bit dry.
  3. Put the mix on to the prepared baking tray and flatten with your hands. Place another sheet of parchment on top and roll using a rolling pin to make a rectangle approx. 36 x 25cm minimum. Remove the top layer of parchment.
    Preparation_shots_of_oat_and_seed_crunchies
    Making the oat and seed dough. Images: Kathryn Hawkins

    4. Bake in the oven for about 20 minutes until lightly browned around the edges. Place a sheet of parchment on the surface of the bake, lay another baking tray on top and carefully flip the mixture over. Peel away the top parchment and return to the oven for a further 15-20 minutes until crisp and lightly golden all over. Cool for 10 minutes then slide on to a wire rack to cool completely.

    Baked_oat_and_seed_crunchy_mixture
    A freshly baked slab of oat and seed crunchies. Image: Kathryn Hawkins

    When cold, transfer to a board and either snap into pieces with your fingers, or break into shards using the tip of a knife.

    Ready_to_eat_oat_and_seed_crunchies
    Oat and seed crunchies. Image: Kathryn Hawkins

    As an alternative way to bake, you can divide the dough into 10 or 12 portions, flatten each one separately, and roll into thin rounds. Bake in the same way for about 5 minutes less cooking time. The crunchies are delicious with all kinds of savoury spreads, but I prefer mine with crunchy wholenut peanut butter.

    Serving_suggestions_oat_and_seed_crunchies_with_peanut_butter
    Ready for snacking. Image: Kathryn Hawkins

Marvellous March

Snowdrops_in_full_bloom
Under a blue sky, snowdrops in full bloom. Image: Kathryn Hawkins

It’s been a wonderfully bright start to the new month. Blue sky, a light breeze, and warm(ish) sunshine. It is chilly in the shade, with frosts overnight, but the spirits are lifting as the flowers are blooming. In the garden, snowdrops are the main stars of the show and small clumps are in flower all over the place.

Clumps_of_snowdrops_under_a_beech_hedge
Snowdrops growing under the beech hedge. Image: Kathryn Hawkins

There are also little pockets of sunshine yellow, here and there, as the Tête á Tête Narcissus have burst into flower these past few days. These are a favourite of mine, with their sweet, spicy perfume as well as their bright, almost glowing, petals.

Miniature_narcisisus
Miniature Narcissus. Image: Kathryn Hawkins

It’s only occurred to me this year, how much of the heather in the garden flowers at this time of the year. In Scotland, heather is something I associate with as a mid to late Summer flowering plant, when it grows over the hills as far as the eye can see. I have planted lots of heather varieties in the garden over the years, and mostly by good fortune, there are plants flowering in all seasons. This pure white one overhangs the driveway.

Scottish_garden_white_heather_flowering_in_March
March flowering white heather. Image: Kathryn Hawkins

A couple of the early flowering rhododendrons are just about fully in flower. At this time of the year, they are vulnerable to frosts, but, so far (with fingers crossed), they have been unaffected. Both shrubs have been in the garden for many years, and are well established; they pretty much look after themselves.

Two_subtle_pink_flowering_rhododendron_flowers
Early flowering rhododendrons. Images: Kathryn Hawkins

In a few shady spots in the garden, where the sun doesn’t reach, the hellebores are opening out. Probably one of the most challenging flowers to photograph owing to their drooping heads, this white one with dark red spots is one that grows more erect. It is the first one to bloom fully; the darker varieties are not quite open yet, but will feature in next month’s post.

White_hellebore_in_a_Scottish_garden
White Hellebore. Image: Kathryn Hawkins
Centre_of_white_hellebore
Hellebore: close up and personal. Image: Kathryn Hawkins

To close my post this month, the most pleasing sight in the garden yesterday was this little fellow, standing alone, just a few centimetres tall. In a couple of weeks, the bare garden soil and gravel paths will be over-run with Chionodoxa and Scilla; there will be speckles of bright blue everywhere. These tiny, wee plants herald the start of the new season in my garden, and are a delight to behold.

Early_Chionodoxa
The first Chionodoxa. Image: Kathryn Hawkins

Rhubarb, raspberry and custard crump (gluten-free, dairy-free, vegan)

Rhubarb_raspberry_and_custard_crump_pudding
Rhubarb, raspberry and custard crump. Image: Kathryn Hawkins

For me, one of the signs that Spring is on its way is the first harvest of my forced rhubarb. I love the rich colour of the stalks, their tenderness when cooked and the mild astringent, tartness of flavour that really packs a punch on the palate. Sadly, my rhubarb is not ready for picking just yet as you can see below, but I couldn’t resist the fresh stalks I saw in the local farm shop this week.

Homegrown_forced_rhubarb_in_Scotland_in_February
My homegrown forced rhubarb in late February. Image: Kathryn Hawkins
Stalks_fresh_forced_rhubarb
Spring rhubarb. Images: Kathryn Hawkins

One of my favourite pairings with rhubarb is raspberry. Whilst it seems like a long time ago I had raspberries ripening in the garden, I have a few packs in the freezer, and this recipe is the perfect opportunity to delve into my supplies.

I love the name of this dish. I assume it comes from the hybridisation of the pudding called “slump” and the one called “crumble”. The recipe works fine with any cooked fruit baked underneath the glorious, melt-in-the-mouth topping. The custard is a recent addition to my recipe and brings an extra spoonful of comfort at this time of the year.

Homegrown_raspberries_on_the_branch_and_frozen
Last years homegrown raspberries. Images: Kathryn Hawkins

Serves: 6

  • 350g fresh rhubarb, trimmed
  • 50g vanilla sugar (or you can use plain caster if you prefer)
  • 175g frozen raspberries
  • 115g dairy free margarine (or butter if you eat it), very soft
  • 75g caster sugar
  • 175g gluten-free plain flour blend (I use Doves Farm)
  • 5ml good quality vanilla extract
  • 500ml gluten-free, dairy-free custard
  1. Trim the rhubarb and cut into 5cm lengths. If you have thin and wider stalks, cut the stalks down so that they are all roughly the same width – this helps the rhubarb cook more evenly.
  2. Arrange neatly in a large, lidded shallow pan. Spoon over 2 tbsp water and sprinkle with the vanilla sugar. Heat until steaming, then cover with the lid and simmer gently for 5-6 minutes until just tender but still holding shape.
  3. Remove from the heat, sprinkle the frozen raspberries on top and leave to cool completely. Transfer to an ovenproof baking dish, about 1.2l capacity. If the fruit is very juicy, drain off a few spoonfuls and keep as a separate serving syrup.

    Cooked_rhubarb_and_raspberries
    Rhubarb and raspberries, a winning combination. Images: Kathryn Hawkins
  4. For the topping, put the margarine (or butter) in a bowl and beat in the caster sugar until smooth and creamy. Mix in the flour and vanilla to make a lumpy, sticky mixture, resembling a soft cookie dough. Cover and chill for 30 minutes until firm.
  5. Preheat the oven to 200°C (180°C fan oven, gas mark 6). Spoon over about half of the custard in small dollops. Break up the chilled topping into clumps and scatter over the top, covering the fruit and custard as much as possible. Stand the dish on a baking tray and bake for about 35 minutes until lightly golden, bubbling and the topping has merged together. Serve hot or warm with the remaining custard and the fruit syrup.
    Final_steps_of_crump_preparation_and_baked
    With custard; with topping, and the freshly baked crump. Images: Kathryn Hawkins

    Portion_of_freshly_baked_rhubarb_raspberry_and_custard_crump
    A spoonful of comfort: hot crump pudding. Images: Kathryn Hawkins

Gluten-free rough puff pastry (with dairy-free & vegan variation)

Gluten_free_rough_puff_pastry_vol_au_vent_cases
Freshly baked gluten-free vol au vent cases. Image: Kathryn Hawkins

One of the foodie joys I miss most by not eating wheat is the crisp, golden, flaky, melt-in-the-mouth bite of real puff pastry. Whilst I’m not about to claim that the following recipe comes close to the original, it does make a crisp, flavoursome alternative that makes a crunchy base for a tart or a handsome topping for a pie. It’s good with sweet or savoury flavours. I use half white vegetable fat and half butter for my taste, but you can substitute the butter for a vegetable based block margarine if you’re dairy free or vegan – butter or margarine adds colour as well as flavour so using all white fat will give a different result. Tapioca flour is often part of a gluten-free blend but adding a little extra to the mix helps give a more stretchy texture to the dough which helps in the layering process.

I remember that rough puff pastry was one of the first “fancy” pastries I made at school, and I’ve been making it ever since. A favourite because it starts off as one hell of a messy mixture, but by the end of all the rolling and folding, you end up with a silky smooth, perfect block of pastry. Even with wheat flour, the rise isn’t perfect, but it’s a lot easier to work the fat into gluten-free flour using the “rough puff” method than with any other method I have tried. It does take a bit of time, but if you fancy the challenge, why not give it a go?

Makes: approx. 550g

  • 65g cornflour
  • 65g tapioca flour
  • 120g gluten-free plain flour blend + extra for dusting (I use Dove’s Farm)
  • ½ tsp salt
  • 75g unsalted butter or non-dairy, vegetable margarine, chilled
  • 75g white vegetable fat (I use Trex), chilled
  • 150ml cold water
  1. Put the 3 flours in a large mixing bowl with the salt and mix together until well blended.
  2. Cut the butter or margarine and white vegetable fat into small pieces and stir into the flour, coating each piece of fat in flour.
  3. Gradually stir in the water until the mixture comes together to make a soft, very lumpy  dough.Then turn turn out on to a lightly floured work surface and work the dough into a flat, roughly rectangular, shape.
    Gluten_free_rough_puff_pastry_dough_making
    Step 1: making the pastry dough. Images: Kathryn Hawkins

    Gluten_free_rough_puff_pastry_rolling_and_folding_the_dough
    Step 2: rolling and folding the pastry dough. Images: Kathryn Hawkins
  4. Now the rolling and folding begins. The aim is to consistently roll out the pastry to the same dimensions, and then to fold it, turn it and seal it in the same way each time; this is how the pastry layers get constructed. My rolling pin is 35cm long and is the perfect length guide for rolling out the pastry to consistently the same length. Roll out the pastry to approximately this length, with a width about 12cm.
  5. Fold the top one third of the pastry down and the bottom one third up and over the top pastry; twist the pastry round so that the open edge is facing to the right, and gently press the 3 open edges of the pastry together with the rolling pin (see middle image of slide below).
  6. Repeat this rolling, folding, turning and sealing 3 more times and then chill the pastry for 30 minutes. The mixture will be very sticky but try to refrain from dusting with too much flour as this will dry the texture of the pastry.
  7. After the chill time, repeat the rolling, folding, turning and sealing another 3 times, working the pastry each time in the same direction. You should now begin to feel that the fat is more blended into the flour. Chill the pastry for a further 30 minutes.
  8. Now you’re on the home-stretch. Repeat the process 3 more times and you should see that the fat pieces have practically disappeared. Wrap and chill for at least 1 hour before using. From start to finish, you should aim to roll and fold the pastry 10 times.
    Making_the_perfect_gluten_free_rough_puff_pastry_dough
    Progression of the dough, from the rough to the smooth. Images: Kathryn Hawkins

    Unless I have lots of baking to do, I usually cut the pastry in half or quarters and wrap for freezing. It cooks perfectly after freezing and means that you have a back up supply for future use. You’re now ready to use the pastry as per your recipe.

    Homemade_gluten_free_rough_puff_pastry
    Homemade gluten-free rough puff pastry. Image: Kathryn Hawkins

You will need to dust the work surface with extra gluten-free flour and put some on your rolling pin too. It is tricky to roll the pastry very thinly, so I usually stop trying at 1/2 cm. For thicker crusts (like vol-au-vents), 1cm gives a good rise. When rolling up, say for palmiers or arlette, you will notice the pastry cracks quite easily. After chilling and wrapping the roll in baking parchment, it is possible to smooth out some of the cracks before slicing and baking – recipes to follow in future posts.

I usually bake the pastry at 200°C (180°C fan oven, gas mark 6), and most things benefit with a light protein-based glaze (milk or egg depending on your diet). I have found that exposed edges of the pastry do bake quite hard after cooking, so if you’re making a turnover or roll, you may want to wrap the pastry round the filling entirely so that the pastry forms a seam rather than a flat, sealed edge.

The finished result is crisp and flaky, with good flavour, and if you do the rolling and folding correctly, you should get plenty of layers.

Gluten_free_rough_puff_pastry_baked_layers
Crisp, baked gluten-free pastry. Image: Kathryn Hawkins


Chocolate tart (gluten-free, dairy-free, vegan)

Gluten_free,_dairy_free,_vegan_chocolate_tart
Chocolate tart. Image: Kathryn Hawkins

Only a few days ago, in my last post, I had the feeling that spring was on its way. But only one day later, down came the snow once again. In fact, as I go to post this piece, it’s very white outside.  At times of despair, a “cheer-me-up” pudding is called for to help me get through the rest of this dreary month, and what comes to mind most naturally? Chocolate, of course!

This is a simple recipe with only a few ingredients. I don’t usually buy out of season fruit, but I made an exception this week and bought some rather delicious looking strawberries. Best of all, they tasted pretty good too. Of course you can top your dessert with any fruit you fancy, or simply leave it plain. I also added a sprinkle of my favourite toasted raw coconut flakes on top, just before serving. Depending on your chocolate taste-buds, use however much of the darker variety you prefer. Enjoy!

Serves: 8-10

  • 140g plain gluten-free, dairy-free granola, finely crushed
  • 50g coconut oil
  • 200ml canned coconut milk
  • 200g dairy free plain chocolate
  • 100g 90% cocoa extra dark chocolate
  • 1 to 2 tsp good quality vanilla bean paste
  • Fresh fruit and toasted coconut, optional, to serve
  1. Grease and line an 18cm spring-form cake tin. Put the granola in a bowl. Melt the coconut oil and mix into the granola until well incorporated.
  2. Press into the bottom of the tin using the back of a spoon and chill whilst preparing the chocolate layer.
  3. Pour the coconut milk into a saucepan. Break up the chocolate and add to the pan. Place over a very low heat, and stir occasionally until melted. Cool for 10 minutes, stir in vanilla paste to taste and then pour over the granola base. Leave to cool, and then chill for about an hour until firm.
  4. Carefully release from the tin. Peel away the lining paper and transfer to a serving plate. Top with fruit and coconut if using.
Vegan_gluten_free_chocolate_tart_with_coconut_topping
Finished with a coconut topping. Image: Kathryn Hawkins
A_slice_of_chocolate_tart
One slice is never enough. Image: Kathryn Hawkins

February in a Scottish garden

Perthshire_back_garden_covered_in_frost
Frosty mornings. Images: Kathryn Hawkins

Frost and fog have been the order of the day since my last out-of-doors post. Without doubt, February is my worst month of the year. To me, it’s neither one season nor the other, and I am longing for Spring. Many plants that seemed so advanced back in December, have slowed down recently, and my hopes for an early end to Winter have been thwarted.

On a positive note, the afternoons are getting noticeably  lighter as the days begin to draw out, and, the snowdrops are beginning to bloom at last. I hadn’t given much thought to this well-known, delicate little flower until I moved to Scotland. Snowdrops grow every where in the countryside around me: from the sides of the roads to carpets in the forests, and in the most modest of gardens to the landscaped grounds of castles and palaces, they certainly feel at home here. I have small clumps growing in different areas all over the garden; none have been planted, they come back naturally year after year.

Snowdrops_in_Scottish_garden
Early February snowdrops. Images: Kathryn Hawkins

Other bulbs are greening up, and most shrubs are in tight bud; I am hoping they will open up in the next two to three weeks. I have are a few heathers in bloom here and there, adding splashes of pink amongst the green shoots.

The weather has just turned milder these past couple of days, which means (fingers crossed) that the garden will spring into action once more. Until next month………..

Pink_heathers_and_pink_rhododendron_buds
February pink heathers and rhododendron buds. Images: Kathryn Hawkins

Nian Gao – sticky rice cake for Chinese New Year (gluten-free, dairy-free, vegan)

Freefrom_nian_gao
Happy Chinese New Year! Image: Kathryn Hawkins

I discovered this sweet treat for the first time last year. The texture is soft and gelatinous, a bit like Turkish Delight. It is teeth-janglingly sweet, so a little goes a long way, but the rich, treacly flavour is strangely addictive. I dare you to try it.

To achieve the right texture, you do need to use the right ingredients, so you may need to make a trip to a Chinese supermarket or research online suppliers. However, good news: there are only four ingredients, and one of those is water! You must use glutinous rice – a fine white powder, full of starch (and don’t worry, no gluten!) – I have tried this with ordinary rice flour and the texture was grainy and quite solid. The brown sugar you use is up to you; the depth of colour and flavour  of the finished cake will depend on how dark the sugar is. This year, I used coconut sugar and the result is, as you see above, very dark, glossy and treacly. The only other ingredient is coconut milk, and I use the canned variety.

Once cooked and cooled, Nian Gao is traditionally cut into slices, dipped in egg and pan-fried until lightly golden all over. It is served with red and gold decorations for luck. I’m not an egg lover, so I don’t do the frying part; I eat the cake about an hour after cooking, just as it is. Lovely.

Bag_of_Chinese_glutinous_rice_flour
Glutinous rice flour. Image: Kathryn Hawkins

Other than the ingredients, you just need a couple of tins or dishes, lined with baking parchment, to cook the mixture in, and a steamer for cooking.

Prepared_tins_for_steaming
Lined 10cm diameter tins for Nian Gao. Image: Kathryn Hawkins

Makes 2 x 10cm cakes (serves 3-4)

  • 100g brown sugar
  • 100ml water
  • 100ml canned coconut milk
  • 100g glutinous rice flour
  1. Line 2 x 10cm tins or dishes with circles of baking parchment – you will need to crease the paper to make it sit snuggly inside. Put the sugar and water in a small saucepan, and heat, stirring, until dissolved. Raise the heat and simmer for 5 minutes until lightly syrupy. Cool for 10 minutes then stir in the coconut milk.
  2. Bring a steamer to the boil, or you can use a saucepan of water fitted with a steaming compartment. Reduce the water to a simmer.
  3. Sift the rice flour into a bowl and make a well in the centre. Gradually pour and whisk in the sugary milk, until well blended, and the mixture resembles a smooth pancake batter.
  4. Divide the batter between the 2 tins or dishes, and arrange in the steamer. Cover loosely with a sheet of baking parchment and then put the lid on top. Leave to cook in the steam for 30 minutes until firm and glossy, like set, thick custard.

    How_to_make_Nian_Gao
    Preparation and cooking Nian Gao. Images: Kathryn Hawkins

5. Remove the cakes from the steamer and leave to cool for 10 minutes, then take out of the tins and place on a wire rack to cool. If you’re going to present the cakes, you might like to leave them in the parchment and tie with red ribbon. A flake of gold leaf on top gives the perfect finishing touch.

This is how I like my Nian Gao, still slightly warm, cut up into small chunks, and served with fresh fruit. Happy Chinese New Year!

Sticky_rice_cake_with_fresh_mango
My favourite way to serve Nian Gao, with fresh mango. Image: Kathryn Hawkins

Chocolate Haggis for a Burns Night supper (gluten-free, dairy-free, vegan)

Chocolate_biscuit_cake_wrapped_in_marzipan_shaped_like_a_haggis
Chocolate haggis wrapped in marzipan. Image: Kathryn Hawkins

January 25th is a Scottish celebration day, commemorating the birth of Scotland’s National poet, Robert Burns. Not wanting to offend my non meat-eating friends, I thought better of posting anything about the traditional savoury supper served on this day, and instead turned my thoughts to something I devised a few years ago, the Chocolate haggis. Much more appealing to all, I think, and perhaps, a wee bit more fun.

My recipe is simply a twist on the classic biscuit or refrigerator cake. You can add any combination of biscuit, fruit and nuts that you fancy. I use Scottish heather honey for the sweetness and flavour, but golden syrup or maple syrup will work just as well for my vegan friends. If you eat butter, you can use this instead of coconut oil. It’s a very versatile mix. Adding a wee tot of whisky is for the celebration; it’s fine without, so I’ll leave that up to you! By the way, I love marzipan, but if it’s not for you, you can achieve a similar effect by using an ivory coloured fondant icing.

Makes 1 haggis – 12 generous slices

  • 125g free from plain chocolate
  • 75g coconut oil (or butter)
  • 2 tbsp golden or maple syrup (or heather honey)
  • 150g free from plain granola or coarse oatcakes, crushed
  • 150g free from shortbread or plain biscuits, crushed
  • 75g currants
  • 2 tbsp whisky (optional)
  • Icing sugar to dust
  • 250g natural marzipan

1. Break the chocolate into a heatproof bowl and add the coconut oil and syrup. Sit the bowl over a saucepan of barely simmering water until melted. Remove from the water and cool for 10 minutes.

2. Mix the granola, shortbread and currants into the melted chocolate and stir in the whisky, if using. Leave in a cool place for about 45 minutes to firm up, but not set completely.

How_to_make_a_chocolate_haggis
Chocolate haggis preparation. Images: Kathryn Hawkins

3. Line the work top with a large, double-thickness, square of cling film and pile the chocolate mixture into the centre. Mound it up it to form a fat oval shape about 12cm long. Wrap the cling film round the mix tightly and twist the ends to seal, making a fat sausage shape. Chill for at least 2 hours until very firm.

4. Lightly dust the work surface with icing sugar. Roll out the marzipan to a rectangle approx. 18 x 28cm, and neaten the edges. Unwrap the chocolate haggis and place in the centre of the marzipan. Fold the marzipan over the top to cover the chocolate haggis completely, and then pinch at either end to make the distinct haggis shape. Tie the ends with twine if liked.

Freshly_made_chocolate_haggis
Chocolate haggis, ready to slice. Image: Kathryn Hawkins

5. Cover loosely with cling film and leave at room temperature for about an hour before slicing to serve, accompanied with a wee dram or two. Slàinte!

Sliced_chocolate_haggis
Chocolate haggis, sliced and ready to serve. Image: Kathryn Hawkins
Chocolate_haggis_for_Burn's_Night_supper
Happy Burns Night! Image: Kathryn Hawkins