Welcome to my blog all about the things I love to grow and cook. You'll find a collection of seasonal gluten-free, dairy-free and vegan-friendly recipe posts, as well as a round up of my gardening throughout the year. I wish you good reading, happy cooking and perfect planting!
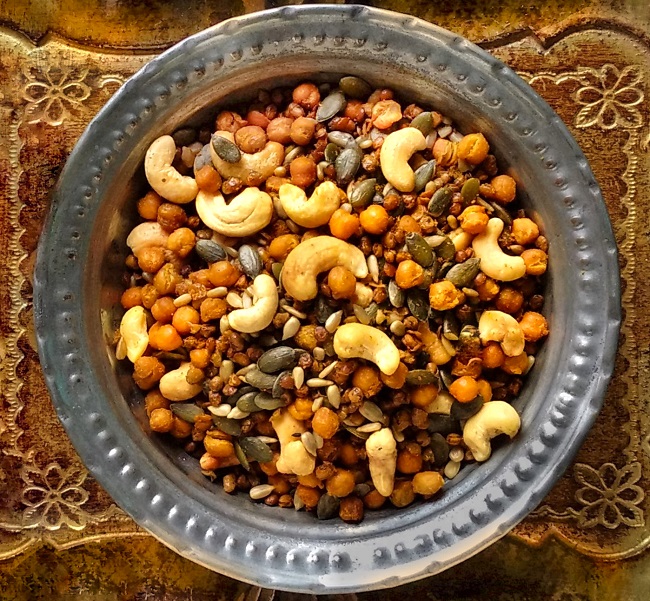
Spiced roast chana and dal. Image: Kathryn Hawkins
A mix of roast pulses, nuts and seeds flavoured with warming spice is a tempting snack, a delicious sprinkle for soups and salads, and a great diversion if, like me, you are forever fighting a battle against a sweet-tooth.
Ingredients ready for mixing and roasting. Image: Kathryn Hawkins
Easy to make, tasty and less fatty than the shop-bought mixes, this is my interpretation of the Asian snack, Bombay Mix. The bulk of the mix is made up of cooked chickpeas (chana) and green split lentils (dal). You can add any nut or seed, but choose the unsalted, natural varieties so that you can adjust the seasoning to suit your taste. I use Madras curry powder but garam masala is also a good blend to use. Here’s what to do:
Makes: 300g
Ingredients
250g cooked chickpeas
250g cooked green lentils
2 tbsp. vegetable oil
4 teasp Madras curry powder
1 teasp salt
65g pumpkin seeds
65g sunflower seeds
100g unsalted cashew nuts
Preheat the oven to 150°C (130°C fan oven, gas 2) . Line a large baking tray with baking parchment. Dry the chickpeas and lentils thoroughly on kitchen paper.
Transfer them to a large bowl and toss in the oil and curry powder. Spread evenly over the baking tray and bake for 1 hour, turning occasionally.
Mix in the seeds and cashews, turning them well on the tray so that they become flavoured with the spices and oil. Spread out evenly again and put back in the oven to roast for a further 30 minutes, turning halfway through, until everything is golden and the pulses have dried out. Leave to cool on the tray.
Drying, flavouring and roasting. Images: Kathryn Hawkins
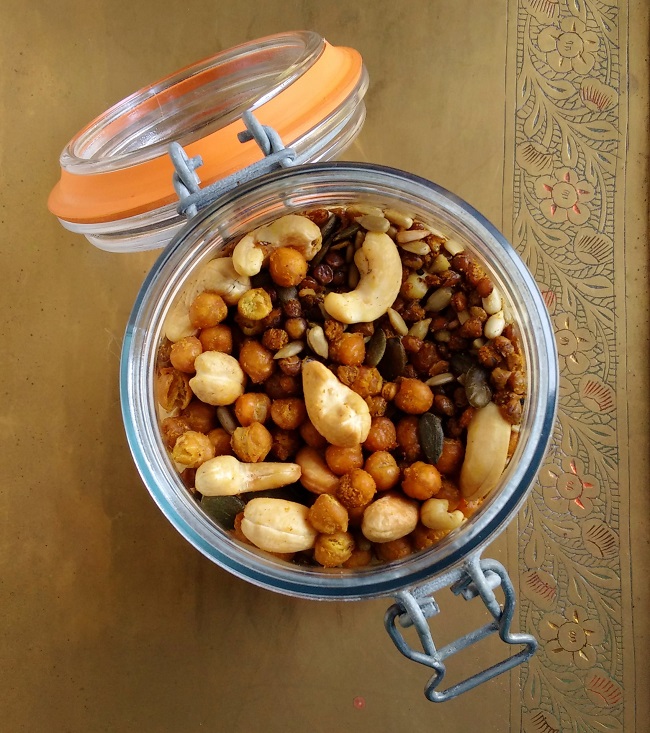
When the mix is completely cold, pack into an airtight container or storage jar, and keep in a cool, dry place. The mix should stay fresh for about 2 weeks, after this time, the pulses may begin to soften.
Storage jar of home-made “Bombay Mix”. Image: Kathryn Hawkins
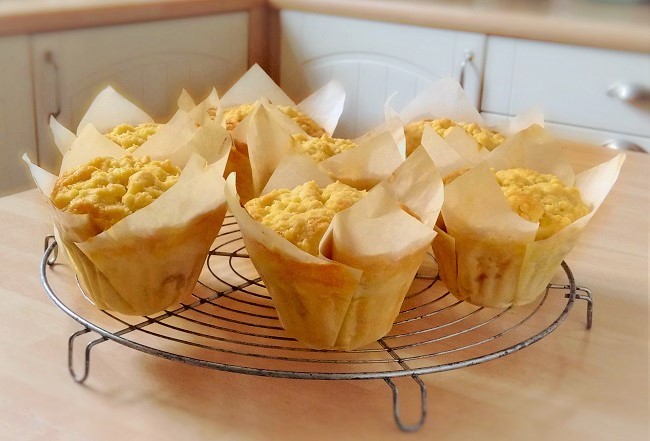
Rhubarb crumble and custard muffin. Image: Kathryn Hawkins
For the first time in a while, I didn’t have a clump of rhubarb to put under a forcer pot back in January. I had transplanted all my rhubarb crowns to a new bed at the end of last year, and I decided that I would be sensible and let them recover and leave them to grow in the open for a harvest later in the year. Now, of course, I regret not having the lovely pink, tender stems to cook, but, never mind, I look forward to a home-grown harvest whenever it is ready. Actually, the clumps are doing very well, so I don’t think it will be too long before I get to pull my first stems of the year.
April rhubarb. Image: Kathryn Hawkins
In the meantime, I bought some rhubarb from the local farm shop this week and baked up a batch of muffins. Serve them hot with extra stewed rhubarb and custard as a pudding, or enjoy them slightly warm for a spring-time breakfast or tea. Best eaten on the day they are made, although they will freeze, and can be reheated successfully in the microwave for a few seconds.
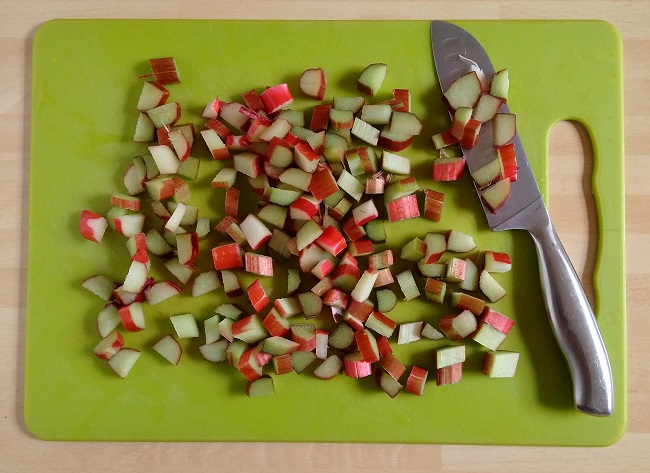
Chopped fresh rhubarb ready for muffin making. Image: Kathryn Hawkins
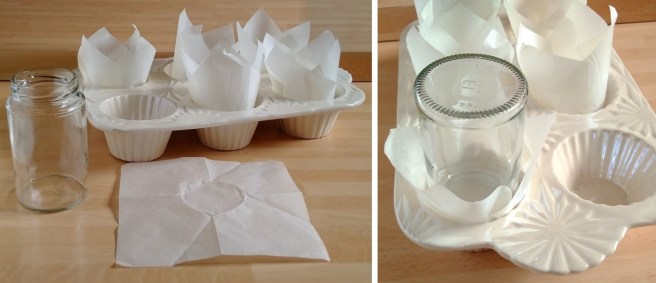
I made my own tulip-style paper cases, which make large “coffee shop” sized muffins. You will need 15cm squares of baking parchment and a jar or glass the same size as a muffin tin, and then it’s just a case of pressing the paper into the tins to make the case shape. If you prefer, divide the mixture between 12 ready-made paper muffin/cupcake cases and cook for slightly less time.
Making tulip-style baking cases. Images: Kathryn Hawkins
Makes 7 large muffins (or 12 traditional size)
Ingredients
For the crumble top:
85g gluten-free plain flour blend (such as Dove’s Farm)
2g gluten-free baking powder (such as Dr Oetker)
55g dairy-free margarine, softened
55g caster sugar
For the muffin mix:
225g gluten-free plain flour blend
8g arrowroot (optional, but I find it does help bind the ingredients together and gives a chewier texture)
10g gluten-free baking powder
115g caster sugar (or half caster and half vanilla sugar)
60g dairy-free plain or coconut yogurt
115g dairy-free margarine, melted
150ml soya milk
2 teasp good quality vanilla extract
175g rhubarb, trimmed and finely chopped
150ml free-from custard
First make the crumble top. Put the flour and baking powder in a bowl and rub in the margarine until well blended. Stir in the sugar and mix until it all clumps together. Cover and chill until required.
Preheat the oven to 200°C (180°C fan oven, gas 6). Line a muffin tin with 7 large tulip-style paper cases or 12 traditional sized cases. For the muffin batter, sift the flour, arrowroot and baking powder into a bowl. Stir in the sugar and make a well in the centre.
Mix the yogurt, melted margarine, non-dairy milk and vanilla extract together in a jug. Gradually pour into the dry ingredients, mixing well to blend everything together. Stir in the chopped rhubarb.
Spoon half of the mixture equally between the paper cases, and spoon a dollop of custard on top, then cover the custard with the remaining muffin batter. Sprinkle the tops generously with the prepared crumble mixture.
Filling the muffin cases. Images: Kathryn Hawkins.
Bake for about 35 minutes for large muffins, and 25-30 minutes for the smaller size. Cool in the tins for 10 minutes, then transfer to a wire rack to cool. Best served warm and eaten on day of baking.
Straight out of the oven. Image: Kathryn Hawkins
The recipe works well with chopped apple or pear (add a little cocoa powder to your custard for a chocolate filling), or you can add fresh small berries like raspberries, blueberries or cherries. Until next week…….happy cooking!
The blue star-shaped flowers of Chionadoxa. Image: Kathryn Hawkins
We had a lovely, blue-sky Easter weekend here in central Scotland; I was able to spend several hours working outside (without a coat!) and taking my images for this week’s post. However, come Easter Monday, the temperature dipped again, it snowed, and just about everything I photographed disappeared under a layer of white slush.
Chionadoxa in the snow. Image: Kathryn HawkinsSpring flower bed. Image: Kathryn Hawkins
I will never tire of these vibrant blue, star-shaped spring flowers. In the sun-light, they dazzle with vibrancy, and in the gloom, they take on an almost iridescent quality. They seem quite hardy and I can see that they haven’t been crushed by the weight of the snow.
Chionadoxa and a Dog-tooth violets. Images: Kathryn Hawkins
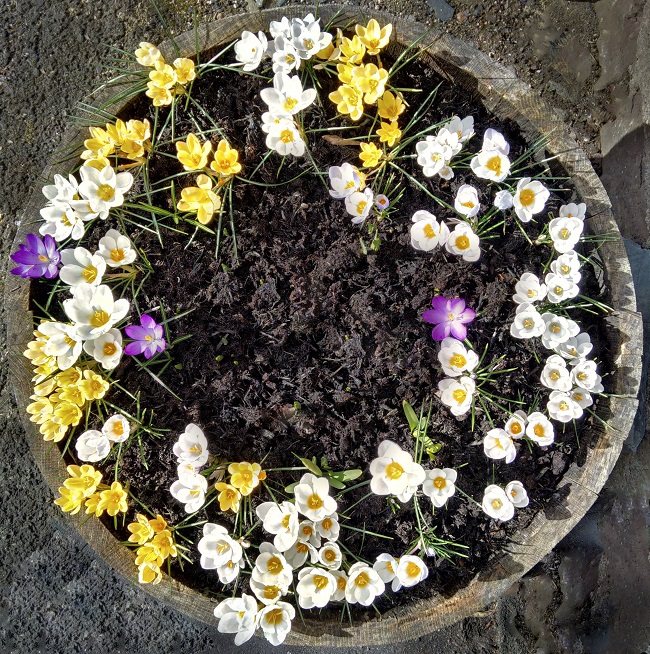
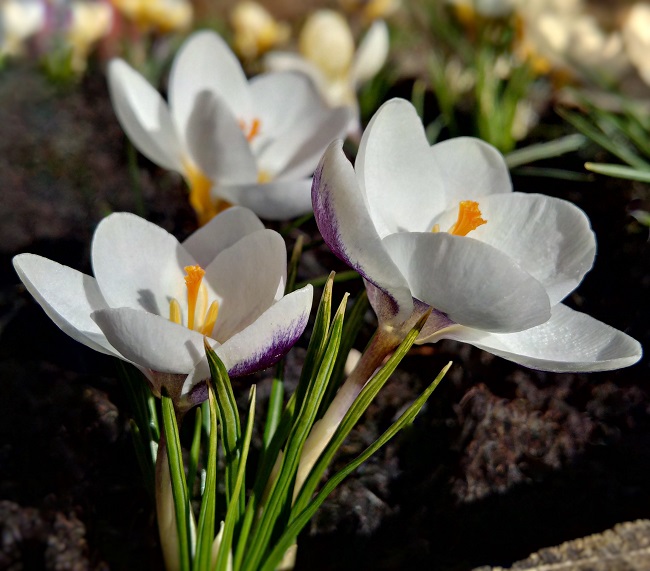
It’s been a marvellous year for crocus. I have never known so many come into flower. Apart from the ones I transplanted into a wooden barrel last year, there are small clumps all over the garden which seemed to have appeared from nowhere. I think the Crocus fairies were busy planting when my back was turned.
My barrel of mixed crocus, the white variety looked particularly stunning in the sunshine. Images: Kathryn HawkinsShades of pink and purple Crocus planted by the fairies. Images: Kathryn Hawkins
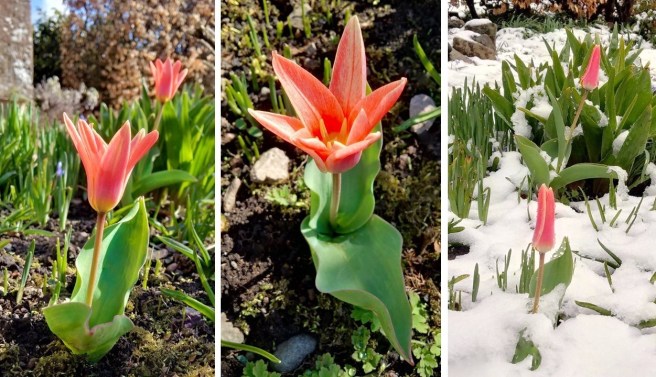
Most of the spring flowers in my garden are shades of blue, yellow and white, but these tulips fellow are an exception. Always the first to flower, long before the rest of the tulips, and this year, ahead of the daffodils.
Early dwarf tulips. Images: Kathryn Hawkins
To round off my flowery post this week, I have a wonderful display of Hellebores again this year. They have been slow to open up, but are now in full bloom and glory. They are quite magnificent, and because they grow in the sheltered parts of the garden, they are not snow-bound 🙂 Have a good week.
For Easter, baked lemon and pistachio cheesecake. Image: Kathryn Hawkins
How I love a good cheesecake. But, with regret, it is a dessert that has been off my menu for quite a while due to my intolerance to most dairy products. Over the years, I have been experimenting with different combinations of ingredients but with little success. However, recently I revisited a much-loved, traditional cheesecake recipe, and I think I have achieved a perfect balance between flavour and texture. So at last, I am able to make a cheesecake entirely without cheese and eggs, and this classic dessert is very much back in my life 🙂
My culinary discovery is perfect timing for the Easter holidays. I have given my recipe a seasonal twist by adding lots of zesty lemon flavour and a subtle nuttiness from pistachios although almonds work just as well if you prefer. If nuts aren’t your thing, leave them out altogether and replace them with another 25g gluten-free flour.
My no dairy, no eggs baked cheesecake. Image: Kathryn Hawkins
You will need a deep tin for this recipe as there is a lot of mixture to start with. Once the cheesecake is baked, it does sink down, but you do need the initial volume of mixture to make a deliciously, deep slice with a firm, dense texture. I prefer to use a spring-clip cake tin because there is less chance of damaging the bake as you take it out of the tin, but it isn’t essential. It is more important to make sure you have a depth of at least 7cm so that you can use all the mixture.
Spring-clip cake tin ready for cheesecake mixture. Image: Kathryn Hawkins
Serves: 8-10
Ingredients
For the pistachio base:
50g gluten-free plain flour blend (such as Dove’s Farm)
5g gluten-free baking powder (such as Dr Oetker)
50g dairy-free margarine, softened
50g silken tofu
50g caster sugar
25g ground, shelled pistachio nuts
½ teasp good quality almond extract
Natural green food colour gel (optional)
For the lemon cheesecake:
150g caster sugar
60g silken tofu
350g free-from vegan soft cheese
Finely grated rind and juice 1 unwaxed lemon
35g cornflour (if you prefer a softer, more mousse-like texture, use 25g)
Natural yellow food colour gel (optional)
Approx. 150ml white bean canning liquid (this is the approximate proportion of canning liquid in a standard sized can)
50g sultanas
To decorate and serve:
1 unwaxed lemon
60g caster sugar
25g chopped, shelled pistachio nuts
Preheat the oven to 170°C (150°C fan oven, gas 3). Grease and line a 7cm deep, 18cm diameter spring-clip cake tin. Put all the ingredients for the pistachio base in a bowl and blend together using an electric whisk until smooth and creamy. Spread over the base of the tin and put to one side (you don’t need to cook this layer on its own).
For the cheesecake, whisk the sugar and tofu together until smooth and creamy, then whisk in the vegan soft cheese, lemon rind and juice, and cornflour until smooth and well combined. Add a few drops of food colouring if using.
In another bowl, whisk the canning liquid until thick and foamy, and then gradually fold into the cheese mixture until well combined but trying to retain as much of the airy-foam texture as possible.
Gently stir in the sultanas and pour the cheesecake mixture over the uncooked pistachio base. The tin will be very full. Carefully transfer to a baking tray and bake for 1 to 1 hour 15 minutes until golden and crusty – the cheesecake should still wobble a bit in the middle.
Turn off the oven, leave the door slightly ajar, and allow the cheesecake to cool completely – it will shrink as it cools. Once the cheesecake is cold, carefully remove it from the tin and place on a serving plate or cake stand. Chill for at least 2 hours before serving.
Preparing the lemon decoration and syrup. Images: Kathryn Hawkins
For the decoration:
Thinly peel the rind from the lemon using a vegetable peeler, and cut into thin strips. Pour 150ml water into small saucepan, bring to the boil, add the lemon rind and cook for 1 minute. Drain, reserving the liquid, and leave the rind to cool.
Extract the juice from the peeled lemon. Return the cooking liquid to the saucepan, pour in the lemon juice and stir in the sugar. Heat gently until the sugar dissolves, then bring to the boil and simmer for about 10 minutes until reduced by half.
Transfer to a heatproof jug and leave to cool. When you are ready to serve the cheesecake, scatter the top with the cooked lemon rind and the pistachios. Serve the syrup as a pouring sauce.
A slice of baked lemon and pistachio cheesecake with lemon syrup. Image: Kathryn Hawkins
I hope you all have a lovely Easter holiday, and that the sun shines for at least some of the time. See you next week as usual 🙂
Sweet potato, spinach and coconut stew. Image: Kathryn Hawkins
A deliciously fragrant and comforting recipe for you this week. An old favourite of mine which works just as well with potatoes if you’re not a fan of the sweet variety. It makes a good side dish, but I usually serve it as a main course, spooned over rice.
Preparing sweet potatoes. Image: Kathryn Hawkins
The stew is very easy to make. You can change the proportions of the individual spices to suit your taste. The overall flavour is reminiscent of a green Thai curry without the lemongrass or lime leaves. I’m not a huge chilli fan, I like a hint of heat rather than a major blast, so you may want to increase the chilli-factor for more of a spicy kick. If you have fresh green chillies, grind them up in the spice paste as an alternative to using the dried flakes.
If you have any leftover, the stew makes a good soup the next day. Just blend it up in a food processor with stock or more coconut milk. I hope you enjoy it 🙂
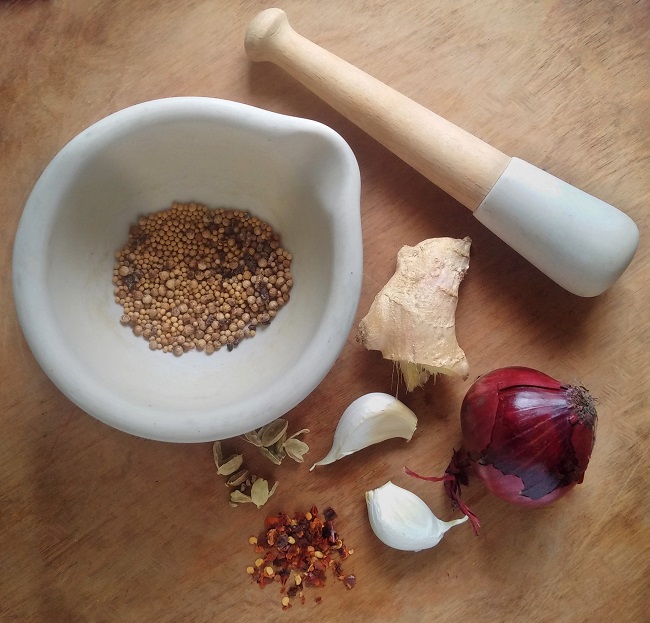
Spice paste ingredients. Image: Kathryn Hawkins
Serves: 4
Ingredients
6 cardamom pods
1 teasp each of coriander and mustard seeds
1 small red onion or shallot
2 garlic cloves
3cm piece root ginger
Dried chilli flakes, to taste
2 tbsp. vegetable oil
400ml canned coconut milk
650g sweet potatoes, peeled and cut into 3cm thick chunky pieces
225g prepared spinach
1 teasp salt
A small bunch fresh coriander, roughly chopped
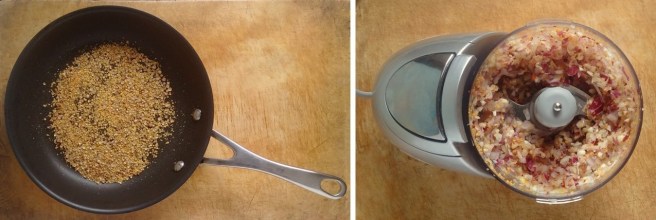
Remove the green casing from the cardamom pods and put the seeds in a pestle and mortar along with the coriander and mustard seeds. Lightly crush them, then toast them in a small frying pan, over a medium heat, for 2-3 minutes until fragrant and lightly toasted but not brown. Leave to cool.
Peel and roughly chop the onion, garlic and ginger and place in a food processor or blender. Add 1 tbsp. oil and the toasted spices and chilli flakes to taste. Blend for a few seconds to make a paste.
Toasting spices and making a spice paste. Image: Kathryn Hawkins
Heat the remaining oil in a large, deep-sided frying pan or wok and gently fry the paste for about 5 minutes until softened but not browned. Pour over the coconut milk, bring to the boil, and stir in the sweet potato pieces. Bring back to the boil, cover, reduce the heat and simmer gently for about an hour until tender.
Add the spinach in batches, stirring well to make sure it gets completely coated in the coconut liquor. Add the salt, cover and continue to cook gently for a further 10 minutes, stirring occasionally, until then spinach is wilted and the sauce is thick.
The 3 stages of stew. Images: Kathryn Hawkins
To serve, sprinkle the stew with a generous amount of chopped, fresh coriander, and extra chilli if liked. Serve immediately, spooned over rice.
Sweet potato stew, ready to serve. Image: Kathryn Hawkins
Under a yew bush, a lion and thistle embossed, iron screen stands boldly behind the first Tête-a-tête of the year. Image: Kathryn Hawkins
The old saying about March certainly rings true for the start of this month here in central Scotland, but there are a few signs of spring in the garden. The snow has gone, and the temperature has risen (slightly). Today though the weather’s been blowing a gale and it’s very, very wet. I’m still not feeling that spring is here entirely.
However, last weekend was fine, and I managed my first major gardening session for several weeks. I was relieved to see that new life is creeping back into the garden again. The first Tête-a-tête are in flower, and my barrel of crocus seem to have suffered no ill-effects from being under snow for several days, and bloomed in the weak sunshine for a few hours. Ever since I took these images, they have been tightly closed.
Crocus after the snow. Image: Kathryn Hawkins
Snowdrops are the main feature in the garden at the moment. The splash of white petals and the bright green foliage bring some welcome interest and signs of life amongst the dying residues of winter and the mostly bare soil.
Charming and delicate, snowdrops are one of the first signs that spring is on its way. Images: Kathryn Hawkins
The first Rhododendron is also in bloom. One of a few different varieties in the garden, this scarlet one is always the first to flower, and often, flowering not long into the new year; however, this year it has been curtailed by the frosts and snow.
My lovely pot Hyacinth has come into full flower this last week. The fragrance is sweet and spicy, and quite intoxicating. The 2 blooms are so heavy and full, I have had to add support to the pot.
Pink pot Hyacinth in full bloom. Image: Kathryn Hawkins
That’s the end of my garden round-up for this month. I’m heading back into the kitchen now to get my next recipe post ready. Until then, I’m keeping my fingers crossed for the second part of the March saying to come true……..Bring on the lambs!
Oatmeal and seed porridge with berry compote. Image: Kathryn Hawkins
It still feels more wintry than spring-like here in central Scotland. We have had a blue-sky day today, the first for a while, and the temperature is slowly rising. The snow is beginning to thaw slowly, but most of the garden is still covered in a thick, white crust of powdery snow. The snowdrops under the hedge are the first to emerge at long last and I am relieved to see that they have survived their week inside a snow-cave – what robust little flowers they are 🙂
After-the-snow snowdrops. Image: Kathryn Hawkins
One of my favourite warming breakfast dishes is porridge, and it seems a lot of people agree: porridge has become the super-star amongst breakfast cereals, and the supermarket shelves are stacked out with different varieties and all sorts of flavours.
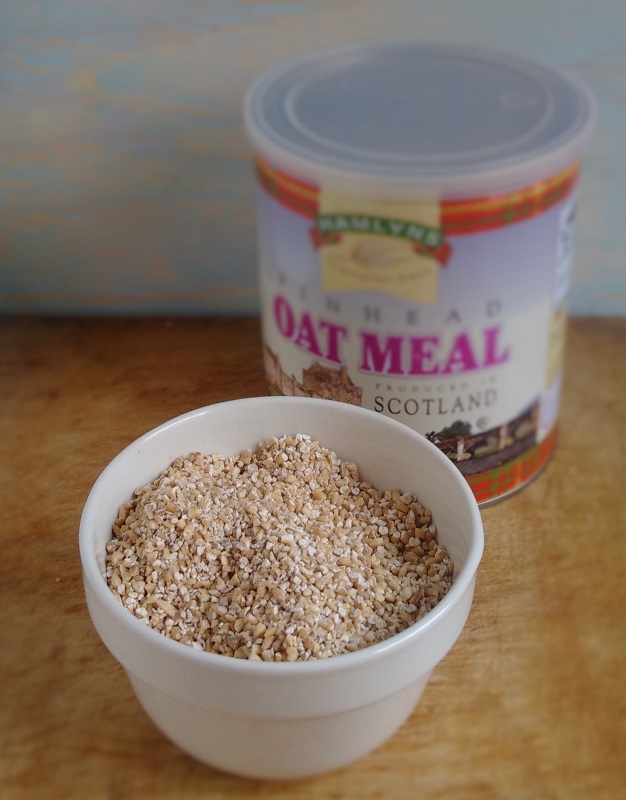
Pinhead oatmeal for “proper” porridge”. Image: Kathryn Hawkins
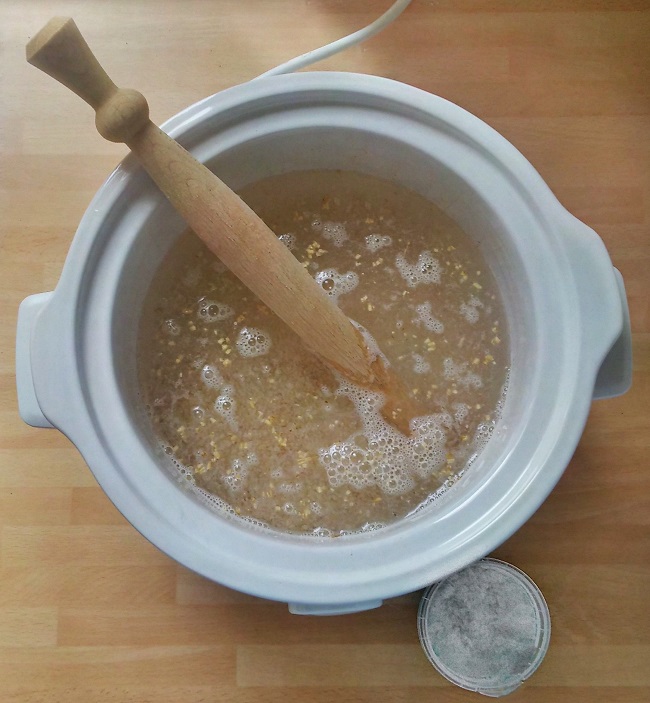
I like my porridge made the traditional way, which means I prefer to use oatmeal (or groats) rather than rolled oats. However, it’s not an instant breakfast and requires some organisation: the oatmeal requires overnight soaking before it can be cooked. But if you have a slow-cooker, you can cut down on the preparation: just mix everything up in the slow-cooker the night before and leave it on a low setting until the next morning, by which time it’s ready to eat as soon as you want it.
The oatmeal in the picture above is a local Scottish brand and is not guaranteed gluten-free. As you will know, oats themselves don’t contain gluten, but there is a contamination risk from other grains during processing, so if you do have a serious gluten allergy, you should seek out gluten-free oatmeal.
Slow-cooker porridge: oatmeal, water and salt. Image: Kathryn Hawkins
If you don’t fancy leaving your slow-cooker on overnight, slow-cook the porridge as you like, and once cooked and cooled, the porridge will keep in the fridge for a few days. You can take out a portion and reheat it with you favourite soya, rice, nut or oat milk when you’re ready. Just pop a portion in a microwave-proof bowl, mash it with a fork and stir in some milk, then reheat on High for about 1 ½ minutes. Alternatively, you can reheat the porridge in a saucepan, with milk, in the same way.
The following quantity will make about 8 servings: pour 1.1litre water into your slow-cooker and stir in 175g pinhead oatmeal. Add a pinch of salt and mix well. Cover with the lid and switch the cooker on to the Low setting. Leave to cook, undisturbed, overnight (for 8-10 hours), until thick and soft. To serve, stir well and serve with hot, non-dairy milk mixed in. Add sugar or syrup to sweeten if you like, and top with sliced banana, fresh berries, grated apple, dried fruit etc.
Homemade seed mix and my frozen summer berries. Images: Kathryn Hawkins
For an extra nutritious start to the day, I like to stir a heaped tablespoon of ground seeds into my bowl porridge and top with some summer berry compote.
For the seed mix, grind 3 tbsp. flax seeds with 2 tbsp. sunflower seeds, 1 tbsp. chia seeds and 1 tbsp. sesame seeds – I use a coffee grinder to do this. Stir in 1 to 2 tbsp. ground almonds, pecans or Brazil nuts. Store in the fridge in an airtight container and use to sprinkle over anything you like for some extra nutritious nuttiness!
The berry compote is made from my freezer supply of home-grown raspberries, blackberries and blueberries. I simply put a quantity, still frozen, in a saucepan with the lid on and sit the pan over a very low heat until the berries soften and cook. I add a little vanilla sugar once the berries are cooked. Delicious eaten hot or cold.
A spoonful of my favourite oatmeal porridge. Image: Kathryn Hawkins
A bit of a departure from my usual gluten-free cookery this week. It’s been Real Bread week here in the UK and my thoughts turned to one of my old favourite loaves made from wholemeal spelt flour. Incidentally, it’s also been a week of “Real Snow” here as well – we are currently in the throes of a snow-storm coming across our shores from Siberia. Bread-making is a perfect excuse to enjoy some baking time.
A stormy start to the new month. Image: Kathryn Hawkins
I first started using spelt flour in my cookery about 20 years ago. Whilst I am intolerant to traditional wheat flours, the lower gluten content of the ancient spelt wheat grain is easier on my digestion, and providing I don’t over-indulge, every now and then it is a real treat to include this flour in my baking.
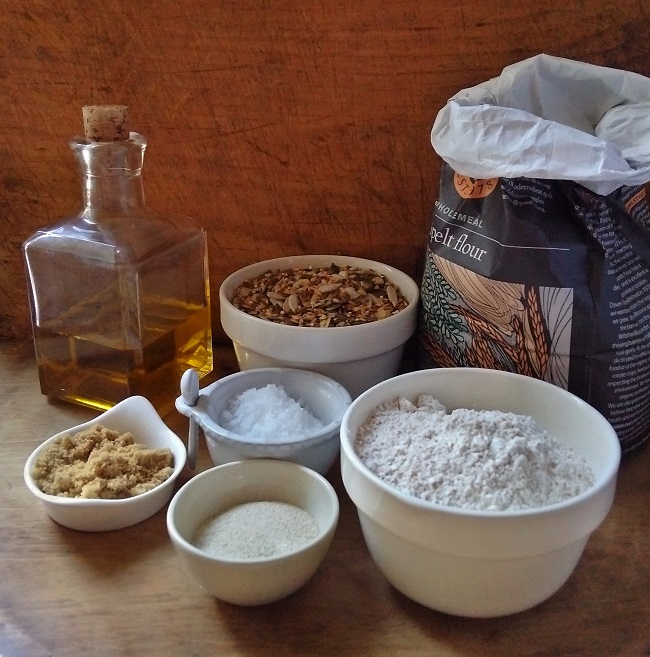
Basic ingredients for my spelt loaf. Image: Kathryn Hawkins
For this loaf, I used the wholemeal variety of spelt flour, but you’ll also find it as white flour as well which is good for cakes where a lighter coloured sponge is required. Other than the flour, my bread recipe is a very standard dough with a blend of my favourite seeds added (pumpkin, sunflower, sesame, fax, linseed and chia). The loaf works just as well without the seeds or you can add chopped nuts and dried fruit instead if you prefer something sweeter. Because spelt flour is lower in gluten, the resulting bread is denser and more cake-like in texture, but it still has the familiar chewy texture of real bread. The flavour is slightly sweet, earthy and nutty.
Wholemeal spelt flour and my favourite seed mix. Image: Kathryn Hawkins
Makes 1 x 700g loaf
Ingredients
450g wholemeal spelt flour (I use Dove’s Farm)
1 ½ level teasp easy-blend dried yeast
1 tbsp. light Muscovado sugar
100g mixed seeds
1 level teasp salt
275ml tepid water
2 tbsp. olive oil
Put the flour in a bowl and stir in the yeast, sugar, 75g seeds and salt. Make a well in the centre and gradually pour and mix in the water along with 1 tbsp. oil, to make a softish, mixture. Turn onto a lightly floured work surface and knead until smooth and slightly elastic – about 10 minutes. Note: to save time when bread-making, I often put the dough in my electric bread-maker to mix together and prove while I get on with other things. I then do the shaping, final rise and baking by conventional means.
Put the dough in a large, lightly floured glass, china or plastic bowl and cover the bowl with a clean tea-towel. Leave at a coolish room temperature for a couple of hours until doubled in size.
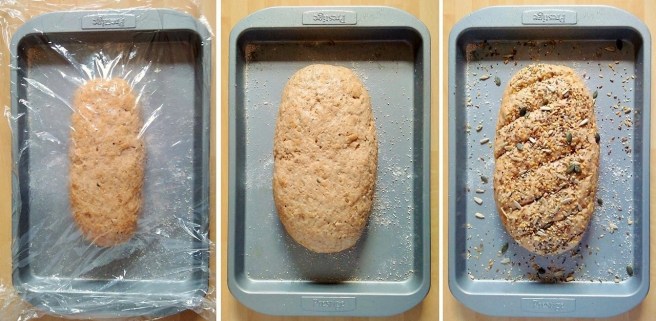
Once risen, turn out on to a lightly floured surface and knead gently (or “knock back”). Shape into a ball and let the dough rest for 5 minutes before shaping into an oval shape about 25cm long. Transfer to a lightly floured baking tray, cover with a large sheet of oiled cling film and leave in a warm place for about an hour until well risen.
Proving and shaping the spelt dough. Image: Kathryn Hawkins
Preheat the oven to 200°C (180°C fan oven, gas 6). Remove the cling film. Using a sharp knife, cut diagonal slashes in the top of the loaf. Brush with the remaining oil and sprinkle with the remaining seeds. Bake for about 45 minutes until golden and crisp – the loaf should sound hollow when tapped underneath. Transfer to a wire rack to cool.
Freshly baked spelt loaf. Image: Kathryn Hawkins
I’d like to have brought you up to date with my garden this week but all the newly sprung snowdrops and crocus are buried under several centimetres of snow. This glorious hyacinth stands proud on my kitchen window-sill just now, and is a reminder of things to come. Until next week……. 🙂
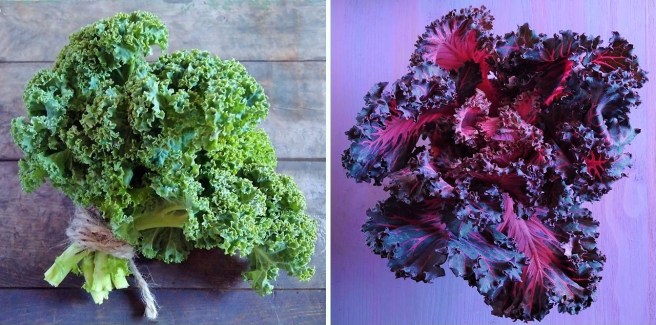
The hardiest of all the Brassica family, and probably the closest to wild cabbage, kale (or kail) is one of the most traditional of Scottish vegetables. The robust leaves withstand harsh frosts and snow, and are said to taste all the better for it. In the past, kale was dismissed as animal fodder, but today it is one of the most trendy vegetables on the menu.
Kale is one of my favourite greens. I love the strong flavour, it is bursting with vitality in every bite, and it is one of the few vegetables tasty enough to stand its own on a plate with other bold flavours.
Keeping kale fresh in a bowl of water. Image: Kathryn Hawkins
As with all leafy vegetables, cook as soon as possible after purchase. Choose firm stalks with fresh, dark or bright green leaves. If you do want to keep them for a couple of days, arrange the stems in a bowl or large jug of water as you would a bunch of flowers, then put in the fridge. I find kale is one of a few vegetables that doesn’t freeze very well – it loses texture and flavour, and becomes a bit slimy when cooked.
Kale leaves. Images: Kathryn Hawkins
Simple to prepare, just rinse kale well in cold, running water to flush out any trapped earth caught in the tight, curling leaves, and then shake off the excess water. Pull off the lower, frilly leaves and keep to one side – these softer leaves are perfect for eating raw in winter salads. Slice out the central stem, and then shred the leaves into the desired size.
Preparing curly kale. Image: Kathryn Hawkins
If you are steaming kale, pack the wet leaves into a steamer and cook for 10-15 minutes until tender. Alternatively, pack the wet leaves into a saucepan, turn on the heat and when the contents begin to steam, put the lid on, reduce the heat to medium and cook with the lid on, turning occasionally, for about 10 minutes – don’t have the heat too high otherwise the leaves will dry and burn. Drain well and chop finely.
For baking and deep-frying, rinse the leaves then make sure you dry them as much as possible in order to cook them to a crisp. Blotting them between layers of absorbent kitchen paper is a good way. If the leaves are too damp, you will end up steaming them in the oven rather than drying them out. In hot oil, the contents will spit and hiss if water still clings to the leaves.
Recipe ideas and serving suggestions
Shredded kale makes fantastic “crispy seaweed”: deep-fry in hot vegetable oil for a few seconds, then drain well and toss in a little salt and white sugar. Season with Szechuan pepper or Chinese 5 spice.
Toss raw, small, tender kale leaves with finely shredded raw leek and grated apple in a lemon vinaigrette and season with freshly ground black pepper. Serve as a crunchy, bold winter salad sprinkled with toasted walnuts.
Steamed kale is delicious, finely chopped, tossed in butter or good quality olive oil and seasoned with black pepper and ground nutmeg. An ideal accompaniment to a bold, red wine gravy based game, meat or bean stew.
Mix finely chopped, steamed kale with cooked brown rice or pearl barley, toasted pine nuts and grated Parmesan (or Vegan cheese) and use as a filling for baked Portobello mushrooms.
Tray-baked kale leaves make a healthy sprinkle for salads, soups, rice and pasta dishes. Here’s what to do: preheat the oven to 150°C (130°C fan oven, gas mark 2). Line 2 large baking trays with baking parchment. Prepare 200g kale leaves as above, then rinse and dry thoroughly. Roughly chop the leaves and place in a large bowl. Toss in no more than 2 tbsp. sunflower oil and arrange over the trays – too much oil will make the leaves go soggy. Mix 1 teasp smoked salt, ½ teasp ground black pepper and 1 teasp ground cumin together and sprinkle over the oily kale.
Baking kale. Image: Kathryn Hawkins
Bake for 25-30 minutes until crisp. Drain well, leave to cool, then pack into air-tight containers or jars to store. The baked kale will keep and stay crisp in this way for up to 2 weeks.
I’m always on the look-out for interesting bakes. I have a large folder of recipe articles saved from magazines and newspapers going back many years, along with various scraps of note paper, tucked in between, containing my culinary jottings from articles that have taken my fancy. Every now and then I go through the folder and decide which idea to experiment with next.
And so to this week’s post. A cake that came to my attention a few months ago when I was experimenting in the kitchen and making vegan meringue from the canning water in a tin of beans. This recipe uses the beans as well as the canning liquid. Sounds weird, but eating is believing, and I was pleasantly surprised by the texture and how good it tasted.
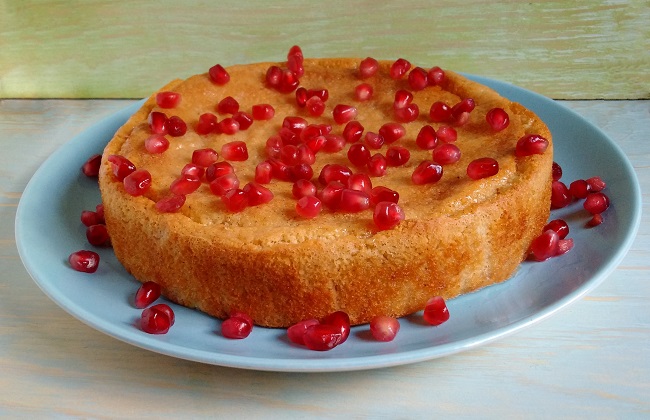
Vanilla bean torte, sliced and ready for eating. Image: Kathryn HawkinsCanned cannellini beans for cake-making. Image: Kathryn Hawkins
Apart from the beans, the other ingredients are mainstream. The flavour can be varied depending on your preference. I used a generous amount of vanilla paste, but fresh orange and lemon rind would work well, as would almond extract if you like a marzipan flavour. I think the mixture could take about 15g cocoa powder added to it for a chocolate version. My cake is soaked in a vanilla flavoured syrup but the syrup can be adapted to suit your chosen cake flavour. There is no added fat or oil in the recipe which makes the syrup an important addition as it not only adds extra sweetness and flavour, but it helps keep the cake moist too. I hope you enjoy it 🙂
Serves: 8-10
Ingredients
400g can cannellini beans in water
50g polenta
75g silken tofu
215g caster sugar
55g ground almonds
1 tbsp vanilla bean paste
Pomegranate seeds to decorate
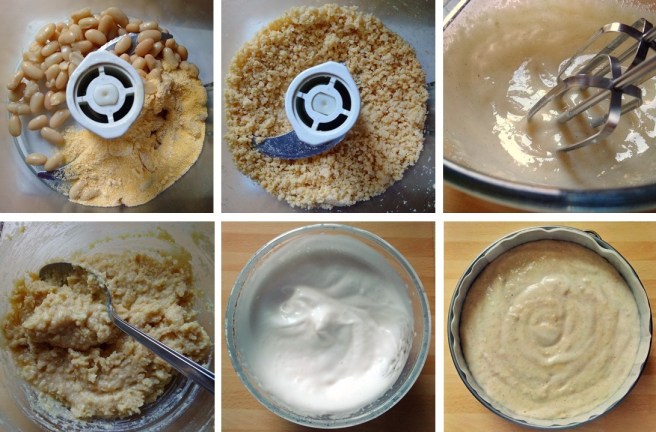
Preheat the oven to 180°C (160°C fan oven, gas mark 4). Grease and line an 18cm diameter cake tin. Open the can of beans and drain well, reserving the canning liquid. Put the beans in a blender or food processor. Add the polenta and blitz for several seconds until well ground. Leave to one side.
Whisk the tofu with 115g sugar until well blended and creamy. Add the ground almonds, half the vanilla paste and the ground bean mixture and stir to form a thick cake batter.
In another bowl, whisk the bean canning liquid until stiff and foamy, then gently fold this into the cake batter. Transfer to the prepared tin, smooth the top and bake for about 1 to 1 ¼ hours, until golden and firm to the touch.
Making bean torte. Images: Kathryn Hawkins
While the cake is in the oven, prepare the syrup. Put the remaining sugar in a small saucepan and add 150ml water. Heat, stirring, until the sugar dissolves then bring to the boil and simmer for 8-10 minutes, until reduced and syrupy. Remove from the heat and stir in the remaining vanilla paste. Keep warm.
Once the cake is cooked, skewer the top all over and slowly pour over the vanilla syrup so that it soaks into the cake evenly. Leave to cool completely in the tin.
Making and adding vanilla syrup. Images: Kathryn Hawkins
To serve, carefully remove the cake from the tin and place on a serving plate. Sprinkle with pomegranate seeds just before slicing. The cake will keep, covered, in a cool place or the fridge, for 3 to 4 days.
Decorating the torte with pomegranate seeds. Image: Kathryn Hawkins
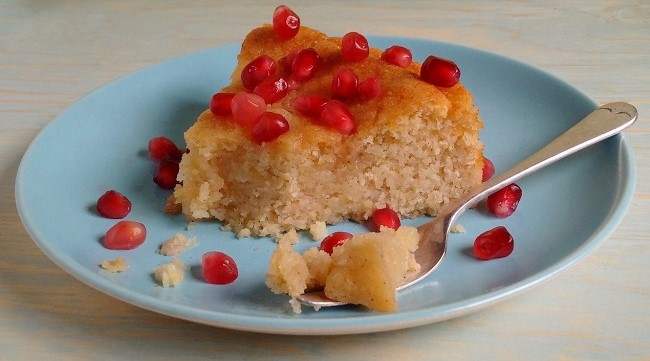
Vanilla bean torte, deliciously moist and full of flavour. Image: Kathryn Hawkins