Caramel “splatter” blondies (gluten-free)

Gluten_free_white_chocolate_and_caramel_blondies
Gluten free caramel “splatter” blondies. Image copyright: Kathryn Hawkins

With the weekend approaching, I thought a baking recipe might go down well today. One of my “turn to” bakes for entertaining is sweet and gooey blondies – a guaranteed winner. Very easy to make, quick to cook, and a bake that improves on keeping (although it doesn’t usually hang around long enough to test this theory to the full!). Here’s the recipe:

Makes 24 pieces

  • 200g good quality white chocolate
  • 115g salted butter
  • 3 medium eggs
  • 115g light soft brown sugar
  • 225g gluten free plain flour blend (such as Dove’s Farm)
  • 1½ tsp gluten free baking powder
  • 1-2 tsp caramel or butterscotch flavour (such as Dr Oetker Caramel Flavour or Beau Concentrated Butterscotch Flavour)
  • 150g white chocolate chunks
  • 300g your favourite caramel sauce or canned caramel
  1. Preheat the oven to 170°C (150°C fan oven, gas mark 3). Grease and line a 20 x 30cm rectangular cake tin. Break up 150g white chocolate into a heatproof bowl and add the butter. Sit the bowl over a saucepan of barely simmering water and leave to melt. Remove from the water and cool for 10 minutes.
  2. Beat the eggs and sugar into the melted chocolate mixture. Stir in the flour and baking powder, and add flavour to taste; then stir in the chocolate chunks.
  3. Transfer to the prepared tin and smooth over the top. Bake in the oven until risen, lightly golden and lightly crusted on top (for about 25 minutes if you want a very dense centre, or for 30 minutes for a more even and spongier texture – this is my preference).
  4. Whilst the cake is warm, score the top with a knife to make 24 equal pieces and then, using a wooden spoon handle, push the end into each portion of cake to make a deep indent – try to avoid pushing the handle right through to the bottom of the tin. Leave to cool completely in the tin.
  5.  Once the cake is cold, remove from the tin and wrap and store for 24 hours to allow the flavour to develop and the texture to moisten.

    caramel_filled_blondie_pieces
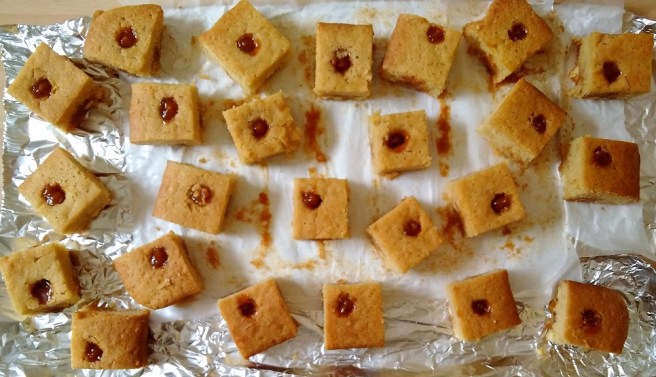
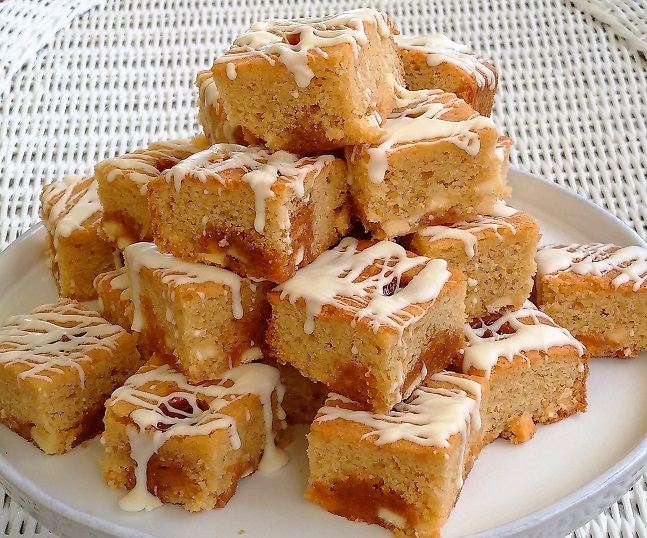
    “Just filled” blondie pieces. Image copyright: Kathryn Hawkins
  6. The next day, unwrap the cake and cut through into the 24 pieces. Depending on your caramel sauce preference, either squirt  it straight from the tube; spoon it, or, transfer it to a piping bag and pipe sufficient caramel into each pocket to fill it.
  7. Melt the reserved white chocolate as above and, using a teaspoon, drizzle liberally over the top of each blondie. Leave in a cool plate to set, or until you are ready to indulge. Yummy!
white_chocolate_splattered_caramel_blondies
Caramel “splatter” blondies. Image copyright: Kathryn Hawkins


Home-grown courgettes with chive butter (gluten-free)

homegrown_Tristar_courgette_with_homemade_chive_butter
Home-grown courgette with chive butter. Images copyright: Kathryn Hawkins

One of the vegetables I have great success in raising is the courgette. This year I have a couple of varieties on the go: Tristar and Jemmer. My single Tristar plant has produced 6 courgettes already and there’s a few more to come. It is in a grow-bag on the floor of my greenhouse. Jemmer is a yellow variety; the first courgettes are just forming.

To enjoy the delicate, slightly earthy, flavour of my “home-grown” courgettes, I cook them very simply: either sliced and gently fried in sunflower oil, or as bigger chunks, lightly seasoned and roasted in the oven. The slices only take a few minutes on each side, just cooked until lightly golden round the edge.

To liven things up a wee bit, I make a herb or spice butter which I allow to melt over the cooked vegetable just before serving. At the moment, the chive bush in the garden is a combination of soft, juicy stems and pretty flower balls, and is the obvious choice for flavoured butter these past couple of weeks.

I make up a small batch at a time which will keep, well wrapped, in the fridge for 2-3 weeks or can be frozen for up to 6 months. Use half a pack of lightly salted, soft butter with 2-3 tablespoons of freshly chopped chives – snip the stalks into small pieces using kitchen scissors to avoid bruising the stems.

Beat the butter well to start with and then mix in the chives. Pile onto a small square of baking parchment and chill until firm enough to roll.

Pop the parchment square on a small sheet of cling film, and wrap the paper round the butter to make  rough tube. Continue rolling until you have made a cylinder of butter, to the thickness you prefer. Wrap tightly in the cling film and chill until required.

homegrown_chives_in_flower
Fresh chives in flower. Image copyright: Kathryn Hawkins

Chive butter is lovely melted over grilled salmon, pan-fried chicken or tossed into freshly cooked seafood and pasta. Don’t forget the flowers: gently pull the flower heads apart and scatter the delicate lilac star-shaped petals over salads, pasta or your finished dish for a subtle oniony flavour.


Green fruits and shoots

The last day of the month is the time for me to catch up with how the garden produce is coming along.

The weather, here in Perthshire this month, has been a real mixed bag. A few sunny days along with some pretty miserable and wet ones. We have had several blustery winds and a couple of much cooler nights. All that said, the garden is looking good.

I keep a sowing and planting diary from year to year, and take a few pictures of the garden each month in order to keep a progress record. Compared to previous times, most of my edibles are at about the same stage as usual, but the runner beans and potatoes seem to be a bit more advanced – fingers crossed, I may get an earlier harvest! The fruit trees are bearing much more fruit than ever before as they become more established in the garden – last year was a poor season with no apples on the miniature trees, only a handful of plums and a solitary pear. I have much higher hopes for this year’s harvest.

June's_green_fruits_and_shoots
From top left: Concorde pears; miniature “Solo” apple tree; Glen Ample raspberries, Hinnonmaki Red gooseberries. From bottom left: Brodie F1 Brussels sprouts; Scarlet Emperor runner beans; and in the greenhouse: Gardener’s Delight tomatoes, and Beth Alpha cucumber

My favourite flower bed at this time of year is full of colour, fragrance and delicate petals. It is home to a combination of peonies, Welsh poppies, white and blue campanulas and foxgloves. Sadly the flowers often get windblown and damaged by heavy rain, but there has been nothing too destructive so far.

I have managed to capture a little of its beauty in the image below.

campanulas_peonies_Welsh_poppies_foxgloves
My favourite flower bed. Image copyright: Kathryn Hawkins

I adore peonies; their perfume is quite overwhelming – I only wish I could post the aroma via my blog. I inherited 4 varieties in this bed, they were very well established when I got here. I have no idea of their varieties, but these are my favourites. They have bloomed without fail for the 12 years I have had the garden; I hardly ever do anything by way of maintenance, except give them an occasional feed.

Peony perfection. Image copyright: Kathryn Hawkins

Scottish Shortbread (gluten-free; dairy-free; vegan)

Scottish_shortbread_moulds.jpg

I’m starting my brand new blog with a post about one of my favourite bakes of all time. I learnt how to make shortbread at school and I have been making it ever since. My teacher taught us to remember the quantities of ingredients as “2, 4, 6” back in the day when pounds and ounces were the only unit of choice. Nowadays I do the conversion subconsciously each time I make a batch.

Since moving to Scotland, the motherland of this well known bake, I have acquired a number of traditional shortbread moulds which help transform something that looks a wee bit on the plain side into a real show-stopper. The one in the middle of the picture above was recently given to me by a friend. It’s a real beauty and the mould I used to make the shortbread in the image below.

So, to the recipe. If you don’t have a mould, press the dough into an 18cm square tin. You can also roll it out to a thickness of about 1cm and stamp with cookie cutters (picture below) – this quantity of dough will make 12 x 6cm rounds. I’ve also added some steps for making 8cm rounds if you have a smaller shortbread mould. I used this mould to make the shortbread on my 2019 Burns Night post.

Makes: 1 x 15 x 20cm slab; 12 x 6cm rounds or 6 x 8cm rounds

Ingredients

  • 50g caster sugar + a little extra for dusting
  • 60g white vegetable fat or coconut oil, softened
  • 40g dairy-free spread (For non-vegan, replace the quantity of fats above with 100g good quality lightly salted butter, softened, if you eat it, and omit the salt)
  • ¼ tsp salt
  • 175g gluten free plain flour blend (such as Dove’s Farm) + a little extra for dusting (for a non-gluten-free version use white spelt or plain wheat flour)
  1. Put the sugar in a bowl with the fat and spread and mix together until soft and creamy. Add the flour and gradually work the ingredients together until well blended, then bring the mixture together with your hands to form a soft dough.
  2. Lightly dust a 15 x 20cm shortbread mould with extra flour and press the mixture into the mould, making sure it is packed snugly into the corners. I usually start to gently peel the dough back from the mould edges before turning it over onto a lined baking tray and giving it a bit of a thump to remove it from the mould.
  3. Prick the top with a fork and chill for at least 30 minutes. If you don’t have a mould, form into a 15 x 20cm rectangle. Neaten all round, then press the edges and prick the top with a fork. Prick and chill as above.
  4. If you have an 8.5cm shortbread mould, divide the dough into 5. Lightly brush the mould with flour and press a piece of dough on top until it reaches just beyond the edge of the mould – the dough should be ¾cm thick when pressed out .
  5. Carefully peel the dough from the mould, and neaten the round using a 8cm plain cutter. Place on a lined tray. Repeat the dusting, pressing and trimming using the other pieces of dough, then gather up all the trimmings to make your 6th round. Chill for 30 minutes.

    Step-by-step_to_using_a_small_shortbread_mould
    Making thistle embossed shortbread rounds. Images: Kathryn Hawkins
  6. Preheat the oven to 180ºC (160ºC fan oven, gas mark 4). Bake the shortbread slab for about 35 minutes until lightly golden all over (smaller cookie shapes like the 6cm shortbread buttons below will take about 20 – 25 minutes, and the 8cm rounds between 25 – 30 minutes). Cool for 10 minutes, then dust lightly with extra sugar and transfer to a wire rack to cool completely. Break the large slab into small (or big) pieces to serve. Shortbread keeps well if you can leave it alone long enough – over a week in an airtight container or tin.
gluten free Scottish shortbread
Traditional Scottish shortbread with a gluten-free and vegan twist. Image copyright: Kathryn Hawkins
gluten free shortbread rounds
6cm shortbread buttons. Image copyright: Kathryn Hawkins