Savoury oat and seed crunchies (gluten-free, dairy-free, vegan)

Pieces_of_savoury_oat_and_seed_crunchies
Oat and seed crunchies. Image: Kathryn Hawkins

Every now and then I try very hard to cut back on the amount of sugar I eat. I find it challenging to find something to stave off the cravings. and I usually turn to seeds to do the job. This week, I started my latest “health-kick” and I found that I had built up quite a collection of different seed varieties from the last time. Many of the seeds are in half-opened bags stored in the fridge and are now coming up to the “best before” date; it seemed the perfect time for a healthy, and very much savoury, baking session. Bursting with  nutrition and flavour, and with super crunchy textures, seeds are one of the best foods to snack on without feeling too guilty.

Chia_sunflower_pumpkin_sesame_and_flax_seeds
Some of my current seed collection. Image: Kathryn Hawkins

You can use any seeds in this recipe, but a mixture of different sizes works the best. Introduce your own flavourings if you like; I kept mine plain and simple this time, but black pepper, smoked paprika, cumin, chilli, thyme and rosemary are good flavours to try if you like to experiment. I use the thicker milled, porridge  (or Scottish Porage) oats, the finer milled varieties seem to go a bit mushy and give a less crisp texture to the final bake. There is a small amount of gram (chickpea) flour added to the mix to help bind the ingredients together but the recipe works fine with other gluten-free blends if you prefer.

Thick_or_coarse_milled_porridge_oats
Thick milled Scottish porridge oats. Image: Kathryn Hawkins

These crunchies are very easy to make and will keep for a week or so in an airtight container. Enjoy them broken into large shards as a crispbread, or crumble them on to soups or salads for extra nutty flavour. Here’s what to do…….

Makes at least 10 big pieces

  • 90g thick or coarse milled oats
  • 175g assorted seeds – I used chia, sunflower, pumpkin, sesame and flax seeds
  • 25g gram (chickpea) flour
  • ½ tsp salt
  • 2 tsp soft dark brown sugar or maple syrup
  • 1 tbsp sunflower oil
  • Approx. 100ml warm water
  1. Preheat the oven to 190°C (170°C fan oven, gas mark 5) Line a large baking tray with baking parchment. Put the oats and seeds in a large bowl and mix well. Stir in the remaining ingredients until thoroughly combined.
  2. Gradually pour and stir in approx. 100ml warm water to make a clumpy mixture. Leave aside to soak for 15 minutes, then squeeze the ingredients together with your hands to make a ball. Add a little more water if the mixture is still a bit dry.
  3. Put the mix on to the prepared baking tray and flatten with your hands. Place another sheet of parchment on top and roll using a rolling pin to make a rectangle approx. 36 x 25cm minimum. Remove the top layer of parchment.
    Preparation_shots_of_oat_and_seed_crunchies
    Making the oat and seed dough. Images: Kathryn Hawkins

    4. Bake in the oven for about 20 minutes until lightly browned around the edges. Place a sheet of parchment on the surface of the bake, lay another baking tray on top and carefully flip the mixture over. Peel away the top parchment and return to the oven for a further 15-20 minutes until crisp and lightly golden all over. Cool for 10 minutes then slide on to a wire rack to cool completely.

    Baked_oat_and_seed_crunchy_mixture
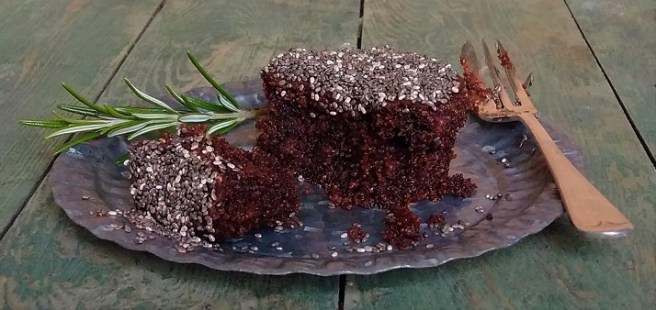
    A freshly baked slab of oat and seed crunchies. Image: Kathryn Hawkins

    When cold, transfer to a board and either snap into pieces with your fingers, or break into shards using the tip of a knife.

    Ready_to_eat_oat_and_seed_crunchies
    Oat and seed crunchies. Image: Kathryn Hawkins

    As an alternative way to bake, you can divide the dough into 10 or 12 portions, flatten each one separately, and roll into thin rounds. Bake in the same way for about 5 minutes less cooking time. The crunchies are delicious with all kinds of savoury spreads, but I prefer mine with crunchy wholenut peanut butter.

    Serving_suggestions_oat_and_seed_crunchies_with_peanut_butter
    Ready for snacking. Image: Kathryn Hawkins

Rhubarb, raspberry and custard crump (gluten-free, dairy-free, vegan)

Rhubarb_raspberry_and_custard_crump_pudding
Rhubarb, raspberry and custard crump. Image: Kathryn Hawkins

For me, one of the signs that Spring is on its way is the first harvest of my forced rhubarb. I love the rich colour of the stalks, their tenderness when cooked and the mild astringent, tartness of flavour that really packs a punch on the palate. Sadly, my rhubarb is not ready for picking just yet as you can see below, but I couldn’t resist the fresh stalks I saw in the local farm shop this week.

Homegrown_forced_rhubarb_in_Scotland_in_February
My homegrown forced rhubarb in late February. Image: Kathryn Hawkins
Stalks_fresh_forced_rhubarb
Spring rhubarb. Images: Kathryn Hawkins

One of my favourite pairings with rhubarb is raspberry. Whilst it seems like a long time ago I had raspberries ripening in the garden, I have a few packs in the freezer, and this recipe is the perfect opportunity to delve into my supplies.

I love the name of this dish. I assume it comes from the hybridisation of the pudding called “slump” and the one called “crumble”. The recipe works fine with any cooked fruit baked underneath the glorious, melt-in-the-mouth topping. The custard is a recent addition to my recipe and brings an extra spoonful of comfort at this time of the year.

Homegrown_raspberries_on_the_branch_and_frozen
Last years homegrown raspberries. Images: Kathryn Hawkins

Serves: 6

  • 350g fresh rhubarb, trimmed
  • 50g vanilla sugar (or you can use plain caster if you prefer)
  • 175g frozen raspberries
  • 115g dairy free margarine (or butter if you eat it), very soft
  • 75g caster sugar
  • 175g gluten-free plain flour blend (I use Doves Farm)
  • 5ml good quality vanilla extract
  • 500ml gluten-free, dairy-free custard
  1. Trim the rhubarb and cut into 5cm lengths. If you have thin and wider stalks, cut the stalks down so that they are all roughly the same width – this helps the rhubarb cook more evenly.
  2. Arrange neatly in a large, lidded shallow pan. Spoon over 2 tbsp water and sprinkle with the vanilla sugar. Heat until steaming, then cover with the lid and simmer gently for 5-6 minutes until just tender but still holding shape.
  3. Remove from the heat, sprinkle the frozen raspberries on top and leave to cool completely. Transfer to an ovenproof baking dish, about 1.2l capacity. If the fruit is very juicy, drain off a few spoonfuls and keep as a separate serving syrup.

    Cooked_rhubarb_and_raspberries
    Rhubarb and raspberries, a winning combination. Images: Kathryn Hawkins
  4. For the topping, put the margarine (or butter) in a bowl and beat in the caster sugar until smooth and creamy. Mix in the flour and vanilla to make a lumpy, sticky mixture, resembling a soft cookie dough. Cover and chill for 30 minutes until firm.
  5. Preheat the oven to 200°C (180°C fan oven, gas mark 6). Spoon over about half of the custard in small dollops. Break up the chilled topping into clumps and scatter over the top, covering the fruit and custard as much as possible. Stand the dish on a baking tray and bake for about 35 minutes until lightly golden, bubbling and the topping has merged together. Serve hot or warm with the remaining custard and the fruit syrup.
    Final_steps_of_crump_preparation_and_baked
    With custard; with topping, and the freshly baked crump. Images: Kathryn Hawkins

    Portion_of_freshly_baked_rhubarb_raspberry_and_custard_crump
    A spoonful of comfort: hot crump pudding. Images: Kathryn Hawkins

Gluten-free rough puff pastry (with dairy-free & vegan variation)

Gluten_free_rough_puff_pastry_vol_au_vent_cases
Freshly baked gluten-free vol au vent cases. Image: Kathryn Hawkins

One of the foodie joys I miss most by not eating wheat is the crisp, golden, flaky, melt-in-the-mouth bite of real puff pastry. Whilst I’m not about to claim that the following recipe comes close to the original, it does make a crisp, flavoursome alternative that makes a crunchy base for a tart or a handsome topping for a pie. It’s good with sweet or savoury flavours. I use half white vegetable fat and half butter for my taste, but you can substitute the butter for a vegetable based block margarine if you’re dairy free or vegan – butter or margarine adds colour as well as flavour so using all white fat will give a different result. Tapioca flour is often part of a gluten-free blend but adding a little extra to the mix helps give a more stretchy texture to the dough which helps in the layering process.

I remember that rough puff pastry was one of the first “fancy” pastries I made at school, and I’ve been making it ever since. A favourite because it starts off as one hell of a messy mixture, but by the end of all the rolling and folding, you end up with a silky smooth, perfect block of pastry. Even with wheat flour, the rise isn’t perfect, but it’s a lot easier to work the fat into gluten-free flour using the “rough puff” method than with any other method I have tried. It does take a bit of time, but if you fancy the challenge, why not give it a go?

Makes: approx. 550g

  • 65g cornflour
  • 65g tapioca flour
  • 120g gluten-free plain flour blend + extra for dusting (I use Dove’s Farm)
  • ½ tsp salt
  • 75g unsalted butter or non-dairy, vegetable margarine, chilled
  • 75g white vegetable fat (I use Trex), chilled
  • 150ml cold water
  1. Put the 3 flours in a large mixing bowl with the salt and mix together until well blended.
  2. Cut the butter or margarine and white vegetable fat into small pieces and stir into the flour, coating each piece of fat in flour.
  3. Gradually stir in the water until the mixture comes together to make a soft, very lumpy  dough.Then turn turn out on to a lightly floured work surface and work the dough into a flat, roughly rectangular, shape.
    Gluten_free_rough_puff_pastry_dough_making
    Step 1: making the pastry dough. Images: Kathryn Hawkins

    Gluten_free_rough_puff_pastry_rolling_and_folding_the_dough
    Step 2: rolling and folding the pastry dough. Images: Kathryn Hawkins
  4. Now the rolling and folding begins. The aim is to consistently roll out the pastry to the same dimensions, and then to fold it, turn it and seal it in the same way each time; this is how the pastry layers get constructed. My rolling pin is 35cm long and is the perfect length guide for rolling out the pastry to consistently the same length. Roll out the pastry to approximately this length, with a width about 12cm.
  5. Fold the top one third of the pastry down and the bottom one third up and over the top pastry; twist the pastry round so that the open edge is facing to the right, and gently press the 3 open edges of the pastry together with the rolling pin (see middle image of slide below).
  6. Repeat this rolling, folding, turning and sealing 3 more times and then chill the pastry for 30 minutes. The mixture will be very sticky but try to refrain from dusting with too much flour as this will dry the texture of the pastry.
  7. After the chill time, repeat the rolling, folding, turning and sealing another 3 times, working the pastry each time in the same direction. You should now begin to feel that the fat is more blended into the flour. Chill the pastry for a further 30 minutes.
  8. Now you’re on the home-stretch. Repeat the process 3 more times and you should see that the fat pieces have practically disappeared. Wrap and chill for at least 1 hour before using. From start to finish, you should aim to roll and fold the pastry 10 times.
    Making_the_perfect_gluten_free_rough_puff_pastry_dough
    Progression of the dough, from the rough to the smooth. Images: Kathryn Hawkins

    Unless I have lots of baking to do, I usually cut the pastry in half or quarters and wrap for freezing. It cooks perfectly after freezing and means that you have a back up supply for future use. You’re now ready to use the pastry as per your recipe.

    Homemade_gluten_free_rough_puff_pastry
    Homemade gluten-free rough puff pastry. Image: Kathryn Hawkins

You will need to dust the work surface with extra gluten-free flour and put some on your rolling pin too. It is tricky to roll the pastry very thinly, so I usually stop trying at 1/2 cm. For thicker crusts (like vol-au-vents), 1cm gives a good rise. When rolling up, say for palmiers or arlette, you will notice the pastry cracks quite easily. After chilling and wrapping the roll in baking parchment, it is possible to smooth out some of the cracks before slicing and baking – recipes to follow in future posts.

I usually bake the pastry at 200°C (180°C fan oven, gas mark 6), and most things benefit with a light protein-based glaze (milk or egg depending on your diet). I have found that exposed edges of the pastry do bake quite hard after cooking, so if you’re making a turnover or roll, you may want to wrap the pastry round the filling entirely so that the pastry forms a seam rather than a flat, sealed edge.

The finished result is crisp and flaky, with good flavour, and if you do the rolling and folding correctly, you should get plenty of layers.

Gluten_free_rough_puff_pastry_baked_layers
Crisp, baked gluten-free pastry. Image: Kathryn Hawkins


Chocolate tart (gluten-free, dairy-free, vegan)

Gluten_free,_dairy_free,_vegan_chocolate_tart
Chocolate tart. Image: Kathryn Hawkins

Only a few days ago, in my last post, I had the feeling that spring was on its way. But only one day later, down came the snow once again. In fact, as I go to post this piece, it’s very white outside.  At times of despair, a “cheer-me-up” pudding is called for to help me get through the rest of this dreary month, and what comes to mind most naturally? Chocolate, of course!

This is a simple recipe with only a few ingredients. I don’t usually buy out of season fruit, but I made an exception this week and bought some rather delicious looking strawberries. Best of all, they tasted pretty good too. Of course you can top your dessert with any fruit you fancy, or simply leave it plain. I also added a sprinkle of my favourite toasted raw coconut flakes on top, just before serving. Depending on your chocolate taste-buds, use however much of the darker variety you prefer. Enjoy!

Serves: 8-10

  • 140g plain gluten-free, dairy-free granola, finely crushed
  • 50g coconut oil
  • 200ml canned coconut milk
  • 200g dairy free plain chocolate
  • 100g 90% cocoa extra dark chocolate
  • 1 to 2 tsp good quality vanilla bean paste
  • Fresh fruit and toasted coconut, optional, to serve
  1. Grease and line an 18cm spring-form cake tin. Put the granola in a bowl. Melt the coconut oil and mix into the granola until well incorporated.
  2. Press into the bottom of the tin using the back of a spoon and chill whilst preparing the chocolate layer.
  3. Pour the coconut milk into a saucepan. Break up the chocolate and add to the pan. Place over a very low heat, and stir occasionally until melted. Cool for 10 minutes, stir in vanilla paste to taste and then pour over the granola base. Leave to cool, and then chill for about an hour until firm.
  4. Carefully release from the tin. Peel away the lining paper and transfer to a serving plate. Top with fruit and coconut if using.
Vegan_gluten_free_chocolate_tart_with_coconut_topping
Finished with a coconut topping. Image: Kathryn Hawkins
A_slice_of_chocolate_tart
One slice is never enough. Image: Kathryn Hawkins

Nian Gao – sticky rice cake for Chinese New Year (gluten-free, dairy-free, vegan)

Freefrom_nian_gao
Happy Chinese New Year! Image: Kathryn Hawkins

I discovered this sweet treat for the first time last year. The texture is soft and gelatinous, a bit like Turkish Delight. It is teeth-janglingly sweet, so a little goes a long way, but the rich, treacly flavour is strangely addictive. I dare you to try it.

To achieve the right texture, you do need to use the right ingredients, so you may need to make a trip to a Chinese supermarket or research online suppliers. However, good news: there are only four ingredients, and one of those is water! You must use glutinous rice – a fine white powder, full of starch (and don’t worry, no gluten!) – I have tried this with ordinary rice flour and the texture was grainy and quite solid. The brown sugar you use is up to you; the depth of colour and flavour  of the finished cake will depend on how dark the sugar is. This year, I used coconut sugar and the result is, as you see above, very dark, glossy and treacly. The only other ingredient is coconut milk, and I use the canned variety.

Once cooked and cooled, Nian Gao is traditionally cut into slices, dipped in egg and pan-fried until lightly golden all over. It is served with red and gold decorations for luck. I’m not an egg lover, so I don’t do the frying part; I eat the cake about an hour after cooking, just as it is. Lovely.

Bag_of_Chinese_glutinous_rice_flour
Glutinous rice flour. Image: Kathryn Hawkins

Other than the ingredients, you just need a couple of tins or dishes, lined with baking parchment, to cook the mixture in, and a steamer for cooking.

Prepared_tins_for_steaming
Lined 10cm diameter tins for Nian Gao. Image: Kathryn Hawkins

Makes 2 x 10cm cakes (serves 3-4)

  • 100g brown sugar
  • 100ml water
  • 100ml canned coconut milk
  • 100g glutinous rice flour
  1. Line 2 x 10cm tins or dishes with circles of baking parchment – you will need to crease the paper to make it sit snuggly inside. Put the sugar and water in a small saucepan, and heat, stirring, until dissolved. Raise the heat and simmer for 5 minutes until lightly syrupy. Cool for 10 minutes then stir in the coconut milk.
  2. Bring a steamer to the boil, or you can use a saucepan of water fitted with a steaming compartment. Reduce the water to a simmer.
  3. Sift the rice flour into a bowl and make a well in the centre. Gradually pour and whisk in the sugary milk, until well blended, and the mixture resembles a smooth pancake batter.
  4. Divide the batter between the 2 tins or dishes, and arrange in the steamer. Cover loosely with a sheet of baking parchment and then put the lid on top. Leave to cook in the steam for 30 minutes until firm and glossy, like set, thick custard.

    How_to_make_Nian_Gao
    Preparation and cooking Nian Gao. Images: Kathryn Hawkins

5. Remove the cakes from the steamer and leave to cool for 10 minutes, then take out of the tins and place on a wire rack to cool. If you’re going to present the cakes, you might like to leave them in the parchment and tie with red ribbon. A flake of gold leaf on top gives the perfect finishing touch.

This is how I like my Nian Gao, still slightly warm, cut up into small chunks, and served with fresh fruit. Happy Chinese New Year!

Sticky_rice_cake_with_fresh_mango
My favourite way to serve Nian Gao, with fresh mango. Image: Kathryn Hawkins

Chocolate Haggis for a Burns Night supper (gluten-free, dairy-free, vegan)

Chocolate_biscuit_cake_wrapped_in_marzipan_shaped_like_a_haggis
Chocolate haggis wrapped in marzipan. Image: Kathryn Hawkins

January 25th is a Scottish celebration day, commemorating the birth of Scotland’s National poet, Robert Burns. Not wanting to offend my non meat-eating friends, I thought better of posting anything about the traditional savoury supper served on this day, and instead turned my thoughts to something I devised a few years ago, the Chocolate haggis. Much more appealing to all, I think, and perhaps, a wee bit more fun.

My recipe is simply a twist on the classic biscuit or refrigerator cake. You can add any combination of biscuit, fruit and nuts that you fancy. I use Scottish heather honey for the sweetness and flavour, but golden syrup or maple syrup will work just as well for my vegan friends. If you eat butter, you can use this instead of coconut oil. It’s a very versatile mix. Adding a wee tot of whisky is for the celebration; it’s fine without, so I’ll leave that up to you! By the way, I love marzipan, but if it’s not for you, you can achieve a similar effect by using an ivory coloured fondant icing.

Makes 1 haggis – 12 generous slices

  • 125g free from plain chocolate
  • 75g coconut oil (or butter)
  • 2 tbsp golden or maple syrup (or heather honey)
  • 150g free from plain granola or coarse oatcakes, crushed
  • 150g free from shortbread or plain biscuits, crushed
  • 75g currants
  • 2 tbsp whisky (optional)
  • Icing sugar to dust
  • 250g natural marzipan

1. Break the chocolate into a heatproof bowl and add the coconut oil and syrup. Sit the bowl over a saucepan of barely simmering water until melted. Remove from the water and cool for 10 minutes.

2. Mix the granola, shortbread and currants into the melted chocolate and stir in the whisky, if using. Leave in a cool place for about 45 minutes to firm up, but not set completely.

How_to_make_a_chocolate_haggis
Chocolate haggis preparation. Images: Kathryn Hawkins

3. Line the work top with a large, double-thickness, square of cling film and pile the chocolate mixture into the centre. Mound it up it to form a fat oval shape about 12cm long. Wrap the cling film round the mix tightly and twist the ends to seal, making a fat sausage shape. Chill for at least 2 hours until very firm.

4. Lightly dust the work surface with icing sugar. Roll out the marzipan to a rectangle approx. 18 x 28cm, and neaten the edges. Unwrap the chocolate haggis and place in the centre of the marzipan. Fold the marzipan over the top to cover the chocolate haggis completely, and then pinch at either end to make the distinct haggis shape. Tie the ends with twine if liked.

Freshly_made_chocolate_haggis
Chocolate haggis, ready to slice. Image: Kathryn Hawkins

5. Cover loosely with cling film and leave at room temperature for about an hour before slicing to serve, accompanied with a wee dram or two. Slàinte!

Sliced_chocolate_haggis
Chocolate haggis, sliced and ready to serve. Image: Kathryn Hawkins
Chocolate_haggis_for_Burn's_Night_supper
Happy Burns Night! Image: Kathryn Hawkins


My favourite mash (gluten-free, dairy-free, vegan

First_snowfall_of_2017_in_Perthshire_garden
The first snow of 2017. Image: Kathryn Hawkins

It’s been a cold week all over the UK; the first snow of the year settled in the garden a few days ago, transforming it into a “Winter Wonderland” overnight. As soon as a chill sets in, my thoughts immediately turn to comfort food.

I am a huge potato fan and this week seemed like the perfect excuse to make my favourite mash potato recipe. Perfectly cooked potatoes, a generous handful of chopped parley, lashings of good quality olive oil, a good pinch of sea salt and some fresh garlic. It’s a delicious that mash seems to go with everything.

Ingredients_and_essential_equipment_for_making_the_perfect_mashed_potato
Ingredients and equipment for olive oil and garlic mash. Images: Kathryn Hawkins

For the best result, you need to choose a potato that mashes well. My preference is King Edward, it’s got good flavour and a dry, floury texture when cooked. Cook the prepared potatoes until they are completely tender. Drain well and then give them a good thump with a potato masher. If you don’t mind a few lumps, leave it at that, but if I’ve got the time, I like to press the mash through a ricer for the smoothest, silkiest texture possible. It’s up to you how much garlic, parsley and seasoning you add, but do use a really tasty olive oil. A good quality extra virgin (cold pressed is even better) oil will not only add flavour and colour, but will add to the indulgence of the finished mash. Only warm the oil, never heat it beyond warm, otherwise the health and flavour benefits will be lost.

Mashed_potato_with_parsley_olive_oil_and_garlic
Olive oil, parsley and garlic mash. Image: Kathryn Hawkins

Serves: 4

  • 900g main crop potatoes, such as King Edward or Maris Piper
  • Sea salt
  • 4 plump garlic cloves, peeled and crushed
  • 1 tbsp sunflower oil
  • Large handful of fresh curly parsley, washed, thick stalks removed, and finely chopped (I like to add about 25g chopped parsley to this quantity of potato)
  • 6 tbsp good quality, extra virgin cold pressed olive oil + extra for serving, if liked
  1. Thinly peel the potatoes. Cut into chunky pieces and rinse in cold water. Place in a large saucepan and cover with cold water. Add a pinch of salt, bring to the boil and cook until completely tender (12-15 minutes, depending on how thick you’ve cut them up). Drain well through a strainer, and leave to air dry for 5 minutes.
  2. Meanwhile, heat the sunflower oil in a small saucepan and very gently fry the garlic for 1-2 minutes until tender but not browned. Remove from the heat.
  3. Return the potatoes to the saucepan and mash well. If you’re not using a ricer, stir in the parsley and cover. If you are ricing the mash, press the potato into a warm bowl, stir in the parsley, and cover the whole bowl with foil.
  4. Stir the olive oil into the cooked garlic and place the saucepan over a very low heat for 2-3 minutes to gently warm the oil.
    Chopped_parsley_garlic_and_olive_oil_being_added_to_mashed_potato
    Adding the flavourings to mashed potato. Images: Kathryn Hawkins


  5. Stir the warm oil into the parsley mash. Taste and season. Pile into a warm serving dish. Drizzle with more olive oil if liked, and serve immediately. Mmmm…mmmmm.

    Single_serving_of_mashed_potato_with_parsley,_olive_oil_and_garlic
    The last spoonful of my favourite mash. Image: Kathryn Hawkins


Moroccan mint tea jellies (gluten-free, dairy-free, vegan)

Jug_of_fresh_mint_and_Moroccan_tea-set
Fresh mint and Moroccan tea-set. Images: Kathryn Hawkins

Mint tea is something I enjoy everyday, usually in the afternoon as an uplifting brew and sometimes, after dinner as a “digestif”. The refreshing taste of mint makes it the perfect herbal choice for this time of year, after over-indulging on rich food, and for anyone looking to make healthier choices for the new year.

I’ve been to Morocco a couple of times and loved the experience. I brought back the tea-set above from my first trip almost 30 years ago. The country’s cuisine is one of my favourites. If you have mint tea made by the locals, it is served piping hot and mouth-tinglingly sweet, which seems utterly contradictory when the air temperature is so warm, but it seems to work and, the restorative powers of a glass or two are amazing.

Moroccan mint tea is made with green or Indian tea and loads of fresh mint. I prefer white tea as I find it has softer tannins. If you don’t want the caffeine hit, you can make the jellies using a couple of peppermint infusion sachets or bags, but do add the fresh mint as well for the extra fresh flavour. I have reduced the sugar to keep it healthy, but you don’t have to add it at all. The recipe can be also be made using traditional gelatine if preferred – 4 leaves would be sufficient.

Makes: 4 small glasses

  • 2 white, green or Indian tea bags
  • A good handful or a small bunch of fresh mint, washed and shaken dry
  • 1 sachet Vege-Gel (I use Dr Oetker)
  • 60ml sugar syrup – see below
  1. Put the tea bags in a heatproof jug with all but 4 sprigs of mint. Add freshly boiled water to the 350ml level on the jug and leave to steep for 5 minutes. Strain the tea into another jug without squeezing the tea bags, and leave to one side. Meanwhile, put a mint sprig into each of 4 x 125ml tea glasses or heatproof dishes.

    Making_mint_tea_jellies
    Mint tea jelly preparation. Images: Kathryn Hawkins
  2. Pour 200ml cold water into a bowl and sprinkle over the Vege-Gel. Stir well until dissolved. Transfer to a small saucepan and heat, stirring, until just boiling. Remove from the heat and stir in the mint tea and sugar syrup.
  3. Leave the tea jelly mixture to cool for 20-30 minutes before pouring into the glasses to cover the mint – this will help stop the mint sprigs discoloring. You need to work with the jelly mix whilst it is still warm – it sets quite quickly as it cools. Leave to cool completely, then chill for at least 1 hour before serving. If you are making a real tea-based jelly, it will turn slightly cloudy no matter what setting agent you use. Herbal tea bags will give a clearer set.
Moroccan_mint_tea_jellies_made_in_tea_glasses
Moroccan mint tea jellies. Image: Kathryn Hawkins

To make your own sugar syrup: put 350g granulated sugar in a saucepan and over pour over 600ml water. Heat, stirring, until the sugar dissolves. Increase the heat and bring to the boil, then simmer without stirring for 10 minutes. Leave to cool. This syrup stores well in a cool place – just pour into a bottle and seal. It is a useful base for adding to ice creams, sorbets, fruit salad syrups and of course, cocktails!

Chocolate, rosemary and orange muffins (gluten-free, dairy-free, vegan)

Gluten-free_vegan_chocolate_rosemary_and_orange_muffins
Chocolate, rosemary and orange muffins. Image: Kathryn Hawkins

On the shortest day of the year, here’s a little something baked to brighten up the barely light hours. I picked rather too much rosemary the other day, and spent a few days pondering on how best to use it up. It doesn’t freeze very well and I’m not a fan of the dried stuff. After admiring the stems as a herbal arrangement in my kitchen for a while, I decided to do some flavour experimentation, and these muffins are the result.

I wasn’t really intending them to be so festive looking, but the sprigs reminded me of tiny pine trees and then my mind started going into creative mode. I hope you enjoy them. The flavour is really rich and perfect for the time of year. You only need to use the leaves for this recipe – the stems are too tough – and try to chop the leaves as small as possible for the best flavour and better eating.

Fresh_rosemary_sprigs_and_leaves
Fresh rosemary. Images: Kathryn Hawkins

Makes: 10

  • 150ml sunflower oil
  • 150g dark brown sugar
  • 150g silken tofu
  • 45g cocoa powder
  • 2 level tsp gluten-free baking powder (such as Dr Oetker)
  • 1 level tbsp ground arrowroot (I often add this to help bind gluten-free cake mixtures together)
  • 100g ground almonds
  • 75g polenta
  • Finely grated rind 1 unwaxed orange
  • 2 level tsp finely chopped rosemary leaves
  • Pinch of salt
  • 125g icing sugar + extra to dust
  • Approx. 40ml freshly squeezed orange juice
  • 10 tsp Chia or poppy seeds
  • 10 small sprigs of fresh rosemary
  1. Preheat the oven to 180°C (160°C fan oven, gas mark 4). Line a muffin tin with 10 paper cases. Put the oil, sugar and tofu in a bowl and whisk together with an electric mixer until well blended and thick.
  2. Sieve 25g cocoa, baking powder and the arrowroot on top. Add the almonds, polenta, orange rind, chopped rosemary and salt. Mix all the ingredients together until thoroughly combined.
  3. Divide the mixture equally between the cases. Smooth the tops and bake for about 35 minutes until just firm to the touch – the cakes may look slightly sunk in the middle. Cool in the tins for 5 minutes then transfer to a wire rack to cool completely.
  4. To decorate, sieve the icing sugar and remaining cocoa powder into a small bowl and mix together with sufficient orange juice to make and smooth, spreadable icing. Spoon sufficient icing on top of each muffin and spread to cover the top completely.
  5. Sprinkle the top of each muffin with 1 tsp seeds. Leave for a few minutes to set before adding the finishing touches.
    Icing_and_topping_muffins_with Chia_seeds
    Decorating the muffins. Image: Kathryn Hawkins

    Just before serving, carefully put the muffins into small flower pots. Push a sprig of rosemary into the top of each and if liked, dust the rosemary lightly with a little icing sugar for a frosted look.

    The muffins freeze well once iced and seeded, and will also keep for 4-5 days in an airtight tin once decorated. Simply decorate with fresh rosemary and icing sugar just before serving.

    Chocolate_and_rosemary_muffin_dusted_with_icing_sugar
    Frosty-looking chocolate, rosemary and orange muffin. Image: Kathryn Hawkins

    Gluten-free_vegan_baking:_chocolate_and_rosemary_muffin
    Gluten-free and vegan, a deliciously dark and tasty chocolate, rosemary and orange muffin. Image: Kathryn Hawkins

Baked coconut apples (gluten-free, dairy-free, vegan)

Cooking_apple_harvest
Late September harvest Lord Derby cooking apples. Image: Kathryn Hawkins

It seems like a long time ago since I picked all these apples from the aged tree in my garden. I still have plenty, stored in a fridge in the back kitchen, and every now and then I bake something suitably fruity. My apple store makes the perfect “turn-to” choice when the fruit bowl is running low, and cooked apple is so very comforting when it’s cold outside.

This variety of cooking apple, Lord Derby, is not particularly tart or exceptionally flavoursome but it retains texture when cooked which makes it the perfect choice for baking. I have often eaten the smaller ones like a crisp eating apple and they taste rather like a Granny Smith.

My recipe this week is a very simple dessert which tastes as good warm as it does at room temperature. I often bake a batch to have for breakfast accompanied with coconut milk yogurt. Delish 🙂 Add ground cinnamon or cardamom for a more seasonal flavour. If you don’t like or can’t eat coconut, vegetable margarine (or butter) is fine to use, and replace the coconut flakes with your favourite nuts or seeds, or use dried cranberries for a fruitier alternative.

Makes 6 – 8 servings

  • Juice of 1 lemon
  • 750g cooking apples
  • 75g coconut oil, melted (if you are not dairy-free, unsalted butter works well)
  • 50g Demerara sugar
  • ½ – 1 tsp ground vanilla pod (use a clean, old pepper mill/grinder and put chopped up dry vanilla pods inside – it works so well ground over fruit for baking)
  • A handful of raw coconut flakes
  1. Preheat the oven to 180°C (160°C fan oven, gas mark 4). Line a large shallow baking dish with baking parchment. Pour the lemon juice into a mixing bowl and half fill with cold water.
  2. Peel and core the apples. Cut into thick wedges. Put the prepared apple wedges in the lemony water and mix well – this will help keep the apples from discolouring too much. Drain the apples and blot dry with absorbent kitchen paper.
  3. Arrange the apple wedges on the baking tray and brush all over with the coconut oil. Sprinkle with the sugar and vanilla.
  4. Bake for 20 minutes, turning halfway through. Sprinkle with coconut flakes and continue to bake for a further 20 minutes or until tender and lightly golden. Best served warm with the cooking juices spooned over.
Coconut_baked_apples_step_by_step
Steps to making baked coconut apples. Images: Kathryn Hawkins
Baked_apple_wedges_with_coconut_and_vanilla
Freshly baked coconut apple wedges with vanilla. Image: Kathryn Hawkins