Welcome to my blog all about the things I love to grow and cook. You'll find a collection of seasonal gluten-free, dairy-free and vegan-friendly recipe posts, as well as a round up of my gardening throughout the year. I wish you good reading, happy cooking and perfect planting!
Hello again. It’s my last recipe post of the year. How 2024 has flown by. It’s been a busy one for me, and I’ll admit to not feeling 100% festive as I sit down to write this post as there is always so much to do at this time. If you’re feeling the same, perhaps this simple, tasty recipe will help get you in the right frame of mind.
Festive chestnut rolls. Images: Kathryn Hawkins
These rolls make the perfect snack or party food. Easy to make from a combination of sage and onion stuffing mix, chopped chestnuts and chutney. You can vary the flavour by using your favourite chutney, I use tomato but an onion one or more fruity one would work just as well as would cranberry sauce. Here’s what to do…
Makes:16
Ingredients
65g sage and onion stuffing mix
225g cooked peeled chestnuts
100g tomato or other flavour chutney plus extra to serve
1tsp onion or plain salt
280g vegan-friendly gluten-free puff pastry sheet
10g soya flour
Fresh sage to garnish
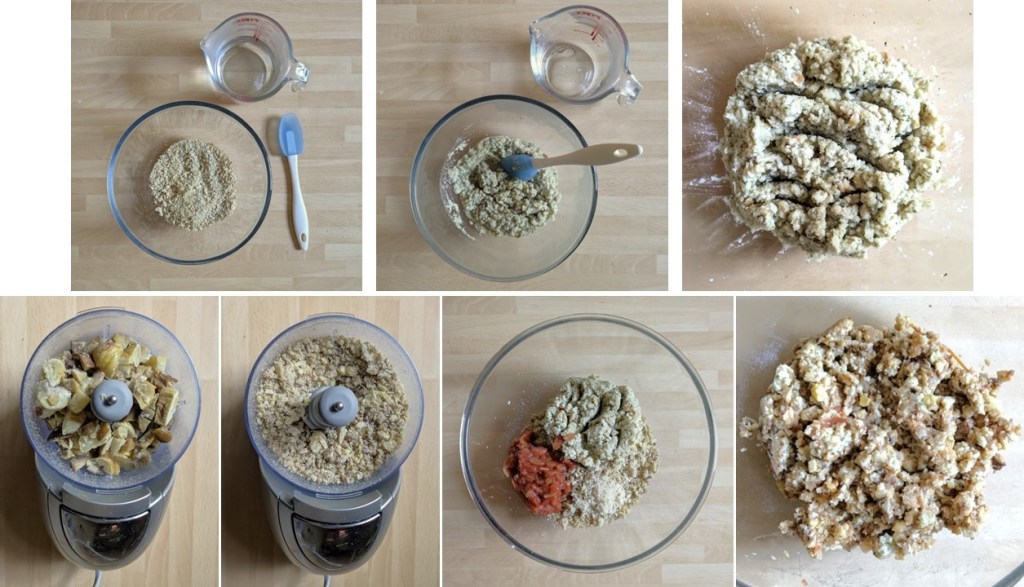
1. Put 50g stuffing mix in a heatproof bowl and mix in 90ml freshly boiled water. Mix well and leave to cool completely.
2. Finely chop the chestnuts in a food processor or by hand and mix into the cold stuffing mixture along with the chutney and salt to make a firm paste.
Making the filling. Images: Kathryn Hawkins
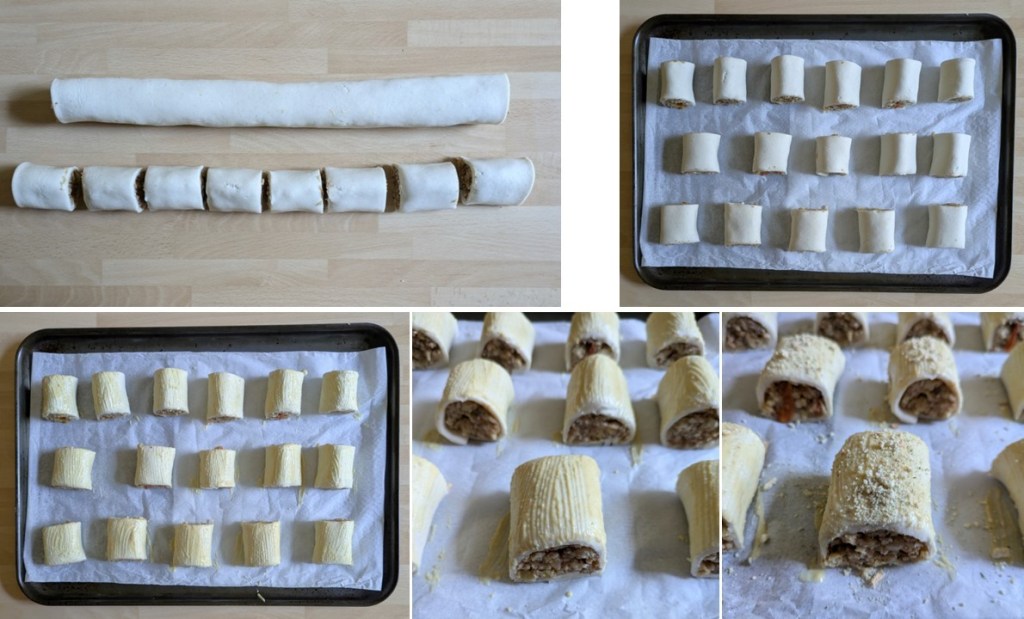
3. Unroll the pastry and use the lining paper to line a large baking tray. Cut the pastry lengthways and divide the stuffing mix between the 2 pastry strips, shaping the stuffing into a long sausage shape down the middle of each.
Forming the chestnut rolls. Images: Kathryn Hawkins
4. Mix the soy flour with 5tsp water to make a glazing paste and brush a little down one side of each pastry strip. Roll the pastry over the filling and press down gently, then roll each pastry back and forth on the work top to neaten and seal.
Shaping the rolls. Images: Kathryn Hawkins
5. Cut each roll into 8 equal portions and arrange spaced apart on the lined baking tray. Brush the tops and sides with the soy paste and sprinkle with the remaining dry stuffing mix. Chill until ready to bake.
Ready for baking. Images: Kathryn Hawkins
6. To cook, preheat the oven to 200°C, 180°C fan, gas mark 6. Bake the rolls for about 20 minutes until golden and crisp. Transfer to a wire rack to cool. Best served slightly warm with extra chutney, garnished with sage.
Fresh chestnut rolls just out of the oven. Image: Kathryn Hawkins
That’s a wrap from me for this year. I hope you all have a good festive season and wish you a happy and healthy time. Until next year, Merry Christmas 🙂
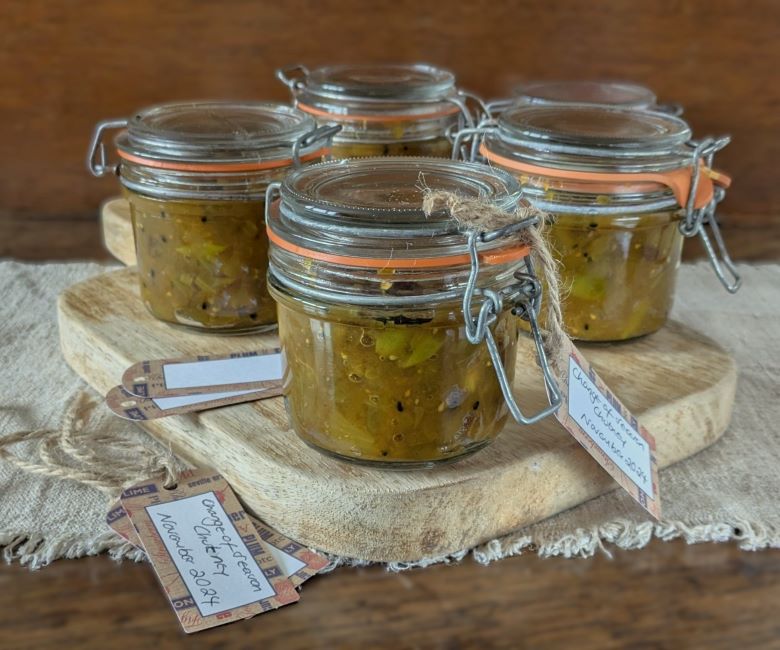
Last of the Autumn produce preserved. Image: Kathryn Hawkins
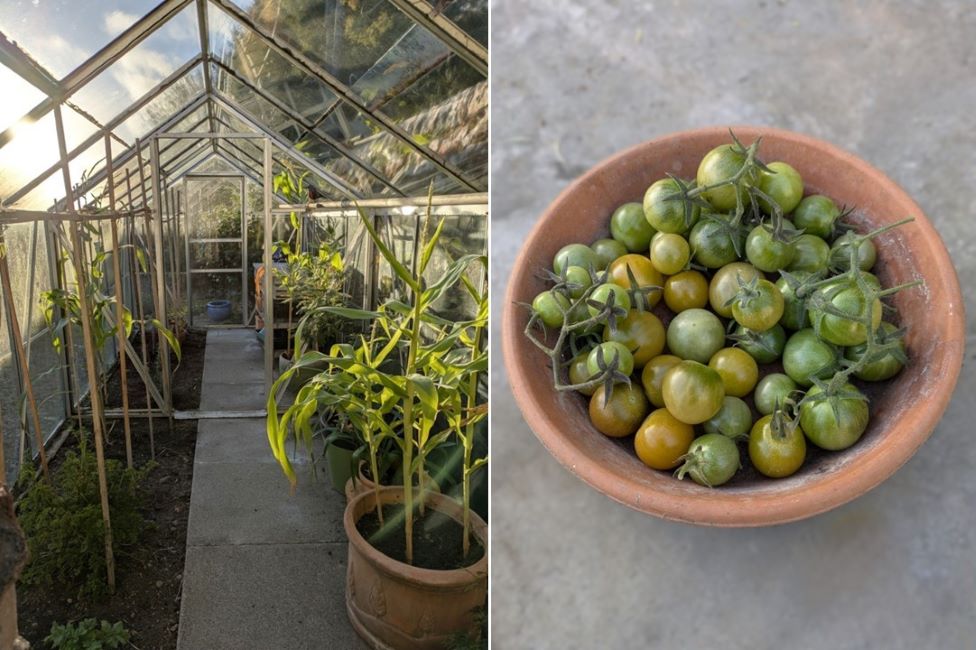
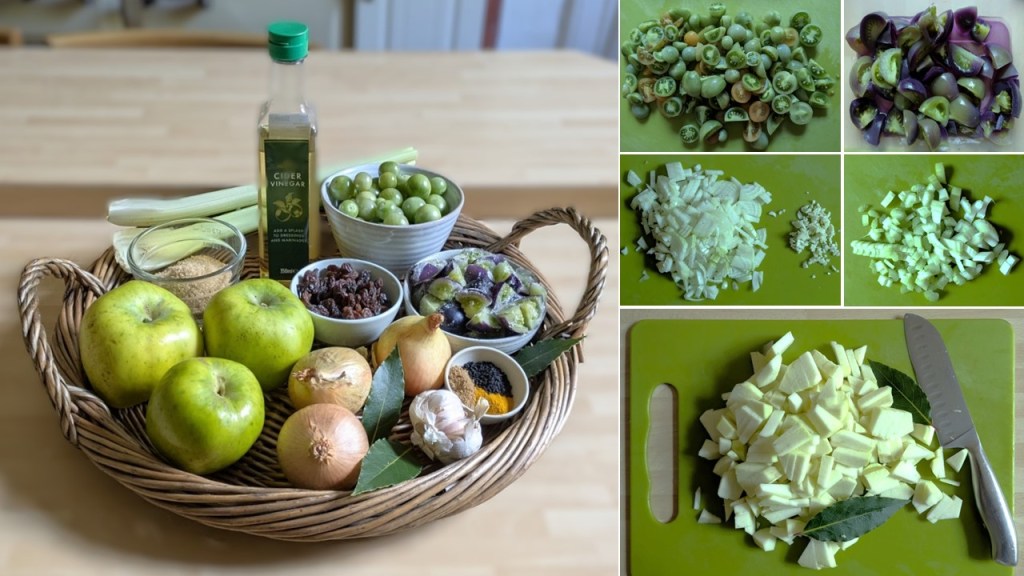
Hello there. When I planned to make this chutney a couple of weeks ago, it was very much still Autumn. I picked off the last of the tomatoes and put the greenhouse to bed during a lovely sunny afternoon. I was going to call the chutney “End of Autumn”.
Last of the greenhouse tomatoes, mid-November 2024. Images: Kathryn Hawkins
However, when I came to make the chutney last weekend, snow was falling very heavily and suddenly we were in winter. And so I thought “Change of Season” chutney would be more appropriate 🙂
November snowy garden. Image: Kathryn Hawkins
I made the chutney in my slow cooker. It is ready to eat as soon as it cools and tastes delicious. I used up the last of this year’s apple harvest along with some black-skinned tomatoes that I had frozen down a few weeks ago. The spices I used give a mild curry flavour but you can change them if you prefer – cinnamon, cumin and coriander for a more earthy flavour would work well.
If you haven’t made a preserve in your slow cooker before, the technique is slightly different in that you can’t boil the preserve down like you would in a saucepan on the stove. The chutney is also cooled before putting in jars, and as such needs to be kept in the fridge. It will however keep for a few weeks or can be frozen for longer term storage.
Makes: approx. 1kg
Ingredients
400g green tomatoes, chopped
2 medium onions, peeled and chopped (about 180g prepared weight)
2 garlic cloves, peeled and chopped
2 sticks celery, trimmed and chopped (about 110g prepared weight)
2 large cooking apples, peeled and chopped (about 300g prepared weight)
2 bay leaves
100ml cider vinegar
75g sultanas or chopped dried apricots
2tsp garam masala
1tsp each nigella seeds, turmeric and salt
150g demerara or light brown sugar (or you can use granulated white sugar)
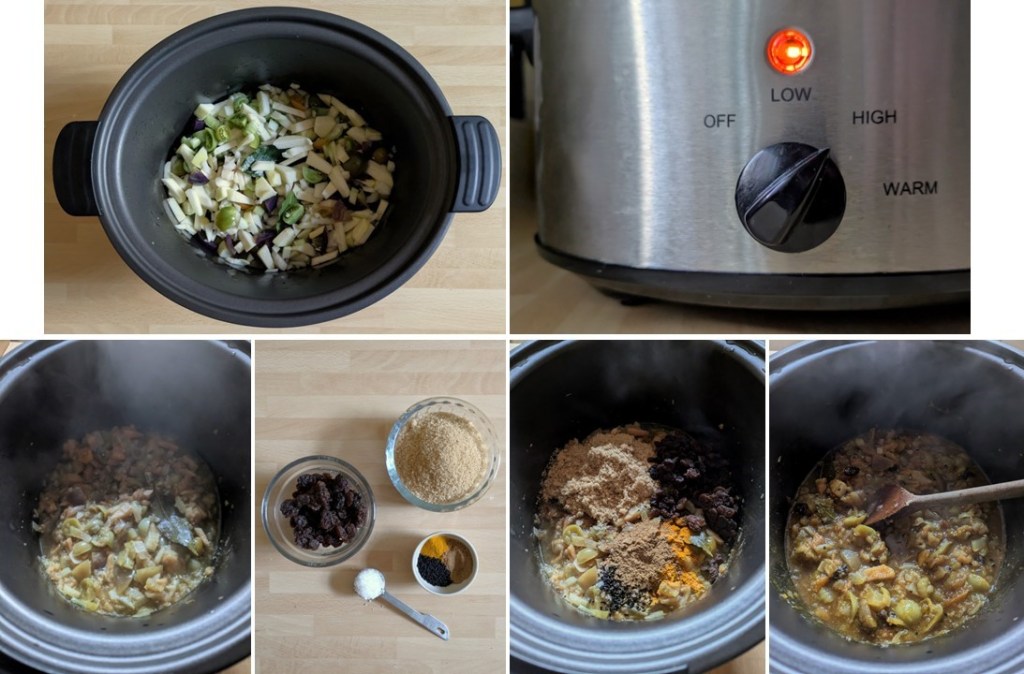
1. Put all the vegetables in the slow cooker with the bay leaves and mix well. Pour over the vinegar, cover with the lid and cook on High for 4 hours.
2. Add the remaining ingredients, mix well, re-cover and cook for 30 minutes to dissolve the sugar.
Slow cooking and seasoning chutney. Images: Kathryn Hawkins
3. Remove the lid, stir well and cook uncovered for a further 2 hours, stirring occasionally until reduced down and jam-like.
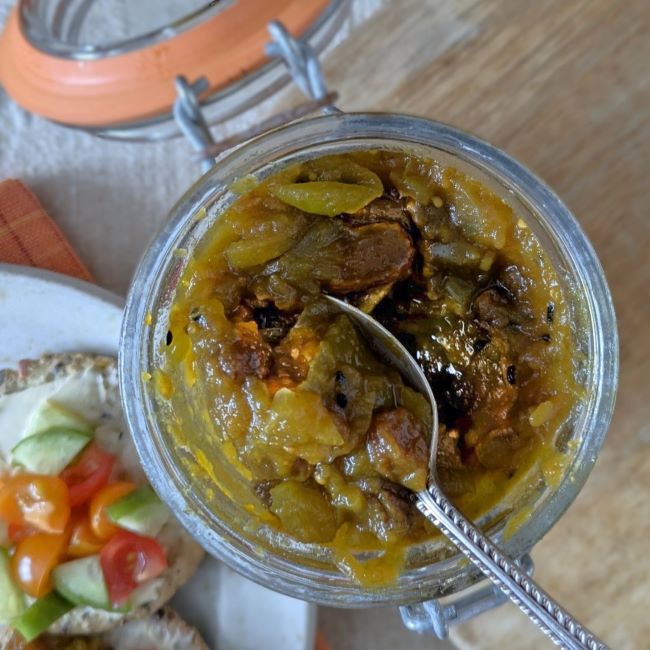
4. Switch off the cooker and leave the chutney to cool completely. Discard the bay leaves and spoon into clean jars. Seal, label and store in the fridge for up to 3 months. Once opened, use within a month. Alternatively, freeze the chutney in containers and defrost when required.
Reducing the chutney down ready for storing. Images: Kathryn Hawkins
A sweet and spicy spoonful. Image: Kathryn Hawkins
That’s me for another month. I have one more post before Christmas, so until then take care and keep warm 🙂
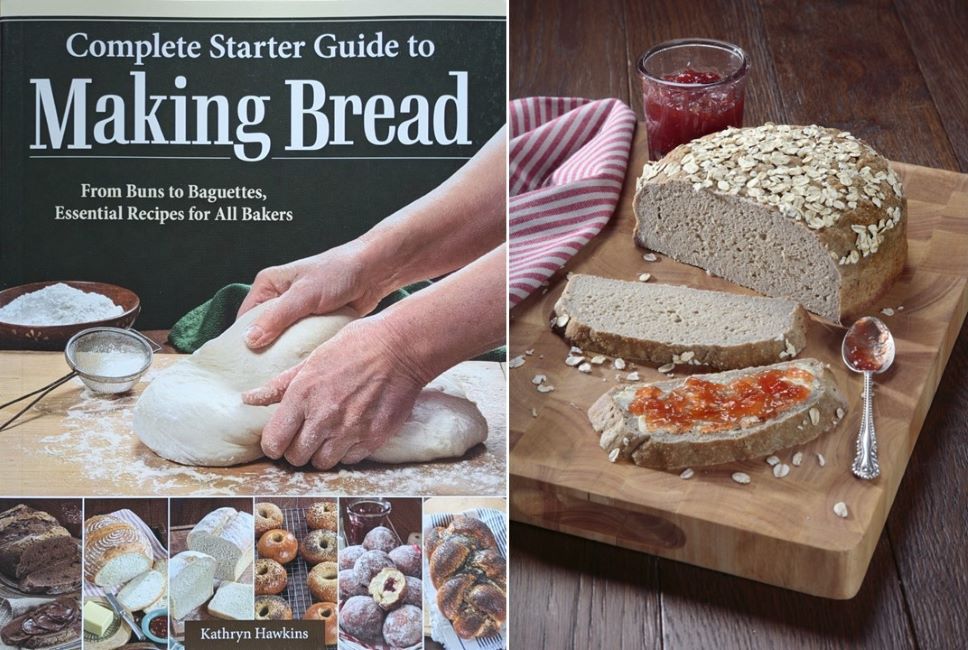
Hello again. Following the launch of my book earlier in the month (see my previous post), I am delighted to share with you one of the gluten-free recipes from the book. As with all gluten-free bread making, there is no kneading, just a bit of mixing and then letting the yeast do its work in the dough.
I did all the food styling for my book and was up to my eyes in various mixes for several weeks. Below is how the oaty loaf was photographed for the book. The mixture was made with eggs, but for this post I am using flax egg.
It’s a very straightforward recipe, using some oat flour and psyllium husk to add a bit more of a chewy texture, and I add xanthan gum to hold the crumb together. I hope you enjoy it 🙂
Makes 1 x approx.850g, 18cm round loaf
Ingredient
2tbsp ground flax seed
200g gluten-free plain flour
200g gluten-free oat flour
2tsp easy blend dried yeast
1½tsp xanthan gum
25g psyllium husk powder
2tsp caster sugar
1tsp salt
425ml lukewarm water
1tbsp gluten-free coarse ground or jumbo oats
1. Grease and line an 18cm diameter, 7.5cm deep, round cake tin. Mix the flax seed with 6tbsp cold water and leave to stand for a few minutes to thicken.
2. Mix the flours in a large mixing bowl and stir in the yeast until well combined. Stir in the xanthan gum, psyllium husk, sugar and salt and make a well in the centre. Add the flax egg and half the water, and mix well with a spatula or wooden spoon until well blended.
Flax egg and adding it to the dough. Images: Kathryn Hawkins
3. Continue mix in sufficient of the remaining water until the mixture is soft and sticky. Leave to rest for 10 minutes, then mix again. In this time, the mixture will become slightly less sticky as the water is absorbed.
4. Transfer to the prepared tin. Smooth the top, cover with a reusable cover or large bowl and leave to rise at a coolish room temperature, away from drafts, for about 2 hours until risen to the top of the tin.
Making the dough. Images: Kathryn Hawkins
5. Meanwhile, preheat the oven to 200°C, 180°C fan oven, gas 6. Uncover the dough and sprinkle over the oats. Bake in the centre of the oven for about 1 hour 10 minutes. It can be quite challenging to know when the loaf is cooked through, so if in doubt, err on the side of caution and cook for a further 10 minutes. The usual rule is that the loaf will sound hollow when tapped underneath. Turn on to a wire rack to cool.
Proving and baking the loaf. Images: Kathryn Hawkins
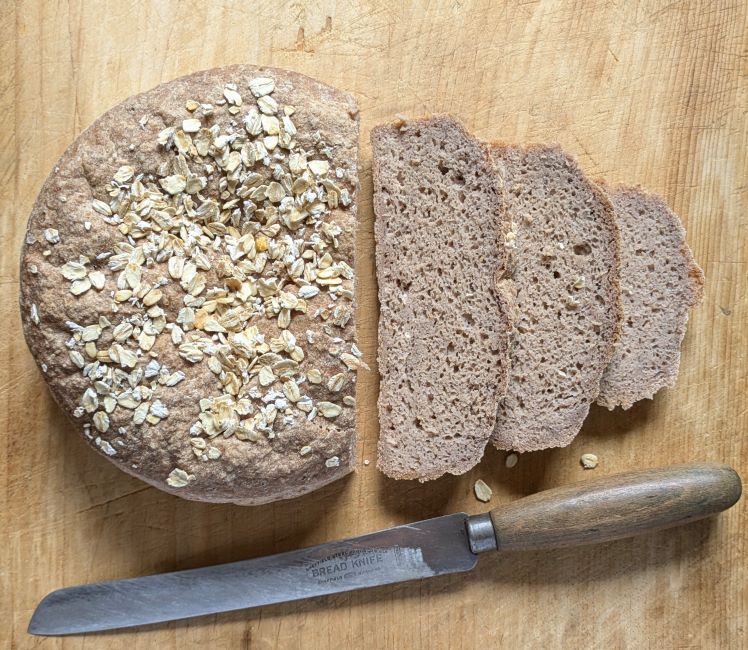
The loaf is best eaten within 3 days of baking. It freezes well. I usually slice the loaf before freezing so I can defrost exactly what I need.
Sliced and ready for freezing. Image: Kathryn Hawkins
The bread is tasty and delicious just as it comes, and if toasted the texture becomes spongier with a crisp bite, much like a toasted crumpet.
Jammy bread. Images: Kathryn Hawkins
For more bread recipes, my book is available from main online retailers. It is published by IMM Lifestyle Publishers.
I hope you have a good few days until my next post. Thanks for stopping by.
It’s almost the most spookiest time of the year, and to celebrate, I thought this recipe would make the perfect treat if you’re entertaining on 31st October. Layers of chocolate brownie mixture covered in marzipan, you could also serve it up as part of an edible table decoration for Christmas or New Year.
The big chocolaty reveal. Image: Kathryn Hawkins
If you like the idea but time is short, you can use rounds of a readymade chocolate cake or chocolate Swiss roll. The brownie recipe alone is rich and delicious and makes a great bake by itself if you don’t want to make the candle. Time to bring on the cake recipe, I hope you like it 🙂
Serves: 8
Ingredients
100g free-from dark or plain chocolate
100g lightly salted plant butter
7tsp ground flax seed
125g caster sugar
1tsp natural vanilla extract
125g gluten-free plain flour blend
¼tsp xanthan gum
75g free-from chocolate frosting or apricot jam, softened
200g natural marzipan
50g free-from white chocolate
1 x tea-light candle
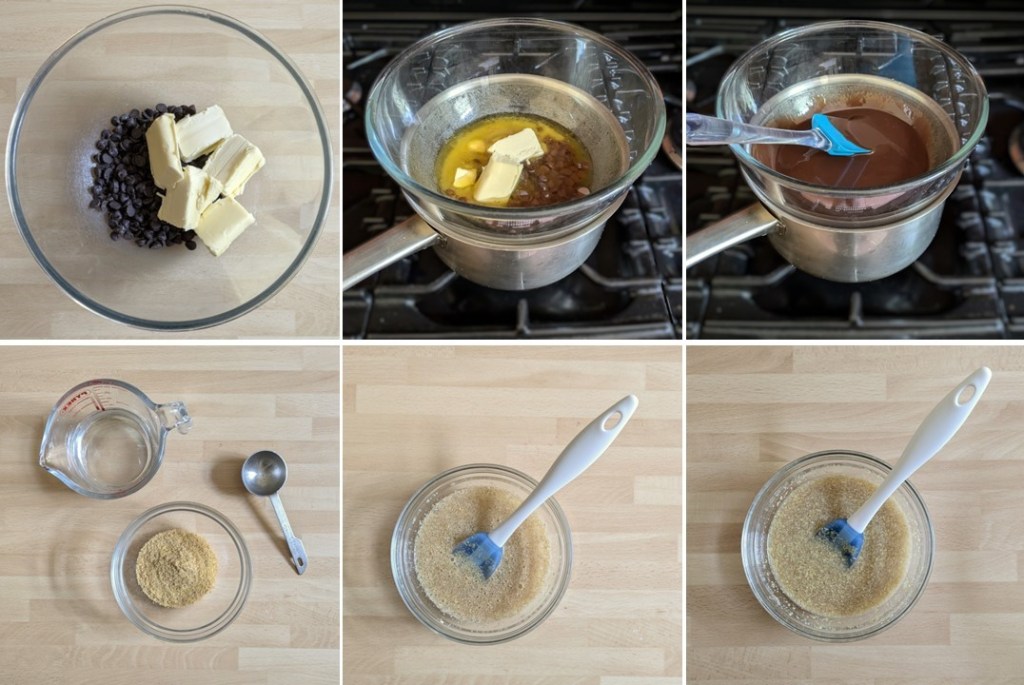
1. Grease and line an 18cm straight sided square cake tin. Melt the plain chocolate and butter together over a saucepan of barely simmering water. Remove from the water and leave to cool for 10 minutes.
2. Meanwhile, mix the ground flax seed with 110ml cold water and leave to stand for a few minutes until thickened. Preheat the oven to 180°C, 160°C fan, gas mark 4.
Preparing the ingredients for chocolate brownie. Images: Kathryn Hawkins
3. Stir the sugar and vanilla into the warm chocolate mixture, then mix in the flax “egg”. Add the flour and xanthan gum and mix well.
4. Spoon into the prepared tin and bake for about 45 minutes until the top looks papery and shiny and a skewer inserted into the centre comes out clean. Leave to cool in the tin before removing.
Making and baking the brownie mix. Images: Kathryn Hawkins
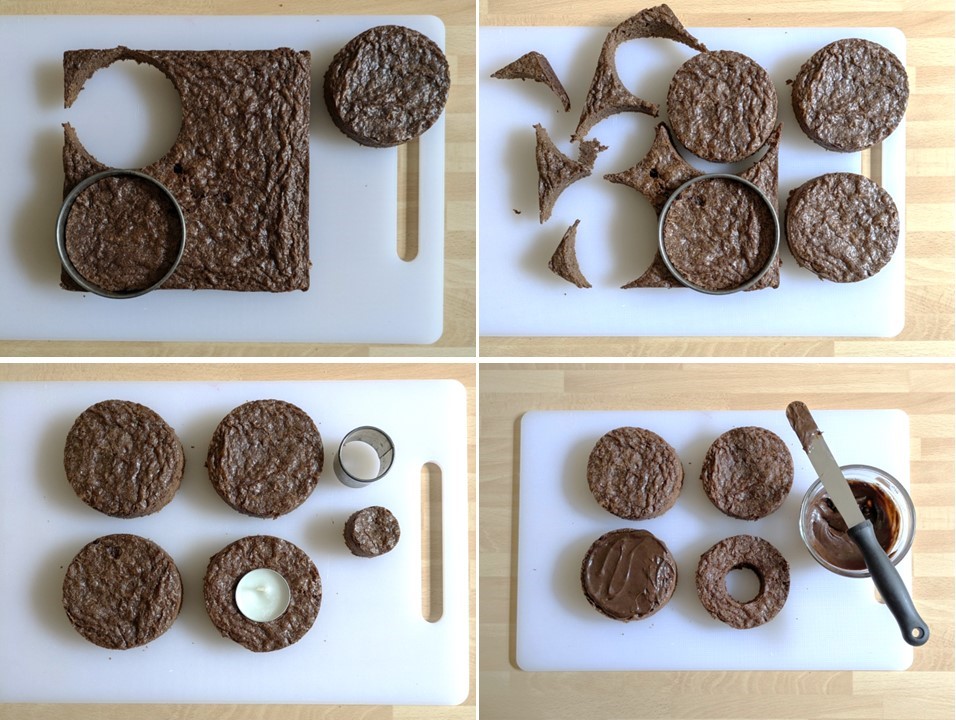
5. Use an 8 to 8.5cm round cookie cutter to cut out 4 neat rounds from the brownie square. Use a small round cutter the same size as the tea-light candle holder (approx.3.5cm) and cut out the centre from one round. Keep the trimmings to make truffles or cake pops.
Cutting brownie rounds. Images: Kathryn Hawkins
6. Spread a little frosting or jam on each round and stack them neatly on top of each other, putting the cut out round on top.
Assembling the candle. Images: Kathryn Hawkins
7. Measure the height and circumference of the brownie stack. My cake was 9.5cm tall, and 27cm round the middle.
8. Knead the marzipan to make it more pliable, then roll out to a thickness of about 0.5cm and a little larger than the cake dimensions, then trim to the size of your cake. Gather up the marzipan trimmings, re-roll and cut out a ring of marzipan using the same cutters as before, to fit the top of the cake.
Covering brownie with marzipan. Images: Kathryn Hawkins
9. Spread the outside of the cake with a little more frosting or jam, then lay the cake on the marzipan and roll it up so that it is completely covered. Stand the cake upright and smooth the ends together. Spread the top with remaining frosting or jam and place the marzipan ring on top. Pop the candle holder inside. If the marzipan is a bit uneven, gently roll the cake back and forth on the work top to smooth.
Covering the brownie. Images: Kathryn Hawkins
10. Melt the white chocolate. Put the candle into the holder and carefully spoon warm chocolate round the top of the cake, letting it drip down the sides to resemble melting wax. Try and keep the edge of the candle holder free from chocolate so that you are able to remove it with ease when you want to slice the cake. Leave the cake in a cool place to set. To serve, put the cake on a heat resistant plate and light the candle.
White chocolate candle wax. Images: Kathryn Hawkins
Cosy candle cake light. Image: Kathryn Hawkins
When you are ready to cut the cake, extinguish the flame and carefully remove the candle holder, remembering that the candle wax will be very hot – I used a pair of tweezers to grip the candle holder for easy removal. Cut the cake in half and then into smaller portions.
Brownie candle close-up. Image: Kathryn Hawkins
If you are celebrating this Hallowe’en, I hope you have a great time. I look forward to sharing some exciting news in my next post early in November. Until then, stay safe 😉
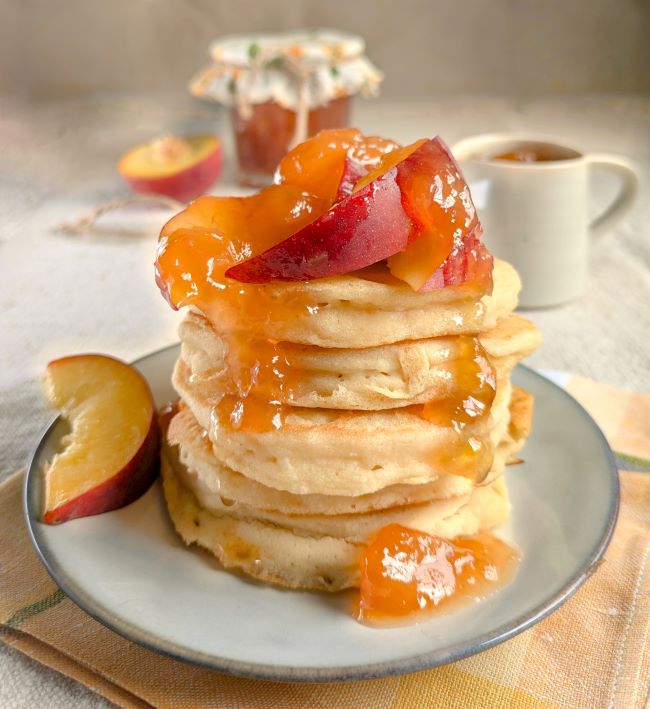
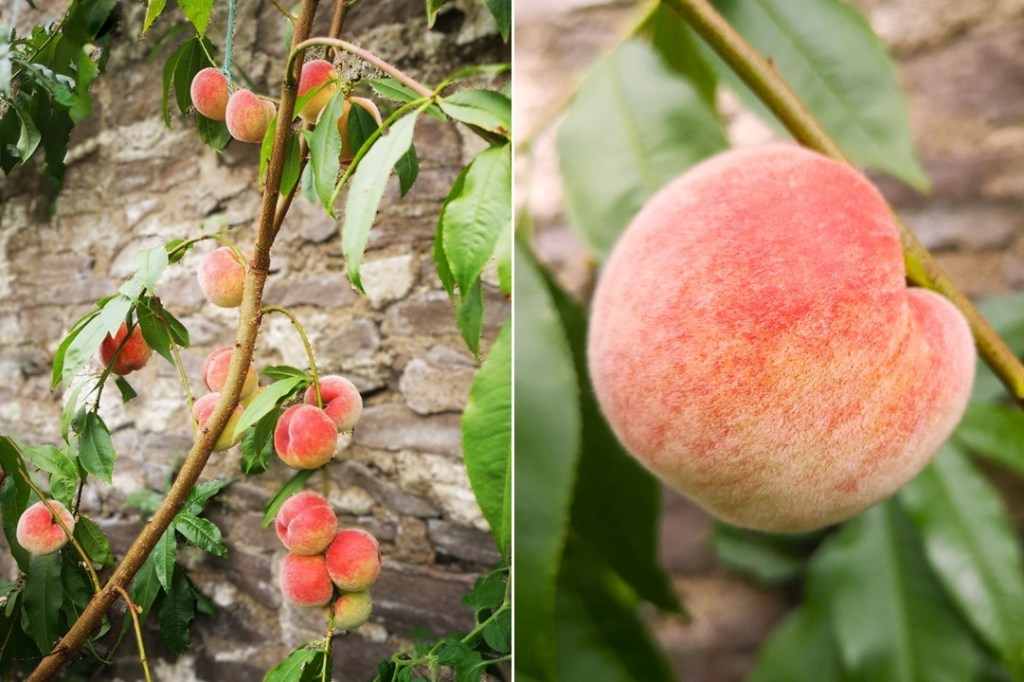
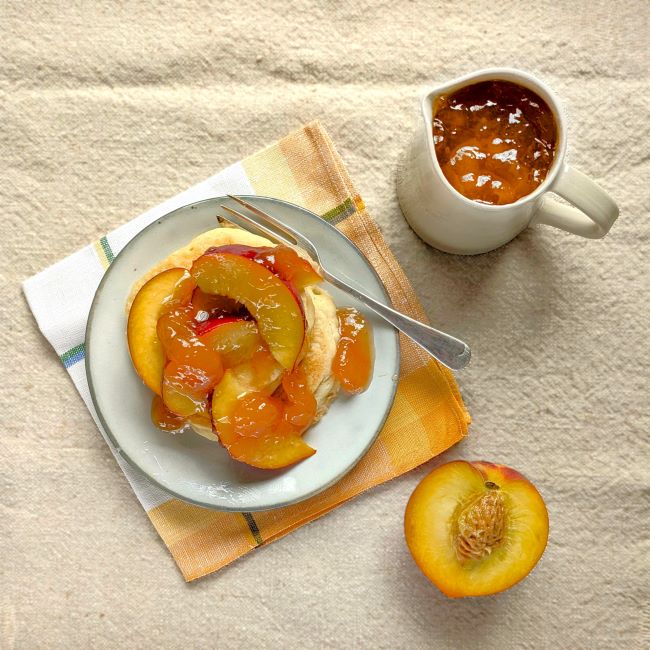
Hello there. I have 2 recipes for you this month: light fluffy pancakes served with a homemade fresh peach jam, inspired by acquiring some homegrown fresh peaches last July. My then neighbour, asked me in to water his burgeoning garden and greenhouse whilst he was away on holiday, and in return I was able to enjoy the pick of the crop. How lucky was I when I discovered the greenhouse peach tree bearing fruit that was ripening so fast the peaches were literally falling from the tree.
Greenhouse white peach tree. Images: Kathryn Hawkins
I gathered up the crop and made peach jam for the very first time. Delicious it was too, and, by the way, I did give him a pot when he returned 🙂 The peaches were a very sweet and juicy white variety which peeled very easily without any intervention. I made some this year with firmer, yellow-fleshed peaches and dipped them in boiling water for a few seconds to loosen and then peel away the skins. You can also use a vegetable peeler to do this if preferred. You do need to peel peaches and nectarines for jam making because the skins become very tough when boiled with sugar.
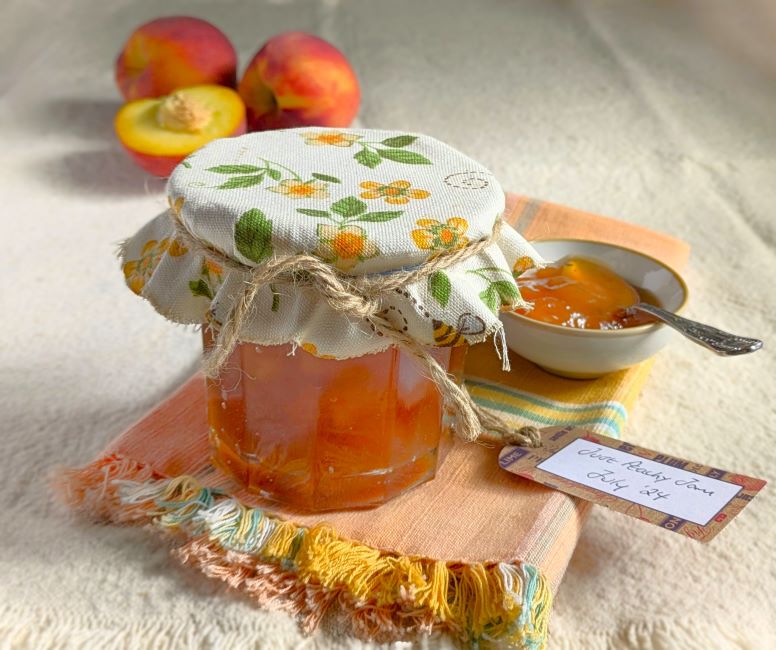
Just peachy jam. Image: Kathryn Hawkins
Pancakes make the perfect base to enjoy homemade jam, so I am combining the jam and pancake recipes below in case you want to make either or both.
Makes: approx. 1.125kg jam and 12 pancakes
Ingredients
For the jam:
1kg peaches
6tbsp lemon juice
800g granulated sugar (I used 200g demerara sugar and 600g white sugar)
For the pancakes:
175ml plant-based milk
2½tsp lemon juice
150g gluten-free blended self raising flour
30g cornflour (cornstarch)
½tsp bicarbonate of soda (baking soda)
50g plant-based butter, melted
1tbsp maple syrup
A little vegetable oil for frying
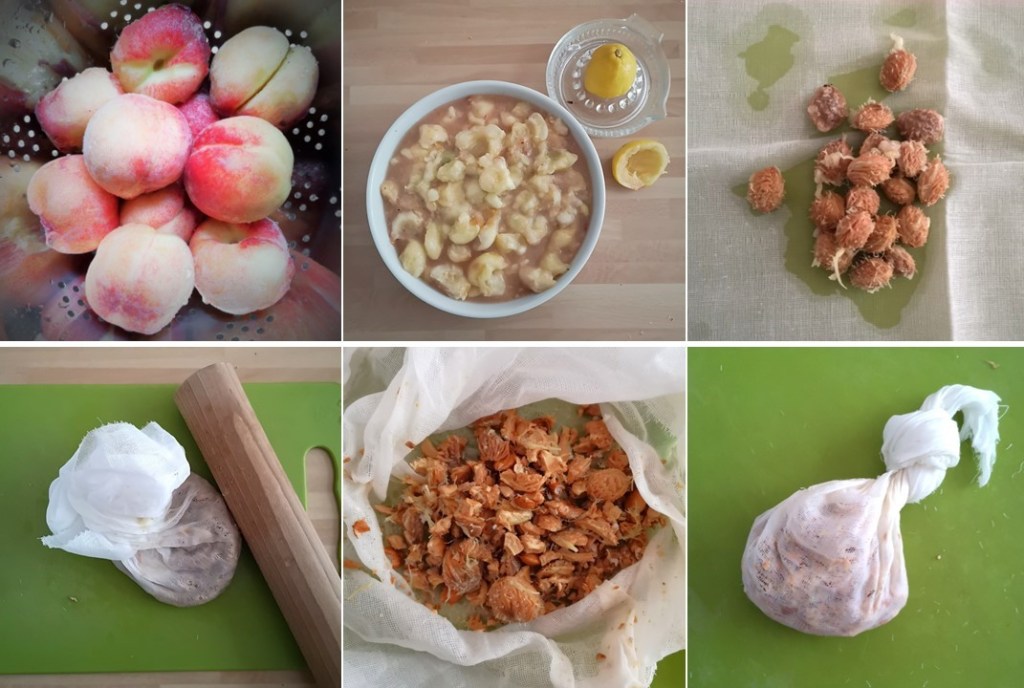
1. For the jam, wash, skin and chop the peaches. If the peaches are very ripe, then will break up easily. If the peaches are firm, cut them into small pieces. Put the stones to one side and place the peach flesh in a bowl. Mix in the lemon juice.
2. Put the stones on a square of muslin, twist the edges together to contain the stones within, and bash hard with a rolling pin to smash them open. Tie the muslin securely.
Peach and peach stone preparation. Images: Kathryn Hawkins
3. Transfer the peach and lemon mixture to a saucepan, and heat until steaming and hot, then simmer gently to soften the fruit. If the peaches are very ripe and soft, they will require little or no cooking.
3. Add the sugar and stir until dissolved, then raise the heat, add the bag of crushed stones and boil rapidly until setting point is reached – between 104° and 105.5°C.
Making peach jam. Images: Kathryn Hawkins
4. Discard the stones and leave the jam to stand for a few minutes to thicken slightly, the stir to distribute the fruit pieces and spoon into clean jars and seal straight away. Cool, then label. The jam is ready to eat but will keep for several months if stored correctly.
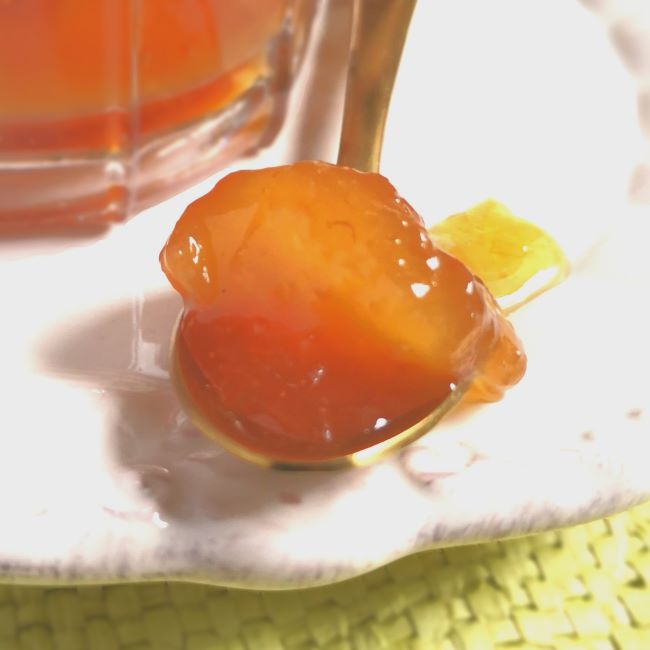
Jammy spoonful. Image: Kathryn Hawkins
To make the pancakes:
1.First make a buttermilk. Mix the milk and lemon juice together and leave to stand for a for a few minutes until it thickens slightly.
2. Sift the flour, cornflour and bicarbonate of soda into a bowl and make a well in the centre. Add the melted butter, maple syrup and buttermilk and gently mix everything together to make a thick batter. Note: as soon as you mix the liquid into the dry ingredients, the raising agents get to work and produce air bubbles. You need to get the batter cooked as quickly as possible in order to make fluffy pancakes.
Making the pancake batter. Images: Kathryn Hawkins
3. Working quickly, brush a large frying pan or flat griddle pan lightly with oil and heat until hot. Use a tablespoon measure to spoon 2 spoonfuls of batter on to the hot pan to make a thick pool. Add further pools depending on how much space you have in the pan. Cook over a medium heat for about 2 minutes, turn over and cook for a further 1-2 minutes until lightly golden and puffed. Either transfer to a dish, cover and keep warm, or cool on a wire rack, whilst you cook the remaining batter.
Cooking pancakes. Images: Kathryn Hawkins
Serve warm or cold with your favourite toppings. The pancakes will keep for a few days in a sealed container and can be toasted or quickly pan-fried to heat through. They also freeze well.
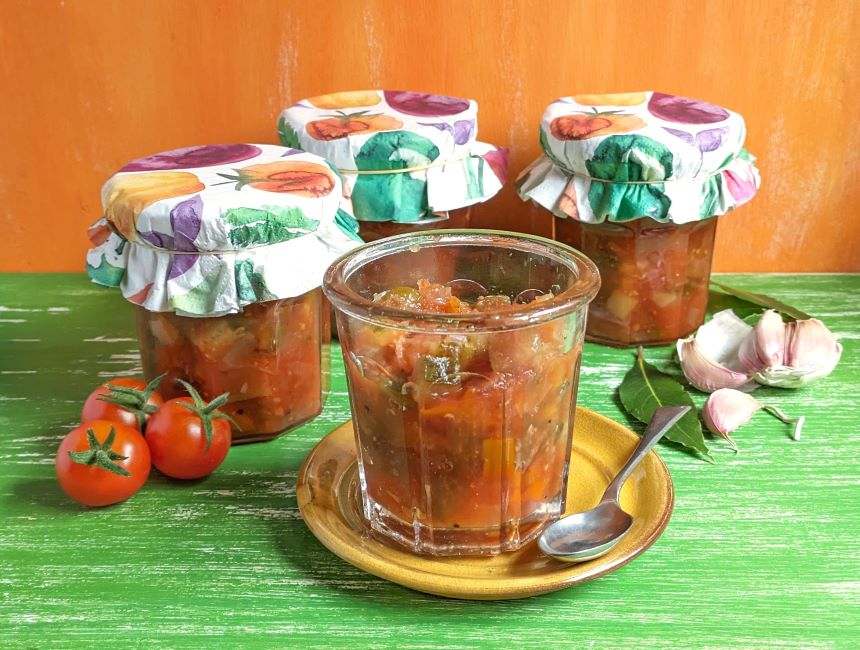
Summer vegetables captured in a jar. Image: Kathryn Hawkins
Hello again. So, we’ve passed the mid point of the year already. Time for a recipe which preserves the time of year perfectly. My recipe this week is an excellent way to use up a selection of the vegetables that are at their best over the next few weeks. If you have homegrown produce, all the better.
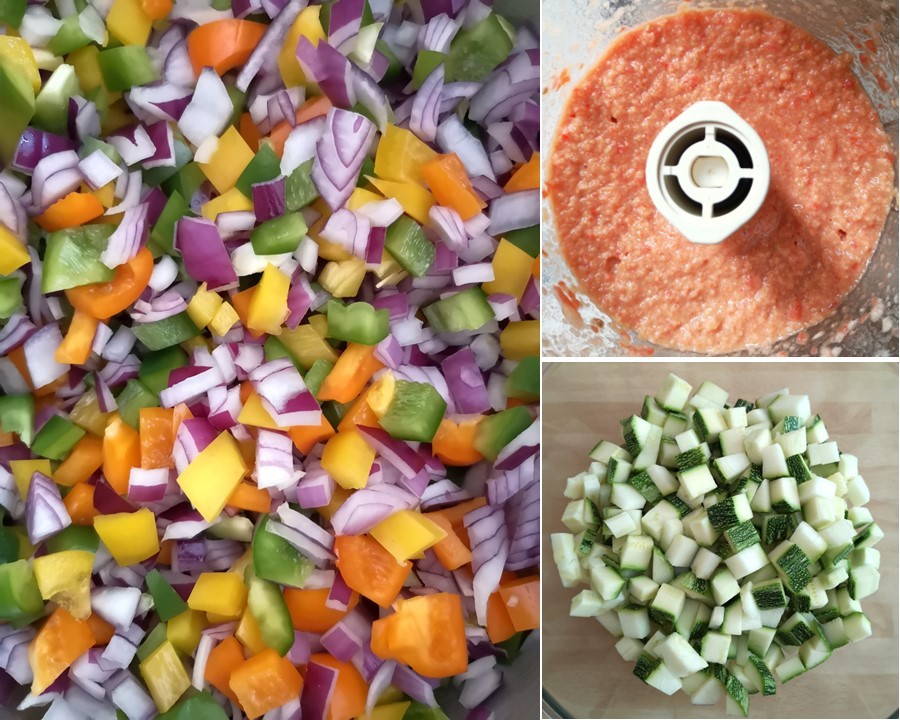
Summer vegetables for chutney making. Images: Kathryn Hawkins
I was inspired by one of my favourite vegetable dishes, Ratatouille, when I put this recipe together. You can mix and match different, similar-textured vegetables in the recipe below, just replace weight for weight, one for another. I used a combination of red onion and mixed peppers, with fresh tomatoes and cooking apples, and some diced courgette (zucchini). The chutney is flavoured with garlic, bay leaves and ground coriander. Aubergine (egg plant) or squash would also be good in this mixture.
A taste of Summer. Images: Kathryn Hawkins
The quantities below make a very generous amount of chutney but you can of course, cut the amount of vegetables you use to make less.
Makes: approx. 3kg
Ingredients
450g prepared mixed bell peppers (approx. 1 each large green, yellow and orange peppers), finely chopped
450g prepared red onions, finely chopped
600ml cider or white wine vinegar
3 bay leaves
4 garlic cloves, peeled
450g fresh tomatoes, roughly chopped
450g prepared cooking apples, roughly chopped
2tbsp tomato purée
1tbsp ground coriander
500g prepared courgette (zucchini), diced
450g granulated sugar
1tbsp salt
Freshly ground black pepper
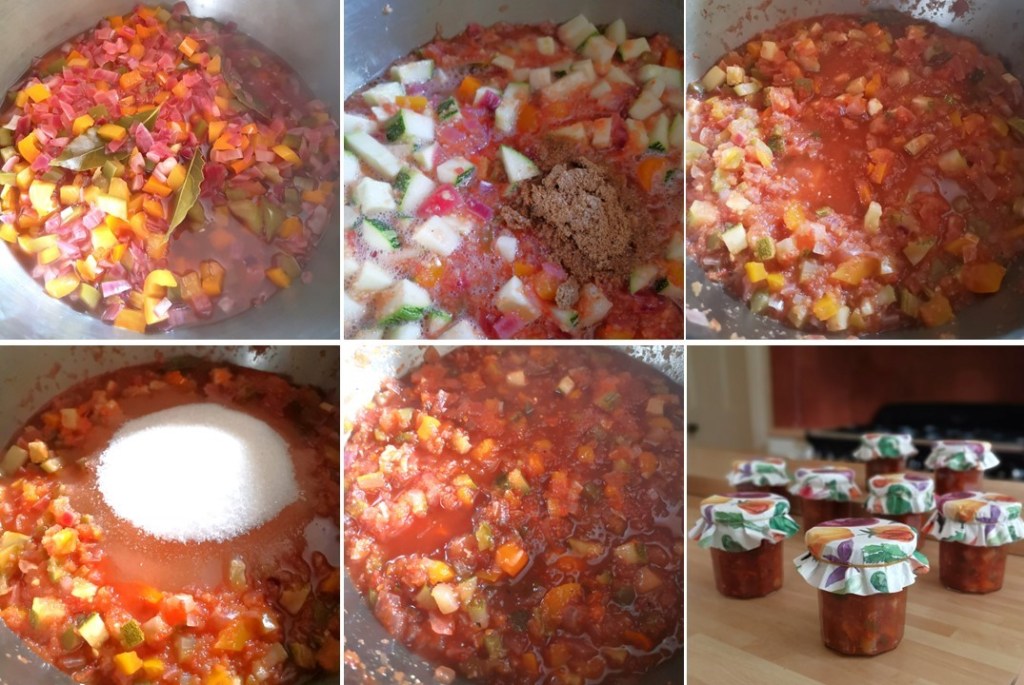
1. Put the peppers and onions in a large saucepan and pour over the vinegar. Add the bay leaves, bring to the boil, cover and simmer for 15 minutes.
2. Meanwhile, put the garlic, tomatoes, apples and tomato purée in a food processer and blitz until smooth.
3. Pour over the peppers and onions and stir in the coriander and courgette (zucchini). Bring to the boil, cover and simmer for 25 minutes until tender and jam-like.
4. Stir in the sugar until dissolved, then mix in the salt and some pepper. Bring to the boil and cook for about 30 minutes until thick and jam-like.
Cooking up vegetables for chutney. Images: Kathryn Hawkins
5. Turn off the heat, discard the bay leaves and spoon into clean jars. Seal immediately. Leave to cool, then label and store for about 1 month before opening. The chutney should keep in a cool, dark cupboard for several months.
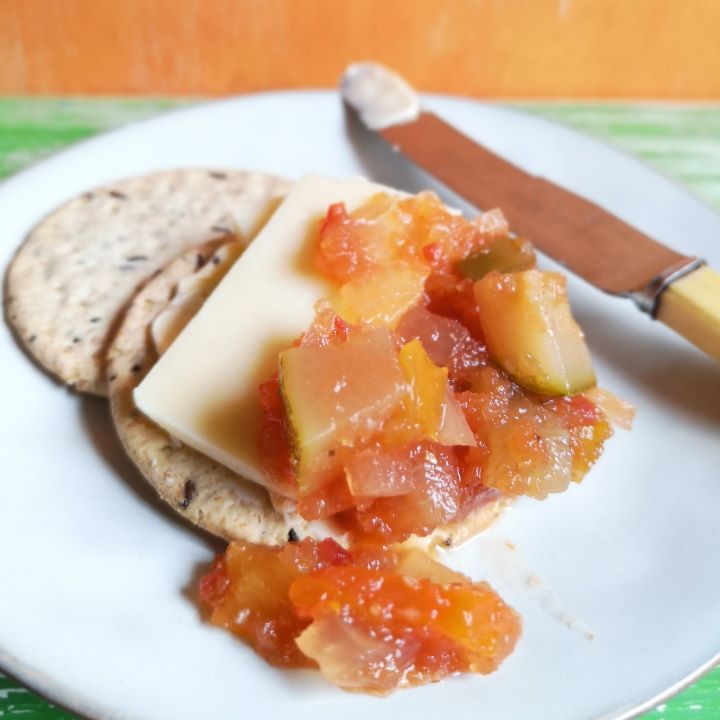
Chutney, cheese and oatcakes. Image: Kathryn Hawkins
I look forward to sharing another recipe with you next month. Until then, enjoy the season and thanks for stopping by 🙂
Hello there. I have a super sunny recipe for you this week which I hope matches the weather where you are (sadly not here today as I type this). I really like tortilla wraps but find the readymade ones a bit on the doughy side. Homemade corn wraps have more texture and flavour, and make a great base for toppings or fillings if you fold them to make taco shells, and are utterly delicious fried as chips.
Loaded and ready to eat. Image: Kathryn Hawkins
A little bit of patience is required to roll the perfect tortilla – I guess that’s why someone invented the tortilla press – but as with everything, practice makes perfect. You’ll see that mine have a raggedy edge, for a neat round edge you’d need to trim with a sharp knife, but I quite like the more characterful look 🙂
The basic wrap is a very simple recipe which I hope you will enjoy trying. Enjoy them warm – they will become drier and firmer as they cool. You can reheat them by popping in the microwave for a few seconds. If you want to turn them into chips, the recipe is further down, below the basic wraps recipe.
Makes: 6
Ingredients
125g gluten free plain bread flour blend plus extra for dusting (Note: bread flour contains Xanthan gum so if you use a standard plain flour, add a little Xanthan gum to make the dough easier to work with)
125g fine cornmeal (Masa farina)
½tsp salt
2tbsp corn oil
1. Put the flour, cornmeal and salt in a bowl and make a well in the centre. Ad the oil and mix in, then gradually pour and mix in about 115ml water to bring the ingredients together into a soft clump.
2. Lightly flour the work top and gently knead the dough for a short time to make a smoothish ball of dough. Form into a neat round, cover lightly and leave to rest for 15 minutes.
Making gluten-free tortilla dough. Images: Kathryn Hawkins
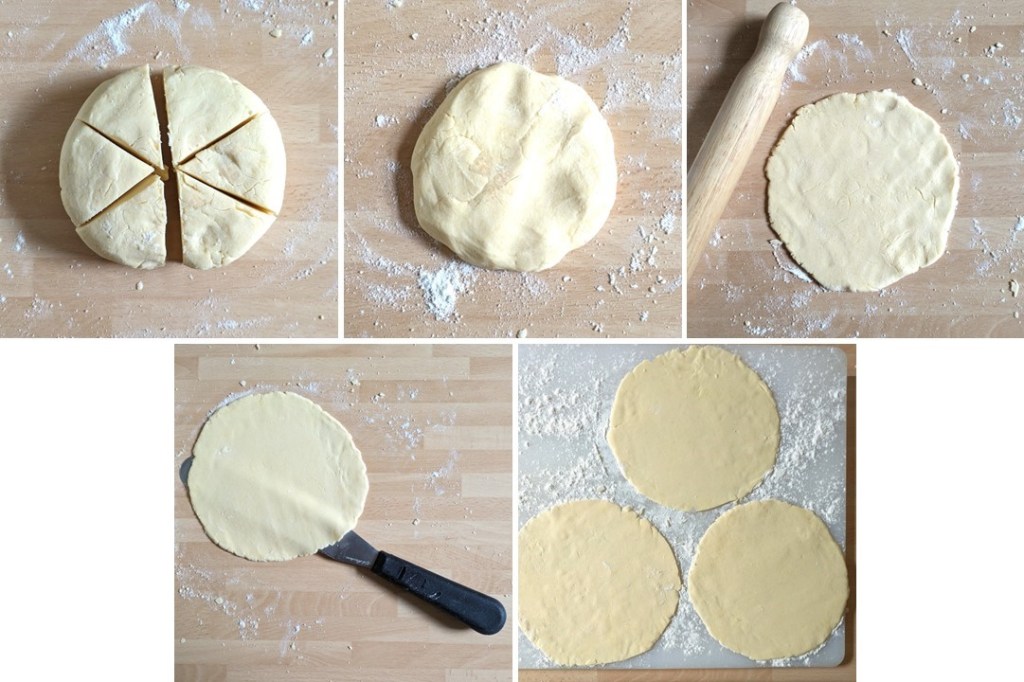
3. Cut into 6 equal wedges. Working on one piece at a time, dust the work top lightly with flour, form a portion into a round and then roll and turn to make an approx. 18cm thin round. You will probably need to slide a palette knife underneath to turn the dough as it gets thinner.
4. Transfer to a lightly floured board and cover whilst you roll out the other 5 pieces in the same way.
Shaping tortilla dough. Images: Kathryn Hawkins
5. To cook, heat a dry frying pan until hot. Carefully add a tortilla and cook over a medium heat for about 2 minutes until it starts to bubble up. Flip over and cook for a further 1-2 minutes until lightly golden and toasted. Wrap them in a clean tea towel to keep them soft and warm whilst you cook the remaining rounds.
Cooking the tortillas. Images: Kathryn Hawkins
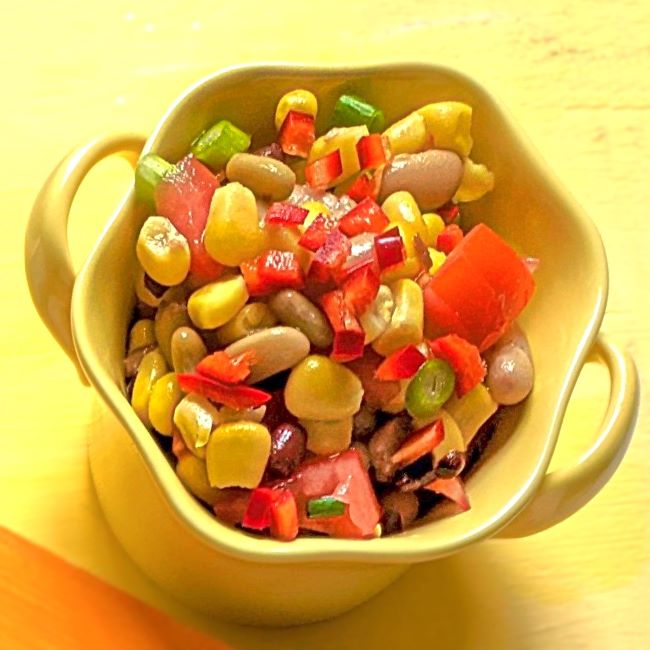
Serve the tortillas warm, topped with your favourite salsa or salads. I made up this very simple combination of chopped tomato mixed with canned beans, cooked sweetcorn and a little spring onion, all mixed together with sweet chilli sauce. Pile on top of a freshly made corn tortilla, sprinkle with fresh red chilli and fresh coriander, and add a dollop of vegan mayo on the side 🙂
Corn and bean salsa. Image: Kathryn Hawkins
To make your own corn chips, cut cold tortillas into 8 neat triangles – I found it easier to use kitchen scissors to do this. Pour corn oil into a deep frying pan or saucepan to a depth of about 5cm and heat to 180˚C. Fry a few chips at a time for about 2 minutes, turning in the oil, until crisp and lightly golden. Drain well and season whilst still warm – I used onion salt.
Cutting and cooking corn chips. Images: Kathryn Hawkins
Freshly fried and seasoned. Image: Kathryn Hawkins
These homemade chips are really the crunchiest chips I’ve ever tasted. They store well for several days in an air tight container (if you can leave them alone!).
New season asparagus on sesame toast. Image: Kathryn Hawkins
Hello again. It’s that time of year again when I welcome the arrival of the British asparagus season. From around the middle of April to the end of May/beginning of June, I have just a few weeks to feast on my favourite green vegetable.
New season British asparagus. Image: Kathryn Hawkins
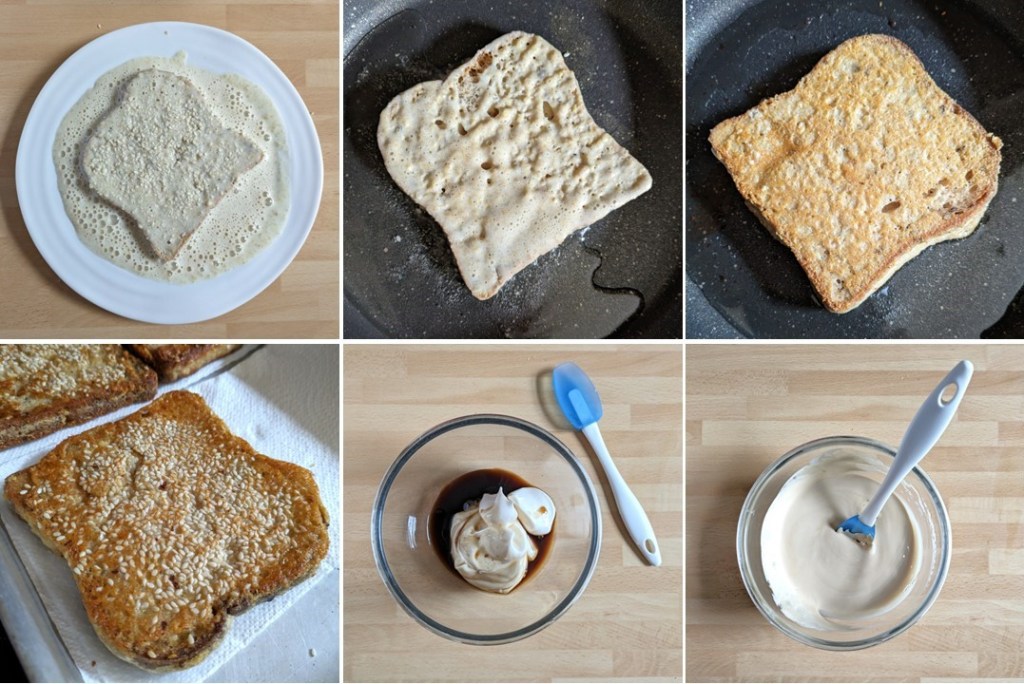
I have suggested a few accompaniments to this delicious vegetable over the years. I like to keep it simple and enjoy the stems for their own unique flavour, and this year’s offering is no exception. Delicious crispy fried toasts dipped in a sesame batter and served with a sesame flavoured mayo dressing.
Tip top British asparagus. Image: Kathryn Hawkins
When the asparagus season is over, make and cut the toasts into triangles and serve as a crunchy and very moreish snack – they really are very tasty.
Crisp and crunchy sesame triangles. Image: Kathryn Hawkins
Makes: 4 servings of asparagus on toast, or 16 sesame triangles
Ingredients
2tbsp chickpea canning water (aquafaba)
20g gram (chickpea) flour
20g ground flaxseeds
Pinch of salt
4tbsp plant milk
4 slices free-from bread
40g toasted sesame seeds
Vegetable oil for shallow frying
6tbsp vegan mayonnaise
1tbsp Teriyaki marinade
2tsp sesame oil
Chopped spring onion to serve
300g new season fine asparagus spears
1. Put the chickpea water in a bowl and whisk with an electric mixer until very thick and foamy.
2. Mix the flours and salt in a bowl. Make a well in the centre and add the milk. Gradually mix everything together then fold in the chickpea foam.
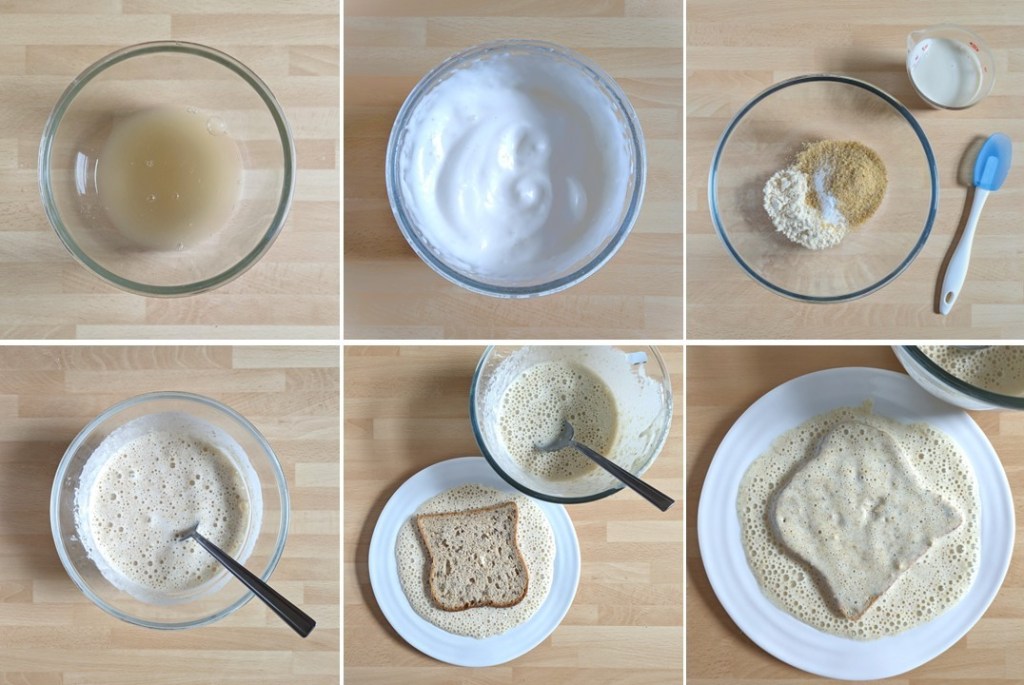
3. Put some of the batter on a plate or in a shallow dish. Working on one piece of bread at a time, dip the bread on both sides and sprinkle the top with a few seeds.
Making the sesame toast batter. Images: Kathryn Hawkins
4. Pour sufficient vegetable oil to just cover the base of a large frying pan and heat until hot. Cook the battered bread over a medium to low heat for about 2-3 minutes on each side until crisp and golden. Drain and keep warm whilst coating and cooking the other 3 slices.
Cooking the toasts and making the dip. Images: Kathryn Hawkins
5. For the dip, mix the mayonnaise with the marinade and 1tsp sesame oil. Cut the toasts into triangles, sprinkle with spring onion and serve warm with the mayo to dip.
Sesame toasts with freshly chopped spring onion. Image: Kathryn Hawkins
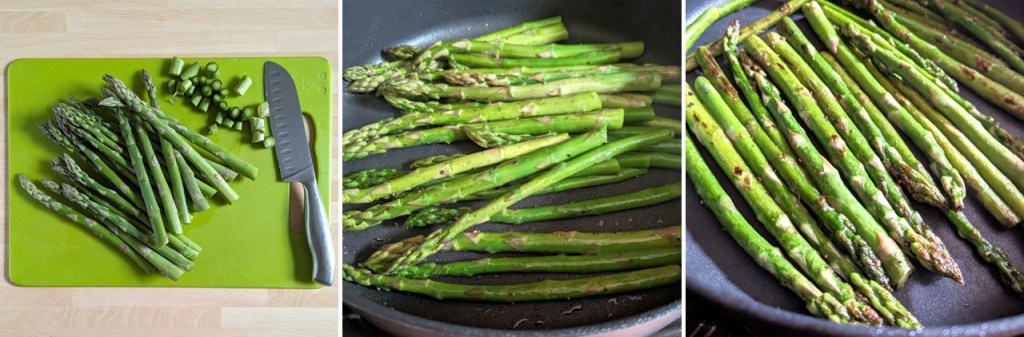
To serve topped with asparagus, trim a little from the ends of the asparagus stems. Heat a little vegetable oil in a large frying pan until hot and stir fry the stems for about 5 minutes until just tender and lightly browned.
Pan-frying new season asparagus. Images: Kathryn Hawkins
Turn off the heat, season with a little salt and drizzle over a little sesame oil. Stand for 5 minutes before serving on sesame toast with a drizzle of the sesame mayo.
Dressed and ready for eating. Image: Kathryn Hawkins
Thanks for stopping by. I hope to see you again in a couple of weeks. Until then, take care and enjoy the season 🙂
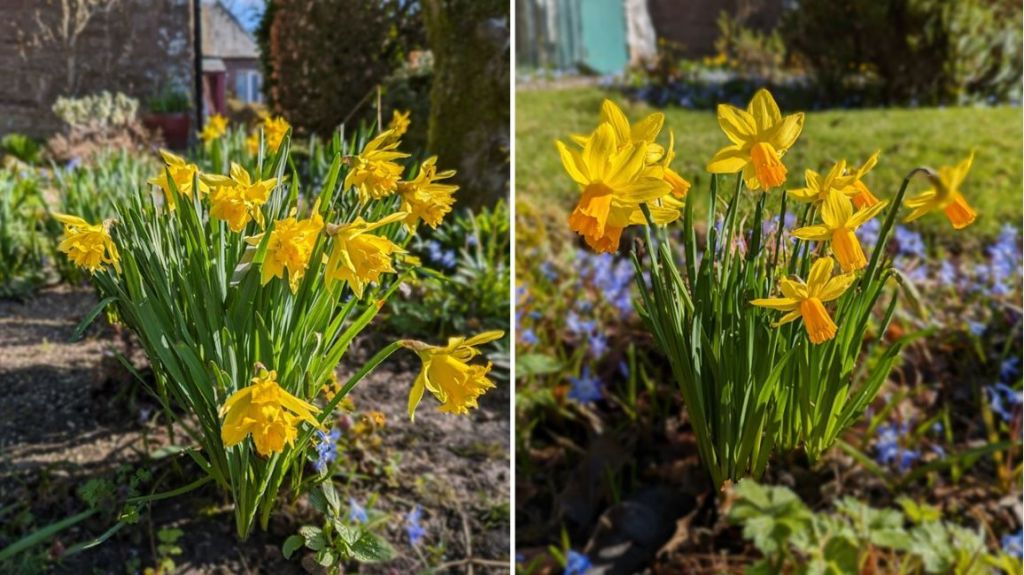
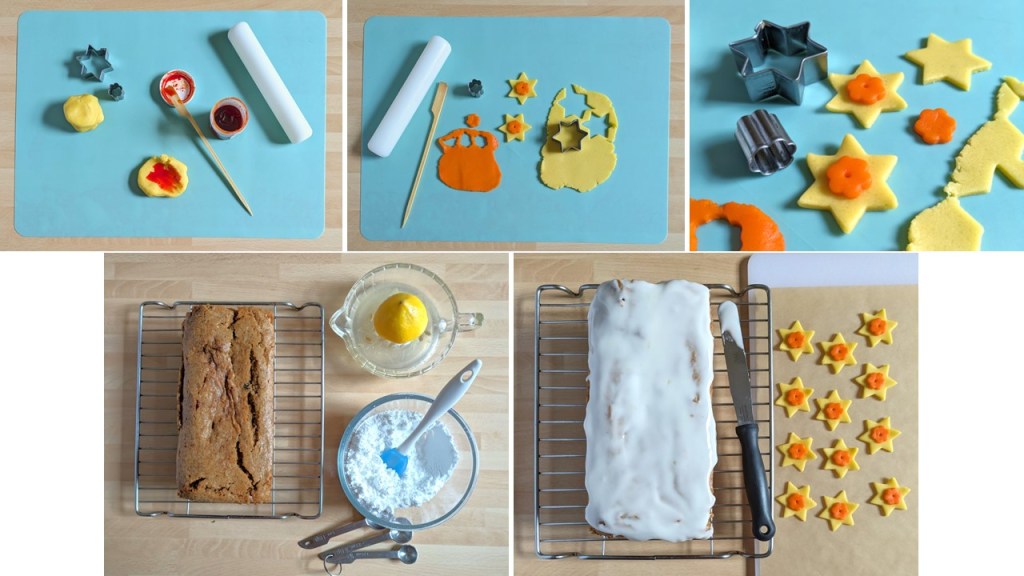
Hello again. It’s nearly Easter which is one of my favourite times of the year. Lots of wonderful spring flowers everywhere with longer days and (usually) warmer temperatures. The garden is full of spring bulbs at the moment, and on a rare sunny day last week, I managed to capture some of them in all their bright and bold glory.
Golden glow. Images: Kathryn Hawkins
My recipe this month is a bake, inspired by Easter and the season, it’s a no-fuss cake mix baked in a loaf tin, flavoured with Chai Masala mix and marzipan. You can use any regular spice mix but if you fancy the Chai blend, here’s a link to making your own from a previous Easter post of mine Chai masala biscuits for Easter (gluten-free, dairy-free, vegan)
Key ingredients and flavours. Images: Kathryn Hawkins
I used a white gluten-free bread flour for this recipe but you can use a standard blend and either add your own Xanthan gum or leave it out altogether. The raising agent is baking soda and the liquid is buttermilk which is quick and easy to make at the beginning of the recipe along with a flax egg.
Marzipan centre. Image: Kathryn Hawkins
I have put a layer of grated golden marzipan running through the cake which you can leave out or replace with extra dried fruit pieces if you prefer. The flowers on top are also made from marzipan, but use coloured ready to roll icing if you prefer.
Easter baking in one slice. Image: Kathryn Hawkins
Serves: 8
Ingredients
5tsp fresh lemon juice
185ml plant milk (I used oat milk)
1tbsp ground flax seed (linseed)
200g golden marzipan
115g lightly salted plant butter, softened
150g light soft brown sugar
250g gluten-free white bread flour
¾tsp bicarbonate of soda
1½tsp Chai Masala or other ground spice mix
75g sultanas
Orange food colour gel
75g icing sugar
1. For the buttermilk, mix 2½tsp lemon juice into the plant milk and leave to stand for 15 minutes until thickened slightly. For the flax egg, mix the ground flax seed with 3tbsp water and leave for a few minutes to thicken.
2. Grate half the marzipan and set aside. Grease and line a 1kg loaf tin. Preheat the oven to 180°C, 160°C fan oven, gas 4.
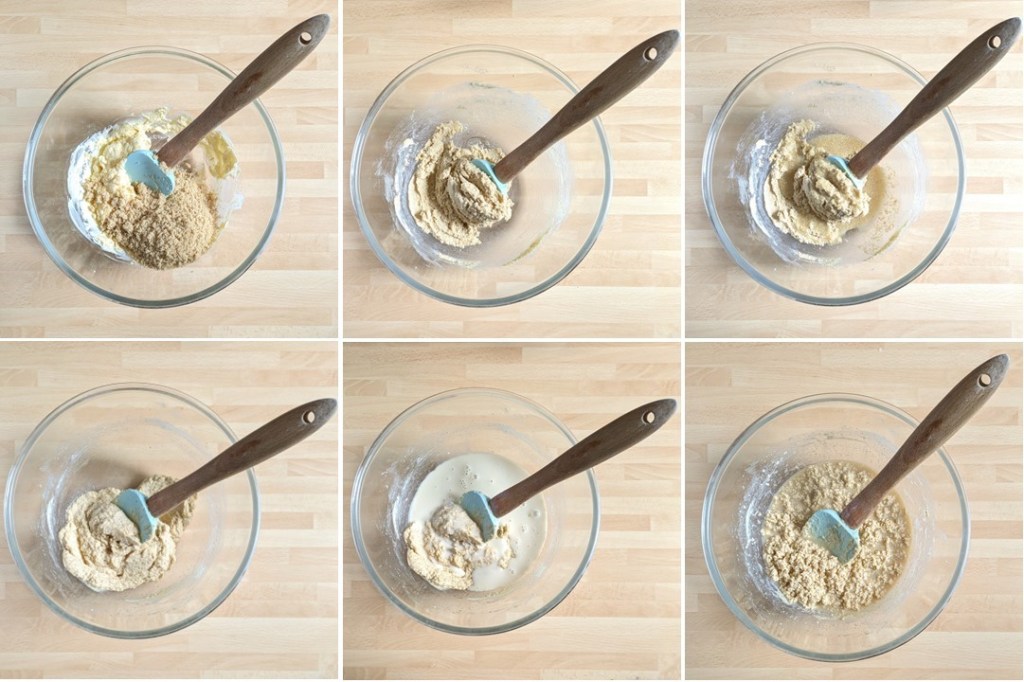
3. Put the butter and sugar in a bowl and mix together until thick and creamy. Stir in the flax egg and then mix in the buttermilk – it will look a bit lumpy and separated at this stage.
Making the batter. Images: Kathryn Hawkins
4. Stir in the flour, bicarbonate of soda, spice and sultanas and mix until everything is well blended and smooth.
5. Spoon half of the cake batter into the tin and smooth the surface. Sprinkle over the grated marzipan and spread the rest of the batter on top. Stand the tin on a baking tray and bake for about 1 hour 15 minutes until risen and firm to the touch – test the centre with a skewer to make sure it completely cooked. Cool in the tin for 30 minutes before removing and placing on a wire rack to cool completely.
Easter loaf ready for baking. Images: Kathryn Hawkins
5. While the loaf is cooling, make the decorations. Break off a small piece of the remaining marzipan and blend in a little orange food colour gel. I used a 4cm star cutter to make the outer yellow petals of the Daffodils, and a 1½cm flower shaped cutter to make the central orange petals.
6. Roll out the marzipan thinly and cut out stars and flower shapes. You should be able to make 12 of each. Transfer to a lined board until ready to decorate the cake.
7. For the icing, sift the icing sugar into a bowl. Add 2-2½tsp of the remaining lemon juice to make a spreadable consistency, then spread over the top of the cake, allowing it to drip down the sides. Arrange the marzipan flowers on top.
Ready for slicing. Image: Kathryn Hawkins
The cake keeps well, and improves in flavour and texture if you make it at least 24 hours before decorating and serving. Store in an airtight container once decorated.
I hope you have a good Easter weekend and enjoy some spring sunshine whatever you are doing. Until next time, thanks for stopping by 🙂
Hello there. I’ve been back in the kitchen for my post this month and I have a very tasty recipe to share, perfect for this time of year when it’s still a bit on the chilly side.
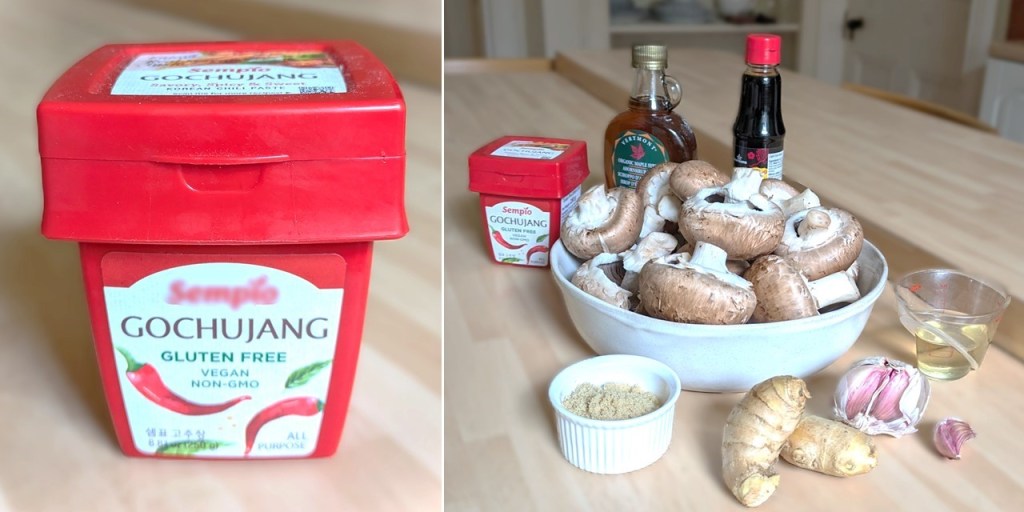
If you’re a regular reader of my recipes you’ll know that I’m not a huge fan of fiery food. However, I discovered this Korean paste a while ago and really enjoy it’s rich umami flavour and spicy chilli heat. I’m sure there are brands on the market which are very hot but this blend is just right for me, and it’s gluten-free and vegan as well 🙂
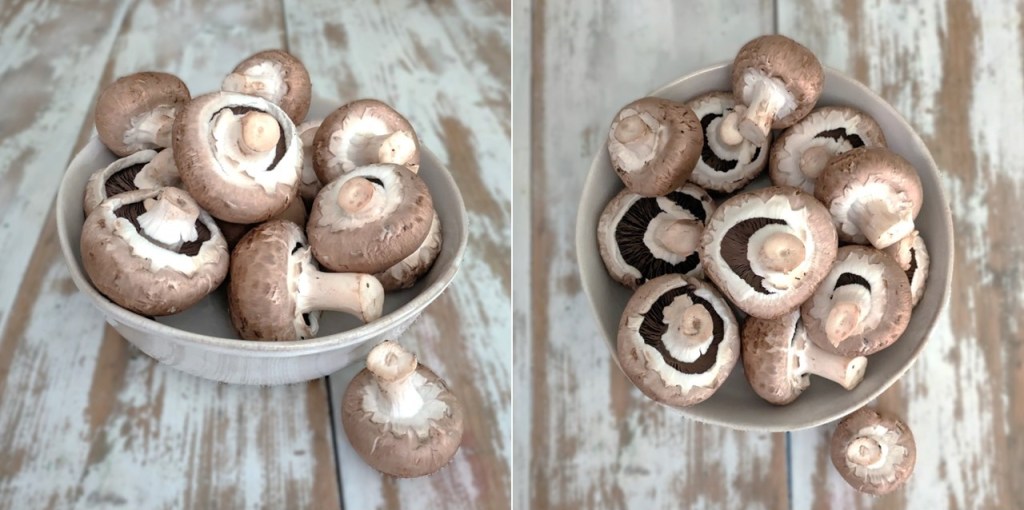
A bowl of chestnut mushrooms. Images: Kathryn Hawkins
I chose chestnut (or brown) mushrooms for this recipe because they have a “meaty” texture but large flat or Portobello mushrooms will work just as well I’m sure. Prepare the ingredients the day before you want to serve the mushrooms. This will allow the marinade time to draw out some of the moisture from the mushrooms. Serve them as a side dish for 4 people or as a main course for 2-3. They also make a delicious filling for steamed sesame buns – see my recipe here Steamed sesame buns (gluten-free; dairy-free; vegan)
Sesame seeds, chopped red chilli and spring onion to serv
1.Peel and finely chop the garlic and ginger. Place in a large bowl and mix in all the ingredients except the mushrooms.
2. Slice the mushrooms thickly, and add to the bowl in batches, mixing with the marinade ingredients to make sure all the slices are coated. Cover and chill overnight.
Making the marinade. Images: Kathryn Hawkins
3. The next day, drain the mushrooms, reserving the marinade and pouring into a small saucepan. Put the mushrooms into a shallow roasting tin and place in the oven. I don’t preheat my oven for recipes like this, I just set it to 200°C, 180°C fan oven, gas 6 and leave the mushrooms for 30 minutes until tender and cooked through.
Ready to roast. Images: Kathryn Hawkins
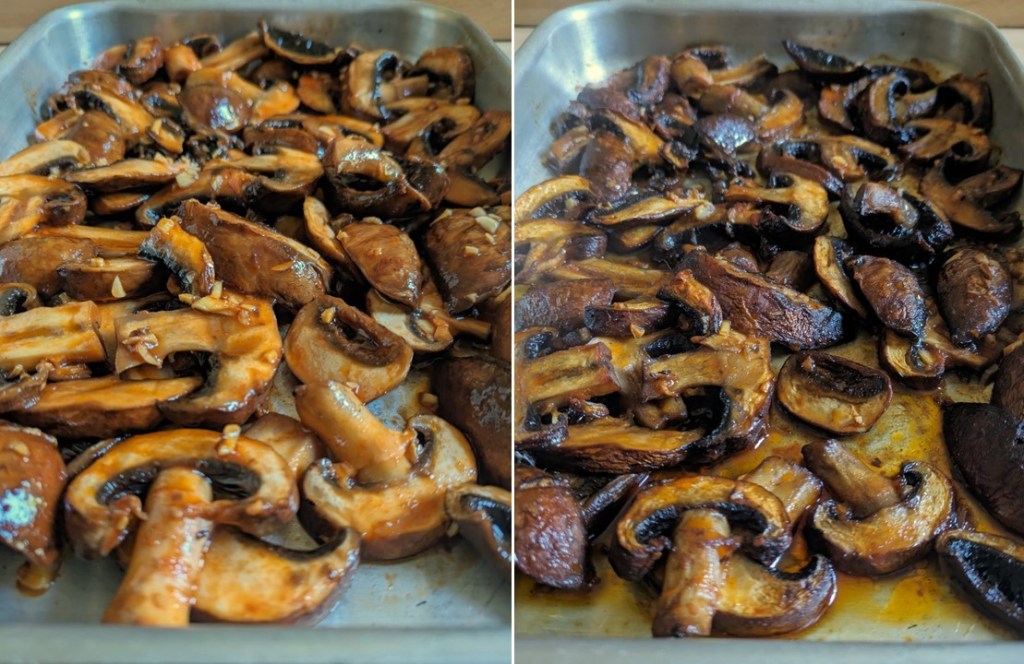
Before and after roasting. Images: Kathryn Hawkins
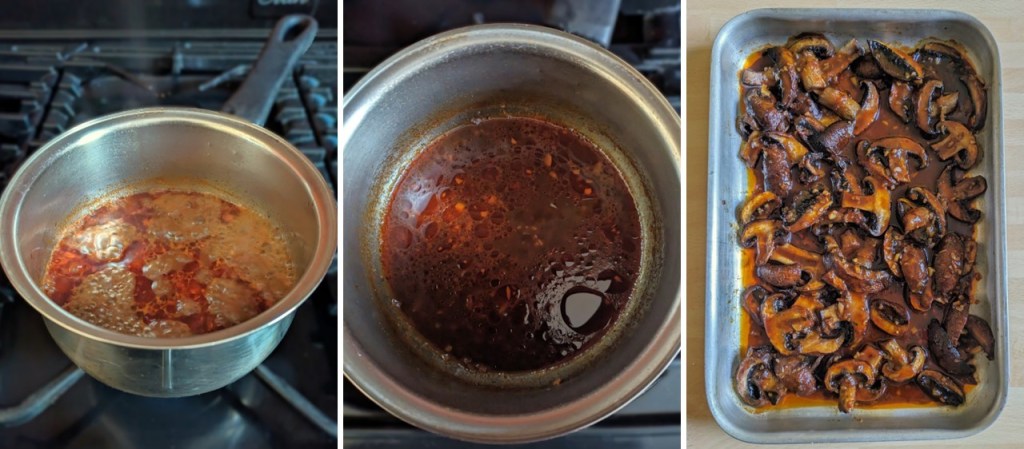
4. While the mushrooms are cooking, bring the marinade to the boil and simmer for about 10 minutes until reduced by half. When the mushrooms are ready, pour the reduced mixture over them and mix well.
Reducing the marinating juices. Images: Kathryn Hawkins
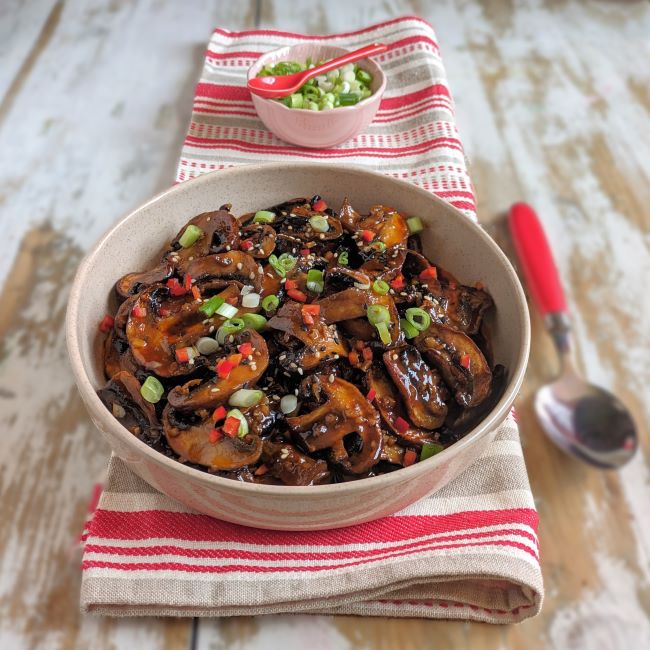
5. Serve the mushrooms with sesame seeds, chopped chilli and spring onion. Great spooned over rice, pasta or noodles. I hope you enjoy this recipe as much as I do. I hope to see you again next month and thanks as always for stopping by 🙂
Warming, spicy and very, very tasty. Image: Kathryn Hawkins