Welcome to my blog all about the things I love to grow and cook. You'll find a collection of seasonal gluten-free, dairy-free and vegan-friendly recipe posts, as well as a round up of my gardening throughout the year. I wish you good reading, happy cooking and perfect planting!
Tomato risotto and roast vegetables. Image: Kathryn Hawkins
Hello again. I hope the sun has been shining on you this month. It’s certainly been a warm, dry and bright month here in central Scotland. Subsequently I haven’t felt much like cooking and when I have, it’s been simple suppers like this no-fuss, no-pfaff risotto recipe.
Risotto topped with roast veg and rosemary. Image: Kathryn Hawkins
I love a good risotto but it’s not something to be hurried so I rarely make one when I’m busy. But now I have discovered this “cheats” version, it’s back on the menu. Once you’ve got the basic rice recipe, you can make whatever variations you like to the flavour or by adding extras. This version uses homemade tomato sauce and a little wine as the liquid but you can use all stock or half and half with wine if you prefer something plainer. A while ago I published a recipe for homemade tomato sauce. If you fancy having a go here’s the link to the post Home-grown tomatoes – recipe for fresh tomato sauce, a salsa, plus other serving suggestions (gluten-free, dairy-free, vegan) If you use a readymade sauce, make sure it’s not too concentrated otherwise the rice may taste quite tart rather than creamy.
My microwave oven has an output of 900 watts and has a turntable. You may need to adjust the cooking times if your oven has a different output.
Serves: 2
Ingredients
1tbsp olive oil
2 garlic cloves, peeled and finely chopped
150g arborio rice
100ml dry white wine or vegetable stock
Salt and freshly ground black pepper
600ml homemade tomato sauce
1tsp dried rosemary
1tsp caster sugar
Roast vegetables and fresh rosemary to serve
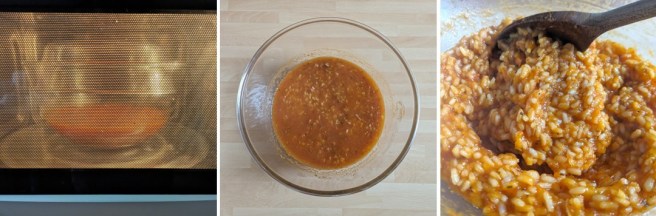
1. Put the oil and garlic in a large microwave-proof bowl. Cover and cook for 1 minute on High power.
2. Mix in the rice, wine or stock and seasoning and then stir in the tomato sauce, rosemary and sugar.
3. Cover and cook on High for 16 minutes. Stir after 6 minutes and then again after 10 minutes of the cooking time. If the rice is still a bit gritty at the end of the cooking time, add a small amount of water and cook for a further minute.
9 steps to making microwave tomato risotto. Images: Kathryn Hawkins
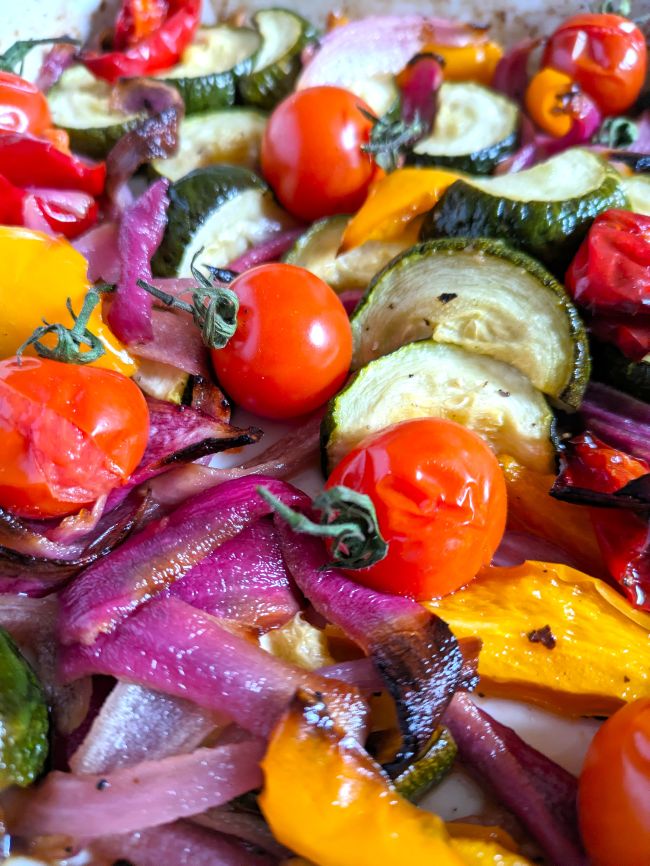
Taste and season before serving. Try topping with fresh rocket for a quick accompaniment or one of my favourite ways to serve this risotto is with a pile of roasted onion, courgette, peppers, tomatoes and fresh rosemary on top.
The rainbow colours of roast veggies. Image: Kathryn Hawkins
Happy May everyone! What a glorious start to the new month here in the UK with the continuation of fine weather and subsequent earlier blooming of many of my favourite garden flowers. I couldn’t resist sharing a few images of the garden as it springs into life in a riot of colours. Apple blossom is one of the prettiest of the fruit blossoms, and it looks like the old Lord Derby apple tree is going to put in another good show this year.
It’s the time in the gardening calendar when everything seems to take off at once, and everywhere has something colourful to show. The later flowering rhododendrons and the wonderfully bold and brash Azaleas, jammed packed with petals as usual, are putting on a great display at the moment.
May soft pink Rhododendron. Images: Kathryn Hawkins
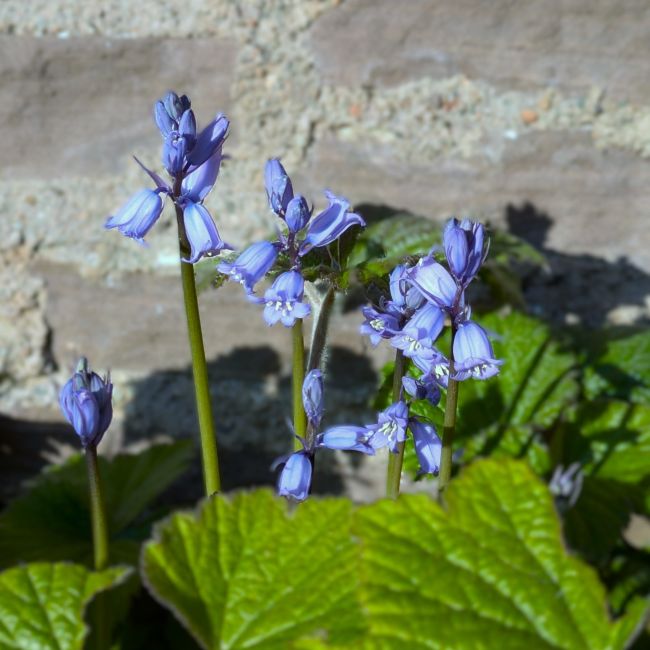
May is all about bluebells and they have been popping up all over the garden since Easter, alongside other cooler coloured flowers like the forget-me-nots, mountain cornflower and the first of the lavenders.
May blues. Images: Kathryn Hawkins
Tufted lavender and mountain cornflower. Images: Kathryn Hawkins
There are still a few reminders of the first spring flowers dotted around like this magnificent white daffodil and the very fragrant Narcissi. The Welsh poppies have put in an early appearance. Usually just one or two would be in flower by now, but this year, they are flowering all round the garden already.
White daffodil and Narcissi. Images: Kathryn Hawkins.
May poppies. Images: Kathryn Hawkins
To round off my post, I have captured the two varieties of Aquilegia that opened up as I started putting this post together. Such delicate and intricate layers of petals, like frilly dresses, the flowers last for a fair length of time and make me feel that Summer isn’t too far away.
Pretty in pink: the first of the Aqualigeas. Images: Kathryn Hawkins
I hope you have enjoyed my flowery photos. I’ll be back in the kitchen for my next post. Until then, happy gardening and enjoy the late Spring colours 🙂
Hello again. Easter is finally upon us. It feels like it’s been a long wait this year. We have had a long spell of warm, dry and sunny weather here in the UK which has brought with it a glorious Spring, full of flowers and blossoms. The daffodils are going over now but they have put on a great show this year, but it is the primroses that have really stolen the show. The dry weather has meant that there have been fewer beasties around to dine out on their delicious petals.
Daffodil assortment. Image: Kathryn Hawkins
April primroses. Image: Kathryn Hawkins
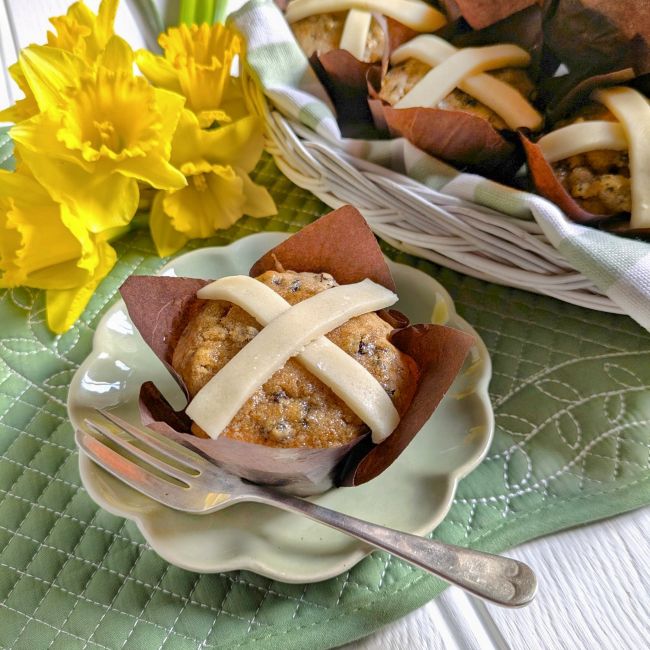
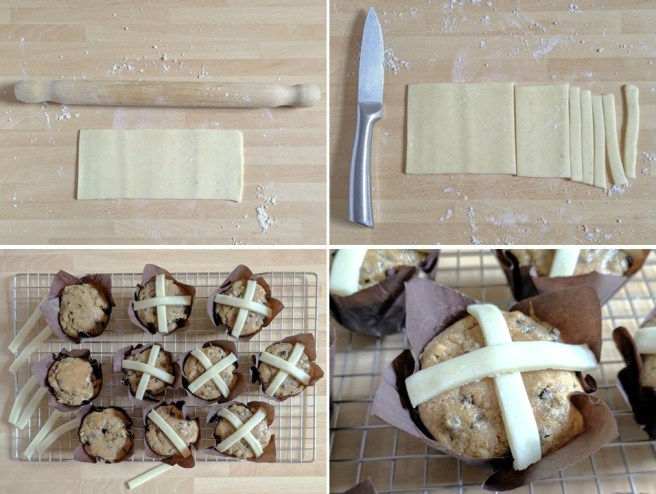
To celebrate the season, I have been baking. A twist on the yeasted fruit and spice buns which are traditional at this time of year, these muffins are easy to make and delicious served warm or cold. They freeze fine as well. I use a gluten-free bread flour which has xanthan gum added to it. Use a plain version if you prefer for a softer and more crumbly muffin.
Freshly baked and ready to serve. Image: Kathryn Hawkins
Easter on a plate. Image: Kathryn Hawkins
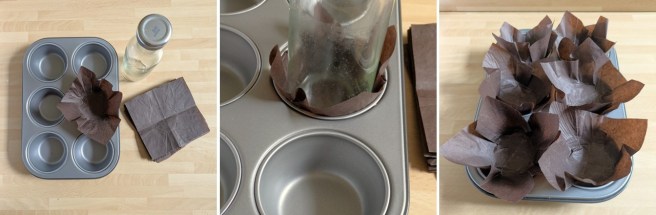
I made my own cases. If you fancy having a go yourself, you will need 10 x 12-13cm squares baking paper and a bottle or jar that fits snuggly into a muffin tin. Line up the paper square over the muffin tin and push it in place using the end of the bottle. You may have to pleat and model the paper a little to make it fit the tin more neatly, but the weight of the cake mixture will hold it in place.
Homemade muffin cases. Images: Kathryn Hawkins
Makes 10:
Ingredients
1tbsp ground linseeds (flaxseeds)
225g gluten free bread flour
2tsp gluten free baking powder
1tso ground mixed spice
115g light soft brown sugar
175g currants or other chopped dried fruit
50g plant-based butter, melted
175ml plant-based milk (I used oat milk)
2tbsp carob or maple syrup
100g natural marzipan
1. Preheat the oven to 190°C, 170°C fan oven, Gas 5. Line 10 muffin tins with paper cases. Mix the linseeds with 3tbsp cold water and leave for 5 minutes to thicken slightly.
2. Sift the flour, baking powder and spice into a bowl and stir in the brown sugar and currants. Make a well in the centre.
3. Pour in the melted butter, milk and linseed mixture, then mix everything together to make a thick batter.
4. Divide between the cases, smooth the tops and bake for 30-35 minutes until risen and lightly golden. Transfer to a cooling rack and brush the tops with the syrup. Leave to cool for 15 minutes.
Easter muffin making. Images: Kathryn Hawkins
5. Meanwhile, lightly dust the work top with icing sugar and roll out the marzipan to a rectangle approx. 7 x 20xm. Cut into 20 thin strips.
6. Arrange the strips on top of each warm bun to form crosses. Serve the buns warm or leave to cool completely if preferred. Best eaten within 2 days of baking. Store in an airtight container or freeze when cold.
Marzipan crosses. Images: Kathryn Hawkins
Too good to resist. Image: Kathryn Hawkins
Whatever you are doing this coming Easter weekend, I hope you have a lovely time. Until next month, I’ll leave you with this image of the first bluebells to open up in the garden. The sunshine has encouraged them to flower a few days earlier than usual. Happy Easter everyone 🙂
Hello there. At last it feels like the season has changed to my favourite time of the year. Lots of new buds and blooms poking up out of the barren soil offering some glimpses of what is to come over the next few weeks. The Tête à Tête and crocus are amongst the first spring flowers to show once the snowdrops start to fade. I love the colour clash in the borders and beds.
Gloriously gold in the March sunshine. Image: Kathryn Hawkins
A riot of purple. Images: Kathryn Hawkins
My greatest joy this spring so far is this Mimosa plant which is standing proud in my unheated greenhouse. I bought it as a potted plant last February, and kept it wrapped up in fleece throughout the winter. Now it is covered with the most delightfully fluffy little flowers.
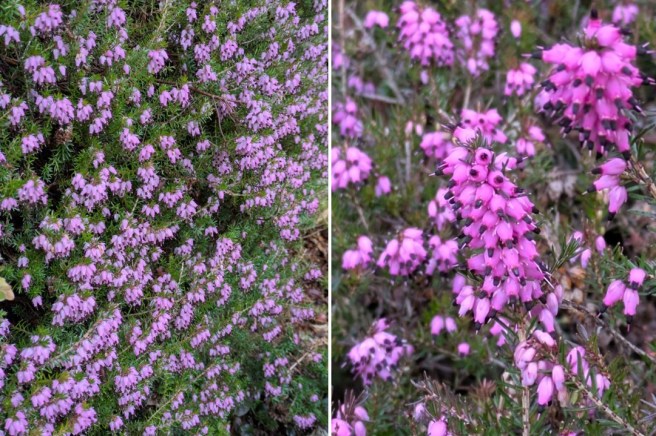
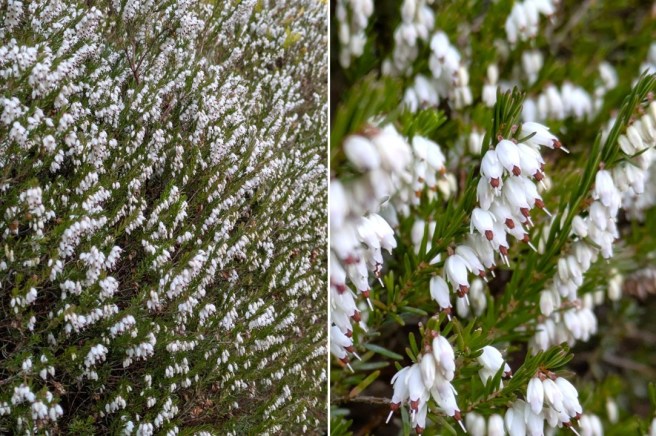
Elsewhere in the garden, the spring heathers are in full bloom. Today I saw my first bee of the year buzzing around the white one; a good sign of things to come.
Spring heathers. Images: Kathryn Hawkins
The Hellebores are much more advanced now, heads beginning to straighten. A welcome splash of colour in the shadier corners of the garden.
In the spring sun and shade, garden Hellebores. Images: Kathryn Hawkins
There have been some clear skies this weekend, and today I managed to capture my favourite shot of the white Pieris against the blue background. The Erythroniumn (Dog tooth violet) also opened out today in the warmth of the sun.
White Pieris and Erythronium in the early spring sunshine. Images: Kathryn Hawkins
Regular as clockwork, the Chionodoxa start putting their vibrant blue heads up above the soil and gravel at this time of year.
The first Chionodoxa of 2025. Images: Kathryn Hawkins
The first Rhododendrons have been coming out in flower since the middle of last month. This pink one in the back garden is at it’s peak right now. The flowerheads remind me of candy floss.
A perfect pair of blooms. Image: Kathryn Hawkins
I’m going to finish my garden round up with one last image of my Mimosa plant which I captured today in the sunshine. The flowers looked exceptionally vibrant and the scent is honey-sweet and earthy. Delicious 🙂
Yellow pom poms of sunshine. Image: Kathryn Hawkins
Until next time, enjoy the spring flowers. I hope to see you again in a few weeks. Thanks for stopping by!
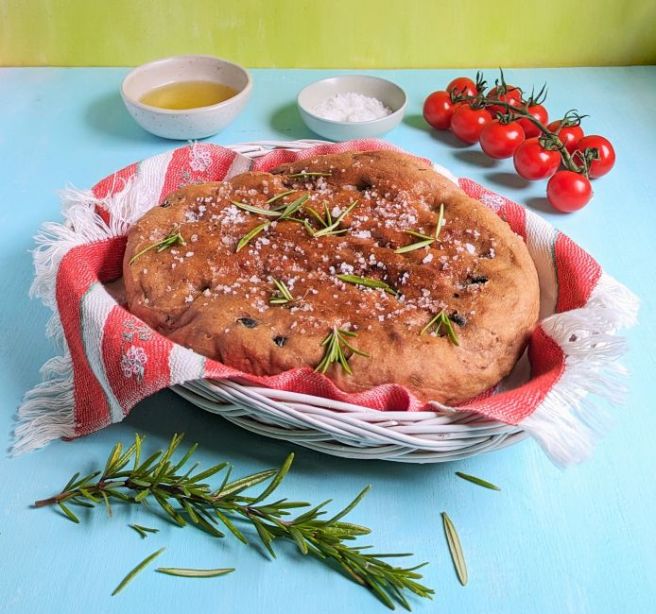
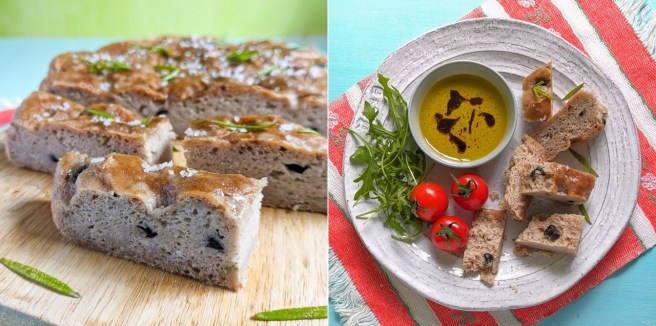
Slow cooker focaccia with olives and rosemary, best served warm. Image: Kathryn Hawkins
Hello there. Welcome to my latest recipe post. So far this month, it’s been the weather for staying indoors here in central Scotland. I’ve been using my slow cooker a lot and eating lots of comforting food in an endeavour to stay warm – well that’s my excuse anyway 🙂
Ripped and ready to eat. Image: Kathryn Hawkins
This week has been Real Bread week here in the UK so I thought I’d join the party and make my latest recipe post a bready one. If you’ve been reading my blog for a few months, you’ll know that I had a book on breadmaking published back in November – here’s the link to the post My new book: Complete starter guide to making bread, published by IMM Lifestyle Books 2024. When researching my recipes, I had been experimenting on cooking bread in the slow cooker and created a simple traditional loaf for inclusion. Sadly, I ran out of pages to feature this gluten-free and vegan slow-cooked loaf, so I’m giving it an airing here instead.
If you’ve never made bread before and are a bit daunted at the prospect, this is a very straightforward loaf to make. As with all gluten-free bread doughs, there is no kneading just a bit of mixing. You can omit the garlic, olives and rosemary to make a plain version if you prefer. I added psyllium husk for some extra texture. This gives the dough a slightly beige tone but adds some chewiness to the crumb. You may want to try making it without for a whiter dough but the texture will be more crumbly.
Rosemary and olive flavoured slow cooker focaccia. Image: Kathryn Hawkins
My slow cooker has a capacity of 5l and the dish is oval shaped – approx. 22 x 18cm. The temperature reached when on the High setting is 120°C. You may need to adapt the quantity of dough to fit your own slow cooker and adjust the cooking time if necessary. Other than that, all the information you need is below. Happy “slow” baking!
Makes: 1 approx. 22 x 18cm oval loaf
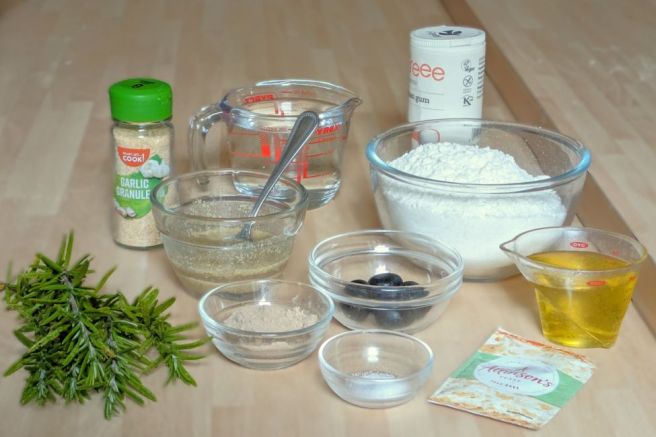
Ingredients
1tbsp ground linseeds
300g gluten free plain flour
7g sachet easy blend dried yeast
2tsp xanthan gum
15g gluten free psyllium husk powder
½tsp salt
2tsp finely chopped rosemary leaves
½tsp garlic granules
25g pitted black olives, chopped
80ml good quality olive oil
Sea salt flakes for sprinkling
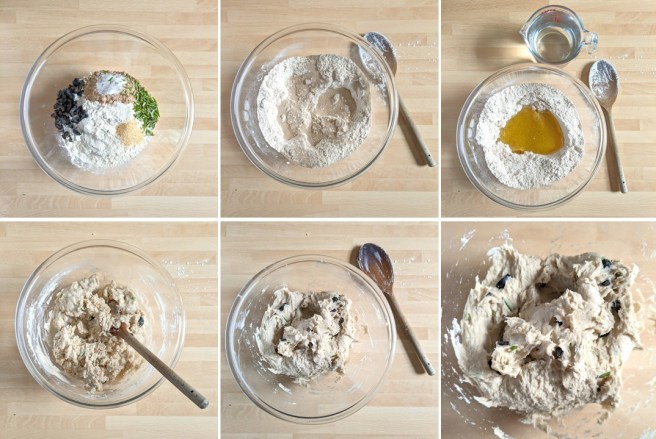
1. Mix the linseeds with 3tbsp cold water and leave for a few minutes to thicken and make a vegan egg.
2. Put the flour in a bowl and mix in the yeast thoroughly, then add the xanthan gum, husk powder, salt, rosemary, garlic and olives and mix well.
3. Make a well in the centre and add 60ml olive oil and the vegan egg. Begin mixing and pouring in 300ml warm water. Continue mixing until you have a thick, sticky batter. Cover the bowl and leave to stand for 10 minutes. In this time the batter will become thicker and less sticky. Give it a thorough mix through.
Making focaccia dough. Images: Kathryn Hawkins
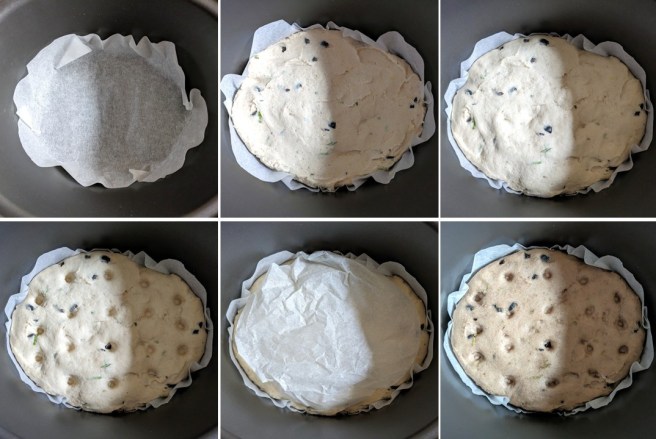
4. Line the base of your slow cooker dish so that the parchment paper comes a little way up the sides of the dish.
5.Scoop the dough on top and press and smooth to fit the dish. Cover with the lid and set the cooker to the Warm setting. Leave to prove for 1½hours until puffed up and spongey in texture. If your cooker doesn’t have a Warm setting, simply cover with the lid and place the whole dish in a cool to warm place to rise.
6. Once the dough is risen, push the end of a wooden spoon into the dough all over to give a dimpled effect. Lay a scrunched up piece of baking parchment loosely on top (this helps prevent the dough getting wet from any water droplets that form inside the lid) and set the cooker to High. Leave to cook for 3 hours until firm on top and crusty round the edge. It can be quit challenging to know when the bread is completely cooked so if in doubt err on the side of caution and cook for a bit longer to avoid a dense texture above the bottom crust. As a rule, the base of the loaf should sound hollow when tapped.
7. Transfer the loaf to a wire rack and discard the lining paper. Brush with remaining olive oil and sprinkle with sea salt. Leave to cool for a few minutes then serve warm. If you prefer a browner top, remove the bread from the slow cooker and place on the grill rack. Cook under a preheated medium/hot grill for 1-2 minutes to brown the top then oil, salt and cool as above.
Warm sliced focaccia, ready to serve. Images: Kathryn Hawkins
This bread is best served warm. If you want to freeze the loaf, omit the salt from the top, and wrap well. Once defrosted, simply reheat the loaf in a medium oven for a few minutes, and sprinkle with salt before serving.
Thanks for reading my post. I hope to see you again next month 🙂
Fiery sunrise over icy hills. Image: Kathryn Hawkins
A very belated happy new year to you. This month has flown by. All the festivities of a few weeks ago seem like a long time away already.
It’s a quiet time out of doors in terms of gardening. The weather has been quite kind so far. Little snow and rain, some stormy winds, and some very cold nights, but nothing extraordinary. The days are slowly drawing out again and there have been some beautiful sunrises.
End of the night, beginning of the day. Image: Kathryn Hawkins
Sun up on a chilly day. Image: Kathryn Hawkins
Whilst there have been lots of lovely starts to the day, I haven’t seen much happening in the skies at the other end of the day, apart from this sunset which is punctuated with puffs of white cloud which look like plumes of steam.
Early new year sunset. Image: Kathryn Hawkins
There have been many postings on social media of the Northern Lights here in central Scotland. It usually means getting up in the middle of the night to look, and to be honest, when it’s so cold, I am not motivated enough to do it. However, earlier in the month, there was an alert that the lights were visible at a much more sociable time. So I ventured outside in the back garden on a wonderfully clear, crisp night and saw…….absolutely nothing! However, pointing my camera at various points in the sky, the lens picked up this faint purple glow in the north-east sky. To the eye, the sky was almost black except for the stars.
Purple night sky. Image: Kathryn Hawkins
To finish this short post, there are a few flowery delights in the garden at the moment. I just hope the Periwinkle, Rhododendrons and snowdrop survive any cold weather that’s heading out way in the next few weeks.
Early bloomers. Images: Kathryn Hawkins
Have a good rest of the month and I’ll be back posting some time in February. Thanks for stopping by 🙂
Hello again. It’s my last recipe post of the year. How 2024 has flown by. It’s been a busy one for me, and I’ll admit to not feeling 100% festive as I sit down to write this post as there is always so much to do at this time. If you’re feeling the same, perhaps this simple, tasty recipe will help get you in the right frame of mind.
Festive chestnut rolls. Images: Kathryn Hawkins
These rolls make the perfect snack or party food. Easy to make from a combination of sage and onion stuffing mix, chopped chestnuts and chutney. You can vary the flavour by using your favourite chutney, I use tomato but an onion one or more fruity one would work just as well as would cranberry sauce. Here’s what to do…
Makes:16
Ingredients
65g sage and onion stuffing mix
225g cooked peeled chestnuts
100g tomato or other flavour chutney plus extra to serve
1tsp onion or plain salt
280g vegan-friendly gluten-free puff pastry sheet
10g soya flour
Fresh sage to garnish
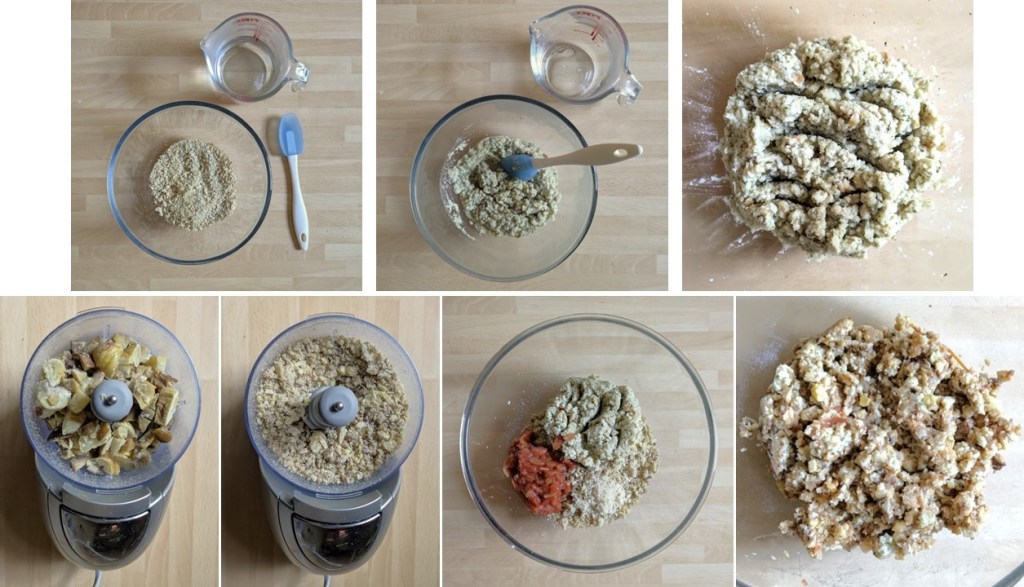
1. Put 50g stuffing mix in a heatproof bowl and mix in 90ml freshly boiled water. Mix well and leave to cool completely.
2. Finely chop the chestnuts in a food processor or by hand and mix into the cold stuffing mixture along with the chutney and salt to make a firm paste.
Making the filling. Images: Kathryn Hawkins
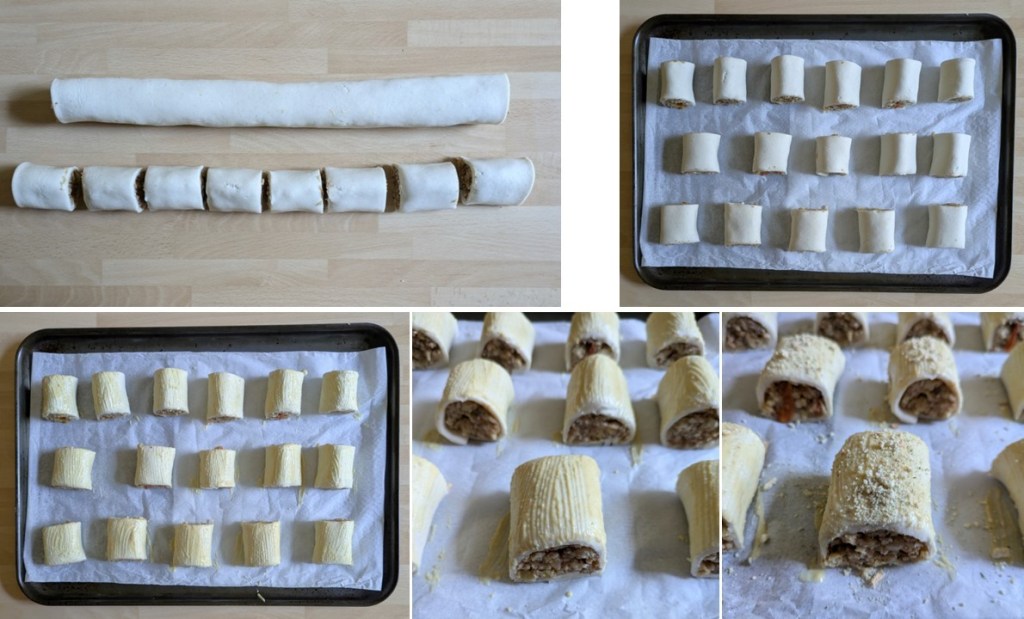
3. Unroll the pastry and use the lining paper to line a large baking tray. Cut the pastry lengthways and divide the stuffing mix between the 2 pastry strips, shaping the stuffing into a long sausage shape down the middle of each.
Forming the chestnut rolls. Images: Kathryn Hawkins
4. Mix the soy flour with 5tsp water to make a glazing paste and brush a little down one side of each pastry strip. Roll the pastry over the filling and press down gently, then roll each pastry back and forth on the work top to neaten and seal.
Shaping the rolls. Images: Kathryn Hawkins
5. Cut each roll into 8 equal portions and arrange spaced apart on the lined baking tray. Brush the tops and sides with the soy paste and sprinkle with the remaining dry stuffing mix. Chill until ready to bake.
Ready for baking. Images: Kathryn Hawkins
6. To cook, preheat the oven to 200°C, 180°C fan, gas mark 6. Bake the rolls for about 20 minutes until golden and crisp. Transfer to a wire rack to cool. Best served slightly warm with extra chutney, garnished with sage.
Fresh chestnut rolls just out of the oven. Image: Kathryn Hawkins
That’s a wrap from me for this year. I hope you all have a good festive season and wish you a happy and healthy time. Until next year, Merry Christmas 🙂
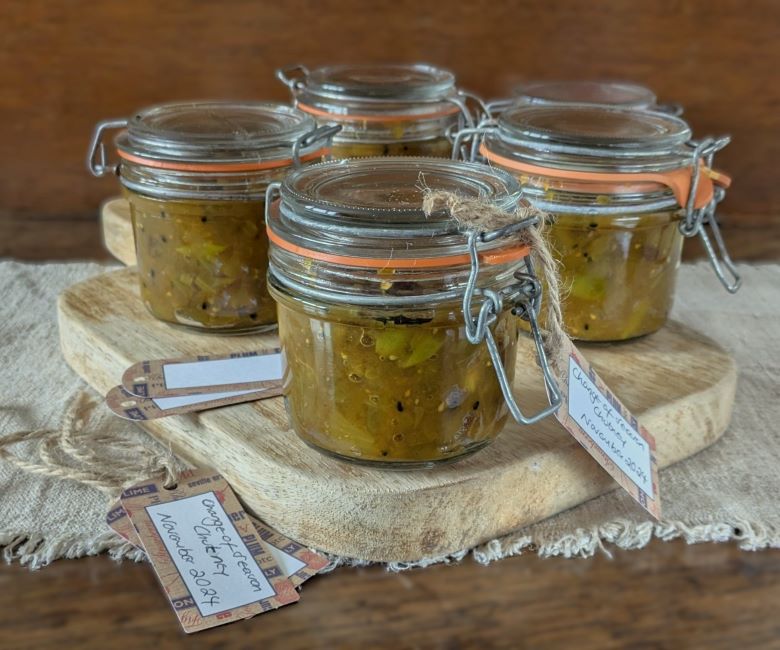
Last of the Autumn produce preserved. Image: Kathryn Hawkins
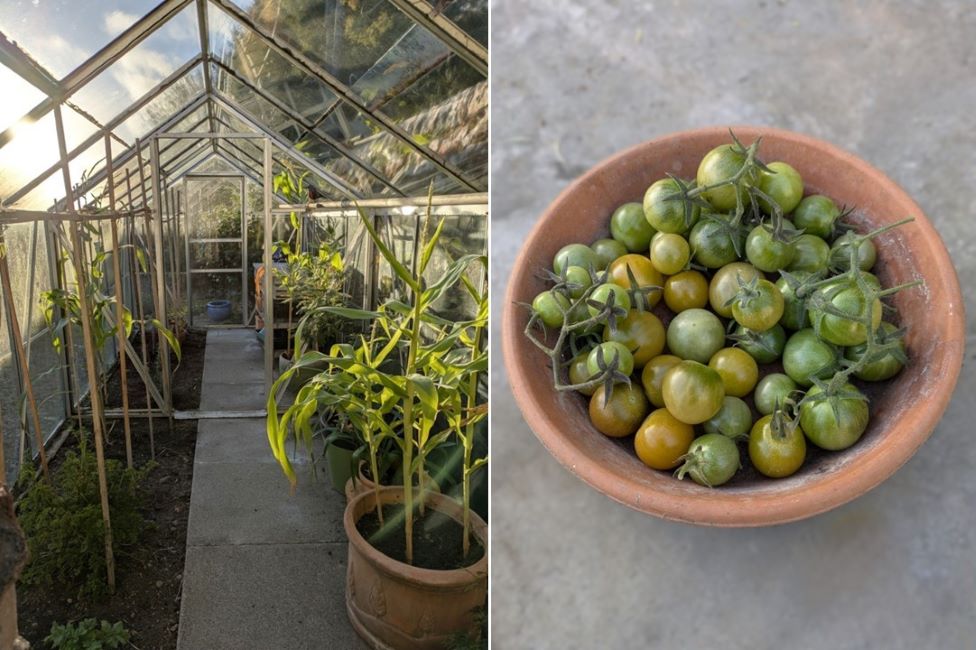
Hello there. When I planned to make this chutney a couple of weeks ago, it was very much still Autumn. I picked off the last of the tomatoes and put the greenhouse to bed during a lovely sunny afternoon. I was going to call the chutney “End of Autumn”.
Last of the greenhouse tomatoes, mid-November 2024. Images: Kathryn Hawkins
However, when I came to make the chutney last weekend, snow was falling very heavily and suddenly we were in winter. And so I thought “Change of Season” chutney would be more appropriate 🙂
November snowy garden. Image: Kathryn Hawkins
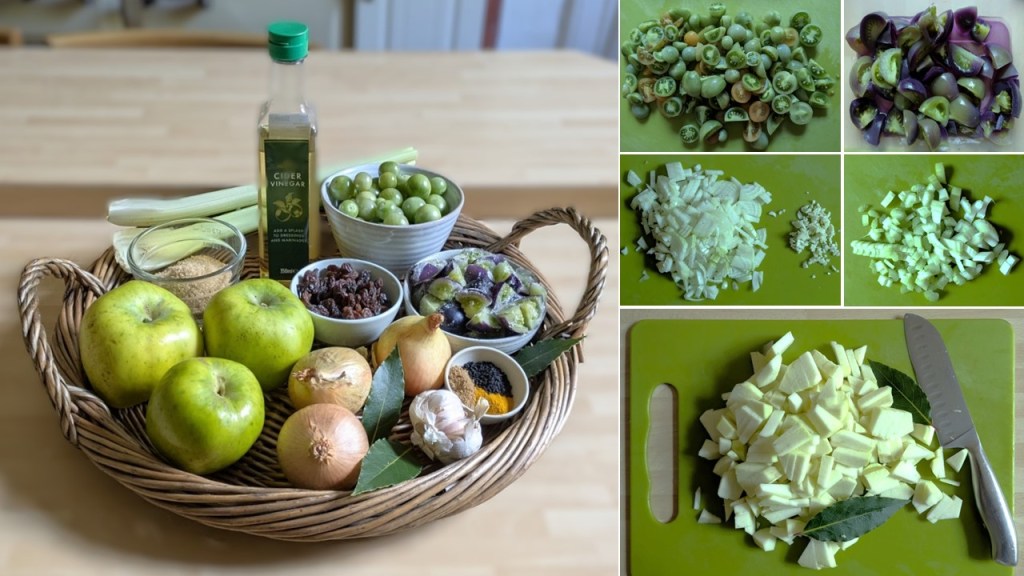
I made the chutney in my slow cooker. It is ready to eat as soon as it cools and tastes delicious. I used up the last of this year’s apple harvest along with some black-skinned tomatoes that I had frozen down a few weeks ago. The spices I used give a mild curry flavour but you can change them if you prefer – cinnamon, cumin and coriander for a more earthy flavour would work well.
If you haven’t made a preserve in your slow cooker before, the technique is slightly different in that you can’t boil the preserve down like you would in a saucepan on the stove. The chutney is also cooled before putting in jars, and as such needs to be kept in the fridge. It will however keep for a few weeks or can be frozen for longer term storage.
Makes: approx. 1kg
Ingredients
400g green tomatoes, chopped
2 medium onions, peeled and chopped (about 180g prepared weight)
2 garlic cloves, peeled and chopped
2 sticks celery, trimmed and chopped (about 110g prepared weight)
2 large cooking apples, peeled and chopped (about 300g prepared weight)
2 bay leaves
100ml cider vinegar
75g sultanas or chopped dried apricots
2tsp garam masala
1tsp each nigella seeds, turmeric and salt
150g demerara or light brown sugar (or you can use granulated white sugar)
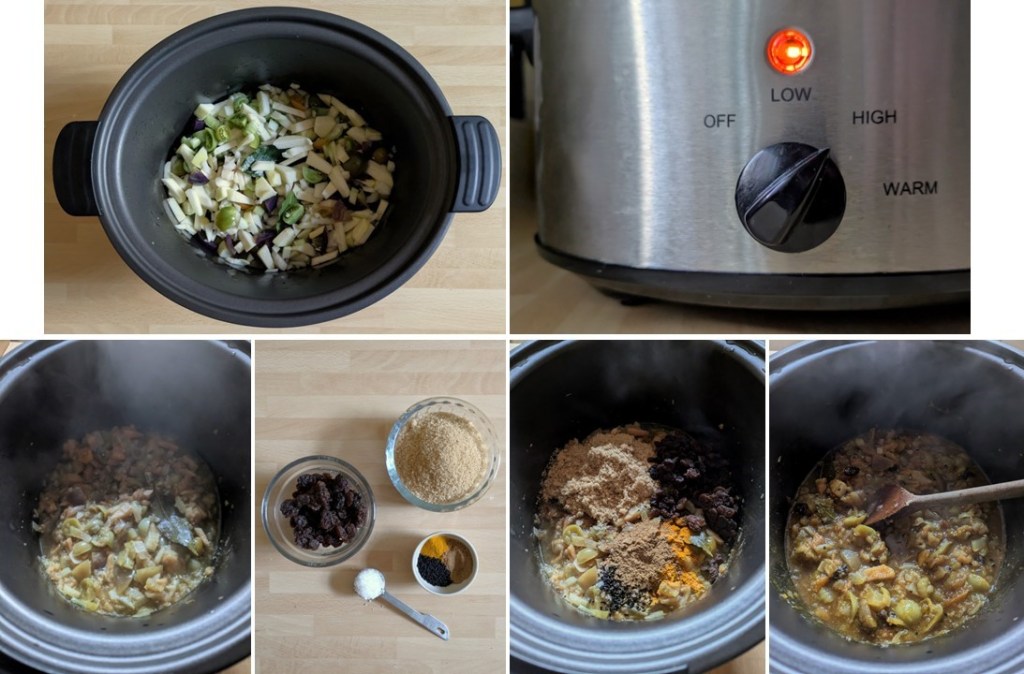
1. Put all the vegetables in the slow cooker with the bay leaves and mix well. Pour over the vinegar, cover with the lid and cook on High for 4 hours.
2. Add the remaining ingredients, mix well, re-cover and cook for 30 minutes to dissolve the sugar.
Slow cooking and seasoning chutney. Images: Kathryn Hawkins
3. Remove the lid, stir well and cook uncovered for a further 2 hours, stirring occasionally until reduced down and jam-like.
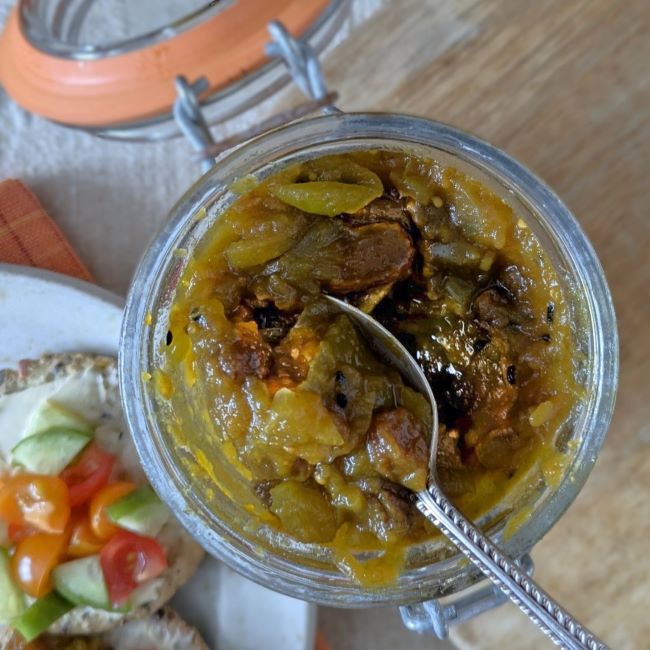
4. Switch off the cooker and leave the chutney to cool completely. Discard the bay leaves and spoon into clean jars. Seal, label and store in the fridge for up to 3 months. Once opened, use within a month. Alternatively, freeze the chutney in containers and defrost when required.
Reducing the chutney down ready for storing. Images: Kathryn Hawkins
A sweet and spicy spoonful. Image: Kathryn Hawkins
That’s me for another month. I have one more post before Christmas, so until then take care and keep warm 🙂
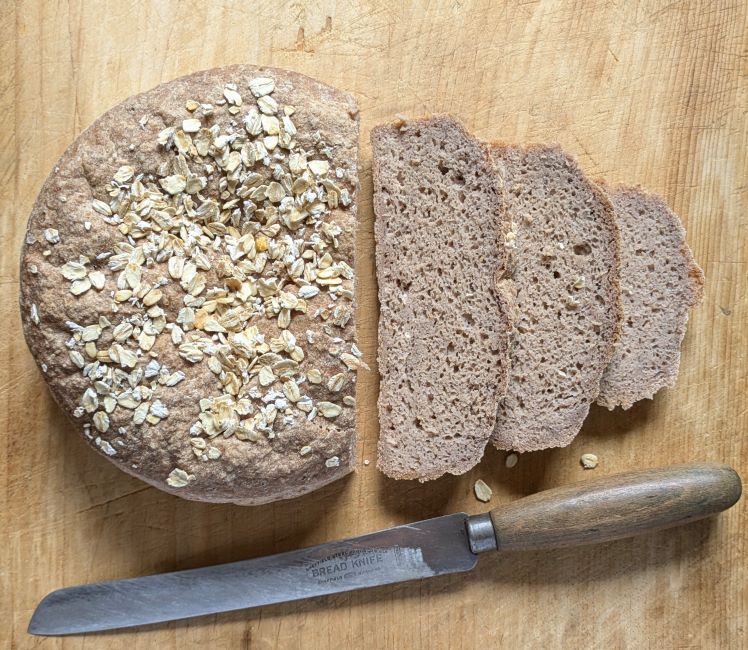
Hello again. Following the launch of my book earlier in the month (see my previous post), I am delighted to share with you one of the gluten-free recipes from the book. As with all gluten-free bread making, there is no kneading, just a bit of mixing and then letting the yeast do its work in the dough.
I did all the food styling for my book and was up to my eyes in various mixes for several weeks. Below is how the oaty loaf was photographed for the book. The mixture was made with eggs, but for this post I am using flax egg.
It’s a very straightforward recipe, using some oat flour and psyllium husk to add a bit more of a chewy texture, and I add xanthan gum to hold the crumb together. I hope you enjoy it 🙂
Makes 1 x approx.850g, 18cm round loaf
Ingredient
2tbsp ground flax seed
200g gluten-free plain flour
200g gluten-free oat flour
2tsp easy blend dried yeast
1½tsp xanthan gum
25g psyllium husk powder
2tsp caster sugar
1tsp salt
425ml lukewarm water
1tbsp gluten-free coarse ground or jumbo oats
1. Grease and line an 18cm diameter, 7.5cm deep, round cake tin. Mix the flax seed with 6tbsp cold water and leave to stand for a few minutes to thicken.
2. Mix the flours in a large mixing bowl and stir in the yeast until well combined. Stir in the xanthan gum, psyllium husk, sugar and salt and make a well in the centre. Add the flax egg and half the water, and mix well with a spatula or wooden spoon until well blended.
Flax egg and adding it to the dough. Images: Kathryn Hawkins
3. Continue mix in sufficient of the remaining water until the mixture is soft and sticky. Leave to rest for 10 minutes, then mix again. In this time, the mixture will become slightly less sticky as the water is absorbed.
4. Transfer to the prepared tin. Smooth the top, cover with a reusable cover or large bowl and leave to rise at a coolish room temperature, away from drafts, for about 2 hours until risen to the top of the tin.
Making the dough. Images: Kathryn Hawkins
5. Meanwhile, preheat the oven to 200°C, 180°C fan oven, gas 6. Uncover the dough and sprinkle over the oats. Bake in the centre of the oven for about 1 hour 10 minutes. It can be quite challenging to know when the loaf is cooked through, so if in doubt, err on the side of caution and cook for a further 10 minutes. The usual rule is that the loaf will sound hollow when tapped underneath. Turn on to a wire rack to cool.
Proving and baking the loaf. Images: Kathryn Hawkins
The loaf is best eaten within 3 days of baking. It freezes well. I usually slice the loaf before freezing so I can defrost exactly what I need.
Sliced and ready for freezing. Image: Kathryn Hawkins
The bread is tasty and delicious just as it comes, and if toasted the texture becomes spongier with a crisp bite, much like a toasted crumpet.
Jammy bread. Images: Kathryn Hawkins
For more bread recipes, my book is available from main online retailers. It is published by IMM Lifestyle Publishers.
I hope you have a good few days until my next post. Thanks for stopping by.
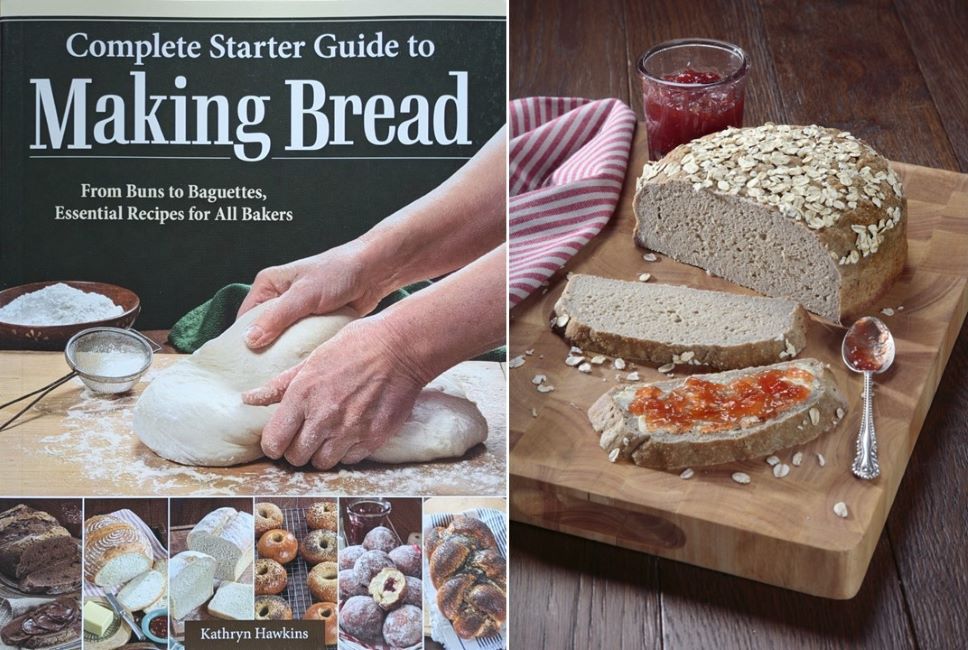
Complete starter guide to making bread by Kathryn Hawkins
Hello there. I hope you are keeping well. I’m delighted to share some news from my work life with you this month. I have a new book just published 🙂
This time last year I was very busy writing and recipe testing recipes for the book and then at the beginning of the year, I made up all the breads for the photographs. It certainly kept me busy for a while, and now it is all published and available to buy. Here’s a little bit about the book, and soon I’ll share one of the gluten-free and vegan recipes with you in my next post.
“Making your own bread is a rewarding experience and is easier than you might think. You can make a loaf with just 3 everyday ingredients and a few basic pieces of kitchen equipment. Once you’ve mastered a few simple techniques, you’ll be well on the way to creating something that is eaten all over the world, every day of the year.
Whether you’re an absolute beginner or an established baker, this book contains everything you need to know to help create a variety of breads, from a simple white loaf to an indulgent buttery brioche. You’ll find recipes for yeasted and non-yeasted breads, sour doughs and breads made with gluten-free ingredients, as well as breads you can cook in the air fryer, slow cooker and steamer. All recipes are vegan or can be adapted to make vegan friendly.
There’s a chapter on the history of bread making; information on all the ingredients you can use to make the perfect loaf; a little bit of science, and lots of tips and techniques for making kneading, proving and shaping the perfect dough, and should something go wrong, there is a useful troubleshooting guide. The book is illustrated with colour photographs throughout to provide extra help and the inspiration you need to start making bread. Happy Baking!”
Complete starter guide to making bread by Kathryn Hawkins, published by IMM Lifestyle Books 2024 is available to buy from major online retailers Food photography by Stuart MacGregor