Vanilla bean torte (gluten-free; dairy-free; vegan)


Vanilla_bean_torta
Vanilla bean torte. Image: Kathryn Hawkins

I’m always on the look-out for interesting bakes. I have a large folder of recipe articles saved from magazines and newspapers going back many years, along with various scraps of note paper, tucked in between, containing my culinary jottings from articles that have taken my fancy. Every now and then I go through the folder and decide which idea to experiment with next.

And so to this week’s post. A cake that came to my attention a few months ago when I was experimenting in the kitchen and making vegan meringue from the canning water in a tin of beans. This recipe uses the beans as well as the canning liquid. Sounds weird, but eating is believing, and I was pleasantly surprised by the texture and how good it tasted.

A_slice_of_vanilla_bean_torta
Vanilla bean torte, sliced and ready for eating. Image: Kathryn Hawkins
Canned_and_drained_cannellini_beans
Canned cannellini beans for cake-making. Image: Kathryn Hawkins

Apart from the beans, the other ingredients are mainstream. The flavour can be varied depending on your preference. I used a generous amount of vanilla paste, but fresh orange and lemon rind would work well, as would almond extract if you like a marzipan flavour. I think the mixture could take about 15g cocoa powder added to it for a chocolate version. My cake is soaked in a vanilla flavoured syrup but the syrup can be adapted to suit your chosen cake flavour. There is no added fat or oil in the recipe which makes the syrup an important addition as it not only adds extra sweetness and flavour, but it helps keep the cake moist too. I hope you enjoy it 🙂

Serves: 8-10

Ingredients

  • 400g can cannellini beans in water
  • 50g polenta
  • 75g silken tofu
  • 215g caster sugar
  • 55g ground almonds
  • 1 tbsp vanilla bean paste
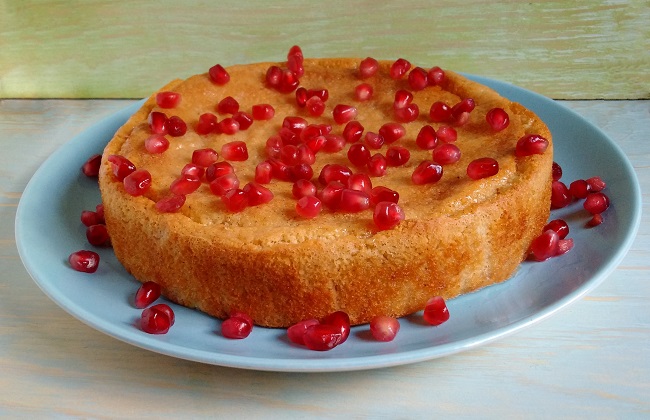
  • Pomegranate seeds to decorate
  1. Preheat the oven to 180°C (160°C fan oven, gas mark 4). Grease and line an 18cm diameter cake tin. Open the can of beans and drain well, reserving the canning liquid. Put the beans in a blender or food processor. Add the polenta and blitz for several seconds until well ground. Leave to one side.
  2. Whisk the tofu with 115g sugar until well blended and creamy. Add the ground almonds, half the vanilla paste and the ground bean mixture and stir to form a thick cake batter.
  3. In another bowl, whisk the bean canning liquid until stiff and foamy, then gently fold this into the cake batter. Transfer to the prepared tin, smooth the top and bake for about 1 to 1 ¼ hours, until golden and firm to the touch.

    Step_by_step_pictures_to_make_a_bean_torta
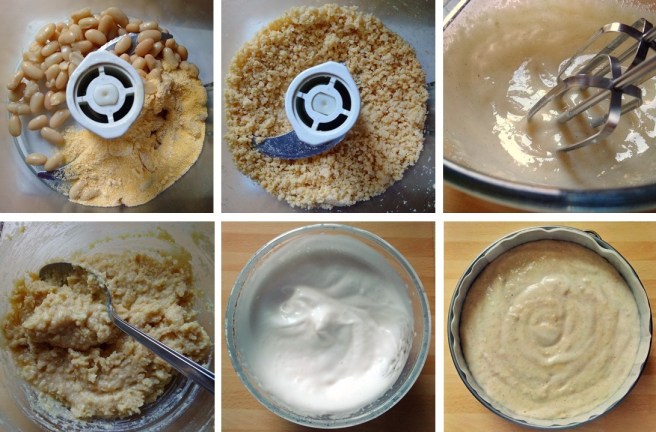
    Making bean torte. Images: Kathryn Hawkins
  4. While the cake is in the oven, prepare the syrup. Put the remaining sugar in a small saucepan and add 150ml water. Heat, stirring, until the sugar dissolves then bring to the boil and simmer for 8-10 minutes, until reduced and syrupy. Remove from the heat and stir in the remaining vanilla paste. Keep warm.
  5. Once the cake is cooked, skewer the top all over and slowly pour over the vanilla syrup so that it soaks into the cake evenly. Leave to cool completely in the tin.

    3_steps_to_making_and_adding_vanilla_syrup
    Making and adding vanilla syrup. Images: Kathryn Hawkins
  6. To serve, carefully remove the cake from the tin and place on a serving plate. Sprinkle with pomegranate seeds just before slicing. The cake will keep, covered, in a cool place or the fridge, for 3 to 4 days.
    Overhead_image_of_vanilla_bean_torta_sprinkled_with_pomegranate_seeds
    Decorating the torte with pomegranate seeds. Image: Kathryn Hawkins

    A_single_serving_of_vanilla_bean_torta
    Vanilla bean torte, deliciously moist and full of flavour. Image: Kathryn Hawkins


New year, new cake – Coffee and pecan loaf (gluten-free; dairy-free; vegan option)

G;uten-free_dairy-free_ coffee_and_pecan_loaf_cake
Coffee and pecan loaf cake. Image: Kathryn Hawkins

I had planned that my first recipe post of the year would be a recipe bursting with nutrition and vitality – new year, fresh start, etc. However, it’s been so cold these past few days, when it came to it, I simply couldn’t face anything too healthy. Instead, I’ve been in the kitchen keeping warm by baking, and thus, my first recipe of 2018 is one of my favourite cakes.

Heavy_garden_frost_in_Scotland_in_early_January
Sun-up on a frosty January morning. Image: Kathryn Hawkins

I took this shot of the garden from an open window about 9am yesterday morning, just as the sun was rising. The image below is the window adjacent to the one I opened – the beautiful ice pattern is on the inside!

Ice_on_the_inside_of_the_window
Window pane iced-up on the inside. Image: Kathryn Hawkins

So, in my books, cold weather is enough justification for cake, and I start my new year blog posts with one of my “desert island” cakes: a coffee one.

I’ve been using a heritage brand of coffee and chicory essence as a coffee flavouring in baking for as long as I can remember. It was our “turn to” flavouring long before decent barista-style instant coffee and espresso shots came to British shores. Sadly, the glass bottle packaging of old has been replaced by a plastic version (making it look less authentic), but the old-fashioned label is practically unchanged in design and the product within tastes just as good as always. I haven’t found anything that comes close to the concentrated flavour it offers in baking. In summer, I use it to make a base for a deliciously smooth and well-rounded iced coffee, ice-creams and chilled custards.

Camp_coffee_essence_and_ground_pecan_nuts
My favourite coffee flavouring, and finely ground pecan nuts. Images: Kathryn Hawkins

The sweet, nutty flavour of pecans goes particularly well with coffee. You can use walnuts if you prefer, but I find them a bit overpowering if you really want the taste  of coffee to dominate your bake. For this recipe, grind up some of the pecans very finely to make a “flour” for a better formed cake crumb, and then add the remainder as finely chopped pieces for extra nutty texture. I add a little arrowroot to help bind the mixture but you can leave it out if you prefer. I hope you enjoy the flavours as much as I do 🙂

Serves: 10

Ingredients

  • 225g pecan halves
  • 125g gluten-free plain flour (such as Dove’s Farm)
  • 8g arrowroot
  • 2 level teaspoons gluten-free baking powder (such as Dr Oetker)
  • 175g light brown soft sugar
  • 3 large eggs (or, for a vegan cake, use 180g silken tofu)
  • 175ml sunflower oil
  • 4 tsp Camp coffee essence or similar
  • 50g Demerara sugar
  1. Preheat the oven to 180°C (160°C fan oven, gas 4). Grease and line a 1kg loaf tin. Put 125g pecans in a blender or food processor and blitz until very finely ground. Chop the remaining pecan nuts finely.
  2. Sift the flour and arrowroot into a bowl and stir in both lots of pecans along with the sugar. Beat the eggs (or tofu) with the oil until well blended, and then thoroughly mix into the dry ingredients.
  3. Transfer to the prepared tin. Smooth the top and put the tin on a baking tray. Scatter the top of the cake with the Demerara sugar. Bake for about 1 hour 10 minutes until risen, lightly cracked, and firm to the touch. A skewer inserted into the centre will come out clean when the cake is cooked. Leave to cool in the tin for 30 minutes, then turn on to a wire rack to cool completely. Wrap and store for 24 hours for better flavour and texture.
    Freshly_baked_coffee_and_pecan_loaf_cake
    Dense, moist textured coffee and pecan loaf cake. Image: Kathryn Hawkins
    Overhead_sliced_coffee_and_pecan_loaf_cake
    Coffee and pecan loaf cake, ready to serve. Image: Kathryn Hawkins


Sesame shortbreads (gluten-free; dairy-free; vegan)

Home-made_sesame_shortbreads
Sesame shortbreads. Image: Kathryn Hawkins

I’ve had a busy few days with my work, and subsequently only had time for one quick baking session this week. I turned to an old favourite of mine, shortbread. Easy to make and lovely to eat, and open to so many variations. This time, I had a break with tradition and made a super rich seeded version and replaced some of the fat with tahini.

I often replace a portion of the flour in cakes and bakes with ground almonds, and, if I don’t have enough ready-ground, I blitz up my own in a coffee grinder. If you use the non-blanched almonds, you’ll find the ground meal gives a more earthy to your bakes.

Dish_of_tahini_and_bowl_of_ground_almonds
Sesame seed paste and home-made ground almonds. Images: Kathryn Hawkins

These tasty shortbreads have a soft, crumbly texture, and a rich, nutty flavour; they are delicious with a cup of coffee and keep well for a few days in an airtight tin. I find them impossible to resist. I’m away to eat the last one after I finish typing this!

Makes: 18

Ingredients

  • 150g gluten-free plain flour (such as Dove’s Farm)
  • 65g icing sugar
  • 75g ground almonds
  • 25g toasted sesame seeds
  • 85g tahini (sesame seed paste)
  • 50g very soft dairy-free margarine (or butter if you eat it)
  • 1 tbsp. each of chia seeds, toasted sesame seeds and Demerara sugar, mixed, for the topping
  1. Sieve the flour and icing sugar into a bowl and stir in the ground almonds and toasted sesame seeds.
  2. Mix the tahini and margarine together until well blended, then stir into the dry ingredients until well mixed.
  3. Bring the ingredients together using your hands, then turn out on to a lightly floured work surface and knead gently to form a smooth dough. Divide into 18 portions and form each into a ball.
  4. Arrange on the baking tray, press down lightly to make chunky rounds and sprinkle lightly with the sugary seed mix. Chill for 30 minutes.

    Preparation_of_sesame_shortbread_biscuits
    Preparing sesame shortbreads. Image: Kathryn Hawkins
  5. Preheat the oven to 180°C (160°C fan oven), gas 4. Line a large baking tray with baking parchment. Bake the shortbreads for about 25 minutes until lightly brown and crisp. Leave to cool on the tray.

    Serving_of_home-made_sesame_shortbreads
    Ready for eating, sesame shortbreads. Image: Kathryn Hawkins


Mini sco-nuts (gluten-free; dairy-free; vegan)

Tray_of_warm_vanilla_sugar_sprinkled_sco-nuts
Vanilla sugar-dredged mini sco-nuts. Image: Kathryn Hawkins

The weather has turned colder this past week, and my thoughts have turned to comfort food. In my opinion, food doesn’t come much more comforting than a light, fluffy doughnut with a crunchy, sugary coating. Sadly, not usually a choice for anyone on a gluten-diet, but I think these little treats are a good alternative, and best of all, they can be made in a fraction of the time that it takes to make the real thing.

Close-up_of_a_mini_ring_sco-nut_coated_in_vanilla_sugar
Mini sco-nut, fresh out of the pan. Image: Kathryn Hawkins

As the name suggests, the recipe derives from a scone mix that is cut and fried like a doughnut. I coated mine in home-made vanilla sugar but plain sugar is just as good. Leave them plain and dip them in a little of your favourite jam or sweet dipping sauce. Sometimes, I drizzle them with a little vanilla or cocoa flavoured glacé icing and decorate with a few sprinkles.

Mini_sco-nuts_drizzled_with_icing_and_decorated_with_sprinkles
Drizzled and decorated, mini sco-nuts. Image: Kathryn Hawkins
Pot_of_home-made_vanilla_sugar
Home-made vanilla sugar. Image: Kathryn Hawkins

I always have a pot of vanilla sugar in the cupboard. I chop up bits of vanilla pod that is past its prime, or any part of the pod that has dried out, and just keep topping up the pot with caster sugar. Every now and then I give the pot a shake to distribute the vanilla pieces, and I keep the pot well sealed. You do need to sieve it when you use it, but keep the bits of pod trapped in the sieve and put them back in the pot along with a top up of sugar, and you can replenish your supply more or less indefinitely. Here’s the recipe.

Makes: 14 mini sco-nuts

Ingredients

  • 150g gluten-free self-raising flour (such as Dove’s Farm)
  • 5g gluten-free baking powder (such as Dr Oetker)
  • 2g xanthum gum, optional – I have started adding this to my scone mixture as it really does improve the crumb texture
  • 25g caster sugar
  • 2 tbsp sunflower oil + extra oil for deep-frying
  • 1 teasp good quality vanilla extract
  • Approx. 6 tbsp. soya or other non-dairy milk
  • Vanilla sugar or caster sugar to dredge
  1. Sieve the flour, baking powder and xanthum gum into a bowl and stir in the caster sugar. Make a well in the centre, and spoon in the oil and vanilla, then bind together with sufficient milk to form a softish scone dough.
  2. Pour the oil for deep-frying into a saucepan or wok and begin heating – the oil temperature needs to be around 180°C to fry the sco-nuts properly. While the oil is heating, turn the dough out on to a lightly floured surface and knead gently to bring the mixture together and make smooth, then roll or press to a thickness of 1cm.
  3. Cut out rounds using a plain 5cm cookie cutter, and press out the middles using a 2cm round cutter. Re-roll the trimmings nd middles to make 14 mini rings in total.
  4. Fry the sco-nuts in 2 batches, turning them gently in the oil, for 2-3 minutes, until golden and crisp all over. Drain well on kitchen paper and keep warm while cooking the second batch.
    Sco-nut_dough_shaping_and_after_frying
    Preparing and cooking mini sco-nuts. Images: Kathryn Hawkins

    Dredge in sugar if liked, or drizzle with icing. Best served while still warm. Sco-nuts do freeze well if you have any leftover; just bag them up, seal and freeze. You can reheat them gently in a moderate oven for about 5 minutes if you want to eat them warm.

    Warm_sco-nuts_being_dipped_in_vanilla_sugar
    Extra indulgence, dipping mini sco-nuts in vanilla sugar. Image: Kathryn Hawkins


Super-seed flapjack (gluten-free; dairy-free; vegan)

A_slice_of_freshly_baked_super-seed_flapjack
Straight out of the tray, super-seed flapjack. Image: Kathryn Hawkins

Over the past year or so, I have been trying to include as many different seeds in my diet as I am able. Seeds are crammed full of protein, minerals and fibre, and unusually for such a worthy food, I find them utterly delicious and a pleasure to eat.

I have been making flapjack since my school days; it’s a real family favourite. Over the years I’ve adapted the recipe to include flavours and ingredients that take my fancy, and for the last few weeks, I’ve been packing this much-loved bake with tiny seeds.

Bags_of_chia_flax_linseed_and_sesame_seeds
A delicious foursome: chia seeds, flax seeds, linseed and sesame seeds. Image: Kathryn Hawkins

In order to benefit from as many of the nutrients in seeds as possible, it is important to make sure you chew them thoroughly. A bake like flapjack is a perfect recipe to make this happen naturally because the oats help increase the chewy texture. If you pre-grind seeds that have a more slippery texture in the mouth, like linseed and flax, you’ll help yourself to more nutrition with ease. I pop a handful in an electric coffee grinder and blitz them for a short while before I put them in the mix.

Whole_linseeds_ground_in_an_electric_coffee_grinder
Grinding linseeds. Image: Kathryn Hawkins

Sesame seeds are a real gold mine of nutrients and a valuable source of calcium for anyone on a dairy-free diet. I love their intense nutty flavour which I enhance by toasting them lightly in a dry, hot frying pan before adding them to a recipe. Keep an eye on them and keep them moving around the pan, as they brown very quickly once they reach a certain temperature.

Toasting_sesame_seeds_in_a_small_frying_pan_to_increase_flavour
Toasting sesame seeds. Image: Kathryn Hawkins

My flapjack recipe makes a large quantity, perfect for batch baking, but you can easily educe the quantity by half and press into an 18cm square tin instead.

Makes: 24 squares

Ingredients

  • 250g vegan margarine (or butter if you eat it)
  • 165g Demerara sugar
  • 75g golden syrup
  • 75g crunchy almond butter (or wholenut peanut butter tastes good too)
  • 325g porridge oats
  • 175g mixed small seeds such as chia seeds, linseeds, flax seeds and toasted sesame seeds
  1. Preheat the oven to 180°C (160°C fan oven, gas 4). Grease and line a 20 x 30cm oblong cake tin. Put the margarine, sugar, syrup and nut butter in a large saucepan and heat gently, stirring, until melted.
  2. Remove from the heat and stir in the oats and seeds until well mixed. Press  evenly into the prepared tin and bake for about 25 minutes until lightly golden all over.
  3. Whilst the bake is hot, gently score the top into 24 squares and then leave to cool in the tin. Once cold, cut through the squares completely and remove from the tin. Store in a air-tight container for up to a week. Flapjack freezes well too!

    Squares_of_freshly_baked_super-seed_flapjack
    A stack of freshly baked super-seed flapjack. Image: Kathryn Hawkins

Tattie scones (gluten-free; dairy-free; vegan)

Flat_griddle_pan_with_cooked_tattie_scones
Freshly cooked tattie (potato) scones. Image: Kathryn Hawkins

The best things in life are often the simplest. These wise words certainly apply to my recipe this week. There aren’t many dishes more straightforward than a tattie scone. Just 3 ingredients, plus some oil to cook them in, and that’s it.

The tattie (potato) scone is synonymous with Scotland. Just about every self-respecting baker makes his or her own, and no supermarket bakery aisle is complete without them. The scones are a good way of using up leftover boiled potato which is mashed and bound with wheat flour, but gluten-free works fine. Tattie scones are  usually quite thin, but I make mine a bit thicker  (about 1cm) as I find the mixture easier to work with. Eat them warm as part of a savoury meal (often served as part of a hearty breakfast) or  as a snack spread with butter and jam. The scones make a great alternative to bread as an accompaniment to a soup or stew as they are perfect for mopping up gravy or a sauce.

Servng_of_freshly_cooked_tattie_scones_and_jam
A tea-time favourite: tattie scones and jam. Image: Kathryn Hawkins

I dug up the last of my home-grown potatoes this week, and decided that there was no better way to enjoy them, than by making up a batch of my own scones.  I’ve been growing the same main crop variety (Pink Fir Apple) for a few years now, and haven’t found any other to rival it in texture or flavour. The potatoes are pink-skinned and can be very knobbly indeed. The flesh is creamy-yellow in colour, sometimes flecked or ringed with pink, and when cooked, it becomes dry and floury in texture. The flavour is slightly sweet and earthy. Pink Fir Apples potatoes are perfect for crushed or mashed potato. and also roast well. They can be cooked and eaten peeled or unpeeled.

Trug_of_freshly_dug_pink_fir_potatoes
My last harvest of Pink Fir Apple potatoes. Image: Kathryn Hawkins

Here’s my recipe.

Makes: 6

Ingredients

  • 400g main crop potatoes
  • 1 tsp salt
  • 40g gluten-free self-raising flour blend (such as Dove’s Farm)
  • Vegetable oil for frying
  1. Peel the potatoes thinly, cut into small pieces, and place in a saucepan. Cover with water and add half the salt. Bring to the boil and cook for 8-10 minutes or until completely tender. Drain well through a colander or strainer, and leave to air-dry for 10 minutes.
  2. Return the potatoes to the saucepan and mash finely with a potato masher. If you have a ricer, use this to achieve a super-smooth texture.
  3. While the mash is still fairly hot, add the remaining salt and sift the flour on top. Gently work the ingredients together to make a pliable dough.
    Potato_preparation_for_making_tattie_scones
    Ricing the potatoes. Images: Kathryn Hawkins

    Making_rolling_and_shaping_potato_dough_for_tattie_scones
    Making and rolling the potato dough. Images: Kathryn Hawkins
  4. Turn the dough on to a lightly floured work surface and roll to form a round about 18cm diameter – roll to 20cm for slightly thinner scones. Cut into 6 triangular wedges.
  5. Brush a large frying pan or flat griddle pan generously with oil and heat until hot. Cook the scones for 2-3 minutes on each side until lightly golden. Drain and serve warm. You can reheat the scones successfully, by either popping them in the frying pan again or under the grill to lightly toast them.

    Serving_of_tattie_scone_with_jam
    Straight out of the pan and spread with my favourite topping: homemade raspberry jam. Image: Kathryn Hawkins


Pick-me-up dark chocolate granola bars (gluten-free; dairy-free; vegan)

Chunk_of_dark_chocolate_granola_bar
The perfect pick-me-up. Image: Kathryn Hawkins
Slab_of_dark_chocolate_granola_bar
Out of the tin and ready for slicing. Image: Kathryn Hawkins

It’s that time of year when the weather turns a bit dull, the nights draw in fast, and it begins to feel a bit chilly. For me, it’s time for a pick-me-up. My standby on these occasions is always some kind of melted chocolate-based mix; it’s easy to put together, requires no baking, and keeps for several days in the fridge.

The recipe is the perfect way to use up all the bits of seeds, fruit and nuts you have in the fridge or cupboard. I usually end up with a different combination of flavours every time I make this recipe. If you prefer, simply half the quantities, pack the mixture into an 18cm square tin and cut into 12 portions instead.

Makes: 24 chunky pieces

Ingredients

  • 500g 90% cocoa solids, dairy-free chocolate
  • 100g coconut oil
  • 60g golden syrup
  • 200g gluten-free, vegan granola
  • 75g crisp rice cereal
  • 100g pumpkin seeds
  • 75g shredded coconut + extra to decorate
  • 400g chopped dried, glacé and candied fruit such as pineapple, cherries, orange peel, golden sultanas, etc.
  • 100g dairy-free, vegan white “chocolate”
  1. Line a 20 x 30cm cake tin with baking parchment or cling film. Break up the 90% cocoa chocolate into pieces and place in a heatproof bowl with the coconut oil and golden syrup. Stand the bowl over a saucepan of barely simmering water and leave to melt. Remove from the water, stir well and cool for 10 minutes.
  2. Mix in all the remaining ingredients except the white chocolate. Stir well until everything is coated, then pack into the prepared tin, pressing down well with the back of a spoon. Cool for at least an hour or until firm.
  3. Carefully remove from the tin and peel away the lining parchment or cling film. Place on a board. Use a large bladed knife to cut into strips and then chunks – the mixture is quite firm to slice.Line a large tray or board with baking parchment and arrange a few pieces on top. Melt the white chocolate as above and then drizzle over each piece. Sprinkle with shredded coconut if like. Leave in a cool place for several minutes to set before serving. Decorate the remaining pieces in the same way. Enjoy!

    Ready_to_serve_dark_chocolate_granola_ars
    Drizzled, sprinkled and ready to eat. Image: Kathryn Hawkins

Lemon-soaked cucumber cake (gluten-free; dairy-free; vegan option)

Lemon_and_cucumber_loaf_cake
Lemon-soaked cucumber cake. Image: Kathryn Hawkins


This week has seen the end of my home-grown cucumber supply. I picked the last one yesterday. The greenhouse is beginning to look a wee bit shabby and tired. I have only the tomato plants bearing fruit and still standing proud alongside the withered vines of the once productive cucumber plants.

I love experimenting with vegetables in baking. Carrots and courgettes get a lot of coverage in cake making, as do beetroot and sweet potato, but the humble cucumber doesn’t get much of a look in, until now.

Grated_homegrown_cucumber
Fresh cucumber. Image: Kathryn Hawkins

The delicate, refreshing flavour of is just about detectable in the finished bake, and the texture of the cooked skin gives a little bite to the mix, but above all else, cucumber as a cake ingredient, gives a lovely moist consistency to the cake.

There aren’t many flowers left on cucumber plants at this time of year, but in the height of the season, you can pick off a few male flowers (the ones without the fairy-sized fruit attached) and add the to salads or a mild cucumber flavour. They make pretty edible decorations, and look good floating in a glass of Pimms of a gin and tonic. Don’t pick off too many otherwise you won’t get any more cucumbers.

Male_and_female_cucumber_flowers
Male and female cucumber flowers. Images: Kathryn Hawkins

Here’s my recipe for a lemon and cucumber cake. Let me know what you think.

Serves: 10

Ingredients

  • 1 lemon
  • 225g caster sugar
  • 2 medium eggs, beaten, or 100g silken tofu, mashed
  • 150ml sunflower oil
  • 225g gluten-free plain flour (such as Dove’s Farm)
  • 2 level teasp gluten-free baking powder (such as Dr Oetker)
  • 8g arrowroot
  • 115g grated cucumber
  • Cucumber flowers to decorate, optional
  1. Preheat the oven to 180°C (160°C fan oven, gas 4). Grease and line a 1kg loaf tin. Using a vegetable peeler, pare away 2 strips of lemon rind, and put to one side. Finely grate the remaining lemon rind and extract the juice.
  2. Put 150g sugar in a bowl and whisk in the eggs or tofu and sunflower oil until well blended. Sift the flour, baking powder and arrowroot on top, and gently mix all the ingredients together until combined. Stir in the cucumber and lemon rind.
  3. Pour into the tin and bake for about 55 minutes until risen, golden, and a skewer inserted into the centre comes out clean.
  4. While the cake is cooking, prepare the lemon glaze. Very thinly slice the reserved strips of lemon rind and place in a heatproof bowl. Cover with boiling water and leave to soften for a couple of minutes. Drain. Mix the remaining sugar with the lemon juice and stir in the blanched lemon rind to make a sugary glaze.
  5. As soon as the cake is cooked, skewer the cake all over, and spoon the lemon glaze all over the top of the cake. Leave the cake to cool completely in the tin. Then remove, wrap and store for 24 hours to allow the flavours to develop.
    Cucumber_and_lemon_cake_preparation
    Preparing the cake mix. Images: Kathryn Hawkins
    Pared_lemon_rind_and_lemon_and_sugar_glaze
    Preparing the lemon glaze. Images: Kathryn Hawkins

    The next day, your delicious cake is ready to serve. Decorate with cucumber flowers if you have them, then simply slice, sit back and enjoy! Until next week, I’m off to the greenhouse for a tidy up…….

    Close-up_on_slice_of_lemon_soaked_cucumber_cake
    Sliced and ready to serve. Image: Kathryn Hawkins

Autumn blues – Blueberry and marzipan cake (gluten-free; dairy-free)

Slices_of_gluten-free_dairy-free_blueberry_and_marzipan_cake
Blueberry and marzipan cake. Image: Kathryn Hawkins

It’s been feeling a wee bit autumnal here in central Scotland for the past couple of weeks. Some of the leafy foliage in the garden is on the turn and the nights are drawing in fast. I also have blueberries ready for picking.

Home-grown blueberries are a delight to behold and eat. The skin is much bluer than any variety I can buy, and the skin has a silvery, almost downy bloom. The fruit is firmer in texture and has a slightly tart, more pronounced flavour. The plants are easy to grow, require little maintenance, and love the acidic Scottish soil. The leaves turn pink as the season progresses, and make a wonderful display in the fruit beds.

Small_plate_of_freshly_picked_blueberries
Freshly picked, home-grown Scottish blueberries. Image: Kathryn Hawkins
Homegrown_blueberries_on_the_bush_ripening_and_on_the_turn
Mid-season blueberries ripe and ready for picking alongside a later variety. Images: Kathryn Hawkins

I planted 3 blushes about 5 years ago. One fruits end of July/beginning of August, one is in full ripening mode now, and the other has fruit that is just turning pink. It is unusual for me to be able to harvest enough berries to make anything substantially blueberry flavoured in one go. Usually I keep adding to a bag of berries in the freezer until I have enough to make jam – blueberries do freeze very well and make very good jam from frozen fruit. This year has been an exception, and I have harvested sufficient fresh berries for this unbelievably easy blueberry cake.

Ready_to_serve_slice_of_blueberry_cake_with_fresh_berries
Slice of homemade blueberry and marzipan cake. Image: Kathryn Hawkins

Serves: 8

Ingredients

  • 115g dairy-free margarine, softened
  • 115g caster sugar
  • 115g gluten-free self raising flour (such as Dove’s Farm)
  • 2 large eggs
  • 50g ground almonds
  • 100g marzipan, cut into small pieces
  • 200g fresh or frozen blueberries
  1. Preheat the oven to 180°C (160°C fan oven, gas 4) Grease and line an 18cm square cake tin. Put the margarine, sugar, flour, eggs and ground almonds in a bowl. Using an electric mixer on a low speed, gently whisk the ingredients together until loosely blended. Increase the mixer speed and continue to whisk for a few seconds longer until creamy and smooth.
  2. Gently stir in the marzipan and blueberries and spoon into the tin. Smooth the top and bake for about 45 minutes until lightly golden and just firm to the touch. Leave to cool in the tin, then slice into 8 portions and serve. If you can leave it alone, the cake tastes even better the next day. It is also delicious served warm as a pudding.
    Ready_to_bake_and_fresh_out_of_the_oven_blueberry_and_marzipan_cake
    Easy to make, blueberry and marzipan cake. Images: Kathryn Hawkins

    There are other signs of Autumn in the garden. The Autumn Crocus opened out this week, and the globe thistles (Echinops) are in various stages of blooming. I was delighted to see so many bees still hard at work when I was taking these pictures. Until next week, enjoy the late summer/very early autumn sunshine.

    Autumn_crocus_in_bloom
    New season Autumn Crocus. Image: Kathryn Hawkins
    Echinops
    Shades of silvery-blue, Echinops (globe thistles). Image: Kathryn Hawkins
    Bee_and_Echinops
    A very busy bee. Image: Kathryn Hawkins


Savoury courgette and corn cakes (gluten-free with dairy-free and vegan alternatives)

Yellow_courgette_and_corn_muffins
Courgette and corn cakes. Image: Kathryn Hawkins

My supply of courgettes is coming to an end now. For several weeks, I’ve had a plentiful supply of produce from the four plants in grow-bags, in my greenhouse. Not only do home-grown courgettes taste delicious, I love the large, bright yellow, star-shaped flowers that the plants produce; they are a very cheery sight even on the dullest of days.

Courgette_flower_and_fruit
Homegrown courgette flower and yellow, globe-shaped fruit Images: Kathryn Hawkins

These muffins are full of golden coloured ingredients and are based on a classic American cornbread recipe. Easy to make, delicious served warm, and perfect for freezing – they will only keep fresh for a couple of days, so freezing is the best option for longer storing.  The chives add a mild oniony flavour, and you could try adding a pinch of chilli flakes or some hot smoked paprika for a bit of a kick. They make a good accompaniment to a bowl of soup or stew, or just as a tasty snack on their own.

Ingredients_for_sunshine_muffins
The main ingredients. Image: Kathryn Hawkins

Makes: 10

Ingredients

  • 115g gluten-free plain flour (such as Dove’s Farm)
  • 2 level teasp gluten-free baking powder (such as Dr Oetker)
  • 150g polenta or fine cornmeal
  • 1 medium egg, beaten, or 50g soft tofu, mashed
  • 225ml dairy-free milk (I used soya)
  • 50g butter or vegan margarine, melted
  • 100g cooked sweetcorn kernels
  • 150g grated courgette (yellow or green)
  • 4 tbsp. freshly chopped chives
  • 50g grated Parmesan cheese or vegan alternative, optional
  1. Preheat the oven to 180°C (160°C fan oven, gas 4). Line a 10-cup muffin tin with paper cases. Sieve the flour and baking powder into a bowl and stir in the polenta or cornmeal. Make a well in the centre.
  2. Put the egg or tofu in the centre and pour in the milk and melted butter or margarine. Gradually mix the ingredients together until well blended, then stir in the remaining ingredients.
  3. Divide between the cases, smooth the tops and bake for 25-30 minutes until lightly golden and firm to the touch. Transfer to a wire rack to cool. Best served warm.
    Warm_sunshine_muffins_on_a_cooling_rack
    Freshly baked courgette and corn cakes. Image: Kathryn Hawkins

    Single_serving_of_freshly_baked_sunshine_muffin
    Ready to serve, sprinkled with fresh chive flowers. Image: Kathryn Hawkins