Welcome to my blog all about the things I love to grow and cook. You'll find a collection of seasonal gluten-free, dairy-free and vegan-friendly recipe posts, as well as a round up of my gardening throughout the year. I wish you good reading, happy cooking and perfect planting!
A short post this week, but I wanted to publish a recipe to celebrate Scotland’s national poet, Robert Burns, whose anniversary falls on January 25th each year. These cute, haggis-shaped sweet treats are a version of my Chocolate Haggis for a Burns Night supper (gluten-free, dairy-free, vegan) recipe from last year. You can mix and match ingredients according to the bits and pieces you have to hand. If you don’t like marzipan, use ivory or cream coloured fondant icing instead.
Makes: 16
Ingredients
50g unsalted butter or coconut oil
50g heather honey or golden syrup
75g free-from dark chocolate, broken into pieces
75g free-from oatcakes, finely crushed
40g toasted fine oatmeal
50g currants
50g toasted flaked almonds, crushed
Icing sugar to dust
400g natural marzipan
Put the butter (coconut oil) and honey (golden syrup) in a saucepan with the chocolate, and heat very gently, stirring, until melted.
Remove from the heat and stir in the crushed oatcakes, oatmeal, currants and almonds. Mix well until thoroughly combined. Leave to cool, then chill for about 30 minutes until firm enough to form into portions.
Divide the mixture into 16 and form each into an oval-shaped sausage. Chill for 30 minutes until firm.
Divide the marzipan into 16 and flatten each into a round – use a little icing sugar if the marzipan is sticky. Wrap a disc of marzipan around each chocolate oat cluster; press the edges to seal and then twist the ends to make a haggis shape.
Mini chocolate haggis preparation. Image: Kathryn Hawkins
Store the mini haggis at a cool room temperature until ready to eat. The marzipan will become sticky if refrigerated. Best enjoyed with coffee and a wee dram. Until next week, I raise a glass to you all and say “Slàinte!” – to your good health 🙂
Mini haggis and a wee dram. Image: Kathryn Hawkins
I’ve had a very “light” pear harvest this year. In fact, just 4 fruit developed on one tree and the other had no fruit at all. Not sure why, the spring was fine, there was so much blossom and plenty of bees around to pollinate it. Perhaps the pear trees decided to have a bit of a holiday this year.
Just before harvest. Image: Kathryn Hawkins
So with such a precious harvest, what to cook? I picked the pears a couple of weeks ago, and they have been ripening gently and slowly in a cool spot in the kitchen. They remained quite firm, so I decided I would cook them.
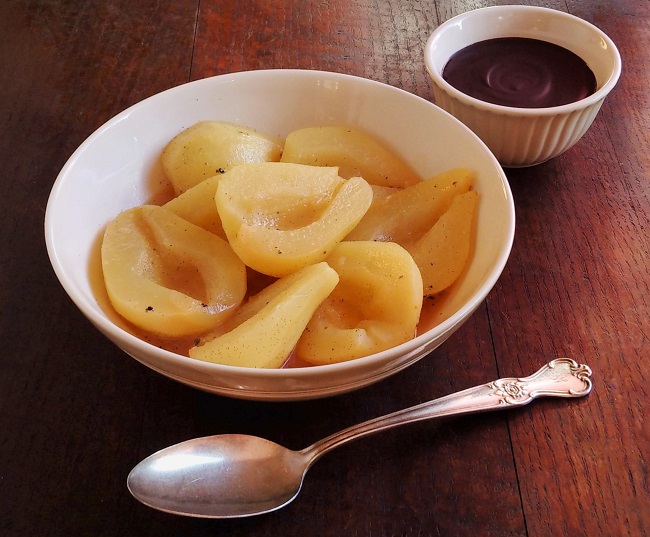
Vanilla baked pears with chocolate “butter”. Image: Kathryn Hawkins
Vanilla is one of my favourite spices, and it is a particularly delicious flavouring for pears. This is a very simple recipe, but it tastes a little bit more special because the pears are cooked in Moscatel de Valencia – the floral notes of this sweet Spanish wine are a perfect match for both pears and vanilla.
Chocolate is another “must have” with pears as far as I’m concerned, and this easy “butter” makes an interesting alternative to the usual chocolate sauce. Moscatel is one of the few wines I think goes well with chocolate, so this is a “win win” recipe for me. Serve the pears very slightly warm or at room temperature so that the cooking juices don’t begin to set, and avoid chilling the chocolate accompaniment (unless the room temperature is very warm) as it will become very hard to spoon.
Serves: 4
Ingredients
4 firm pears
Juice of ½ a lemon
1 vanilla pod
300ml Moscatel de Valencia wine (or white grape juice if preferred)
1 tbsp. agave syrup (or clear honey if you eat it)
40g dairy-free margarine (or unsalted butter)
100g dairy-free 85% cocoa chocolate
50g golden syrup
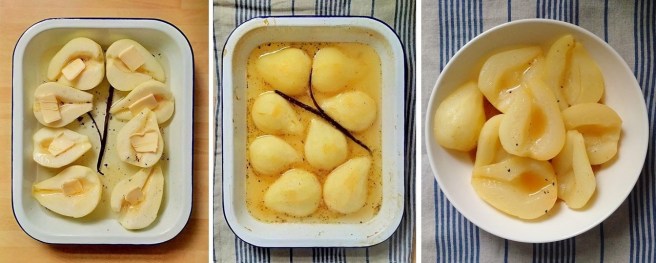
Preheat the oven to 180°C (160°C fan oven, gas 4). Peel and core the pears, and cut in half. Brush lightly with lemon juice and place cut-side up in a shallow baking dish.
Split the vanilla pod and scoop out some of the seeds using the tip of a sharp knife. Push the rest of the pod into the dish of pears, mix the scooped-out seeds with the wine and pour over the pears.
Dot the pears with 15g of the margarine and drizzle with agave syrup. Cover with foil and bake for 30 minutes. Remove the foil, turn the pears over, baste with the cooking juices, and return to the oven to bake, uncovered, for a further 20 minutes or until the pears are tender.
Cool for 30 minutes in the cooking juices, discard the vanilla pod, then lift out the pears using a slotted spoon and place in a heatproof dish. Pour the cooking juices into a small saucepan.
Bring the cooking juices to the boil and simmer for about 5 minutes until reduced by half. Pour over the pears and leave to cool.
Preparing baked pears with vanilla. Images: Kathryn Hawkins
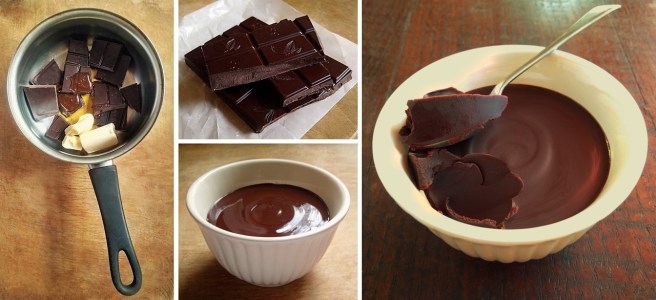
For the chocolate “butter”, break the chocolate into pieces and put in a saucepan with the remaining margarine and the golden syrup. Heat very gently, stirring, until melted. Remove from the heat, mix well and pour into a small, heatproof dish. Leave to cool – the “butter” will solidify when it becomes cold.
Making chocolate “butter”. Images: Kathryn Hawkins
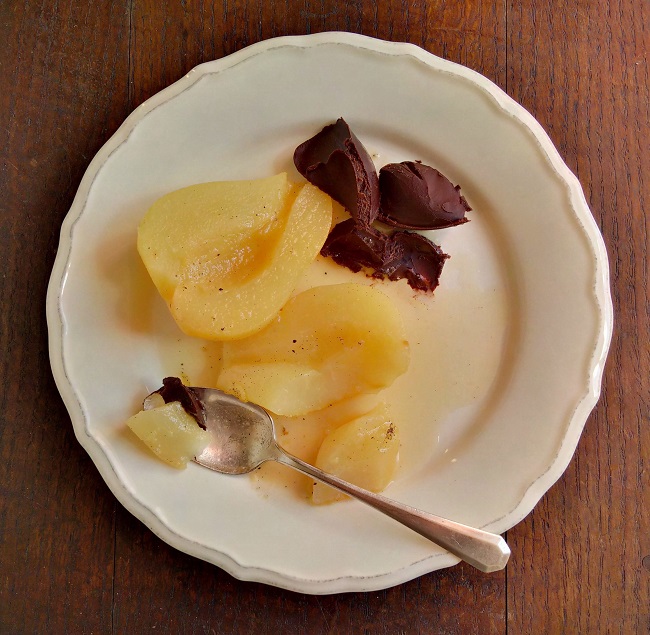
Serve the pears at room temperature accompanied with the chocolate “butter”. If you prefer, leave the chocolate mixture to cool for about 30 minutes and serve warm as a thick, glossy chocolate sauce.
Vanilla baked pears with chocolate “butter”. Image: Kathryn Hawkins
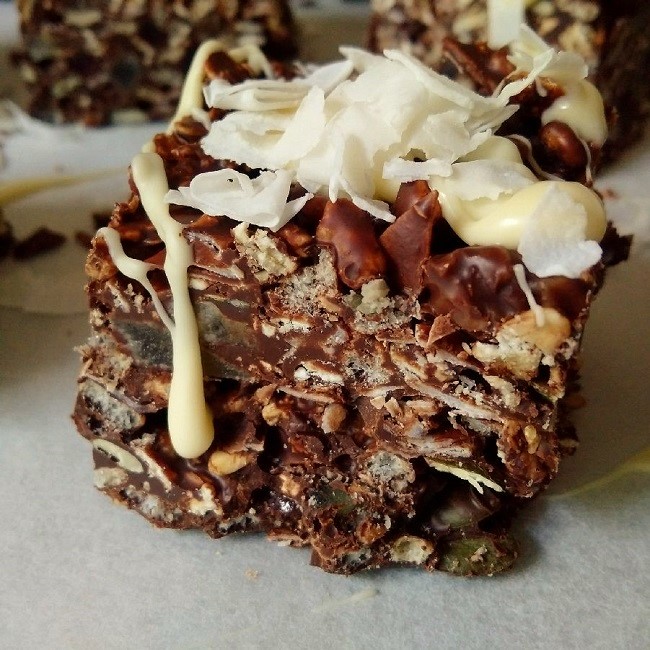
The perfect pick-me-up. Image: Kathryn HawkinsOut of the tin and ready for slicing. Image: Kathryn Hawkins
It’s that time of year when the weather turns a bit dull, the nights draw in fast, and it begins to feel a bit chilly. For me, it’s time for a pick-me-up. My standby on these occasions is always some kind of melted chocolate-based mix; it’s easy to put together, requires no baking, and keeps for several days in the fridge.
The recipe is the perfect way to use up all the bits of seeds, fruit and nuts you have in the fridge or cupboard. I usually end up with a different combination of flavours every time I make this recipe. If you prefer, simply half the quantities, pack the mixture into an 18cm square tin and cut into 12 portions instead.
Makes: 24 chunky pieces
Ingredients
500g 90% cocoa solids, dairy-free chocolate
100g coconut oil
60g golden syrup
200g gluten-free, vegan granola
75g crisp rice cereal
100g pumpkin seeds
75g shredded coconut + extra to decorate
400g chopped dried, glacé and candied fruit such as pineapple, cherries, orange peel, golden sultanas, etc.
100g dairy-free, vegan white “chocolate”
Line a 20 x 30cm cake tin with baking parchment or cling film. Break up the 90% cocoa chocolate into pieces and place in a heatproof bowl with the coconut oil and golden syrup. Stand the bowl over a saucepan of barely simmering water and leave to melt. Remove from the water, stir well and cool for 10 minutes.
Mix in all the remaining ingredients except the white chocolate. Stir well until everything is coated, then pack into the prepared tin, pressing down well with the back of a spoon. Cool for at least an hour or until firm.
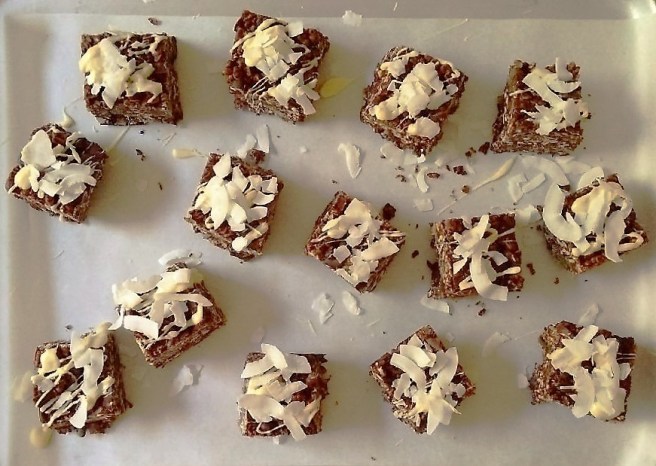
Carefully remove from the tin and peel away the lining parchment or cling film. Place on a board. Use a large bladed knife to cut into strips and then chunks – the mixture is quite firm to slice.Line a large tray or board with baking parchment and arrange a few pieces on top. Melt the white chocolate as above and then drizzle over each piece. Sprinkle with shredded coconut if like. Leave in a cool place for several minutes to set before serving. Decorate the remaining pieces in the same way. Enjoy!
Drizzled, sprinkled and ready to eat. Image: Kathryn Hawkins
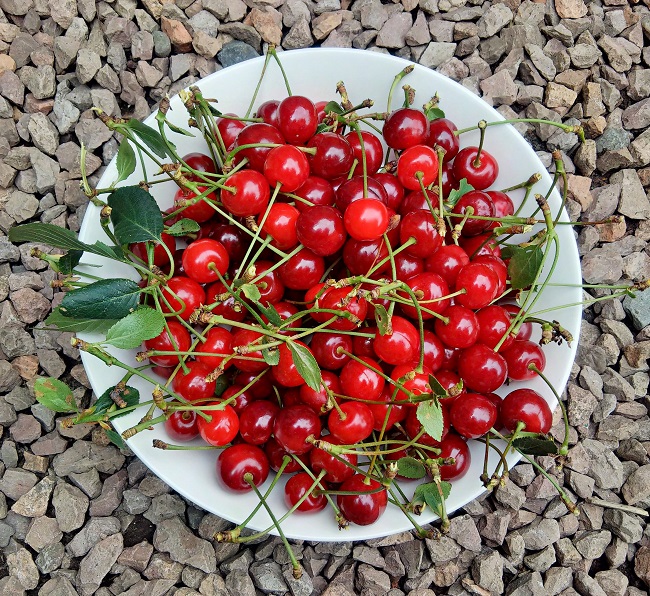
Morello cherries, ripe and ready for picking. Image: Kathryn Hawkins
Picking the cherries from my espalier Morello cherry tree is one of the highlights of my fruit growing calendar. Having had such a mild Scottish spring this year, all the fruit in the garden seems to be ripening a bit earlier than in other years. The cherries are no exception. Usually I pick them in the middle of August, but this week, they were ripe and ready. The harvest was pretty good too: from one small tree, I picked ¾kg.
This year’s Morello cherry harvest. Image: Kathryn Hawkins
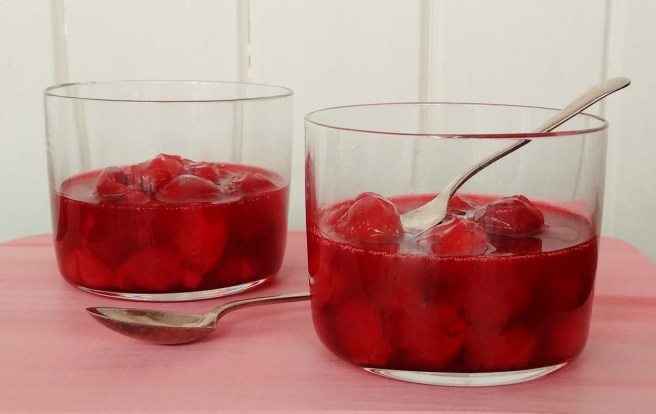
I’m not that adventurous when it comes to cooking with cherries. I suppose it’s because I never have that many to play with, therefore, I want to make sure I enjoy what I cook. Morellos are a sour cherry and are too tart to eat as a fresh fruit. This year I made a large pot of jam and, my favourite, a compote flavoured with vanilla and lemon – recipe below.
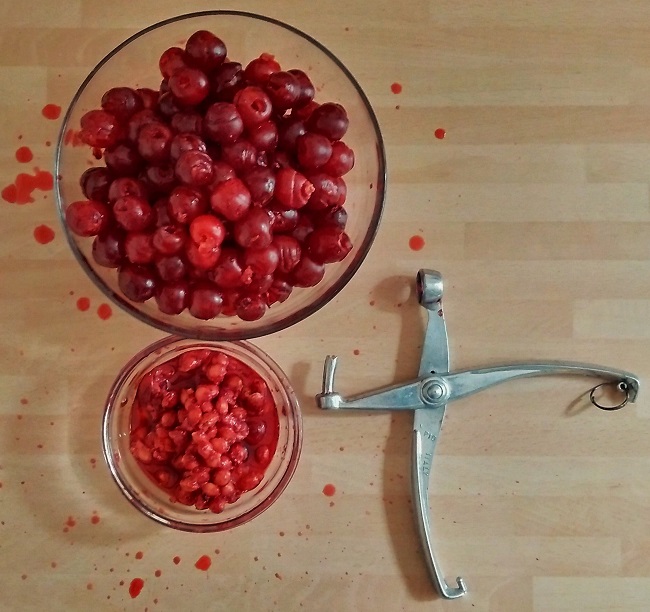
I use a cherry stoner to remove the pits; I’ve had it for years, and it does the job perfectly. This years cherries were so ripe, the pit just plopped out without any effort. Wash the cherries first and then prepare them over a bowl to catch the stones and the juice that falls; you can then easily drain off the stones, keeping the juice. If you don’t have a specialist stoner, a small knife with a pointed blade should enable you to prise out the stones with ease. After preparation, the final weight of the cherries I picked this year, along with the juice from the bowl, was around 650g.
Vital piece of kit: my cherry stoner. Image: Kathryn HawkinsPitting cherries. Image: Kathryn Hawkins
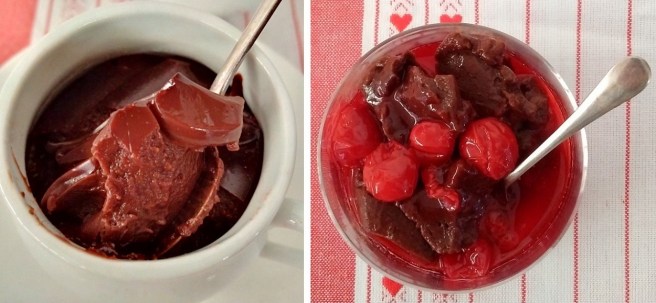
Flavours that go well with cherries are: almond (especially marzipan); citrus fruit; vanilla; cinnamon (just a pinch); coconut, and chocolate. I often make something chocolatey to go along side the compote, and this year, it was a nostalgic chocolate blancmange, deliciously velvety and thick. A perfect combination. So here are my recipes for both compote and blancmange. By the way, if you are using sweet cherries for the compote, you’ll need to reduce the quantity of sugar you add to the compote by at least half.
300g prepared ripe Morello cherries (about 350g with stones)
100g caster sugar
2 level teasp cornflour
½ vanilla pod, split
Juice of ½ small lemon or half a lime
For the blancmange:
50g cornflour
25g cocoa powder
50g vanilla sugar (use plain caster if preferred)
500ml non-dairy milk (I used soya milk)
1. To make the compote, put the cherries in a saucepan and gently mix in the caster sugar and 3 tbsp. water. Heat gently, stirring until the sugar dissolves, then bring to the boil, reduce to a gentle simmer, and cook for about 3 minutes until just tender – take care not to over-cook, ripe cherries need very little cooking.
2. Blend the cornflour with 2 tbsp. water to make a paste, then stir into the cherries. Bring back to the boil, stirring, and cook for a further 1 minute until slightly thickened. Remove from the heat, push in the vanilla pod and leave to cool completely. Remove the pod and stir in the lemon juice. Chill lightly before serving – about 30 minutes.
3. For the blancmange, mix the cornflour, cocoa and sugar in a saucepan, and gradually stir in the milk, making sure it is thoroughly blended – I find a balloon whisk is good for mixing powders into liquids.
4. Keep stirring the mixture over the heat, until it reaches boiling point and becomes very thick. Continue to cook for 1 minute to make sure the cornflour is completely cooked then spoon into small individual heat-proof dishes – there is enough to fill 6 x pot au chocolat dishes (it is quite rich, so these little dishes are the perfect size for me). Leave to cool completely, then chill for an hour until ready to serve.
Chocolate blancmange and Morello cherry compote. Images: Kathryn HawkinsMy espalier Morello cherry tree with spring blossom, and in fruit earlier this week. Images: Kathryn Hawkins
Beetroot and raspberry blondies Image: Kathryn Hawkins
After my post on Fresh globe beetroot a couple of weeks ago, I finally got round to a spot of beetroot-baking with the fine specimens I took pictures of. This is a great tasting recipe which makes the most of how naturally colourful the vegetable is.
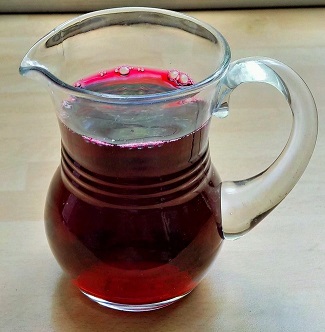
You’ll find plenty of recipes for brownies and blondies, so now, here’s one for “pinkies”. For all intents and purposes, it is a blondie recipe with cooked beetroot added to it. I used natural raspberry extract to flavour my recipe but a good quality vanilla extract or freshly grated orange rind would work just as well. As with the more traditional blondie (and brownie) recipes, this one is better the day after baking. By the way, if you cook beetroot from raw, the cooking water turns very pink. I used a little of this to make the icing. The pinkies also freeze well. By the way, the recipe also works with cooked carrot instead of beetroot.
100g white chocolate drops (or dairy-free alternative)
75g butter (or dairy-free alternative)
75g caster sugar
75g silken tofu
115g cooked, peeled beetroot in natural juice
75g gluten-free self raising flour
75g ground almonds
¼- ½ tsp natural raspberry extract
150g icing sugar
2-3 tsp beetroot cooking water or water and natural pink food colouring
Freeze-dried raspberry pieces, to decorate
Preheat the oven to 180°C (160° fan oven, 350° F, gas mark 4). Grease and line an 18cm square cake tin. Put the chocolate chips, butter and sugar in a saucepan and heat gently to melt together. Cool for 10 minutes.
Meanwhile, blend the tofu and beetroot together to make a purée.
Sieve the flour into a bowl. Add the ground almonds, beetroot purée and melted chocolate mixture. Add the extract and mix well to make a smooth batter.
Spoon into the prepared cake tin and bake for about 30 minutes until lightly crusted but slightly soft underneath. Cool for 20 minutes then turn on to a wire rack to cool completely. Wrap in greaseproof paper and foil and store for 24 hours to allow the texture and flavour together.
Preparation of beetroot and raspberry blondies. Images: Kathryn Hawkins
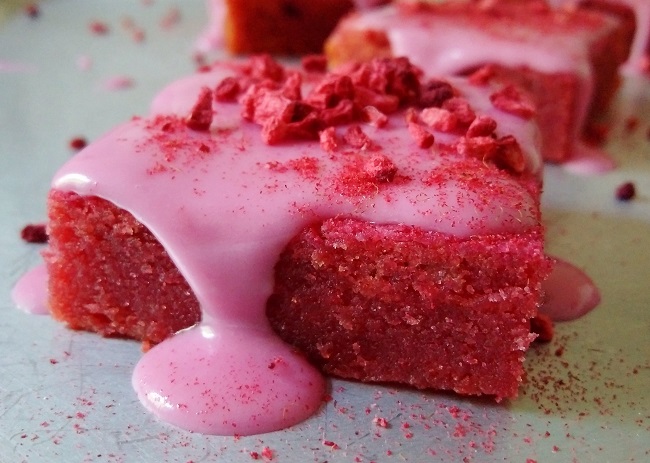
To decorate. remove the wrappings and cut the cake into 9 equal squares. Sift the icing sugar into a bowl. Stir in a little beetroot or tap water to make a smooth, spreadable icing. Add pink colouring if using.
Spoon a dollop of icing of over each piece of cake and spread to cover the tops, allowing it to drip down the sides. Sprinkle with freeze-dried raspberries. Leave to set for about 30 minutes before serving.
Slice of beetroot and raspberry blondie. Image: Kathryn Hawkins
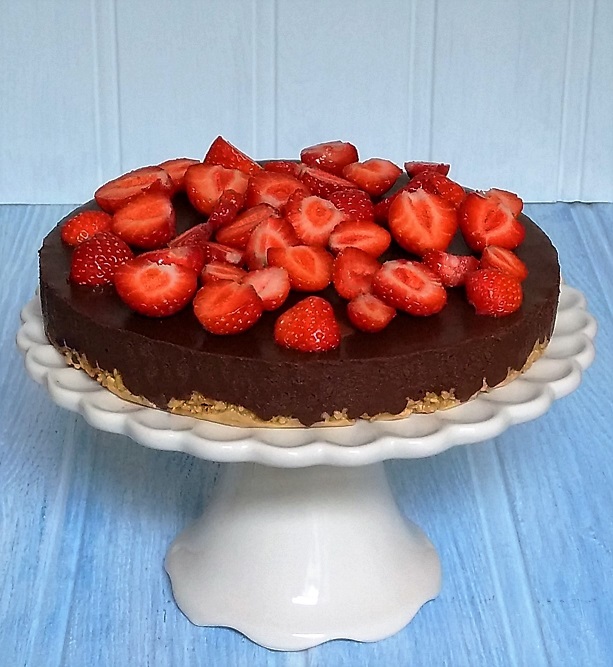
Only a few days ago, in my last post, I had the feeling that spring was on its way. But only one day later, down came the snow once again. In fact, as I go to post this piece, it’s very white outside. At times of despair, a “cheer-me-up” pudding is called for to help me get through the rest of this dreary month, and what comes to mind most naturally? Chocolate, of course!
This is a simple recipe with only a few ingredients. I don’t usually buy out of season fruit, but I made an exception this week and bought some rather delicious looking strawberries. Best of all, they tasted pretty good too. Of course you can top your dessert with any fruit you fancy, or simply leave it plain. I also added a sprinkle of my favourite toasted raw coconut flakes on top, just before serving. Depending on your chocolate taste-buds, use however much of the darker variety you prefer. Enjoy!
Fresh fruit and toasted coconut, optional, to serve
Grease and line an 18cm spring-form cake tin. Put the granola in a bowl. Melt the coconut oil and mix into the granola until well incorporated.
Press into the bottom of the tin using the back of a spoon and chill whilst preparing the chocolate layer.
Pour the coconut milk into a saucepan. Break up the chocolate and add to the pan. Place over a very low heat, and stir occasionally until melted. Cool for 10 minutes, stir in vanilla paste to taste and then pour over the granola base. Leave to cool, and then chill for about an hour until firm.
Carefully release from the tin. Peel away the lining paper and transfer to a serving plate. Top with fruit and coconut if using.
Finished with a coconut topping. Image: Kathryn HawkinsOne slice is never enough. Image: Kathryn Hawkins
Chocolate haggis wrapped in marzipan. Image: Kathryn Hawkins
January 25th is a Scottish celebration day, commemorating the birth of Scotland’s National poet, Robert Burns. Not wanting to offend my non meat-eating friends, I thought better of posting anything about the traditional savoury supper served on this day, and instead turned my thoughts to something I devised a few years ago, the Chocolate haggis. Much more appealing to all, I think, and perhaps, a wee bit more fun.
My recipe is simply a twist on the classic biscuit or refrigerator cake. You can add any combination of biscuit, fruit and nuts that you fancy. I use Scottish heather honey for the sweetness and flavour, but golden syrup or maple syrup will work just as well for my vegan friends. If you eat butter, you can use this instead of coconut oil. It’s a very versatile mix. Adding a wee tot of whisky is for the celebration; it’s fine without, so I’ll leave that up to you! By the way, I love marzipan, but if it’s not for you, you can achieve a similar effect by using an ivory coloured fondant icing.
Makes 1 haggis – 12 generous slices
125g free from plain chocolate
75g coconut oil (or butter)
2 tbsp golden or maple syrup (or heather honey)
150g free from plain granola or coarse oatcakes, crushed
150g free from shortbread or plain biscuits, crushed
75g currants
2 tbsp whisky (optional)
Icing sugar to dust
250g natural marzipan
1. Break the chocolate into a heatproof bowl and add the coconut oil and syrup. Sit the bowl over a saucepan of barely simmering water until melted. Remove from the water and cool for 10 minutes.
2. Mix the granola, shortbread and currants into the melted chocolate and stir in the whisky, if using. Leave in a cool place for about 45 minutes to firm up, but not set completely.
3. Line the work top with a large, double-thickness, square of cling film and pile the chocolate mixture into the centre. Mound it up it to form a fat oval shape about 12cm long. Wrap the cling film round the mix tightly and twist the ends to seal, making a fat sausage shape. Chill for at least 2 hours until very firm.
4. Lightly dust the work surface with icing sugar. Roll out the marzipan to a rectangle approx. 18 x 28cm, and neaten the edges. Unwrap the chocolate haggis and place in the centre of the marzipan. Fold the marzipan over the top to cover the chocolate haggis completely, and then pinch at either end to make the distinct haggis shape. Tie the ends with twine if liked.
Chocolate haggis, ready to slice. Image: Kathryn Hawkins
5. Cover loosely with cling film and leave at room temperature for about an hour before slicing to serve, accompanied with a wee dram or two. Slàinte!
Chocolate haggis, sliced and ready to serve. Image: Kathryn HawkinsHappy Burns Night! Image: Kathryn Hawkins
Chocolate, rosemary and orange muffins. Image: Kathryn Hawkins
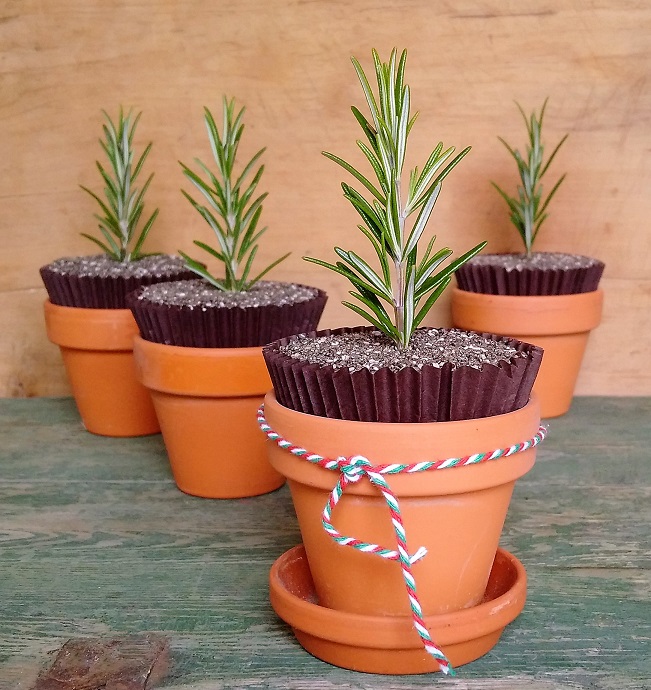
On the shortest day of the year, here’s a little something baked to brighten up the barely light hours. I picked rather too much rosemary the other day, and spent a few days pondering on how best to use it up. It doesn’t freeze very well and I’m not a fan of the dried stuff. After admiring the stems as a herbal arrangement in my kitchen for a while, I decided to do some flavour experimentation, and these muffins are the result.
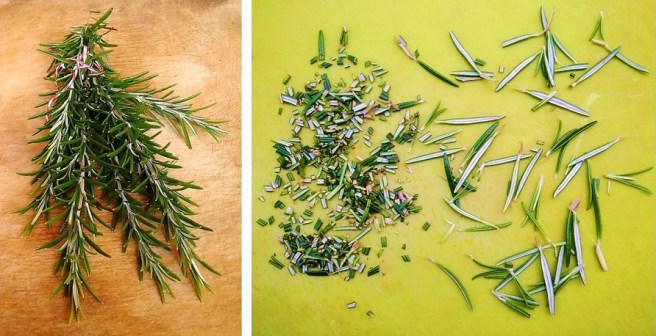
I wasn’t really intending them to be so festive looking, but the sprigs reminded me of tiny pine trees and then my mind started going into creative mode. I hope you enjoy them. The flavour is really rich and perfect for the time of year. You only need to use the leaves for this recipe – the stems are too tough – and try to chop the leaves as small as possible for the best flavour and better eating.
Fresh rosemary. Images: Kathryn Hawkins
Makes: 10
150ml sunflower oil
150g dark brown sugar
150g silken tofu
45g cocoa powder
2 level tsp gluten-free baking powder (such as Dr Oetker)
1 level tbsp ground arrowroot (I often add this to help bind gluten-free cake mixtures together)
100g ground almonds
75g polenta
Finely grated rind 1 unwaxed orange
2 level tsp finely chopped rosemary leaves
Pinch of salt
125g icing sugar + extra to dust
Approx. 40ml freshly squeezed orange juice
10 tsp Chia or poppy seeds
10 small sprigs of fresh rosemary
Preheat the oven to 180°C (160°C fan oven, gas mark 4). Line a muffin tin with 10 paper cases. Put the oil, sugar and tofu in a bowl and whisk together with an electric mixer until well blended and thick.
Sieve 25g cocoa, baking powder and the arrowroot on top. Add the almonds, polenta, orange rind, chopped rosemary and salt. Mix all the ingredients together until thoroughly combined.
Divide the mixture equally between the cases. Smooth the tops and bake for about 35 minutes until just firm to the touch – the cakes may look slightly sunk in the middle. Cool in the tins for 5 minutes then transfer to a wire rack to cool completely.
To decorate, sieve the icing sugar and remaining cocoa powder into a small bowl and mix together with sufficient orange juice to make and smooth, spreadable icing. Spoon sufficient icing on top of each muffin and spread to cover the top completely.
Sprinkle the top of each muffin with 1 tsp seeds. Leave for a few minutes to set before adding the finishing touches.
Decorating the muffins. Image: Kathryn Hawkins
Just before serving, carefully put the muffins into small flower pots. Push a sprig of rosemary into the top of each and if liked, dust the rosemary lightly with a little icing sugar for a frosted look.
The muffins freeze well once iced and seeded, and will also keep for 4-5 days in an airtight tin once decorated. Simply decorate with fresh rosemary and icing sugar just before serving.
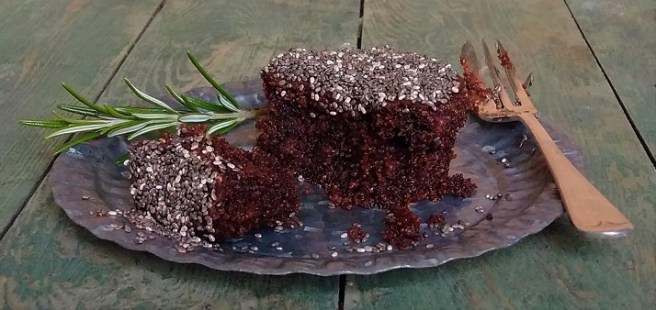
Frosty-looking chocolate, rosemary and orange muffin. Image: Kathryn Hawkins
Gluten-free and vegan, a deliciously dark and tasty chocolate, rosemary and orange muffin. Image: Kathryn Hawkins
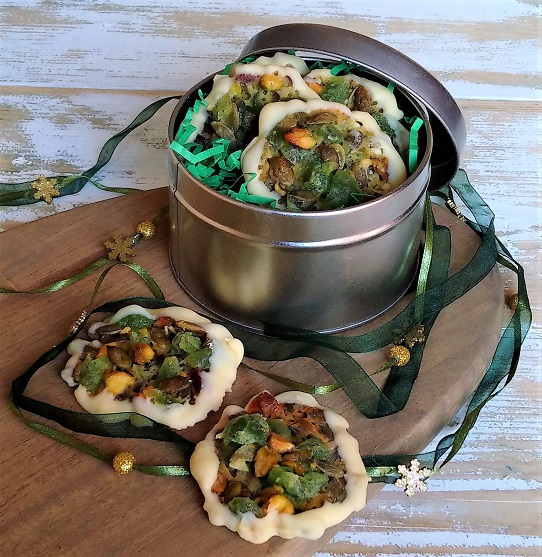
I’m spoilt for choice at this time of year as to what sweet treats and edible goodies to make, but Florentines have to be up there in my Top 10 of all time favourites. These thin, crisp, Italian, chocolate-spread morsels are jammed packed with fruit and nuts, and they are just as delicious served with a spoonful of your favourite ice cream or sorbet, as they are with a cup of coffee.
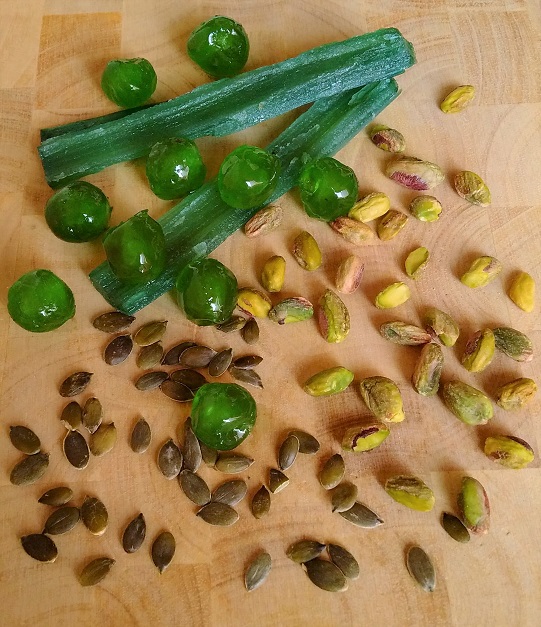
I have chosen to use a combination of candied green fruits, seeds and nuts, but you can use any dried or candied fruit, and any unsalted, roasted nuts and seeds – in fact these biscuits are one of the best ways to use up any bits and pieces of dried fruit, nuts and seeds you have leftover. They will also work with all fruit or all nuts and seeds, so you can make up your own combinations to suit your personal preference.
Traditionally, Florentine biscuits are spread with melted dark chocolate on the back, but they are good left as they are. Cover the backs with 90% extra dark chocolate for a less sweet finish, and, if you can bring yourself to give them away, they make a lovely gift.
1 tsp good quality natural almond or vanilla extract (such as Dr Oetker)
200g milk free, vegan white “chocolate”
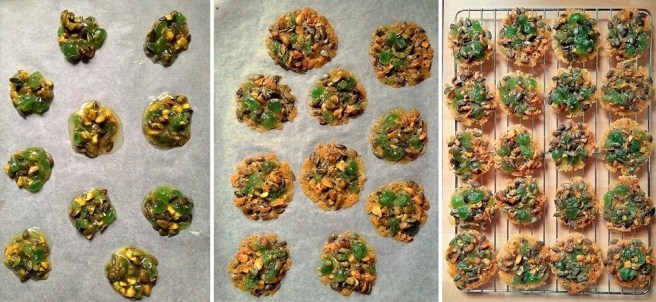
Preheat the oven to 180°C (160°C fan oven, gas mark 4). Line 2 large baking trays with baking parchment. Melt the oil or margarine with the syrup in a saucepan. Remove from the heat and stir in the remaining ingredients except the white “chocolate”.
Drop 20 heaped teaspoonfuls, spaced well apart on to the prepared trays, and flatten each mound slightly. Bake for 10-12 minutes until flattened and lightly golden. Leave to cool for 10 minutes on the trays, then transfer to a wire rack to cool completely.
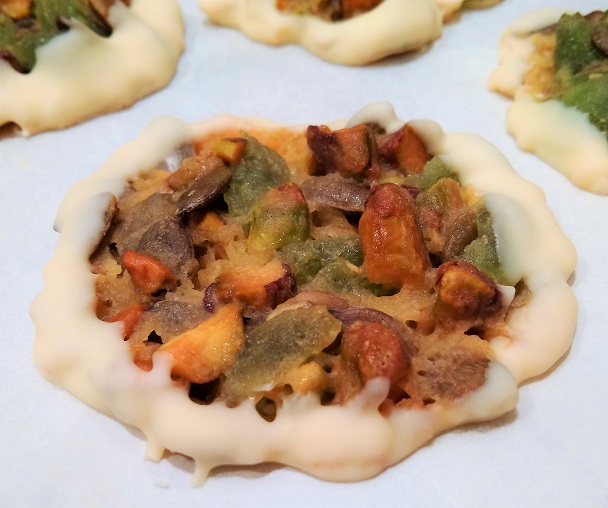
To cover the biscuits with chocolate, put just over half the amount of chocolate in a heatproof bowl and melt over a saucepan of barely simmering water. Line a large board with baking parchment.
Working on one biscuit at a time, carefully dip and roll the edge of the biscuit all the way round in chocolate and place on the lined board. Leave to set.
Covering the sides and backs of Florentines in melted white “chocolate”. Images: Kathryn Hawkins
Once all the biscuits are dipped and set, melt the remaining chocolate as above. Turn the biscuits over and spread a little chocolate thinly over the backs. Leave to set. Note: If you can leave them alone, these biscuits will store well in an airtight container for up to 1 week.
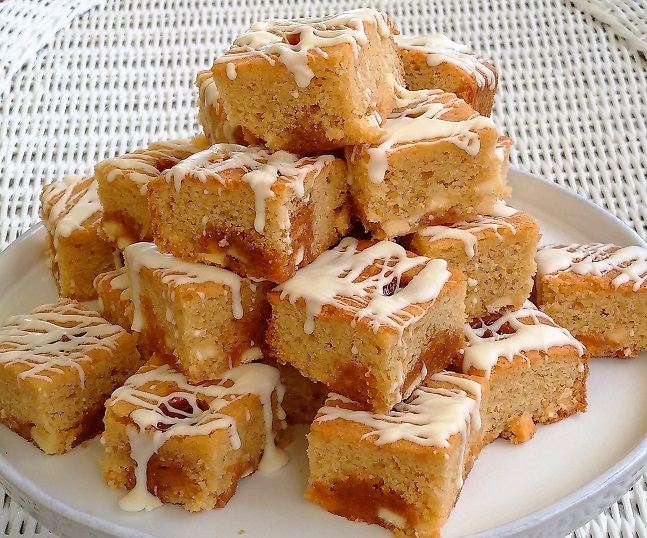
With the weekend approaching, I thought a baking recipe might go down well today. One of my “turn to” bakes for entertaining is sweet and gooey blondies – a guaranteed winner. Very easy to make, quick to cook, and a bake that improves on keeping (although it doesn’t usually hang around long enough to test this theory to the full!). Here’s the recipe:
Makes 24 pieces
200g good quality white chocolate
115g salted butter
3 medium eggs
115g light soft brown sugar
225g gluten free plain flour blend (such as Dove’s Farm)
1½ tsp gluten free baking powder
1-2 tsp caramel or butterscotch flavour (such as Dr Oetker Caramel Flavour or Beau Concentrated Butterscotch Flavour)
150g white chocolate chunks
300g your favourite caramel sauce or canned caramel
Preheat the oven to 170°C (150°C fan oven, gas mark 3). Grease and line a 20 x 30cm rectangular cake tin. Break up 150g white chocolate into a heatproof bowl and add the butter. Sit the bowl over a saucepan of barely simmering water and leave to melt. Remove from the water and cool for 10 minutes.
Beat the eggs and sugar into the melted chocolate mixture. Stir in the flour and baking powder, and add flavour to taste; then stir in the chocolate chunks.
Transfer to the prepared tin and smooth over the top. Bake in the oven until risen, lightly golden and lightly crusted on top (for about 25 minutes if you want a very dense centre, or for 30 minutes for a more even and spongier texture – this is my preference).
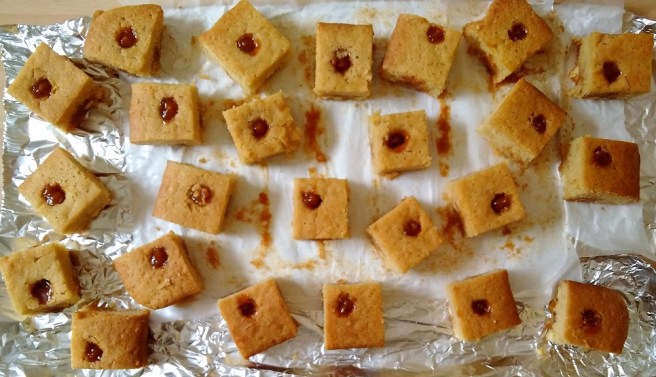
Whilst the cake is warm, score the top with a knife to make 24 equal pieces and then, using a wooden spoon handle, push the end into each portion of cake to make a deep indent – try to avoid pushing the handle right through to the bottom of the tin. Leave to cool completely in the tin.
Once the cake is cold, remove from the tin and wrap and store for 24 hours to allow the flavour to develop and the texture to moisten.
The next day, unwrap the cake and cut through into the 24 pieces. Depending on your caramel sauce preference, either squirt it straight from the tube; spoon it, or, transfer it to a piping bag and pipe sufficient caramel into each pocket to fill it.
Melt the reserved white chocolate as above and, using a teaspoon, drizzle liberally over the top of each blondie. Leave in a cool plate to set, or until you are ready to indulge. Yummy!