Welcome to my blog all about the things I love to grow and cook. You'll find a collection of seasonal gluten-free, dairy-free and vegan-friendly recipe posts, as well as a round up of my gardening throughout the year. I wish you good reading, happy cooking and perfect planting!
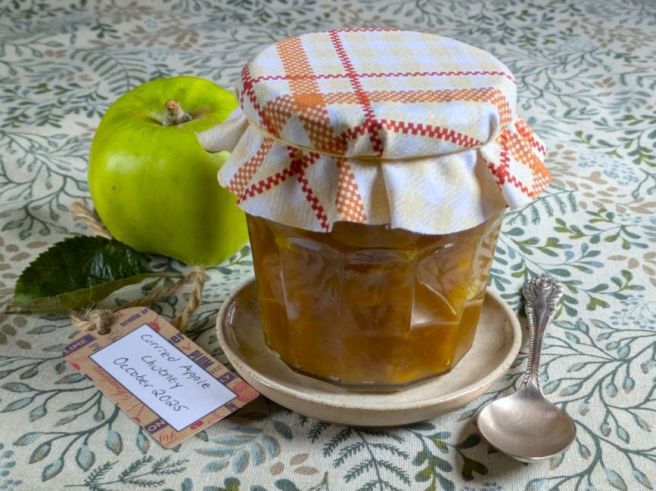
Sweet and spicy homemade chutney. Image: Kathryn Hawkins
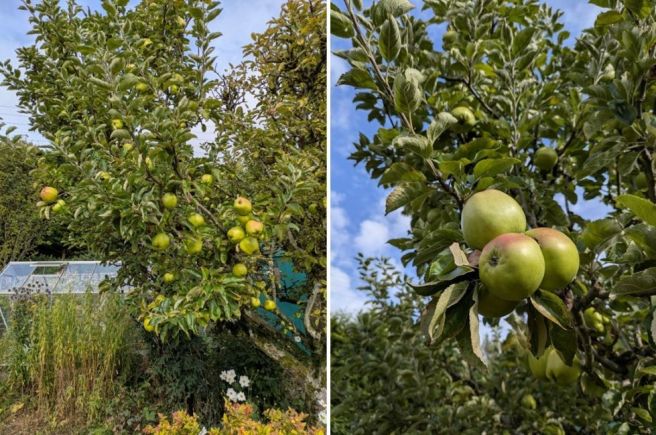
Hello again. I hope you are keeping well and enjoying the colours of Autumn. It’s remained quite dry here in central Scotland and the trees are looking very colourful around and about. Everywhere I look, it really has been a bumper year fruit especially plums and apples in my garden. The old apple tree produced yet another bountiful crop of some 70kg! Now that the harvest is in, it’s enjoying a well earned rest I’m sure.
A tree full of apples. Images: Kathryn Hawkins
Harvest gathered, this year’s bumper crop of cooking apples. Images: Kathryn Hawkins
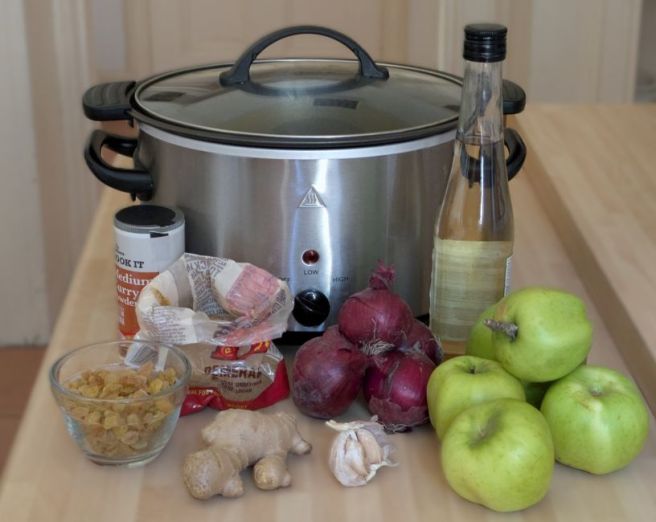
We did a lot of the apples away this year as there were far too many to cook up or freeze down. But I still have a box full to work through and one of the first things to make was some apple chutney. I made this batch in the slow cooker. It’s very easy to make and tastes delicious. One slight difference to this slow cooker recipe is that it uses less vinegar and sugar than traditional recipe so the chutney does need to be stored in the fridge.
Curried apple chutney ingredients. Image: Kathryn Hawkins
Makes: approx. 1.2kg
Ingredients
300g prepared red or white onions, chopped
15g peeled root ginger, grated
10g peeled garlic, grated
750g prepared cooking apples, chopped
125ml cider or white wine vinegar
1tbsp medium curry powder
100g sultanas
200g Demerara sugar
1 1/2 tsp salt
1. Put the onion, ginger, garlic and apples in the slow cooker. Pour over the vinegar, mix well, cover with the lid and cook on High for 4 hours.
Apple chutney preparation. Images: Kathryn Hawkins
2. Stir in the remaining ingredients, cover and cook for 30 minutes longer to dissolve the sugar. After this time, remove the lid and if the mixture looks watery, leave the chutney to cook without the lid on for up to 2 hours, stirring occasionally, until thick and jam-like.
The 4 stages of slow cooker chutney. Images: Kathryn Hawkins
3. Leave to cool completely then pack into clean jars, seal tightly and store in the fridge for up to 3 months. It’s ready to eat immediately and doesn’t need to mature. Great news for the impatient preserve-makers amongst us 🙂
A spoonful of homemade chutney. Images: Kathryn Hawkins
This chutney makes a great alternative to mango chutney with and Indian meal as well as a delicious finishing touch to a sandwich.
That’s me for another month. Enjoy the rest of the season and I’ll see you again next month when winter will be upon us. Until then, take care and thanks for stopping by.
Hello again. I hope you are keeping well. Are you beginning to feel Christmassy yet? We’ve had some snowfall here, not very much but it certainly feels like winter is upon us.
I haven’t had much time for making preserves this year and most of my harvested garden produce is still buried deep in the freezer waiting for me to get cooking. However, I did find some time a few days ago to make one of my favourites. I love the combination of sweet and smoke with a hint of chilli spice in this savoury jelly. It’s one of those preserves that goes with lots of things and makes a great gift for a food lover. It’s also ready to eat immediately or will store for up to a year.
You might want to scale back the recipe to make a smaller quantity but I wanted a few jars for myself as well as a couple to give away. Add more chillies for a spicy-hot jelly or use hot smoked paprika instead.
Makes: approx. 1.4kg
Ingredients
Approx. 1.5kg cooking apples, washed and left whole
Approx. 750g red (bell) peppers or capsicum, washed and stalks removed
50-100g red chillies, washed and stalks removed
6-8 garlic cloves, peeled
2 large sprigs of fresh sage
5 bay leaves
approx. 1.1kg granulated white sugar
175ml cider vinegar
2tsp smoked paprika
1½tsp salt
1-2tsp dried chilli flakes
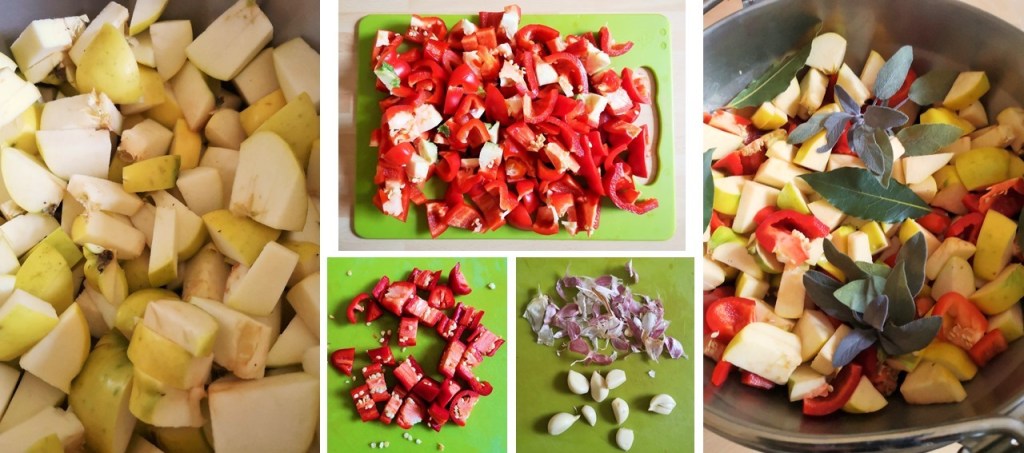
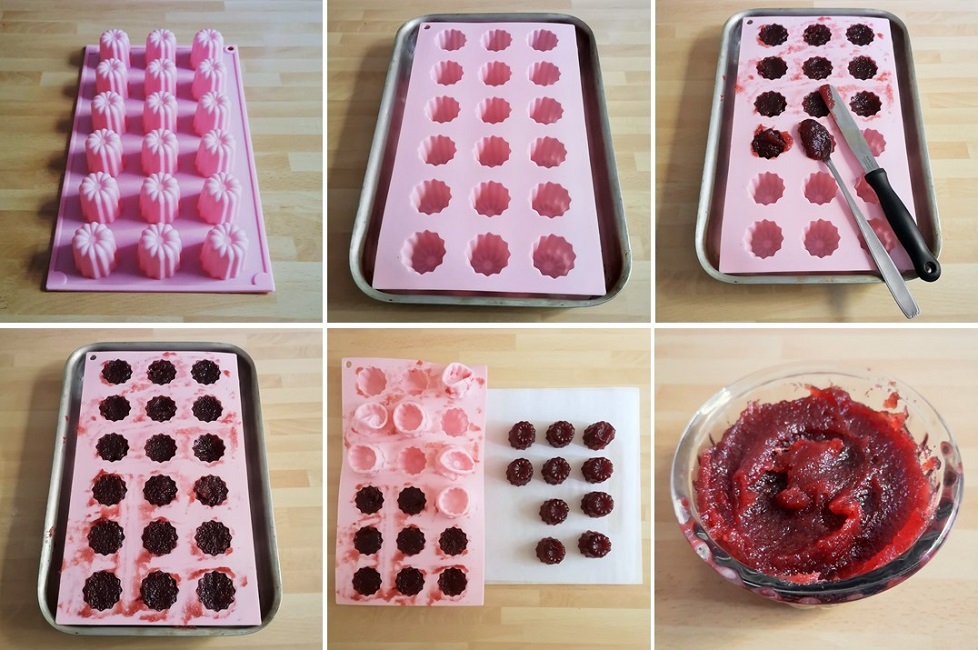
1. Chop the apples and place in a large preserving pan – seeds, core, skin, everything. Do the same with the peppers and chillies, then add to the pan along with the garlic, sage and bay leaves.
Main ingredients: apples, peppers, chillies and garlic. Images: Kathryn Hawkins
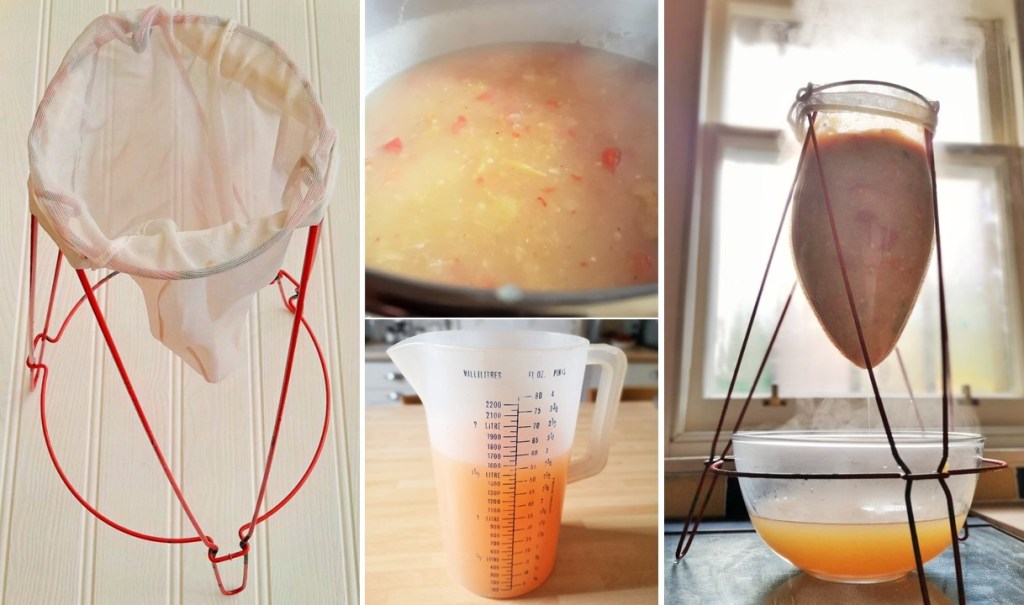
2. Pour over 1.7l water, bring to the boil, cover and simmer for about 40 minutes, mashing with a spoon occasionally, until everything is soft and pulpy. Leave to cool for 30 minutes.
3. Carefully ladle the pulp into a jelly bag suspended over a bowl and leave in a cool place to drip over night. Discard the pulp and measure the juice.
Making and straining the cooked fruit and veg. Images: Kathryn Hawkins
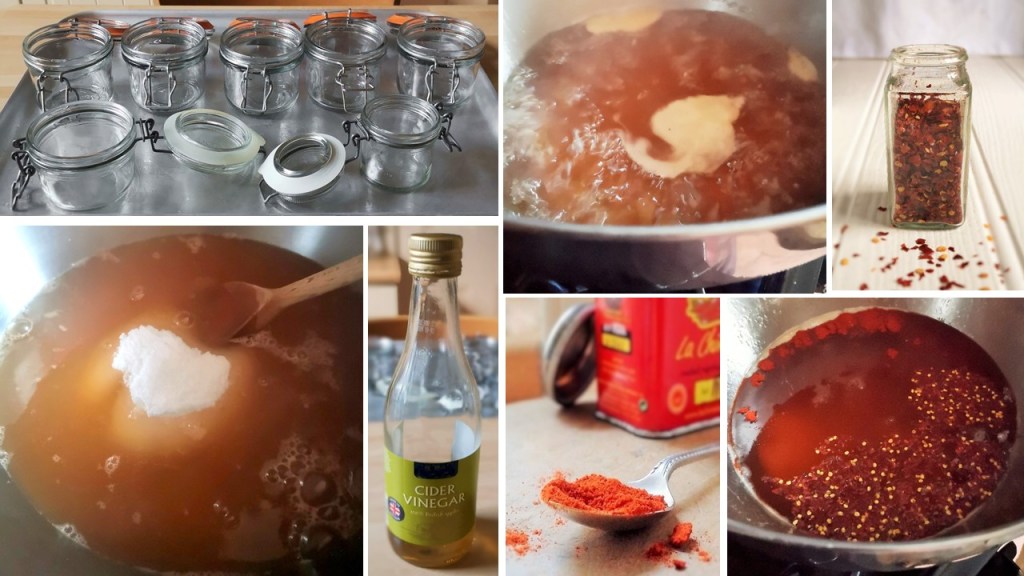
4. Pour the juice into a clean preserving pan and heat until hot. Add 450g sugar for every 650ml juice collected – I had 1.6l juice and added 1.1kg sugar. Pour in the vinegar and stir until the sugar dissolves, then raise the heat and boil rapidly until setting point is reached – 105°C on a sugar thermometer. Turn off the heat and stir in the salt, paprika and chillies. Leave to stand for 10 minutes.
Cooking and flavouring the jelly. Images: Kathryn Hawkins
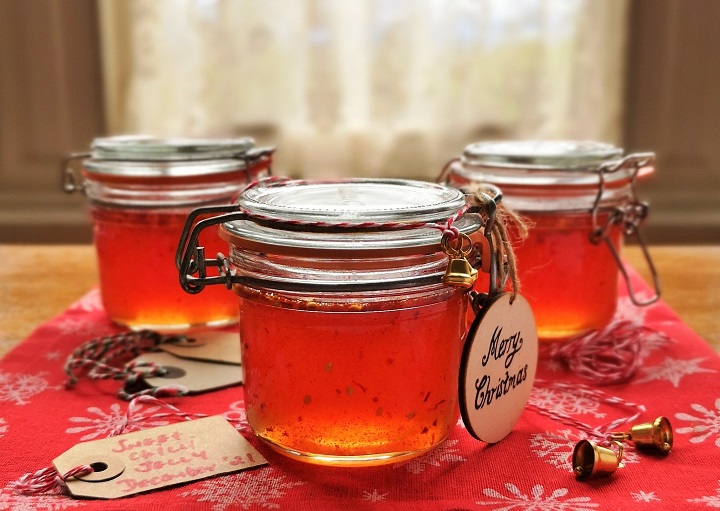
4. Stir the jelly mixture and ladle into sterilized jam jars. Seal tightly while hot, then leave to cool before labelling. Store in a cool, dry, dark cupboard for up to 1 year.
Freshly cooked sweet chilli jelly in the jar and on the spoon. Images: Kathryn Hawkins
That’s me for another week. One more recipe post before the holidays. I’ll see you again in a few days. All the best until then 🙂
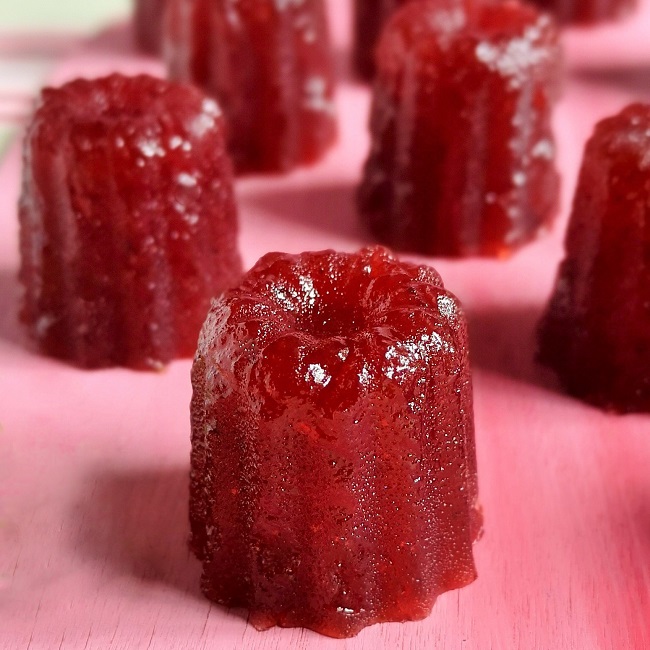
Homemade plum, sloe and apple cheese. Image: Kathryn Hawkins
Hello again. I have a very seasonal recipe to share with you this week. I have been out and about enjoying the autumnal colours. On one of my walks, I was fortunate enough to find some sloe berries still in situ on a wild blackthorn hedge. They were growing so thickly that they looked like bunches of grapes. I had a small bag with me and was able to fill it with a precious harvest of these dark blue-skinned fruits with their fine silvery bloom.
Scottish sloe foraging. Images: Kathryn Hawkins
Finding the sloes coincided with the last few Victoria plums ripening in the garden, and the beginning of the apple season. What better way to use them all than to combine them in a delicious thick and fruity preserve, the perfect colour to match the season.
End of the season Victoria plums and new season Lord Derby cooking apples. Images: Kathryn Hawkins
I have posted a similar recipe to this one, before using only plums. You can find the recipe here: Plum and bay membrillo (naturally gluten-free and vegan) This year’s version is very fruity and makes a delicious sweet treat on its own or with cream or yogurt. Serve it as an accompaniment to roasted, grilled or barbecued food, and if you eat cheese, it’s good served with just about any variety.
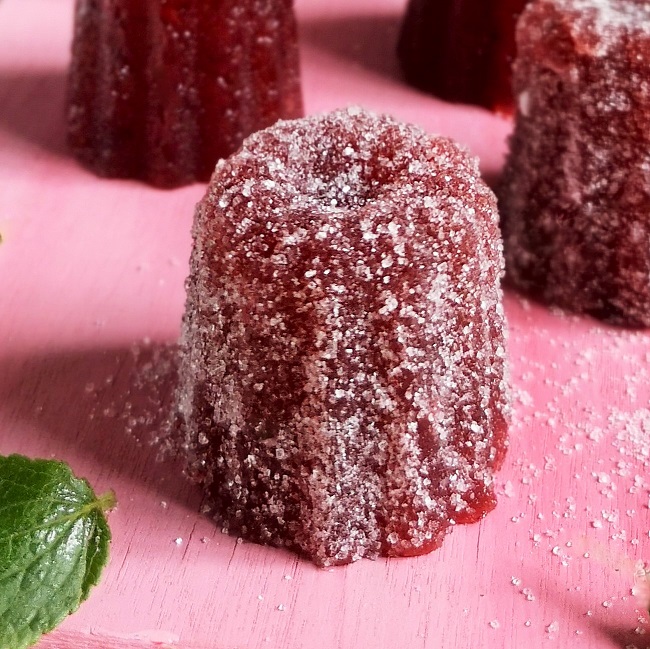
Sugar-coating fruit cheeses. Image: Kathryn Hawkins
I set the fruit cheese in individual silicone moulds and dusted them with more sugar; the remaining cheese went into a ramekin dish. Choose anything heatproof like a tin or ovenproof dish; line the container and then once it is cold you can slice it or turn it out. Keep the cheese wrapped up in the fridge for up to a month or it can be frozen. Set in a pretty little dish, I think it would make a lovely edible gift – if you can bring yourself to hand it over to anyone else!
Sugar-coated fruit cheese. Image: Kathryn Hawkins
Makes: approx. 750g
Ingredients
275g plums, stones removed, chopped
275g sloes, washed
500g cooking apples, cored and chopped
approx. 550g granulated white sugar + extra for dusting (optional)
1. Put all the fruit in a large saucepan and pour over 200ml water. Bring to the boil, cover and then simmer for 15-20 minutes until very soft.
2. Mash the fruit and push through a nylon sieve positioned over a large bowl until you have only dry matter left in the sieve. Weigh the purée. My yield was around 850g of fruit purée.
Cooking the fruit for cheese. Images: Kathryn Hawkins
3. Clean the saucepan and put the purée back inside. Bring to the boil and cook, stirring occasionally, for about 20 minutes to reduce the pulp by about one third – it should be thick enough to hold a “slice” in the bottom of the sauce.
4. To make the preserve, you need to stir in the same quantity of white sugar to the amount of thickened purée – I had 550g purée so I added 550g white sugar.
5. Stir the mixture until the sugar dissolves and then bring back to the boil and continue cooking for a further 20 minutes, stirring frequently to prevent the mix sticking on the bottom of the pan, until very thick. If you have a jam thermometer, cook the mixture to 105°C. I use a spatula for the stirring because it gets right into the edges of the pan which helps to prevent the mixture sticking and burning.
Cooking the fruit purée. Images: Kathryn Hawkins
6. Working quickly, spoon the mixture into whatever you have chosen to set the cheese. As the mixture cools, it becomes thicker and more solidified making it more challenging to shape. However, you can reheat the mixture gently to soften it if you need to.
7. Allow the cheese to cool and set completely before attempting to turn it out or to slice it. I would suggest chilling it for an hour after cooling if you want to turn it out cleanly.
Moulding and unmoulding the fruit cheese. Images: Kathryn Hawkins
If you are making individual cheeses, you will find that a sugar coating sticks easily to the surface. Simple sprinkle over or gently roll the cheeses in a pile of sugar. The sugar coating does make smaller pieces easier to wrap in waxed paper and helps prevent the cheese sticking to the wrapping.
Fruit cheeses up close. Image: Kathryn Hawkins
I hope you have a good few days ahead and that you are able to get out and about to enjoy the beautiful shades of the season. Until next time, my best wishes to you 🙂
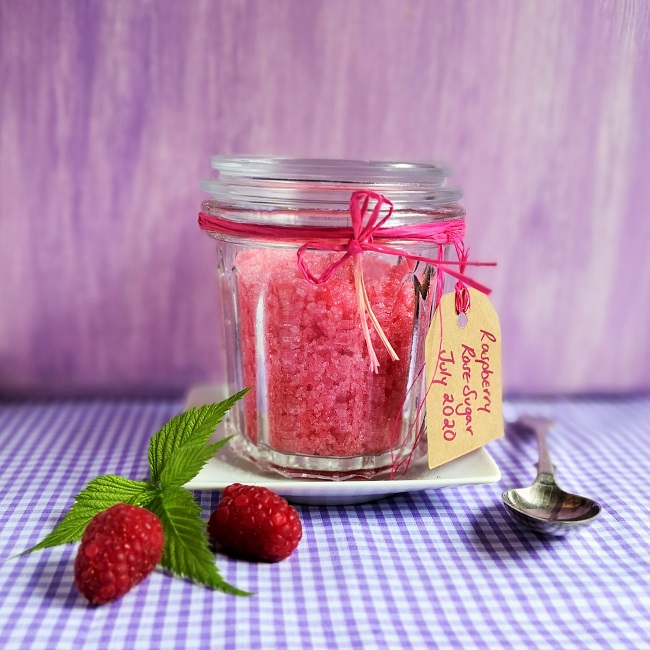
Homemade raspberry and rose sugar. Image: Kathryn Hawkins
Hello again. I hope this post finds you keeping well and enjoying some good weather. It’s been a mixed bag here since my last post. Quite a lot of rain, some strong winds and some sunshine in between. Apart from the wind which no plant likes, the combination of rain and sunshine has been perfect for the ripening of the raspberries in the garden.
This past week, quite randomly, one or two berries have turned red almost overnight. I have been able to harvest a handful so far, which, believe it or not, is more than you need for my recipe this week.
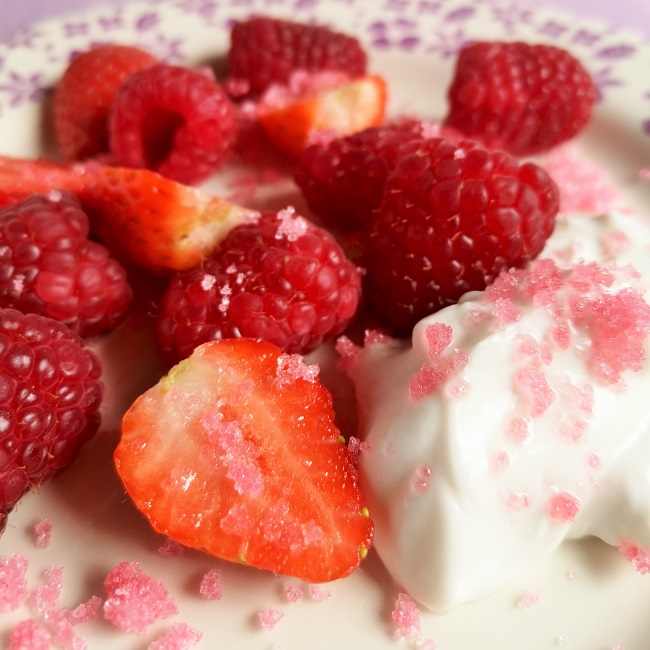
Berries and yogurt sprinkled with raspberry sugar. Image: Kathryn Hawkins
This very simple recipe for fruit-flavoured sugar can be made with strawberries if you have them and makes a pretty sprinkle over fruit desserts or as a cake or cookie decoration. It doesn’t take long to make but if you want to store the sugar for a while, you need to leave the sugar to dry out for a few hours before putting it into a storage container. If the flavour of rose isn’t to your taste, leave it out of the mix altogether, or add some finely grated orange rind or vanilla seeds instead. Here’s what you do……
Makes: 200g
Ingredients
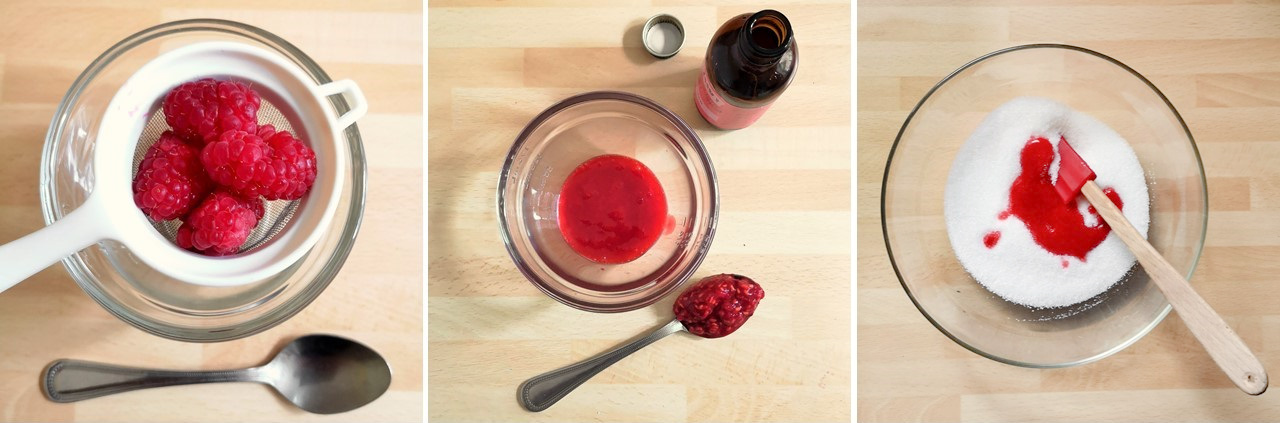
Approx. 25g fresh raspberries
A few drops rosewater
200g granulated sugar
Wash and pat dry the raspberries. Push through a small sieve to remove the seeds and make a purée – you need 1 tbsp of sieved raspberry purée.
Add a few drops of rosewater to taste.
Put the sugar in a bowl and mix in the raspberry purée until well blended. The sugar can be used immediately but will be too soft and damp for long-term storage.
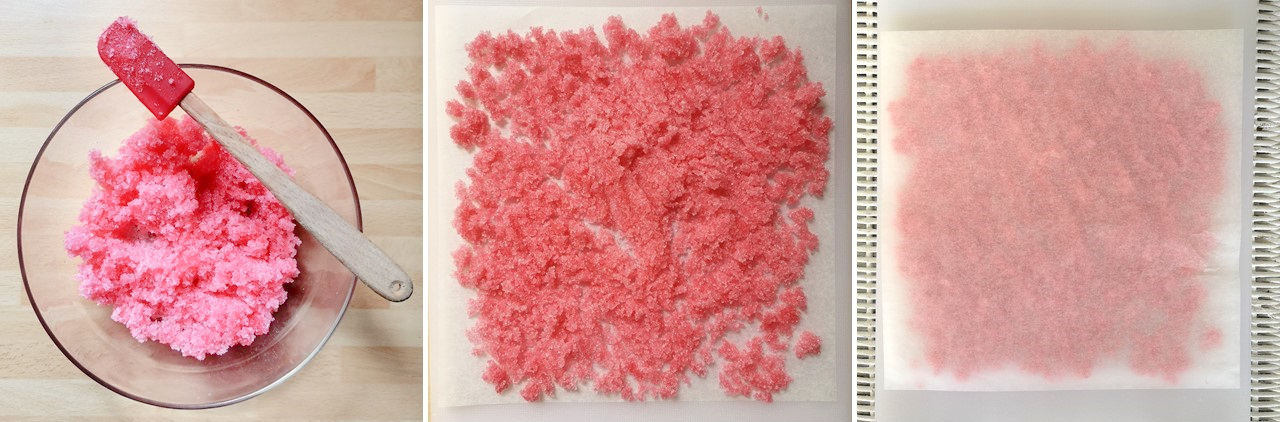
Mixing and drying raspberry sugar. Images: Kathryn Hawkins
Spread the sugar evenly on a sheet of greaseproof paper on a board, then cover with another sheet of paper and leave in a dry, warm place for a few hours (or overnight) until dry and crisp.
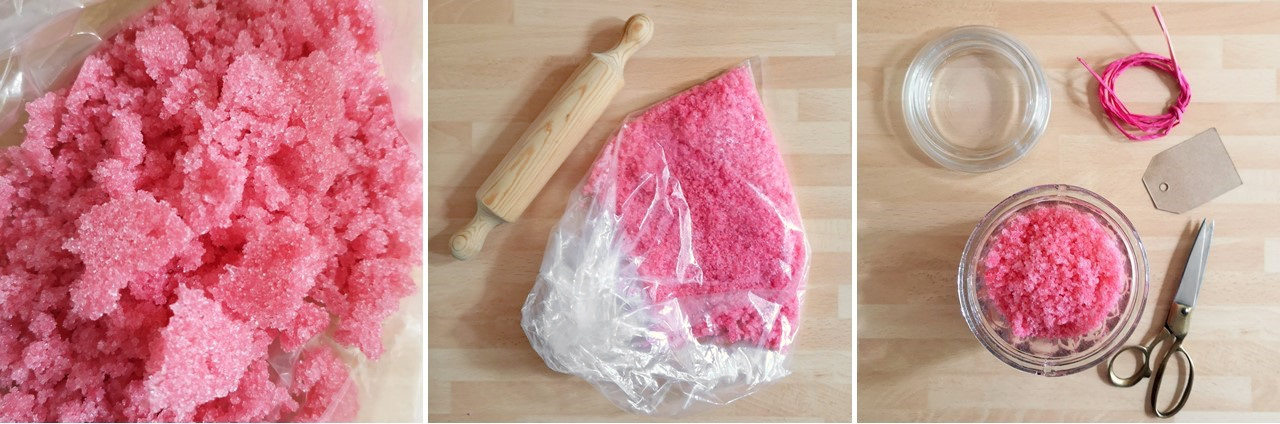
Transfer the sugar to a clean plastic bag – it will dry in clumps. Twist the bag closed and and crush with a rolling pin to break up the clumps of sugar crystals.
Preparing dry raspberry sugar for storage. Images: Kathryn Hawkins.
Spoon into clean jam jars and seal well. Store in a cool, dry place, away from the light for up to 6 to 8 weeks.
Sugar dusted berries with coconut yogurt. Image: Kathryn Hawkins
I am looking forward to a good crop of raspberries this year, the bushes look full of berries. I netted the bushes today – I want to make sure I get to them before the birds do! Until next time, I hope you have a good few days and that you are able to enjoy eating fresh seasonal fruit and vegetables 🙂
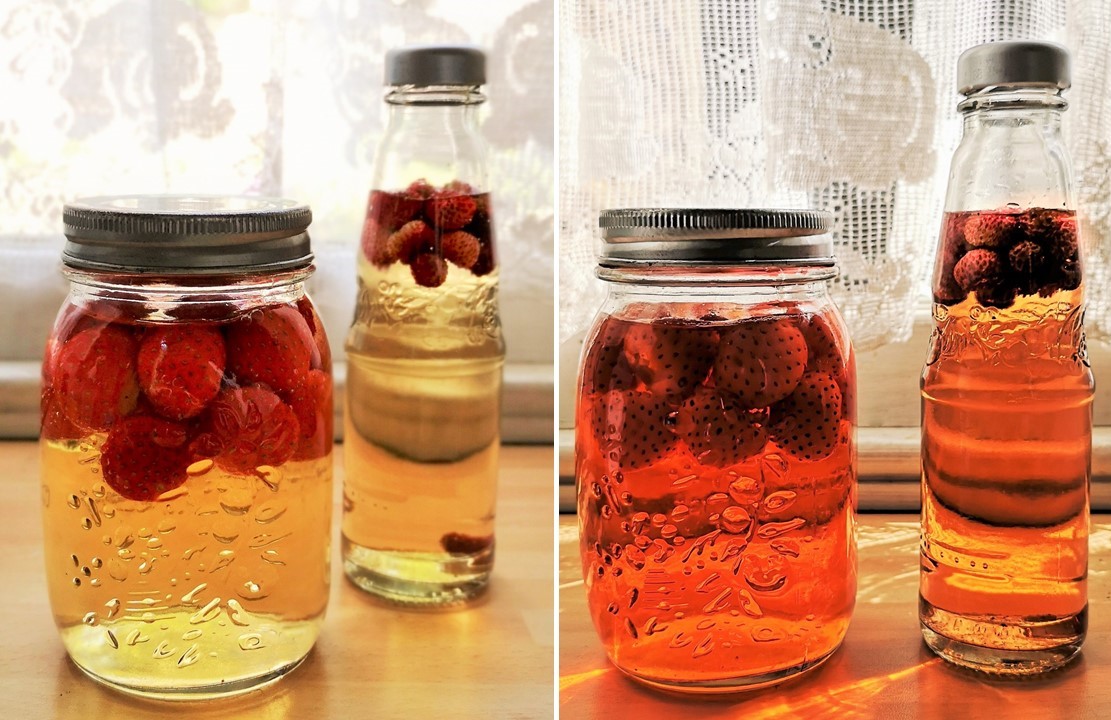
June 2020, homemade strawberry vinegars. Image: Kathryn Hawkins
Hello everyone. I hope you are well. I can hardly believe that we are halfway through the year already! Where does the time go? This is such a great time of the year for homegrown produce. The strawberries in particular seem particularly good this year. Very fragrant and sweet. To mark midsummer on the calendar, I decided to make some strawberry vinegar this week to capture the flavour of the season.
Wild and cultivated Scottish strawberries. Images: Kathryn Hawkins
I have a few wild strawberry plants growing around the garden and I managed to harvest a handful of ripe berries before the birds got to them. The cultivated ones came from a local farm shop. Perfectly formed heart-shaped fruit, sweet and delicious, and perfect for flavouring vinegar.
Ingredients and equipment for fruit vinegar making. Image: Kathryn Hawkins
In the past I have used white balsamic vinegar as a base, but as the fruit is so sweet this year, I used a plain white wine vinegar. A clean screw-top bottle for the wild strawberry vinegar, and a wide-neck screw-top jar for the larger berries. Make sure the lids are non-corrosive and that everything is very clean for perfect results. The method is the same for any berry.
Wash and pat dry the fruit and remove stalks and hulls, etc. Prick larger fruit with a small skewer a few times before putting in the jar to help release the juices. Depending on the time of year you are making fruit vinegar, you may want to warm the vinegar slightly before you pour it over the fruit. The temperature here was quite warm this week, so I just used the vinegar straight from the bottle. Simply cover the fruit with vinegar and seal it up. How much fruit you use is up to you, I like to use a fair bit to start with to give a more intense flavour at the beginning.
Maturing on with windowsill. Images: Kathryn Hawkins
Leave the vinegar on a bright windowsill, and give it a light shake each day. You will see the colour change quite quickly. I leave the first lot of berries in the vinegar for 3 or 4 days, then I strain off the vinegar and add a fresh batch of berries. After the second addition, put the vinegar in a cool, dark place and after this time you will end up with a vinegar ready to use in about a month. For longer storage, remove the fruit after a month. rebottle and seal until ready to use.
Strawberry heart. Image: Kathryn Hawkins
As I type this last paragraph, it is still very bright here at just after 9.30pm and the sky still has patches of blue here and there. Until next time, I wish you a happy summer solstice and midsummer eve 🙂
Hello everyone. I have two lighthearted recipes for you this week. One for cake and one for cookies, and if you choose to, you can make either or both 🙂
I don’t think there are many people who can resist a gingerbread man cookie. They look so cute for one thing and then there is the sweetness and the mellow spiciness of gingerbread itself. It is a perfect bake for this time of year with its warming and comforting aroma and flavour.
Just waiting to be eaten. Image: Kathryn Hawkins
The gingerbread men cookies keep very well in an airtight container for over a week, and also freeze well. The cakes are best eaten within 24 hours, so you may want to ice a few at a time. After 24 hours, I find that the cake dries. The cake batter has a relatively low fat content compared to other cake recipes so the keeping qualities are reduced. No matter, the cakes and the frosting freeze fine too. By the way, the uniced cakes can be served warm as a pudding, just pop in the microwave for a few seconds and voila!
Mini homemade gingerbread men cookies. Image: Kathryn Hawkins
On with the recipes. They are remarkably similar in ingredients and straightforward to make so I hope you enjoy making them 🙂
Gingerbread men cookies
Makes: approx. 25
Ingredients:
75g plain gluten-free flour blend (such as Doves’ Farm) + extra for dusting
¼ tsp bicarbonate of soda
1 tsp ground ginger
½ tsp ground mixed spice
25g dairy-free margarine
40g soft dark brown sugar
25g golden or corn syrup
1 tbsp white icing for decorating (I make mine simply with 2 tbsp icing sugar and a few drops of water)
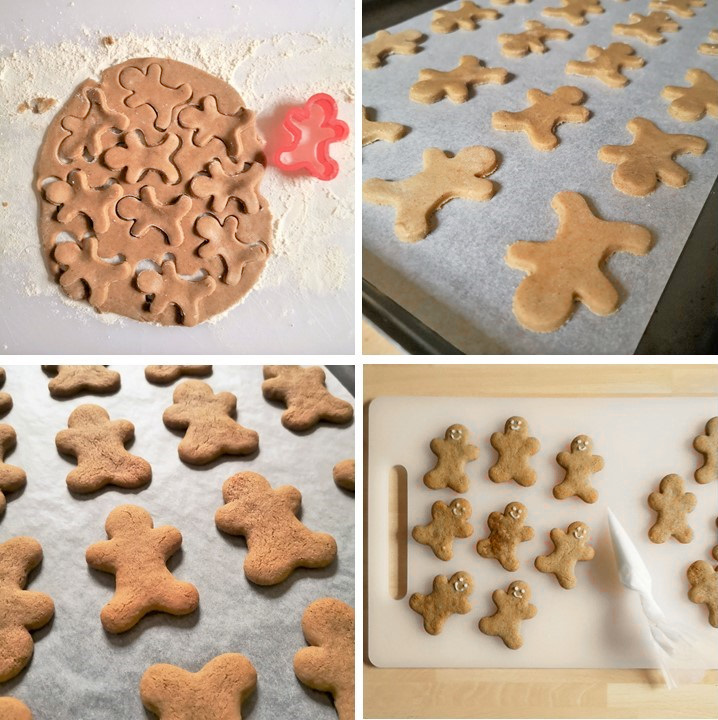
Line 2 baking trays with baking parchment. Sieve the flour, bicarbonate of soda and the spices into a bowl and rub in the margarine with your fingertips until well blended. Stir in the sugar.
Make a well in the centre and add the syrup, then mix everything together well to make a softish, smooth dough.
Lightly dust the work surface with a little more flour and roll out the dough to a thickness of about 3mm. Use a small gingerbread man cutter to cut out shapes, gathering and re-rolling the trimmings as necessary. My cutter is 6cm tall, and I made 25 cookies. Transfer to the baking trays and chill for 30 minutes.
Preheat the oven to 190°C, 170°C fan oven, gas 5 and bake the cookies for about 10 minutes until firm and lightly golden. Transfer to a wire rack to cool.
When cool, put the icing in a piping bag (no nozzle necessary). Snip off a tiny piece from the end and pipe features on each cookie. Leave for a few minutes to dry before storing in an airtight container.
Making, baking and decorating gingerbread men cookies. Images: Kathryn Hawkins
Gingerbread cupcakes
Makes: 12
Ingredients
300g plain gluten-free flour blend
20g gluten-free baking powder
2 tsp ground ginger
1 tsp ground mixed spice
190g soft dark brown sugar
2 pieces stem ginger, finely chopped (optional)
75ml vegetable oil
225ml plant-based milk (I used oat milk)
Lightly spiced frosting
100g dairy-free margarine, softened
200g icing sugar
2 tsp ground ginger
½ tsp ground mixed spice
1 tbsp ginger wine or the syrup from stem ginger jar if using (optional)
Preheat the oven to 180°C, 160°C fan oven, gas 4. Line 12 muffin or cupcake tins with paper cases. Sieve the flour, baking powder and spices into a bowl. Add the sugar and stem ginger if using. Mix everything together.
Make a well in the centre and add the oil and milk. Gradually work the dry ingredients into the liquid and continue mixing until all the ingredients are well blended and make a smooth, thick batter.
Divide between the cases and bake for about 30 minutes until just firm to the touch – they do sink a little bit so don’t worry. Transfer to a wire rack to cool.
For the frosting, put the margarine in a bowl and beat to make it smooth and glossy, then gradually sieve over the icing sugar, in small batches, mixing it in well after each addition, to make a smooth, soft and fluffy icing. Stir in the spices and ginger wine or syrup if using.
Transfer to a piping bag fitted with a small closed star nozzle, and pipe a swirl on top of each cupcake. If you don’t fancy piping, simply smooth some frosting on top using a small palette knife.
Baking and decorating gingerbread cupcakes. Images: Kathryn Hawkins
Just before serving, pop a gingerbread man cookie on top of each cupcake. The cookies will go soft if left on top of the cakes for more than half an hour, so best leave the arranging until the last minute to eat them at their crisp best.
Have a good few days. Until next time, happy baking!
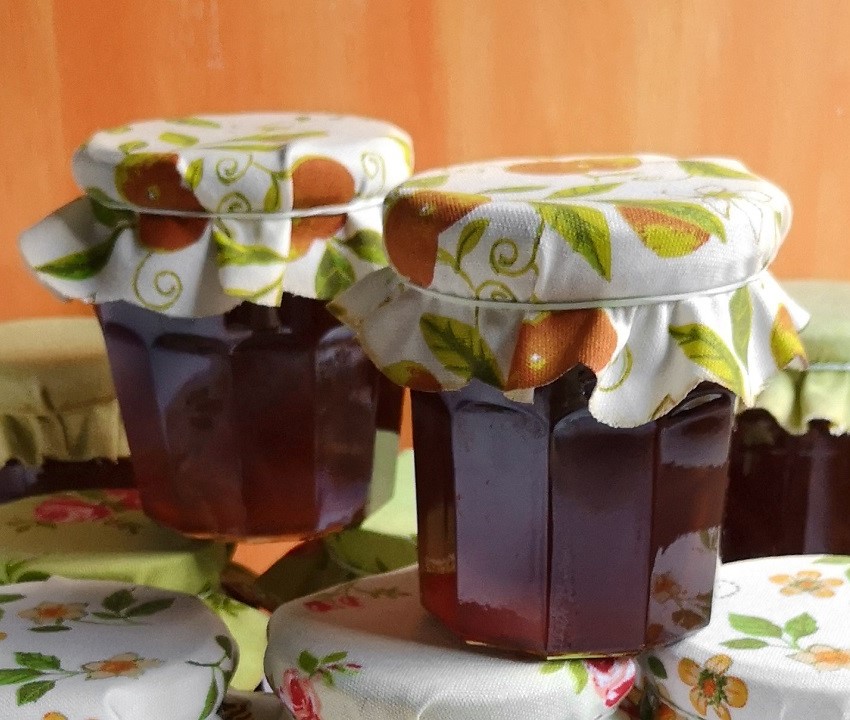
Seville orange marmalade-making comes but once a year, and that time is now. The bitter Spanish oranges are only in the shops between January and mid February. They are the best citrus fruit to achieve a classic tartly-flavoured orange marmalade, the favourite preserve of one Paddington Bear 🙂
In season, Seville oranges. Images: Kathryn Hawkins
There’s no getting away from it, making marmalade is labour-intensive if you make it the traditional way, but I enjoy it, and to me, the reward is greater than the effort involved. I have 2 versions of the same recipe to post this week. The first is the traditional, bright orange, softly set breakfast staple that we’re all familiar with. The second is a dark version which includes dark brown sugar to give a treacly flavour; it is also my personal favourite – delicious over porridge or rice pudding. However, it doesn’t photograph that well in the jar as you may imagine, so I am only posting “selective” images!
Traditional and dark Seville orange marmalade. Images: Kathryn Hawkins
How you prepare the peel is up to you. I like chunky (which is easier to prepare!). Get yourself organised and soak the peel overnight as this helps soften it, and make sure you cook it properly before adding the sugar to the pan – once the sugar is added, the peel won’t soften any more.
Marmalade spoonfuls. Images: Kathryn Hawkins
On with the recipe, and happy marmalade making if you fancy having a go 🙂
Makes: approx. 3kg
Ingredients
750g Seville oranges (approx. 5 large fruit), washed
2.5 litres cold water
2kg granulated sugar
100ml freshly squeezed lemon juice
The day before, juice the oranges, keeping all the pips and membrane that remain on the juicer. Cover the juice and refrigerate.
I use a serrated grapefruit spoon to scrape out the fleshy bits that remain inside the orange shells, leaving just the skin and pith of the oranges ready for slicing.
Pile all the pips, membrane and scrapings from inside the orange shells onto a large piece of clean muslin, and tie in a bundle securely with string. Put to one side. Halve the orange shells and slice as thinly and as small as you like.
Preparing the orange peel. Images: Kathryn Hawkins
Place the sliced orange in a large bowl, pour over the water and add the muslin bag. Cover loosely, put in a cool place and leave to soak overnight.
The next day, carefully transfer the contents of the bowl into a large preserving pan. Bring to the boil, then reduce the heat to simmer the peel gently until very soft. This takes around 45 – 55 minutes depending on how thick you cut the peel.
Carefully remove the muslin bag and place in a sieve over a jug. Squeeze out as much of the liquid as you can, and pour back into the saucepan. Discard the bag.
Soaking and cooking the peel. Images: Kathryn Hawkins
Pour the orange juice into the saucepan and stir in the sugar and lemon juice. Mix well and heat gently until the sugar dissolves. Raise the heat and let the mixture come to a rapid boil, then cook the marmalade for about 20 minutes until the temperature reaches 105-106°C – spoon a little on to a cold plate from time to time as the temperature rises to check setting point is reached; once it cools, the pool of marmalade should wrinkle when pushed gently with your finger.
Turn off the heat and leave the contents of the pan to stand for about 15 minutes – this enables the mixture to thicken a little and helps keep the citrus peel evenly suspended in the jelly when transferred to the jars.
Stir the marmalade well before spooning into clean jars whilst hot, and seal well. Leave to cool, then label and store in the usual way.
This year’s haul of homemade marmalade. Image: Kathryn Hawkins
For the dark version, replace 500g of the granulated sugar with dark brown sugar and cook as above. If you use a very dark Muscovado sugar you may find the setting point more difficult to achieve (as I did this year!). I added a 250ml bottle of liquid pectin to the mixture to help things along, and a good set was achieved. I have no idea why this happened, the same recipe worked fine last year, the only change was a darker variety of sugar. One of life’s little mysteries…..Have a good week 🙂
Brown sugar Seville orange Marmalade. Image: Kathryn Hawkins
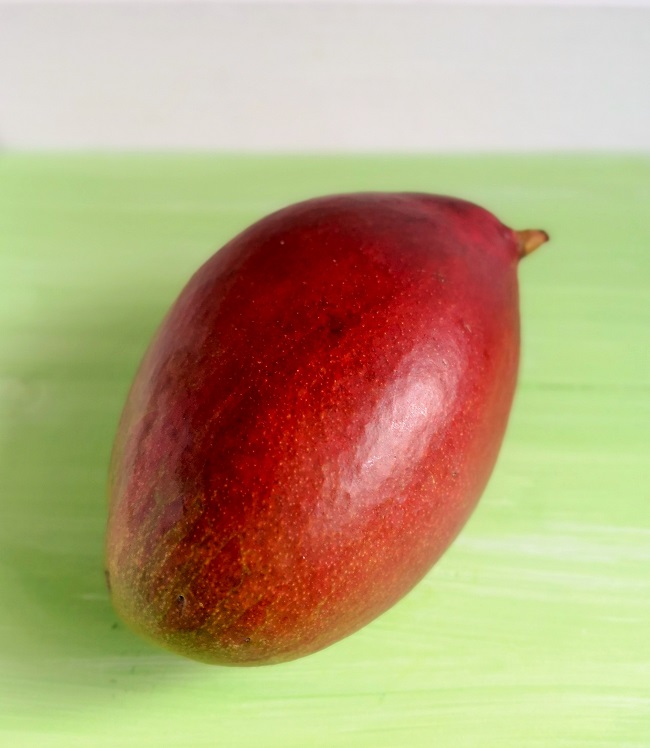
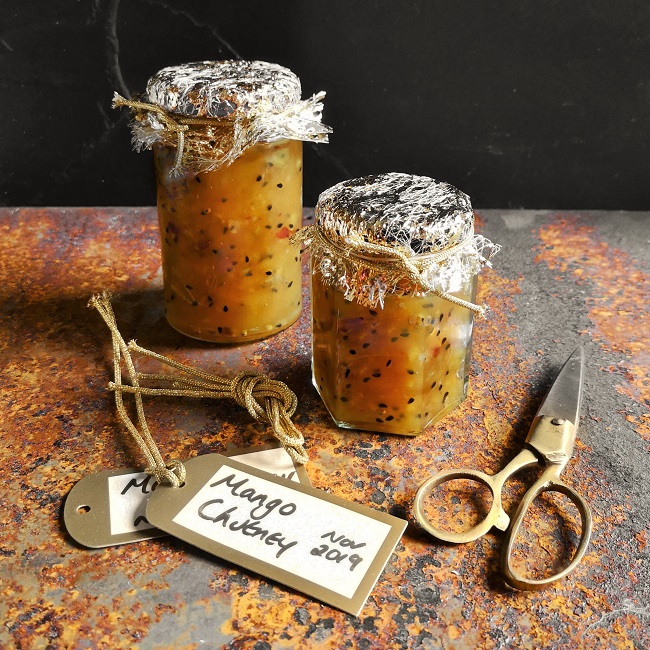
It’s the time of year when you might be thinking about making something edible for giving as a Christmas present so my post this week may be an idea for you. Last week I found large fresh mangoes for sale in the supermarket at a very reasonable price and decided to make mango chutney. This is a favourite preserve in our house; we get through lots of it, but I hardly ever get round to making it.
Fresh mango fruit. Image: Kathryn Hawkins
Choose slightly under-ripe mangoes for chutney so that you end up with some texture in your preserve. Very ripe mango will go very soft and will also increase the sweetness of the final chutney.
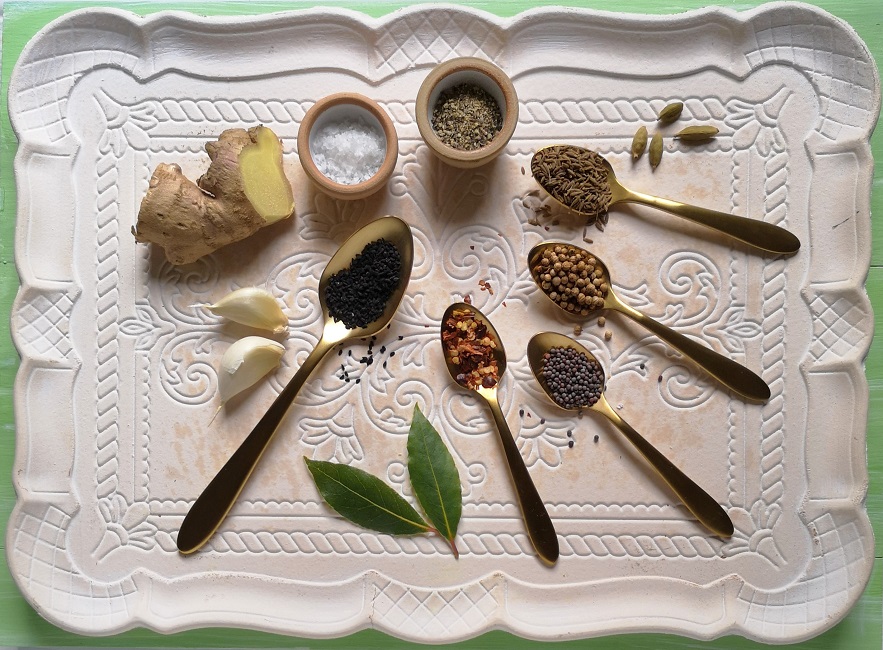
Spice and seasoning tray. Image: Kathryn Hawkins
You can go one of two ways when you make mango chutney: the spicy route, whilst or the smooth, sweet and jam-like. If you prefer the latter, you don’t need to add the spice bag or the chillis and onion seeds from the recipe below, but I do recommend keeping the ginger, bay and garlic as well as salt and pepper . Blend or mash the mango finely before you start, and for a more vibrant colour, add some paprika.
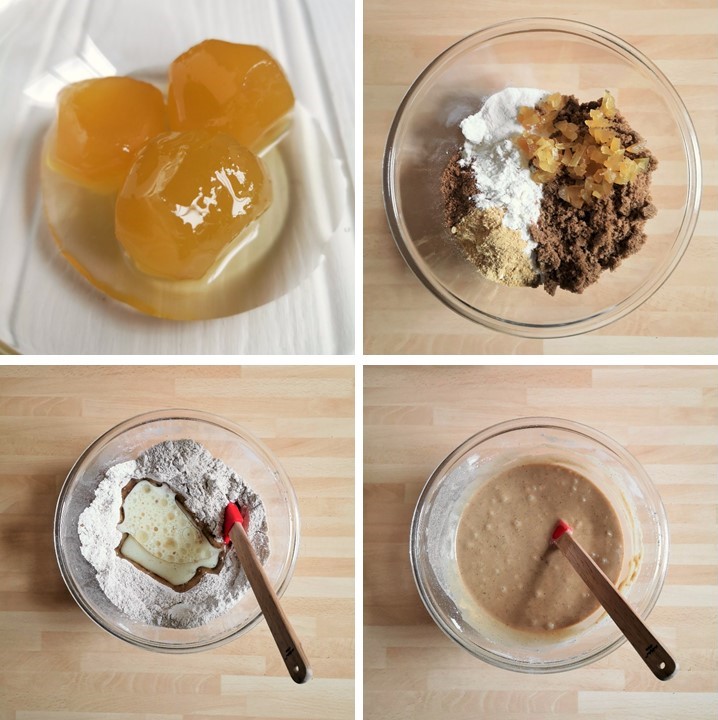
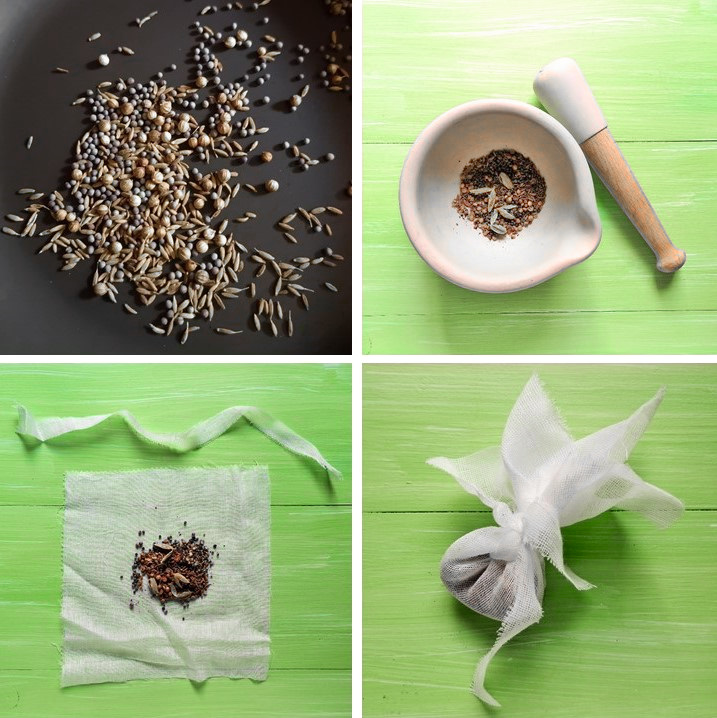
Toasting and grinding spices ready for a spice bag. Images: Kathryn Hawkins
For a spicy version, I prefer to keep the chutney as clear as possible so I avoid ground spices as these can give a murky result. Instead I opt for making a spice bag. It’s a bit of a faff but worth it to achieve a more “professional” appearance. Toast the cumin, coriander and black mustard seeds first in a dry frying pan for a couple of minutes. Cool and then grind them with the cardamom pods. Pile on to a small square of clean muslin and add the ground pepper. Tie up with a strip of muslin or clean cook’s string and you’re ready to go.
Ready for gifting. Image: Kathryn Hawkins
If you can bear to part with your preserve, it does make a lovely and impressive gift for any curry or Indian food lover. Make it now and it will be just about ready to eat at Christmas, but perfect for keeping into the new year. I haven’t decided what to do with my 3 jars yet – keep or gift? Probably the former 🙂
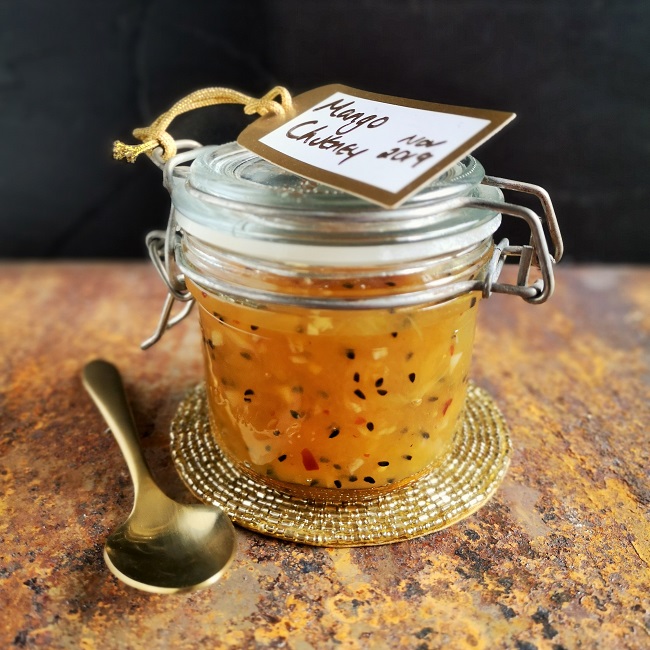
Homemade mango chutney ready for storage until Christmas. Image: Kathryn Hawkins
Makes: approx. 525g
Ingredients
½ tsp each cumin, coriander and black mustard seeds
4 cardamom pods
½ tsp coarse ground black pepper
2-3 large slightly under-ripe mangoes – see below
2 garlic cloves, peeled and finely chopped
20g piece root ginger, peeled and finely chopped
2 bay leaves
1 tsp dried chilli flakes
150ml cider vinegar
225g granulated sugar
2 tbsp. fresh lemon juice
1 tsp black onion seeds
½ tsp salt
First make up the spice bag as described above and put to one side. Next prepare the mango. Slice down either side of the large smooth, flat central stone. Peel off the skin and chop the flesh, then slice off the remaining flesh from around the edge of the stone. You will need 600g prepared fruit for this recipe.
Fresh mango preparation. Images: Kathryn Hawkins
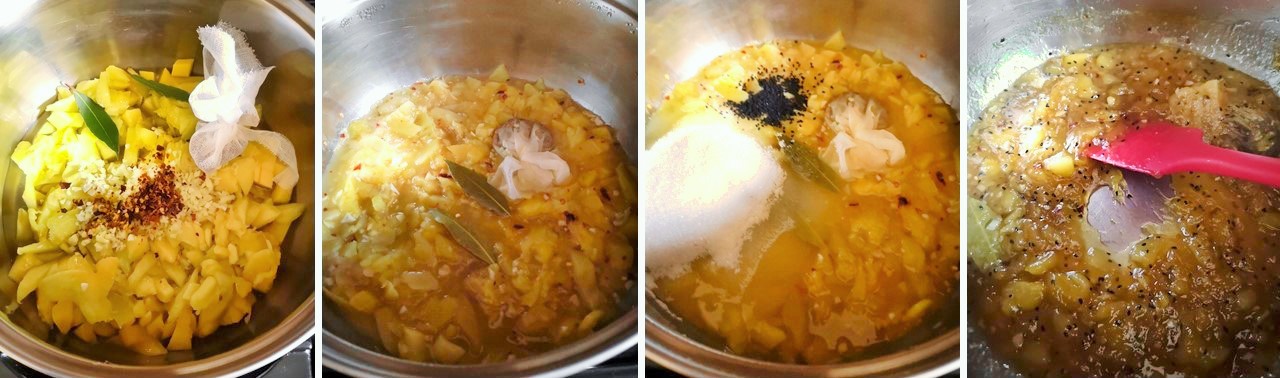
Put the mango flesh in a large saucepan and add the spice bag, garlic, ginger, bay leaves and chilli. Pour over the vinegar, bring to the boil, cover and gently simmer for about 10 minutes until softened.
Stir in the sugar until dissolved, then add the lemon juice. Bring to the boil and cook for about 15 minutes until thick and jam-like, stirring occasionally as it may start to stick on the bottom of the saucepan. Turn off the heat, stir in the onion seeds and salt, cover and stand for 10 minutes, then discard the bay leaves and spice bag.
The 4 stages of chutney. Images: Kathryn Hawkins
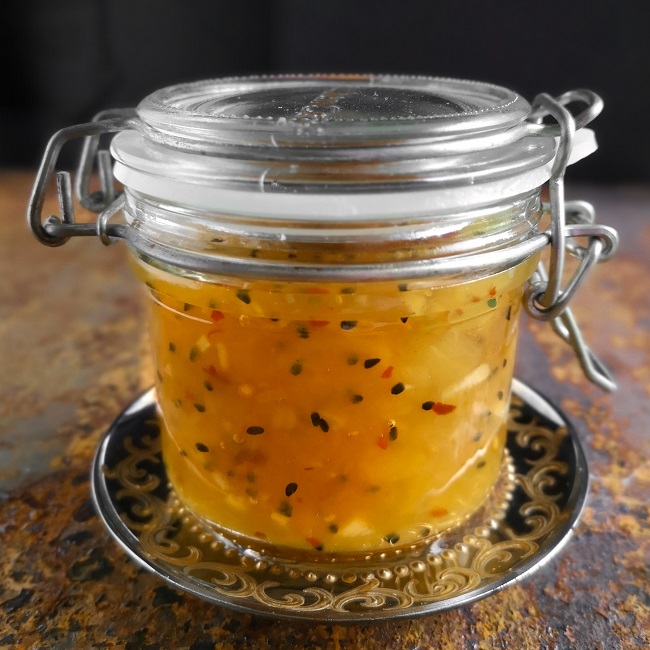
Stir the mixture before spooning into hot, sterilised jars and sealing immediately. Leave to cool, then label and store in a cool, dry cupboard for at least a month to mature before serving.
That’s all for this month. I wish you a good few days. I’ll see you again in December on the run up to Christmas 🙂
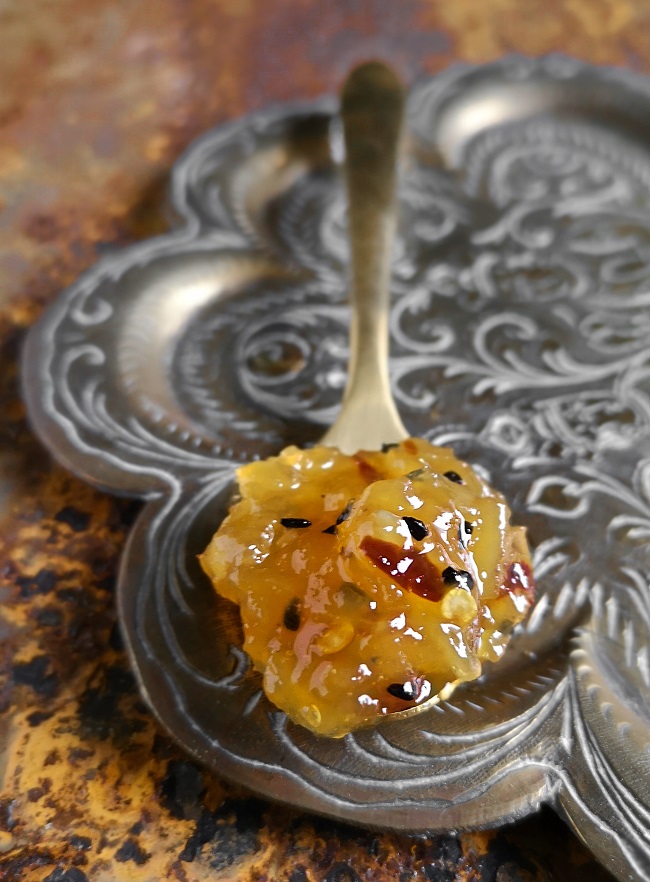
A spoonful of sweet and spicy homemade mango chutney. Image: Kathryn Hawkins
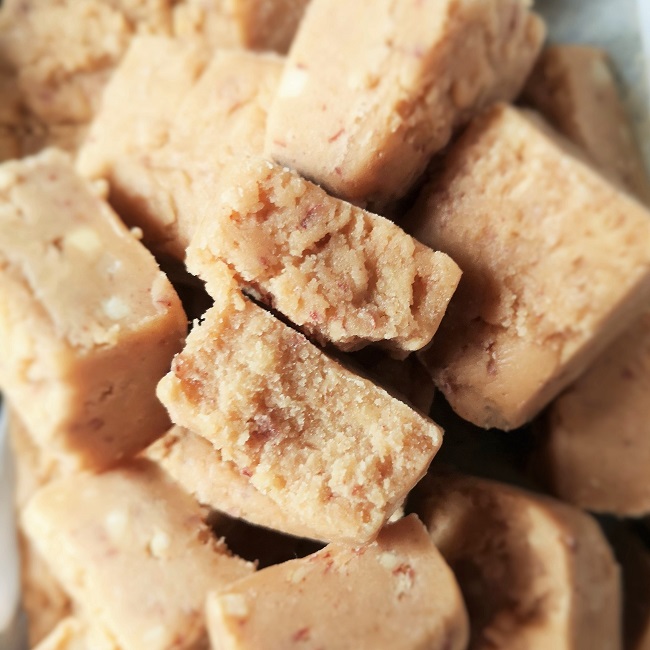
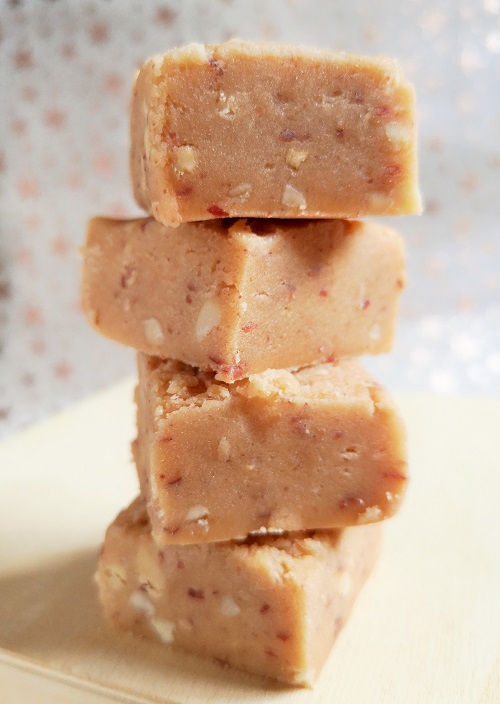
Salt and caramel nut butter fudge. Image: Kathryn Hawkins
I’ve had a hectic few days since my last post. I have got a bit behind with my festive preparations, but I’m pleased to report that back on track again now. I’ve been in the kitchen this weekend and here is the first of my 2 festive posts.
Home-made fudge, a perfect gift for Christmas. Image: Kathryn Hawkins
I am a huge fan of homemade sweeties, especially fudge, but I have found it difficult to find a recipe that works well as a dairy-free version. I have made the super-easy chocolate-based fudge recipes from time to time, but they do have a different texture to the fudge I remember from childhood.
For this week’s recipe, I have turned to an old recipe book and adapted a traditional recipe which produces the flaky, melt-in-the-mouth texture I really like, and it makes a lovely edible gift too, perfect for the time of year – if you can bare to give it away!
I used peanut butter as the main flavouring, but any nut butter (or tahini) will work just as well. To get the right consistency, you do need to use a butter replacement with a high fat content; I used coconut oil but a solid white vegetable fat like “Trex” would work if you don’t want the extra flavour from using coconut.
As with most traditional sweet making, a sugar thermometer is a vital piece of kit, but if you don’t have one, I’ve included a quick tip which will help determine whether the fudge is ready or not.
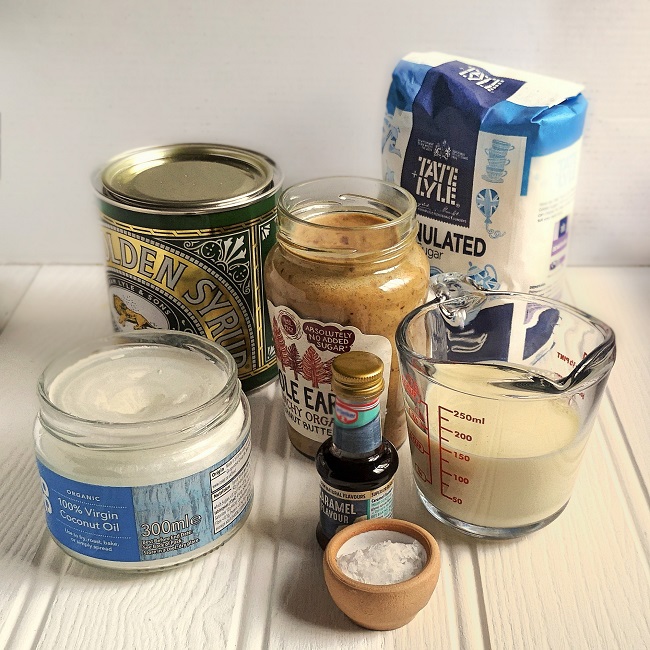
Ingredients for making home-made fudge the traditional way. Image: Kathryn Hawkins
Makes: 25 to 36 pieces
Ingredients
450g granulated sugar
1 ½ tsp salt (use less or none if you don’t want the salty flavour)
50g coconut oil or white vegetable fat
150g no added salt or sugar peanut or other nut butter
150ml unsweetened dairy-free milk (I use unsweetened soya milk)
2 tbsp. golden syrup
2 tsp caramel flavour (or vanilla extract to taste if you prefer a different flavour)
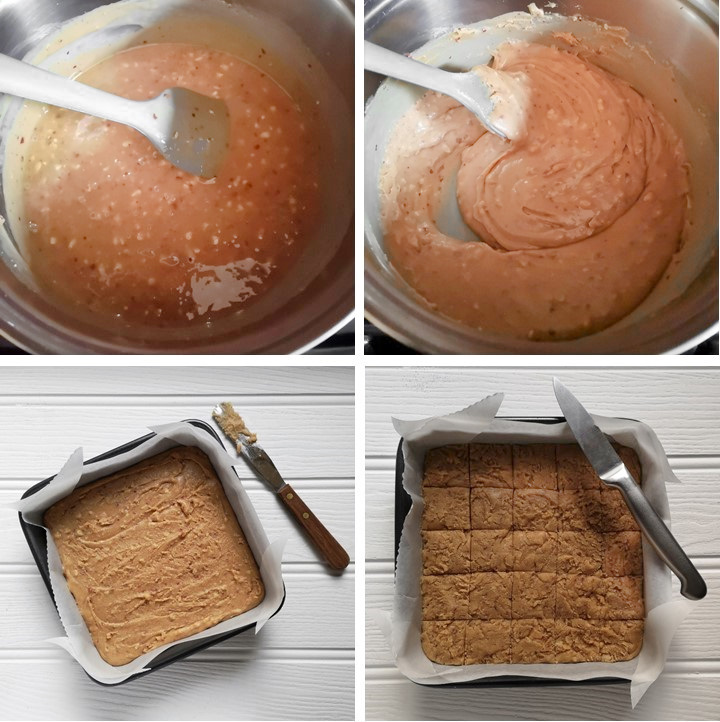
Line an ungreased 18cm square cake tin with baking parchment or waxed paper. Put all the ingredients except the flavouring in a large saucepan and heat gently, stirring, until the sugar dissolves and the coconut oil melts.
Bring to the boil and continue boiling for about 5 minutes until a temperature of 116°C is reached on a sugar thermometer. Alternatively, drop a little of the mixture into a cup of cold water. If it forms a soft ball when rolled between your finger and thumb, the cooking is complete. It is important to keep stirring the boiling mixture to prevent it sticking and burning on the bottom of the pan.
Cooking and testing the fudge mixture. Images: Kathryn Hawkins
Turn off the heat, add the flavouring and stir well. Keep stirring the mixture occasionally as it cools. After about 20 minutes or so, the mixture will begin to thicken and lose its shine, this is the time to mix thoroughly until the texture becomes grainy and stiffer – this is how the perfect texture is achieved.
Transfer to the prepared tin, smooth off the top and leave to cool for about 30 minutes until almost set. Score the top with a sharp knife into 25 or 36 squares, then leave to cool completely for 2 to 3 hours.
Cooling and setting cooked fudge mixture. Images: Kathryn Hawkins
Cut through the pieces completely and remove from the tin. Store between sheets of baking parchment or waxed paper in an airtight container for up to 3 weeks.
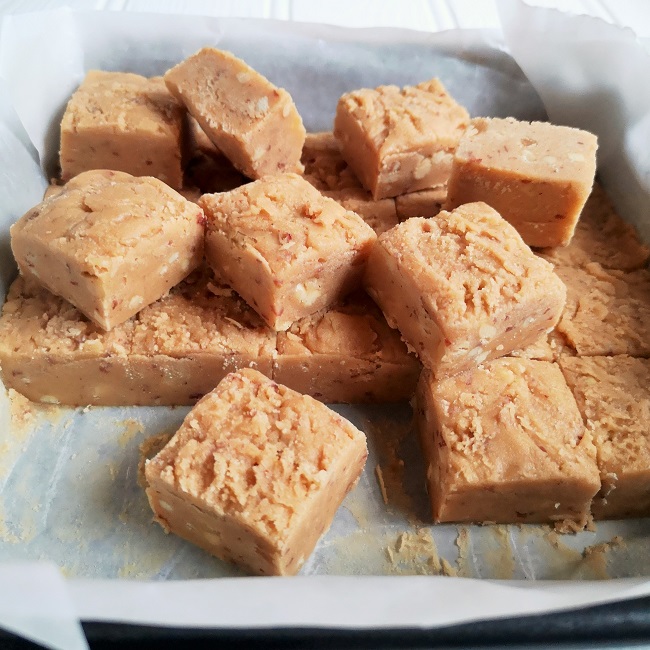
Ready for sampling. Image: Kathryn Hawkins
Traditional home-made fudge. Image: Kathryn Hawkins
Have a good few days and good luck with all your festive preparations. I have my second festive post to put up before Christmas, so I will be with you again in a few days time 🙂
A short post this week, but I wanted to publish a recipe to celebrate Scotland’s national poet, Robert Burns, whose anniversary falls on January 25th each year. These cute, haggis-shaped sweet treats are a version of my Chocolate Haggis for a Burns Night supper (gluten-free, dairy-free, vegan) recipe from last year. You can mix and match ingredients according to the bits and pieces you have to hand. If you don’t like marzipan, use ivory or cream coloured fondant icing instead.
Makes: 16
Ingredients
50g unsalted butter or coconut oil
50g heather honey or golden syrup
75g free-from dark chocolate, broken into pieces
75g free-from oatcakes, finely crushed
40g toasted fine oatmeal
50g currants
50g toasted flaked almonds, crushed
Icing sugar to dust
400g natural marzipan
Put the butter (coconut oil) and honey (golden syrup) in a saucepan with the chocolate, and heat very gently, stirring, until melted.
Remove from the heat and stir in the crushed oatcakes, oatmeal, currants and almonds. Mix well until thoroughly combined. Leave to cool, then chill for about 30 minutes until firm enough to form into portions.
Divide the mixture into 16 and form each into an oval-shaped sausage. Chill for 30 minutes until firm.
Divide the marzipan into 16 and flatten each into a round – use a little icing sugar if the marzipan is sticky. Wrap a disc of marzipan around each chocolate oat cluster; press the edges to seal and then twist the ends to make a haggis shape.
Mini chocolate haggis preparation. Image: Kathryn Hawkins
Store the mini haggis at a cool room temperature until ready to eat. The marzipan will become sticky if refrigerated. Best enjoyed with coffee and a wee dram. Until next week, I raise a glass to you all and say “Slàinte!” – to your good health 🙂
Mini haggis and a wee dram. Image: Kathryn Hawkins