Welcome to my blog all about the things I love to grow and cook. You'll find a collection of seasonal gluten-free, dairy-free and vegan-friendly recipe posts, as well as a round up of my gardening throughout the year. I wish you good reading, happy cooking and perfect planting!
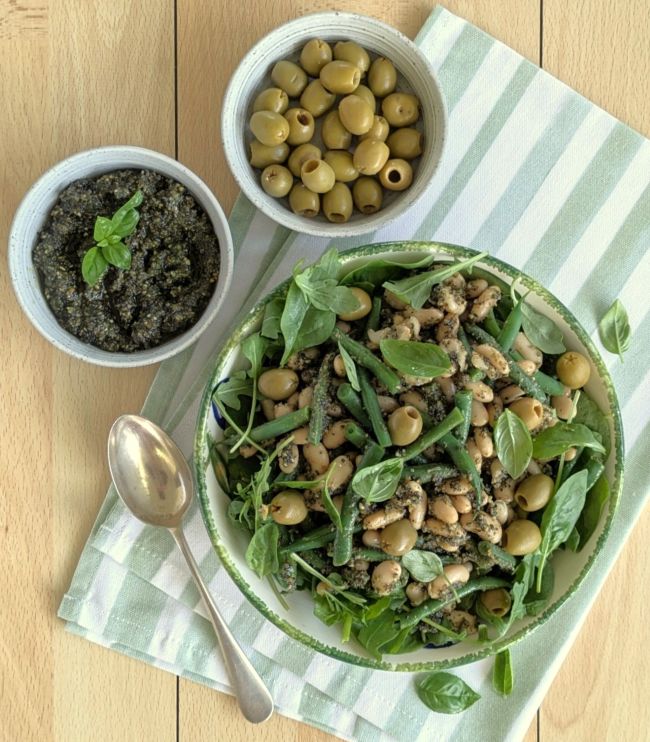
Bean salad flavoured with almond and poppy seed pesto. Image: Kathryn Hawkins
Hello there. I hope you are enjoying some good weather this season. It’s been very hot here in the UK again, and so salads are very much still on my daily menu. To follow on from my post last month which you can read here , I have another recipe which can help towards increasing your calcium levels if you are on a gluten-free, dairy-free and/or vegan diet.
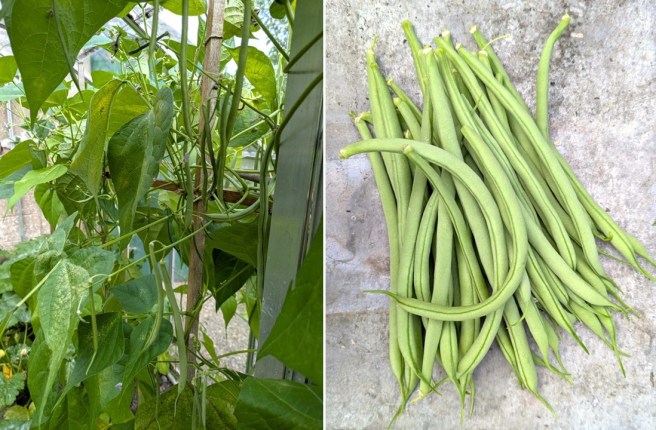
Gorgeous greenhouse green beans. Images: Kathryn Hawkins
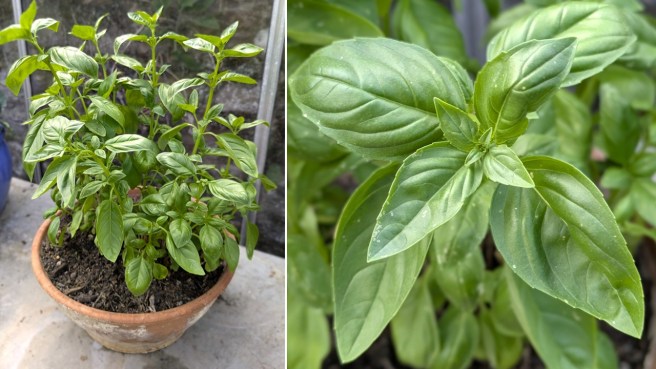
Summery greenhouse basil. Images: Kathryn Hawkins
It’s been a bumper season for the green (French) beans (Cobra variety) in my greenhouse. The vines have been producing an abundance of beans for several weeks now, and the basil plant loves all the heat and sunshine as well. To my delight, I discovered that both green beans and basil offer useful amounts of calcium, and that’s how my recipe this month began.
Combined with some other calcium-rich ingredients, this tasty salad is delicious on its own or as a side dish. The table below gives you a breakdown of which ingredients contain the most calcium so that you can make up your own combinations.
Rocket
216mg calcium/100g
Baby spinach
119mg calcium/100g
Cooked cannellini beans
93mg calcium/100g
Cooked green beans
61mg calcium/100g
Green olives
61mg calcium/100g
Fresh basil
250mg calcium/100g
Whole almonds
269mg calcium/100g
Poppy seeds
1580mg calcium/100g
Garlic
19mg calcium/100g
Source: McCance and Widdowson’s The Composition of Foods
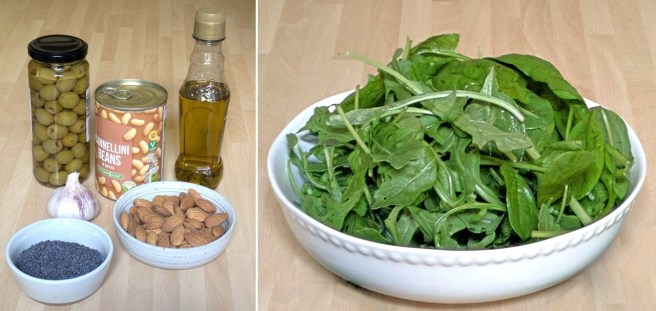
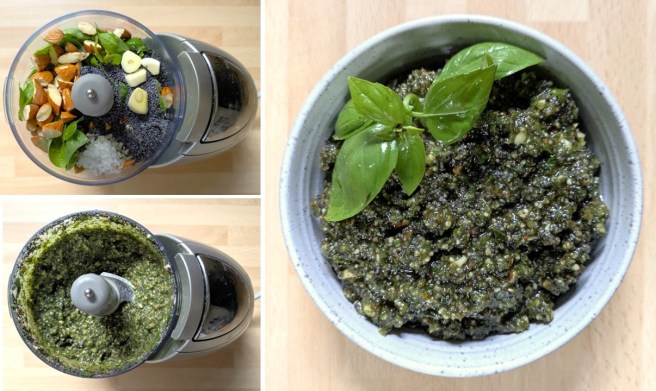
For the pesto, put 20g fresh basil in a food processor with a peeled garlic clove and add 50g roughly chopped whole almonds, 20g poppy seeds and some salt. Pour over 60ml extra virgin olive oil and blitz until smooth.
Making almond and poppy seed pesto. Images: Kathryn Hawkins
For the salad, I combined 240g canned cannellini beans with 100g chopped cooked green beans and half the pesto sauce above. I lined a salad bowl with 40g wild rocket and 20g baby spinach and piled the bean mixture on top. Serve with 100g pitted green olives and extra basil leaves, with the remaining pesto on the side.
Assembling the salad. Images: Kathryn Hawkins
The salad serves 4, and each portion will provide 238mg calcium and 330 calories.
That’s me for another month. Hope to see you again soon. Thanks for stopping by 🙂
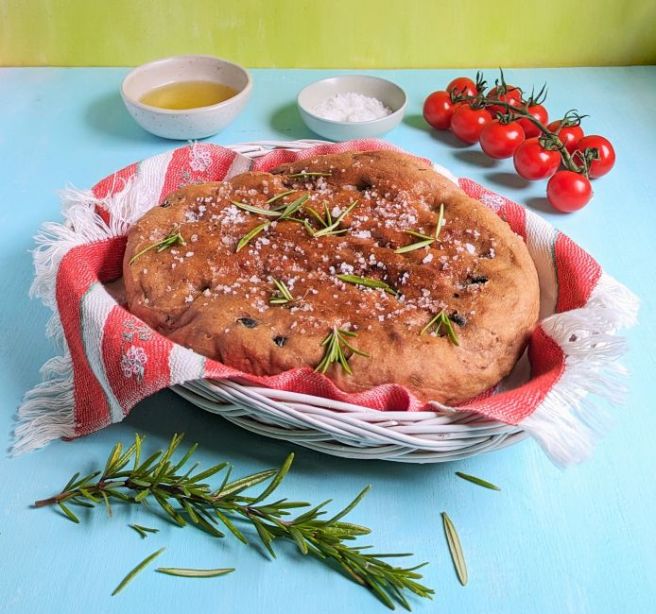
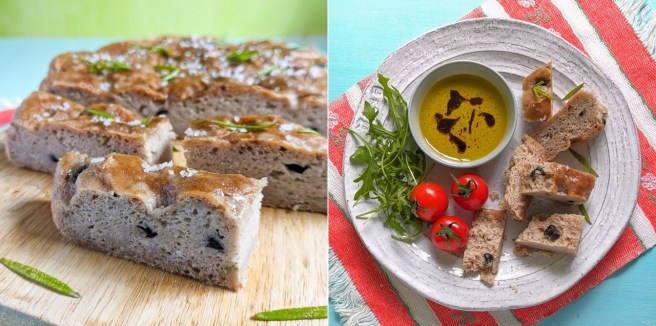
Slow cooker focaccia with olives and rosemary, best served warm. Image: Kathryn Hawkins
Hello there. Welcome to my latest recipe post. So far this month, it’s been the weather for staying indoors here in central Scotland. I’ve been using my slow cooker a lot and eating lots of comforting food in an endeavour to stay warm – well that’s my excuse anyway 🙂
Ripped and ready to eat. Image: Kathryn Hawkins
This week has been Real Bread week here in the UK so I thought I’d join the party and make my latest recipe post a bready one. If you’ve been reading my blog for a few months, you’ll know that I had a book on breadmaking published back in November – here’s the link to the post My new book: Complete starter guide to making bread, published by IMM Lifestyle Books 2024. When researching my recipes, I had been experimenting on cooking bread in the slow cooker and created a simple traditional loaf for inclusion. Sadly, I ran out of pages to feature this gluten-free and vegan slow-cooked loaf, so I’m giving it an airing here instead.
If you’ve never made bread before and are a bit daunted at the prospect, this is a very straightforward loaf to make. As with all gluten-free bread doughs, there is no kneading just a bit of mixing. You can omit the garlic, olives and rosemary to make a plain version if you prefer. I added psyllium husk for some extra texture. This gives the dough a slightly beige tone but adds some chewiness to the crumb. You may want to try making it without for a whiter dough but the texture will be more crumbly.
Rosemary and olive flavoured slow cooker focaccia. Image: Kathryn Hawkins
My slow cooker has a capacity of 5l and the dish is oval shaped – approx. 22 x 18cm. The temperature reached when on the High setting is 120°C. You may need to adapt the quantity of dough to fit your own slow cooker and adjust the cooking time if necessary. Other than that, all the information you need is below. Happy “slow” baking!
Makes: 1 approx. 22 x 18cm oval loaf
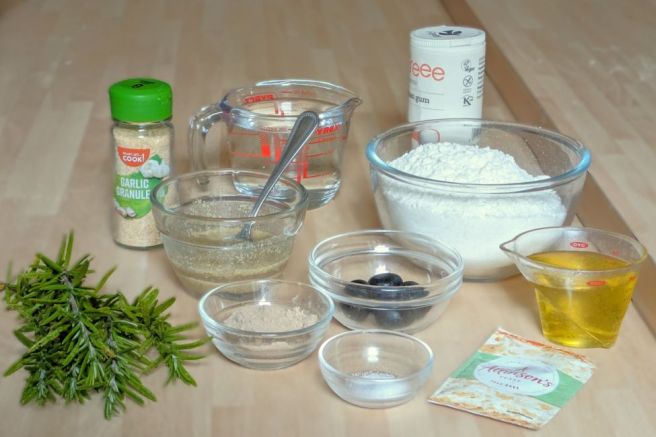
Ingredients
1tbsp ground linseeds
300g gluten free plain flour
7g sachet easy blend dried yeast
2tsp xanthan gum
15g gluten free psyllium husk powder
½tsp salt
2tsp finely chopped rosemary leaves
½tsp garlic granules
25g pitted black olives, chopped
80ml good quality olive oil
Sea salt flakes for sprinkling
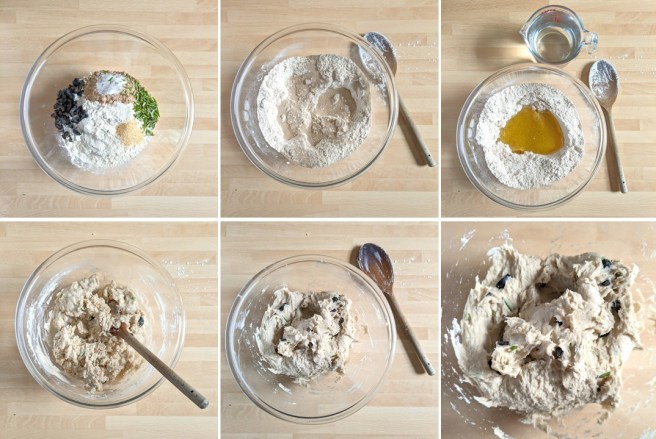
1. Mix the linseeds with 3tbsp cold water and leave for a few minutes to thicken and make a vegan egg.
2. Put the flour in a bowl and mix in the yeast thoroughly, then add the xanthan gum, husk powder, salt, rosemary, garlic and olives and mix well.
3. Make a well in the centre and add 60ml olive oil and the vegan egg. Begin mixing and pouring in 300ml warm water. Continue mixing until you have a thick, sticky batter. Cover the bowl and leave to stand for 10 minutes. In this time the batter will become thicker and less sticky. Give it a thorough mix through.
Making focaccia dough. Images: Kathryn Hawkins
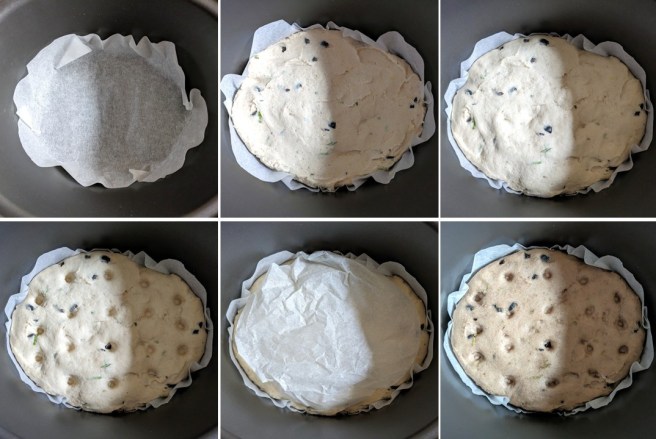
4. Line the base of your slow cooker dish so that the parchment paper comes a little way up the sides of the dish.
5.Scoop the dough on top and press and smooth to fit the dish. Cover with the lid and set the cooker to the Warm setting. Leave to prove for 1½hours until puffed up and spongey in texture. If your cooker doesn’t have a Warm setting, simply cover with the lid and place the whole dish in a cool to warm place to rise.
6. Once the dough is risen, push the end of a wooden spoon into the dough all over to give a dimpled effect. Lay a scrunched up piece of baking parchment loosely on top (this helps prevent the dough getting wet from any water droplets that form inside the lid) and set the cooker to High. Leave to cook for 3 hours until firm on top and crusty round the edge. It can be quit challenging to know when the bread is completely cooked so if in doubt err on the side of caution and cook for a bit longer to avoid a dense texture above the bottom crust. As a rule, the base of the loaf should sound hollow when tapped.
7. Transfer the loaf to a wire rack and discard the lining paper. Brush with remaining olive oil and sprinkle with sea salt. Leave to cool for a few minutes then serve warm. If you prefer a browner top, remove the bread from the slow cooker and place on the grill rack. Cook under a preheated medium/hot grill for 1-2 minutes to brown the top then oil, salt and cool as above.
Warm sliced focaccia, ready to serve. Images: Kathryn Hawkins
This bread is best served warm. If you want to freeze the loaf, omit the salt from the top, and wrap well. Once defrosted, simply reheat the loaf in a medium oven for a few minutes, and sprinkle with salt before serving.
Thanks for reading my post. I hope to see you again next month 🙂
Hello again. It’s my last recipe post of the year. How 2024 has flown by. It’s been a busy one for me, and I’ll admit to not feeling 100% festive as I sit down to write this post as there is always so much to do at this time. If you’re feeling the same, perhaps this simple, tasty recipe will help get you in the right frame of mind.
Festive chestnut rolls. Images: Kathryn Hawkins
These rolls make the perfect snack or party food. Easy to make from a combination of sage and onion stuffing mix, chopped chestnuts and chutney. You can vary the flavour by using your favourite chutney, I use tomato but an onion one or more fruity one would work just as well as would cranberry sauce. Here’s what to do…
Makes:16
Ingredients
65g sage and onion stuffing mix
225g cooked peeled chestnuts
100g tomato or other flavour chutney plus extra to serve
1tsp onion or plain salt
280g vegan-friendly gluten-free puff pastry sheet
10g soya flour
Fresh sage to garnish
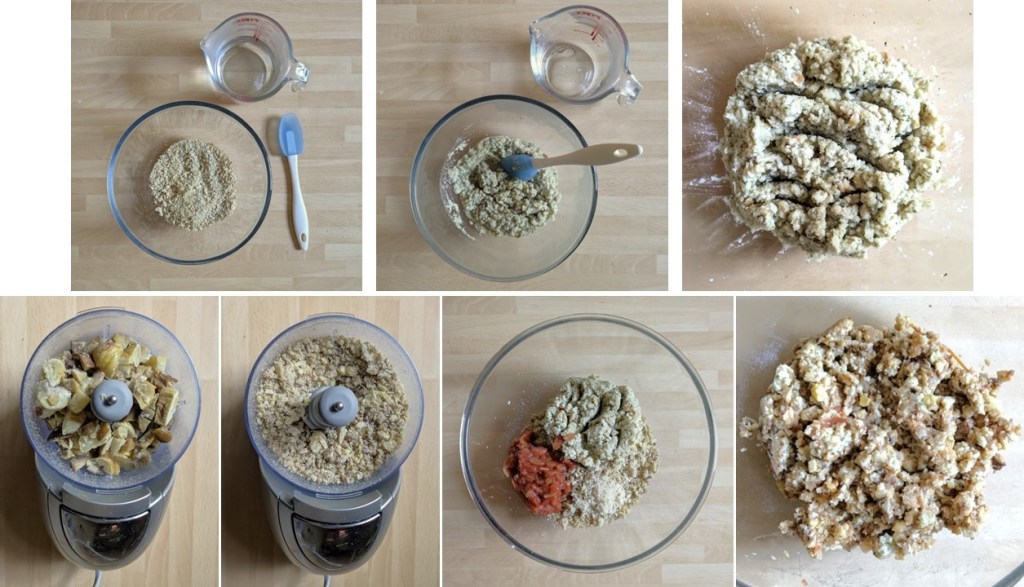
1. Put 50g stuffing mix in a heatproof bowl and mix in 90ml freshly boiled water. Mix well and leave to cool completely.
2. Finely chop the chestnuts in a food processor or by hand and mix into the cold stuffing mixture along with the chutney and salt to make a firm paste.
Making the filling. Images: Kathryn Hawkins
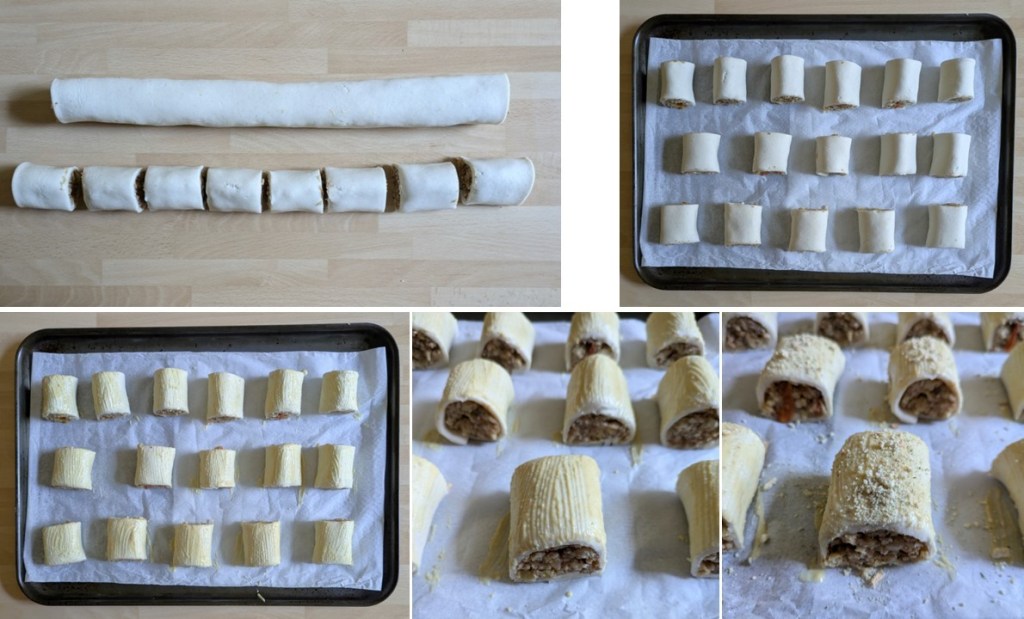
3. Unroll the pastry and use the lining paper to line a large baking tray. Cut the pastry lengthways and divide the stuffing mix between the 2 pastry strips, shaping the stuffing into a long sausage shape down the middle of each.
Forming the chestnut rolls. Images: Kathryn Hawkins
4. Mix the soy flour with 5tsp water to make a glazing paste and brush a little down one side of each pastry strip. Roll the pastry over the filling and press down gently, then roll each pastry back and forth on the work top to neaten and seal.
Shaping the rolls. Images: Kathryn Hawkins
5. Cut each roll into 8 equal portions and arrange spaced apart on the lined baking tray. Brush the tops and sides with the soy paste and sprinkle with the remaining dry stuffing mix. Chill until ready to bake.
Ready for baking. Images: Kathryn Hawkins
6. To cook, preheat the oven to 200°C, 180°C fan, gas mark 6. Bake the rolls for about 20 minutes until golden and crisp. Transfer to a wire rack to cool. Best served slightly warm with extra chutney, garnished with sage.
Fresh chestnut rolls just out of the oven. Image: Kathryn Hawkins
That’s a wrap from me for this year. I hope you all have a good festive season and wish you a happy and healthy time. Until next year, Merry Christmas 🙂
Hello again. I don’t know about you, but I’m always looking for ways to cut back on the amount of energy I use especially in the kitchen. I have certainly changed the way I cook my everyday meals and only put the oven on if I can fill it.
One of the things I do every now and then is have a big bake up of all the bits and pieces of vegetable I have in the veg rack or fridge and I have taken a few images over the past few months of the combinations I have cooked depending on what I have to hand.
Veg prep for roasting. Images: Kathryn Hawkins
Most vegetables require only simple prep, just peeling and cutting into uniform pieces so that they all bake evenly. The only vegetable I par-cook is turnip (swede) because it is denser than other vegetables. Just a quick cook of 10 minutes in boiling water, then drain and cool before mixing into the other prepared veg.
For best results, choose vegetables that take roughly the same amount of time to cook, or add quicker-cooking vegetables later on once the other have had a bit of a head start.
Seasoned diced roots, ready for roasting. Images: Kathryn Hawkins
Use what ever oil you prefer too cook your vegetables with. Toss a generous amount into the prepared veg, season with plenty of salt and ground black pepper and mix well. Add herbs and spices to taste. Spread out evenly on lined baking trays and put the trays in a cold oven – no need to waste energy on preheating the oven for this type of cooking. Set the dial to 200°C, 180°C fan oven, Gas 6. After about 25 minutes, turn the vegetables and cook for a further 15-25 minutes depending on how finely you have chopped them, until they are tender.
Roasted and ready for freezing. Images: Kathryn Hawkins
When they are cooked, drain off the excess oil, blot with kitchen paper and they are ready to serve straightaway. Alternatively, leave them to cool after draining and pack into containers for later use. In the fridge, the cooked vegetables will keep for 3-4 days, or freeze them for up to 6 months. Most vegetables freeze fine and can be added to soups, sauces and stews at a later date (usually I add them still frozen directly to hot stock or sauce and just heat them through).
Tray-roast peppers, onion, celery, garlic and herbs. Images: Kathryn Hawkins
Tray-roast carrots, onion, celery, garlic and herbs. Images: Kathryn Hawkins
Potatoes, mushrooms, garlic and herbs. Images: Kathryn Hawkins
Until next time, have a good rest of the month and I hope that I will see you again in February. Thanks for stopping by 🙂
Freshly made tomato confit. Image: Kathryn Hawkins
Hello again. I hope you have had a good few days since my last post. After lousy weather here in the UK in August, September started with a mini heatwave. The high temperatures have come to an end now but the extra heat and sunshine certainly helped ripen off the fruit and vegetables. It’s been a bumper year for tomatoes, and I’ve been exploring new ways to serve and preserve them.
My recipe this week is a very simple one. It’s an easy and energy-efficient way to cook small tomatoes. All you need is a slow-cooker and an amount of small tomatoes to fit neatly in a single layer over the base of the cooking dish. You can adapt the quantities you cook to fit the size of your cooker.
Confit ingredients. Images: Kathryn Hawkins
I have kept the flavours simple, using fresh herbs from the garden, some garlic and a few coriander seeds. Add chilli for some heat, or experiment with your favourite spices. The confit can be served on its own as a sauce for pasta or blitzed and used as a base sauce for other dishes. If you want to keep it for a few days, place in a sealed container, covering the tomatoes with extra oil as necessary, and store it in the fridge. For longer storage, it freezes fine.
Tomato confit, fresh basil and black pepper. Images: Kathryn Hawkins
This really is a great way to enjoy the flavour of freshly picked sweet baby tomatoes with the minimum of effort. I hope you enjoy the recipe 🙂
Serves: 4-6
Ingredients
650g whole, same size, small or cherry tomatoes – or a weight that fits neatly in a single layer inside the base of your slow-cooker dish
A few sprigs of fresh thyme and oregano
1 bay leaf
1tsp coriander seeds, crushed
3 garlic cloves, peeled
1tsp sea salt
Freshly ground black pepper
2tsp caster sugar (optional)
100ml good quality olive oil + extra for storing
1. Remove the stalks from the tomatoes and wash well. Pat dry using kitchen paper and place in a single layer in the slow-cooker dish.
2. Add the remaining ingredients, cover with the lid and set the cooker to Low. Cook for 4hrs or until the tomatoes are soft but still holding shape. Leave to cool completely.
Preparing the confit. Images: Kathryn Hawkins
3. For storing, discard the herbs and ladle into a clean, sealable storage container – I used a 750ml Kilner jar. Add more oil as necessary to cover the tomatoes, then seal and store for up to 10 days in the fridge. Alternatively, portion into containers and freeze. The oil can be drained off before serving and re-used to cook with or flavour salad dressings.
Filling a storage jar with tomato confit. Images: Kathryn Hawkins
That’s me for another week. I have just picked another haul of tomatoes after coming back home after a few days away. I’ll have to get creating again. Until next time, thanks for stopping by 🙂
My back-from-holiday tomato haul. Image: Kathryn Hawkins
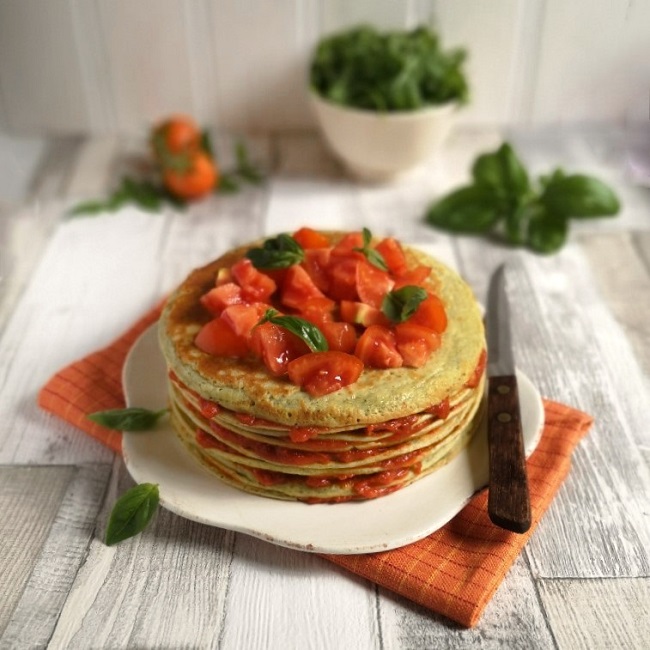
Pesto pancake and tomato layer. Image: Kathryn Hawkins
Hello again. What a mixed bag of weather there has been here since my last post. Plenty of rain to restore the water supplies with thundery downpours and a few sunny days here and there. The garden has bucked up again and the green grass has been restored.
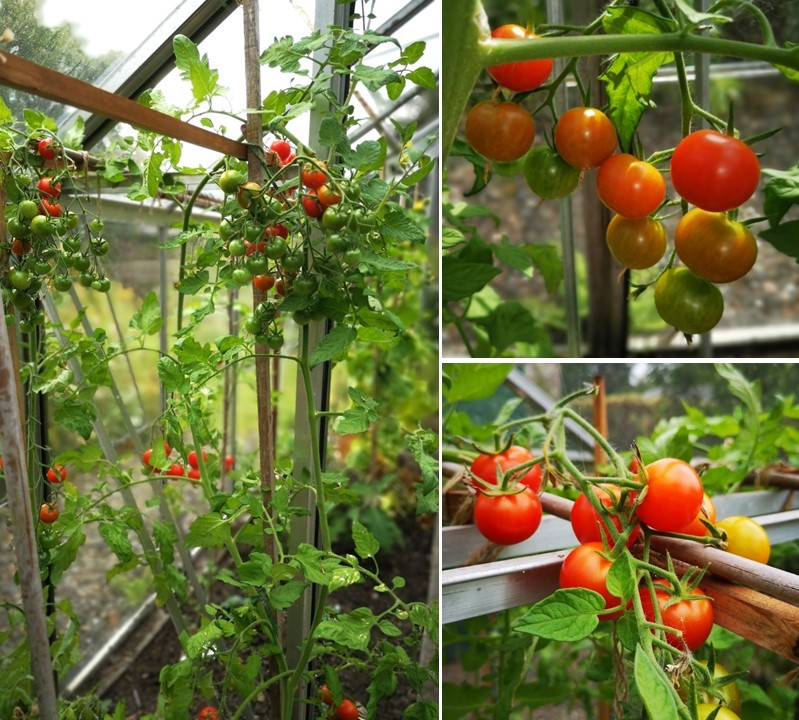
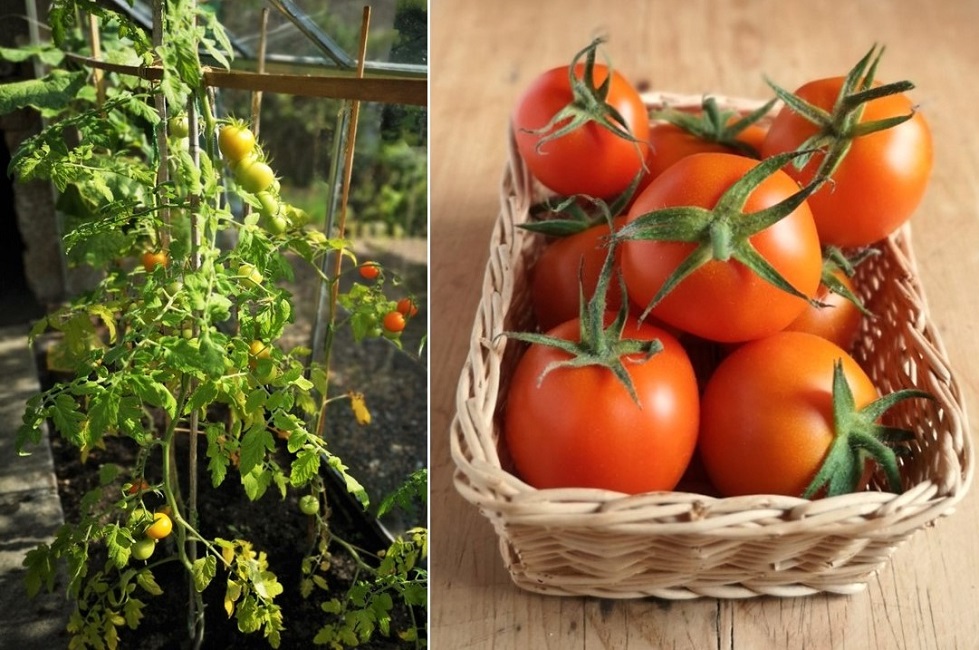
My recipe post this week gives a little nod towards the change of month and season. The greenhouse tomatoes are ripening now. I planted only 3 plants this year, but I am enjoying a steady supply to eat in salads. The variety is called Golden Zlatava, orange on the outside with reddish flesh inside. Whilst I haven’t grown enough for cooking this year, there are plenty of delicious locally grown tomatoes around, like these fantastic small plum tomatoes, which are perfect for sauce-making.
Fresh plum tomatoes. Image: Kathryn Hawkins
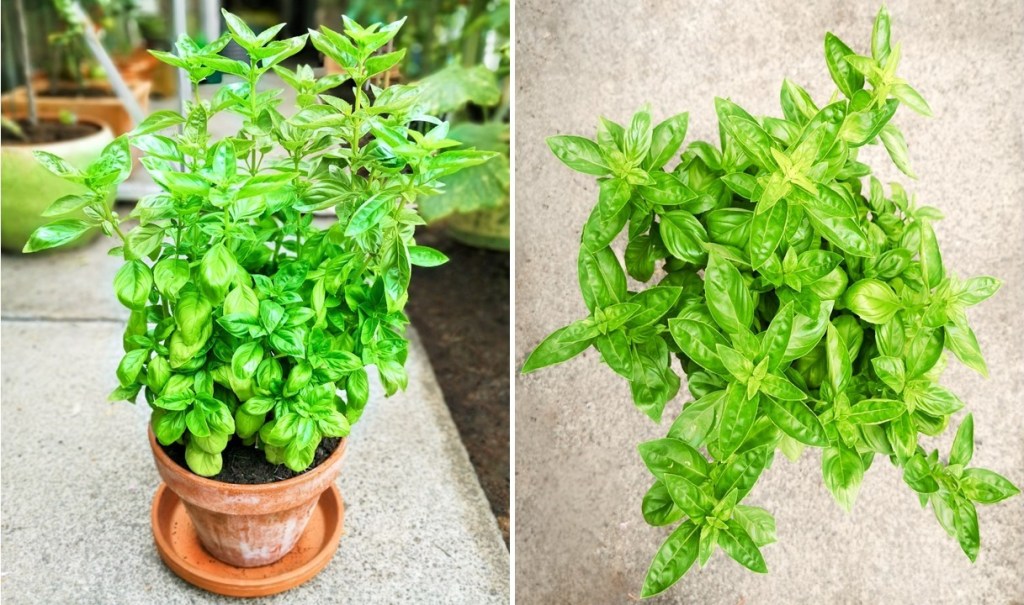
The greenhouse basil really enjoyed the hot weather we had last month and has grown very bushy and bold. I love the flowers as well. Plenty of leaves to make one of my most favourite savoury sauces, pesto, which seems to be the best way to preserve the flavour of the herb once it has been frozen.
Greenhouse basil. Images: Kathryn Hawkins
There are 2 main components to the recipe this week: making the pancakes and making a tomato sauce. Both elements freeze well in case you want to make the recipe in stages. I made pesto in a previous post, so if you fancy having a go at that as well, here’s the link to the recipe Runner bean and pesto fritters (gluten-free; dairy-free; vegan)
Serves: 4
Ingredients
Tomato sauce
1kg fresh tomatoes, washed and chopped
6 garlic cloves, peeled
A selection of fresh herbs such as sage, bay, marjoram and oregano
2tbsp olive oil
1tsp caster sugar
100g drained sundried tomatoes in oil, blotted on kitchen paper
Salt to taste
Pesto pancakes
110g tapioca flour
110g gram (chickpea or garbanzo) flour
6g gluten-free baking powder
1tsp salt
65g fresh vegan pesto
250ml plant-based milk (I used oat milk)
160ml chickpea canning liquid (or other aqua fava)
Vegetable oil for brushing
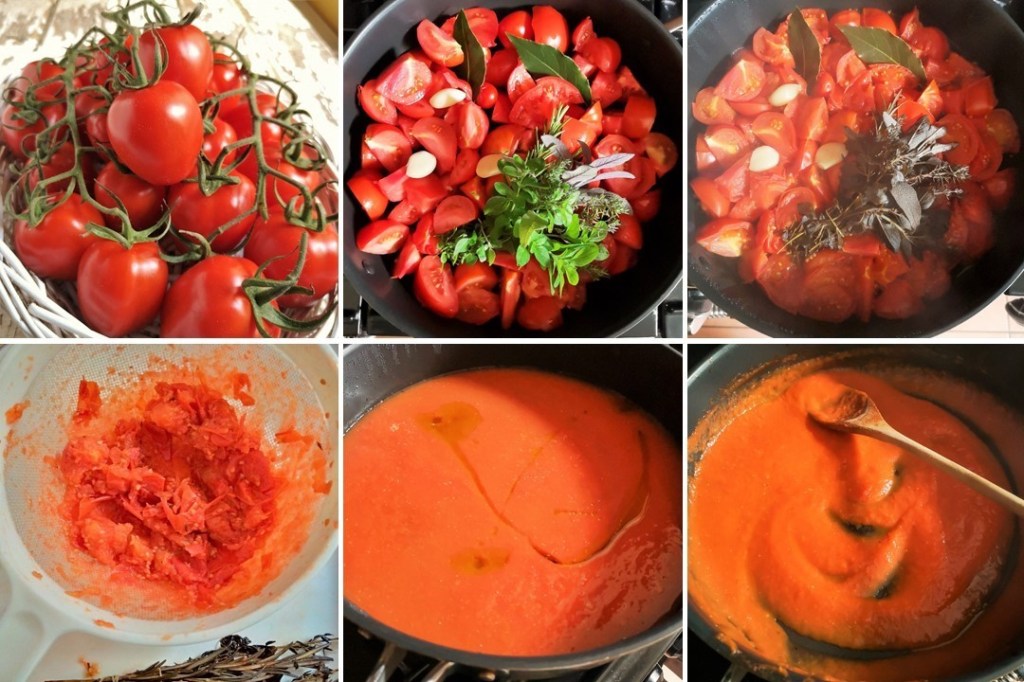
1. First make the sauce. Put the tomatoes in a large pan with a lid and add the garlic and herbs. Heat until steaming, then cover, and simmer gently for about 45 minutes until very tender. Turn off the heat and leave to cool with the lid on.
2. Discard the herbs. Push the tomatoes and garlic through a nylon sieve, in batches, to remove the skins and seeds. Depending on the juiciness of your tomatoes, you should end up with around 700ml pulp.
3. Pour the pulp into a clean pan. Add the oil and sugar, heat gently, stirring, until boiling, then simmer for about 20 minutes until thickened and reduced to about 300ml. Leave to cool.
4. Put the sundried tomatoes in a blender or food processor and blitz until smooth, then stir into the cold tomato sauce. Taste and season. Cover and chill until ready to use.
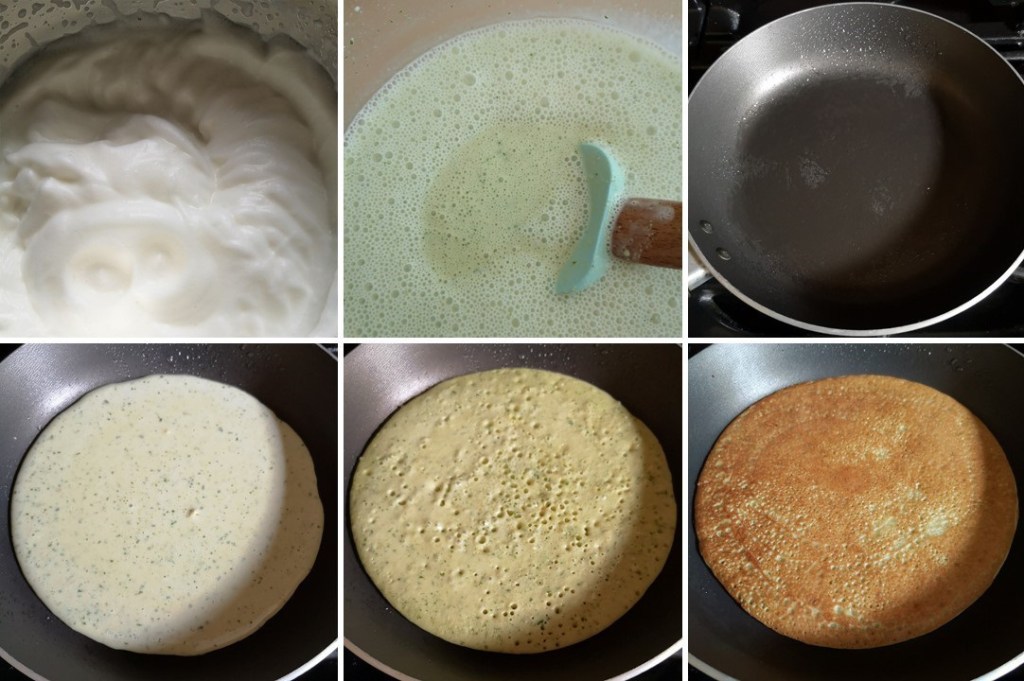
5. For the pancakes, put the flours, baking powder and salt in a bowl and make a well in the centre. Add the pesto, and gradually blend in the milk to make a smooth batter.
Making the pesto batter. Images: Kathryn Hawkins
6. In another bowl, whisk the chickpea water until very thick and foamy, then gently mix into the batter to make a bubbly mixture.
7. Brush a small frying pan (15-16cm base diameter) lightly with oil and heat until hot. Spoon in 4-5tbsp batter, tilting the pan to cover the base with batter. Cook over a medium/low heat for 2-3 minutes until set and bubbles appear on top. Flip over and cook for a further 2 minutes until cooked through.
8. Layer the cooked pancake on a sheet of baking parchment on a wire rack, and cover while you make another 7 pancakes. Stack the pancakes on top of each other, between sheets of parchment to help keep them from drying out. If you are making the pancakes in advance, leave them to cool, then wrap them well and keep in the fridge for up to 3 days or freeze for up to 6 months.
Cooking the pancakes. Images: Kathryn Hawkins
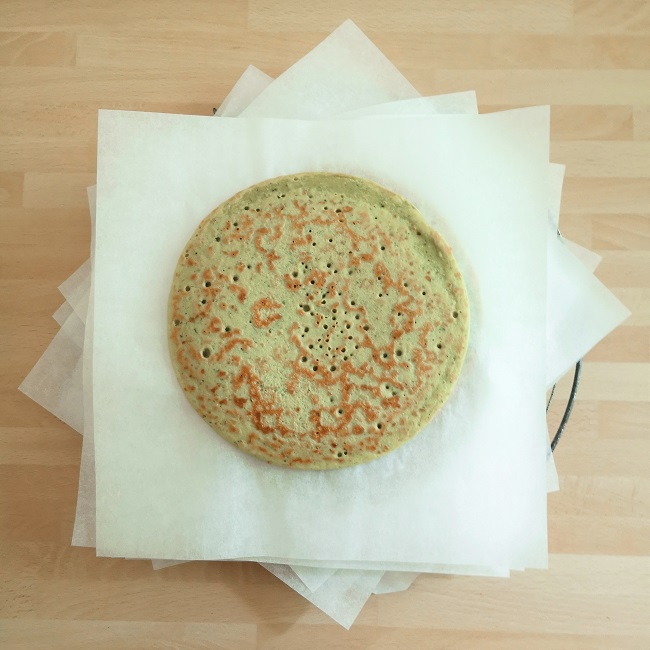
Pesto pancake stack. Image: Kathryn Hawkins
9. To assemble, spread a pancake with cold tomato sauce, almost to the edge of the pancake. Transfer to a lined baking tray and continue the spreading and layering with the remaining sauce and pancakes. If you have leftover sauce, keep it to serve with the pancakes.
Layering before baking. Images: Kathryn Hawkins
10. Cover the pancake stack with foil and place in a preheated oven at 190°C, 170°C fan oven, gas 5. Heat through in the oven for about 45 minutes. Best served warm. Top with fresh chopped tomato and fresh basil to serve and accompany with wild rocket and any leftover tomato sauce.
Hello again. Well it’s certainly feeling much more autumnal since my last post. After a few bright and sunny days, the weather has turned much cooler and, as I type this, it is pouring with rain.
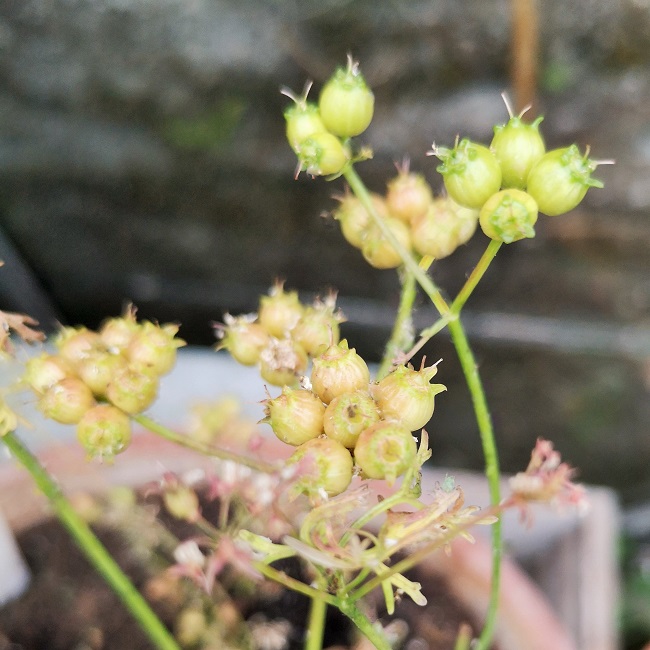
Towards the end of last month, I harvested my first crop of coriander (cilantro) seed. When I sowed the herb seeds back in late spring, my only intention was to grow the herb for its leaves for use in salads, curries and salsas. However, once the seedlings appeared, I never quite got round to thinning out the crop. I kept them all in the same pot, in the greenhouse, just picking off a few leaves here and there, and never quite finding the time to separate them and plant them outside.
After a while, the individual plants became leggy and formed flower stalks. I enjoyed the flowers for their aroma and the splash of brightness they offered. The leaves had started to become coarser in texture and had a bronze edge, and weren’t quite so appealing to eat. In early August, I decided it was time to get rid of them altogether as the flowers had dried and were falling. However, on closer inspection, the fallen petals had left behind bright green “berries”.
Bright green seeds. Images: Kathryn Hawkins
After a bit of research and a quick change of plan, I decided to keep the plants with the hope of being able to harvest the seeds. You can pick the green fruit and use it in cooking, but they don’t store well. I tried one or two, the flavour was mild, fresh and slightly sweet, and would be good chopped up in a salad or added to a relish. The green berries can be pickled as well.
However, I read that if you leave the fruit on the stems long enough, the berries will dry naturally and can be harvested for longer storing, and used as the familiar fragrant spice.
Beginning to dry out. Image: Kathryn Hawkins
By the end of August the seeds had turned light gold, and in another month, they had dried out completely. At the time, we were blessed with some dry weather so I think this helped with the drying process. I guess that a damp atmosphere could cause the seeds to turn mouldy.
Coriander seed dried and ready for harvesting. Images: Kathryn Hawkins
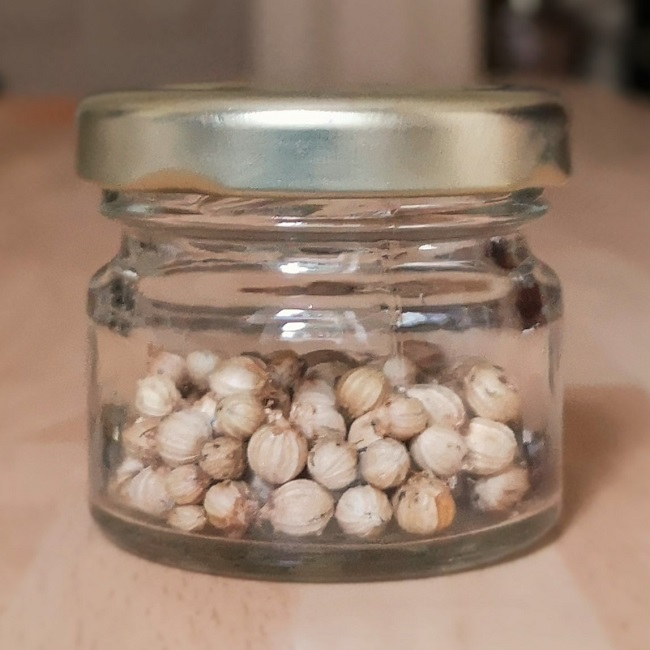
I found it easier to pull the stems from the soil and pick off the seeds into a small bowl. I left them in the greenhouse for a few more days to finish ripening naturally in the sunshine.
It was a very small harvest, accidental by nature but rewarding all the same. Now the seeds are in a tiny jam jar in my spice cupboard waiting for the right recipe to include them in.
Precious seed harvest ready for storing. Image: Kathryn Hawkins
Until next time, take care, my best wishes to you, and thank you for stopping by again 🙂
Hello everyone. I hope you well and that the sun has been shining wherever you are. It’s been a mixed bag here. Some sunshine, some rain, but warmer temperatures on the whole.
I have a very simple post this week. Several plants in the garden are about 2 weeks behind this year, and this has enabled me to put together a post I have wanted to do for a while but have not, until now, had the selection of colours to make it work.
Below is a compilation of flowering plants from my garden photographed this week from Midsummer’s Day on Monday through to this morning. All the colours of the rainbow plus a couple more. I hope you enjoy them.
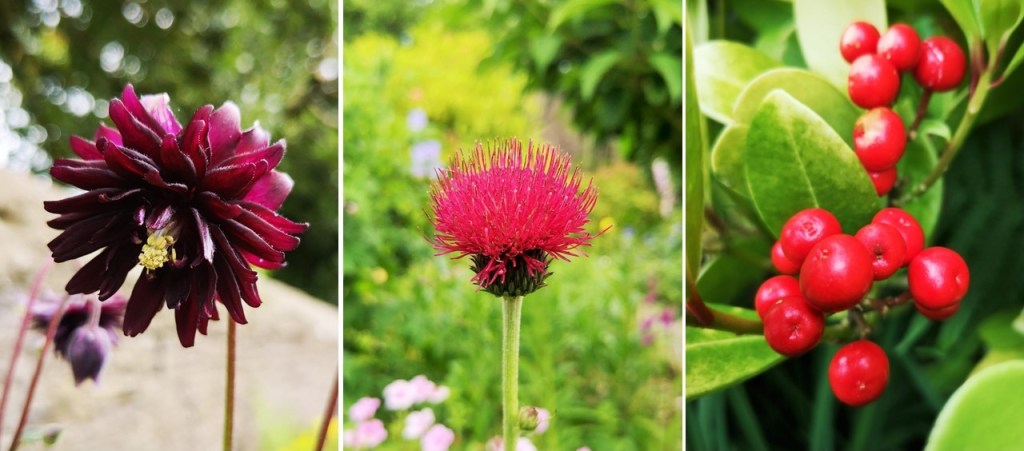
The reds: Aquilegia; Plume thistle, and Skimmia Japonica berries. Images: Kathryn Hawkins
The oranges: Azalea, Lupin and Pilosella (fox and cubs). Images: Kathryn Hawkins
The yellows: Sedum, Lysimachia and Day Lilies. Images: Kathryn Hawkins
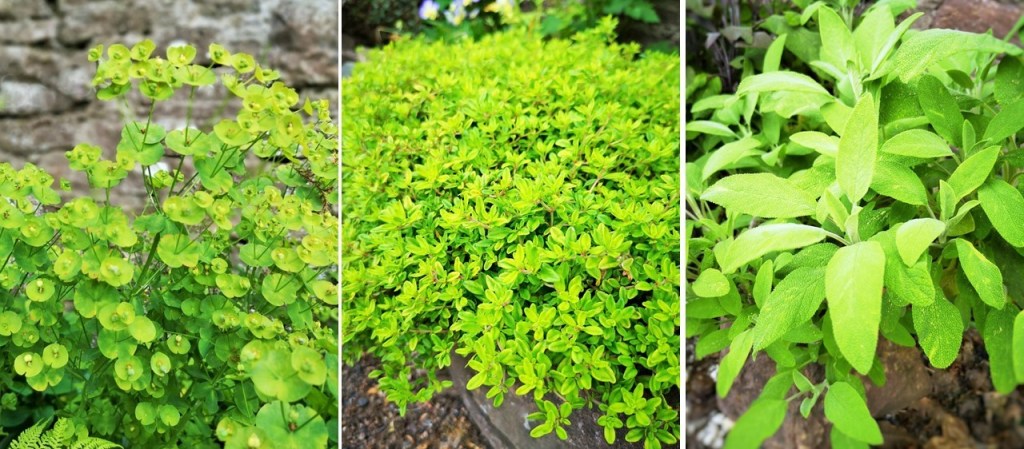
The greens: Euphorbia, lemon Thyme, and sage. Images: Kathryn Hawkins
The blues: Geranium Magnificum, Campanula and Centaurea Montana. Images: Kathryn Hawkins
The violets: Lupin, trailing Campanula and Violas. Images: Kathryn Hawkins
The pinks: Gertrude Jekyll rose, Foxglove and Lupin. Images: Kathryn Hawkins
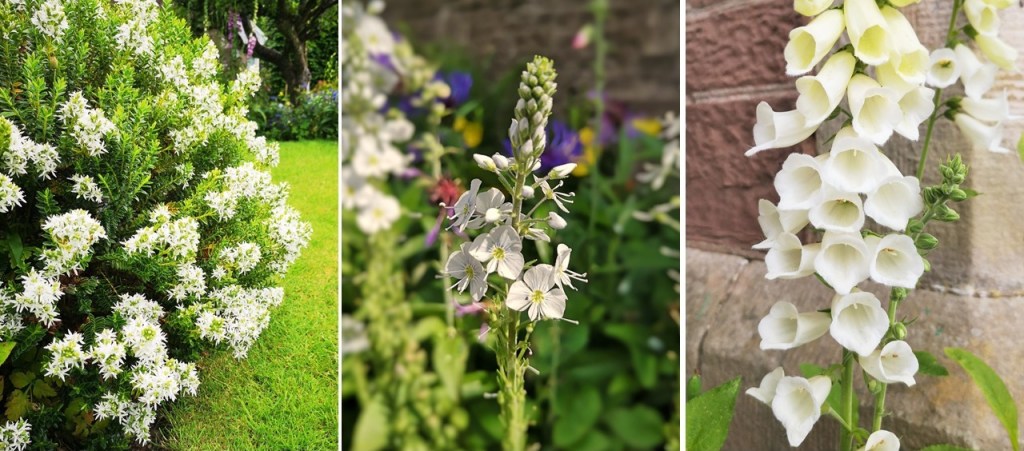
The whites: Hebe, Veronica and Foxglove. Images: Kathryn Hawkins
I’m heading back to the kitchen for my next post. I will see again in a few days. Until then, take care and keep safe 🙂
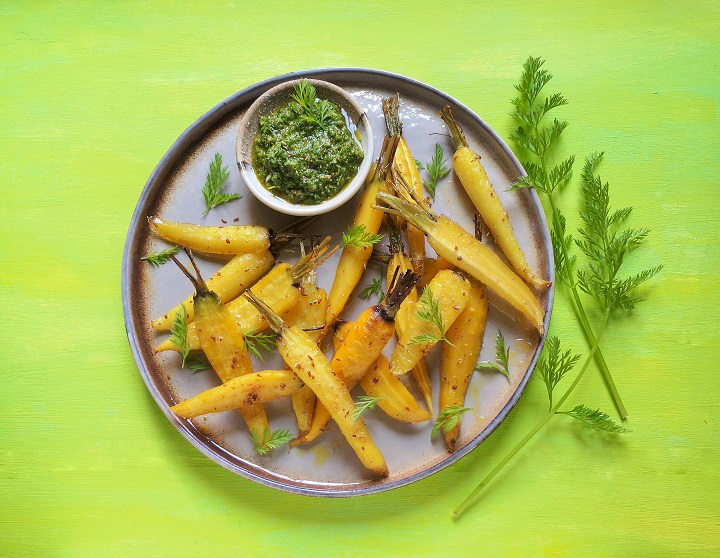
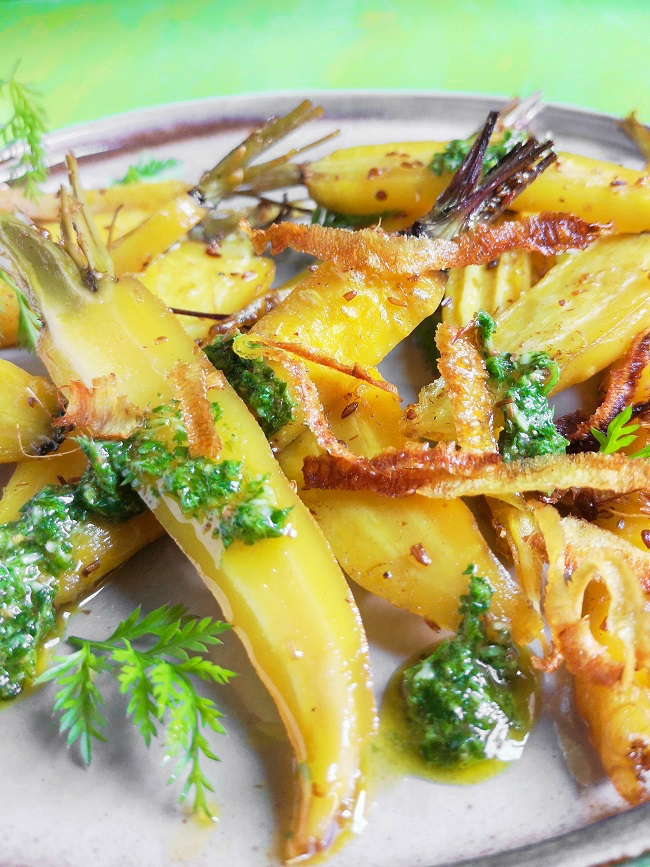
Spiced golden carrots with carrot top and coriander dressing. Image: Kathryn Hawkins
Hello there. It’s another “golden” post from me this week, all be it a recipe-led one rather than one from my garden. To be honest, I had intended this to be a “rainbow carrot” feature but Mother Nature stepped in and things turned out a little different to what I was expecting. Let me explain.
Rainbow carrot seeds. Image: Kathryn Hawkins
Back in September last year, I decided to experiment by sowing some carrots seeds as a late crop. All being well, I should end up with baby carrots in the early winter. I chose a rainbow mix, and planted them in 2 trench-style containers in the (unheated) greenhouse. I was delighted when they started growing, but as the daylight hours dwindled, and the temperature cooled, the seedlings, unsurprisingly, stopped growing.
From December 2020 through to April and June 2021, overwintering carrots. Images: Kathryn Hawkins
I decided to leave them alone and allowed them to overwinter in the same spot in the greenhouse. Nothing much happened until the weather warmed up in March this year when the seedlings started growing again. By April they were thriving so I put the pots outside. With the benefit of hindsight, the carrots were probably ready for pulling about a month ago, but nevertheless, this month, I finally enjoyed a bunch of homegrown carrots with fine flavour, all be they with a distinct lack of rainbow 🙂
Golden carrot harvest. Image: Kathryn Hawkins
Only white and yellow carrots grew, although there was one orange one which didn’t quite make the grade for this recipe. It had split and grown in a very strange shape, much like a crossed pair of legs. It went in a salad instead and tasted delicious.
One wee wonky carrot. Image: Kathryn Hawkins
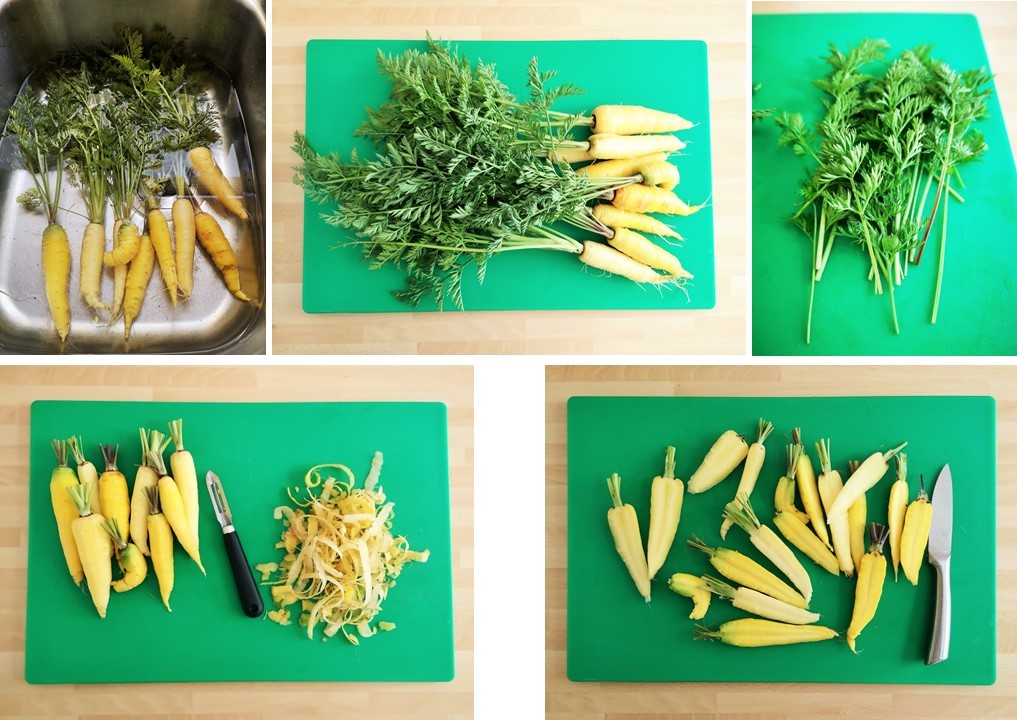
On with the carrot recipe which uses up all parts of the vegetable. I peeled the carrots because they were a little hairy, but ideally homegrown carrots are best left unpeeled. I also wanted an excuse to make crispy carrot peelings which I love. I used some of the carrot tops in a dressing and the rest I am working my way through as a sprinkling over salads and soups. I keep them in a jug of water in the fridge; they last for several days if you change the water regularly. If you have carrots without the tops, you can make the dressing with all coriander instead. Give all parts of the carrot a good wash to remove grit, dust and soil from the ground.
Carrot preparation. Images: Kathryn Hawkins
Serves: 2-3
Ingredients
350g carrots, washed and peeled if preferred (don’t forget to keep the peelings!)
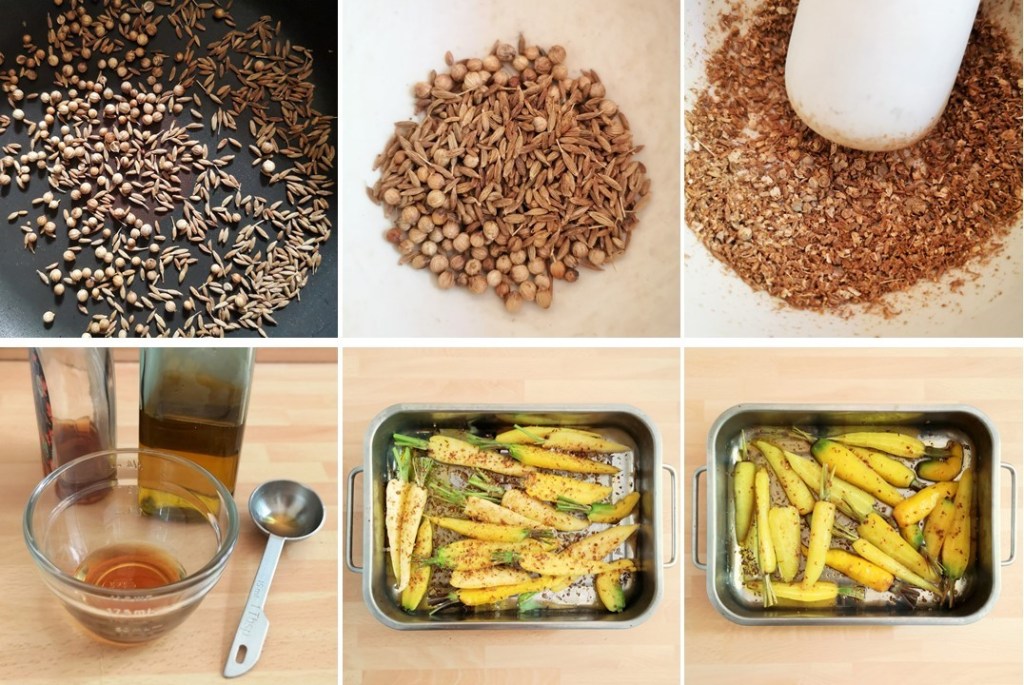
1 tsp each coriander and cumin seeds, toasted and ground
1 tbsp maple syrup + a little extra if you are going to cook the peelings
4 tbsp cold pressed rapeseed oil (I chose this for the nutty flavour and golden colour, but any vegetable oil is fine) + a little extra for cooking the peelings
Sea salt
15g carrot top leaves, washed (use the leafy fronds rather than the stalks which can be tough) + a few extra for garnish
15g coriander leaves, washed
2 garlic cloves, peeled and roughly chopped
¼ tsp ground fenugreek (use a mild curry powder if this is unavailable)
1. Preheat oven to 200°C, 180°C fan oven, gas 6. If the carrots are different sizes, cut them into even sized pieces. My carrots were about 10cm long, and I simply cut them in half. Put in a roasting tin and sprinkle with half the toasted seeds.
2. Mix the maple syrup and 1 tbsp oil together and toss into the carrots. Season with salt, cover with foil and bake for 30 minutes.
Toasting and grinding spices for baking carrots with maple syrup and rapeseed oil. Images: Kathryn Hawkins
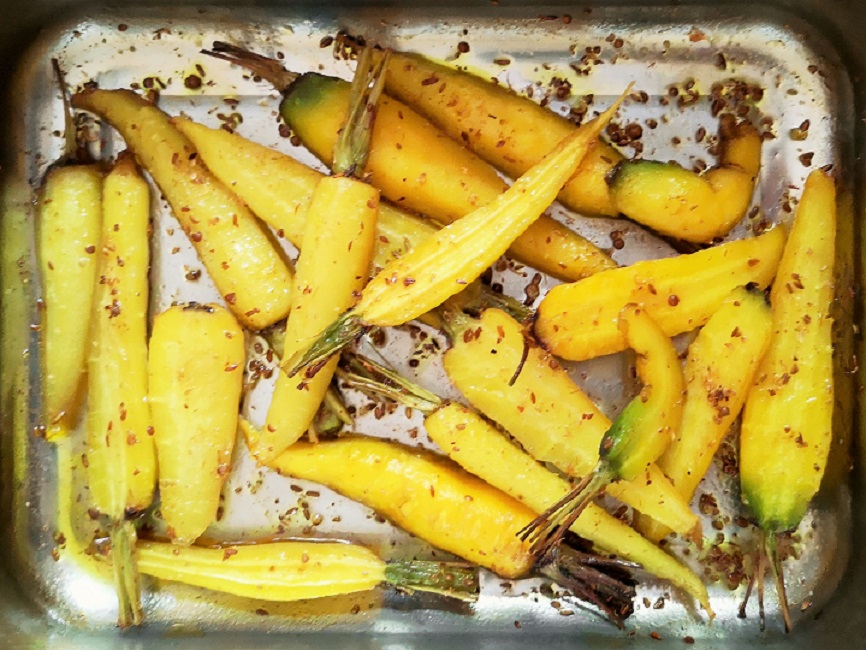
3. Remove the foil, mix the carrots in the pan juices and return to the oven for a further 15 minutes, this time uncovered, until tender and lightly golden.
Baked carrots straight out of the oven. Image: Kathryn Hawkins
4. While the carrots are cooking, make the dressing. Put the remaining ingredients in a blender or food processor and with the remaining toasted seeds and oil, and blitz until well blended. Season with salt to taste. Cover and leave at room temperature for the best flavour.
Making carrot top and coriander dressing. Images: Kathryn Hawkins
5. If you want to cook the peelings, mix them with a drizzle of maple syrup and oil, then spread them out on a baking tray, season and bake for 10-15 minutes until crisp and golden. Drain on kitchen paper.
Roasting carrot peelings. Images: Kathryn Hawkins
6. To serve, drain the carrots and arrange on a warm serving plate. Sprinkle with chopped carrot tops and serve with the dressing and crispy peelings.
Carrots with dressing and crispy sprinkles. Image: Kathryn Hawkins
I have chosen to grow a purple variety of carrot this year, and the first seedlings are quite well advanced already. If all goes to plan you may well see another carrot-led post from me in a few weeks.
Carrot top and coriander dressing. Images: Kathryn Hawkins
I hope you have a good few days ahead. Until my next post, take care and keep safe 🙂
Hello everyone. I hope you have had a good few days. I can hardly believe that it is September already! We have had a fine few days of weather this last week, and the garden dried out enough to get gardening again. It felt good to be outside once again.
Runner beans 2020. Images: Kathryn Hawkins
At the end of my last post I mentioned that I was about to tackle a glut of runner beans. It has been perfect conditions for a bumper harvest this summer: plenty of rain intermixed with sunshine and warmth. The bean vines are still looking very lush and healthy, and there has been a second flush of flowers which means, if the weather holds, I should be picking beans for a while longer.
Fresh basil pesto. Images: Kathryn Hawkins
Apart from enjoying runner beans as an accompaniment to meals, so far I have a couple of bags in the freezer for eating later on in the year. I seldom do anything else, although leftover cold beans make a great salad ingredient – click here for a delicious runner bean salad I posted last year. This week’s recipe gives runner beans a leading role. I hope you enjoy the fritters, they are crisp and delicious, and for a little extra effort, I would suggest making your own pesto. I am very proud of my basil plant. It is thriving in the greenhouse; the leaves have a strong, peppery bite. The quantity below will make enough for this recipe. If you double or triple it you can freeze the remainder in small batches. It will also keep for a couple of weeks sealed tight in a jar in the fridge.
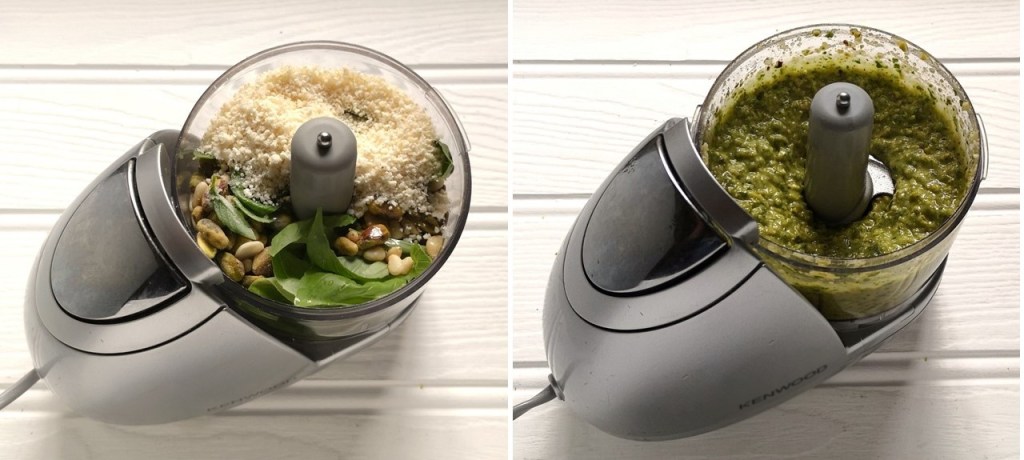
Vegan pesto: put a peeled garlic clove in a small food processor with 15g basil leaves, 60g unsalted nuts such as pistachio, pine nuts or almonds (I used a combination of all 3), a pinch of salt, 50ml extra virgin olive oil and 30g grated hard vegan cheese. Blitz for a few seconds until smooth, and that’s it. Pesto perfecto! This combination makes a thick pesto which is perfect for this recipe, but add extra oil to taste for a looser pasta sauce.
Preparing and cooking runner beans. Images: Kathryn Hawkins
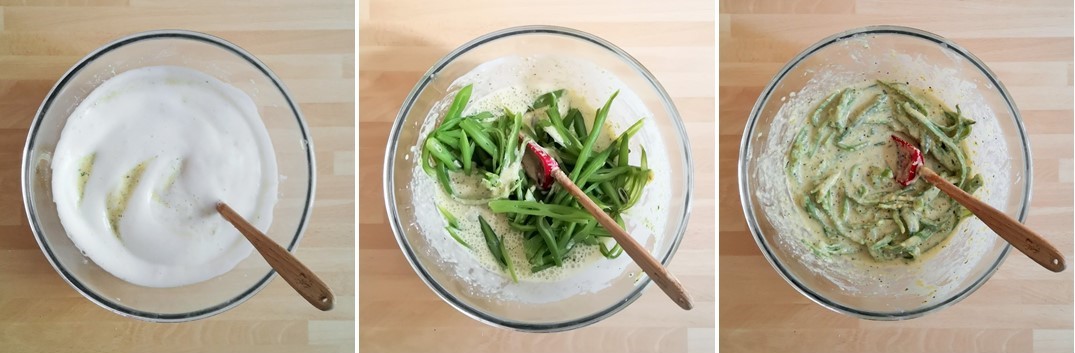
I have found that strips of bean work well in this recipe. The batter has a larger surface area to cling on to and cooks really crisply. Peel the sides of the beans using a vegetable peeler and remove the stalk end. If you have a bean slicer, push them through that, otherwise, slice them as thinly as you can. Steam them over simmering water for 5 minutes, then cool in cold water and drain well. Pat dry with kitchen paper. Now, let’s get on with the recipe.
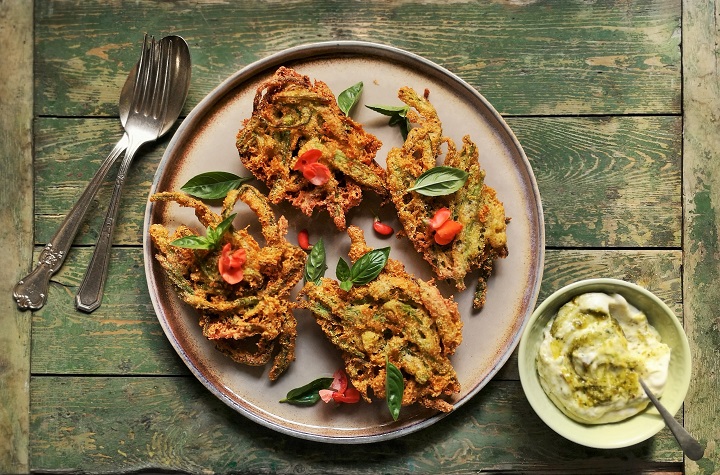
Fritters and pesto mayo. Image: Kathryn Hawkins
Makes: 8
Ingredients
50g polenta
75g gluten-free plain flour
2 tsp gluten-free baking powder
1 tbsp flax seeds, finely ground (I use a coffee grinder)
3 tbsp pesto sauce – see recipe above
120ml dairy-free milk
75ml aqua fava (bean or chickpea canning water)
225g cooked runner beans
Vegetable oil for deep frying
Vegan mayonnaise
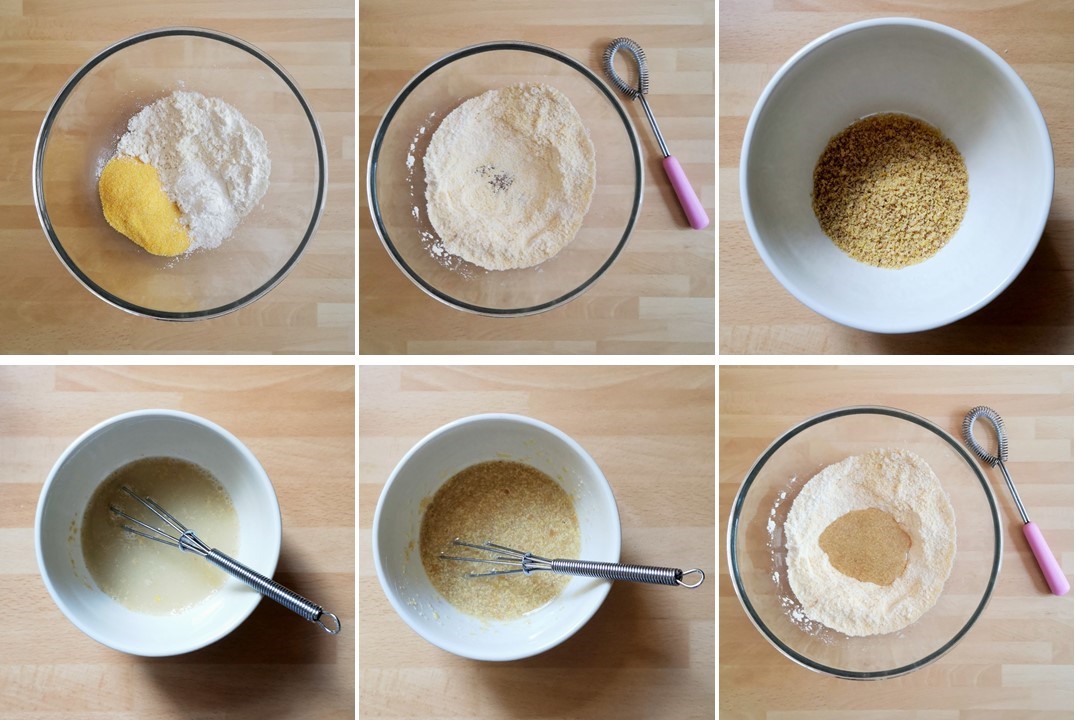
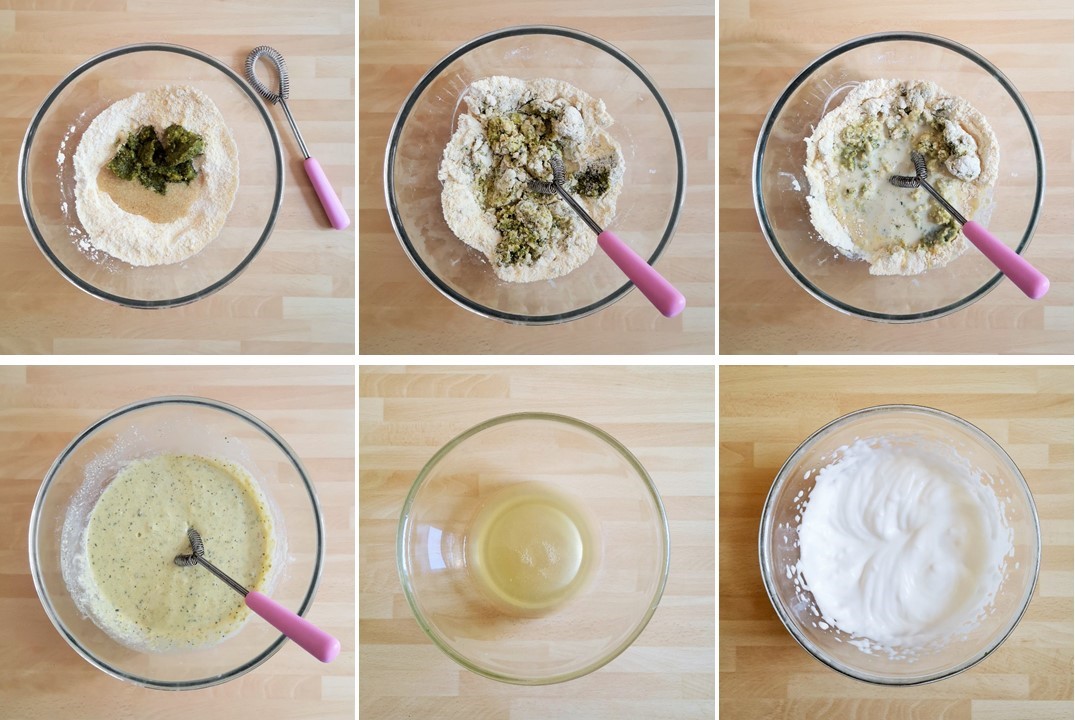
Put the polenta, flour and baking powder in a bowl. Mix together and make a well in the centre.
Mix the flax seeds with 3 tbsp cold water and leave to stand for about 5 minutes until thickened. Pour into the well. Preparing fritter batter and flax egg. Images: Kathryn Hawkins
Add the pesto sauce and milk and whisk together to make a smooth batter.
In another bowl, whisk the aqua fava to a stiff foam and then gently fold into the batter. Finally, carefully stir in the beans, making sure they are well covered. Adding pesto, whisked aqua fava and the beans. Images: Kathryn Hawkins
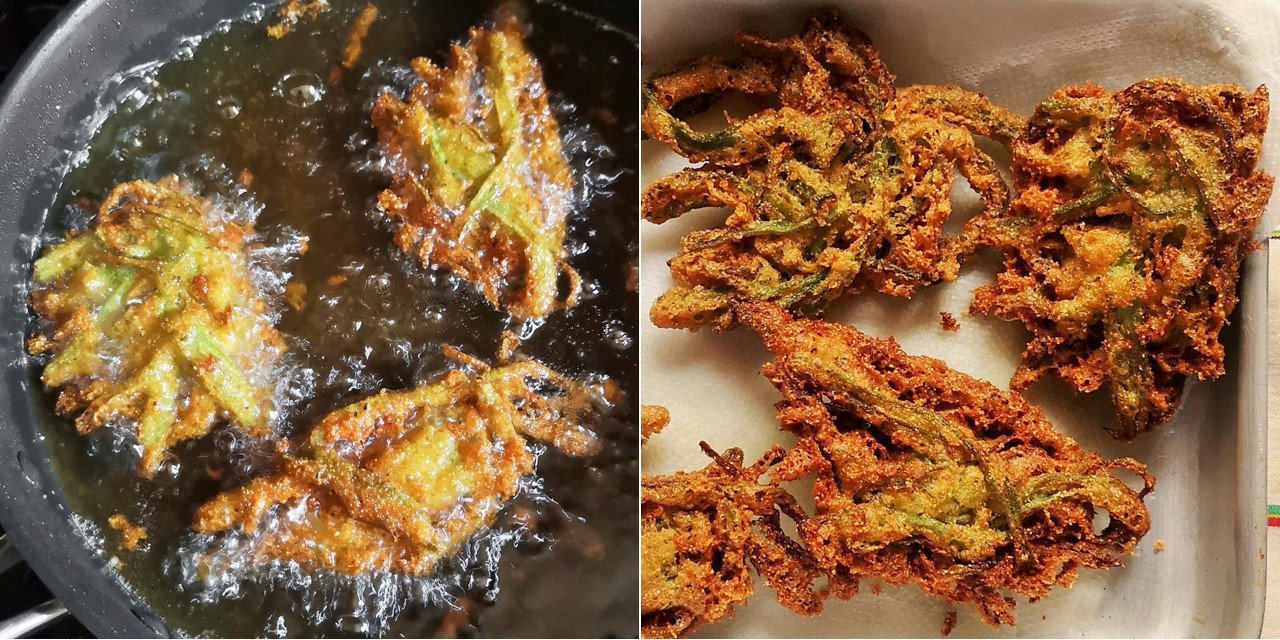
5. Pour sufficient oil into a large deep frying pan or wok to a depth of about 3cm and heat to 180ºC. Fry bundles of beans in batter in batches of 3 or 4, turning in the oil, for 4-5 minutes until crisp and golden. You should be able to make 8 fritters with this quantity. Drain well on kitchen paper and keep warm until ready to serve.
Cooking the fritters. Images: Kathryn Hawkins
6. To serve, mix 1 part pesto to 2 parts vegan mayonnaise and serve with the fritters accompanied with fresh tomatoes. Scatter with fresh basil and runner bean flowers, if liked.
Fritters with homegrown tomatoes, fresh basil and homemade pesto mayo. Image: Kathryn Hawkins
Use this batter with ribbons of courgette or carrot instead – lightly steam them first. Leave out the pesto if you prefer, or simply add grated vegan cheese to the batter and some chopped chives, shredded leek or spring onion.