Slow cooker curried apple chutney (naturally gluten-free, dairy-free and vegan)

Jar_of_homemade_slow_cooker_curried_apple_chutney
Sweet and spicy homemade chutney. Image: Kathryn Hawkins

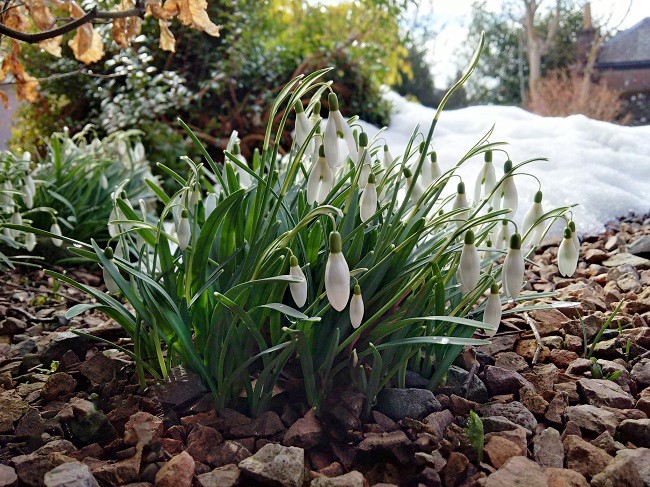
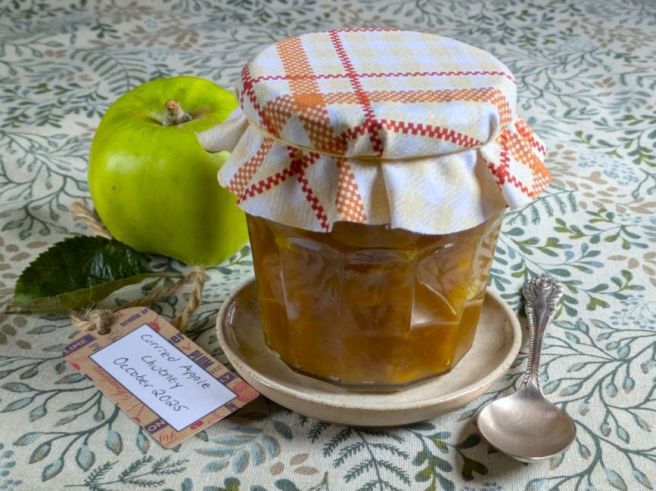
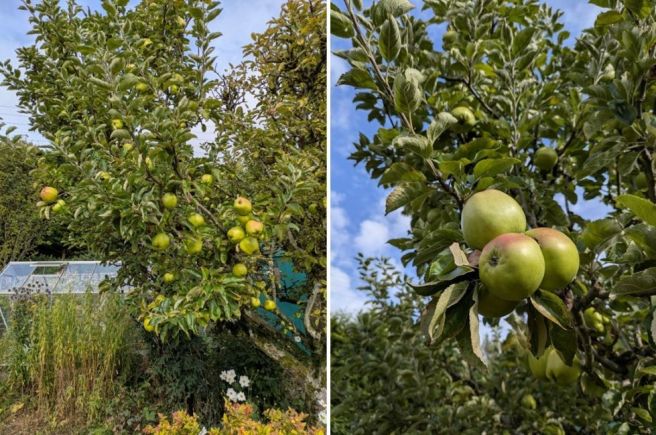
Hello again. I hope you are keeping well and enjoying the colours of Autumn. It’s remained quite dry here in central Scotland and the trees are looking very colourful around and about. Everywhere I look, it really has been a bumper year fruit especially plums and apples in my garden. The old apple tree produced yet another bountiful crop of some 70kg! Now that the harvest is in, it’s enjoying a well earned rest I’m sure.

Ripe_and_ready_to_harvest_Scottish_garden_cooking_apples_October_2025
A tree full of apples. Images: Kathryn Hawkins
Scottish_garden_cooking_apple_harvest_October_2025
Harvest gathered, this year’s bumper crop of cooking apples. Images: Kathryn Hawkins

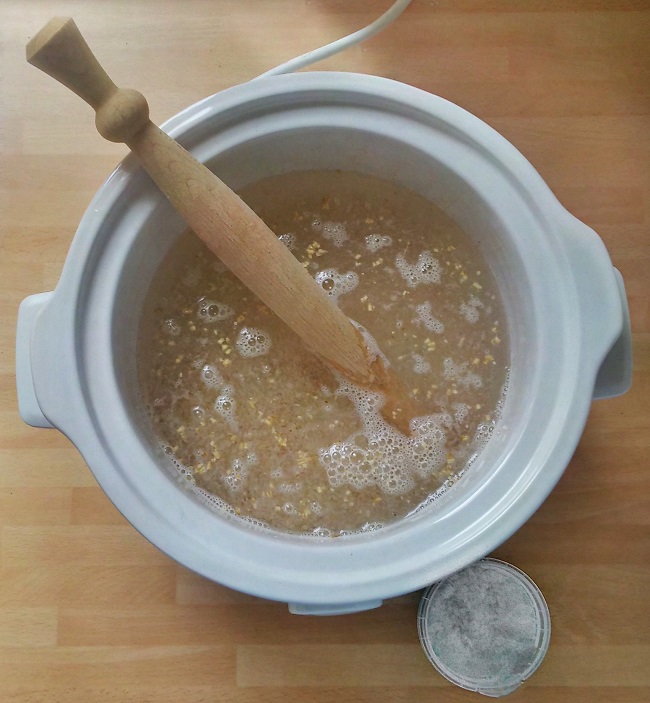
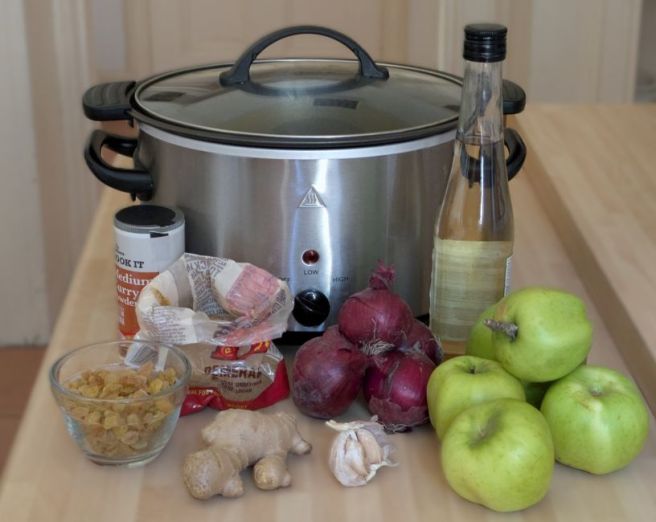
We did a lot of the apples away this year as there were far too many to cook up or freeze down. But I still have a box full to work through and one of the first things to make was some apple chutney. I made this batch in the slow cooker. It’s very easy to make and tastes delicious. One slight difference to this slow cooker recipe is that it uses less vinegar and sugar than traditional recipe so the chutney does need to be stored in the fridge.

Ingredients_for_slow_cooker_curried_apple_chutney
Curried apple chutney ingredients. Image: Kathryn Hawkins

Makes: approx. 1.2kg
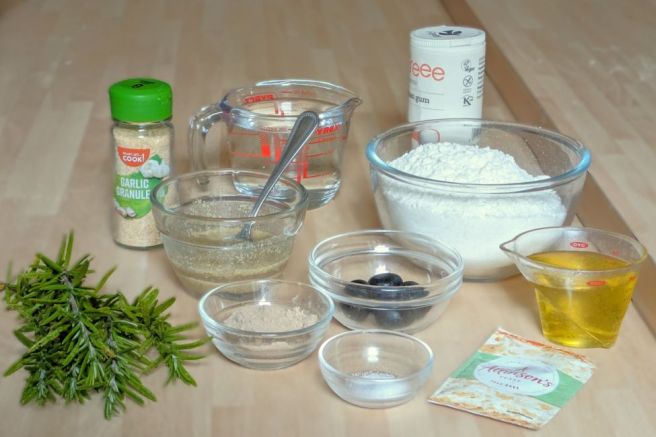
Ingredients

  • 300g prepared red or white onions, chopped
  • 15g peeled root ginger, grated
  • 10g peeled garlic, grated
  • 750g prepared cooking apples, chopped
  • 125ml cider or white wine vinegar
  • 1tbsp medium curry powder
  • 100g sultanas
  • 200g Demerara sugar
  • 1 1/2 tsp salt

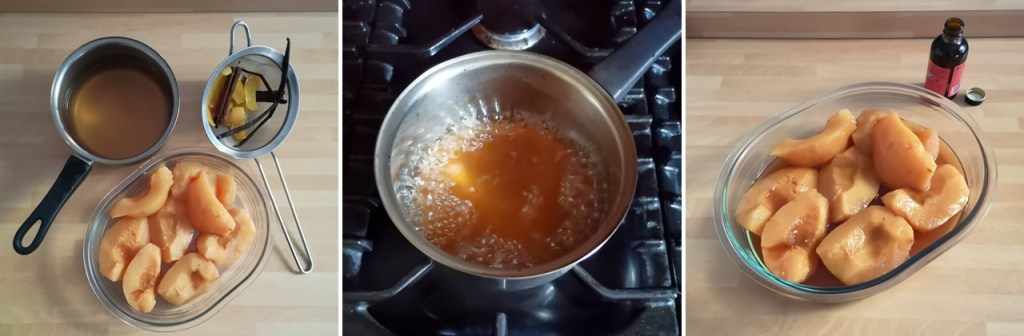
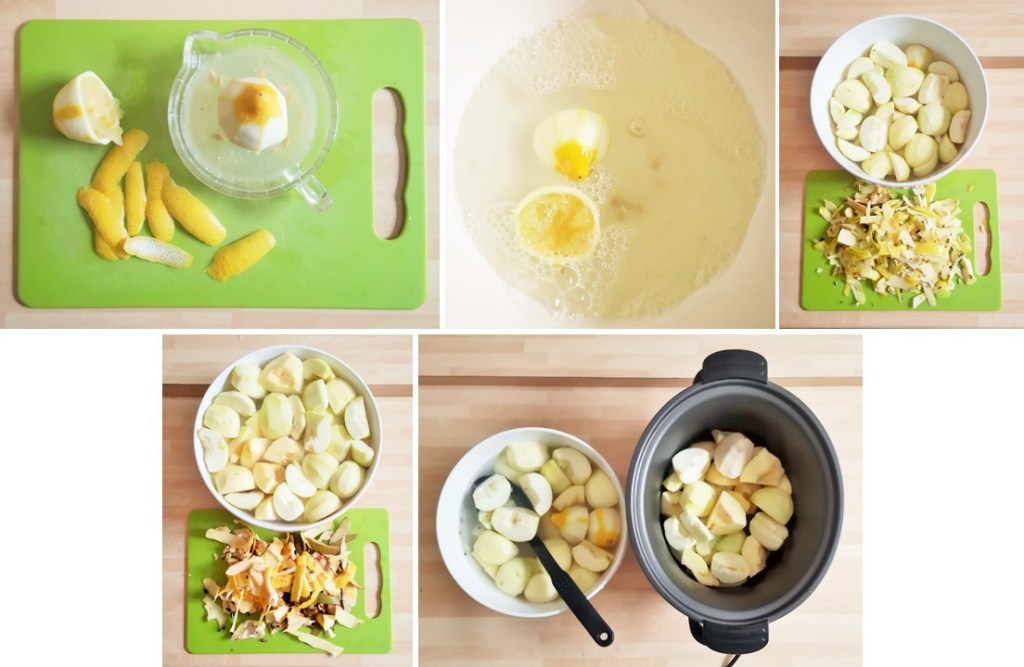
1. Put the onion, ginger, garlic and apples in the slow cooker. Pour over the vinegar, mix well, cover with the lid and cook on High for 4 hours.

Preparing_the_apples_for_slow_cooker_curried_apple_chutney
Apple chutney preparation. Images: Kathryn Hawkins

2. Stir in the remaining ingredients, cover and cook for 30 minutes longer to dissolve the sugar. After this time, remove the lid and if the mixture looks watery, leave the chutney to cook without the lid on for up to 2 hours, stirring occasionally, until thick and jam-like.

Curried_apple_chutney_cooking_in_a_slow_cooker
The 4 stages of slow cooker chutney. Images: Kathryn Hawkins

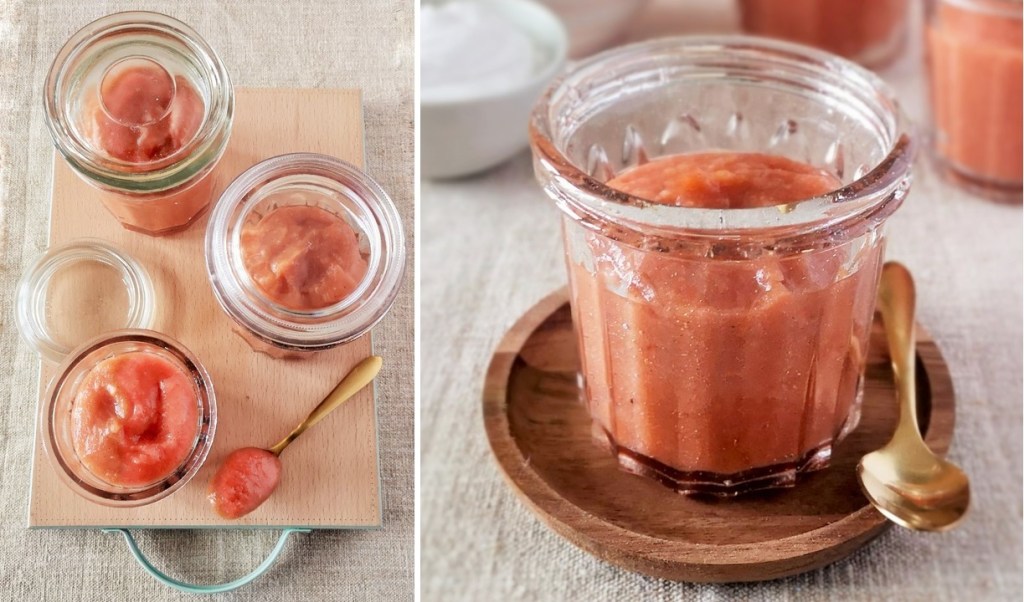
3. Leave to cool completely then pack into clean jars, seal tightly and store in the fridge for up to 3 months. It’s ready to eat immediately and doesn’t need to mature. Great news for the impatient preserve-makers amongst us 🙂

Homemade_slow_cooker_curried_apple_chutney_on_spoon
A spoonful of homemade chutney. Images: Kathryn Hawkins

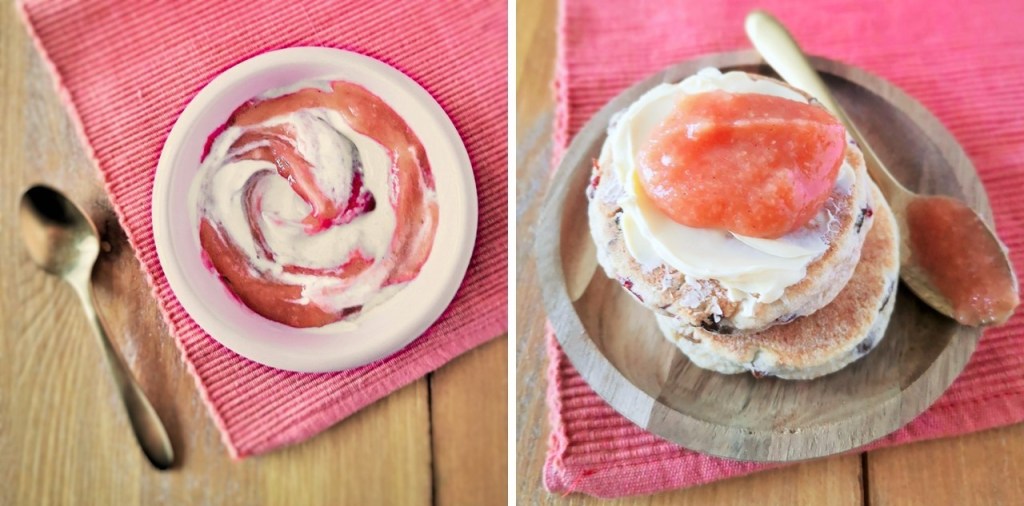
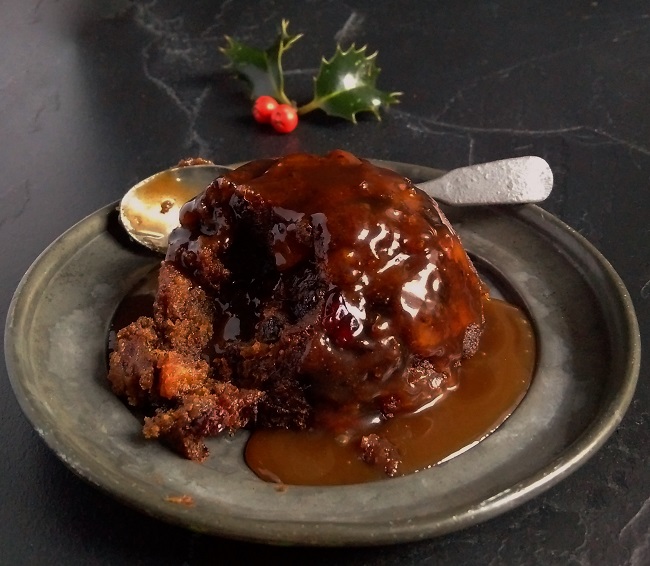
This chutney makes a great alternative to mango chutney with and Indian meal as well as a delicious finishing touch to a sandwich.

That’s me for another month. Enjoy the rest of the season and I’ll see you again next month when winter will be upon us. Until then, take care and thanks for stopping by.

Slow cooker focaccia-style bread (gluten-free; dairy-free; vegan)

Gluten-free_vegan_focaccia-style_bread_in_a_basket
Slow cooker focaccia with olives and rosemary, best served warm. Image: Kathryn Hawkins

Hello there. Welcome to my latest recipe post. So far this month, it’s been the weather for staying indoors here in central Scotland. I’ve been using my slow cooker a lot and eating lots of comforting food in an endeavour to stay warm – well that’s my excuse anyway 🙂

Gluten-free_slow_cooker_vegan_focaccia-style_bread_interior
Ripped and ready to eat. Image: Kathryn Hawkins

This week has been Real Bread week here in the UK so I thought I’d join the party and make my latest recipe post a bready one. If you’ve been reading my blog for a few months, you’ll know that I had a book on breadmaking published back in November – here’s the link to the post My new book: Complete starter guide to making bread, published by IMM Lifestyle Books 2024. When researching my recipes, I had been experimenting on cooking bread in the slow cooker and created a simple traditional loaf for inclusion. Sadly, I ran out of pages to feature this gluten-free and vegan slow-cooked loaf, so I’m giving it an airing here instead.

Gluten-free_vegan_focaccia_bread_dough_ingredients
Slow cooker focaccia ingredients. Image: Kathryn Hawkins

If you’ve never made bread before and are a bit daunted at the prospect, this is a very straightforward loaf to make. As with all gluten-free bread doughs, there is no kneading just a bit of mixing. You can omit the garlic, olives and rosemary to make a plain version if you prefer. I added psyllium husk for some extra texture. This gives the dough a slightly beige tone but adds some chewiness to the crumb. You may want to try making it without for a whiter dough but the texture will be more crumbly.

Gluten-free_vegan_rosemary_and_olive_slow_cooker_focaccia-style_bread
Rosemary and olive flavoured slow cooker focaccia. Image: Kathryn Hawkins

My slow cooker has a capacity of 5l and the dish is oval shaped – approx. 22 x 18cm. The temperature reached when on the High setting is 120°C. You may need to adapt the quantity of dough to fit your own slow cooker and adjust the cooking time if necessary. Other than that, all the information you need is below. Happy “slow” baking!

Makes: 1 approx. 22 x 18cm oval loaf

Ingredients

  • 1tbsp ground linseeds
  • 300g gluten free plain flour
  • 7g sachet easy blend dried yeast
  • 2tsp xanthan gum
  • 15g gluten free psyllium husk powder
  • ½tsp salt
  • 2tsp finely chopped rosemary leaves
  • ½tsp garlic granules
  • 25g pitted black olives, chopped
  • 80ml good quality olive oil
  • Sea salt flakes for sprinkling

1. Mix the linseeds with 3tbsp cold water and leave for a few minutes to thicken and make a vegan egg.

2. Put the flour in a bowl and mix in the yeast thoroughly, then add the xanthan gum, husk powder, salt, rosemary, garlic and olives and mix well.

3. Make a well in the centre and add 60ml olive oil and the vegan egg. Begin mixing and pouring in 300ml warm water. Continue mixing until you have a thick, sticky batter. Cover the bowl and leave to stand for 10 minutes. In this time the batter will become thicker and less sticky. Give it a thorough mix through.

Making_gluten-free_vegan_slow_cooker_focaccia-style_bread_dough
Making focaccia dough. Images: Kathryn Hawkins

4. Line the base of your slow cooker dish so that the parchment paper comes a little way up the sides of the dish.

5.Scoop the dough on top and press and smooth to fit the dish. Cover with the lid and set the cooker to the Warm setting. Leave to prove for 1½hours until puffed up and spongey in texture. If your cooker doesn’t have a Warm setting, simply cover with the lid and place the whole dish in a cool to warm place to rise.

6. Once the dough is risen, push the end of a wooden spoon into the dough all over to give a dimpled effect. Lay a scrunched up piece of baking parchment loosely on top (this helps prevent the dough getting wet from any water droplets that form inside the lid) and set the cooker to High. Leave to cook for 3 hours until firm on top and crusty round the edge. It can be quit challenging to know when the bread is completely cooked so if in doubt err on the side of caution and cook for a bit longer to avoid a dense texture above the bottom crust. As a rule, the base of the loaf should sound hollow when tapped.

Cooking_gluten-free_vegan_focaccia_dough_in_a_slow_cooker
Slow cooking focaccia dough. Images: Kathryn Hawkins

7. Transfer the loaf to a wire rack and discard the lining paper. Brush with remaining olive oil and sprinkle with sea salt. Leave to cool for a few minutes then serve warm. If you prefer a browner top, remove the bread from the slow cooker and place on the grill rack. Cook under a preheated medium/hot grill for 1-2 minutes to brown the top then oil, salt and cool as above.

Browning_slow_cooker_focaccia-style_bread
Browning slow cooker bread. Images: Kathryn Hawkins
Sliced_and_served_gluten-free_vegan_slow_cooker_focaccia
Warm sliced focaccia, ready to serve. Images: Kathryn Hawkins

This bread is best served warm. If you want to freeze the loaf, omit the salt from the top, and wrap well. Once defrosted, simply reheat the loaf in a medium oven for a few minutes, and sprinkle with salt before serving.

Thanks for reading my post. I hope to see you again next month 🙂

Aromatic and spiced, slow-cooker quince (naturally gluten-free; dairy-free; vegan)

Gold_serving_bowl_of_freshly_cooked_slow-cooker_spiced_quince
Slow-cooker spiced quince. Image: Kathryn Hawkins

Hello again. It’s officially the time of year when the slow-cooker is permanently on the work top in my kitchen. With daylight hours becoming fewer and the temperature getting lower and lower, in my mind, “comfort food” is an important aid to get me through the next few months.

Fresh_quince_in_a_gold_bowl
Golden quince. Image: Kathryn Hawkins

I’ve been saving these beautiful quince for a few weeks, making sure they are perfectly ripe for maximum flavour and aroma before I cook them. I chose a selection of my favourite aromatics to add to a sugar syrup: rose water, lemon, vanilla and cinnamon, all perfect companions for this fabulous autumn fruit.

Fresh_quince_and_flavours_for_cooking
Fresh qunice and flavourings. Images: Kathryn Hawkins

This is a very straightforward recipe for the slow-cooker. Once the quince are prepared it’s just a case of making the syrup to pour over. When the cooking is done, I reduced the cooking juices down to make a more intensely flavoured syrup to pour back over the fruit. If you don’t have quince, try using slightly under-ripe pears instead.

Serves: 4-6

Ingredients

  • 750g ripe quince
  • 1 unwaxed lemon
  • 1 cinnamon stick, split
  • 1 vanilla pod, split
  • 50g caster sugar
  • 2tbsp carob or maple syrup
  • Rosewater to taste
  • Pistachios and pomegranate seeds to sprinkle

1.Using a vegetable peeler, carefully peel away the outer lemon zest without taking too much white pith. Set aside. Cut the lemon in half and extract the juice. Place in a large bowl along with the squeezed out lemon shells. Top up with cold water.

2.Peel the quince thinly. Cut into quarters and slice out the core. As soon as you prepare each quarter, push it down into the lemony water to help prevent discolouration.

3.When all the fruit is prepared, drain well, discard the lemon shells and place the quince in the slow-cooker dish. Add the reserved lemon zest, cinnamon and vanilla.

4.Put the sugar in a saucepan with 400ml water. Heat gently to dissolve, then bring to the boil and cook for 5 minutes. Pour over the fruit, place the lid on top and cook on High for 2 hours, turning the fruit halfway through, until tender.

7_steps_to_preparing_quince_for_slow-cooking
Slow-cooker spiced quince preparation. Images: Kathryn Hawkins

5. Turn off the power and leave to cool for 2 hours before draining the fruit and straining the cooking liquid into a saucepan. Put the fruit in a heat proof dish and cover with foil.

6. Add the maple or carob syrup to the cooking juices, bring to the boil and simmer for 7-8 minutes until syrupy. Cool for 10 minutes. Add a few drops of rosewater to taste then pour over the fruit and leave to cool completely.

Making_a_flavoured_syrup_for_slow-cooker_spiced_quince
Making the syrup. Images: Kathryn Hawkins

7. Cover and chill until ready to eat. Serve at room temperature for maximum flavour. Sprinkle with pistachios and pomegranate seeds for crunch. The quince freezes well in the syrup for later enjoyment.

Slow-cooker_spiced_quince_close-up
Sweet, spiced deliciousness. Image: Kathryn Hawkins

I hope you enjoy the recipe and I look forward to welcoming you back to my next post in a couple of weeks time. Thanks for stopping by 🙂

Fruit butter (naturally gluten-free; dairy-free, and vegan)

Homemade_fruit_butter_in_glass_jars_and_served_with_coconut_yogurt
Homemade fruit butter. Image: Kathryn Hawkins

Happy New Year! I hope you have had a good holiday. We find ourselves at the beginning of a brand new year, wondering what 2023 has instore for us all. Let’s hope it’s a good one.

It’s been a chilly, frosty and snowy end of year here in central Scotland. I didn’t venture very far. I have been in the kitchen keeping cosy and have been trying new ways of using up what remains of the stored fruit from last Autumn. This week’s post is the result of one of my experiments, slow-cooked fruit butter. It keeps for about a week in the fridge but can be frozen for use later in the year.

Homemade_fruit_butter_in_glass_jars
In the jar. Images: Kathryn Hawkins

Fruit butter has nothing to do with dairy butter. In fact, it is completely fat free. I guess it gets its name from the fact that it is silky smooth in texture. It tastes delicious and is very easy (and moreish!) to eat. You can use it like jam, spread on toast, or as a filling for pancakes, pastry cases and sponge cakes, or as a dessert with yogurt. It is delicious served with rice pudding, granola, porridge or as a topping for a cheesecake.

Homemade_fruit_butter_serving_suggestions
Fruit butter with coconut yogurt and on griddle scones. Images: Kathryn Hawkins

The sugar content is much lower than jam so you do need to keep it in the fridge. It freezes very well with no alteration in texture, colour or flavour. If you portion the butter up in small containers, it will defrost quickly and can be used up in a few days.

Wooden_bowl_of_ripe_quince_pears_and_apples
Ripe fruit and flavourings. Images: Kathryn Hawkins

I used a combination of quince, cooking pears and small cooking apples, but you can use the same method for a single fruit butter, although you may need to adjust the sugar content. And when it comes to flavouring, you can use whatever you fancy. For speed, ground spices are the easiest option because it saves time at the end of cooking. You can simply blitz the fruit and store. I prefer whole spices along with lemon rind, and as long as you know how many pieces you have added, then you know how many bits you need to fish out before your start blending. Cinnamon, allspice, cloves, ginger and orange would all work very nicely, it’s just personal preference.

On with the recipe. All the work is in the preparation of the fruit, then it’s a case of letting the slow-cooker do the rest of the work.

Makes: approx. 1.6kg

Ingredients

  • 1 unwaxed lemon
  • 2kg quince, cooking or firm pears, and cooking apples (dessert apples will also work, just adjust the sugar quantity accordingly)
  • 125g caster sugar
  • 1 vanilla pod, split
  • 6 to 8 cadamom pods, split

1. Pare the lemon rind in thick strips using a vegetable peeler, and extract the juice. Put the spent lemon shells in a large bowl, pour over the juice and top up with cold water to half fill the bowl. Keep the pared rind for the slow cooker.

2. Peel and core all the fruit, and cut into pieces – apple and pear will cook more quickly than quince if you are using a combination. Simply cut the quince (or any firmer pieces of fruit) into small pieces for even cooking. As you prepare the fruit, put it in the lemony water to reduce the deterioration of colour.

3. When you have prepared all the fruit, use a draining spoon to ladle it into your slow cooker. There is no need to drain the fruit too much as a little of the lemony water will help create steam as the fruit cooks. Discard the lemon shells.

5_images_showing_the_steps_of_fruit_preparation_prior_to_slow_cooking
Preparing fruit for slow cooking. Images: Kathryn Hawkins

4. Add the sugar, pared lemon rind and your other chosen flavourings and mix everything together, then cover with the lid and set the cooker to High for 5 to 6 hours, or Low for 10-12 hours. The exact cooking time will depend on how ripe the fruit is. After a couple of hours, give the fruit a stir then re-cover, and stir again after a further 2 hours. Continue cooking until the fruit is very soft.

Prepared_apple_pear_and_quince_in_slow_cooker_before and_after_cooking
Before and after cooking. Images: Kathryn Hawkins

5. Switch off the cooker and leave the fruit, covered with the lid, to go cold. Remove the rind and whole spices if using and either use a stick blender to blitz the fruit or transfer to a standing blender. The fruit butter should be thick and beautifully smooth.

Blending_slow_cooked_fruit_to_make_fruit_butter
The final step to perfect fruit butter. Images: Kathryn Hawkins

6. Once you have your butter, either spoon it into clean, sealable jars or containers for keeping in the fridge, or pack it into cartons for freezing.

Freezing_homemade_fruit_butter
Ready for freezing. Image: Kathryn Hawkins

I hope you have enjoyed my post this week. I will be back with another recipe in a couple of weeks. Until then, take care and keep well. I will see you again soon 🙂

Rise and shine oatmeal porridge (gluten-free; dairy-free; vegan)

Bowl_of_oatmeal_porridge_with_blood_oranges_pecan_and_marmalade
A super sunny start to the day. Image: Kathryn Hawkins

Hello everyone! I have something bright and cheerful for you this week. Given all the doom and gloom in the news, this tasty and super-charged breakfast will get your day off to a bright and cheerful start. It’s a seasonal update on a recipe I posted a couple of years ago.

Skinless_blood_orange_slices
Blood orange slices. Image: Kathryn Hawkins

No sooner has the bitter marmalade orange season finished, the next citrus beauties are on the horizon, coming into the shops and markets in mid-February. Actually, the season is coming to an end but I’ve been enjoying the ruby-red fleshed oranges for a couple of weeks already. This orange seems to have had a name change, and is now, rather boringly, called red orange, but I will always think of them as the blood orange or Sanguinelli. The flavour is sweet and tart at the same time. They are very juicy and you never quite know how red the flesh will be until you start peeling.

4_steps_showing_how_to_peel_and_slice_oranges
Perfect peeling. Images: Kathryn Hawkins

For the past few days the weather has been decidedly chilly here; it’s been the kind of temperature that calls for porridge. My recipe for an overnight oatmeal porridge which cooks in the slow-cooker means it is ready for you to enjoy the next morning without any fuss. The oatmeal is cooked the traditional Scottish way in just water with some salt to season. Everything else is added afterwards. I posted the original recipe back in March 2018 – you can find it here.

Slow-cooker_oatmeal_porridge_ingredients_water_salt_and_pinhead_oatmeal
Slow-cooker + water + salt + oatmeal. Image: Kathryn Hawkins

To make 6 hearty servings, put 150g pinhead oatmeal in your slow-cooker. Add a generous pinch of salt and pour over 950ml cold water. Cover with the lid and switch on to the low setting. Leave for 8 hours (up to 10). After the cooking time, the surface of the porridge will form a light skin, but give it a good stir and the creaminess of the cooked oats will be appear. Once I’ve got my portion in my cereal bowl, I mix in oat milk (I love the Barista versions for extra richness) to loosen up the texture. Once the porridge has cooled it will solidify. It will keep in the fridge for up to a week, and reheats very well in the microwave – just mash with a fork, mix in some milk and reheat.

3_steps_showing_the_cooking_of_oatmeal_porridge_in_the_slow-cooker
Slow-cooker oatmeal porridge. Image: Kathryn Hawkins

So with the cooking taken care of, you just need to make up your mind what to eat with it. To prepare the orange slices, slice the top and bottom off an orange and then remove the peel by slicing downwards with a sharp knife, trying to take only the skin and white pith away. Slice into rounds or chop smaller.

Adding_a_generous_spoonful_of_homemade_Seville_orange_marmalade_to_oatmeal_porridge
Homemade marmalade for extra citrus flavour. Images: Kathryn Hawkins

Back in January, I posted my recipe for Seville orange marmalade. I’ve been putting my stocks to good use this week. It makes a great addition to a bowl of porridge, adding some sweetness and also more orange-flavour. All in all, this is a seriously citrusy and sunshiny breakfast bowl, with a few pecans sprinkled over for some crunch. I’m looking forward to my breakfast already 🙂 Until next time, I hope you have a good few days and stay healthy.

Close-up_on_oatmeal_porridge_with_marmalade_blood_oranges_and_pecan_nuts
A breakfast bowl of sunshine, Image: Kathryn Hawkins

Slow-cooker bean and vegetable hash (gluten-free; dairy-free; vegan)

Plated_vegan_breakfast_cooked_overnight_in_slow-cooker
Rise and shine, bean and vegetable hash with fresh toast. Image: Kathryn Hawkins

Welcome to my first post of the new year. On the menu this week is a hearty (and healthy) breakfast/supper dish cooked in the slow-cooker, perfect for the time of year and for Veganuary, as this month has become known 🙂

Plateful_of_vegan_bean_and_vegetable_hash
A hearty, healthy start to the day. Image: Kathryn Hawkins

The recipe takes next to no time to prepare, and once it’s all mixed up and in the cooker, you’ve got 9 hours to get on with your life. The hash is a simple combination of vegetables that slow-cook well, some cooked beans and a mix of spices to pep things up.

Vegetables_for_vegan_bean_and_vegetable_hash
Hash vegetables. Image: Kathryn Hawkins

Cooked_borlotti_beans
Cooked borlotti beans. Image: Kathryn Hawkins

Mix_of_spices_ad_herbs_for_seasoning_bean_and_vegetable_hash
Hash seasoning. Image: Kathryn Hawkins

So with no more blurb from me, here’s what to do……

Serves: 4

Ingredients

  • 225g sweet potato
  • 225g general purpose potatoes
  • 1 red onion
  • 1 each yellow and red pepper
  • 3 tbsp. vegetable oil
  • 350g ripe tomatoes
  • 240g cooked pinto, kidney or borlotti beans
  • 1 tsp each ground cumin and smoked paprika
  • ½ tsp dried chilli flakes
  • ½ tsp smoked or regular salt
  • Freshly ground black pepper
  • Freshly chopped parsley
  1. Peel the potatoes and cut into approx. 0.75cm thick pieces. Peel and slice the onion. Deseed and slice the peppers.

    Prepared_vegetables_on_chopping_board
    Prepared hash vegetables. Image: Kathryn Hawkins
  2. Heat the oil in a large frying pan and stir fry the prepared vegetables for 5 minutes. Transfer to the slow cooker dish.
  3. Quarter the tomatoes and mix into the vegetables along with the beans, spices and seasonings.

    Preparing_and_cooking_vegetables and beans_for_hash
    Hash preparation. Images: Kathryn Hawkins
  4. Cover with the lid. switch the slow-cooker on to the Low setting and leave to cook undisturbed overnight or up to 9 hours, until the vegetables are meltingly tender.

    Slow-cooker_close-up
    My slow cooker. Image: Kathryn Hawkins
  5. To serve, stir the mixture well. Pile on to warm serving plates and sprinkle with parsley. For breakfast, some freshly grilled toast is all the extras you need; for supper, the hash is great spooned over rice or pasta.

    Up_close_on_serving_of_vegan_bean_and_vegetable_hash
    Ready to eat. Image: Kathryn Hawkins

Overnight seed and berry porridge (gluten-free; dairy-free; vegan)

Bowl_of_oatmeal_porridge_with_berry_compote
Oatmeal and seed porridge with berry compote. Image: Kathryn Hawkins

It still feels more wintry than spring-like here in central Scotland. We have had a blue-sky day today, the first for a while, and the temperature is slowly rising. The snow is beginning to thaw slowly, but most of the garden is still covered in a thick, white crust of powdery snow. The snowdrops under the hedge are the first to emerge at long last and I am relieved to see that they have survived their week inside a snow-cave – what robust little flowers they are 🙂

A_clump_of_snowdrops_sheltered_from_the_snow
After-the-snow snowdrops. Image: Kathryn Hawkins

One of my favourite warming breakfast dishes is porridge, and it seems a lot of people agree: porridge has become the super-star amongst breakfast cereals, and the supermarket shelves are stacked out with different varieties and all sorts of flavours.

Tin_and_bowl_of_pinhead_oatmeal
Pinhead oatmeal for “proper” porridge”. Image: Kathryn Hawkins

I like my porridge made the traditional way, which means I prefer to use oatmeal (or groats) rather than rolled oats. However, it’s not an instant breakfast and requires some organisation: the oatmeal requires overnight soaking before it can be cooked. But if you have a slow-cooker, you can cut down on the preparation: just mix everything up in the slow-cooker the night before and leave it on a low setting until the next morning, by which time it’s ready to eat as soon as you want it.

The oatmeal in the picture above is a local Scottish brand and is not guaranteed gluten-free. As you will know, oats themselves don’t contain gluten, but there is a contamination risk from other grains during processing, so if you do have a serious gluten allergy, you should seek out gluten-free oatmeal.

Slow-cooker_with_oatmeal_water_and_salt
Slow-cooker porridge: oatmeal, water and salt. Image: Kathryn Hawkins

If you don’t fancy leaving your slow-cooker on overnight, slow-cook the porridge as you like, and once cooked and cooled, the porridge will keep in the fridge for a few days. You can take out a portion and reheat it with you favourite soya, rice, nut or oat milk when you’re ready. Just pop a portion in a microwave-proof bowl, mash it with a fork and stir in some milk, then reheat on High for about 1 ½ minutes. Alternatively, you can reheat the porridge in a saucepan, with milk, in the same way.

The following quantity will make about 8 servings: pour 1.1litre water into your slow-cooker and stir in 175g pinhead oatmeal. Add a pinch of salt and mix well. Cover with the lid and switch the cooker on to the Low setting. Leave to cook, undisturbed, overnight (for 8-10 hours), until thick and soft. To serve, stir well and serve with hot, non-dairy milk mixed in. Add sugar or syrup to sweeten if you like, and top with sliced banana, fresh berries, grated apple, dried fruit etc.

Close-up_of_mixed_ground_seeds_and_frozen_summer_berries
Homemade seed mix and my frozen summer berries. Images: Kathryn Hawkins

For an extra nutritious start to the day, I like to stir a heaped tablespoon of ground seeds into my bowl porridge and top with some summer berry compote.

For the seed mix, grind 3 tbsp. flax seeds with 2 tbsp. sunflower seeds, 1 tbsp. chia seeds and 1 tbsp. sesame seeds – I use a coffee grinder to do this. Stir in 1 to 2 tbsp. ground almonds, pecans or Brazil nuts. Store in the fridge in an airtight container and use to sprinkle over anything you like for some extra nutritious nuttiness!

The berry compote is made from my freezer supply of home-grown raspberries, blackberries and blueberries. I simply put a quantity, still frozen, in a saucepan with the lid on and sit the pan over a very low heat until the berries soften and cook. I add a little vanilla sugar once the berries are cooked. Delicious eaten hot or cold.

Spoon_of_seed_porridge_with_berry_compote
A spoonful of my favourite oatmeal porridge. Image: Kathryn Hawkins


Sticky toffee Christmas pudding (gluten-free; dairy-free; vegan)

Individual_sticky_toffee_Christmas_pudding
Sticky toffee Christmas pudding. Image: Kathryn Hawkins

Just a few days to go before the festive feasts begin, and what could be more appropriate for my last post before Christmas, than a delicious alternative Christmas pudding. I do enjoy a traditional, steamed fruit pudding, but this year I fancied a change, and have developed an alternative recipe. This pudding is fruity, but a little wee bit lighter in texture, and with the emphasis on toffee flavour rather than spice; I guarantee, it is utterly divine 🙂

Pile_of_dried_fruit_for_Christmas_pudding
Cherries, apricots, sultanas and currants. Image: Kathryn Hawkins

The recipe makes 2 x 250ml puddings, which I think serve between 2 and 4 people, depending on how large an appetite you have. If you prefer,  put the mixture in a 500ml basin and cook it for about an hour longer. I usually steam puddings in a slow cooker, this way I can forget about them and don’t end up with a steamy kitchen. If you prefer, put the puddings on a trivet, in a saucepan or in a steamer compartment, cover tightly with a lid, and then cook in the steam for about 1 1/2 to 2 hours. You can use any combination of fruit (or nuts) you have to make up the weight in the ingredients list, it’s a great pudding to use up any odds and ends you have.

Makes 2 x 250ml puddings

Ingredients

  • 75g dried dates
  • 50g dairy-free margarine
  • 50g light Muscovado sugar
  • 50g silken tofu
  • 65g self-raising gluten-free flour
  • ½ teasp bicarbonate of soda
  • 125g mixed dried fruit

For the sauce:

  • 85g light Muscovado sugar
  • 30g dairy-free margarine
  • 110ml canned coconut milk
  • ½ teasp good quality vanilla extract
  1. Grease and flour 2 x 250ml pudding basins. Put the dates in a small saucepan with 75ml water. Bring to the boil, cover and simmer gently for 5 minutes until very soft. Beat well with a wooden spoon until smooth, then leave to cool completely.
  2. When you are ready to mix up the puddings, put the slow cooker on High and leave to preheat for 20 minutes. Meanwhile, put the margarine, sugar and tofu in a bowl. Add the cold date mixture and whisk everything together until smooth and creamy.

    Preparing_the_pudding_mixture
    Preparing the date mixture and blending the ingredients. Images: Kathryn Hawkins
  3. Sieve the flour and bicarbonate of soda on top. Add the fruit and gently mix all the ingredients together. Divide between the 2 basins and smooth the tops.

    2_china_basins_covered_with_parchment_and_foil
    Preparing the puddings for steaming. Image: Kathryn Hawkins
  4. Cover the puddings with a layer of baking parchment, and then foil, and tie securely with string. Put the basins in the slow cooker, side by side, pour in sufficient hot water to come halfway up the sides of the basins, cover and leave to cook for 2 hours. A skewer inserted into the centre of each pudding will come out clean when the puddings are ready.
  5. For the sauce, put the sugar, margarine and half the coconut milk in a small saucepan. Heat gently, stirring, until melted together, then raise the heat and simmer for about 5 minutes until richly golden and caramelised. Remove from the heat and stir in the remaining coconut milk and vanilla extract.

    Making_dairy-free_vegan_toffee_sauce
    Making the toffee sauce. Images: Kathryn Hawkins


  6. When the puddings are ready, remove them from the slow cooker and leave them to stand for 5 minutes. Remove the wrappings and turn out on to warm serving plates. Pour over sauce and serve immediately.

    A_spoonful_of_sticky_toffee_Christmas_pudding
    Ready to eat, sticky toffee Christmas pudding. Image: Kathryn Hawkins

    That just leaves me to pass on my very best wishes to you for a happy, healthy and enjoyable Christmas holiday. Happy festive feasting!