Welcome to my blog all about the things I love to grow and cook. You'll find a collection of seasonal gluten-free, dairy-free and vegan-friendly recipe posts, as well as a round up of my gardening throughout the year. I wish you good reading, happy cooking and perfect planting!
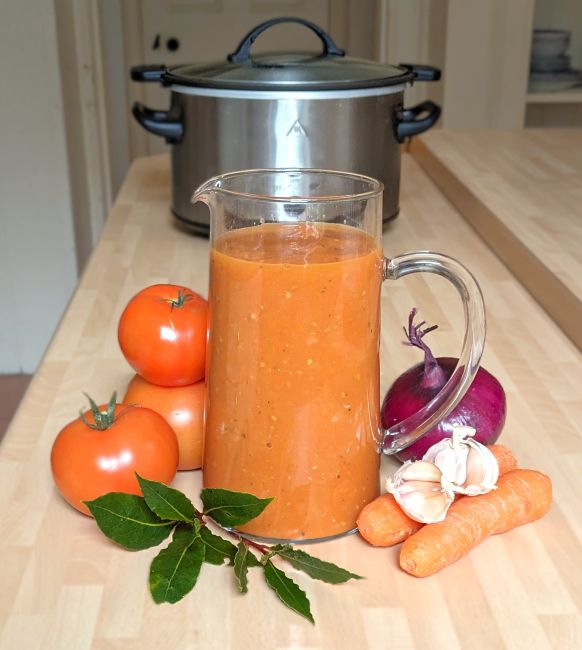
Easy to make, slow cooker tomato sauce. Image: Kathryn Hawkins
Hello again. It’s that time of year when there is so much produce ready at the same time. My fridge is groaning with vegetables and fruit, and I really need to get down to some serious recipe/meal planning and freezing.
For a simple tomato sauce, put 1.5kg washed and chopped fresh tomatoes in the slow cooker with 2 peeled and sliced medium carrots. Add a peeled and chopped large onion and 4 peeled and halved garlic cloves. I seasoned the mix with 2 teaspoons celery salt, 1/2 teaspoon black pepper and 4 teaspoons caster sugar. Add a couple of bay leaves and drizzle over 3 tablespoons olive oil. Mix well, cover with the lid and switch to the High setting. Leave to cook for 4 to 5 hours, until completely soft.
Blitz and freeze. Images: Kathryn Hawkins
Discard the bay leaves and blitz with a hand blender then leave to cool before packing into freezer containers. This quantity will make around 1.75kg sauce. It will keep in the fridge for about 5 days, and in the freezer for 6 months or so.
Reduced and thickened slow cooker tomato sauce. Images: Kathryn Hawkins
The sauce is quite thin which is fine for some recipes but if you want it thicker, transfer a few ladles of sauce to a deep frying pan, drizzle with a little olive oil, bring to the boil and simmer for a few minutes, stirring occasionally, until it is thickened to you liking.
Using homemade tomato sauce. Images: Kathryn Hawkins
Thinner sauce is perfect for soups and risotto stocks, whilst thicker sauce clings better to pasta shapes or can be used as a spread for tarts and pizza bases.
That’s all for this post. I hope you are enjoying some good weather and fine homegrown produce. Until next time, thanks for stopping by 🙂
Tomato risotto and roast vegetables. Image: Kathryn Hawkins
Hello again. I hope the sun has been shining on you this month. It’s certainly been a warm, dry and bright month here in central Scotland. Subsequently I haven’t felt much like cooking and when I have, it’s been simple suppers like this no-fuss, no-pfaff risotto recipe.
Risotto topped with roast veg and rosemary. Image: Kathryn Hawkins
I love a good risotto but it’s not something to be hurried so I rarely make one when I’m busy. But now I have discovered this “cheats” version, it’s back on the menu. Once you’ve got the basic rice recipe, you can make whatever variations you like to the flavour or by adding extras. This version uses homemade tomato sauce and a little wine as the liquid but you can use all stock or half and half with wine if you prefer something plainer. A while ago I published a recipe for homemade tomato sauce. If you fancy having a go here’s the link to the post Home-grown tomatoes – recipe for fresh tomato sauce, a salsa, plus other serving suggestions (gluten-free, dairy-free, vegan) If you use a readymade sauce, make sure it’s not too concentrated otherwise the rice may taste quite tart rather than creamy.
My microwave oven has an output of 900 watts and has a turntable. You may need to adjust the cooking times if your oven has a different output.
Serves: 2
Ingredients
1tbsp olive oil
2 garlic cloves, peeled and finely chopped
150g arborio rice
100ml dry white wine or vegetable stock
Salt and freshly ground black pepper
600ml homemade tomato sauce
1tsp dried rosemary
1tsp caster sugar
Roast vegetables and fresh rosemary to serve
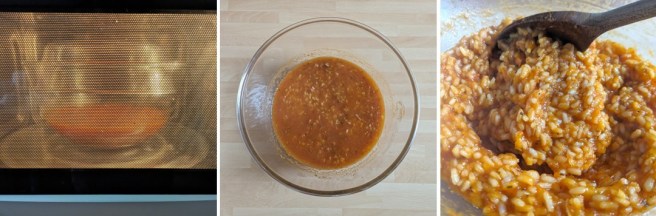
1. Put the oil and garlic in a large microwave-proof bowl. Cover and cook for 1 minute on High power.
2. Mix in the rice, wine or stock and seasoning and then stir in the tomato sauce, rosemary and sugar.
3. Cover and cook on High for 16 minutes. Stir after 6 minutes and then again after 10 minutes of the cooking time. If the rice is still a bit gritty at the end of the cooking time, add a small amount of water and cook for a further minute.
9 steps to making microwave tomato risotto. Images: Kathryn Hawkins
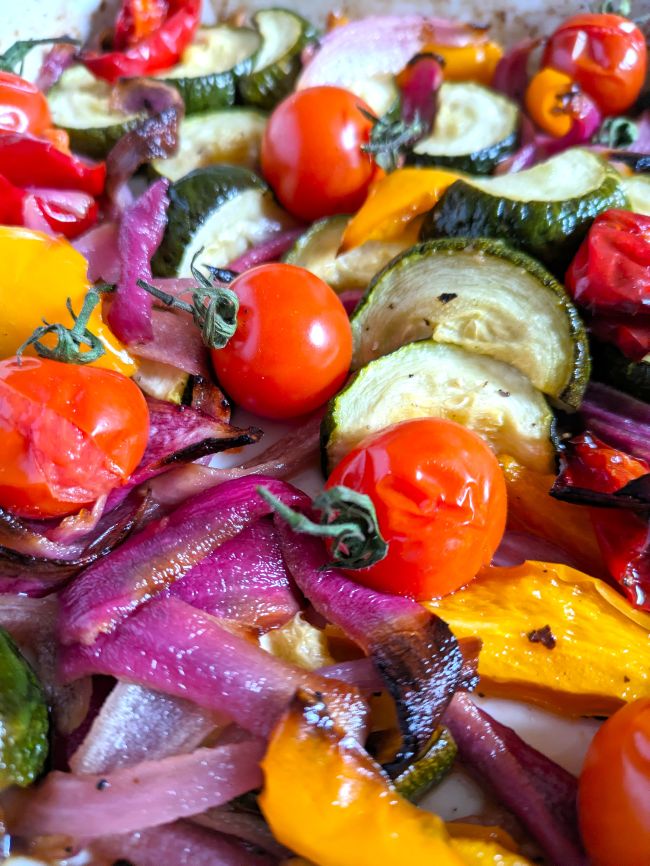
Taste and season before serving. Try topping with fresh rocket for a quick accompaniment or one of my favourite ways to serve this risotto is with a pile of roasted onion, courgette, peppers, tomatoes and fresh rosemary on top.
The rainbow colours of roast veggies. Image: Kathryn Hawkins
Last of the Autumn produce preserved. Image: Kathryn Hawkins
Hello there. When I planned to make this chutney a couple of weeks ago, it was very much still Autumn. I picked off the last of the tomatoes and put the greenhouse to bed during a lovely sunny afternoon. I was going to call the chutney “End of Autumn”.
Last of the greenhouse tomatoes, mid-November 2024. Images: Kathryn Hawkins
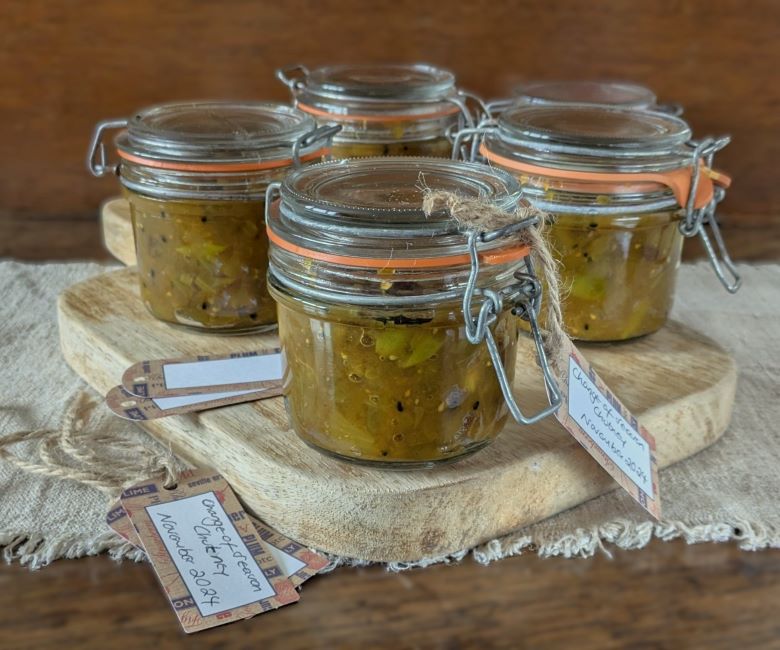
However, when I came to make the chutney last weekend, snow was falling very heavily and suddenly we were in winter. And so I thought “Change of Season” chutney would be more appropriate 🙂
November snowy garden. Image: Kathryn Hawkins
I made the chutney in my slow cooker. It is ready to eat as soon as it cools and tastes delicious. I used up the last of this year’s apple harvest along with some black-skinned tomatoes that I had frozen down a few weeks ago. The spices I used give a mild curry flavour but you can change them if you prefer – cinnamon, cumin and coriander for a more earthy flavour would work well.
If you haven’t made a preserve in your slow cooker before, the technique is slightly different in that you can’t boil the preserve down like you would in a saucepan on the stove. The chutney is also cooled before putting in jars, and as such needs to be kept in the fridge. It will however keep for a few weeks or can be frozen for longer term storage.
Makes: approx. 1kg
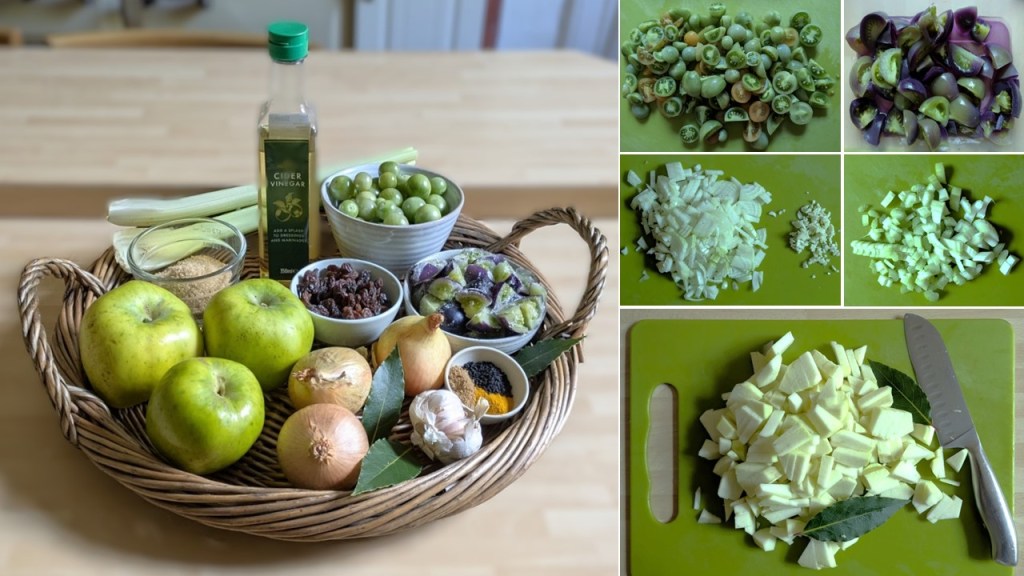
Ingredients
400g green tomatoes, chopped
2 medium onions, peeled and chopped (about 180g prepared weight)
2 garlic cloves, peeled and chopped
2 sticks celery, trimmed and chopped (about 110g prepared weight)
2 large cooking apples, peeled and chopped (about 300g prepared weight)
2 bay leaves
100ml cider vinegar
75g sultanas or chopped dried apricots
2tsp garam masala
1tsp each nigella seeds, turmeric and salt
150g demerara or light brown sugar (or you can use granulated white sugar)
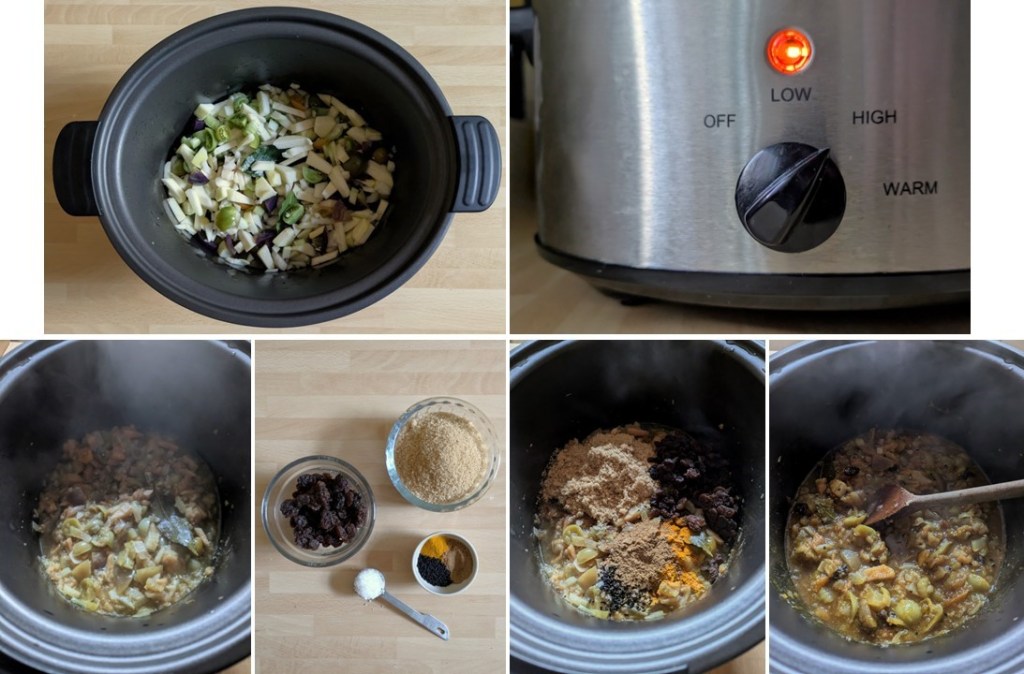
1. Put all the vegetables in the slow cooker with the bay leaves and mix well. Pour over the vinegar, cover with the lid and cook on High for 4 hours.
2. Add the remaining ingredients, mix well, re-cover and cook for 30 minutes to dissolve the sugar.
Slow cooking and seasoning chutney. Images: Kathryn Hawkins
3. Remove the lid, stir well and cook uncovered for a further 2 hours, stirring occasionally until reduced down and jam-like.
4. Switch off the cooker and leave the chutney to cool completely. Discard the bay leaves and spoon into clean jars. Seal, label and store in the fridge for up to 3 months. Once opened, use within a month. Alternatively, freeze the chutney in containers and defrost when required.
Reducing the chutney down ready for storing. Images: Kathryn Hawkins
A sweet and spicy spoonful. Image: Kathryn Hawkins
That’s me for another month. I have one more post before Christmas, so until then take care and keep warm 🙂
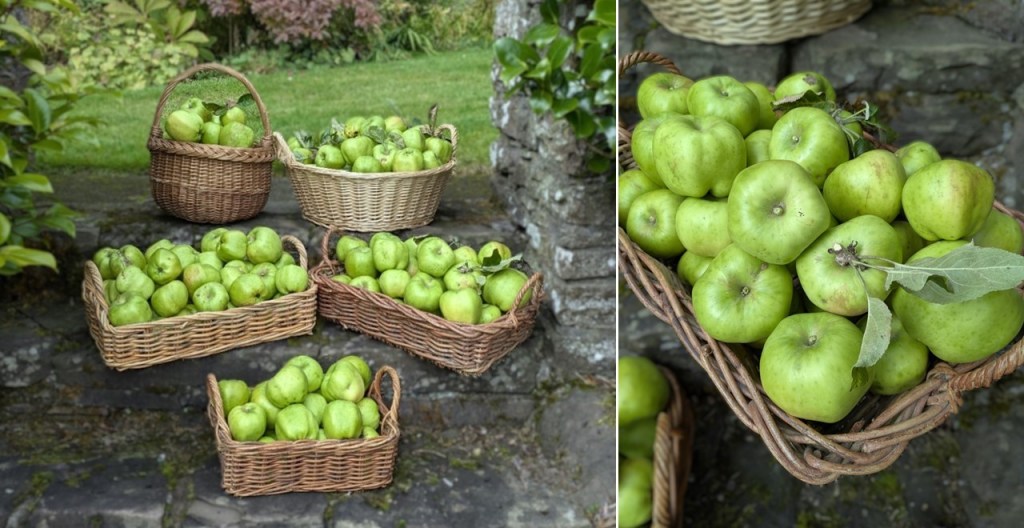
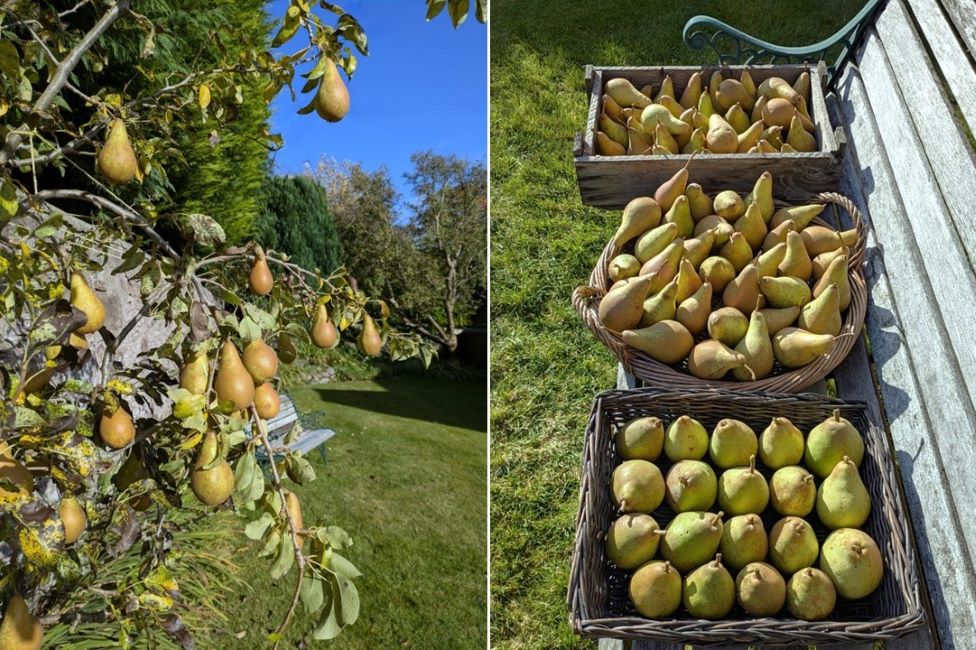
Another bumper year from the old apple tree. Images: Kathryn Hawkins
Hello again. Well, that’s just about everything edible in from the garden for another year. It was a fine bright day yesterday, perfect weather for apple and pear picking. What a bumper harvest this year: 35kg apples and 10kg pears – woo hoo!
This year’s Concorde and Comice pear harvest. Images: Kathryn Hawkins
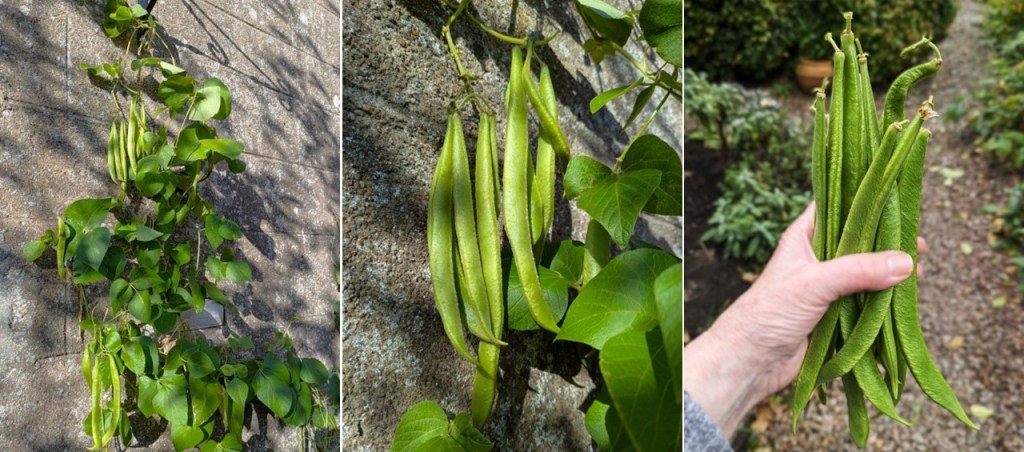
I’m glad to report on the back of last month’s post, there have been runner beans to enjoy at last. I picked off the last of them yesterday and took the plants down. As I type, the weather has become very stormy and I am pretty sure that the beans wouldn’t have survived a pounding from gale force winds.
Runner beans at last! Images: Kathryn Hawkins
In the greenhouse, some plants are shutting down like the French beans, cucumber and tomatoes. There are a few tomatoes left on the vines to ripen, but I was pleased with this basket full. The baby sweetcorn I planted (almost too) late is also about ready to pick.
Last of the runner beans. Image: Kathryn Hawkins
The sweetcorn fairies are coming. Image: Kathryn Hawkins
Looking forward to next spring, the potted mimosa plant is doing well in the greenhouse and has set lots of flower buds. Now all I need to do is keep it from the harm of a potentially very cold Scottish winter.
A hint of spring. Mimosa flower buds. Images: Kathryn Hawkins
Outside the garden is alive with beautiful colours of the Japanese maple and Autumn crocuses.
Glorious Autumnal shades. Images: Kathryn Hawkins
Sunny Autumn crocus. Images: Kathryn Hawkins
The deliciously scented pink rose is out flowering again. Such a heady aroma when you catch the scent in the air.
In the pink in October. Images: Kathryn Hawkins
I’ll end my post with a nod to the next season. I’ve been working on Christmas projects for a few weeks already but in the garden the holly trees are bursting with berries this year. Some would say that this means we’re in for a cold winter, but I’d prefer to believe that it simply means that this year has given the trees just the right growing conditions to produce a huge amount of fruit. We’ll see…..fingers crossed I’m right.
Bursting with berries. Images: Kathryn Hawkins
I’ll be back recipe posting in a few days, something suitably spooky for Hallowe’en. Until then, thanks for stopping by.
Freshly made tomato confit. Image: Kathryn Hawkins
Hello again. I hope you have had a good few days since my last post. After lousy weather here in the UK in August, September started with a mini heatwave. The high temperatures have come to an end now but the extra heat and sunshine certainly helped ripen off the fruit and vegetables. It’s been a bumper year for tomatoes, and I’ve been exploring new ways to serve and preserve them.
My recipe this week is a very simple one. It’s an easy and energy-efficient way to cook small tomatoes. All you need is a slow-cooker and an amount of small tomatoes to fit neatly in a single layer over the base of the cooking dish. You can adapt the quantities you cook to fit the size of your cooker.
Confit ingredients. Images: Kathryn Hawkins
I have kept the flavours simple, using fresh herbs from the garden, some garlic and a few coriander seeds. Add chilli for some heat, or experiment with your favourite spices. The confit can be served on its own as a sauce for pasta or blitzed and used as a base sauce for other dishes. If you want to keep it for a few days, place in a sealed container, covering the tomatoes with extra oil as necessary, and store it in the fridge. For longer storage, it freezes fine.
Tomato confit, fresh basil and black pepper. Images: Kathryn Hawkins
This really is a great way to enjoy the flavour of freshly picked sweet baby tomatoes with the minimum of effort. I hope you enjoy the recipe 🙂
Serves: 4-6
Ingredients
650g whole, same size, small or cherry tomatoes – or a weight that fits neatly in a single layer inside the base of your slow-cooker dish
A few sprigs of fresh thyme and oregano
1 bay leaf
1tsp coriander seeds, crushed
3 garlic cloves, peeled
1tsp sea salt
Freshly ground black pepper
2tsp caster sugar (optional)
100ml good quality olive oil + extra for storing
1. Remove the stalks from the tomatoes and wash well. Pat dry using kitchen paper and place in a single layer in the slow-cooker dish.
2. Add the remaining ingredients, cover with the lid and set the cooker to Low. Cook for 4hrs or until the tomatoes are soft but still holding shape. Leave to cool completely.
Preparing the confit. Images: Kathryn Hawkins
3. For storing, discard the herbs and ladle into a clean, sealable storage container – I used a 750ml Kilner jar. Add more oil as necessary to cover the tomatoes, then seal and store for up to 10 days in the fridge. Alternatively, portion into containers and freeze. The oil can be drained off before serving and re-used to cook with or flavour salad dressings.
Filling a storage jar with tomato confit. Images: Kathryn Hawkins
That’s me for another week. I have just picked another haul of tomatoes after coming back home after a few days away. I’ll have to get creating again. Until next time, thanks for stopping by 🙂
My back-from-holiday tomato haul. Image: Kathryn Hawkins
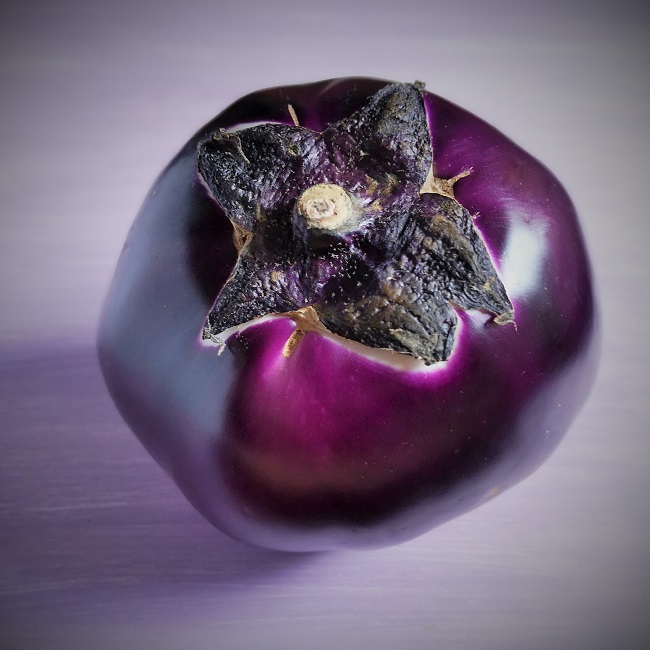
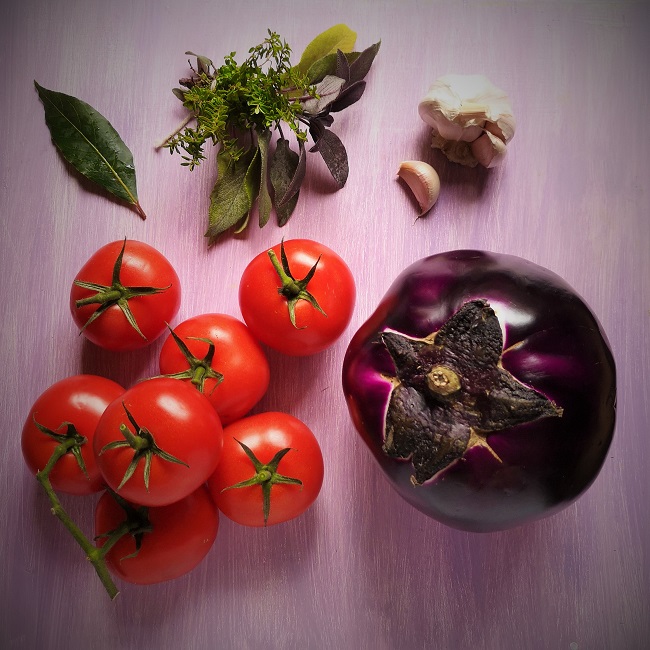
A vision in violet, Italian round aubergine (eggplant). Image: Kathryn Hawkins
My post this week is inspired by this wonderful aubergine (eggplant) I bought recently from an Italian deli. The size of a small football, it weighed in at just over 700g. The variety is Italian round aubergine or Melanzane to give it its authentic Italian name.
Aubergine is one of my favourite vegetables – I love the way it cooks down to a rich, melting tenderness – and my number one recipe for serving it is simply baked in homemade tomato and garlic sauce.
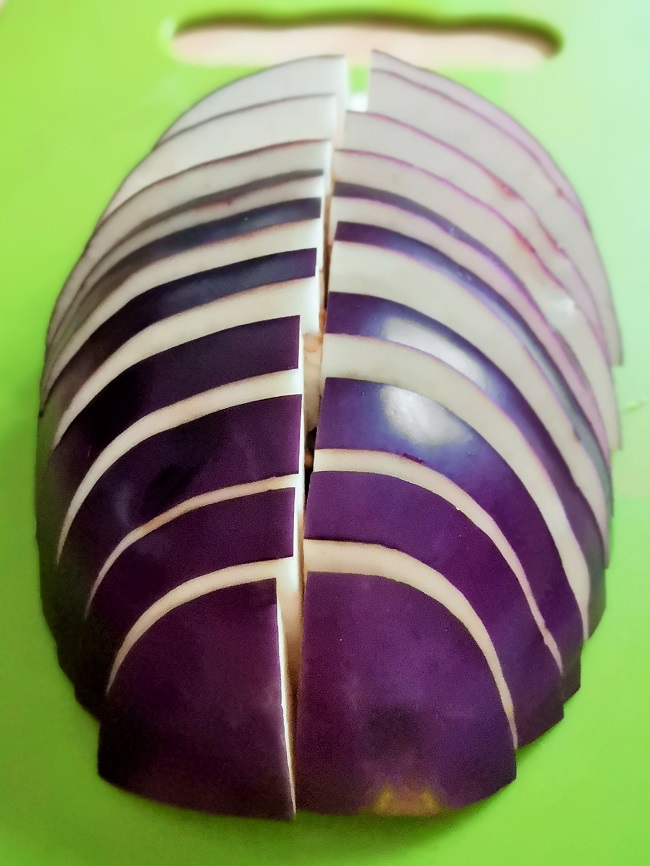
Halved and sliced, Italian round aubergine. Image: Kathryn Hawkins
Round aubergine can be prepared just as you would the standard black variety. I cut it in half and then sliced each half in half again and then into approx. 1cm thick slices. It looks like a giant purple bug don’t you think?
I always salt aubergine as I find it cooks more quickly and also cooks more tenderly. Simply lay the slices in layers in a large colander or strainer, sprinkling with salt as you go, and then leave to stand over a plate or bowl for 30 minutes. After this time, you should see water exuding from the slices. Rinse thoroughly and then pat dry with kitchen paper.
The sauce is made with ripe tomatoes, garlic and a bunch of fresh herbs tied together for flavour. It is seasoned with salt, pepper, and a little sugar and enriched with a dash of olive oil. I have outlined the cooking stages below but for more details, take a look at this previous post for some more illustrations on tomato sauce-making Pesto pancake and tomato layer (gluten-free; dairy-free; vegan)
I topped mine with some grated Parmesan, but a non-dairy alternative works just as well. If you prefer not to use cheese at all, sprinkle the top with gluten-free dried breadcrumbs or polenta, or leave the bake untopped and cover the dish with foil when ready to bake.
Serves: 4
Ingredients
For the sauce:
1.25kg ripe tomatoes, washed and roughly chopped
Large sprig each of fresh thyme and sage
1 bay leaf
2 cloves garlic, peeled
Salt and freshly ground black pepper
1-2tsp caster sugar
2tbsp good quality olive oil
For the aubergine:
750g aubergine, sliced into 1cm thick slices
Salt
Approx. 150ml good quality olive oil
50g freshly grated Parmesan or plant-based alternative, optional – or 3tbsp dry gluten-free breadcrumbs or polenta
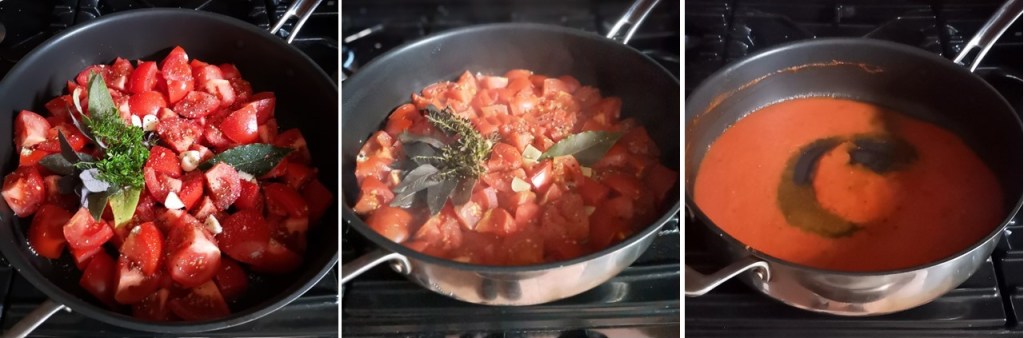
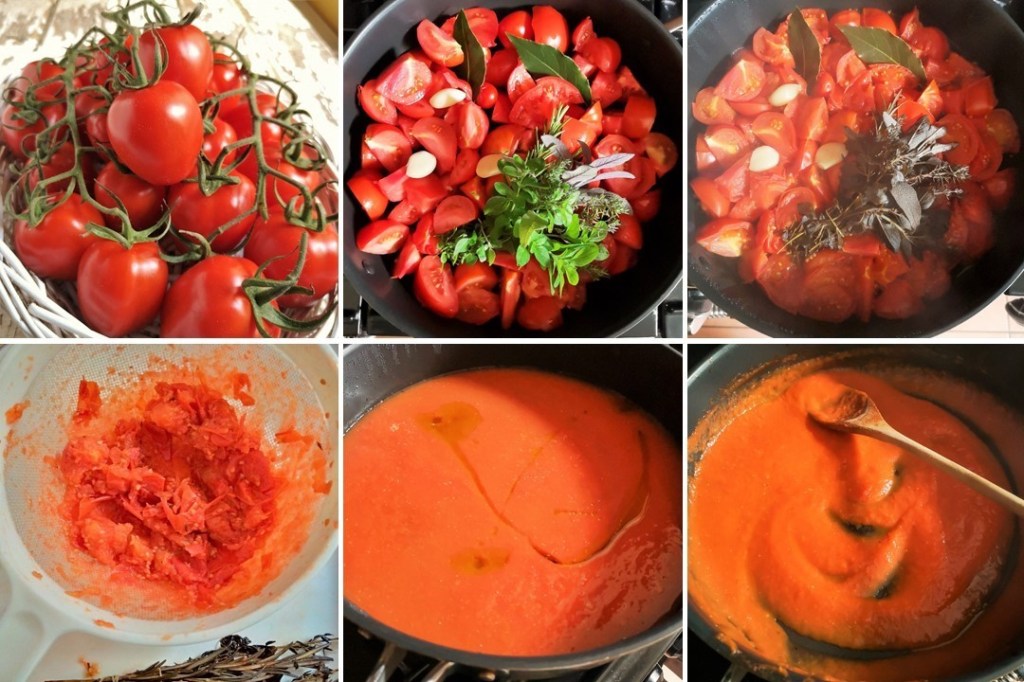
1. Make the sauce first so that it is cold when you assemble the dish. You can make it up a day or two beforehand to save time on the day you want to serve it. Put the tomatoes in a deep frying pan or large saucepan and add the herbs and garlic. Season well. Cover with a lid and cook over a low/medium heat for about 40 minutes until soft and collapsed.
2. Discard the herbs, then push the tomatoes and garlic through a nylon sieve to extract as much tomato pulp as you can. Return the pulp to a clean pan and add sugar to taste; spoon in the oil. Bring to a gentle simmer and cook gently for 30-40 minutes until thickened and reduced – you will need about 450-500ml for this recipe. Leave to cool, then cover and chill until ready to use.
Making tomato, garlic and herb sauce. Images: Kathryn Hawkins
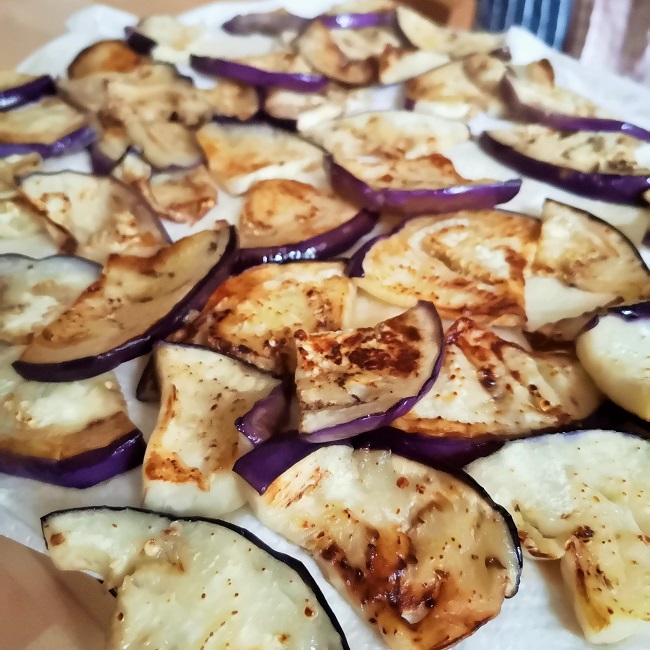
3. For the aubergine, salt them as I described above, then rinse well and pat dry with kitchen paper. Heat 2-3tbsp oil in a large frying pan and fry a few slices at a time for 2-3 minutes on each side, until lightly golden. Drain well on kitchen paper. Repeat using more oil as needed to fry the remaining slices. Leave to cool, then cover and chill until ready to assemble the bake.
Salted and fried aubergine (eggplant) slices. Image: Kathryn Hawkins
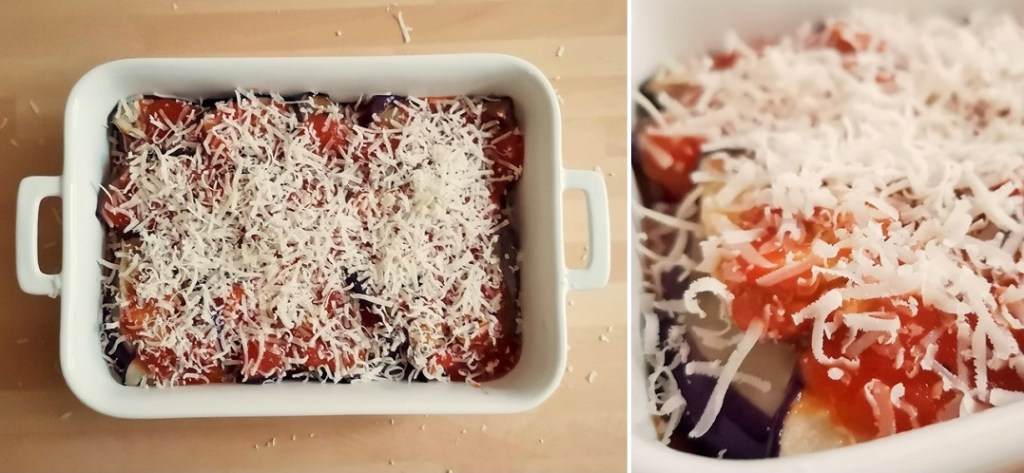
4. When ready to cook, preheat the oven to 180°C, 160°C fan oven, gas 4. Spread one third of the sauce over the bottom of a 1.5l baking dish and top with half the aubergine slices. Add half the remaining sauce and top with the remaining aubergine slices.
Layering up the bake. Images: Kathryn Hawkins
5. Spoon the remaining sauce on top and sprinkle with cheese or crumbs. Stand the dish on a baking tray and bake for about 50 minutes until tender, golden and bubbling.
Sprinkling the bake with dairy or plant-based cheese. Images: Kathryn Hawkins
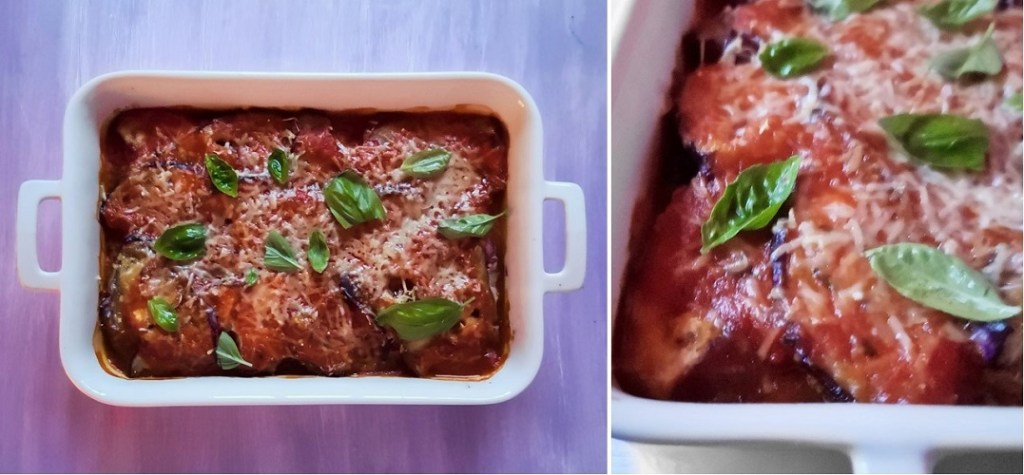
Leave the bake to stand for 10 minutes before serving. I sprinkled the top with the last few leaves of homegrown basil from my greenhouse and accompanied it with a crisp salad and some freshly cooked rice. It was absolutely delicious 🙂
Just out of the oven and sprinkled with fresh basil. Images: Kathryn Hawkins
I hope you have a good few days ahead. We will be into November the next time I post. I know I say this quite a lot but where does the time go? Until then, take care and best wishes to you. Thanks for stopping by 🙂
Pesto pancake and tomato layer. Image: Kathryn Hawkins
Hello again. What a mixed bag of weather there has been here since my last post. Plenty of rain to restore the water supplies with thundery downpours and a few sunny days here and there. The garden has bucked up again and the green grass has been restored.
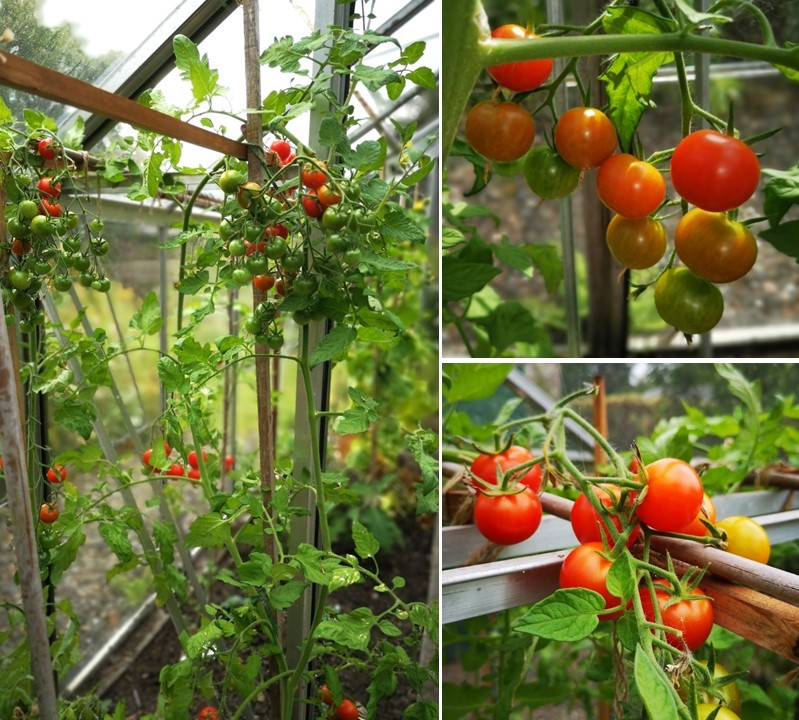
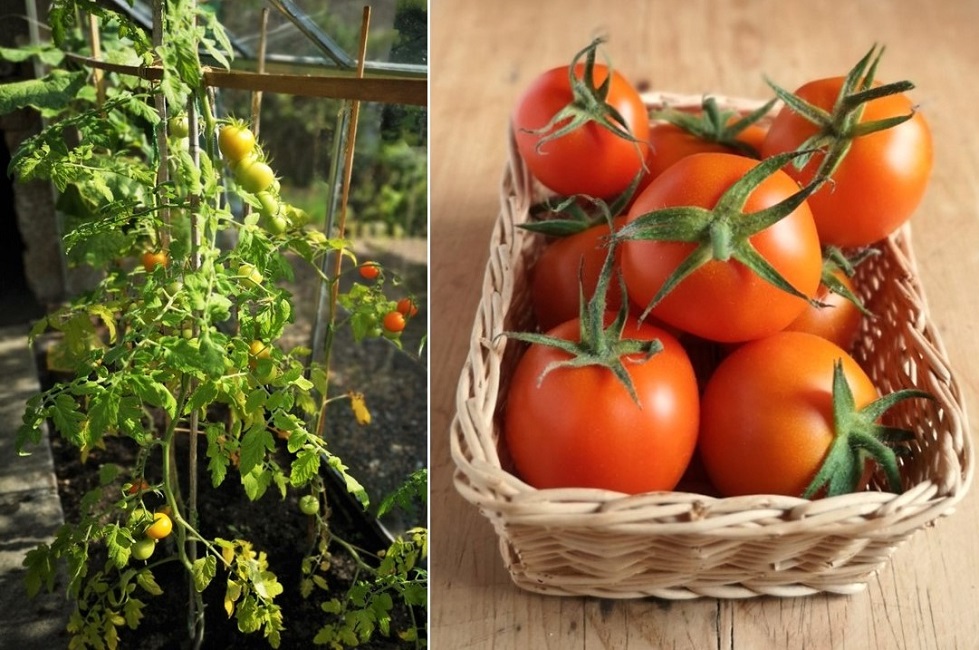
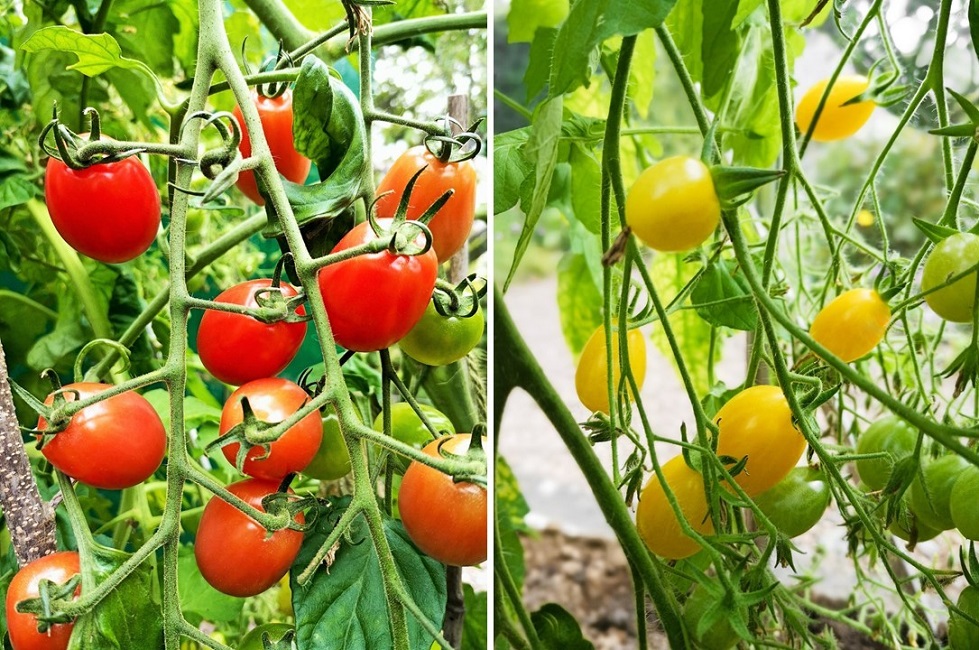
My recipe post this week gives a little nod towards the change of month and season. The greenhouse tomatoes are ripening now. I planted only 3 plants this year, but I am enjoying a steady supply to eat in salads. The variety is called Golden Zlatava, orange on the outside with reddish flesh inside. Whilst I haven’t grown enough for cooking this year, there are plenty of delicious locally grown tomatoes around, like these fantastic small plum tomatoes, which are perfect for sauce-making.
Fresh plum tomatoes. Image: Kathryn Hawkins
The greenhouse basil really enjoyed the hot weather we had last month and has grown very bushy and bold. I love the flowers as well. Plenty of leaves to make one of my most favourite savoury sauces, pesto, which seems to be the best way to preserve the flavour of the herb once it has been frozen.
Greenhouse basil. Images: Kathryn Hawkins
There are 2 main components to the recipe this week: making the pancakes and making a tomato sauce. Both elements freeze well in case you want to make the recipe in stages. I made pesto in a previous post, so if you fancy having a go at that as well, here’s the link to the recipe Runner bean and pesto fritters (gluten-free; dairy-free; vegan)
Serves: 4
Ingredients
Tomato sauce
1kg fresh tomatoes, washed and chopped
6 garlic cloves, peeled
A selection of fresh herbs such as sage, bay, marjoram and oregano
2tbsp olive oil
1tsp caster sugar
100g drained sundried tomatoes in oil, blotted on kitchen paper
Salt to taste
Pesto pancakes
110g tapioca flour
110g gram (chickpea or garbanzo) flour
6g gluten-free baking powder
1tsp salt
65g fresh vegan pesto
250ml plant-based milk (I used oat milk)
160ml chickpea canning liquid (or other aqua fava)
Vegetable oil for brushing
1. First make the sauce. Put the tomatoes in a large pan with a lid and add the garlic and herbs. Heat until steaming, then cover, and simmer gently for about 45 minutes until very tender. Turn off the heat and leave to cool with the lid on.
2. Discard the herbs. Push the tomatoes and garlic through a nylon sieve, in batches, to remove the skins and seeds. Depending on the juiciness of your tomatoes, you should end up with around 700ml pulp.
3. Pour the pulp into a clean pan. Add the oil and sugar, heat gently, stirring, until boiling, then simmer for about 20 minutes until thickened and reduced to about 300ml. Leave to cool.
4. Put the sundried tomatoes in a blender or food processor and blitz until smooth, then stir into the cold tomato sauce. Taste and season. Cover and chill until ready to use.
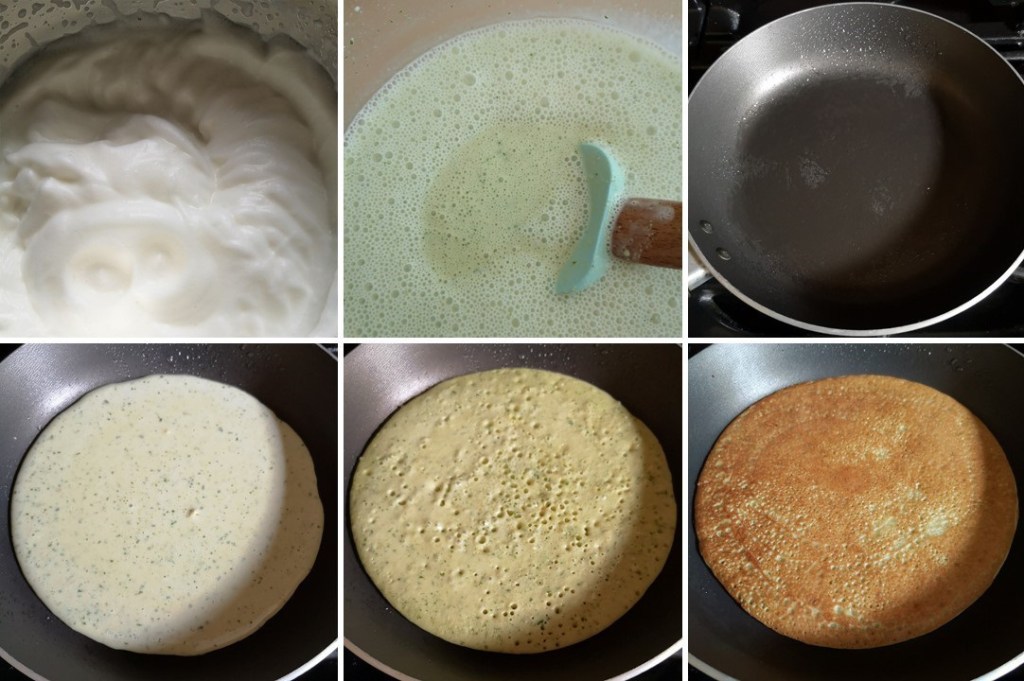
5. For the pancakes, put the flours, baking powder and salt in a bowl and make a well in the centre. Add the pesto, and gradually blend in the milk to make a smooth batter.
Making the pesto batter. Images: Kathryn Hawkins
6. In another bowl, whisk the chickpea water until very thick and foamy, then gently mix into the batter to make a bubbly mixture.
7. Brush a small frying pan (15-16cm base diameter) lightly with oil and heat until hot. Spoon in 4-5tbsp batter, tilting the pan to cover the base with batter. Cook over a medium/low heat for 2-3 minutes until set and bubbles appear on top. Flip over and cook for a further 2 minutes until cooked through.
8. Layer the cooked pancake on a sheet of baking parchment on a wire rack, and cover while you make another 7 pancakes. Stack the pancakes on top of each other, between sheets of parchment to help keep them from drying out. If you are making the pancakes in advance, leave them to cool, then wrap them well and keep in the fridge for up to 3 days or freeze for up to 6 months.
Cooking the pancakes. Images: Kathryn Hawkins
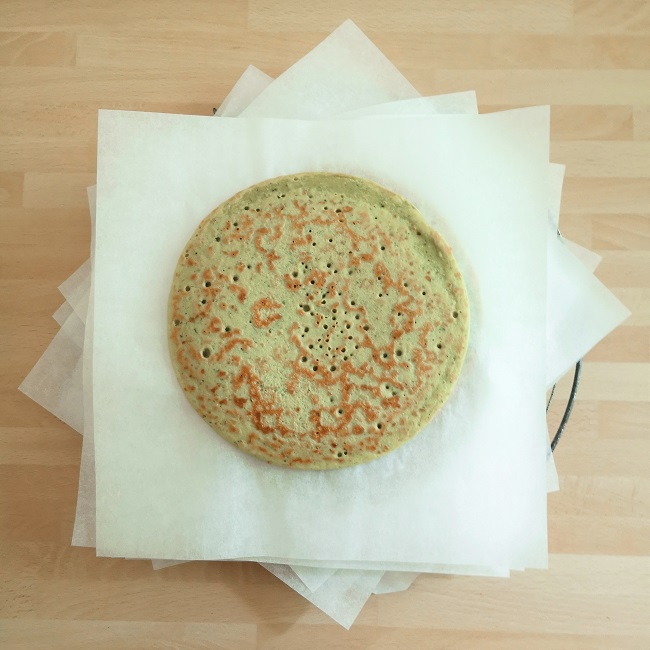
Pesto pancake stack. Image: Kathryn Hawkins
9. To assemble, spread a pancake with cold tomato sauce, almost to the edge of the pancake. Transfer to a lined baking tray and continue the spreading and layering with the remaining sauce and pancakes. If you have leftover sauce, keep it to serve with the pancakes.
Layering before baking. Images: Kathryn Hawkins
10. Cover the pancake stack with foil and place in a preheated oven at 190°C, 170°C fan oven, gas 5. Heat through in the oven for about 45 minutes. Best served warm. Top with fresh chopped tomato and fresh basil to serve and accompany with wild rocket and any leftover tomato sauce.
Hello again. I’m back in the garden this week. It’s been a topsy-turvy few days of weather. We have had a lot of rain, a few strong winds, and plenty of grey, gloomy skies. However, there have been one to two blue-sky days, one of which was today, and as well as being a great opportunity to get outside and do some tidying up, I have been able to take all my pictures in the glorious November sunshine.
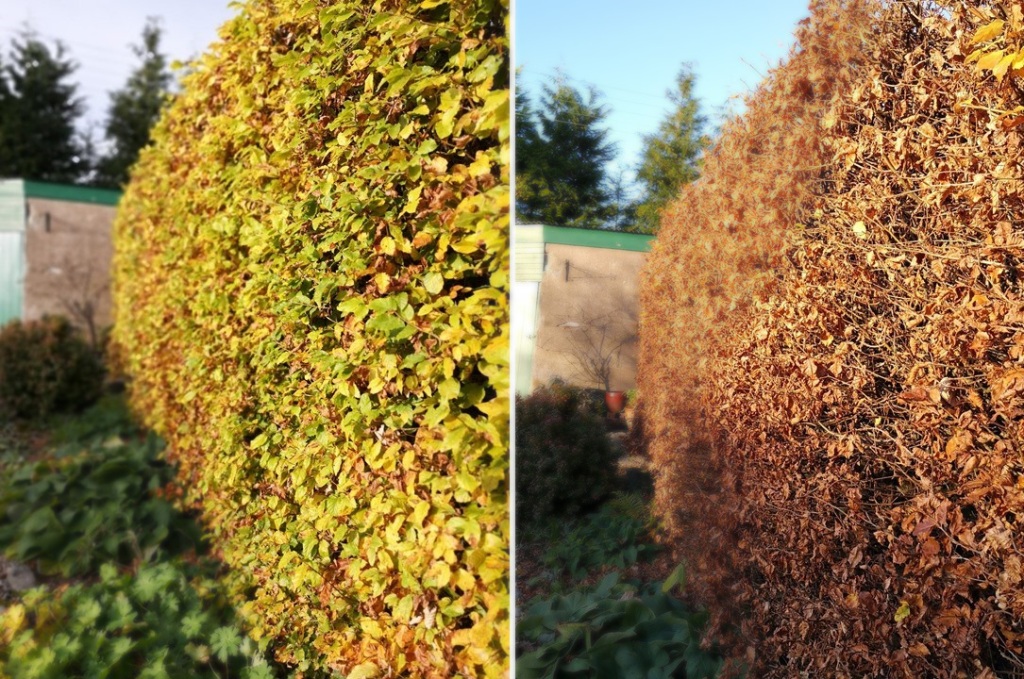
Flaming yellow Acer before and after the fall. Images: Kathryn Hawkins
The two images above capture the essence of Autumn for me. One day you can admire the brilliant colours of a tree in leaf, and then the next day, following a heavy downpour, the leaves are washed to the ground and the paths and beds are covered in a rich golden carpet.
Beech hedge in the Autumn sunshine. Images: Kathryn Hawkins
The beech hedge is more robust than the Japanese Maple, and is still fully clad although the golden leaves have dried and browned this week. I love this hedge. It is quite tall and thick and is alive with the sound of bird-song – many sparrows live in this hedge and at times their chitter-chatter tweeting is quite something to hear. You never feel alone in this part of the garden.
Sunlit Cotoneaster. Image: Kathryn Hawkins
There are several Cotoneaster shrubs growing around the garden. This one hangs over the front drive-way. It is rather spindly compared to others that grow up against walls, and to be honest, I rarely notice it. In the sunshine the other day, the tiny leaves were glowing red, it really caught my eye.
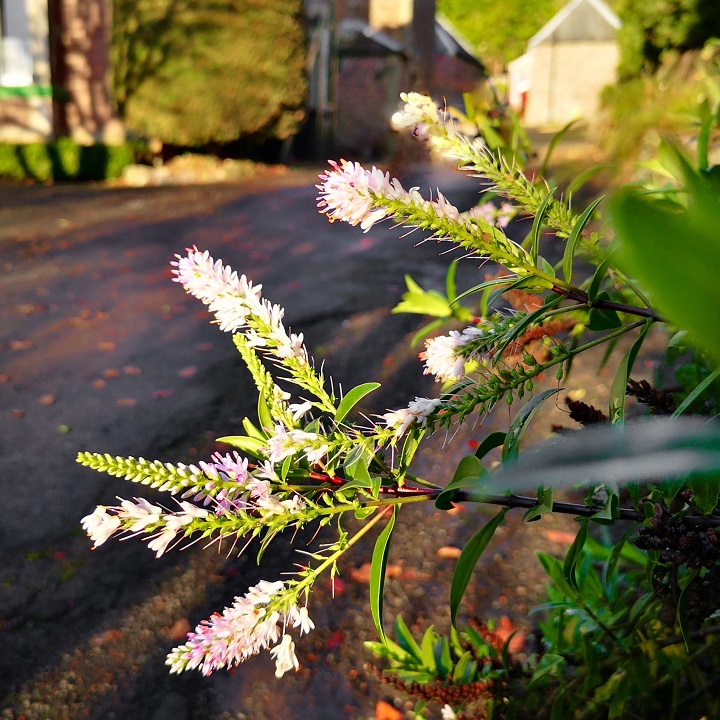
Late-flowering Hebe. Image: Kathryn Hawkins
Just the other side of the Cotoneaster, this pale lilac Hebe has come into flower for the second time this year, and in the back garden a lonely, and tired-looking Foxglove is still clinging on to a few of its precious pink flower heads.
Fading Foxglove. Image: Kathryn HawkinsLast greenhouse tomatoes of the year. Images: Kathryn Hawkins
I’m feeling a bit sad this week as I have finally harvested all my tomatoes. The plants were slowly withering away in the greenhouse due to a lack of light and warmth at this time of year, and with the prospect of some very chilly weather in the offing, I decided to pick off all the fruit and bring the tomatoes indoors. I am hoping some will ripen off a bit more, but the majority will be going in chutney. The greenhouse is looking pretty bare today now that I have taken down most of the vines.
November Chamomile flowers. Image: Kathryn Hawkins
It seems slightly unseasonal to me to have so many Chamomile flowers in bloom. The rockery in the back garden has four large plants, all with several daisy-like heads. They certainly make a cheery feature in this part of the garden now most of the other plants are dying back.
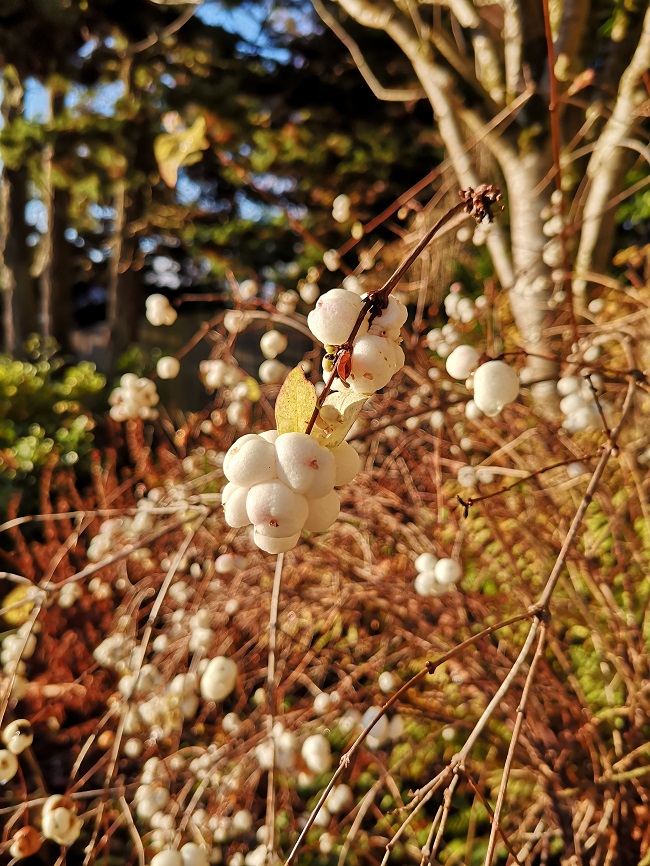
A flurry of snowberries. Image: Kathryn Hawkins
Before I started writing this post, I looked back at images I have taken of the garden in previous Novembers and I came across a picture of a small cluster of snowberries taken a couple of years ago. The same plant is now covered in berries after being given a new lease of life earlier in the year. It was given a lot more space to develop when an old shrub was taken out. I’m so glad it has made the most of its new found freedom.
Japanese Anemone hybrid “Loreley”. Image: Kathryn Hawkins
My final image this week is of another new pink Japanese Anemone which wasn’t in flower in time for last month’s piece. This one is called Loreley. It has gone from strength to strength since it was planted, and still has flower buds yet to open. I wonder how long it will keep flowering given that we are heading for winter.
That’s all from me this time. I hope you are all keeping well and staying safe as we head into the winter months. Until next time, my best wishes to you. See again you next time.
Apple and tomato tart tatin. Image: Kathryn Hawkins
Here we are in the bewitching month of October already. Where does the time go? We’ve been enjoying some late season sunshine here in central Scotland which has been very welcome. Not only am I still able to garden and tidy up outside uninhibited by poor weather, the tomatoes are ripening off nicely in the greenhouse, and all the eating apples are ready for picking.
Flamingo and Ildi tomatoes. Images: Kathryn Hawkins
Miniature eating apple tree (variety unknown). Image: Kathryn Hawkins
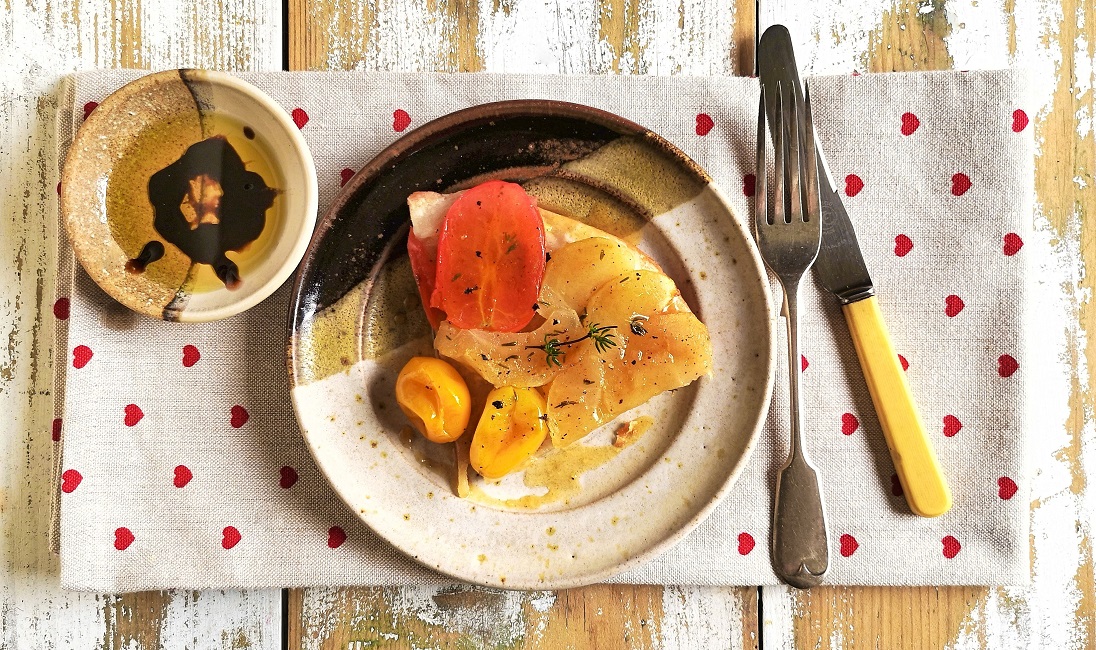
This week’s recipe is my twist on the well known French upside-down apple tart. So many tomato varieties are sweet to eat these days, they can easily be eaten as part of a dessert. However, I’ll leave it up to you to decide how you serve this recipe. The tart goes well either served simply dressed with olive oil and balsamic vinegar, or is equally as delicious served as a dessert with pouring cream or custard.
Served warm with olive oil and balsamic vinegar to dress. Image: Kathryn Hawkins
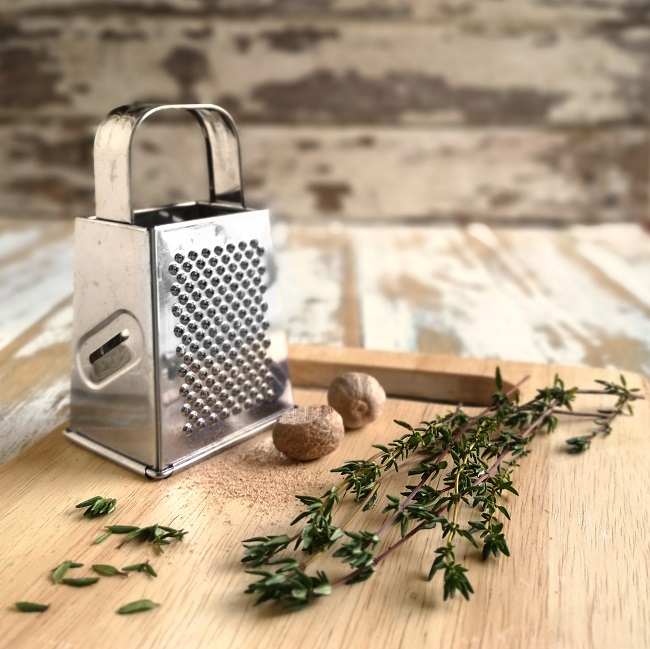
I use freshly grated nutmeg and fresh thyme to flavour the tart as well as salt, pepper and a little sugar. I use a crisp, layered pastry as a base so that it doesn’t crumble when you turn it out. Use readymade, chilled or frozen (gluten-free) puff pastry for convenience, but if you have the time, try my own recipe for a gluten-free rough puff pastry
Whole nutmeg and fresh thyme. Image: Kathryn Hawkins
I have made the tart with all tomatoes and, of course, just with apples, but mixing and matching both fruit is my favourite combination 🙂 I hope you think so too.
My favourite combination. Image: Kathryn Hawkins
Serves: 2
Ingredients:
Gluten-free flour for dusting
175g gluten-free puff or rough puff pastry
35g vegan margarine
1 tbsp. caster sugar
Freshly grated nutmeg, salt and freshly ground black pepper, to taste
A few fresh thyme leaves
2 small eating apples
4 large plum tomatoes
6 cherry or other small variety of tomatoes
2 tsp olive oil
Fresh thyme to garnish
Preheat the oven to 200°C, 180°C fan oven, gas 6. Line a 20cm round cake tin with baking parchment and lightly grease the sides.
Lightly flour the work top with gluten-free flour and roll out the pastry to a square slightly bigger than the tin. Using the tin as a template, cut a circle 1cm larger than the tin – keep the pastry trimmings for baking as croutons or use small tart bases – then chill the pastry circle until ready to use.
Dot the margarine all over the bottom of the tin, and sprinkle with sugar, seasonings and thyme leaves.
Peel, core and thickly slice the apples; halve the large tomatoes and leave the small ones whole. Arrange over the tin base in a decorative pattern.
9 steps to the perfect apple and tomato tart tatin. Images: Kathryn Hawkins
Carefully arrange the pastry circle over the fruit and press the pastry edges to the side of the tin to seal. Brush with olive oil and place on a baking tray. Bake for about 25 minutes until crisp and golden. Leave to stand for 5 minutes before inverting on to a warm serving plate. Spoon over any juices that remain in the tin. Best served hot or warm, garnished with fresh thyme sprigs if liked.
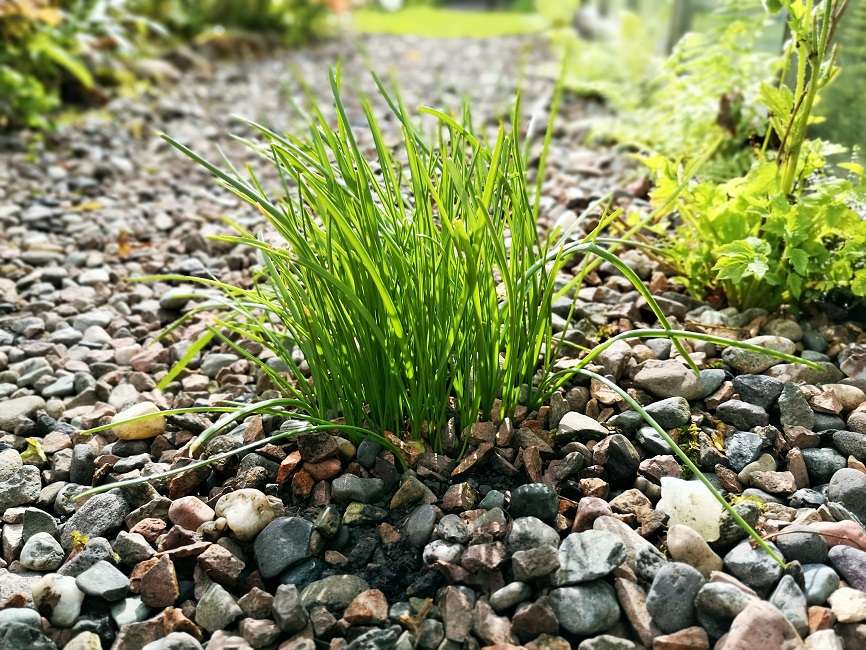
Hello again. As I sat down to write this post, it felt like summer was here again. Today has been gloriously warm and sunny with blue sky all over. A perfect day to do some tidying up in the garden before the weather turns more seasonal. Whilst the nights are drawing in and leaves on the trees are on the turn, spring bulb shoots and leaves are sprouting all round the garden.
Grape hyacinth foliage. Image: Kathryn Hawkins
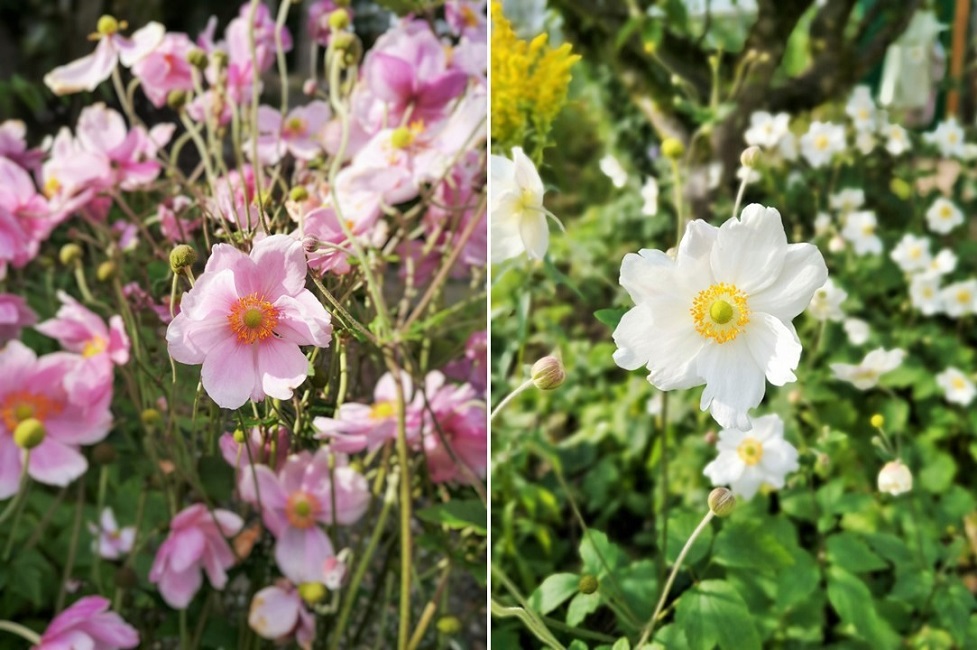
The Japanese anemones have been in flower since early last month and are still going strong. Surviving batterings from both wind and rain, they are so hardy and yet so fragile looking.
Pink and white Japanese anemones. Images: Kathryn Hawkins
One indicator that Autumn is upon us is when the Autumn crocus appears. Towards the end of last month the tall, pale, leafless stems of the crocus first appeared in the shadier parts of the borders. Another leafless stem is the Nerine. These lilies have opened this week; they love the sunshine and their deep pink petals are a very welcome sight when most plants are dying back.
Autumn crocus and Nerines. Images: Kathryn Hawkins
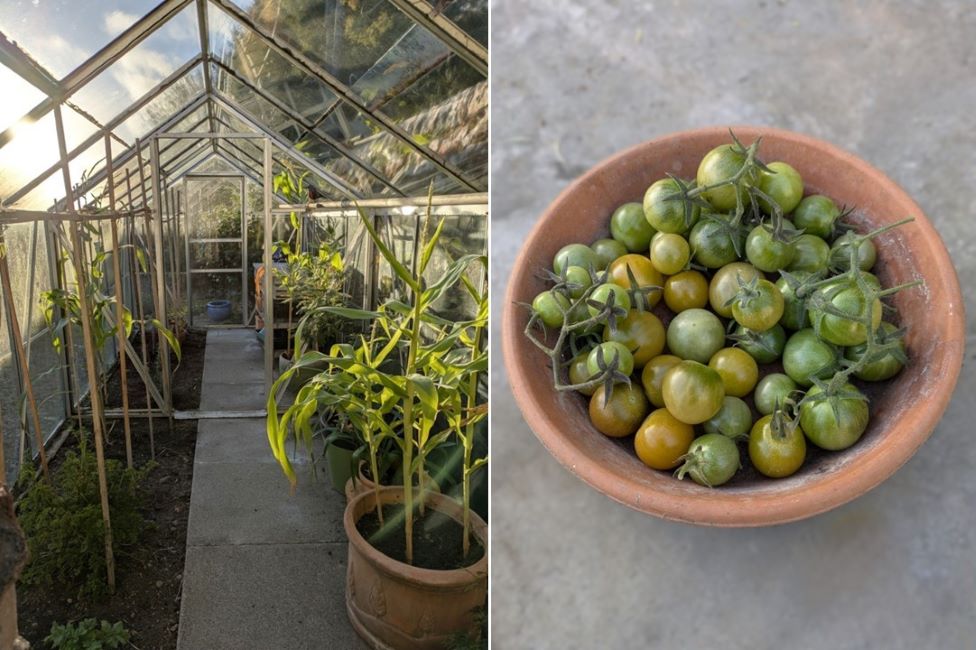
In my garden, September is the time of year when a lot of produce is ready for harvest. This late sunny spell is very welcome particularly for the greenhouse tomatoes. I have so many green ones yet to ripen, but I am hoping that over the next couple of days more will start to redden, and herald the time to get the chutney pan out again.
September greenhouse tomatoes. Images: Kathryn Hawkins
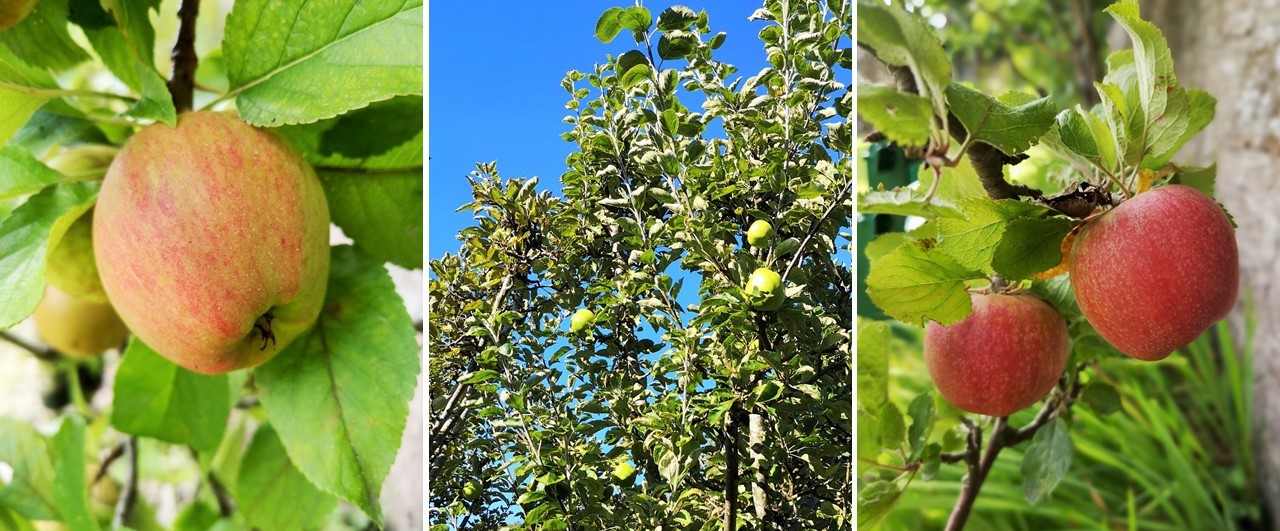
It’s not been such a good year for the old apple tree in the garden. In fact, you have to play spot the apple this year. I should have enough to put with the tomatoes for making chutney, but not enough to freeze. The miniature eating apples have done well though. The fruit is crispy, refreshing and sweet; they make a delicious tarte tatin.
This year’s eating and cooking apples. Images: Kathryn Hawkins
The runner beans had a slow start this year but have more than made up for it now. The plants are heaving with beans. I dug the first of the Pink Fir potatoes last weekend, and was very pleased with the yield. They store well, so I should have plenty for a few weeks ahead. That’s all from me this week. I’m looking forward to spending the weekend out of doors and enjoying the sunshine. A happy weekend to you what ever you are doing 🙂
Runner beans, Autumn raspberries and Pink Fir potatoes. Images: Kathryn Hawkins