Ribbon vegetable soba noodles with peanut dressing (gluten-free; dairy-free; vegan)

Runner_bean_and_peanut_soba_noodles_with_peanut_dressing
Runner bean and peanut soba noodles. Image: Kathryn Hawkins

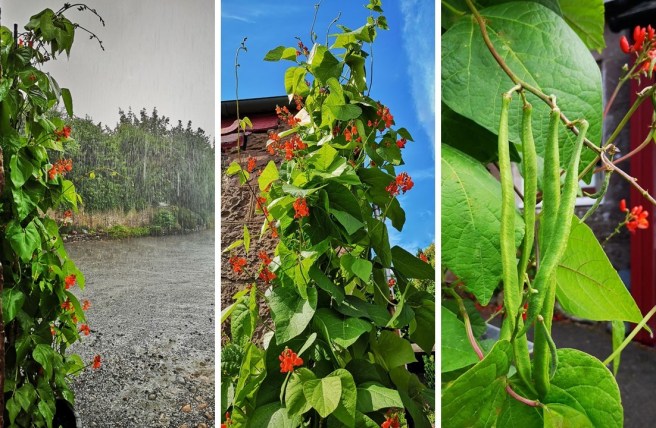
Over the past week or so, I’ve picked more runner beans from my 3 plants than I can possibly eat. The beans do keep well for a few days in a container of water in the fridge, but even so, this year, I have resorted to freezing some down. Not ideal as they do lose some texture, but it’s a good way of eking them out a while longer.

Home-grown_runner_beans_on_the_vine_and_freshly_picked
My late summer harvest of runner beans. Images: Kathryn Hawkins

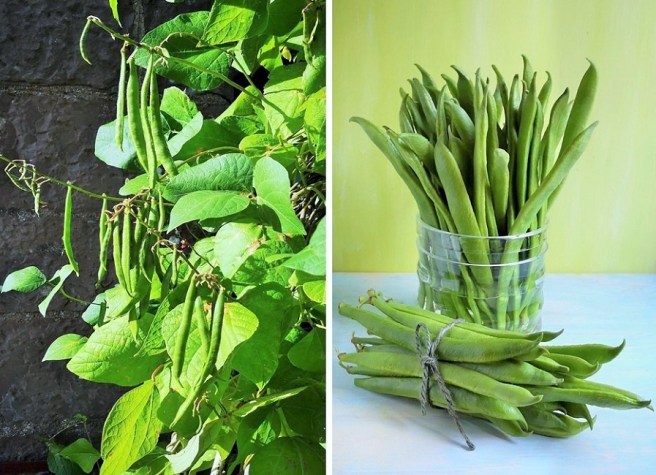
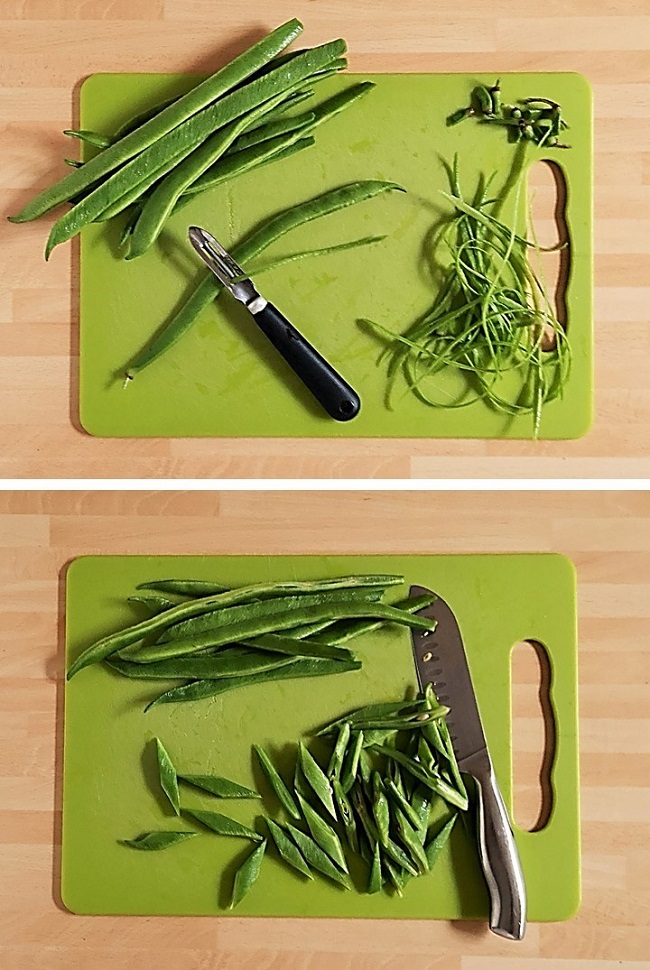
I like my runner beans cut thinly in fine ribbons. I inherited a tiny, wee gadget from my grandmother which is perfect for this. If the beans are very fresh, you can whip them through the fine, grill-like slicing plate in next to no time, and sliced this way, they take just a few minutes to cook.

Vintage_Zipp_runner_bean_slicer
Grannie’s Zipp runner bean slicer. Images: Kathryn Hawkins

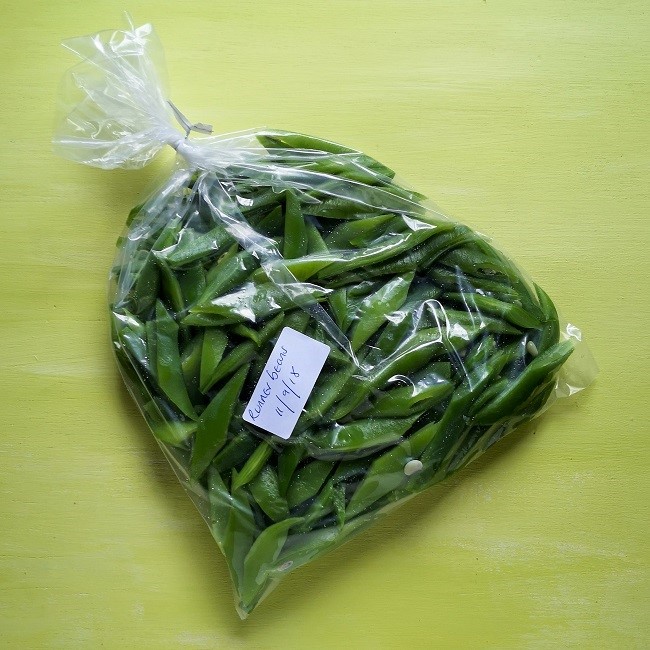
For freezing, it helps preserve texture if you cut the runner beans into chunkier pieces, and that’s what I did with the majority of these beans. I blanched the prepared beans in rolling, boiling water for about 1 ½ minutes, then drained them and cooled them completely in cold running water. Before bagging your prepared vegetables, shake off the excess water, pat dry with kitchen paper and then pack into freezer bags. Make sure the bag is free of as much air as possible. I do this by screwing the bag closed, and then sucking out the excess air via a straw inserted into the top. It’s very effective. Seal the bag tightly with a wire bag tie or clip, and don’t forget to label – remember how time flies! Blanched vegetables should keep perfectly fresh in the freezer for at least 6 months. If you don’t do the blanching, use them up in a couple of months.

Bag_of_home-grown_runner_beans_blanched_and_ready_for_the_freezer
Blanched and ready for the freezer. Image: Kathryn Hawkins

This week’s recipe is a tasty vegetable noodle dish that can be eaten hot but I usually enjoy the dish served cold as a light lunch. Try and cut all the vegetables thinly and evenly so that they cook to the same texture. If you don’t have a bean slicer, cut the beans into short lengths and then slice thinly lengthways. For the dressing, if peanuts aren’t to your taste, use cashews or almonds and the associated nut butters instead.

Plated_vegetable_noodles_with_peanut_dressing
Vegetable noodles served cold with peanut dressing. Image: Kathryn Hawkins

Serves: 4

Ingredients

  • 225g runner beans
  • 1 large carrot
  • 1 medium leek
  • 200g soba noodles (or use your favourite variety and cook accordingly)
  • 1 tsp sesame oil
  • 2 tbsp. toasted sesame seeds
  • 40g roasted peanuts, crushed

For the dressing:

  • 50g smooth peanut butter
  • 1 tsp sesame oil
  • 25ml gluten-free soy sauce
  • 1 tbsp. white rice vinegar
  • 15g light soft brown sugar
  1. Trim the beans. Peel the sides of the beans using a vegetable peeler and slice into thin shreds. Peel and trim the carrot; slice into thin ribbons using a vegetable peeler. Trim the leek. Slice down the centre and run under cold running water to flush out any trapped soil. Shake well to remove excess water, then cut in half, and slice into ribbon-like strips. Arrange all the vegetables in a steamer, colander or large sieve.

    Preparing_runner_beans_and_carrots_into_ribbons_for_steaming
    Preparing the ribbon vegetables. Images: Kathryn Hawkins
  2. Bring a saucepan of water to the boil (unsalted if you’re using soba noodles). Put the vegetables on top, cover and cook for 2 minutes. Add the noodles to the boiling water, bring back to the boil, put the vegetables back on top, and cook everything for a further 5 minutes, until the noodles are tender and the vegetables are just cooked through. Drain the noodles well, and return to the saucepan. Toss in the sesame oil and then the vegetables. Mix well and either leave to cool if serving as a salad, or cover to keep warm.

  3. For the dressing, put all the ingredients in a small screw-top jar. Seal and shake well to mix into a thick, dressing.

    Glass_jar_for_making_peanut_dressing
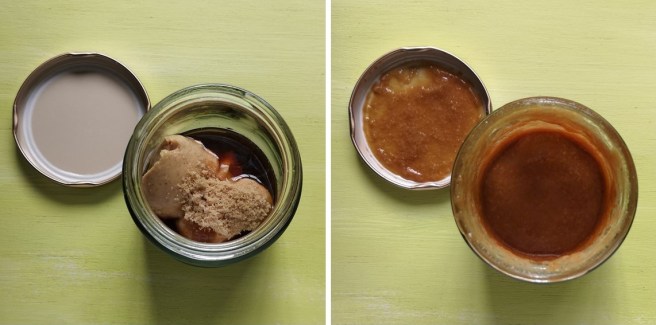
    Making peanut dressing. Images: Kathryn Hawkins
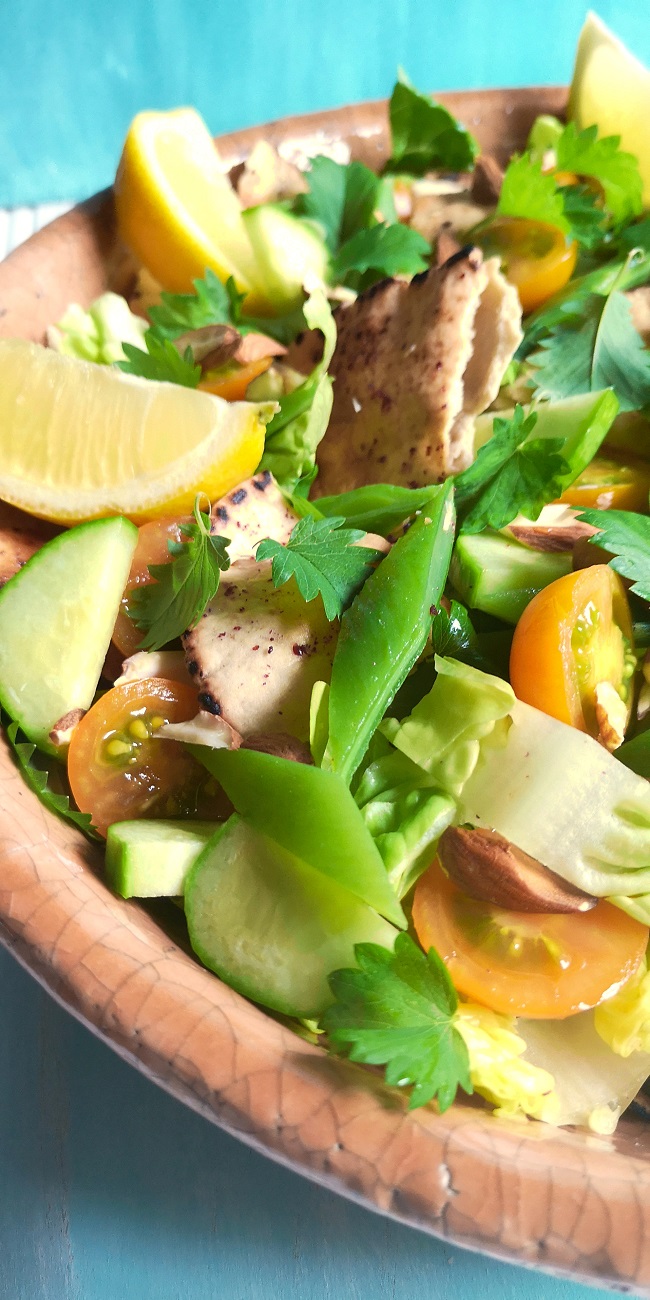
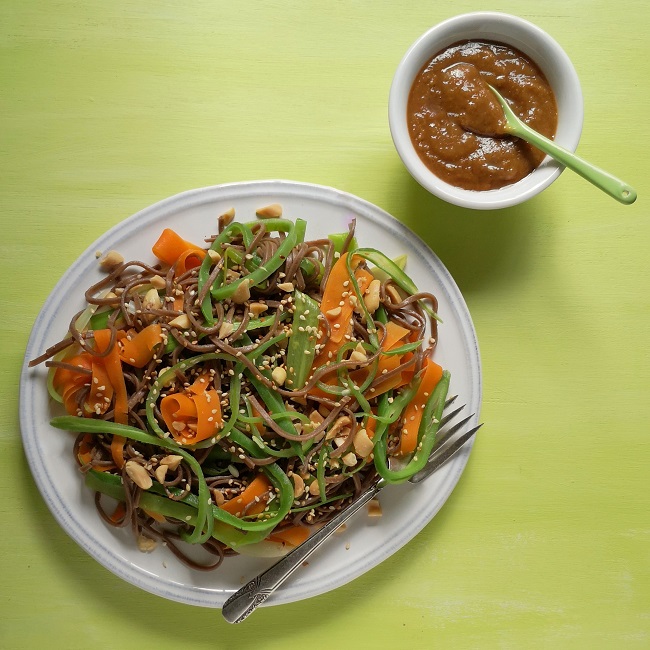
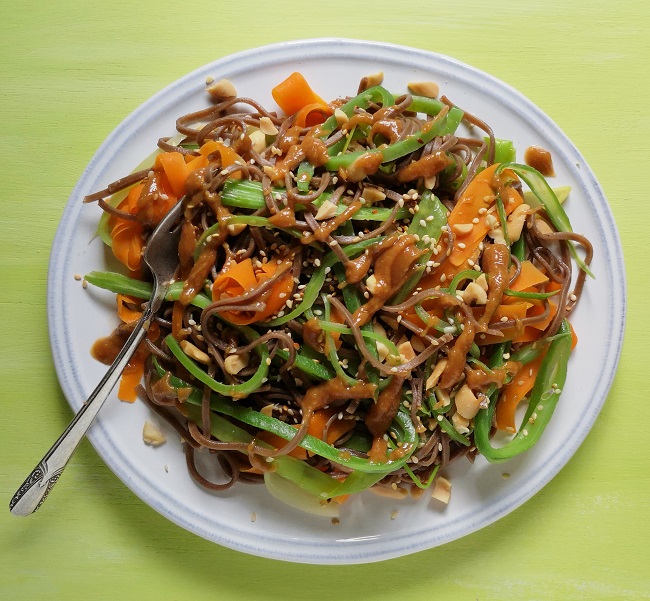
  4. To serve, pile the hot or cold vegetable noodles on to a serving platter and sprinkle with sesame seeds and peanuts. Serve with the peanut dressing.

    Forkful_of_ribbon_vegetables_and_soba_noodles_served_as_a_salad
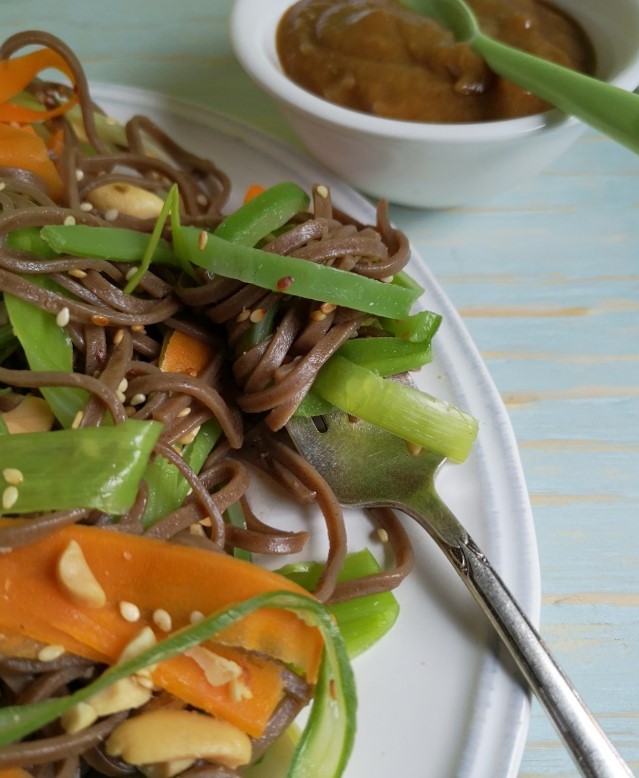
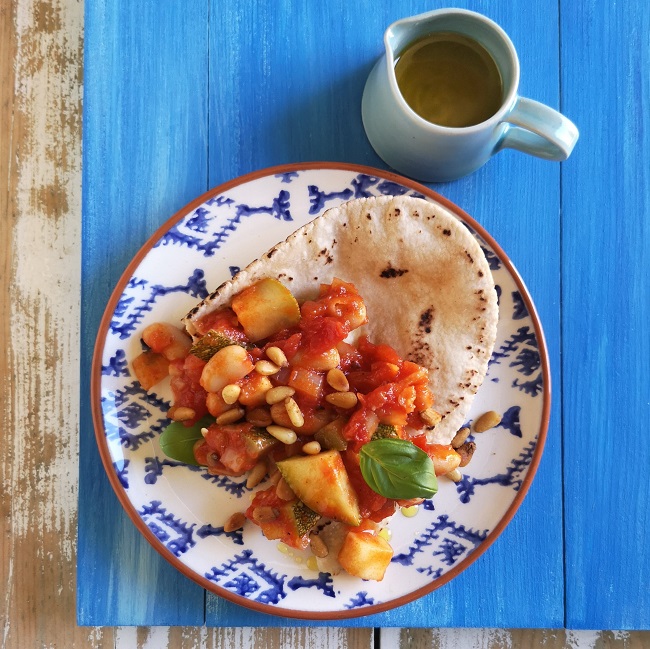
    Ready to eat, ribbon vegetable and soba noodle salad. Image: Kathryn Hawkins

Courgette and leek bhajis (gluten-free; dairy-free; vegan)

Pile_of_courgette_and_leek_bhajis_sprinkled_with_coriander
Courgette and leek bhajis with cucumber and coconut raita. Image: Kathryn Hawkins

It has reached the time of year that sees the end of my supply of home-grown courgettes. The three plants I sowed from seed have been growing happily, side by side, in a grow-bag, in my greenhouse over the past few weeks. The plants have given me a good, steady and tasty crop of yellow and green globe-shaped fruits. I am sad to see their demise.

A_yellow_globe_courgette_and_a_green_variety
Yellow and green globe courgettes. Image: Kathryn Hawkins

To use up the last of the crop, this week’s recipe is for a mildly spiced, Indian-style fritter, based on a classic takeaway favourite, the onion bhaji. The flour used is chickpea (or gram/besan) flour which very is earthy and nutty in flavour, and the flavourings used are fragrant rather than over-powering: cumin, fenugreek, black onion seeds and toasted sesame seeds. Add some minced green chilli or chopped fresh coriander for some zesty freshness if you like.

Bag_of_chickpea_flour_and_spices_to_flavour_courgette_bhajis
Gram flour, ground fenugreek, ground cumin and toasted sesame seeds with black onion seeds. Images: Kathryn Hawkins

Serve the bhajis as a starter with wedges of lemon to squeeze over, some fresh coriander, and a traditional cucumber and yogurt salad.

Overhead_image_of_home-made_courgette_and_leek_bhajis
Bhajis sprinkled with fresh coriander and accompanied with lemon wedges and a coconut yogurt and cucumber salad.

Makes: 15

Ingredients

  • 190g chickpea (gram or besan) flour
  • 1 tsp salt
  • 200g courgette, trimmed and coarsely grated
  • 1 small leek, trimmed and shredded
  • 1 tsp ground fenugreek
  • 1½ tsp ground cumin
  • 2 tsp black onion seeds
  • 2 tbsp. toasted sesame seeds
  • Sunflower oil for deep-frying
  • Fresh coriander and lemon to serve

For the cucumber salad

  • 150g cucumber, trimmed and chopped
  • Small bunch fresh chives, chopped
  • A few sprigs fresh mint, leaves chopped
  • 100g free-from coconut yogurt
  • Salt to taste
  1. Sieve the flour and salt into a bowl. Add the courgette, leek, spices and seeds. Mix well. Put to one side. Heat the oil for deep-frying to 180°C, then mix 75ml cold water into the spiced vegetables to make a thick batter. Add the water just before cooking to make sure it stays thick.

    Steps_to_making_courgette_and_leek_bhaji_batter
    Preparing the bhaji batter. Images: Kathryn Hawkins
  2. Use 2 dessert spoons to form scoops of batter and gently drop into the oil – cook 7-8 scoops at a time for 7-8 minutes, turning in the oil, until golden and crisp. Don’t make the bhajis too big otherwise they won’t cook all the way through. Drain on kitchen paper and keep warm while you prepare the other remaining batter.

    Courgette_and_leek_bhajis_being_deep_fried
    Courgette and leek bhajis in the fryer. Image: Kathryn Hawkins
  3. For the cucumber salad, mix all the ingredients together and season to taste.
  4. Serve the bhajis while they are warm, sprinkled with fresh coriander and accompanied with lemon wedges and the cucumber salad.

    Freshly_cooked_home-made_courgette_and_leek_bhajis
    Ready to serve, freshly cooked courgette bhaji. Image: Kathryn Hawkins


Runner bean fattoush (gluten-free; dairy-free; vegan)

Middle_Eastern_fattoush_salad_with_runner_beans
Runner bean fattoush. Image: Kathryn Hawkins

A variation on a Middle Eastern classic salad for you this week. Fattoush is served all over the Middle East in various forms, but always with toasted bread added to it. It makes a light and refreshing sharing platter as a starter or lunch, and also serves as a versatile accompaniment to barbecued and grilled food. Most usually Fattoush consists of crisp lettuce, cucumber, tomato, pepper, onion and herbs, with chunks of bread tossed into them. It is usually dressed simply with olive oil and lemon juice.

Runner_bean_fattoush-style_salad
My take on a Middle Eastern classic salad. Image: Kathryn Hawkins

The good mix of sunshine and, latterly, rain this summer has produced a flourish of runner beans. Only 3 plants survived the initial “trauma” of being planted outside this year, and they were very skinny and frail for several weeks. But then suddenly they took off, and now just look at them, I have my very own giant beanstalks.

Runner_bean_vines_in_pouring_rain_and_in_sunshine
Come rain, come shine, I have plenty of beans on the vine. Images: Kathryn Hawkins

My fattoush recipe combines the salad ingredients I have growing in the garden at the moment – cucumber, tomatoes and runner beans. For the herb, I used salad burnet which has a refreshing cucumber taste; coriander, mint and parsley are most usually added.

Fresh_runner_beans_Home-grown_cucumber_and_picked_salad_burnet
Freshly picked runner beans, cucumber and salad burnet. Images: Kathryn Hawkins

Instead of onion, I used fresh chives, and for extra crunch, I chopped up some whole almonds and sprinkled them on top. After toasting the bread, I seasoned it with salt, pepper and tangy sumac powder for extra zing.

Toasted_gluten_free_pitta_breads_with_olive_oil_and_sumac_powder
Toasted gluten-free pittas with olive oil and sumac. Image: Kathryn Hawkins

Ingredients

Serves: 4

  • 175g runner beans
  • 1 Romaine or Little Gem lettuce
  • 150g cherry tomatoes
  • 1 small cucumber
  • A small bunch fresh chives (or use 3 chopped spring onions, or finely chop half a small red onion)
  • A few sprigs salad burnet (or coriander, parsley and/or mint)
  • 2 large gluten-free pitta breads
  • Good quality olive oil
  • Sumac powder
  • Salt and freshly ground black pepper
  • 50g whole almonds, roughly chopped
  • Fresh lemon
  1. Trim the beans – I like to peel the sides with a vegetable peeler, and then nip of the tops. Cut into chunks. Bring a small saucepan of water to the boil and cook the beans for 3-4 minutes until lightly cooked. Drain well and rinse in cold running water to cool. Drain well.

    TRimming_and_chopping_home-grown_runner_beans
    Preparing fresh runner beans. Images: Kathryn Hawkins
  2. Tear or shred the lettuce and place in a large serving bowl. Halve the tomatoes, and thickly slice the cucumber. Toss into the lettuce along with the cooked beans. Snip the chives into pieces with scissors and strip the leaves from the salad burnet or other fresh herbs. Mix into the salad.
  3. Toast the pitta breads. Brush with oil and sprinkle with sumac and season to taste. Tear into chunky pieces and toss into the salad. Sprinkle with almonds. Serve the salad with olive oil and wedges of lemon to squeeze over.

    Runner_bean_fattoush_salad_close-up
    Close-up on fattoush. Image: Kathryn Hawkins


Warm tomato, sage and caper bruschetta (gluten-free; dairy-free; vegan)

Platter_of_4_bruschetta_topped_with_tomatoes_sage_and_capers
Warm tomato, sage and caper bruschetta. Image: Kathryn Hawkins

I have never been able to pick home-grown tomatoes this early before. Usually, my tomatoes don’t ripen until at least September, and I’m always left wondering whether I will be making pots-loads of green tomato chutney. This year, the tomatoes are ripening at least one month ahead, and I am delighted 🙂

I planted 8 different varieties this year in the greenhouse, and all are doing very well. I’m going to be eating a lot of tomatoes this year!

Orange_yellow_red_and_pink_varieties_of_tomato
Early August tomato harvest. Image: Kathryn Hawkins

I enjoy eating tomatoes raw, simply sliced, sprinkled with a little seasoning, and a pinch of sugar to bring out the sweetness, and topped with a few fresh basil leaves.

Different_colours_and_varieties_of_home-grown_ tomatoes
A colourful variety of tomatoes. Images: Kathryn Hawkins

However, I do cook with them occasionally, and my recipe this week is for a lightly cooked tomato dish which I put on top of gluten-free ciabatta-style bread to eat as a light lunch or quick supper snack. The topping also makes a great sauce to serve over pasta or roast veg. The tomatoes are flavoured with fresh sage, garlic and capers, and for a tangy sweetness, I’ve added a little white balsamic vinegar.

Home-grown_tomatoes_on_the_vine_and_fresh_sage
Rosella tomatoes, fresh sage, and Flamingo tomatoes. Images: Kathryn Hawkins

To enjoy all the flavours of the recipe, leave the mix to cool slightly before serving rather than eating it too hot or fresh out of the saucepan.

Freshly_prepared_tomato_bruschetta_garnished_with_fresh_sage
Bruschetta ready to serve. Image: Kathryn Hawkins

Serves: 2

Ingredients

  • 225g small tomatoes, halved or quartered
  • A few leaves fresh sage
  • 1 clove garlic, peeled and finely chopped
  • 1 tbsp. capers
  • 1 tbsp. white balsamic vinegar
  • Salt and freshly ground black pepper
  • Extra virgin olive oil
  • 4 slices of freshly toasted bread
  1. Put the tomatoes, sage, garlic, capers and vinegar in a small saucepan. Season to taste and heat gently until simmering. Cover with a lid, turn down the heat to low and cook the tomatoes very gently for 10 minutes, until soft. Leave to cool for about 30 minutes.

    Tomatoes_capers_fresh_sage_and_gluten-free_ciabatta_bread
    Bruschetta ingredients and preparation. Images: Kathryn Hawkins
  2. To serve, discard the sage leaves. Drizzle freshly toasted bread with olive oil and spoon over the tomato topping. Garnish with fresh sage.

    Close-up_on_warm_tomato_bruschetta
    Bruschetta, ready to serve. Image: Kathryn Hawkins


Broad bean byessar & fresh thyme za’atar (gluten-free; dairy-free; vegan)

Platter_of_Moroccan_inspired_dips_and_salads
Broad bean byessar served with fresh thyme za’atar on flat breads, with carrots and black olives. Image: Kathryn Hawkins

This is a great time of year for fresh fruit and vegetables. The first of the home-grown beans, broad beans, have arrived in the shops these past couple of weeks, and I have made one of my favourite dips with my first batch. If you like hummus (houmous), you’ll love byessar. Usually made with dried broad beans (fava beans), I prefer to make my version with fresh when the beans are in season, or frozen, at other times of the year.

Fresh_broad_beans_in_the_pod_and_shelled
Fresh broad beans. Images: Kathryn Hawkins

To accompany the dip, I have made up a batch of za’atar (zaatar or zahtar), a blend of thyme, sesame seeds and sumac powder. This is a traditional blend from the Middle East and it is used as a seasoning for lots of meat dishes; it is sprinkled over salads and vegetable dishes, and used as a topping for breads. Simply make it into a paste with olive oil, spread it on flat breads or pittas and pop under the grill to toast. As I have lots of fresh thyme in the garden, I’m using fresh leaves, but dried thyme is more traditional. Using dried also means that you can keep it for longer as a dry mix,  in a sealed container as you would any other spice blend.

Fresh_thyme_sumac_powder_and_lightly_toasted_sesame_seeds
Za’atar ingredients. Images: Kathryn Hawkins

If you can’t find sumac powder, something tangy and zesty like lemon rind would bring a bit of zing to the mix.

Serves: 4

Ingredients:

Byessar:

  • Salt
  • 500g fresh broad beans, shelled (or 175g shelled beans)
  • 1 sprig fresh thyme
  • 1 garlic clove, peeled
  • 1 tsp ground cumin or hot curry powder
  • 1 tbsp. olive oil
  • Fresh thyme flowers to garnish

Za’atar

  • 1 tbsp. lightly toasted sesame seeds
  • ½ tsp sumac powder
  • ½ fresh thyme leaves or dried thyme
  • 1-2 tbsp. olive oil

Free-from flat breads, carrot sticks and olives to serve

1. To make byessar, bring a small saucepan of lightly salted water to the boil, and cook the beans with the thyme, garlic and cumin or curry powder for 4-5 minutes, until tender. Drain, reserving the cooking liquid, and cool for 10 minutes. Discard the thyme.

2. Put the beans and garlic in a food processor or blender. Add 75ml of the cooking liquid and the oil. Blitz until smooth. Taste and season with salt. Transfer to a serving bowl and leave to cool, then chill until ready to serve. Accompany with bread and carrots to dip; garnish with fresh thyme flowers or leaves, if liked


Ingredients_and_making_of_borad_bean_dip_(byessar)
Making byessar. Images: Kathryn Hawkins

To make za’atar, mix the dry ingredients together. When ready to serve, mix with sufficient olive oil to make a paste. Lightly toast flat breads, cut into strips, then spread lightly with the za’atar paste. Toast under a hot grill for a few seconds to warm through. Serve as an accompaniment to dips and salads.

Za'tar_seasoned_flat_breads_with_broad_bean_dip
Delicious summery lunch. Image: Kathryn Hawkins


Courgette and white bean salad (gluten-free; dairy-free; vegan)

Mediterranean-style_setting_with_bowl_of_courgette_and_white_bean_salad
Courgette and white bean salad with fried pine nuts, basil, gluten-free flat bread and extra virgin olive oil. Image: Kathryn Hawkins

Amazingly, the heat is still on full blast here in the UK. The sky has been gloriously blue, day after day, and the sun is shining down strongly. No rain in the forecast; the water butt has been dry for days!

Plenty of time to enjoy the garden at a more leisurely pace. The thought of preparing and eating hot food is not so appealing at the moment, so salads are featuring heavily on my menu. I picked my first courgettes this week – all the extra watering by hand has been worth it – and made an exception by doing a little bit of cooking. I made them into a tasty cold dish with some canned beans and a rich tomato sauce.

Green_and_yellow_ball-shaped_courgettes
The first of this year’s home-grown courgettes. Image: Kathryn Hawkins

You can adapt the recipe to use other vegetables and pulses – aubergine and chickpeas make a good combination too, especially seasoned with some cumin and fresh coriander. The salad makes a good sauce for pasta when served freshly made, and I have also served it as a filling for a warmed pastry case.

Overhead_shot_of_platter_of_courgette_and_white_bean_salad_with_flat_bread_pine_nuts_and_olive oil
Platter of salad and accompaniments. Image: Kathryn Hawkins

Serves: 4

Ingredients

  • 2 tbsp. olive oil
  • 2 onions, peeled and chopped
  • 2 garlic cloves, peeled and chopped
  • 2 fresh bay leaves or 1 dried
  • 2 sprigs fresh rosemary
  • 150ml dry white wine
  • 400g can chopped tomatoes
  • 2 tbsp. tomato purée
  • 2 teasp caster sugar
  • 1 teasp salt
  • Freshly ground black pepper
  • 250g cooked cannellini beans
  • 500g courgettes, trimmed and chopped into 2cm dice
  • Fresh basil, fried pine nuts, gluten-free flat bread and extra virgin olive oil to serve
  1. Heat the oil in a large covered frying pan and gently fry the onion, garlic and herbs, with the lid on, over a low heat, for 15 minutes, to soften without browning.

    Chopping_board_with_fresh_onion_garlic_bay_and_rosemary
    Prepared onion and garlic with fresh bay and rosemary, ready for the pot. Image: Kathryn Hawkins
  2. Pour in the wine and stir in the chopped tomatoes, tomato purée, sugar, salt and pepper. Bring to the boil, then simmer for 5 minutes. Remove the rosemary and bay leaves.

    Freshly_chopped_courgette_on_a_chopping_board
    Courgette cut into 2cm dice. Image: Kathryn Hawkins
  3. Stir in the beans and courgette, making sure they are well covered in the sauce. Bring to the boil, cover, reduce the heat, and simmer gently for 7-8 minutes until the courgette is just tender. Leave to cool completely.

    3_steps_to_making_courgette_and_white_bean_salad
    Making the sauce and cooking the salad. Images: Kathryn Hawkins
  4. Transfer to a bowl and chill until ready to serve. Best served at room temperature for more flavour. Delicious spooned over warm flat breads, sprinkled with fresh basil, fried pine nuts and a drizzle of extra virgin olive oil. Bon Appétit 🙂

    Small_plate_with_a_portion_of_flat_bread_and_courgette_and_white_bean_salad
    The perfect lunch for a sunny day. Image: Kathryn Hawkins

Curly kale – recipe ideas and serving suggestions

Bunches_of_green_and_red_curly_kale
Green and red curly kale. Images: Kathryn Hawkins

The hardiest of all the Brassica family, and probably the closest to wild cabbage, kale (or kail) is one of the most traditional of Scottish vegetables. The robust leaves withstand harsh frosts and snow, and are said to taste all the better for it. In the past, kale was dismissed as animal fodder, but today it is one of the most trendy vegetables on the menu.

Kale is one of my favourite greens. I love the strong flavour, it is bursting with vitality in every bite, and it is one of the few vegetables tasty enough to stand its own on a plate with other bold flavours.

Curly_kale_leaves_in_water
Keeping kale fresh in a bowl of water. Image: Kathryn Hawkins

As with all leafy vegetables, cook as soon as possible after purchase. Choose firm stalks with fresh, dark or bright green leaves. If you do want to keep them for a couple of days, arrange the stems in a bowl or large jug of water as you would a bunch of flowers, then put in the fridge. I find kale is one of a few vegetables that doesn’t freeze very well – it loses texture and flavour, and becomes a bit slimy when cooked.

Curly_green_and_red_kale_leaves
Kale leaves. Images: Kathryn Hawkins

Simple to prepare, just rinse kale well in cold, running water to flush out any trapped earth caught in the tight, curling leaves, and then shake off the excess water. Pull off the lower, frilly leaves and keep to one side – these softer leaves are perfect for eating raw in winter salads. Slice out the central stem, and then shred the leaves into the desired size.

Preparing_stems_of_curly_Kale
Preparing curly kale. Image: Kathryn Hawkins

If you are steaming kale, pack the wet leaves into a steamer and cook for 10-15 minutes until tender. Alternatively, pack the wet leaves into a saucepan, turn on the heat and when the contents begin to steam, put the lid on, reduce the heat to medium and cook with the lid on, turning occasionally, for about 10 minutes – don’t have the heat too high otherwise the leaves will dry and burn. Drain well and chop finely.

For baking and deep-frying, rinse the leaves then make sure you dry them as much as possible in order to cook them to a crisp. Blotting them between layers of absorbent kitchen paper is a good way. If the leaves are too damp, you will end up steaming them in the oven rather than drying them out. In hot oil, the contents will spit and hiss if water still clings to the leaves.

Recipe ideas and serving suggestions

  • Shredded kale makes fantastic “crispy seaweed”: deep-fry in hot vegetable oil for a few seconds, then drain well and toss in a little salt and white sugar. Season with Szechuan pepper or Chinese 5 spice.
  • Toss raw, small, tender kale leaves with finely shredded raw leek and grated apple in a lemon vinaigrette and season with freshly ground black pepper. Serve as a crunchy, bold winter salad sprinkled with toasted walnuts.
  • Steamed kale is delicious, finely chopped, tossed in butter or good quality olive oil and seasoned with black pepper and ground nutmeg. An ideal accompaniment to a bold, red wine gravy based game, meat or bean stew.
  • Add finely chopped, steamed kale to a garlic mash. See My favourite mash (gluten-free, dairy-free, vegan
  • Mix finely chopped, steamed kale with cooked brown rice or pearl barley, toasted pine nuts and grated Parmesan (or Vegan cheese) and use as a filling for baked Portobello mushrooms.
  • Tray-baked kale leaves make a healthy sprinkle for salads, soups, rice and pasta dishes. Here’s what to do: preheat the oven to 150°C (130°C fan oven, gas mark 2). Line 2 large baking trays with baking parchment. Prepare 200g kale leaves as above, then rinse and dry thoroughly. Roughly chop the leaves and place in a large bowl. Toss in no more than 2 tbsp. sunflower oil and arrange over the trays – too much oil will make the leaves go soggy. Mix 1 teasp smoked salt, ½ teasp ground black pepper and 1 teasp ground cumin together and sprinkle over the oily kale.
How_to_bake_kale
Baking kale. Image: Kathryn Hawkins

Bake for 25-30 minutes until crisp. Drain well, leave to cool, then pack into air-tight containers or jars to store. The baked kale will keep and stay crisp in this way for up to 2 weeks.

Plate_of_baked_kale_and_storage_jar
Cumin-spiced, tray-baked kale. Image: Kathryn Hawkins


Baked root vegetable squares (gluten-free; dairy-free; vegan)

Layers_of_sweet_potato_turnip_(swede)_and_potatoes_baked_and_cut_into_squares
Freshly baked root vegetable squares. Image: Kathryn Hawkins

I like all root vegetables, but sadly I struggle to grow anything other than potatoes. Fortunately, I am able to buy a good variety from local farm shops and this feels like the next best thing to growing them myself. This week’s recipe can be made with any root you have to hand. The cooking method bakes the different vegetable layers to a melting-tenderness and is a perfect choice if you want a vegetable dish suitable for preparing ahead. Once the basic layering and baking is done, the cooked vegetables will sit quite happily in the fridge for a couple of days before baking again to serve. You can scale the recipe up easily if you’re feeding a crowd and mix and match the vegetables you use.

Turnip_sweet_potatoes_and_King Edward_potatoes_in_a_small_wooden_crate
Turnip, sweet potatoes and King Edward potatoes ready for preparation. Image: Kathryn Hawkins

My version makes an 18cm square layer which cuts neatly into 9 portions and uses sweet potatoes, turnip (or swede, depending on where you come from) and potatoes, but carrots, parsnips and celeriac work fine as well, and you can also use just 1kg of your favourite root, if you prefer. The most important things to remember are to slice the vegetables thinly and evenly (preferably use a food processor or mandolin) and make sure you cook the vegetables until completely tender during the first baking – test with a skewer to be completely sure.

Tray_of_thinly_sliced_sweet_potato_turnip_and_potato
Thinly sliced root vegetables. Image: Kathryn Hawkins

Makes 9 portions

Ingredients

  • 300g sweet potatoes
  • 300g turnip (swede)
  • 400g main crop potatoes such as King Edward or Maris Piper
  • 75ml vegetable stock
  • 3 tbsp. olive oil
  • 40g dairy-free margarine (or butter if you eat it)
  • 1 large clove garlic, peeled and crushed
  • Salt and freshly ground black pepper
  • Freshly chopped parsley
  1. Preheat the oven to 180°C (160°C fan oven, gas 4). Grease and line a straight-sided, deep 18cm square cake tin with baking parchment.
  2. Peel and thinly slice all the vegetables – I use a food processor for this. Either layer in the tin individually or mix all the vegetables together and arrange evenly in the tin.

    Layering_sliced_vegetables Original
    Layering the root vegetables in individual layers. Images: Kathryn Hawkins
  3. Pour over the stock and drizzle with the oil. Cover the top of the tin with foil and bake for at least an hour until completely tender. Remove the foil and leave to cool completely.
  4. Cut a square of firm cardboard the same size as the inside of the tin and wrap in a layer of foil. Place a sheet of baking parchment over the vegetables and sit the foil-wrapped board on top. Weigh down the vegetables evenly using 3 or 4 same-weight cans or jars and chill overnight or for up to 2 days before serving.

    How_to_press_the_vegetable_layer
    Pressing the vegetable layer. Images: Kathryn Hawkins
  5. When ready to cook, preheat the oven to 200°C (180°C fan oven, gas 6). Remove the weights, foil board and baking parchment and carefully remove the pressed vegetable square from the tin.
  6. Cut into 9 squares and arrange on a lined baking tray. Melt the margarine (or butter) and mix in the garlic and seasoning. Brush the mixture generously over the vegetable squares.

    Preparation_steps_for_baking_the_vegetable_squares
    Ready for baking. Images: Kathryn Hawkins
  7. Bake the squares for about 30 minutes until golden and hot. Serve immediately sprinkled with chopped parsley. A great accompaniment to any kind of roast.
    Tray_of_baked_root_vegetable_squares_just_out_of_the_oven
    Just baked root vegetable squares. Image: Kathryn Hawkins
    Close-up_on_a_root_vegetable_square
    Root vegetables: meltingly tender and packed full of flavour. Image: Kathryn Hawkins


Cauliflower – the king of winter vegetables – 3 recipe ideas (gluten-free; dairy-free; vegan)


Indian-spiced_roast_cauliflower_teriyaki_stir_fried_cauliflower_and_Italian-style_cauliflower_steak
Cauliflower roasted, stir fried, and steaks. Image: Kathryn Hawkins

When it comes to the winter months of the year, trying to buy only home-grown, British vegetables (as is my want) can be quite challenging especially if you desire something other than starchy root crops. In my opinion, the humble cauliflower reigns supreme at this time of year as it is a welcome diversion in flavour, taste and texture.

However, my thoughts haven’t always been so positive towards the cauliflower. At school, cauliflower was boiled beyond all recognition and served as a watery, soft mush – enough to put anyone off the vegetable for life. Yet, today, it is one of the “on trend” vegetables. If you cook it correctly, cauliflower has a  meaty texture, sweet flavour, and best of all, it can be cooked in many ways. It’s full of vitamin C and K, as well as B vitamins and dietary fibre. Easy to prepare, you can eat just about all of it from the inner the cream-coloured curds  to the outer wrapping of juicy leaves.

Preparing_a_whole_cauliflower_in_4_steps
Preparing cauliflower. Images: Kathryn Hawkins

The leaves help protect the curds, so try to buy the vegetable with as much greenery as possible. If you want to store cauliflower for a few days,  keep the leaves intact and place the stalk-end in a shallow depth of water in a bowl, in the fridge, and the cauliflower should keep fresh for up to a week.

To prepare, discard any damaged outer leaves, but keep the inner, more tender leaves – these can be cooked like cabbage. Once the curds are free from leaves, slice or break the head into florets. Prepared cauliflower florets dehydrate quickly so are best cooked soon after preparation.

I rarely cook cauliflower in water, but if I do, it is for a very short time only – the curds can get very spongy very quickly when cooked in water, and the flavour will be lost.

Following are my current 3 favourite ways of cooking cauliflower for maximum taste and texture: roasting, griddled steaks and stir-fried sprouting stems.

Spiced_roast_cauliflower_with_red_onion_and_chick_peas
Roast cauliflower with Indian spices. Image: Kathryn Hawkins

Toss chunky florets of cauliflower and  thickly sliced red onion in sunflower oil. Season with garam masala to taste. Spread out on a baking tray, season with salt and pepper and roast at 200°C (180°C fan oven, gas 6) for about 30 minutes, turning occasionally. Mix in cooked chick peas and return to the oven for a further 10 minutes until everything is lightly browned. Drain well, then serve sprinkled with black onion seeds. For a main meal,  mix into freshly cooked Basmati rice and sprinkle with fresh coriander and roasted cashew nuts.

Close-up_of_spiced_roast_cauliflower_florets
Freshly roasted spiced cauliflower. Image: Kathryn Hawkins

Probably the most popular way to serve cauliflower at the moment is as a steak. I usually cut the prepared curds into 2cm thick slices and poach them in simmering water for a couple of minutes before frying or placing on a griddle or barbecue – a large frying pan is good for poaching as it enables you to lift out the steaks more easily. Use tongs to make sure you drain the steaks well,  and dry them on kitchen paper so that excess cooking water is removed before cooking in oil.

Poaching_cauliflower_steaksin_gently_simmering_water
Pre-cooking cauliflower steaks. Image: Kathryn Hawkins
Griddled_cauliflower_steaks_with_Italian_flavours
Cauliflower steaks with Italian flavours. Image: Kathryn Hawkins

Brush the prepared cauliflower steaks lightly with vegetable oil on one side. Heat a griddle pan or frying pan until very hot, then add the streaks, oiled-side down. Press into the pan, reduce the heat to medium, and cook for 2-3 minutes until golden or lightly charred. Brush the top with more oil, and turn the steaks over. Cook for a further 2-3 minutes or until cooked to you liking. Serve straight from the pan drizzled with extra virgin olive oil, balsamic glaze or reduction, and toasted pine nuts. Top with griddled cherry vine tomatoes and fresh basil.

Vase_of_sweet_sprouting_cauliflower_stems
Sweet sprouting cauliflower. Image: Kathryn Hawkins

One of the new kids on the block in the cauliflower world, is a variety with fine green stems and small, flowery curds. I was a bit sceptical when I first saw it (mainly because of the price), but I have since been converted. The stems are best cooked for a minimum time, just as you would for asparagus – steamed, griddled or stir fried – in order to retain the crisp texture. Unusually, the stems become even brighter green when cooked. The flavour is mild and sweet. To make sure the stems cook evenly, break or cut the stems up so that you have same-size thickness pieces.

You can keep these stems in a jug of water in the fridge for a couple of days to keep them fresh, as they do lose texture quickly. These sweet stems are a perfect choice for a single serving or to add to a combination of other vegetables.

Steamed_cauliflower_sprouts
Freshly steamed in 3-4 minutes, sweet sprouting cauliflower stems. Image: Kathryn Hawkins

Heat a tablespoon of vegetable oil in a deep-frying pan or wok until hot. Add prepared raw stems and stir fry in the hot oil for 3 minutes. Cover with a lid, reduce the heat, and cook for a further 1 minute. Turn off the heat,  add finely chopped garlic to taste and drizzle with a little honey or agave syrup and gluten-free teriyaki marinade. Put the lid back on and leave to stand in the residual steam for a further minute. Drain the stems, reserving the juices, and pile into a warm serving bowl. Sprinkle with toasted sesame seeds. Mix a little sesame oil into the pan juices and serve alongside the stems as a dressing or dip. Utterly delicious 🙂

Bowl_of_freshly_cooked_cauliflower_stems_dressed_with_teryiaki_and_sesame_seeds
Teriyaki and sesame dressed cauliflower stems. Image: Kathryn Hawkins


Rumbledethumps (gluten-free; dairy-free & vegan alternatives)


Dish_of_Scottish_classic_potatoes_and_kale_with_cheese_on_top
Freshly baked Rumbledethumps. Image: Kathryn Hawkins

Great name for a recipe eh? What’s more, I haven’t made it up. This is a Scottish classic, and I’ve chosen to post it now for 2 reasons. It’s been very cold here this week and this is fabulous comfort food, and also with the festive season nearly upon us, it is an excellent recipe for using up leftovers. It uses 2 of my favourite vegetables, potatoes and kale (or cabbage).

I love kale. So much flavour and texture, I think it out-strips cabbage and other greens in every way. Up until a couple of years ago, Cavelo Nero, Italian black kale, was my favourite variety, but then along came mini kale and my mind was changed. Very quick to cook, simple to prepare, with a milder, slightly sweet and nutty flavour, it looks very pretty too. The small leaves are  also excellent raw in winter salads.

Colander_of_mini_kale
Mini kale. Image: Kathryn Hawkins
Close-up_of_mini_kale
Heads of mini kale, up close. Image: Kathryn Hawkins

So on with the recipe. Traditionally, this is a very simple combination of leftover cooked potatoes and cabbage fried with onion and then grilled with cheese on top. What’s not to like? The name, by the way, is believed to come from the combination of the “thumping” sound associated with mashing potato and the mixing together of the ingredients (a “rumble”). Here’s my version.

Serves: 3 to 4 as a side dish

Ingredients

  • 150g mini kale, kale, cabbage or other greens (if you have leftovers, you’re halfway there with the recipe already)
  • 500g cooked potatoes (I had some boiled small potatoes with skins on to use up)
  • 25g butter or dairy-free margarine
  • 1 tbsp. vegetable oil
  • 1 leek, trimmed and shredded (or use thinly sliced onion if you prefer)
  • Salt and freshly ground black pepper
  • 50g grated Scottish Cheddar or dairy-free/vegan grated cheese
  1. If you are starting from scratch, prepare the greens and cook them in lightly salted water for 3-5 minutes until just tender. Drain well.
  2. Put the potatoes in a bowl and mash them to crush slightly.
  3. In a large frying pan, melt the butter with the oil and gently fry the leek for 3-4 minutes until softened (if you’re using onion, cook it gently for longer, until tender).
  4. Stir in the potatoes and greens, and stir fry the vegetables gently together for 5-6 minutes until thoroughly heated. Season well and transfer to a heatproof dish.

    Steps_to_making_Rumbledethumps
    Basic preparation of Rumbledethumps. Image: Kathryn Hawkins
  5. Preheat the grill to medium/hot. Sprinkle the vegetables with grated cheese and grill for about 5 minutes until golden and bubbling. Serve immediately.
A_spoonful_of_Rumbledethumps
Comfort with every spoonful. Image: Kathryn Hawkins