Tattie scones (gluten-free; dairy-free; vegan)

Flat_griddle_pan_with_cooked_tattie_scones
Freshly cooked tattie (potato) scones. Image: Kathryn Hawkins

The best things in life are often the simplest. These wise words certainly apply to my recipe this week. There aren’t many dishes more straightforward than a tattie scone. Just 3 ingredients, plus some oil to cook them in, and that’s it.

The tattie (potato) scone is synonymous with Scotland. Just about every self-respecting baker makes his or her own, and no supermarket bakery aisle is complete without them. The scones are a good way of using up leftover boiled potato which is mashed and bound with wheat flour, but gluten-free works fine. Tattie scones are  usually quite thin, but I make mine a bit thicker  (about 1cm) as I find the mixture easier to work with. Eat them warm as part of a savoury meal (often served as part of a hearty breakfast) or  as a snack spread with butter and jam. The scones make a great alternative to bread as an accompaniment to a soup or stew as they are perfect for mopping up gravy or a sauce.

Servng_of_freshly_cooked_tattie_scones_and_jam
A tea-time favourite: tattie scones and jam. Image: Kathryn Hawkins

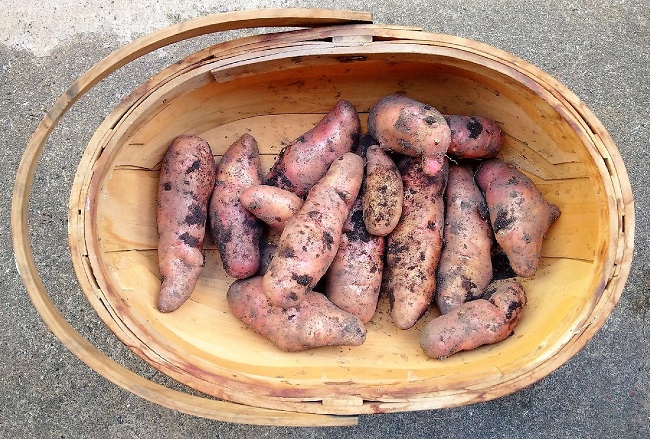
I dug up the last of my home-grown potatoes this week, and decided that there was no better way to enjoy them, than by making up a batch of my own scones.  I’ve been growing the same main crop variety (Pink Fir Apple) for a few years now, and haven’t found any other to rival it in texture or flavour. The potatoes are pink-skinned and can be very knobbly indeed. The flesh is creamy-yellow in colour, sometimes flecked or ringed with pink, and when cooked, it becomes dry and floury in texture. The flavour is slightly sweet and earthy. Pink Fir Apples potatoes are perfect for crushed or mashed potato. and also roast well. They can be cooked and eaten peeled or unpeeled.

Trug_of_freshly_dug_pink_fir_potatoes
My last harvest of Pink Fir Apple potatoes. Image: Kathryn Hawkins

Here’s my recipe.

Makes: 6

Ingredients

  • 400g main crop potatoes
  • 1 tsp salt
  • 40g gluten-free self-raising flour blend (such as Dove’s Farm)
  • Vegetable oil for frying
  1. Peel the potatoes thinly, cut into small pieces, and place in a saucepan. Cover with water and add half the salt. Bring to the boil and cook for 8-10 minutes or until completely tender. Drain well through a colander or strainer, and leave to air-dry for 10 minutes.
  2. Return the potatoes to the saucepan and mash finely with a potato masher. If you have a ricer, use this to achieve a super-smooth texture.
  3. While the mash is still fairly hot, add the remaining salt and sift the flour on top. Gently work the ingredients together to make a pliable dough.
    Potato_preparation_for_making_tattie_scones
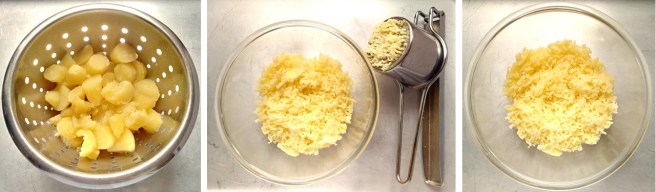
    Ricing the potatoes. Images: Kathryn Hawkins

    Making_rolling_and_shaping_potato_dough_for_tattie_scones
    Making and rolling the potato dough. Images: Kathryn Hawkins
  4. Turn the dough on to a lightly floured work surface and roll to form a round about 18cm diameter – roll to 20cm for slightly thinner scones. Cut into 6 triangular wedges.
  5. Brush a large frying pan or flat griddle pan generously with oil and heat until hot. Cook the scones for 2-3 minutes on each side until lightly golden. Drain and serve warm. You can reheat the scones successfully, by either popping them in the frying pan again or under the grill to lightly toast them.

    Serving_of_tattie_scone_with_jam
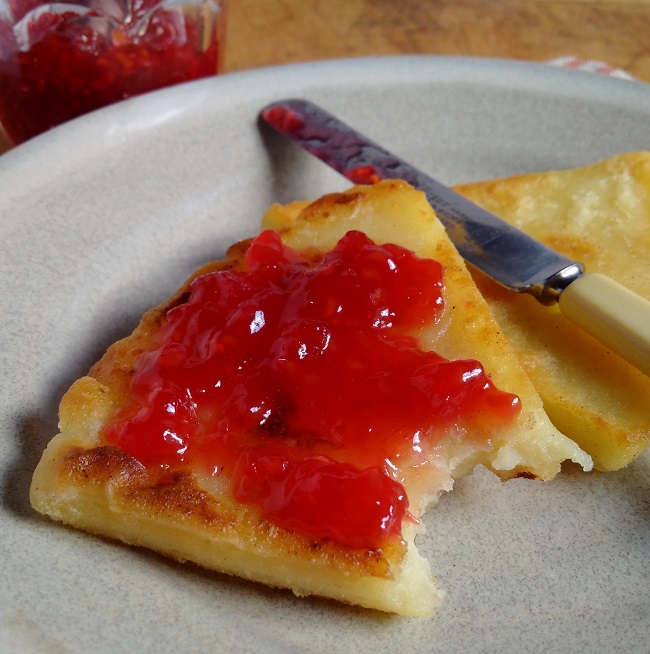
    Straight out of the pan and spread with my favourite topping: homemade raspberry jam. Image: Kathryn Hawkins


Sweet baby sweetcorn – growing your own baby corn and serving suggestions (gluten-free; dairy-free; vegan)

Home-grown_baby_sweetcorn
Freshly picked baby corn. Image: Kathryn Hawkins

The month of May seems like a long time ago now, but this is when my quest to grow my own sweetcorn began. I am quietly astounded that I managed to raise 12 plants from seed to fruit in an unpredictable Scottish climate, yielding their first harvest this very week. It seems that Mother Nature’s combination of a mild spring, intermittent sunshine and showers, along with my interventions – fussing like an old mother hen, protecting the plants from the slightest breath of wind and giving them an occasional feed – has paid off.

Sowing_sweetcorn_seeds_and_planting_young_sweetcorn_plants
Sowing sweetcorn seeds in early May, and planting out one month later. Images: Kathryn Hawkins

I chose a hard variety of baby corn called Snowbaby. All varieties of sweetcorn need to develop a firm root structure in order to grow to the height they needs to produce cobs. If you take this into account from the very beginning, you will find the crop easy to grow. Pack the sowing compost firmly into compostable pots – using biodegradable pots will enable you to plant the young seedlings into the soil without disturbing the roots. From sowing the seeds at the beginning of May and keeping them sheltered in an unheated greenhouse, it took 4 weeks to develop seedlings with 5 or 6 leaves which were then ready to plant out after acclimatization.

Sweetcorn likes a nutritious, well-draining soil; a sheltered spot; plenty of sunshine, and frequent watering. I put 6 plants in an old barrel and the other 6 went in a suitable spot in the garden. Sweetcorn requires little maintenance and is virtually pest resistant. Triumphant, some 4 months later, I picked my first bunch of cobs.

Fully_grown_baby_sweetcorn_plants
Mature baby sweetcorn plants and cobs. Images: Kathryn Hawkins
Freshly_harvested_home-grown_baby_sweetcorn
Home-grown baby corn. Image: Kathryn Hawkins

The tall sweetcorn stems with their draping, long, ribbon-like leaves and fine feathery flowers make an attractive architectural plant display, and the way the baby corn cobs develop is very intriguing. The cobs form in the gap between stem and leaf. Once the cobs are large enough, the silky threads protecting the cobs inside the leaf wrapping, burst out of the tops to indicate that the baby corn cobs inside are ready to be picked. Simply twist the cobs from the stalks or snap them off outwards. Cook them quickly as they are prone to drying out, although I have kept the cobs, still wrapped in leaf, in a jug of water in the fridge for 3 or 4 days, and they stayed perfectly fresh.

Preparing_freshly_picked_home-grown_baby_corn
Preparing baby sweetcorn. Image: Kathryn Hawkins

Carefully strip away the outer leaves and gently pull away the silky strings to reveal the mini cob in the centre. Either steam or boil the cobs for 3-4 minutes and serve immediately. For best results, don’t salt the cooking water but add a pinch of sugar instead to bring out the sweetness. Freshly picked cobs have an earthy, sweet flavour so avoid over-seasoning in order to appreciate the difference between home-grown and mass-cultivated crops.

Serving suggestions:

  • Strip away a few leaves from the cob but keep a few in place so that you are able to wrap the cob up again; carefully remove the strings. Secure the remaining leaves round the cob again with string and blanch in boiling water for 1 minute. Drain well and cook over hot coals for 2-3 minutes until tender and lightly charred. Remove the string and leaves and serve as part of a barbecue feast.
  • Simmer baby corn cobs in coconut milk with a little chilli and garlic and serve sprinkled with chopped coriander and toasted sesame seeds.
  • Slice into chunks and stir fry with shredded leek, pak choi and chopped garlic for 3-4 minutes until tender. Dress lightly with soy sauce, rice wine vinegar and a spoonful of honey or sweet chilli sauce.
  • Blanch sliced baby corn pieces for 1 minute; drain, cool and mix with cooked sweetcorn kernels, a handful of raisins, and toasted pine nuts. Dress with olive oil and a little balsamic vinegar.

No recipe pictures from me this week. I enjoyed my first harvest of freshly picked baby corn cobs steamed and served with a dollop of lightly salted butter and a sprinkling of black pepper – nothing fancy but completely and utterly delicious. I couldn’t resist taking this last picture though. I hope “she” makes you smile.

Sweetcorn_fairy
My sweetcorn fairy. Image: Kathryn Hawkins

Home-grown tomatoes – recipe for fresh tomato sauce, a salsa, plus other serving suggestions (gluten-free, dairy-free, vegan)

Bowl_of_freshly_picked_tomatoes
Freshly picked tomatoes. Image: Kathryn Hawkins

With the fine, warm spring weather we had this year, my tomato plants have done very well. The fruit started to ripen earlier than usual, and I have been picking a steady supply tomatoes since the end of July. By this time of the year, I’m usually left with a greenhouse filled with hard, green fruit, wondering how on earth they are all going to ripen as the days shorten and the weather turns.

Growing_on_the_vine_home-grown_tomatoes
Ripe and ready to pick. Image: Kathryn Hawkins

Of all the fruit and vegetables you can grow yourself, the tomato has to be in my top 5 as having the most marked difference in flavour compared to most commercially grown varieties, and it is one that I never tire of; I would happily consume a plateful every day if given the opportunity.

To preserve the flavour, avoid putting tomatoes in the fridge as this seems to destroy a lot of the taste – the unique fragrance also seems to disappear. I try to pick only what I need for eating or cooking that day, but if there are a lot that are ripe, I store them in a cool place in the kitchen and use within a couple of days.

Last month I made a batch of my favourite tomato preserve: Smoky Tomato Jam (gluten-free, dairy-free, vegan) and semi-dried a batch which I have preserved in olive oil – Preserving the Summer (Semi-cuit tomatoes – gluten-free, dairy-free, vegan) If preserving isn’t your thing, and you have too many ripe tomatoes to eat, you can freeze them whole in bags for use in sauces and soups later on. Making a batch of tomato sauce is a good way to use them up too, and it also freezes well. Homemade tomato sauce makes a deliciously intense flavoured base for soups and pasta dishes, or as a tasty pouring sauce for meat, fish and vegetables.

Jug_of_homemade_tomato_sauce
Homemade tomato sauce. Image: Kathryn Hawkins

To make about 450ml fresh tomato sauce: simply wash and pat dry 1 kg tomatoes; cut in half and place in a large lidded frying pan or saucepan. Try and keep them in a single layer if possible, for even cooking. Season lightly with salt and pepper and add a bunch of fresh herbs – I use rosemary, thyme, oregano and a bay leaf. Place over a low heat until beginning to steam, then cover with a lid and continue to cook very gently for about 40 minutes to 1 hour, depending on the size of the tomatoes, until soft and collapsed. Cool for 10 minutes, then discard the herbs and push the tomatoes through a nylon sieve to make a pulpy juice.

Before_and_after_cooking_tomatoes_for_sauce
Preparing tomato sauce. Image: Kathryn Hawkins

Pour into a clean saucepan, add 25g butter or vegan margarine, 1 tbsp. good quality olive oil, and 1 tsp caster sugar. Taste and add more seasoning if necessary. Heat gently until the butter or margarine melts, then raise the heat and simmer steadily for about 20 minutes, stirring occasionally, until thickened, but still thin enough to pour. Use as per recipe or allow to cool completely, then cover and store in the fridge for up to 3 days. Freeze in sealable containers for up to 6 months. Note: you can add garlic to the tomatoes before cooking – peeled, whole cloves work fine and will cook into a pulp with the tomatoes. I prefer to keep the sauce plain and add my garlic when I use the sauce in a recipe.

Saucepan_of_tomato_sauce
Homemade tomato sauce, ready to serve. Image: Kathryn Hawkins

Here are a few other ideas for serving up fresh tomatoes:

  • Dress a plate of sliced fresh tomatoes by simply seasoning with a light dusting of white sugar, a little salt, freshly ground pepper and a few toasted and crushed cumin seeds.
  • For a quick “chutney”, gently fry 2 finely sliced red onions with a crushed clove of garlic in olive oil. Add a pinch or 2 of chilli flakes and cook until very soft. Add 225g chopped fresh tomatoes, 2 tbsp. balsamic vinegar and 2 tbsp. caster sugar. Season and cook gently, stirring occasionally, until thick. Leave to cool, then store in the fridge for up to a week. Lovely with barbecued meat, vegetables and as an accompaniment to cheeses.
  • Roughly chop a few ripe tomatoes. Blitz in a blender; push through a nylon sieve into a jug. Season with Tabasco sauce and/or Worcestershire sauce. Put ice in a tumbler, add a slug of vodka and pour over the seasoned juice.
  • Bake halves of tomato, side by side in a shallow dish, in a moderate oven with a topping of fresh breadcrumbs, capers, slivers of garlic and a drizzle of olive oil, until tender. Serve scattered with lots of freshly chopped parsley.
  • Small pieces of sweet tomato make and interesting addition to a citrusy fruit salad. Pour over a plain sugar syrup and scatter with chopped, fresh mint to serve.
  • For a delicious salsa to go with Indian food: combine chopped tomatoes, cucumber, and fresh mango with a little finely chopped red onion. Sprinkle with black onion seeds and toss in a little white balsamic vinegar. Serve at room temperature for the best flavour.
Bowl_of_fresh_tomato_cucumber_and_mango_salsa
Tomato and mango salsa Image: Kathryn Hawkins


French (Green) beans – tips and serving suggestions

Freshly_picked_homegrown_French_beans
My first French beans of the season. Image: Kathryn Hawkins

I haven’t grown French beans for a few years. I like the vegetable very much but have preferred to grow runner beans instead. This year I fancied a change. I decided to make holes in the bottom of an old wheelbarrow, fill it with compost and raised a few plants from seed. Much to my delight, my first harvest was ready to pick this week, and there are plenty more to come. I had my doubts about the barrow; we have had so much rain on and off over the past few weeks, I was convinced it would become water-logged and the beans would drown. In fact,  I have been fussing around them like an old mother hen for weeks. But all to the good, the plants seem very healthy and my efforts have paid off.

French_beans_growing_in_a_wheelbarrow
My barrowful of beans. Image: Kathryn Hawkins

I grew a dwarf variety, which doesn’t usually require support. However, I did tie each plant to a thin cane as the barrow is quite shallow and the plants were beginning to sway around in the wind. Ideally, French beans thrive at their best in a sheltered spot; they love the sunshine, plenty of feeding, and whilst they like a lot of water, they need a free-draining soil – hence my worry over the barrow becoming water-logged.

French_bean_flowers_and_beans_on_the_vine
French bean plant in flower and in bean! Images: Kathryn Hawkins

Once the dainty, cream-white flowers have formed, the young beans develop quite quickly, and the full-grown beans are ready for picking in 4 to 6 weeks – the perfect bean for the impatient gardener! Pick the beans young to enjoy the super-tender texture, and also to encourage the other beans on the plant to grow. In spite of their name, it appears the beans originated in South America, although they have long been associated with the cooking of France. If you leave the bean pods on the plants, they will form beans inside the pods which can be picked, shelled and eaten as flageolet beans (another French delicacy and favourite of mine). Leave them longer still, and you’ll have your own haricot beans for drying and storing. Sadly, I don’t have the climate for haricots, or for that matter, the ability to resist picking the pods!

French_bean_preparation
Preparing French beans. Image: Kathryn Hawkins

Preparation is simple, just nip off the stalk end and cook the beans whole, either steaming them for 6-8 minutes, or cooking in a little boiling water for 4-5 minutes. They freeze well: just blanch them in boiling water for barely a minute and then refresh, dry and pack as for any other freezer-destined vegetable.

Serving suggestions:

  • All beans are best picked, cooked and served as fresh as possible. Dress with a knob of butter or a drizzle of olive oil, a pinch of salt and pepper and a few freshly chopped, soft-leaved herbs sprinkled over the top – basil, mint, parsley, coriander, tarragon and chives are great flavours for all beans.
  • Once cooked, chop French beans into short lengths and mix with lightly cooked and mashed butter beans. Season and mix in lots of chopped parsley, then dress with a lemon and honey vinaigrette. Perfect served on freshly toasted bread.
  • Add chopped, cooked French beans to a frittata, omelette or scrambled egg, and flavour with chopped chives.
  • Dress a plate of freshly cooked warm beans with a few shakes of balsamic vinegar and a light dusting of brown sugar.
  • This is one of my favourite French bean recipes: heat 2 tbsp. olive oil with a finely chopped garlic clove for 1 minute over a low heat. Add a chopped ripe tomato and a few chopped, pitted dry-pack black olives. Season with a pinch of salt and a pinch of sugar. Heat through gently for 2-3 minutes. Pour over freshly cooked warm French beans, and serve sprinkled with freshly ground black pepper and a few tarragon leaves. Bon appétit!
    Plate_of_freshly_cooked_warm_French_beans_with_garlic_and_tomato_ressing
    A favourite warm French bean salad. Image: Kathryn Hawkins

    Freshly_picked_homegrown_French_beans_still-life
    Home-grown French beans. Image: Kathryn Hawkins

Cucumber conundrums and recipe ideas


Jar_of_freshly_picked_homegrown_cucumbers
Freshly picked cucumbers. Image: Kathryn Hawkins

I think it’s safe to say that growing cucumbers is one of my fortes. Every year I raise a bumper crop from seed, without really trying very hard. As with any watery vegetable (or fruit) that doesn’t freeze well, you have to get creative in order to make the most from your harvest when it’s fresh. Over the years, I have accumulated a few recipe ideas which I am happy to share with you and anyone else in a similar “glut” situation.

Homegrown_cucumber_flower_and_fruit Original
Home-grown grow-bag cucumbers in my unheated greenhouse. Images: Kathryn Hawkins

Originally, the cucumber was a wild plant with origins in India. Now it is cultivated and grown the world over, and  few salads are complete without it. If left to their own devices, cucumbers will grow to enormous proportions. Just a couple of weeks ago, I discovered one hiding at the back of a plant, behind a very large leaf; it looked more like a marrow than a cucumber, and I have no idea how the plant was supporting it! In general, the bigger they grow, the less flavour they have. As with all watery produce, cucumbers are best cut and used immediately. For slightly longer storage, wipe them dry and then wrap individually and tightly in cling-film, and this way they will keep in the fridge for 3-4 days without losing texture.

Preparing_a_fresh_cucumber
Cucumber preparation. Image: Kathryn Hawkins

To eat raw, all you need to do is rinse, dry, and then trim away either end, and that’s it, you’re ready to slice, dice or grate. Peeling is unnecessary unless the skin is tough – some varieties have rough, knobbly skins (ridged varieties) which can get tough on larger fruit – you can just whip off the skin with a vegtable peeler. If the seeds are a problem, cut the cucumber in half and scoop out the centre using a teaspoon before slicing.

For cooking, the skin can become bitter. You can temper it by blanching the cucumber in boiling water for a few seconds, or simply peel the cucumber before cooking.  Prepared chunks of cucumber will cook in lightly salted water for 2-3 minutes, or steam in 5 minutes, depending on thickness. Strips or ribbons of cucumber (pared using a vegetable peeler), make a delicious and healthy bed or wrapping when steaming fish.

Because cucumber has such a delicate, mild flavour, it can easily be overpowered by strong flavours. Some of the soft-leaved fresh herbs go very well with the crisp texture and fresh flavour of cucumber. As well as the herbs below, dill and fennel also make tasty choices. The herb salad burnet (below) does have a mild cucumber flavour and is the ideal herb for flavour enhancement.

Selection_of_herbs_that_add_flavour_to_fresh_cucumber
Cucumber-loving herbs: tarragon, salad burnet, chives flowers and stems, parsley, and mint. Image: Kathryn Hawkins

Cucumber recipe suggestions

  • Peel and chop cucumber, then blitz in a blender with chopped green melon or kiwi fruit, yogurt, mint and a little unsweetened apple juice. Pour over ice and enjoy as a cooling smoothie.
  • Add a few slices of cucumber to a glass of iced water or a spritzer for a refreshing taste. A few slices also make a good addition to a gin and tonic!
  • Finely dice peeled cucumber and simmer gently in a little stock and white wine. Stir in cream and chopped tarragon to finish. Makes a great sauce to serve with fish, chicken or over roasted vegetables or pasta.
  • Bake peeled cucumber in thick slices in a baking dish, drizzled with olive oil (or dotted with butter). Season lightly and add some fresh dill or fennel. Cover with foil and bake at 190°C (170°C fan oven, gas mark 5) for 25-30 minutes.
  • Add slices or small chunks to a prawn stir fry for the last minute of cooking.
  • Grate fresh cucumber and mix with a little grated root ginger. Sprinkle with rice vinegar, a little sugar and light soy sauce. A tasty, instant relish to accompany sushi.
  • Replace grated courgette in a cake, bread or muffin recipe with grated cucumber, just reduce the quantity by a quarter as cucumber is much more watery. I have  a cucumber-enriched cake recipe to share in a later post – Lemon-soaked cucumber cake (gluten-free; dairy-free; vegan option).
  • For a tangy salad to accompany smoked or barbecued food, try this recipe for gremolata-style cucumber salad: mix 150g finely chopped cucumber with a little crushed garlic. Stir in 40g chopped pickled cucumber or gherkins, 25g pickled capers, 40g chopped, pitted green olives along with 2 tbsp. each freshly chopped parsley and chives. Mix in a little white balsamic vinegar and serve. Delicious as a sandwich filler too!
    Cucumber_gremolata_salad
    Cucumber gremolata salad served sprinkled with chive flowers and leaves of salad burnet. Images: Kathryn Hawkins

    To make your own cucumber pickle, see my post from last year In a bit of a pickle

New season courgettes + recipe for courgette and thyme fritters (gluten-free, dairy-free, vegan)

Yellow_and_green_round_courgettes
My first vegetable harvest of 2017: home-grown courgettes. Image: Kathryn Hawkins

The mild spring weather and fine, early summer days has brought on my greenhouse vegetables a treat this year. It looks like I’m in for another bumper crop of courgettes. I thought I’d try to grow a new variety, and decided on this round, globe courgette called Tricolour. I only raised 4 plants from seed, so it is completely by chance that I’ve ended up with 2 yellow and 2 dark green vegetable plants. The third colour is pale green, and, I guess, is to be saved for next year.

Providing you give them plenty of water, I think growing courgette plants offers little challenge to the gardener, and for a modicum of effort, you are usually rewarded with plenty of produce. I have mine growing in grow-bags; the roots don’t stretch very deep so it is an ideal way to grow them if space is limited.

Yellow_and_green_courgette_plants
My grow-bag courgettes. Images: Kathryn Hawkins

Here’s an easy recipe for a courgette starter or vegetable accompaniment. Chives or rosemary work well in the batter instead of thyme, if you prefer. If you’re not dairy-free, add a couple of tablespoons of freshly grated Parmesan cheese to the batter for extra flavour. The batter goes with any vegetable that’s suitable for deep-frying such as rings of onion, baby leeks, spring onions, sliced mushrooms, strips of pepper and carrot, sliced aubergine, etc.

Courgette and thyme fritters – serves: 4

Ingredients

  • 400g courgettes
  • 65g self-raising gluten-free flour blend (such as Dove’s Farm)
  • 40g cornflour
  • Salt and freshly ground black pepper
  • 1 teasp freshly chopped thyme leaves + extra for serving
  • 90ml soda water
  • Vegetable oil for deep-frying
  1. Wash and pat dry the courgettes. Trim away the ends and cut into thin slices, approx. ½ cm thick. Arrange in layers in a wide, shallow dish, sprinkling lightly with 25g of the flour as you go. Make sure both sides of each slice have a light coating of flour.
  2. For the batter, mix the rest of the flour with the cornflour in  bowl and season. Stir in the chopped thyme leaves. Using a small whisk, gradually blend in the soda water. Heat the oil for deep-frying to 180°C.
  3. Carefully pour the batter over the courgette slices, lifting them up so that the batter seeps right through to the bottom of the dish – the slices don’t have to be completely covered in batter (this is a very light, crispy batter that cooks better when used sparingly) but make sure there is a little on each slice. Tongs are useful for lifting individual slices.
  4. Cook the slices in the hot oil, in  4 batches, for 4-5 minutes, turning occasionally, until crisp and lightly golden. Drain well and keep warm whilst cooking the remaining slices. Serve as soon after cooking as possible, sprinkled with more fresh thyme and some crushed sea salt flakes.
    Freshly_cooked_courgette_fritters_in_a_thyme_flavoured_batter
    Courgette and thyme fritters. Image: Kathryn Hawkins

    For more recipes using courgettes see my previous posts Home-grown courgettes with chive butter (gluten-free) and Yellow courgette and lemon cake (gluten-free, dairy-free)


Fresh globe beetroot

Fresh_beetroot
Fresh beetroot. Image: Kathryn Hawkins

Apart from the glorious colour of fresh beetroot, if you’ve never tried this root vegetable fresh, it is well worth checking out. The texture is firm, almost meaty, and the flavour of the fresh root is delicately earthy and sweet – sadly both characteristics get lost once it is pickled or soaked in vinegar.

The dense texture does mean it requires a lot of cooking, but you can enjoy small, raw slivers in salads – it bleeds into other ingredients so is best added at the last-minute. Small beet leaves are also good as salad leaves, and have a slight flavour of the vegetable itself; the larger, red-veined leaves can be cooked like spinach or chard but sadly they lose much of the red colour once cooked.

Freshly_picked_baby_beetroot_leaves
Baby beet leaves. Image: Kathryn Hawkins

Preparing and cooking fresh beetroot

Beetroot juice is very strongly coloured. To prevent staining your hands, you might want to wear thin latex gloves. Slice off the leaves, wash the roots thoroughly, peel thinly, and grate coarsely. Alternatively, slice thinly and then into fine strips for salads, or pare pieces directly into a salad using a vegetable peeler.

For boiling, remove the leaves, wash the whole roots and then place unpeeled in a saucepan. Cover with water, bring to the boil and cook for 1 to 2 hours depending on the size – golf ball sized beetroot are best for boiling and will be ready easily within an hour. If you cut the beetroot before cooking, you will lose much of the colour to the cooking water – although this is fine for making soups or casseroles when you will eat the cooking juices as part of the dish. Drain and refresh in cold water before rubbing away the skin. Serve as a hot vegetable or leave to go cold for other uses.

Beetroot bake well. Choose medium-sized roots and wash as above. Leave unpeeled and wrap individually in foil. Place the parcels on a baking tray and bake in a preheated oven at 200°C(180°C fan oven, 400°G, gas mark 6) for about 1 ¼ hours until the beetroot feels tender when slightly squeezed. Serve straight from the foil, split, and lightly seasoned.

Serving suggestions

  • Beetroot goes well with orange, apple, watercress, rocket, dill, caraway, cumin, horseradish, smoked fish, pickled herring, and goat’s cheese and other soft dairy cheeses or creams.
  • Toss thick slices of cooked beetroot in seasoned flour and shallow fry in vegetable oil for a few minutes on each side until golden. Drain well and serve with a sweetened balsamic vinegar and wholegrain mustard dressing.
  • You can make an instant beetroot “chutney” by grating or chopping cooked roots and mixing with finely chopped raw red onion, grated carrot, black onion seeds and seasoning. Mix in balsamic vinegar and sugar (or honey) to taste. Keep sealed in a jar in the fridge for 24 hours to allow the flavours to develop. Great with Indian food. Will keep for about a week, sealed in the fridge.
  • Peel and chunk raw beetroot and mix with chopped onion, carrot, garlic, cumin and ground coriander. Place in the bottom of a casserole dish, season and sprinkle with a little sugar. This makes a great base for slow cooking lamb on top – seal with a tight-fitting lid so that everything cooks in its own juices.
  • Shred raw beet leaves and add to a stir fry for the last-minute of cooking.
  • One of my favourite winter salads from yesteryear is Russian salad: a combination of cooked diced beetroot, mixed with cooked diced potatoes and carrot, some cooked peas, chopped fresh cucumber and some chopped pickled gherkins. Tossed in mayonnaise. Often topped with sliced hardboiled egg for more of a main meal. Also good with pickled herring.
  • Replace grated carrot in a cake or loaf recipe with grated cook beetroot. You’ll end up with a pretty pink bake with a deliciously moist texture. Note: sadly I’ve been too busy with work to bake this week, but I do have a great recipe which I’ll be posting once I get back in the kitchen again 🙂

    Single_globe_beetroot
    Globe beetroot. Image: Kathryn Hawkins


Asparagus and sesame sushi rice bars (gluten-free, dairy-free; vegan)

Sushi_rice_bars_topped_with_fresh_asparagus

Asparagus is my favourite vegetable. It has been highly prized since Roman times, and it is peak asparagus season at the moment. I had my first taste of the new season’s crop a couple of weeks ago when I was on holiday in Sussex, and I have consumed quite a lot more since then!

The season here in the UK is brief: just  6 short weeks in late spring. In my mind, asparagus is one of the vegetables that tastes noticeably different when locally grown and freshly picked. The flavour is sweeter, fresher and nuttier than the varieties that are flown in all year round. I think it is well worth the wait each year and I am taking every opportunity to savour and enjoy it whilst these magnificent steams are available.

Freshly_harvested_British_asparagus
New season British asparagus. Image: Kathryn Hawkins
Fresh_asparagus_spears_in_a_glass_of_water
Keeping asparagus fresh. Image: Kathryn Hawkins

As with any vegetable, buy and eat asparagus as soon as possible after picking to enjoy the freshest flavour and juiciest texture. But if you do end up with more than you can eat, trim away the woody ends as you would with fresh flowers and pop the stems in a vase or jug of cold water. Either store in a cool place or put in the fridge. This way, the stems will stay fresh for at least 48 hours. You can freeze it, but I really don’t like the softer texture of frozen asparagus once it is cooked – I think it over-cooks too easily – however it makes the perfect base for soup-making or blending with mayonnaise or very ripe avocado for a dip, so it is worth freezing a few stems for this purpose alone.

Trimming_away_the_woody_end_from_fresh_asparagus_stems
Preparing fresh asparagus for cooking and keeping. Image: Kathryn Hawkins

I like my asparagus best when it has been griddled or roasted. Thin spears cook very quickly in a hot, lightly oiled frying pan or on a griddle pan brushed with oil. Larger stems are good for roasting –  brush with oil and spread out on a lined baking tray, and bake in a moderately hot oven for 10-15 minutes. If you prefer to use water, try to cook the stems so that the tips stay out of the water. You can buy tall upright asparagus steamers if you’re a big asparagus fan – these enable you to stand the stems upright in bunches – only the stalks are in the water whilst the tops cook in the steam. Otherwise, steaming, covered, over a saucepan of water is the next best way – keep the cooking water to add to your recipe as stock if you’re making a soup or risotto.

Here’s my recipe for sushi rice bars topped with asparagus tips – a delicious light snack for a spring lunch. If you need to trim away lots of stalk to make this recipe, keep the leftovers, and either use them to make stock or soup, or slice them into thin rounds and add to a stir fry.

Sushi_rice_bars_topped_with_fresh_asparagus
Homemade asparagus and sesame sushi bars. Image: Kathryn Hawkins

Makes: 12

  • 150g sushi rice
  • 25g piece root ginger
  • 1 large clove garlic
  • 1 tsp vegetable oil
  • 2 tbsp toasted sesame seeds
  • 3 tbsp freshly chopped chives
  • 4 tsp mirin, sweet sherry or white balsamic vinegar (Agredolce)
  • ¼ tsp salt
  • 12 fine asparagus spears
  • Fresh chives and flowers to garnish

1. Double line a shallow 18cm square cake tin with cling film so that the film overhangs the sides. Rinse the rice in cold running water. Put in a small saucepan and pour over 200ml cold water. Bring to the boil, reduce to a simmer, cover and cook for 10 minutes undisturbed. Turn off the heat and leave to stand with the lid on for 20 minutes. It is worth checking the manufacturer’s cooking instructions for the particular rice you are using as timings and water quantities may vary between brands.

2. Meanwhile, peel the ginger and garlic and chop finely. Heat the vegetable oil in a small frying pan and gently fry for 2-3 minutes until softened but not browned. Leave aside.

3. When the rice is ready, scrape it into a heat-proof bowl and fork through to break up the grains. Add the ginger and garlic along with the seeds, chives, wine, sherry or vinegar and salt. Mix well.

4. Pile into the prepared tin, press down with the back of a spoon and leave to cool completely, then fold over the cling film and chill for 2 hours until firm.

Ingredients_and_preparation_of_seasoned_sticky_rice
Making seasoned sushi rice. Images: Kathryn Hawkins

5. Bring a saucepan of water to the boil. Trim the asparagus to approx. 8cm lengths and place in a steaming compartment over the water. Cover and cook for 2-3 minutes until just tender – insert the tip of a sharp knife into the end of the stalk is a good way to check it is perfectly tender. Cool under cold running water, then drain, place on damp kitchen paper and chill until required.

6. To serve, remove the rice cake from the tin and remove the cling film. Place on a board, cut into 12 bars and arrange asparagus on top of each bar. If liked, wrap a length of chive stem around each piece and arrange on a serving platter. Sprinkle with chive flowers, and serve with wasabi paste if liked.

Spears_of_fresh_British_asparagus
New season fresh, British asparagus spears. Image: Kathryn Hawkins


Marsh samphire

Stems_of_fres_marsh_samphire
Fresh marsh samphire Image: Kathryn Hawkins

Also known as glasswort, marsh samphire is a vegetable that I associate with this time of year. I’m not entirely sure why, but the texture is succulent and crisp, and goes well with the lighter, brighter dishes I yearn for at this time of year. The vibrant green colour makes it look fresh and very appealing.  Samphire is definitely one of the ingredients and flavours that marries perfectly with this vibrant season.

Samphire_cooked_in_a_griddle_pan
Griddled samphire. Image: Kathryn Hawkins

The thin, green succulent stems of marsh samphire remind me of fine, young asparagus stalks and can be eaten and cooked in the same way. However, the flavour is completely different; you won’t need to turn to the salt-cellar  or any other salted ingredients when you come to cooking and serving samphire, it is naturally salty and is, therefore, best served in small portions. I like to griddle a handful of stems in a very hot pan, brushed with a little oil. They wilt in a couple of minutes and take on a slightly charred flavour. You can also toss stems in oil, spread them out on a baking tray and blast them in a hot oven for a few minutes to get a similar effect.

Two_stems_of_marsh_samphire
Fine, young samphire stems. Image: Kathryn Hawkins

Young, fine, very fresh stems can be eaten raw. Just give them a thorough rinse in cold running water, chop them into small bits and toss them into your salad greens for a salty crunch. Larger stems are best briefly cooked in boiling water or lightly steamed, and can be a stir-fried.

Salmon_samphire_and_rice_noodles
Smoked Salmon and samphire noodles Image: Kathryn Hawkins

Because of the “sea-salt” flavour, samphire is perfect served with fish, but it is also good with roast lamb. I like to add some sweetness in a dressing, or add a splash of vinegar or lemon juice to temper the taste of the salt. Samphire is a vegetable that is traditionally pickled (although I haven’t tried this); I can imagine a sweet, spicy pickling liquid would work well and make a great accompaniment to go with smoked mackerel or ham. My current favourite combination of ingredients with griddled samphire is freshly cooked plain rice noodles, flakes of hot smoked salmon and a dressing of Thai sweet chilli sauce – so simple and yet utterly delicious!

Garden Sorrel (Rumex acetosa)

New_season_spring_garden_sorrel
New season garden sorrel. Image: Kathryn Hawkins

I have more books on the subject of herbs and spices than on any other. I love growing my own herbs and experimenting with new flavours. It’s lovely to see that my herb garden is coming back to life again, now that the days are getting lighter and the sun is slowly warming up.

One of the best culinary friends from the herb garden is garden sorrel. A hardy perennial – I’ve noticed that even in the depths of a Scottish winter, there are always a few leaves poking their way through the earth – it is easy to grow and is very versatile. Related to spinach and the wild, leafy plant, Dock, garden sorrel is a real favourite with cooks and chefs alike.

A_small_garden_trug_of_fresh_sorrel_leaves
Freshly picked sorrel leaves. Image: Kathryn Hawkins

Spring is the time to start picking a few leaves here and there – the more you pick, the more the plant will regenerate, and you’ll have a succession of young leaves right through until autumn. At this time of year, the new leaves are juicy and fresh tasting. Larger leaves have more of the classic, astringent lemony flavour associated with the herb. As the season progresses, tougher, red flowering stems will form with clusters of tiny red flowers at the end, and a few of the leaves will become very large. Whilst the flowering stem should be cut down,  the large leaves, which are too coarse to eat, make perfect wrappings for tenderising meat and flavouring fish during cooking.

Very_young_tender_leaves_ and_more_mature_sorrel_leaves
Baby sorrel and larger sorrel leaves. Image: Kathryn Hawkins

If you fancy growing your own, buy some seed now and get sowing. You may also find potted clumps at the garden centre. Garden sorrel likes rich, moist soil, and the sun or semi-shade. And that’s about it; it will look after itself. If you want a supply for winter, either cover the clump with a cloche, or split the roots in autumn and pot some up – I usually keep a pot in my unheated greenhouse over the winter months to tide me over until the next spring.

Growing_garden_sorrel
New season sorrel in my herb garden. Image: Kathryn Hawkins

Garden sorrel serving suggestions and tips

  • Sorrel is best picked as required. Treat like spinach if you do need to store it: place in a plastic bag and keep in the fridge for a couple of days maximum. It can be frozen successfully, but loses its flavour if dried.
  • Because of the acid content, sorrel is affected by cast iron cookware and will discolour. Use a stainless steel knife blade for cutting, and only shred just before using to avoid discolouration and flavour loss.

    Chopping_fresh_sorrel_with_a_stainless_steel_blade
    Garden sorrel preparation. Image: Kathryn Hawkins
  • Young garden sorrel leaves are delicious mixed with other green salad leaves and soft-leaved herbs; they add a tangy lemony flavour to the plate, and reduce the need for vinegar or lemon juice in a salad dressing.
  • Used by the Greeks and Romans as an aid to digestion, garden sorrel is the perfect accompaniment to rich foods such as soft cheese (especially goat’s and sheep’s cheeses), oily fish, lamb and pork.

    Pork_and_pancetta_patties_flavoured_with_garden_sorrel
    Patties of minced pork and pancetta mixed with salt, pepper, garlic, freshly chopped chives and shredded garden sorrel. Image: Kathryn Hawkins
  • Garden sorrel is commonly used in egg dishes. Try adding to pancake batter, or a quiche filling; stir into scrambled eggs, or add as an ingredient to an omelette fines herbes. Pep up an egg mayonnaise sandwich filling by adding a few fresh leaves – much zingier than mustard and cress!
  • Add some chopped leaves to soft butter or margarine along with some black pepper and a little salt. Melt over hot grilled fish, barbecued chicken or steaks. See my recipe for chive butter if you fancy making some  Homegrown courgettes with chive butter (gluten-free)
  • As well as all the culinary uses, sorrel leaves are rich in potassium and the vitamins A, B1 and C.

    Bright_green_lance_shaped_leaves_of_garden_sorrel
    Broad, arrow-shaped leaf of garden sorrel. Image: Kathryn Hawkins