My favourite mash (gluten-free, dairy-free, vegan

First_snowfall_of_2017_in_Perthshire_garden
The first snow of 2017. Image: Kathryn Hawkins

It’s been a cold week all over the UK; the first snow of the year settled in the garden a few days ago, transforming it into a “Winter Wonderland” overnight. As soon as a chill sets in, my thoughts immediately turn to comfort food.

I am a huge potato fan and this week seemed like the perfect excuse to make my favourite mash potato recipe. Perfectly cooked potatoes, a generous handful of chopped parley, lashings of good quality olive oil, a good pinch of sea salt and some fresh garlic. It’s a delicious that mash seems to go with everything.

Ingredients_and_essential_equipment_for_making_the_perfect_mashed_potato
Ingredients and equipment for olive oil and garlic mash. Images: Kathryn Hawkins

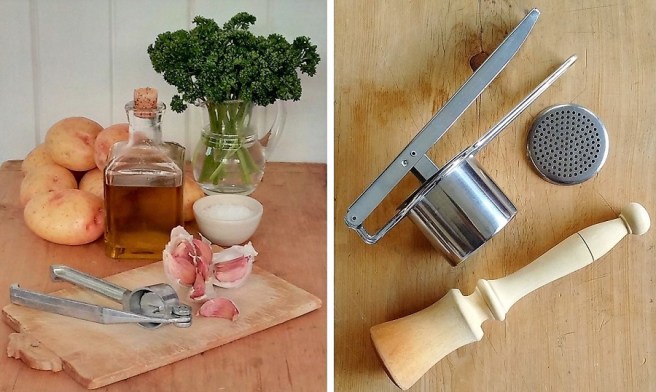
For the best result, you need to choose a potato that mashes well. My preference is King Edward, it’s got good flavour and a dry, floury texture when cooked. Cook the prepared potatoes until they are completely tender. Drain well and then give them a good thump with a potato masher. If you don’t mind a few lumps, leave it at that, but if I’ve got the time, I like to press the mash through a ricer for the smoothest, silkiest texture possible. It’s up to you how much garlic, parsley and seasoning you add, but do use a really tasty olive oil. A good quality extra virgin (cold pressed is even better) oil will not only add flavour and colour, but will add to the indulgence of the finished mash. Only warm the oil, never heat it beyond warm, otherwise the health and flavour benefits will be lost.

Mashed_potato_with_parsley_olive_oil_and_garlic
Olive oil, parsley and garlic mash. Image: Kathryn Hawkins

Serves: 4

  • 900g main crop potatoes, such as King Edward or Maris Piper
  • Sea salt
  • 4 plump garlic cloves, peeled and crushed
  • 1 tbsp sunflower oil
  • Large handful of fresh curly parsley, washed, thick stalks removed, and finely chopped (I like to add about 25g chopped parsley to this quantity of potato)
  • 6 tbsp good quality, extra virgin cold pressed olive oil + extra for serving, if liked
  1. Thinly peel the potatoes. Cut into chunky pieces and rinse in cold water. Place in a large saucepan and cover with cold water. Add a pinch of salt, bring to the boil and cook until completely tender (12-15 minutes, depending on how thick you’ve cut them up). Drain well through a strainer, and leave to air dry for 5 minutes.
  2. Meanwhile, heat the sunflower oil in a small saucepan and very gently fry the garlic for 1-2 minutes until tender but not browned. Remove from the heat.
  3. Return the potatoes to the saucepan and mash well. If you’re not using a ricer, stir in the parsley and cover. If you are ricing the mash, press the potato into a warm bowl, stir in the parsley, and cover the whole bowl with foil.
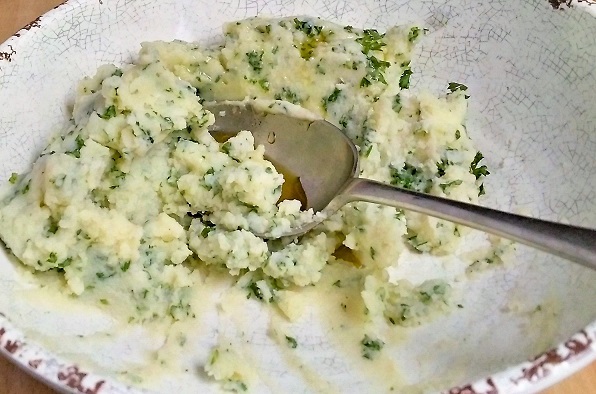
  4. Stir the olive oil into the cooked garlic and place the saucepan over a very low heat for 2-3 minutes to gently warm the oil.
    Chopped_parsley_garlic_and_olive_oil_being_added_to_mashed_potato
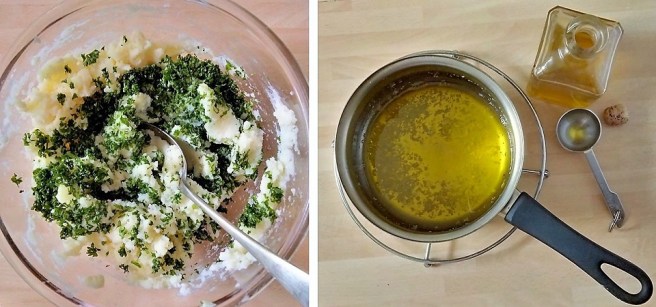
    Adding the flavourings to mashed potato. Images: Kathryn Hawkins


  5. Stir the warm oil into the parsley mash. Taste and season. Pile into a warm serving dish. Drizzle with more olive oil if liked, and serve immediately. Mmmm…mmmmm.

    Single_serving_of_mashed_potato_with_parsley,_olive_oil_and_garlic
    The last spoonful of my favourite mash. Image: Kathryn Hawkins


Brussels sprouts

Homegrown_Brussels_sprouts_and_sprout_tops
Home-grown Brussels sprouts. Images: Kathryn Hawkins

Love them or loathe them, you can’t get away from Brussels sprouts at this time of year. Believed to be a descendent of the wild cabbage, we have been eating these tasty and nutritious winter greens since the 18th century.

I planted several seedlings (variety Brodie F1) back in early June, but sadly most succumbed to pests and the plants have been dwindling as the months have gone by. However, I managed to keep a few plants unscathed, ready for the Christmas table and a couple more meals on top of that. Some of the stems have lovely tops which have developed into small cabbages with pretty pink veining, so I have them to cook as well.

Brussels_sprouts_on_the_stem
A fine stem of “fairy cabbages”. Image: Kathryn Hawkins

I was told a story a few years ago by a lady who had been struggling to get her little daughter to try a Brussels sprout. There was something about the humble sprout that her daughter wouldn’t entertain even though she would eat every other green vegetable without hesitation. Her mother, in exasperation, said that they were simply tiny cabbages grown by the fairies, and from then on, her daughter ate them with gusto!

Freshly_picked_homegrown_Brussels_sprouts_and_tops
Still life of Brussels sprout stems and tops. Images: Kathryn Hawkins

Pick sprouts when they are small and firm as larger sprouts have less flavour. Smaller sprouts will be crisper in texture and have a sweeter, nuttier taste. Don’t forget the tops – these can be cooked just liked cabbage. Ideally pick sprouts just before cooking, trim away any loose leaves and leave whole if small, or halve if bigger. Rinse in cold water, and then cook in a little lightly salted, boiling, water for a few minutes until just tender – they should have some texture when cooked, and not be slime-green coloured, full of water and soggy like the ones I remember from my school dinners – yuk!

Ready_to_cook_fresh_Brussels_sprouts
Picked sprouts ready for cooking. Image: Kathryn Hawkins

Here are a few of my favourite ways to serve fresh Brussels sprouts:

  • Brussels sprouts go well with blue cheese, goat’s cheese, chopped nuts and seeds, crisp bacon, chorizo, chilli, sage, thyme, garlic, onion, orange, wholegrain mustard, Worcestershire sauce, soy sauce and balsamic vinegar.
  • Serve small cooked sprouts on a bed of crushed, seasoned peas in Yorkshire puddings and flood with gravy or a tasty cheese sauce.
  • Shred or roughly chop sprouts and stir fry with shredded leeks and very finely sliced white cabbage. Finish with a few dashes of Worcestershire sauce and some melted redcurrant jelly.
  • Stir fry chopped sprouts with finely chopped garlic and add sultanas, a pinch of chilli, cinnamon and cumin, and a drizzle of honey or maple syrup.
  • Blanch 300g prepared larger sprouts in boiling water for 1 minute and cool quickly in cold running water. Drain well, cut in half or quarter, and mix with wedges of eating apple, fresh sage leaves and finely chopped onion. Toss in 1 tbsp each of olive oil, balsamic vinegar and honey or maple syrup. Spread across a lined baking tray, season well and cover with foil. Bake at 200°C (180°C fan oven, gas mark 6) for 15 minutes, then remove the foil and cook for a further 10 minutes until tender.

    Tray_of_sprouts_apple_sage_and_onion
    Ready to bake, sprouts with apple, sage and onion. Image: Kathryn Hawkins

Pesto pea pastries (gluten-free)

Gluten-free_pesto_pea_pastries
Freshly baked pesto pea pastries. Image: Kathryn Hawkins

Peas are one of my favourite vegetables. When they’re not in season, I always have a bag in the freezer; they are my “go to” emergency vegetable.

The filling for these pastries is very versatile. You can use it as a dip, spread it thickly on warm toasted bread or, it makes a lovely fresh filling for wraps or sandwiches with some crisp green leaves and cooked chicken. Make your own pesto if you have time, it really does make all the difference.

Makes: 9

  • Gluten-free plain flour, for dusting
  • 400g block ready-made gluten-free puff pastry (such as Silly Yak)
  • 225g cooked peas, mashed with a fork or potato masher
  • 50g fresh pesto sauce (recipe below)
  • 1 medium egg
  • 100ml whole milk or soya milk
  • Salt and freshly ground black pepper
  1. Preheat the oven to 200°C (180°C fan oven, gas mark 6). Line a large baking tray with baking parchment.
  2. Lightly dust the work surface with flour and roll out the pastry to make 30cm square. Cut out 9 x 10cm rounds using a pastry cutter.
  3. Mix the peas and pesto sauce together and pile a spoonful in the centre of each round. Pinch the edges of the pastry round the pea filling to make a tartlet shape. Transfer to the baking tray.
  4. Mix the egg and milk together and season well. Carefully pour a little over the top of the pea mixture. Bake in the oven for about 25 minutes until lightly golden. Best served warm.
How_to_make_pesto_pea_pastries
Assembly of pesto pea pastries. Images: Kathryn Hawkins

To make your own pesto sauce: in a blender or food processor, blitz together 125g pine nuts (kernels), 2 peeled garlic cloves, 60g freshly grated Parmesan cheese , 15g fresh basil leaves, pinch of salt and 90ml good quality olive oil. Unused pesto sauce will keep in the fridge, in a sealed container for up to 1 week. Homemade pesto sauce is also suitable for freezing.

Pesto_pea_pastries_serving_suggestion
Gluten-free pesto pea pastries. Image: Kathryn Hawkins

Vegetable confetti (gluten-free, dairy-free, vegan)

Finely_chopped_roasted_vegetable
Tray of roasted vegetable “confetti”. Image by Kathryn Hawkins

One of the culinary terms that has stuck with me since my cookery classes at school, is the word”confetti”. Whether it is actually a technical term doesn’t really matter; it is one of those quirky, self-explanatory meanings that has lived with me for years. It aptly describes a combination of finely chopped fruit or vegetables, and I think it is very appropriate.

A few weeks ago, I wrote a Summer cookery feature for one of the magazines I freelance for; I included a “confetti” salad of finely chopped vegetables. It looked bright and tasted great; it did take a bit of time chopping everything up small, it looked spectacular.

Salad_of_freshly_chopped_vegetables
Summery salad of “confetti” vegetables. Image by Kathryn Hawkins

I’m less inclined to eat a raw vegetable salad during the colder months of the year, so I have taken the same combination of vegetables and started baking them in the oven. Serve the vegetables as a side dish on their own or mix them into freshly cooked pasta. I like them stirred into freshly cooked basmati rice and served sprinkled with roasted cashew nuts. Here’s the (very easy) recipe:

Makes 8 servings

  • 1 each red, yellow and green (capsicum) peppers
  • 150g radish
  • 225g carrots
  • 150g red cabbage
  • 1 red onion
  • 6 tbsp olive oil
  • 4 garlic cloves, peeled and finely chopped
  • Salt and freshly ground black pepper
  1. Preheat the oven to 180°C (160°C fan oven, gas mark 6). Line a large baking tray with baking parchment. Halve, deseed and finely chop the peppers and put in a large bowl.
  2. Trim and chop the radish. Peel and finely chop the carrots. Shred and chop the cabbage. Mix them all into the peppers.
  3. Peel and finely chop the onion, then toss into the other vegetables along with the olive oil and garlic.
  4. Spread the vegetables evenly over the lined baking tray and season well. Cover with foil and bake for about 45 minutes, turning occasionally, until tender. Drain well and serve.
Rice_with_roast_chopped_vegetables_ and_cashew_nuts
Roast vegetable rice with cashews. Image by Kathryn Hawkins

Homegrown aubergine (eggplant)

Fresh_aubergine_(eggplant)_fruit
Freshly picked aubergines (eggplant). Image by Kathryn Hawkins

I have been working away from home for a few days so that means no cooking or enjoying homegrown goodies from the garden. Whilst I was happy not to cook for a while, I did miss my garden. No matter, what a fabulous treat awaited me when I got back: 3 ripe aubergine.

I only planted one wee seedling back in June, so these 3 fruits are a somewhat mammouth production for one plant. And, even better, there are a couple more fruits to come.

Growing aubergine (eggplant) fruit
Homegrown aubergine (eggplant) fruit.

The plant itself is a beauty with glossy black stems and bright green, soft, downy leaves. The delightful purple flowers of “scrunched up tissue paper” petals, appeared back in August, followed by the first tiny, fairy-sized fruit a couple of weeks later. The plant has thrived unprotected in my unheated greenhouse all summer.

Fruit_forming_in_aubergine_(eggplant)_flower
Aubergine (eggplant) flower. Image by Kathryn Hawkins

Aubergine is one of my favourite vegetables. I love the melting texture of the flesh once it is cooked, and the mild, nutty flavour. I don’t do anything special, no pre-salting or soaking, just trim, slice and griddle. Most usually I chop them up with onions, peppers and courgettes, scatter them with oil, fresh herbs and salt and pepper, and then roast them to serve hot as an accompaniment to serve with meat or fish, or leave them to cool and serve cold with fresh tomatoes and balsamic vinegar. Mmmm……

Assortment_of_ vegetables_and_herbs_freshly_roasted
Tray baked vegetables. Image by Kathryn Hawkins

End of July harvest

Homegrown_end_of_July_fruit_and_vegetables
Home-grown rhubarb, tomatoes, runner beans, cucumber, raspberries, Morello cherries, yellow courgettes and red gooseberries, all harvested in the past fortnight.

Time for a recap on what’s been happening in my fruit and veg garden. It’s been a mixed bag of weather this month, although it doesn’t seem to have affected anything I’ve been growing for the kitchen. In fact, even though the sun hasn’t been shining as often as I’d have liked, I have never had tomatoes ripen so early in the year – it’s usually September before I get my first taste!

Home-grown tomatoes, above all else, are the best produce to grow for flavour and sweetness, and remain unrivalled by any tomatoes you can buy. I grow them in my unheated greenhouse, planted in grow-bags. I never put the picked fruit in the fridge, I store them in a cool part of the kitchen and eat them as soon as possible after picking. Served simply with some fresh pot basil, a little salt and pepper, and drizzle of balsamic vinegar, this is one of my greatest foodie pleasures.

Homegrown_Gardener's_Delight_tomatoes_and_fresh_basil
My first harvest of Gardener’s Delight tomatoes with fresh pot basil leaves. Image copyright: Kathryn Hawkins

I have been picking runner beans for a couple of weeks now and, with lots of flowers still blooming, I hope to be enjoying them for a few weeks longer. I don’t usually do much with them, other than chop them up, cook them lightly, and enjoy them as a vegetable in their own right. Occasionally, I make a frittata with any leftover cooked veg and combine runner beans with cooked potato, onion – sometimes a little bacon if I have any – some seasoning and chopped fresh thyme. Delicious served warm or cold with salad.

Leftover_cooked_vegetable_frittata
Runner bean and potato frittata (gluten free). Image copyright: Kathryn Hawkins

Most of the fruit I grow gets made into jams and jellies, or I freeze it for cooking later in the year. The cherries were made into a compote – I didn’t have enough for jam this year. Rhubarb is cooked in muffins, stewed as a simple dessert, or cooked as pie filling. I have just made rhubarb and custard ice lollies for the first time, so it will be interesting to see how they turn out.

The yellow courgette plants are growing like triffids in the greenhouse. Thank goodness I only planted 2! They are both producing heavily, so it looks like I will have to get creative with my courgette cookery. I prefer the yellow variety as I find the flesh firmer and there is slightly more of an earthy flavour to them. I also love the colour. I have been chopping them and simply frying them in butter with smoked bacon and black pepper, and then stirring in a little bit of maple syrup before serving. Very tasty with just about anything.

Yellow_courgette_with_bacon_and_maple_syrup
Pan-cooked yellow courgette with bacon and maple syrup (gluten and dairy free). Image copyright: Kathryn Hawkins


Home-grown courgettes with chive butter (gluten-free)

homegrown_Tristar_courgette_with_homemade_chive_butter
Home-grown courgette with chive butter. Images copyright: Kathryn Hawkins

One of the vegetables I have great success in raising is the courgette. This year I have a couple of varieties on the go: Tristar and Jemmer. My single Tristar plant has produced 6 courgettes already and there’s a few more to come. It is in a grow-bag on the floor of my greenhouse. Jemmer is a yellow variety; the first courgettes are just forming.

To enjoy the delicate, slightly earthy, flavour of my “home-grown” courgettes, I cook them very simply: either sliced and gently fried in sunflower oil, or as bigger chunks, lightly seasoned and roasted in the oven. The slices only take a few minutes on each side, just cooked until lightly golden round the edge.

To liven things up a wee bit, I make a herb or spice butter which I allow to melt over the cooked vegetable just before serving. At the moment, the chive bush in the garden is a combination of soft, juicy stems and pretty flower balls, and is the obvious choice for flavoured butter these past couple of weeks.

I make up a small batch at a time which will keep, well wrapped, in the fridge for 2-3 weeks or can be frozen for up to 6 months. Use half a pack of lightly salted, soft butter with 2-3 tablespoons of freshly chopped chives – snip the stalks into small pieces using kitchen scissors to avoid bruising the stems.

Beat the butter well to start with and then mix in the chives. Pile onto a small square of baking parchment and chill until firm enough to roll.

Pop the parchment square on a small sheet of cling film, and wrap the paper round the butter to make  rough tube. Continue rolling until you have made a cylinder of butter, to the thickness you prefer. Wrap tightly in the cling film and chill until required.

homegrown_chives_in_flower
Fresh chives in flower. Image copyright: Kathryn Hawkins

Chive butter is lovely melted over grilled salmon, pan-fried chicken or tossed into freshly cooked seafood and pasta. Don’t forget the flowers: gently pull the flower heads apart and scatter the delicate lilac star-shaped petals over salads, pasta or your finished dish for a subtle oniony flavour.