Chocolate, rosemary and orange muffins (gluten-free, dairy-free, vegan)

Gluten-free_vegan_chocolate_rosemary_and_orange_muffins
Chocolate, rosemary and orange muffins. Image: Kathryn Hawkins

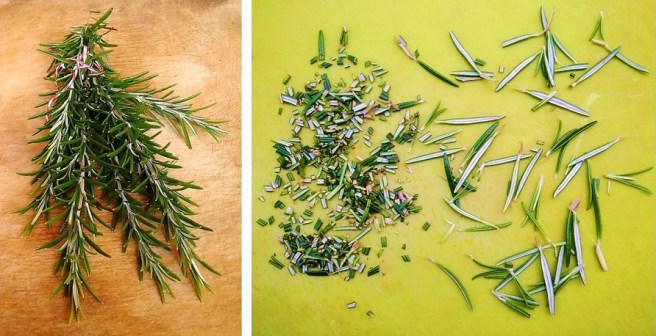
On the shortest day of the year, here’s a little something baked to brighten up the barely light hours. I picked rather too much rosemary the other day, and spent a few days pondering on how best to use it up. It doesn’t freeze very well and I’m not a fan of the dried stuff. After admiring the stems as a herbal arrangement in my kitchen for a while, I decided to do some flavour experimentation, and these muffins are the result.

I wasn’t really intending them to be so festive looking, but the sprigs reminded me of tiny pine trees and then my mind started going into creative mode. I hope you enjoy them. The flavour is really rich and perfect for the time of year. You only need to use the leaves for this recipe – the stems are too tough – and try to chop the leaves as small as possible for the best flavour and better eating.

Fresh_rosemary_sprigs_and_leaves
Fresh rosemary. Images: Kathryn Hawkins

Makes: 10

  • 150ml sunflower oil
  • 150g dark brown sugar
  • 150g silken tofu
  • 45g cocoa powder
  • 2 level tsp gluten-free baking powder (such as Dr Oetker)
  • 1 level tbsp ground arrowroot (I often add this to help bind gluten-free cake mixtures together)
  • 100g ground almonds
  • 75g polenta
  • Finely grated rind 1 unwaxed orange
  • 2 level tsp finely chopped rosemary leaves
  • Pinch of salt
  • 125g icing sugar + extra to dust
  • Approx. 40ml freshly squeezed orange juice
  • 10 tsp Chia or poppy seeds
  • 10 small sprigs of fresh rosemary
  1. Preheat the oven to 180°C (160°C fan oven, gas mark 4). Line a muffin tin with 10 paper cases. Put the oil, sugar and tofu in a bowl and whisk together with an electric mixer until well blended and thick.
  2. Sieve 25g cocoa, baking powder and the arrowroot on top. Add the almonds, polenta, orange rind, chopped rosemary and salt. Mix all the ingredients together until thoroughly combined.
  3. Divide the mixture equally between the cases. Smooth the tops and bake for about 35 minutes until just firm to the touch – the cakes may look slightly sunk in the middle. Cool in the tins for 5 minutes then transfer to a wire rack to cool completely.
  4. To decorate, sieve the icing sugar and remaining cocoa powder into a small bowl and mix together with sufficient orange juice to make and smooth, spreadable icing. Spoon sufficient icing on top of each muffin and spread to cover the top completely.
  5. Sprinkle the top of each muffin with 1 tsp seeds. Leave for a few minutes to set before adding the finishing touches.
    Icing_and_topping_muffins_with Chia_seeds
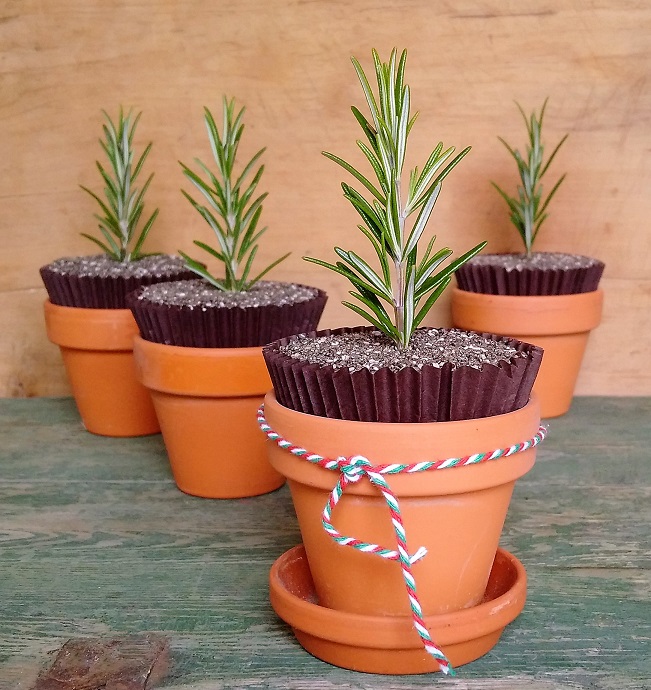
    Decorating the muffins. Image: Kathryn Hawkins

    Just before serving, carefully put the muffins into small flower pots. Push a sprig of rosemary into the top of each and if liked, dust the rosemary lightly with a little icing sugar for a frosted look.

    The muffins freeze well once iced and seeded, and will also keep for 4-5 days in an airtight tin once decorated. Simply decorate with fresh rosemary and icing sugar just before serving.

    Chocolate_and_rosemary_muffin_dusted_with_icing_sugar
    Frosty-looking chocolate, rosemary and orange muffin. Image: Kathryn Hawkins

    Gluten-free_vegan_baking:_chocolate_and_rosemary_muffin
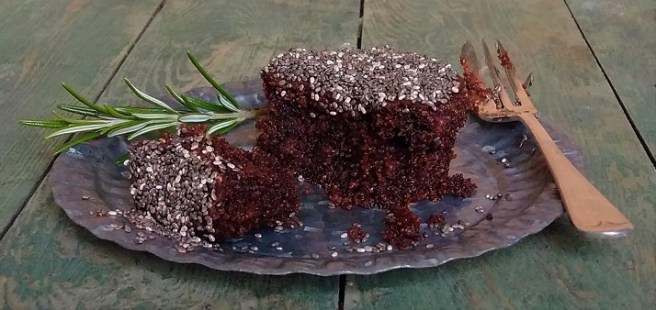
    Gluten-free and vegan, a deliciously dark and tasty chocolate, rosemary and orange muffin. Image: Kathryn Hawkins

Baked coconut apples (gluten-free, dairy-free, vegan)

Cooking_apple_harvest
Late September harvest Lord Derby cooking apples. Image: Kathryn Hawkins

It seems like a long time ago since I picked all these apples from the aged tree in my garden. I still have plenty, stored in a fridge in the back kitchen, and every now and then I bake something suitably fruity. My apple store makes the perfect “turn-to” choice when the fruit bowl is running low, and cooked apple is so very comforting when it’s cold outside.

This variety of cooking apple, Lord Derby, is not particularly tart or exceptionally flavoursome but it retains texture when cooked which makes it the perfect choice for baking. I have often eaten the smaller ones like a crisp eating apple and they taste rather like a Granny Smith.

My recipe this week is a very simple dessert which tastes as good warm as it does at room temperature. I often bake a batch to have for breakfast accompanied with coconut milk yogurt. Delish 🙂 Add ground cinnamon or cardamom for a more seasonal flavour. If you don’t like or can’t eat coconut, vegetable margarine (or butter) is fine to use, and replace the coconut flakes with your favourite nuts or seeds, or use dried cranberries for a fruitier alternative.

Makes 6 – 8 servings

  • Juice of 1 lemon
  • 750g cooking apples
  • 75g coconut oil, melted (if you are not dairy-free, unsalted butter works well)
  • 50g Demerara sugar
  • ½ – 1 tsp ground vanilla pod (use a clean, old pepper mill/grinder and put chopped up dry vanilla pods inside – it works so well ground over fruit for baking)
  • A handful of raw coconut flakes
  1. Preheat the oven to 180°C (160°C fan oven, gas mark 4). Line a large shallow baking dish with baking parchment. Pour the lemon juice into a mixing bowl and half fill with cold water.
  2. Peel and core the apples. Cut into thick wedges. Put the prepared apple wedges in the lemony water and mix well – this will help keep the apples from discolouring too much. Drain the apples and blot dry with absorbent kitchen paper.
  3. Arrange the apple wedges on the baking tray and brush all over with the coconut oil. Sprinkle with the sugar and vanilla.
  4. Bake for 20 minutes, turning halfway through. Sprinkle with coconut flakes and continue to bake for a further 20 minutes or until tender and lightly golden. Best served warm with the cooking juices spooned over.
Coconut_baked_apples_step_by_step
Steps to making baked coconut apples. Images: Kathryn Hawkins
Baked_apple_wedges_with_coconut_and_vanilla
Freshly baked coconut apple wedges with vanilla. Image: Kathryn Hawkins


Festive Floretines (gluten-free, dairy-free, vegan)

Edible_gift:_gluten-free_and_vegan_Florentines
Festive Florentines. Image: Kathryn Hawkins

I’m spoilt for choice at this time of year as to what sweet treats and edible goodies to make, but Florentines have to be up there in my Top 10 of all time favourites. These thin, crisp, Italian, chocolate-spread morsels are jammed packed with fruit and nuts, and they are just as delicious served with a spoonful of your favourite ice cream or sorbet, as they are with a cup of coffee.

I have chosen to use a combination of candied green fruits, seeds and nuts, but you can use any dried or candied fruit, and any unsalted, roasted nuts and seeds – in fact these biscuits are one of the best ways to use up any bits and pieces of dried fruit, nuts and seeds you have leftover. They will also work with all fruit or all nuts and seeds, so you can make up your own combinations to suit your personal preference.

Traditionally, Florentine biscuits are spread with melted dark chocolate on the back, but they are good left as they are. Cover the backs with 90% extra dark chocolate for a less sweet finish, and, if you can bring yourself to give them away, they make a lovely gift.

Main_ingredients_for_Florentine_cookies
Angelica, green-coloured cherries, pistachio nuts and pumpkin seeds. Image: Kathryn Hawkins

Makes: 20

  • 75g coconut oil or vegan margarine
  • 75g golden syrup
  • 50g gluten-free plain flour blend (such as Dove’s Farm)
  • 60g pumpkin seeds
  • 60g unsalted shelled pistachio nuts, lightly crushed
  • 100g green glacé cherries, roughly chopped
  • 25g angelica, finely chopped
  • 1 tsp good quality natural almond or vanilla extract (such as Dr Oetker)
  • 200g milk free, vegan white “chocolate”
  1. Preheat the oven to 180°C (160°C fan oven, gas mark 4). Line 2 large baking trays with baking parchment. Melt the oil or margarine with the syrup in a saucepan. Remove from the heat and stir in the remaining ingredients except the white “chocolate”.
  2. Drop 20 heaped teaspoonfuls, spaced well apart on to the prepared trays, and flatten each mound slightly. Bake for 10-12 minutes until flattened and lightly golden. Leave to cool for 10 minutes on the trays, then transfer to a wire rack to cool completely.Preparation_of_mixture_for_baking_Florentines
  3. To cover the biscuits with chocolate, put just over half the amount of chocolate in a heatproof bowl and melt over a saucepan of barely simmering water. Line a large board with baking parchment.
  4. Working on one biscuit at a time, carefully dip and roll the edge of the biscuit all the way round in chocolate and place on the lined board. Leave to set.

    Covering_gluten-free_Florentines_with_vegan_white_"chocolate"
    Covering the sides and backs of Florentines in melted white “chocolate”. Images: Kathryn Hawkins
  5. Once all the biscuits are dipped and set, melt the remaining chocolate as above. Turn the biscuits over and spread a little chocolate thinly over the backs. Leave to set. Note: If you can leave them alone, these biscuits will store well in an airtight container for up to 1 week.
Gluten-free,_vegan_Florentine_cookie
Vegan, gluten-free, chocolate-dipped Florentine biscuit. Image: Kathryn Hawkins


Cranberries & Cranberry Jam recipe (gluten-free, dairy-free, vegan)

Cranberry_plant_and_berries
Cranberry plant with fruit. Plant images: Stuart MacGregor. Berry image: Kathryn Hawkins

In my humble opinion, there is no fruit nor vegetable that looks more festive than the cranberry. The fresh berries have just started arriving on the greengrocer’s shelves these past few days. The season for fresh cranberries in the UK is quite short, so I’m stocking up my freezer for a year round supply.

The cranberry plant is low growing and creeping in habit, and likes damp, acidic soil; it is a member of the heather family. A few years ago, I grew my own plant in a deep pot. Once it was established, it made a lovely trailing plant in a hanging basket for a while, until I forgot to water it (!) and sadly, it met a very sorry, shrivelled, end. I hope to try again this spring if I can track down a suitable mature plant.

The waxy-looking, scarlet berries are rich in Vitamin C and a staple of the Thanksgiving and Christmas menu. I’ve just made a batch of jam to serve with the Christmas roast; very easy to make and much nicer than anything you can buy in a jar. Add finely grated orange rind for a zesty flavour, and/or a few spoonfuls of Port at the end of cooking for a richer taste. I put the jam into small jars which then makes it ideal for gifting.

Jars_of_homemade_cranberry_jam
Jars of my freshly made cranberry jam. Image: Kathryn Hawkins

Makes: 5 x 200ml jars

  • 500g fresh cranberries – the recipe will also work fine using frozen berries
  • 175ml water
  • 600g granulated sugar
  1. Put the berries and water into a preserving pan or large saucepan. Put a lid over the pan and begin heating – the berries will start “popping” and may jump a bit as they warm up.
  2. Bring the contents of the saucepan to simmering point and cook gently for about 10 minutes until the berries are soft and pulpy.
  3. Stir in the sugar over a low heat until dissolved, then boil rapidly for 5-8 minutes, stirring occasionally, until thick and the liquid has reduced. Cranberries have lots of pectin so this mixture will set readily without having to test that a setting point has been achieved.
  4. Spoon whilst hot into warm sterilised jars and seal immediately. Once cool, label and cover the jar lids if preferred. Store in a dry, cool, dark cupboard; as with most preserves, cranberry jam will keep for several months.

    Cranberry_sauce_serving_suggestion
    Homemade cranberry jam. Image: Kathryn Hawkins


My garden in December

Winter_sunrise_over_a_Scottish_garden
Early Winter sunrise over a Scottish garden. Image: Kathryn Hawkins

It’s been a busy month of work for me. I haven’t been around at home for more than a few days at a time, so subsequently, I haven’t had any gardening opportunities.

We haven’t had any snow yet in this part of Scotland, but there have been a couple of very heavy frosts which put pay to most of the flowering shrubs in the garden – I took this picture a few days ago when the temperature had dropped well below zero overnight, the ice beautiful patterns are on the inside of the window!

Ice_patterns_on_inside_of_window
Icy window. Image: Kathryn Hawkins

Today, I have been able to get outside for a couple of hours – hoorah! There is lot as of clearing up to do after the frosts: plenty of bedraggled shrubs with drooping leaves which make the garden look very sad and now need cutting back. The weather forecasters are saying that we are due some milder weather this coming week, so I should get some out-of-doors tidying up done.

I was happy to see that there is still some colour, here and there, in the more sheltered parts of the garden. A shrub that grows well in several places in the garden is Cotoneaster horizontalis, but usually by now the berries have dropped off or have been eaten by the birds. This one is still covered with fruit and gives a welcome blaze of colour growing up against a small outbuilding wall.

Cotoneaster_horizontalis_red_berries_in_Winter
Cotoneaster horizontalis. Images: Kathryn Hawkins

By next month, the sprawling Winter Jasmine, which grows outside the back door, will be in full bloom. Today there are a few buds breaking open to reveal the cheery yellow blooms I love. It is one of my favourite plants of the season, so delicate and pretty.

Just_in_bloom_Winter_Jasmine
Winter Jasmine flower and bud. Image: Kathryn Hawkins

Another favourite is the Snowberry. I see them each Winter growing in other people’s gardens and in the hedgerows, but never get round to planting one for myself. This year, a few straggly branches have appeared growing through an old Camellia bush in the back garden. I will take care now I know it’s there, and see if I can get a better crop next year.

Snowberries
Snowberries. Image by Kathryn Hawkins

I like to end my monthly garden report with something quirky and unseasonal. I found this wee fellow growing at the top of the rockery, under a big conifer tree, in the back garden. Not sure how he’s managed to remain unscathed from the effects of the frosts, but he was looking very healthy and strong, and truly magnificent in bright blue bloom.

Winter_flowering_Periwinkle
Solitary Periwinkle in bloom in early December. Image: Kathryn Hawkins


Pesto pea pastries (gluten-free)

Gluten-free_pesto_pea_pastries
Freshly baked pesto pea pastries. Image: Kathryn Hawkins

Peas are one of my favourite vegetables. When they’re not in season, I always have a bag in the freezer; they are my “go to” emergency vegetable.

The filling for these pastries is very versatile. You can use it as a dip, spread it thickly on warm toasted bread or, it makes a lovely fresh filling for wraps or sandwiches with some crisp green leaves and cooked chicken. Make your own pesto if you have time, it really does make all the difference.

Makes: 9

  • Gluten-free plain flour, for dusting
  • 400g block ready-made gluten-free puff pastry (such as Silly Yak)
  • 225g cooked peas, mashed with a fork or potato masher
  • 50g fresh pesto sauce (recipe below)
  • 1 medium egg
  • 100ml whole milk or soya milk
  • Salt and freshly ground black pepper
  1. Preheat the oven to 200°C (180°C fan oven, gas mark 6). Line a large baking tray with baking parchment.
  2. Lightly dust the work surface with flour and roll out the pastry to make 30cm square. Cut out 9 x 10cm rounds using a pastry cutter.
  3. Mix the peas and pesto sauce together and pile a spoonful in the centre of each round. Pinch the edges of the pastry round the pea filling to make a tartlet shape. Transfer to the baking tray.
  4. Mix the egg and milk together and season well. Carefully pour a little over the top of the pea mixture. Bake in the oven for about 25 minutes until lightly golden. Best served warm.
How_to_make_pesto_pea_pastries
Assembly of pesto pea pastries. Images: Kathryn Hawkins

To make your own pesto sauce: in a blender or food processor, blitz together 125g pine nuts (kernels), 2 peeled garlic cloves, 60g freshly grated Parmesan cheese , 15g fresh basil leaves, pinch of salt and 90ml good quality olive oil. Unused pesto sauce will keep in the fridge, in a sealed container for up to 1 week. Homemade pesto sauce is also suitable for freezing.

Pesto_pea_pastries_serving_suggestion
Gluten-free pesto pea pastries. Image: Kathryn Hawkins

Vegetable confetti (gluten-free, dairy-free, vegan)

Finely_chopped_roasted_vegetable
Tray of roasted vegetable “confetti”. Image by Kathryn Hawkins

One of the culinary terms that has stuck with me since my cookery classes at school, is the word”confetti”. Whether it is actually a technical term doesn’t really matter; it is one of those quirky, self-explanatory meanings that has lived with me for years. It aptly describes a combination of finely chopped fruit or vegetables, and I think it is very appropriate.

A few weeks ago, I wrote a Summer cookery feature for one of the magazines I freelance for; I included a “confetti” salad of finely chopped vegetables. It looked bright and tasted great; it did take a bit of time chopping everything up small, it looked spectacular.

Salad_of_freshly_chopped_vegetables
Summery salad of “confetti” vegetables. Image by Kathryn Hawkins

I’m less inclined to eat a raw vegetable salad during the colder months of the year, so I have taken the same combination of vegetables and started baking them in the oven. Serve the vegetables as a side dish on their own or mix them into freshly cooked pasta. I like them stirred into freshly cooked basmati rice and served sprinkled with roasted cashew nuts. Here’s the (very easy) recipe:

Makes 8 servings

  • 1 each red, yellow and green (capsicum) peppers
  • 150g radish
  • 225g carrots
  • 150g red cabbage
  • 1 red onion
  • 6 tbsp olive oil
  • 4 garlic cloves, peeled and finely chopped
  • Salt and freshly ground black pepper
  1. Preheat the oven to 180°C (160°C fan oven, gas mark 6). Line a large baking tray with baking parchment. Halve, deseed and finely chop the peppers and put in a large bowl.
  2. Trim and chop the radish. Peel and finely chop the carrots. Shred and chop the cabbage. Mix them all into the peppers.
  3. Peel and finely chop the onion, then toss into the other vegetables along with the olive oil and garlic.
  4. Spread the vegetables evenly over the lined baking tray and season well. Cover with foil and bake for about 45 minutes, turning occasionally, until tender. Drain well and serve.
Rice_with_roast_chopped_vegetables_ and_cashew_nuts
Roast vegetable rice with cashews. Image by Kathryn Hawkins

Coconut granola (gluten-free, dairy-free, vegan)

Gluten_free_vegan_coconut_granola
Tray-baked homemade coconut granola. Image by Kathryn Hawkins

Breakfast is the one meal of the day that I am more choosy about than any other. I rarely have the same thing 2 days running, and often can’t face breakfast at all. At present, I am alternating between gluten-free toast, fresh fruit and coconut yogurt, and my own recipe, granola.

I turned to making my own granola after finding most ready-made combinations either too sweet or so hard and dry that they were more tortuous to eat than enjoyable. This granola recipe is easy to make and is much tastier than anything I can buy, plus you can chop and change the flavourings to suit your taste and whatever you have in the cupboard. If you like dried fruit in your granola, it is better to stir it into to the tray of still warm, cooked ingredients once the tray is of the oven – this helps to keep the fruit soft and stops it drying out and hardening in the oven.

Makes 8 servings

  • 175g thick milled or jumbo oats
  • 1/2 tsp salt
  • 50g coconut sugar or light brown sugar
  • 50g flaked coconut
  • 3 tbsp coconut oil or sunflower oil
  • 1 tsp vanilla paste
  1. Preheat the oven to 150°C (130°C fan oven, gas mark 2). Line a large baking tray with baking parchment.
  2. Put the oats, salt and sugar in a large bowl and toss in the coconut, coconut oil and vanilla paste. Mix well until well coated in oil.
  3. Spread the mixture evenly across the tray. Bake for 40 minutes, stirring 3 times during baking, until lightly toasted. Leave to cool on the tray.
  4.  Transfer to a clean storage jar and seal well. Delicious served with coconut rice milk and fresh berry fruits or sliced banana.

If I have them, I often add pecan pieces, flaked almonds or pumpkin seeds for extra crunch.

Breakfast_bowl_of_coconut_granola
A favourite breakfast: homemade coconut granola. Image by Kathryn Hawkins

Pear gingerbread cake (gluten-free, dairy-free, vegan)

Storing_Concorde_pears
Homegrown Concorde pears. Image by Kathryn Hawkins

The pears I picked a couple of weeks ago are fully ripe now. Most usually, I enjoy them fresh, peeled or unpeeled; occasionally I use a few in cooking. One of my quick “comfort” desserts is to chop pears and mix them with grated marzipan to use as a filling for a gluten-free puff pastry jalousie or plait. Quite delicious.

Today, I’m sharing a recipe for what I call a “proper cake”. In other words, a dense textured cake, neither spongy nor light, but something substantial, and just right for this time of year. Keep it for at least a day after baking to allow the fruit juices to soak into the cake and for the flavours to develop. I use coconut oil and coconut milk a lot in my cookery because I love the flavour; but in this recipe it isn’t noticeable by taste, it simply adds to the richness of the texture. Use another vegetable oil or vegan margarine if you prefer, and a nut, rice or soya milk will work fine as an alternative to coconut milk.

Pears_and_other_ingredients_ready_for_recipe
Ingredients for pear gingerbread cake. Image by Kathryn Hawkins

Serves: 6 to 8

  • 75g coconut oil
  • 75g light brown sugar
  • 75g golden syrup
  • 75g treacle
  • 6 tbsp canned coconut milk
  • 150g gluten-free, self raising flour (such as Dove’s Farm)
  • 2 tbsp ground ginger
  • ½ tsp ground allspice
  • 4 small pears
  • Juice ½ lemon
  1. Preheat the oven 170°C (150°C fan oven, gas mark 3). Grease and line a deep, 12cm round cake tine. Put the oil, sugar, syrup and treacle in a saucepan and heat very gently, until melted together. Remove from the heat and stir in the coconut milk. Cool for 10 minutes.
  2. Meanwhile, sift the flour and spices into a bowl and make a well in the centre.
  3. Thinly peel the pears, leaving them whole. Trim away a small slice from the base of each so that they sit upright, and arrange in the cake tin. Brush all over with lemon juice.
  4. Pour the melted ingredients into the spiced flour and mix together to form a thick, smooth batter. Carefully pour into the tin.
  5. Cover the tops of the pears with small pieces of foil to prevent burning. Put the cake tin on a baking tray and bake in the oven for about 1 hour 40 minutes until a skewer inserted into the centre of the cake comes out clean. Discard the foil and leave the cake to cool in the tin completely.

    Pear_gingerbread_cake_in_tin
    Just out of the oven, freshly baked pear gingerbread cake. Image by Kathryn Hawkins
  6. Remove from the tin. Wrap in foil and store in a cool place for 24 hours to allow the texture and flavours to develop. Enjoy cold as a cake or, warm slightly and serve as a pudding with dairy free custard.

    Pear_gingerbread_cake_whole_with_slice
    Pear gingerbread cake. Images by Kathryn Hawkins


Autumn shades in a Perthshire garden

Copper_beech,_Japanese_Maple_and conifers_in_Perthahire_garden
Autumn shades in a Perthshire garden. Image by Kathryn Hawkins

This time last month, I was wondering what I would be sharing with you in November. But having had an unseasonally mild October, with no high winds or frosts, we are being treated to a magnificent Autumn, here in central Scotland. As I type this, I am looking out on to the copper beech in the front garden which is a blazing coppery-orange in the setting sun.

All around this part of the country, trees form the backdrop of the scenery. Autumn is a time for getting out of doors and celebrating the glories of natural colour. I’m fortunate in the fact that I don’t have to travel very far to experience this, my garden is alive with different shades of foliage, and even a few flowers.

Japanese_Maple_in_Autumn_in_a_Perthshire_garden
Japanese Maple. Image by Kathryn Hawkins
Pink,_red_and_copper_tones_of_Japanese_Maple_leaves
Japanese Maple foliage. Image by Kathryn Hawkins
Blueberry_leaves_in_Autumn
Red blueberry bush leaves. Image by Kathryn Hawkins

Back in the Summer, I shared my white Hydrangea flowers in a post. The plant is still producing, and now as a bonus, the foliage is starting to turn wonderful shades of blue and purple; I thought it was worth another outing.

White_Hydrangea_in_Autumn
White Hydrangea with peacock-blue leaves. Image by Kathryn Hawkins

I’ll draw this piece to a close (the light is rapidly fading outside) with a splash of colour from one of my favourite garden plants, the nasturtium. This variety is called Empress of India and the leaves are a blue-green when they first open, and the flowers a deep red. It’s been blossoming for a few weeks now and has gone a bit “blousy”, but still offers an eye-catching display at the front of the house. I wonder what I’ll be posting next month; fingers crossed the garden’s not covered in a pile of the white stuff……

Autumn_display_of_bright_red-orange_nasturtium_flowers
Nasturtium: Empress of India. Image by Kathryn Hawkins