Festive Floretines (gluten-free, dairy-free, vegan)

Edible_gift:_gluten-free_and_vegan_Florentines
Festive Florentines. Image: Kathryn Hawkins

I’m spoilt for choice at this time of year as to what sweet treats and edible goodies to make, but Florentines have to be up there in my Top 10 of all time favourites. These thin, crisp, Italian, chocolate-spread morsels are jammed packed with fruit and nuts, and they are just as delicious served with a spoonful of your favourite ice cream or sorbet, as they are with a cup of coffee.

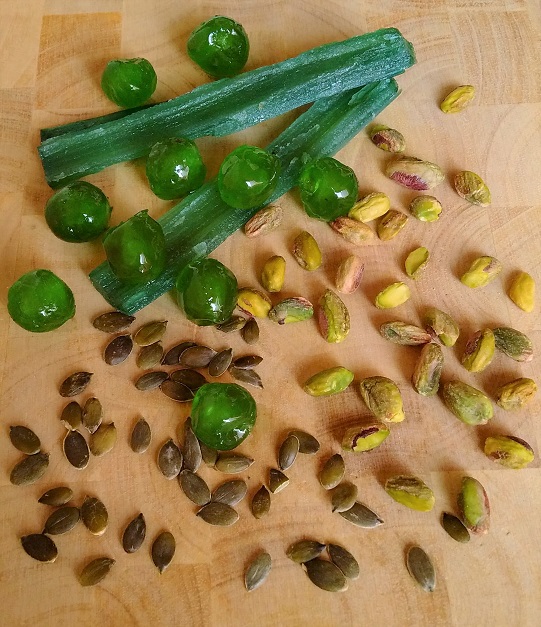
I have chosen to use a combination of candied green fruits, seeds and nuts, but you can use any dried or candied fruit, and any unsalted, roasted nuts and seeds – in fact these biscuits are one of the best ways to use up any bits and pieces of dried fruit, nuts and seeds you have leftover. They will also work with all fruit or all nuts and seeds, so you can make up your own combinations to suit your personal preference.

Traditionally, Florentine biscuits are spread with melted dark chocolate on the back, but they are good left as they are. Cover the backs with 90% extra dark chocolate for a less sweet finish, and, if you can bring yourself to give them away, they make a lovely gift.

Main_ingredients_for_Florentine_cookies
Angelica, green-coloured cherries, pistachio nuts and pumpkin seeds. Image: Kathryn Hawkins

Makes: 20

  • 75g coconut oil or vegan margarine
  • 75g golden syrup
  • 50g gluten-free plain flour blend (such as Dove’s Farm)
  • 60g pumpkin seeds
  • 60g unsalted shelled pistachio nuts, lightly crushed
  • 100g green glacé cherries, roughly chopped
  • 25g angelica, finely chopped
  • 1 tsp good quality natural almond or vanilla extract (such as Dr Oetker)
  • 200g milk free, vegan white “chocolate”
  1. Preheat the oven to 180°C (160°C fan oven, gas mark 4). Line 2 large baking trays with baking parchment. Melt the oil or margarine with the syrup in a saucepan. Remove from the heat and stir in the remaining ingredients except the white “chocolate”.
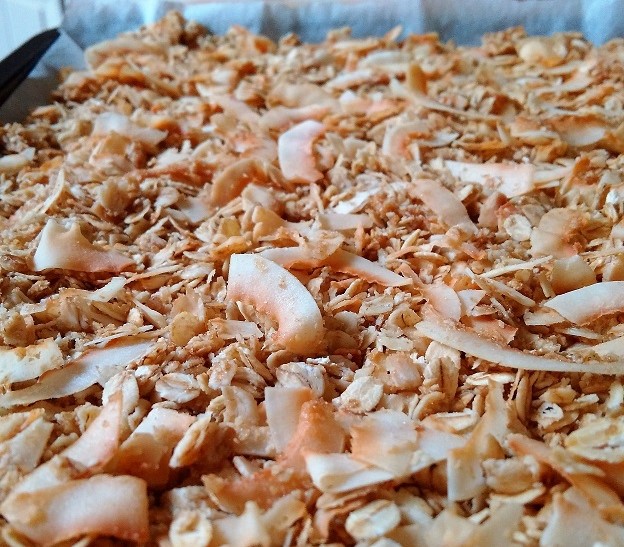
  2. Drop 20 heaped teaspoonfuls, spaced well apart on to the prepared trays, and flatten each mound slightly. Bake for 10-12 minutes until flattened and lightly golden. Leave to cool for 10 minutes on the trays, then transfer to a wire rack to cool completely.Preparation_of_mixture_for_baking_Florentines
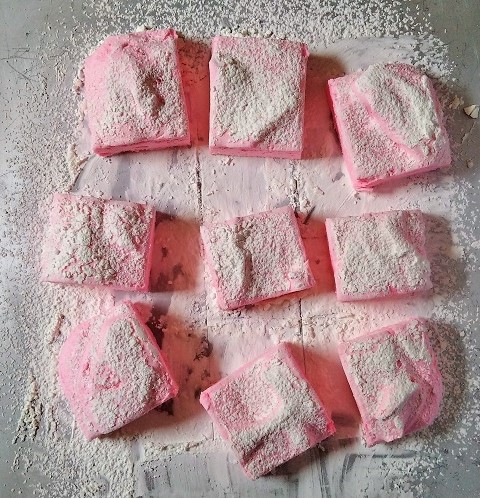
  3. To cover the biscuits with chocolate, put just over half the amount of chocolate in a heatproof bowl and melt over a saucepan of barely simmering water. Line a large board with baking parchment.
  4. Working on one biscuit at a time, carefully dip and roll the edge of the biscuit all the way round in chocolate and place on the lined board. Leave to set.

    Covering_gluten-free_Florentines_with_vegan_white_"chocolate"
    Covering the sides and backs of Florentines in melted white “chocolate”. Images: Kathryn Hawkins
  5. Once all the biscuits are dipped and set, melt the remaining chocolate as above. Turn the biscuits over and spread a little chocolate thinly over the backs. Leave to set. Note: If you can leave them alone, these biscuits will store well in an airtight container for up to 1 week.
Gluten-free,_vegan_Florentine_cookie
Vegan, gluten-free, chocolate-dipped Florentine biscuit. Image: Kathryn Hawkins


Cranberries & Cranberry Jam recipe (gluten-free, dairy-free, vegan)

Cranberry_plant_and_berries
Cranberry plant with fruit. Plant images: Stuart MacGregor. Berry image: Kathryn Hawkins

In my humble opinion, there is no fruit nor vegetable that looks more festive than the cranberry. The fresh berries have just started arriving on the greengrocer’s shelves these past few days. The season for fresh cranberries in the UK is quite short, so I’m stocking up my freezer for a year round supply.

The cranberry plant is low growing and creeping in habit, and likes damp, acidic soil; it is a member of the heather family. A few years ago, I grew my own plant in a deep pot. Once it was established, it made a lovely trailing plant in a hanging basket for a while, until I forgot to water it (!) and sadly, it met a very sorry, shrivelled, end. I hope to try again this spring if I can track down a suitable mature plant.

The waxy-looking, scarlet berries are rich in Vitamin C and a staple of the Thanksgiving and Christmas menu. I’ve just made a batch of jam to serve with the Christmas roast; very easy to make and much nicer than anything you can buy in a jar. Add finely grated orange rind for a zesty flavour, and/or a few spoonfuls of Port at the end of cooking for a richer taste. I put the jam into small jars which then makes it ideal for gifting.

Jars_of_homemade_cranberry_jam
Jars of my freshly made cranberry jam. Image: Kathryn Hawkins

Makes: 5 x 200ml jars

  • 500g fresh cranberries – the recipe will also work fine using frozen berries
  • 175ml water
  • 600g granulated sugar
  1. Put the berries and water into a preserving pan or large saucepan. Put a lid over the pan and begin heating – the berries will start “popping” and may jump a bit as they warm up.
  2. Bring the contents of the saucepan to simmering point and cook gently for about 10 minutes until the berries are soft and pulpy.
  3. Stir in the sugar over a low heat until dissolved, then boil rapidly for 5-8 minutes, stirring occasionally, until thick and the liquid has reduced. Cranberries have lots of pectin so this mixture will set readily without having to test that a setting point has been achieved.
  4. Spoon whilst hot into warm sterilised jars and seal immediately. Once cool, label and cover the jar lids if preferred. Store in a dry, cool, dark cupboard; as with most preserves, cranberry jam will keep for several months.

    Cranberry_sauce_serving_suggestion
    Homemade cranberry jam. Image: Kathryn Hawkins


Vegetable confetti (gluten-free, dairy-free, vegan)

Finely_chopped_roasted_vegetable
Tray of roasted vegetable “confetti”. Image by Kathryn Hawkins

One of the culinary terms that has stuck with me since my cookery classes at school, is the word”confetti”. Whether it is actually a technical term doesn’t really matter; it is one of those quirky, self-explanatory meanings that has lived with me for years. It aptly describes a combination of finely chopped fruit or vegetables, and I think it is very appropriate.

A few weeks ago, I wrote a Summer cookery feature for one of the magazines I freelance for; I included a “confetti” salad of finely chopped vegetables. It looked bright and tasted great; it did take a bit of time chopping everything up small, it looked spectacular.

Salad_of_freshly_chopped_vegetables
Summery salad of “confetti” vegetables. Image by Kathryn Hawkins

I’m less inclined to eat a raw vegetable salad during the colder months of the year, so I have taken the same combination of vegetables and started baking them in the oven. Serve the vegetables as a side dish on their own or mix them into freshly cooked pasta. I like them stirred into freshly cooked basmati rice and served sprinkled with roasted cashew nuts. Here’s the (very easy) recipe:

Makes 8 servings

  • 1 each red, yellow and green (capsicum) peppers
  • 150g radish
  • 225g carrots
  • 150g red cabbage
  • 1 red onion
  • 6 tbsp olive oil
  • 4 garlic cloves, peeled and finely chopped
  • Salt and freshly ground black pepper
  1. Preheat the oven to 180°C (160°C fan oven, gas mark 6). Line a large baking tray with baking parchment. Halve, deseed and finely chop the peppers and put in a large bowl.
  2. Trim and chop the radish. Peel and finely chop the carrots. Shred and chop the cabbage. Mix them all into the peppers.
  3. Peel and finely chop the onion, then toss into the other vegetables along with the olive oil and garlic.
  4. Spread the vegetables evenly over the lined baking tray and season well. Cover with foil and bake for about 45 minutes, turning occasionally, until tender. Drain well and serve.
Rice_with_roast_chopped_vegetables_ and_cashew_nuts
Roast vegetable rice with cashews. Image by Kathryn Hawkins

Coconut granola (gluten-free, dairy-free, vegan)

Gluten_free_vegan_coconut_granola
Tray-baked homemade coconut granola. Image by Kathryn Hawkins

Breakfast is the one meal of the day that I am more choosy about than any other. I rarely have the same thing 2 days running, and often can’t face breakfast at all. At present, I am alternating between gluten-free toast, fresh fruit and coconut yogurt, and my own recipe, granola.

I turned to making my own granola after finding most ready-made combinations either too sweet or so hard and dry that they were more tortuous to eat than enjoyable. This granola recipe is easy to make and is much tastier than anything I can buy, plus you can chop and change the flavourings to suit your taste and whatever you have in the cupboard. If you like dried fruit in your granola, it is better to stir it into to the tray of still warm, cooked ingredients once the tray is of the oven – this helps to keep the fruit soft and stops it drying out and hardening in the oven.

Makes 8 servings

  • 175g thick milled or jumbo oats
  • 1/2 tsp salt
  • 50g coconut sugar or light brown sugar
  • 50g flaked coconut
  • 3 tbsp coconut oil or sunflower oil
  • 1 tsp vanilla paste
  1. Preheat the oven to 150°C (130°C fan oven, gas mark 2). Line a large baking tray with baking parchment.
  2. Put the oats, salt and sugar in a large bowl and toss in the coconut, coconut oil and vanilla paste. Mix well until well coated in oil.
  3. Spread the mixture evenly across the tray. Bake for 40 minutes, stirring 3 times during baking, until lightly toasted. Leave to cool on the tray.
  4.  Transfer to a clean storage jar and seal well. Delicious served with coconut rice milk and fresh berry fruits or sliced banana.

If I have them, I often add pecan pieces, flaked almonds or pumpkin seeds for extra crunch.

Breakfast_bowl_of_coconut_granola
A favourite breakfast: homemade coconut granola. Image by Kathryn Hawkins

Pear gingerbread cake (gluten-free, dairy-free, vegan)

Storing_Concorde_pears
Homegrown Concorde pears. Image by Kathryn Hawkins

The pears I picked a couple of weeks ago are fully ripe now. Most usually, I enjoy them fresh, peeled or unpeeled; occasionally I use a few in cooking. One of my quick “comfort” desserts is to chop pears and mix them with grated marzipan to use as a filling for a gluten-free puff pastry jalousie or plait. Quite delicious.

Today, I’m sharing a recipe for what I call a “proper cake”. In other words, a dense textured cake, neither spongy nor light, but something substantial, and just right for this time of year. Keep it for at least a day after baking to allow the fruit juices to soak into the cake and for the flavours to develop. I use coconut oil and coconut milk a lot in my cookery because I love the flavour; but in this recipe it isn’t noticeable by taste, it simply adds to the richness of the texture. Use another vegetable oil or vegan margarine if you prefer, and a nut, rice or soya milk will work fine as an alternative to coconut milk.

Pears_and_other_ingredients_ready_for_recipe
Ingredients for pear gingerbread cake. Image by Kathryn Hawkins

Serves: 6 to 8

  • 75g coconut oil
  • 75g light brown sugar
  • 75g golden syrup
  • 75g treacle
  • 6 tbsp canned coconut milk
  • 150g gluten-free, self raising flour (such as Dove’s Farm)
  • 2 tbsp ground ginger
  • ½ tsp ground allspice
  • 4 small pears
  • Juice ½ lemon
  1. Preheat the oven 170°C (150°C fan oven, gas mark 3). Grease and line a deep, 12cm round cake tine. Put the oil, sugar, syrup and treacle in a saucepan and heat very gently, until melted together. Remove from the heat and stir in the coconut milk. Cool for 10 minutes.
  2. Meanwhile, sift the flour and spices into a bowl and make a well in the centre.
  3. Thinly peel the pears, leaving them whole. Trim away a small slice from the base of each so that they sit upright, and arrange in the cake tin. Brush all over with lemon juice.
  4. Pour the melted ingredients into the spiced flour and mix together to form a thick, smooth batter. Carefully pour into the tin.
  5. Cover the tops of the pears with small pieces of foil to prevent burning. Put the cake tin on a baking tray and bake in the oven for about 1 hour 40 minutes until a skewer inserted into the centre of the cake comes out clean. Discard the foil and leave the cake to cool in the tin completely.

    Pear_gingerbread_cake_in_tin
    Just out of the oven, freshly baked pear gingerbread cake. Image by Kathryn Hawkins
  6. Remove from the tin. Wrap in foil and store in a cool place for 24 hours to allow the texture and flavours to develop. Enjoy cold as a cake or, warm slightly and serve as a pudding with dairy free custard.

    Pear_gingerbread_cake_whole_with_slice
    Pear gingerbread cake. Images by Kathryn Hawkins


Apple crumble cake (gluten-free, dairy-free, vegan)

Old_Scottish_apple_tree
Lord Derby cooking apples. Images by Kathryn Hawkins

A couple of weeks ago, I picked a bumper crop of cooking apples from the old tree in my garden. I have no idea how old the tree is, but it’s gnarly and interesting to look at, and each year produces large, bright green apples with a slightly tart taste. The variety is called Lord Derby. The apples keep their texture when cooked and are perfect for thinly slicing and layering in a deep filled apple pie or peeled and quartered for a tart tatin. Kept in the cool and dark, this variety of apple stores for about 3 months – until about Christmas-time.

This is one of my favourite apple recipes. It keeps well if you can leave it alone, and becomes more cake-like as time goes on. Serve the cake hot or cold, for pudding or with coffee. I guarantee you’ll love it!

Serves: 10-12

  • 225g vegan margarine ( or lightly salted butter if you prefer),  softened
  • 165g + 2 tbsp Demerara sugar
  • 1 tsp natural vanilla extract
  • 350g gluten-free plain flour (such as Dove’s Farm)
  • 10g gluten-free baking powder (such as Dr Oetker)
  • 500g cooking apples
  • Juice 1 small lemon
  • 1 tbsp cornflour
  • 1 tsp ground cinnamon
  • 50g thick milled oats
  • 1 tsp icing sugar
  1. Preheat the oven to 180°C (160°C fan oven, gas mark 4). Grease and line a 5cm deep x 23cm round, cake tin. In a mixing bowl, beat the margarine with 165g sugar and the vanilla, until well blended and creamy.
  2. Sift the flour and baking powder on top and bring together to form a crumbly mixture. Press about two-thirds evenly into the base of the tin to make a smooth, thick base. Prick all over with a fork and bake for 20 minutes until lightly golden and slightly crusty.
  3. Meanwhile, prepare the filling. Put the lemon juice in a bowl. Thinly peel and core the apples, and chop into small pieces. Toss in the lemon juice to help prevent browning. Drain away the excess juice and toss in the cornflour and cinnamon.
  4. Spread the apple evenly over the baked base. Mix the oats into the remaining crumble and spoon on top, making sure all the apple is covered. Sprinkle over the remaining Demerara sugar. Bake in the oven for about 40 minutes until golden brown and firm to the touch.

    Step_by_step_preparation_for_apple_crumble_cake
    Preparation of apple crumble cake. Images: Kathryn Hawkins

If you want to serve the cake as a pudding, leave it to firm up for 15 minutes before removing from the tin; otherwise leave it to cool completely and enjoy cold. Dust lightly with icing sugar just before serving. Enjoy!

Freshly_baked_gluten_free_apple_crumble_cake
Homemade gluten-free apple crumble cake. Images by Kathryn Hawkins


Smoky Tomato Jam (gluten-free, dairy-free, vegan)

Late_ripening_homegrown_tomatoes
Homegrown early Autumn tomatoes. Image copyright: Kathryn Hawkins

This is the time of year when I often get very busy with my work and have little time to spend in the garden or the kitchen (outside work hours). However, making preserves is something I try to find time for no matter what else needs to be done. There is so much produce around at the moment, practically begging to be put in the pot and made into jam or chutney, I can’t ignore it.

One of my most popular preserves is, thankfully, one of the easiest to make, so this weekend I got the large preserving pan out of the cupboard and set about cooking up this year’s first batch of Smoky Tomato Jam. It’s really a smooth chutney, but the texture lends itself better to being called jam. One of the best thing about this particular preserve is that it’s ready to be eaten immediately, as well as being a good “keeper”.

Fresh_fruit_and_vegetables_for_jam_making
Ingredients for tomato jam making. Image copyright: Kathryn Hawkins

Makes 5 x 325ml jars

  • 700g fresh prepared ripe, but firm, tomatoes, roughly chopped
  • 350g prepared red onion, roughly chopped
  • 550g prepared cooking apples, roughly chopped
  • 350ml red wine or cider vinegar
  • 2 bay leaves
  • 2 large sprigs rosemary
  • 275g granulated sugar
  • 2 tsp each of salt, ground cumin and smoked paprika
  1. Put the tomatoes and onion in a food processor and blitz for a few seconds until well chopped and pulpy. Transfer to a large saucepan.
  2. Put the apples in the food processor with half the vinegar and blitz for a few seconds until well chopped. Transfer to the saucepan containing the tomato and onion mixture.
  3. Pour over the remaining vinegar and add the bay leaves and rosemary. Bring to the boil, stirring occasionally, and then simmer gently for 10 minutes until softened.
  4. Stir in the sugar over a low heat, until dissolved, then raise the heat and simmer steadily for 15 to 20 minutes, stirring occasionally, until it reaches the consistency of thick jam. Turn off the heat, discard the herbs and stir in the salt and spices.
  5. Ladle into warm, sterilised jars and seal with non-corrosive lids. Allow to cool and store for 6-8 months in a cool, dark cupboard. Once opened, keep in the fridge and use within 2 weeks. Delicious with all cured meats, smoked fish, and cheese dishes.
Homemade_tomato_preserve
Jars of freshly made Smoky Tomato Jam. Image copyright: Kathryn Hawkins

In a bit of a pickle

Cucumber_harvest
Homegrown cucumbers. Image copyright: Kathryn Hawkins

For several years now, I have been a successful cucumber grower. So much so, that even though I reduce the amount of plants I raise each year, I always end up with a glut. Whilst I enjoy eating cucumber raw in salads, and they are very good lightly cooked in a stir fry, I have been at a loss as to what else to do with them.

Whilst leafing through an old cookery book for inspiration, I came across an intriguing recipe called Bread and Butter pickle. The name drew me in, and to my delight, it is a real gem. It is one of the best pickles I have ever made, and so easy to make. I hope you like it as much as I do.

Makes 5 x 325ml jars

  • 1kg prepared cucumbers, chopped into 1.5cm pieces
  • 250g prepared red onion, finely chopped
  • 3 tbsp sea salt
  • 550ml white wine vinegar
  • 175g granulated sugar
  • 2 bay leaves
  • Pinch of dried chilli flakes
  • ¼ tsp ground black pepper
  • 1 tsp each of mustard seeds, coriander seeds and cumin seeds, coarsely ground
  1. Mix the cucumber, red onion and salt together in a large, clean, china or glass bowl. Leave to stand at room temperature, lightly covered, for 1 hour.
  2. Drain the vegetables in a fine-holed colander or strainer. Rinse very well in cold running water, then dry very well on absorbent kitchen paper. Pack into 5 x 325ml sterilised jam jars.

    Preparation_of _vegetables_for_cucumber_pickle
    Preparation of vegetables for Bread and Butter Pickle. Image copyright: Kathryn Hawkins
  3. Put the vinegar in a saucepan and add the remaining ingredients. Heat gently, stirring, until the sugar dissolves. Raise the heat and boil for 3 minutes. Discard the bay leaves.
  4. Pour the hot vinegar over the vegetables, making sure they are completely covered. Seal tightly with non corrosive, screw-top lids. Leave to cool, then label, and store in a cool, dry place for at least 3 months before opening. Delicious served with smoked fish or cold cuts. I spoon the pickle over chilli beef tacos – delicious!

    Homegrown_cucumber_pickle
    Homemade cucumber pickle. Image copyright: Kathryn Hawkins

Preserving the Summer (Semi-cuit tomatoes – gluten-free, dairy-free, vegan)

Freshly_picked_homegrown_tomatoes
Home-grown tomatoes ready for the dryer. Image copyright: Kathryn Hawkins

I’ve been picking tomatoes from my greenhouse for over a month now, and there are still plenty to ripen. Whilst I am enjoying them fresh, I do like to make preserves, and first up this year is to steep a few tomatoes in olive oil. A couple of years ago I bought myself a dehydrator, and  I have been drying various homegrown produce ever since. Semi-cuit (semi-dry) tomatoes make a sweet, indulgent and delicious out-of-season treat for later in the year, so these wee treasures are heading for the dehydrator right away.

Dehydrating_tomatoes
My Stockli dehydrator and prepared tomatoes. Image copyright: Kathryn Hawkins

Dehydrating is a very straightforward process. Wash and pat dry the tomatoes; if they are small to medium size, cut them in half – you may want to slice larger tomatoes or just “cook” them for longer. My dehydrator has 3 shelves; I divide up the tomatoes between the shelves, making sure there is some air space between them, pop the lid on and set the temperature to 70°C (158°F). This batch of 650g will take 6-7 hours to dry down so that they are still a bit fleshy and not too leathery. The final yield will be about 150g.

Once the tomatoes have cooled, I will pack them into a sterilised jam jar with a screw top lid, and add a few sprigs of fresh rosemary, bay and thyme from the garden. Pour over good quality extra virgin olive oil to cover the tomatoes completely and screw on the lid tightly. Stored in a cool, dark, dry cupboard, they will keep for about 6 months – so perfect for festive eatings. Once opened, store them in the fridge for up to 6 weeks – the oil will turn cloudy and clumpy when chilled, but becomes liquid again at room temperature. Roll on Christmas!

Semi-cuit_tomatoes_preserved_in_olive_oil_with_herbs
Semi-cuit tomatoes with olive oil and rosemary. Image copyright: Kathryn Hawkins

Rose marshmallow (gluten-free, dairy-free)

Pink_rose_marshmallow
Homemade rose marshmallow. Image copyright: Kathryn Hawkins

One of my favourite flavours married with a much loved sweetie are a match made in heaven in this recipe. Some shop-bought marshmallow can be a bit on the chewy side to my taste, so my version may be a bit different to what you’ve come to expect. This recipe makes a lighter, fluffier marshmallow, but if you want a firmer texture, it is worth experimenting by adding more gelatine.

If you can make meringue, then marshmallow is just one step on. You will need a sugar thermometer to take away the guesswork when making a sugar syrup. Other than that, the most important thing I can say before you get started, is to get yourself organised and have everything lined up and ready to go.

Makes 1 x 18cm square of marshmallow which cuts into 9 chunky pieces

  • 5 leaves good quality gelatine
  • 2 medium egg whites or 2 single egg sachets dried egg white powder
  • 100g granulated sugar
  • 50g liquid glucose
  • Pink food colour gel
  • Good quality rose water (I use Nielsen Massey)
  • 25g cornflour
  • Sugared rose petals to decorate
  1. Line a deepish 18cm  square cake tin with baking parchment. Cut up the gelatine into small pieces and place in a small heatproof bowl. Add 75ml cold water and leave to soak for 5 minutes, then place in the microwave and cook on High for 30-40 seconds until dissolved – microwave in 10 second blasts to avoid overheating, and do not boil. Leave aside.
  2. Meanwhile, whisk the egg whites or powder in a large, grease-free, heatproof bowl until very stiff.
  3. Put the sugar in a small saucepan with the glucose and 50ml cold water. Heat gently, stirring, until melted, then raise the heat and let the mixture bubble until it becomes clear and syrupy and reaches 118ºC on a sugar thermometer.
  4. Remove the syrup from the heat. Start whisking the egg whites again and gently pour over the hot syrup in a slow and steady stream. Keep whisking as you pour in the liquid gelatine.
  5. Continue to whisk to form a thick and glossy meringue-like mixture – this may take up to 5 minutes depending on how much heat I retained.
  6. Working quickly before the mixture begins to set add sufficient food colour gel and rose water to taste.
  7. Scrape the marshmallow into the lined tin and smooth over the top as best you can. Leave to cool, then put in a cool place (not the fridge) for 3-4 hours until completely set and firm to the touch.
  8. To finish, dust a tray with the cornflour and turn the marshmallow on to it. Peel away the parchment. Using a large bladed knife, cut into 9 squares and toss in the cornflour to coat lightly. The marshmallow is ready to eat, or it will store, layered on pieces of baking parchment in an airtight container, in a cool place for up to 2 weeks. Note: homemade marshmallow does not like the fridge and will start to dissolve in damp conditions.

For an extra rose flavour, top each piece with a sugared rose petal – I gave a recipe for these in my July 19th 2016 post.

pink_rose_flavoured_marshmallow
Homemade rose marshmallow. Image copyright: Kathryn Hawkins