Welcome to my blog all about the things I love to grow and cook. You'll find a collection of seasonal gluten-free, dairy-free and vegan-friendly recipe posts, as well as a round up of my gardening throughout the year. I wish you good reading, happy cooking and perfect planting!
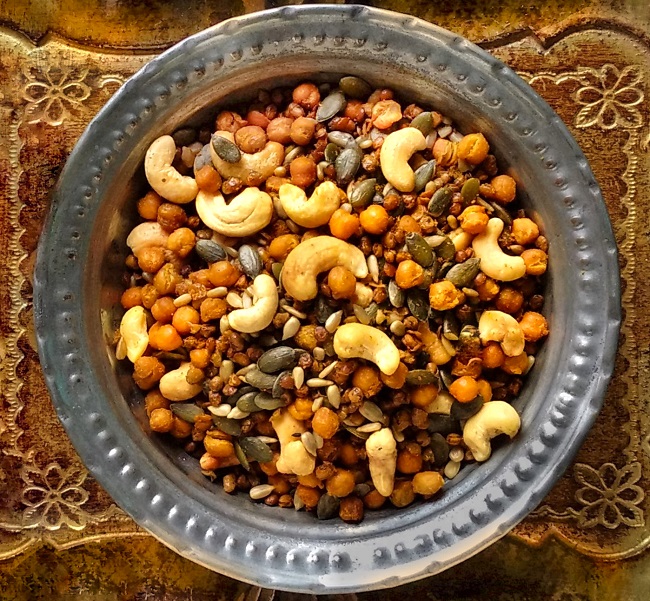
Spiced roast chana and dal. Image: Kathryn Hawkins
A mix of roast pulses, nuts and seeds flavoured with warming spice is a tempting snack, a delicious sprinkle for soups and salads, and a great diversion if, like me, you are forever fighting a battle against a sweet-tooth.
Ingredients ready for mixing and roasting. Image: Kathryn Hawkins
Easy to make, tasty and less fatty than the shop-bought mixes, this is my interpretation of the Asian snack, Bombay Mix. The bulk of the mix is made up of cooked chickpeas (chana) and green split lentils (dal). You can add any nut or seed, but choose the unsalted, natural varieties so that you can adjust the seasoning to suit your taste. I use Madras curry powder but garam masala is also a good blend to use. Here’s what to do:
Makes: 300g
Ingredients
250g cooked chickpeas
250g cooked green lentils
2 tbsp. vegetable oil
4 teasp Madras curry powder
1 teasp salt
65g pumpkin seeds
65g sunflower seeds
100g unsalted cashew nuts
Preheat the oven to 150°C (130°C fan oven, gas 2) . Line a large baking tray with baking parchment. Dry the chickpeas and lentils thoroughly on kitchen paper.
Transfer them to a large bowl and toss in the oil and curry powder. Spread evenly over the baking tray and bake for 1 hour, turning occasionally.
Mix in the seeds and cashews, turning them well on the tray so that they become flavoured with the spices and oil. Spread out evenly again and put back in the oven to roast for a further 30 minutes, turning halfway through, until everything is golden and the pulses have dried out. Leave to cool on the tray.
Drying, flavouring and roasting. Images: Kathryn Hawkins
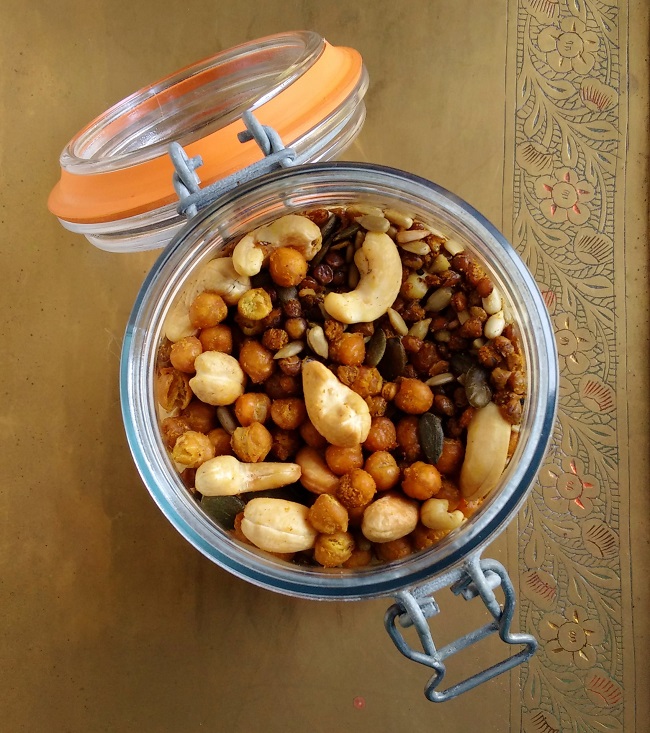
When the mix is completely cold, pack into an airtight container or storage jar, and keep in a cool, dry place. The mix should stay fresh for about 2 weeks, after this time, the pulses may begin to soften.
Storage jar of home-made “Bombay Mix”. Image: Kathryn Hawkins
Rhubarb crumble and custard muffin. Image: Kathryn Hawkins
For the first time in a while, I didn’t have a clump of rhubarb to put under a forcer pot back in January. I had transplanted all my rhubarb crowns to a new bed at the end of last year, and I decided that I would be sensible and let them recover and leave them to grow in the open for a harvest later in the year. Now, of course, I regret not having the lovely pink, tender stems to cook, but, never mind, I look forward to a home-grown harvest whenever it is ready. Actually, the clumps are doing very well, so I don’t think it will be too long before I get to pull my first stems of the year.
April rhubarb. Image: Kathryn Hawkins
In the meantime, I bought some rhubarb from the local farm shop this week and baked up a batch of muffins. Serve them hot with extra stewed rhubarb and custard as a pudding, or enjoy them slightly warm for a spring-time breakfast or tea. Best eaten on the day they are made, although they will freeze, and can be reheated successfully in the microwave for a few seconds.
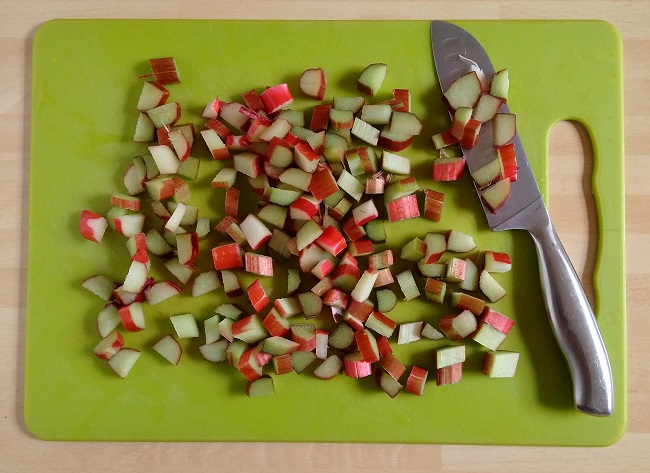
Chopped fresh rhubarb ready for muffin making. Image: Kathryn Hawkins
I made my own tulip-style paper cases, which make large “coffee shop” sized muffins. You will need 15cm squares of baking parchment and a jar or glass the same size as a muffin tin, and then it’s just a case of pressing the paper into the tins to make the case shape. If you prefer, divide the mixture between 12 ready-made paper muffin/cupcake cases and cook for slightly less time.
Making tulip-style baking cases. Images: Kathryn Hawkins
Makes 7 large muffins (or 12 traditional size)
Ingredients
For the crumble top:
85g gluten-free plain flour blend (such as Dove’s Farm)
2g gluten-free baking powder (such as Dr Oetker)
55g dairy-free margarine, softened
55g caster sugar
For the muffin mix:
225g gluten-free plain flour blend
8g arrowroot (optional, but I find it does help bind the ingredients together and gives a chewier texture)
10g gluten-free baking powder
115g caster sugar (or half caster and half vanilla sugar)
60g dairy-free plain or coconut yogurt
115g dairy-free margarine, melted
150ml soya milk
2 teasp good quality vanilla extract
175g rhubarb, trimmed and finely chopped
150ml free-from custard
First make the crumble top. Put the flour and baking powder in a bowl and rub in the margarine until well blended. Stir in the sugar and mix until it all clumps together. Cover and chill until required.
Preheat the oven to 200°C (180°C fan oven, gas 6). Line a muffin tin with 7 large tulip-style paper cases or 12 traditional sized cases. For the muffin batter, sift the flour, arrowroot and baking powder into a bowl. Stir in the sugar and make a well in the centre.
Mix the yogurt, melted margarine, non-dairy milk and vanilla extract together in a jug. Gradually pour into the dry ingredients, mixing well to blend everything together. Stir in the chopped rhubarb.
Spoon half of the mixture equally between the paper cases, and spoon a dollop of custard on top, then cover the custard with the remaining muffin batter. Sprinkle the tops generously with the prepared crumble mixture.
Filling the muffin cases. Images: Kathryn Hawkins.
Bake for about 35 minutes for large muffins, and 25-30 minutes for the smaller size. Cool in the tins for 10 minutes, then transfer to a wire rack to cool. Best served warm and eaten on day of baking.
Straight out of the oven. Image: Kathryn Hawkins
The recipe works well with chopped apple or pear (add a little cocoa powder to your custard for a chocolate filling), or you can add fresh small berries like raspberries, blueberries or cherries. Until next week…….happy cooking!
For Easter, baked lemon and pistachio cheesecake. Image: Kathryn Hawkins
How I love a good cheesecake. But, with regret, it is a dessert that has been off my menu for quite a while due to my intolerance to most dairy products. Over the years, I have been experimenting with different combinations of ingredients but with little success. However, recently I revisited a much-loved, traditional cheesecake recipe, and I think I have achieved a perfect balance between flavour and texture. So at last, I am able to make a cheesecake entirely without cheese and eggs, and this classic dessert is very much back in my life 🙂
My culinary discovery is perfect timing for the Easter holidays. I have given my recipe a seasonal twist by adding lots of zesty lemon flavour and a subtle nuttiness from pistachios although almonds work just as well if you prefer. If nuts aren’t your thing, leave them out altogether and replace them with another 25g gluten-free flour.
My no dairy, no eggs baked cheesecake. Image: Kathryn Hawkins
You will need a deep tin for this recipe as there is a lot of mixture to start with. Once the cheesecake is baked, it does sink down, but you do need the initial volume of mixture to make a deliciously, deep slice with a firm, dense texture. I prefer to use a spring-clip cake tin because there is less chance of damaging the bake as you take it out of the tin, but it isn’t essential. It is more important to make sure you have a depth of at least 7cm so that you can use all the mixture.
Spring-clip cake tin ready for cheesecake mixture. Image: Kathryn Hawkins
Serves: 8-10
Ingredients
For the pistachio base:
50g gluten-free plain flour blend (such as Dove’s Farm)
5g gluten-free baking powder (such as Dr Oetker)
50g dairy-free margarine, softened
50g silken tofu
50g caster sugar
25g ground, shelled pistachio nuts
½ teasp good quality almond extract
Natural green food colour gel (optional)
For the lemon cheesecake:
150g caster sugar
60g silken tofu
350g free-from vegan soft cheese
Finely grated rind and juice 1 unwaxed lemon
35g cornflour (if you prefer a softer, more mousse-like texture, use 25g)
Natural yellow food colour gel (optional)
Approx. 150ml white bean canning liquid (this is the approximate proportion of canning liquid in a standard sized can)
50g sultanas
To decorate and serve:
1 unwaxed lemon
60g caster sugar
25g chopped, shelled pistachio nuts
Preheat the oven to 170°C (150°C fan oven, gas 3). Grease and line a 7cm deep, 18cm diameter spring-clip cake tin. Put all the ingredients for the pistachio base in a bowl and blend together using an electric whisk until smooth and creamy. Spread over the base of the tin and put to one side (you don’t need to cook this layer on its own).
For the cheesecake, whisk the sugar and tofu together until smooth and creamy, then whisk in the vegan soft cheese, lemon rind and juice, and cornflour until smooth and well combined. Add a few drops of food colouring if using.
In another bowl, whisk the canning liquid until thick and foamy, and then gradually fold into the cheese mixture until well combined but trying to retain as much of the airy-foam texture as possible.
Gently stir in the sultanas and pour the cheesecake mixture over the uncooked pistachio base. The tin will be very full. Carefully transfer to a baking tray and bake for 1 to 1 hour 15 minutes until golden and crusty – the cheesecake should still wobble a bit in the middle.
Turn off the oven, leave the door slightly ajar, and allow the cheesecake to cool completely – it will shrink as it cools. Once the cheesecake is cold, carefully remove it from the tin and place on a serving plate or cake stand. Chill for at least 2 hours before serving.
Preparing the lemon decoration and syrup. Images: Kathryn Hawkins
For the decoration:
Thinly peel the rind from the lemon using a vegetable peeler, and cut into thin strips. Pour 150ml water into small saucepan, bring to the boil, add the lemon rind and cook for 1 minute. Drain, reserving the liquid, and leave the rind to cool.
Extract the juice from the peeled lemon. Return the cooking liquid to the saucepan, pour in the lemon juice and stir in the sugar. Heat gently until the sugar dissolves, then bring to the boil and simmer for about 10 minutes until reduced by half.
Transfer to a heatproof jug and leave to cool. When you are ready to serve the cheesecake, scatter the top with the cooked lemon rind and the pistachios. Serve the syrup as a pouring sauce.
A slice of baked lemon and pistachio cheesecake with lemon syrup. Image: Kathryn Hawkins
I hope you all have a lovely Easter holiday, and that the sun shines for at least some of the time. See you next week as usual 🙂
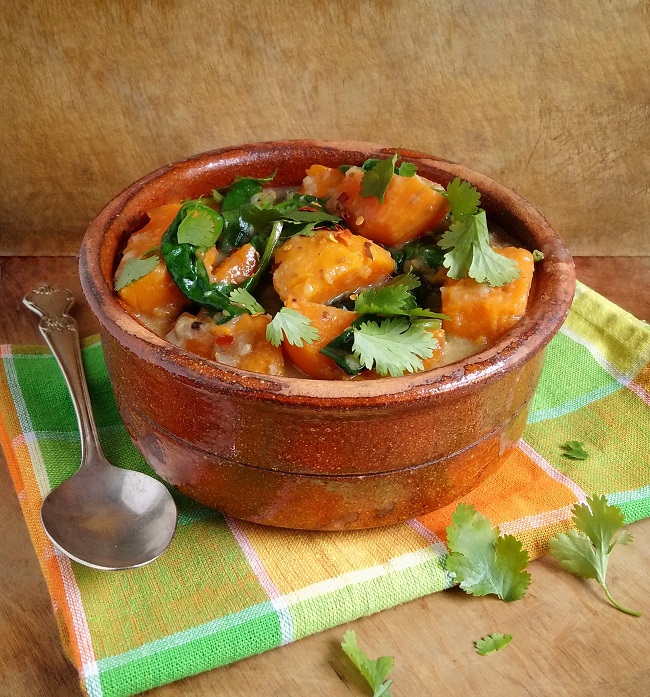
Sweet potato, spinach and coconut stew. Image: Kathryn Hawkins
A deliciously fragrant and comforting recipe for you this week. An old favourite of mine which works just as well with potatoes if you’re not a fan of the sweet variety. It makes a good side dish, but I usually serve it as a main course, spooned over rice.
Preparing sweet potatoes. Image: Kathryn Hawkins
The stew is very easy to make. You can change the proportions of the individual spices to suit your taste. The overall flavour is reminiscent of a green Thai curry without the lemongrass or lime leaves. I’m not a huge chilli fan, I like a hint of heat rather than a major blast, so you may want to increase the chilli-factor for more of a spicy kick. If you have fresh green chillies, grind them up in the spice paste as an alternative to using the dried flakes.
If you have any leftover, the stew makes a good soup the next day. Just blend it up in a food processor with stock or more coconut milk. I hope you enjoy it 🙂
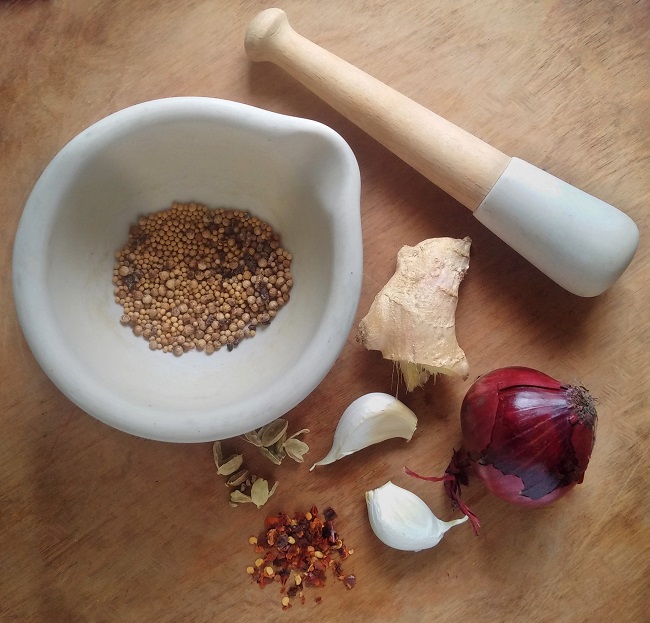
Spice paste ingredients. Image: Kathryn Hawkins
Serves: 4
Ingredients
6 cardamom pods
1 teasp each of coriander and mustard seeds
1 small red onion or shallot
2 garlic cloves
3cm piece root ginger
Dried chilli flakes, to taste
2 tbsp. vegetable oil
400ml canned coconut milk
650g sweet potatoes, peeled and cut into 3cm thick chunky pieces
225g prepared spinach
1 teasp salt
A small bunch fresh coriander, roughly chopped
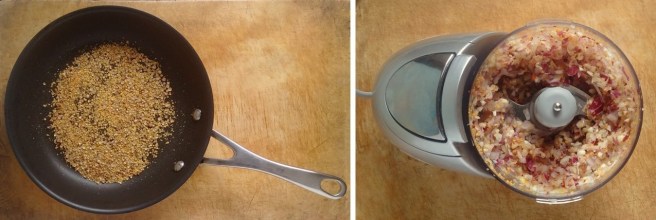
Remove the green casing from the cardamom pods and put the seeds in a pestle and mortar along with the coriander and mustard seeds. Lightly crush them, then toast them in a small frying pan, over a medium heat, for 2-3 minutes until fragrant and lightly toasted but not brown. Leave to cool.
Peel and roughly chop the onion, garlic and ginger and place in a food processor or blender. Add 1 tbsp. oil and the toasted spices and chilli flakes to taste. Blend for a few seconds to make a paste.
Toasting spices and making a spice paste. Image: Kathryn Hawkins
Heat the remaining oil in a large, deep-sided frying pan or wok and gently fry the paste for about 5 minutes until softened but not browned. Pour over the coconut milk, bring to the boil, and stir in the sweet potato pieces. Bring back to the boil, cover, reduce the heat and simmer gently for about an hour until tender.
Add the spinach in batches, stirring well to make sure it gets completely coated in the coconut liquor. Add the salt, cover and continue to cook gently for a further 10 minutes, stirring occasionally, until then spinach is wilted and the sauce is thick.
The 3 stages of stew. Images: Kathryn Hawkins
To serve, sprinkle the stew with a generous amount of chopped, fresh coriander, and extra chilli if liked. Serve immediately, spooned over rice.
Sweet potato stew, ready to serve. Image: Kathryn Hawkins
Oatmeal and seed porridge with berry compote. Image: Kathryn Hawkins
It still feels more wintry than spring-like here in central Scotland. We have had a blue-sky day today, the first for a while, and the temperature is slowly rising. The snow is beginning to thaw slowly, but most of the garden is still covered in a thick, white crust of powdery snow. The snowdrops under the hedge are the first to emerge at long last and I am relieved to see that they have survived their week inside a snow-cave – what robust little flowers they are 🙂
After-the-snow snowdrops. Image: Kathryn Hawkins
One of my favourite warming breakfast dishes is porridge, and it seems a lot of people agree: porridge has become the super-star amongst breakfast cereals, and the supermarket shelves are stacked out with different varieties and all sorts of flavours.
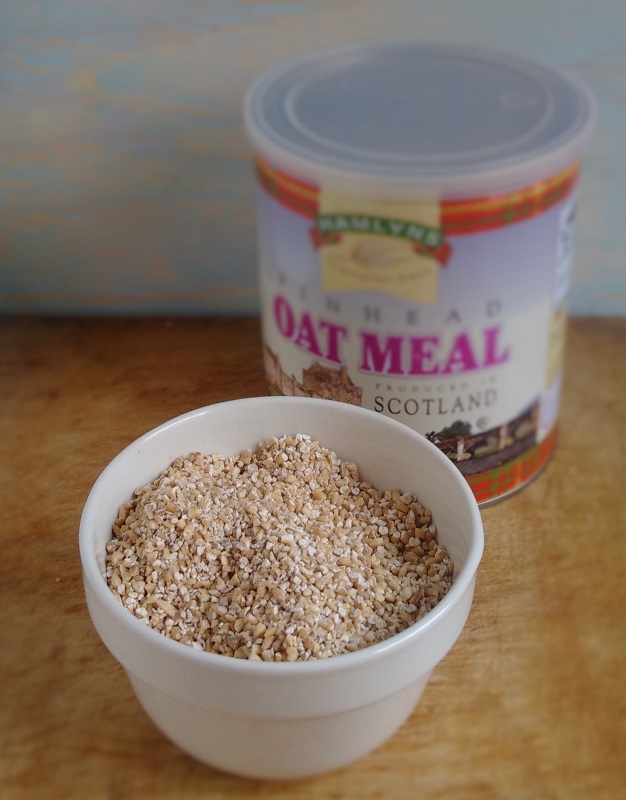
Pinhead oatmeal for “proper” porridge”. Image: Kathryn Hawkins
I like my porridge made the traditional way, which means I prefer to use oatmeal (or groats) rather than rolled oats. However, it’s not an instant breakfast and requires some organisation: the oatmeal requires overnight soaking before it can be cooked. But if you have a slow-cooker, you can cut down on the preparation: just mix everything up in the slow-cooker the night before and leave it on a low setting until the next morning, by which time it’s ready to eat as soon as you want it.
The oatmeal in the picture above is a local Scottish brand and is not guaranteed gluten-free. As you will know, oats themselves don’t contain gluten, but there is a contamination risk from other grains during processing, so if you do have a serious gluten allergy, you should seek out gluten-free oatmeal.
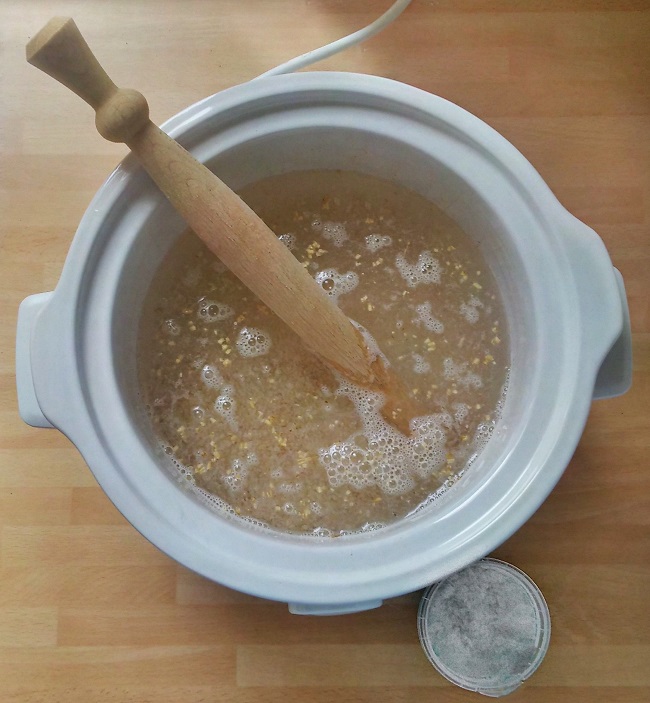
Slow-cooker porridge: oatmeal, water and salt. Image: Kathryn Hawkins
If you don’t fancy leaving your slow-cooker on overnight, slow-cook the porridge as you like, and once cooked and cooled, the porridge will keep in the fridge for a few days. You can take out a portion and reheat it with you favourite soya, rice, nut or oat milk when you’re ready. Just pop a portion in a microwave-proof bowl, mash it with a fork and stir in some milk, then reheat on High for about 1 ½ minutes. Alternatively, you can reheat the porridge in a saucepan, with milk, in the same way.
The following quantity will make about 8 servings: pour 1.1litre water into your slow-cooker and stir in 175g pinhead oatmeal. Add a pinch of salt and mix well. Cover with the lid and switch the cooker on to the Low setting. Leave to cook, undisturbed, overnight (for 8-10 hours), until thick and soft. To serve, stir well and serve with hot, non-dairy milk mixed in. Add sugar or syrup to sweeten if you like, and top with sliced banana, fresh berries, grated apple, dried fruit etc.
Homemade seed mix and my frozen summer berries. Images: Kathryn Hawkins
For an extra nutritious start to the day, I like to stir a heaped tablespoon of ground seeds into my bowl porridge and top with some summer berry compote.
For the seed mix, grind 3 tbsp. flax seeds with 2 tbsp. sunflower seeds, 1 tbsp. chia seeds and 1 tbsp. sesame seeds – I use a coffee grinder to do this. Stir in 1 to 2 tbsp. ground almonds, pecans or Brazil nuts. Store in the fridge in an airtight container and use to sprinkle over anything you like for some extra nutritious nuttiness!
The berry compote is made from my freezer supply of home-grown raspberries, blackberries and blueberries. I simply put a quantity, still frozen, in a saucepan with the lid on and sit the pan over a very low heat until the berries soften and cook. I add a little vanilla sugar once the berries are cooked. Delicious eaten hot or cold.
A spoonful of my favourite oatmeal porridge. Image: Kathryn Hawkins
I’m always on the look-out for interesting bakes. I have a large folder of recipe articles saved from magazines and newspapers going back many years, along with various scraps of note paper, tucked in between, containing my culinary jottings from articles that have taken my fancy. Every now and then I go through the folder and decide which idea to experiment with next.
And so to this week’s post. A cake that came to my attention a few months ago when I was experimenting in the kitchen and making vegan meringue from the canning water in a tin of beans. This recipe uses the beans as well as the canning liquid. Sounds weird, but eating is believing, and I was pleasantly surprised by the texture and how good it tasted.
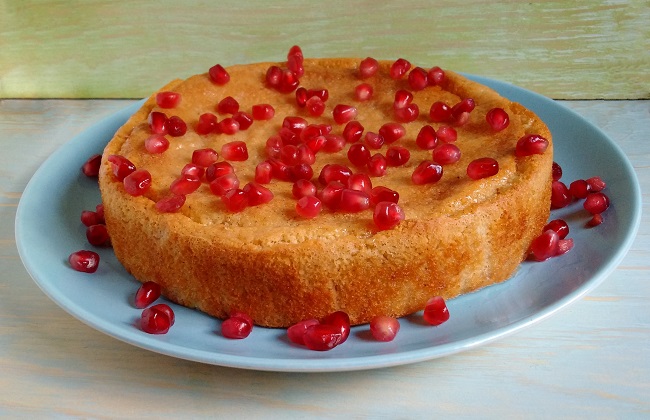
Vanilla bean torte, sliced and ready for eating. Image: Kathryn HawkinsCanned cannellini beans for cake-making. Image: Kathryn Hawkins
Apart from the beans, the other ingredients are mainstream. The flavour can be varied depending on your preference. I used a generous amount of vanilla paste, but fresh orange and lemon rind would work well, as would almond extract if you like a marzipan flavour. I think the mixture could take about 15g cocoa powder added to it for a chocolate version. My cake is soaked in a vanilla flavoured syrup but the syrup can be adapted to suit your chosen cake flavour. There is no added fat or oil in the recipe which makes the syrup an important addition as it not only adds extra sweetness and flavour, but it helps keep the cake moist too. I hope you enjoy it 🙂
Serves: 8-10
Ingredients
400g can cannellini beans in water
50g polenta
75g silken tofu
215g caster sugar
55g ground almonds
1 tbsp vanilla bean paste
Pomegranate seeds to decorate
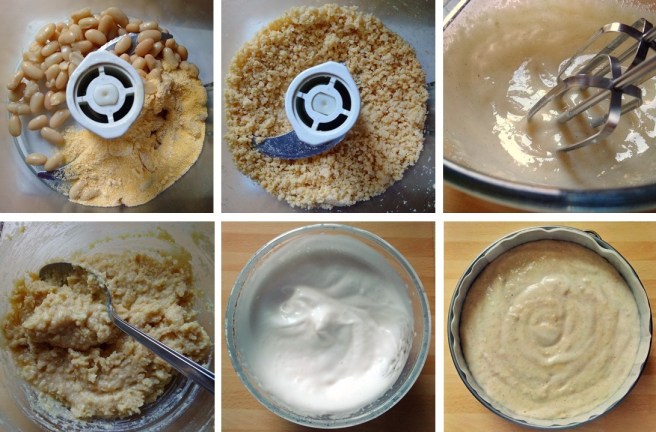
Preheat the oven to 180°C (160°C fan oven, gas mark 4). Grease and line an 18cm diameter cake tin. Open the can of beans and drain well, reserving the canning liquid. Put the beans in a blender or food processor. Add the polenta and blitz for several seconds until well ground. Leave to one side.
Whisk the tofu with 115g sugar until well blended and creamy. Add the ground almonds, half the vanilla paste and the ground bean mixture and stir to form a thick cake batter.
In another bowl, whisk the bean canning liquid until stiff and foamy, then gently fold this into the cake batter. Transfer to the prepared tin, smooth the top and bake for about 1 to 1 ¼ hours, until golden and firm to the touch.
Making bean torte. Images: Kathryn Hawkins
While the cake is in the oven, prepare the syrup. Put the remaining sugar in a small saucepan and add 150ml water. Heat, stirring, until the sugar dissolves then bring to the boil and simmer for 8-10 minutes, until reduced and syrupy. Remove from the heat and stir in the remaining vanilla paste. Keep warm.
Once the cake is cooked, skewer the top all over and slowly pour over the vanilla syrup so that it soaks into the cake evenly. Leave to cool completely in the tin.
Making and adding vanilla syrup. Images: Kathryn Hawkins
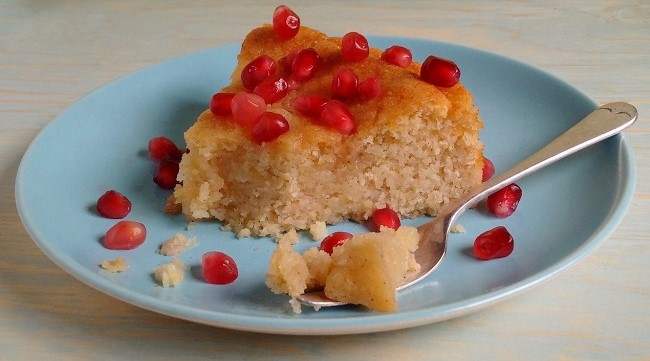
To serve, carefully remove the cake from the tin and place on a serving plate. Sprinkle with pomegranate seeds just before slicing. The cake will keep, covered, in a cool place or the fridge, for 3 to 4 days.
Decorating the torte with pomegranate seeds. Image: Kathryn Hawkins
Vanilla bean torte, deliciously moist and full of flavour. Image: Kathryn Hawkins
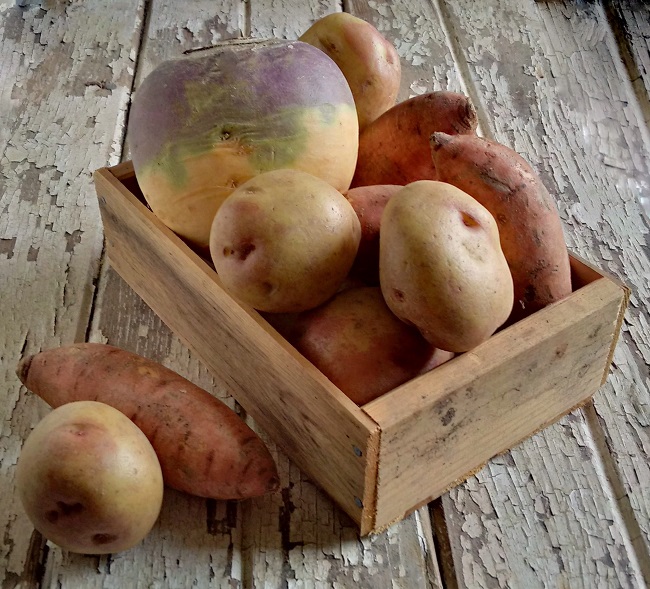
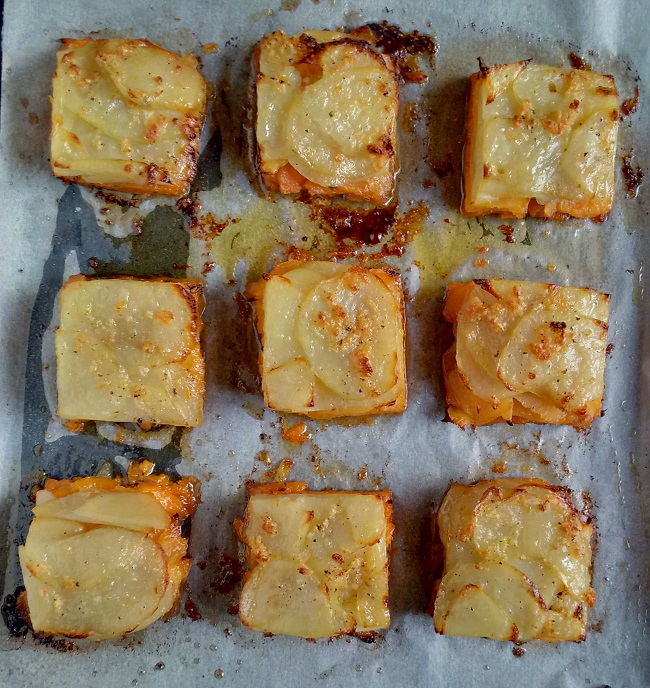
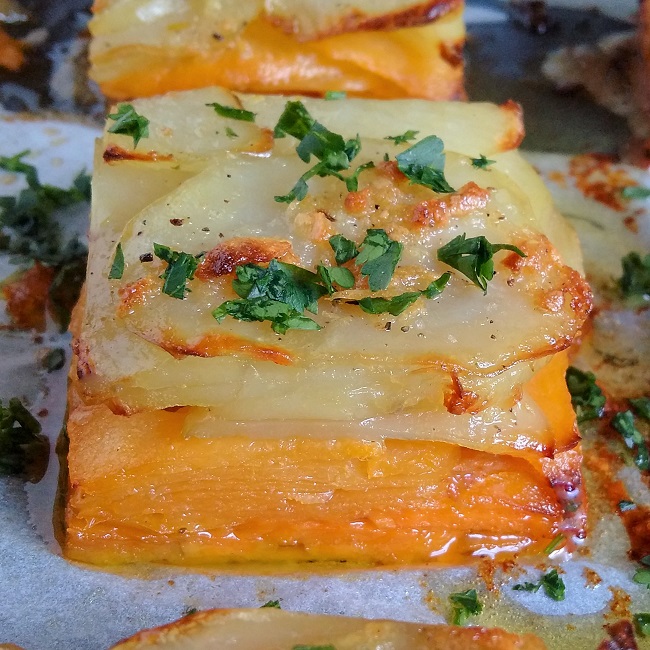
I like all root vegetables, but sadly I struggle to grow anything other than potatoes. Fortunately, I am able to buy a good variety from local farm shops and this feels like the next best thing to growing them myself. This week’s recipe can be made with any root you have to hand. The cooking method bakes the different vegetable layers to a melting-tenderness and is a perfect choice if you want a vegetable dish suitable for preparing ahead. Once the basic layering and baking is done, the cooked vegetables will sit quite happily in the fridge for a couple of days before baking again to serve. You can scale the recipe up easily if you’re feeding a crowd and mix and match the vegetables you use.
Turnip, sweet potatoes and King Edward potatoes ready for preparation. Image: Kathryn Hawkins
My version makes an 18cm square layer which cuts neatly into 9 portions and uses sweet potatoes, turnip (or swede, depending on where you come from) and potatoes, but carrots, parsnips and celeriac work fine as well, and you can also use just 1kg of your favourite root, if you prefer. The most important things to remember are to slice the vegetables thinly and evenly (preferably use a food processor or mandolin) and make sure you cook the vegetables until completely tender during the first baking – test with a skewer to be completely sure.
400g main crop potatoes such as King Edward or Maris Piper
75ml vegetable stock
3 tbsp. olive oil
40g dairy-free margarine (or butter if you eat it)
1 large clove garlic, peeled and crushed
Salt and freshly ground black pepper
Freshly chopped parsley
Preheat the oven to 180°C (160°C fan oven, gas 4). Grease and line a straight-sided, deep 18cm square cake tin with baking parchment.
Peel and thinly slice all the vegetables – I use a food processor for this. Either layer in the tin individually or mix all the vegetables together and arrange evenly in the tin.
Layering the root vegetables in individual layers. Images: Kathryn Hawkins
Pour over the stock and drizzle with the oil. Cover the top of the tin with foil and bake for at least an hour until completely tender. Remove the foil and leave to cool completely.
Cut a square of firm cardboard the same size as the inside of the tin and wrap in a layer of foil. Place a sheet of baking parchment over the vegetables and sit the foil-wrapped board on top. Weigh down the vegetables evenly using 3 or 4 same-weight cans or jars and chill overnight or for up to 2 days before serving.
Pressing the vegetable layer. Images: Kathryn Hawkins
When ready to cook, preheat the oven to 200°C (180°C fan oven, gas 6). Remove the weights, foil board and baking parchment and carefully remove the pressed vegetable square from the tin.
Cut into 9 squares and arrange on a lined baking tray. Melt the margarine (or butter) and mix in the garlic and seasoning. Brush the mixture generously over the vegetable squares.
Ready for baking. Images: Kathryn Hawkins
Bake the squares for about 30 minutes until golden and hot. Serve immediately sprinkled with chopped parsley. A great accompaniment to any kind of roast.
Just baked root vegetable squares. Image: Kathryn HawkinsRoot vegetables: meltingly tender and packed full of flavour. Image: Kathryn Hawkins
A short post this week, but I wanted to publish a recipe to celebrate Scotland’s national poet, Robert Burns, whose anniversary falls on January 25th each year. These cute, haggis-shaped sweet treats are a version of my Chocolate Haggis for a Burns Night supper (gluten-free, dairy-free, vegan) recipe from last year. You can mix and match ingredients according to the bits and pieces you have to hand. If you don’t like marzipan, use ivory or cream coloured fondant icing instead.
Makes: 16
Ingredients
50g unsalted butter or coconut oil
50g heather honey or golden syrup
75g free-from dark chocolate, broken into pieces
75g free-from oatcakes, finely crushed
40g toasted fine oatmeal
50g currants
50g toasted flaked almonds, crushed
Icing sugar to dust
400g natural marzipan
Put the butter (coconut oil) and honey (golden syrup) in a saucepan with the chocolate, and heat very gently, stirring, until melted.
Remove from the heat and stir in the crushed oatcakes, oatmeal, currants and almonds. Mix well until thoroughly combined. Leave to cool, then chill for about 30 minutes until firm enough to form into portions.
Divide the mixture into 16 and form each into an oval-shaped sausage. Chill for 30 minutes until firm.
Divide the marzipan into 16 and flatten each into a round – use a little icing sugar if the marzipan is sticky. Wrap a disc of marzipan around each chocolate oat cluster; press the edges to seal and then twist the ends to make a haggis shape.
Mini chocolate haggis preparation. Image: Kathryn Hawkins
Store the mini haggis at a cool room temperature until ready to eat. The marzipan will become sticky if refrigerated. Best enjoyed with coffee and a wee dram. Until next week, I raise a glass to you all and say “Slàinte!” – to your good health 🙂
Mini haggis and a wee dram. Image: Kathryn Hawkins
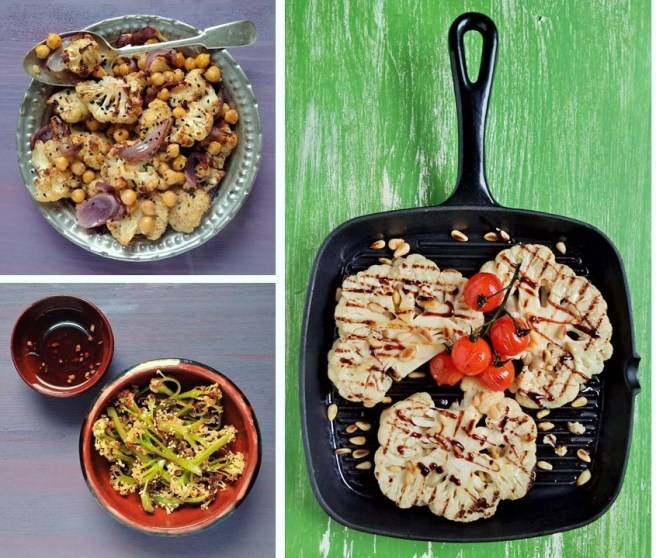
Cauliflower roasted, stir fried, and steaks. Image: Kathryn Hawkins
When it comes to the winter months of the year, trying to buy only home-grown, British vegetables (as is my want) can be quite challenging especially if you desire something other than starchy root crops. In my opinion, the humble cauliflower reigns supreme at this time of year as it is a welcome diversion in flavour, taste and texture.
However, my thoughts haven’t always been so positive towards the cauliflower. At school, cauliflower was boiled beyond all recognition and served as a watery, soft mush – enough to put anyone off the vegetable for life. Yet, today, it is one of the “on trend” vegetables. If you cook it correctly, cauliflower has a meaty texture, sweet flavour, and best of all, it can be cooked in many ways. It’s full of vitamin C and K, as well as B vitamins and dietary fibre. Easy to prepare, you can eat just about all of it from the inner the cream-coloured curds to the outer wrapping of juicy leaves.
Preparing cauliflower. Images: Kathryn Hawkins
The leaves help protect the curds, so try to buy the vegetable with as much greenery as possible. If you want to store cauliflower for a few days, keep the leaves intact and place the stalk-end in a shallow depth of water in a bowl, in the fridge, and the cauliflower should keep fresh for up to a week.
To prepare, discard any damaged outer leaves, but keep the inner, more tender leaves – these can be cooked like cabbage. Once the curds are free from leaves, slice or break the head into florets. Prepared cauliflower florets dehydrate quickly so are best cooked soon after preparation.
I rarely cook cauliflower in water, but if I do, it is for a very short time only – the curds can get very spongy very quickly when cooked in water, and the flavour will be lost.
Following are my current 3 favourite ways of cooking cauliflower for maximum taste and texture: roasting, griddled steaks and stir-fried sprouting stems.
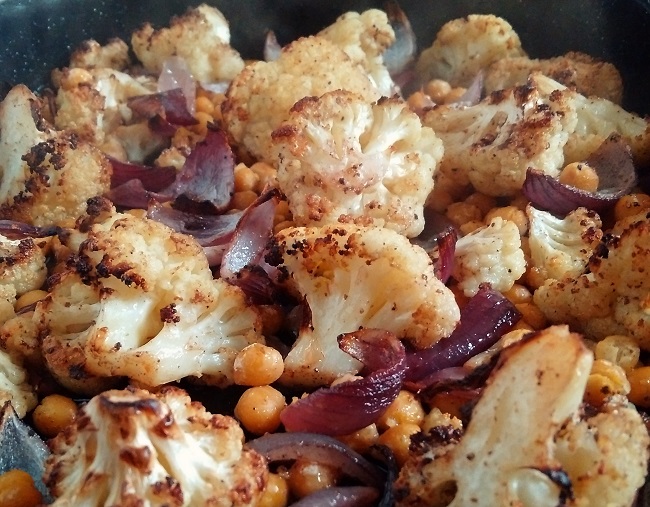
Roast cauliflower with Indian spices. Image: Kathryn Hawkins
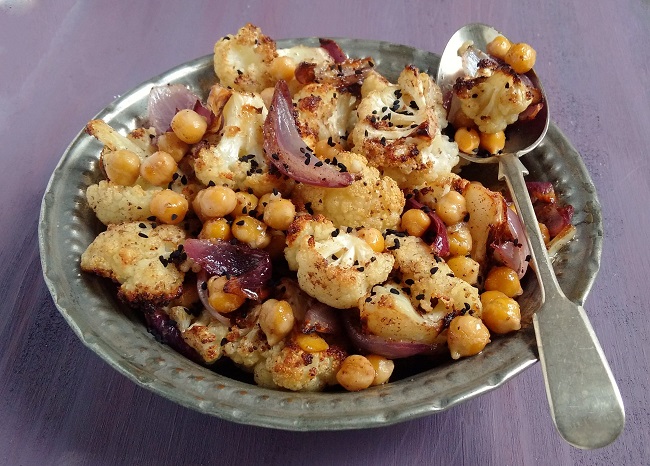
Toss chunky florets of cauliflower and thickly sliced red onion in sunflower oil. Season with garam masala to taste. Spread out on a baking tray, season with salt and pepper and roast at 200°C (180°C fan oven, gas 6) for about 30 minutes, turning occasionally. Mix in cooked chick peas and return to the oven for a further 10 minutes until everything is lightly browned. Drain well, then serve sprinkled with black onion seeds. For a main meal, mix into freshly cooked Basmati rice and sprinkle with fresh coriander and roasted cashew nuts.
Probably the most popular way to serve cauliflower at the moment is as a steak. I usually cut the prepared curds into 2cm thick slices and poach them in simmering water for a couple of minutes before frying or placing on a griddle or barbecue – a large frying pan is good for poaching as it enables you to lift out the steaks more easily. Use tongs to make sure you drain the steaks well, and dry them on kitchen paper so that excess cooking water is removed before cooking in oil.
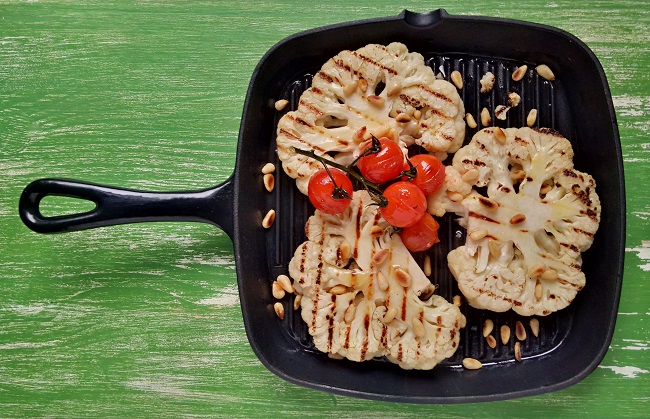
Pre-cooking cauliflower steaks. Image: Kathryn HawkinsCauliflower steaks with Italian flavours. Image: Kathryn Hawkins
Brush the prepared cauliflower steaks lightly with vegetable oil on one side. Heat a griddle pan or frying pan until very hot, then add the streaks, oiled-side down. Press into the pan, reduce the heat to medium, and cook for 2-3 minutes until golden or lightly charred. Brush the top with more oil, and turn the steaks over. Cook for a further 2-3 minutes or until cooked to you liking. Serve straight from the pan drizzled with extra virgin olive oil, balsamic glaze or reduction, and toasted pine nuts. Top with griddled cherry vine tomatoes and fresh basil.
One of the new kids on the block in the cauliflower world, is a variety with fine green stems and small, flowery curds. I was a bit sceptical when I first saw it (mainly because of the price), but I have since been converted. The stems are best cooked for a minimum time, just as you would for asparagus – steamed, griddled or stir fried – in order to retain the crisp texture. Unusually, the stems become even brighter green when cooked. The flavour is mild and sweet. To make sure the stems cook evenly, break or cut the stems up so that you have same-size thickness pieces.
You can keep these stems in a jug of water in the fridge for a couple of days to keep them fresh, as they do lose texture quickly. These sweet stems are a perfect choice for a single serving or to add to a combination of other vegetables.
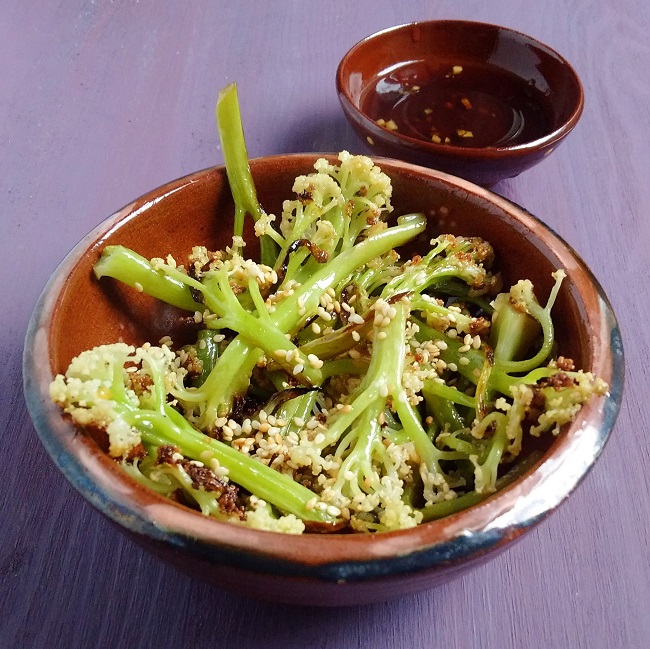
Heat a tablespoon of vegetable oil in a deep-frying pan or wok until hot. Add prepared raw stems and stir fry in the hot oil for 3 minutes. Cover with a lid, reduce the heat, and cook for a further 1 minute. Turn off the heat, add finely chopped garlic to taste and drizzle with a little honey or agave syrup and gluten-free teriyaki marinade. Put the lid back on and leave to stand in the residual steam for a further minute. Drain the stems, reserving the juices, and pile into a warm serving bowl. Sprinkle with toasted sesame seeds. Mix a little sesame oil into the pan juices and serve alongside the stems as a dressing or dip. Utterly delicious 🙂
Teriyaki and sesame dressed cauliflower stems. Image: Kathryn Hawkins
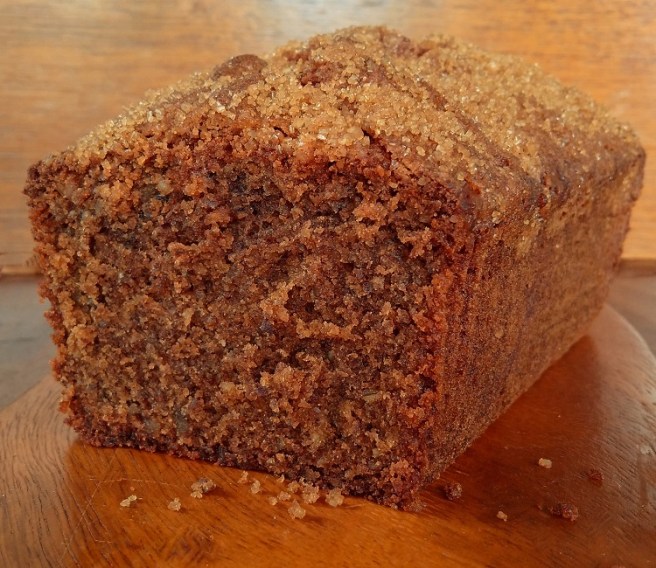
Coffee and pecan loaf cake. Image: Kathryn Hawkins
I had planned that my first recipe post of the year would be a recipe bursting with nutrition and vitality – new year, fresh start, etc. However, it’s been so cold these past few days, when it came to it, I simply couldn’t face anything too healthy. Instead, I’ve been in the kitchen keeping warm by baking, and thus, my first recipe of 2018 is one of my favourite cakes.
Sun-up on a frosty January morning. Image: Kathryn Hawkins
I took this shot of the garden from an open window about 9am yesterday morning, just as the sun was rising. The image below is the window adjacent to the one I opened – the beautiful ice pattern is on the inside!
Window pane iced-up on the inside. Image: Kathryn Hawkins
So, in my books, cold weather is enough justification for cake, and I start my new year blog posts with one of my “desert island” cakes: a coffee one.
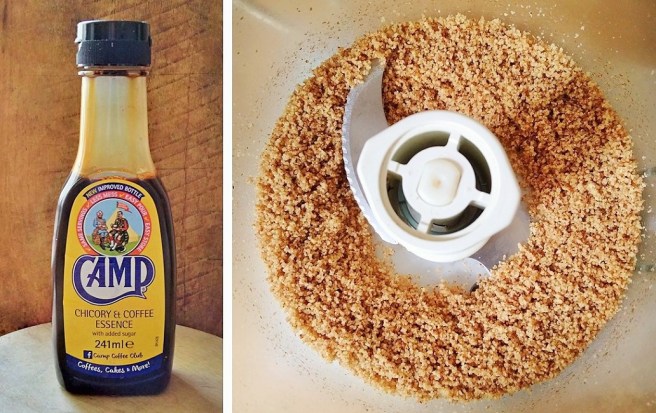
I’ve been using a heritage brand of coffee and chicory essence as a coffee flavouring in baking for as long as I can remember. It was our “turn to” flavouring long before decent barista-style instant coffee and espresso shots came to British shores. Sadly, the glass bottle packaging of old has been replaced by a plastic version (making it look less authentic), but the old-fashioned label is practically unchanged in design and the product within tastes just as good as always. I haven’t found anything that comes close to the concentrated flavour it offers in baking. In summer, I use it to make a base for a deliciously smooth and well-rounded iced coffee, ice-creams and chilled custards.
My favourite coffee flavouring, and finely ground pecan nuts. Images: Kathryn Hawkins
The sweet, nutty flavour of pecans goes particularly well with coffee. You can use walnuts if you prefer, but I find them a bit overpowering if you really want the taste of coffee to dominate your bake. For this recipe, grind up some of the pecans very finely to make a “flour” for a better formed cake crumb, and then add the remainder as finely chopped pieces for extra nutty texture. I add a little arrowroot to help bind the mixture but you can leave it out if you prefer. I hope you enjoy the flavours as much as I do 🙂
Serves: 10
Ingredients
225g pecan halves
125g gluten-free plain flour (such as Dove’s Farm)
8g arrowroot
2 level teaspoons gluten-free baking powder (such as Dr Oetker)
175g light brown soft sugar
3 large eggs (or, for a vegan cake, use 180g silken tofu)
175ml sunflower oil
4 tsp Camp coffee essence or similar
50g Demerara sugar
Preheat the oven to 180°C (160°C fan oven, gas 4). Grease and line a 1kg loaf tin. Put 125g pecans in a blender or food processor and blitz until very finely ground. Chop the remaining pecan nuts finely.
Sift the flour and arrowroot into a bowl and stir in both lots of pecans along with the sugar. Beat the eggs (or tofu) with the oil until well blended, and then thoroughly mix into the dry ingredients.
Transfer to the prepared tin. Smooth the top and put the tin on a baking tray. Scatter the top of the cake with the Demerara sugar. Bake for about 1 hour 10 minutes until risen, lightly cracked, and firm to the touch. A skewer inserted into the centre will come out clean when the cake is cooked. Leave to cool in the tin for 30 minutes, then turn on to a wire rack to cool completely. Wrap and store for 24 hours for better flavour and texture.
Dense, moist textured coffee and pecan loaf cake. Image: Kathryn HawkinsCoffee and pecan loaf cake, ready to serve. Image: Kathryn Hawkins