Welcome to my blog all about the things I love to grow and cook. You'll find a collection of seasonal gluten-free, dairy-free and vegan-friendly recipe posts, as well as a round up of my gardening throughout the year. I wish you good reading, happy cooking and perfect planting!
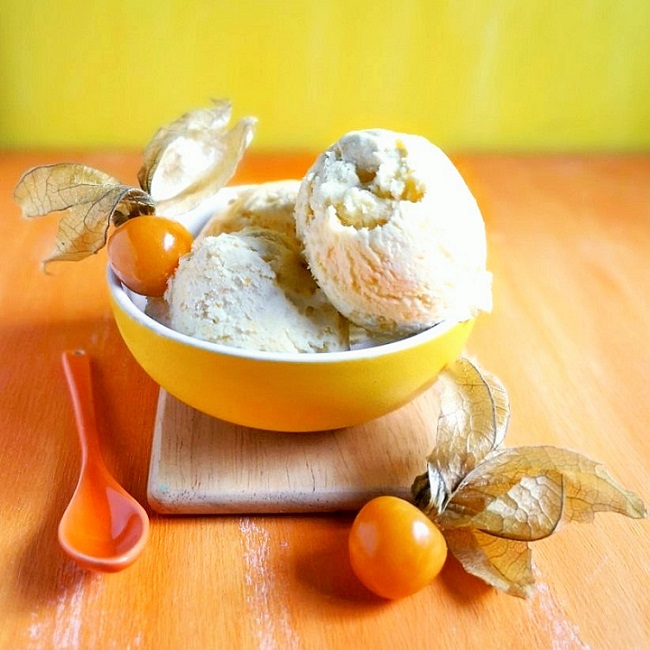
Hello again. It’s been super-warm here in the UK for several days now, so, it feels the right time to publish an easy ice cream recipe. Of course, this will mean that the weather is guaranteed to break, but hey ho, we do need some rain 🙂
Fruity scoop. Image: Kathryn Hawkins
This ice cream really is very easy to make. Just 3 ingredients. No ice cream machine required although you can of course use one if you prefer. You will need to use a bit of elbow-grease to beat the mixture twice, but that’s the only effort necessary.
Take 3: fruit, cream and condensed milk. Image: Kathryn Hawkins
You can make the ice cream with any fruit. I happened to have a lot of physalis (Cape gooseberries) when I made up this batch. Fruits like gooseberries, blackberries, cherries, apricots, plums, blackcurrants and other currants will need to be cooked into a pulp for best results, but other softer fruits like raspberries, blueberries, strawberries, peach and mango can just be blitzed in a blender. Whether you sieve to remove seeds is up to you. I prefer the added texture from seeds and skins and use the pulp as it is.
Serves: 4-6
Ingredients
300g ripe fruit for cooking such as physalis, gooseberries, blackberries, black or red currants OR 250ml-275ml unsweetened fresh fruit purée
370g can plant-based condensed milk
400ml plant-based double cream
1. To prepare fruit for cooking, place in a saucepan with 2tbsp water, heat until steaming, then cover and simmer for 5-7 minutes until soft. Leave to cool them blitz with a blender until smooth. Sieve if preferred.
Making cooked fruit purée. Images: Kathryn Hawkins
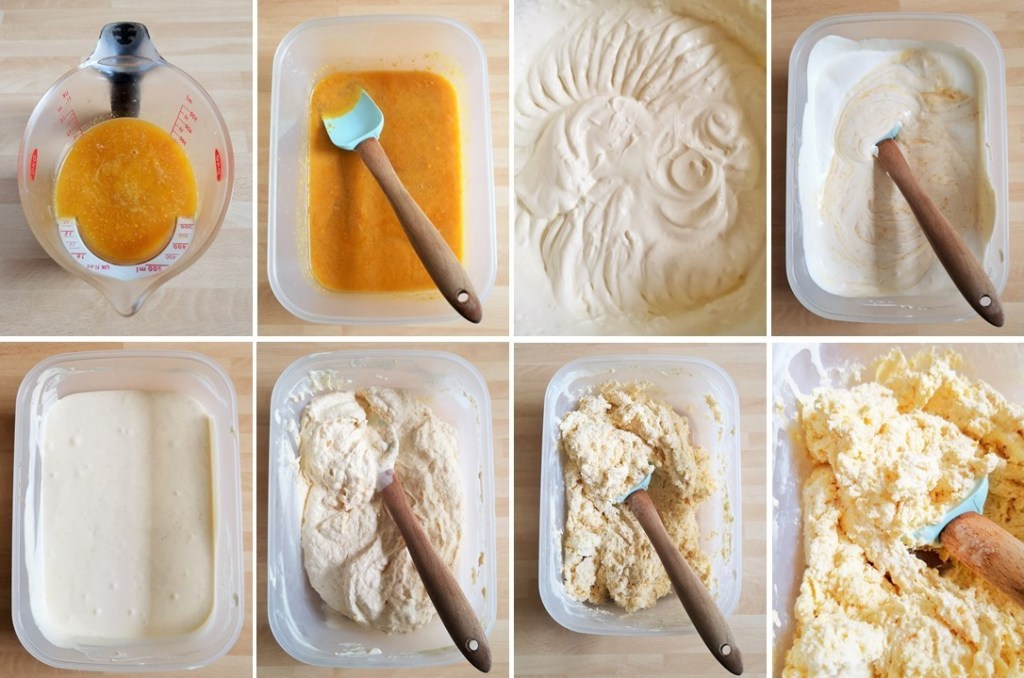
2. Pour the fruit purée into a freezer-proof container and mix in the condensed milk.
3. Whip the cream until softly peaking then fold into the mixture, stirring well until combined.
4. Freeze for about 2hr until the mixture is soft and slushy. Beat well to break up the mixture and return to the freezer for a further 45-60 minutes until it has firmed up again. Beat once more, then keep in the freezer until ready to serve.
Preparing the ice cream. Images: Kathryn Hawkins
And that’s it. If your freezer is particularly cold, you may need to let the ice cream stand at room temperature for a few minutes before scooping. For longer term storing, pop a lid on the container, and keep in the freezer for up to 3 months.
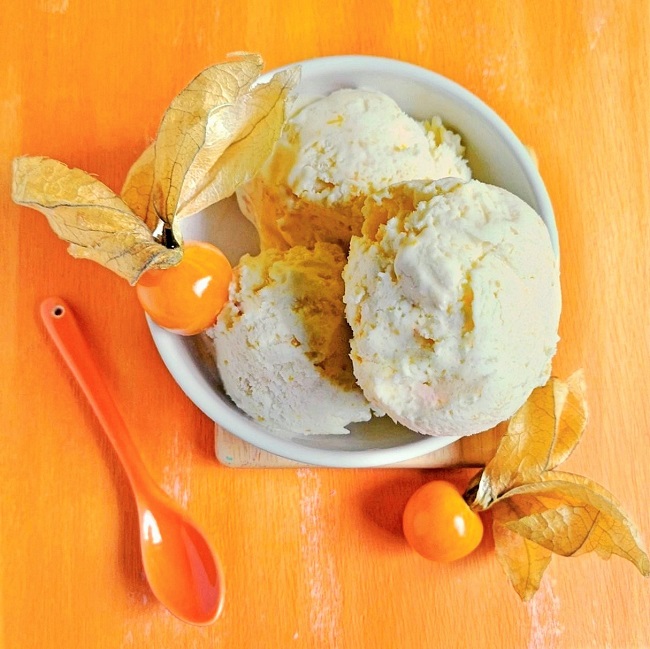
3 ingredient fruit ice cream. Image: Kathryn Hawkins
I’ll be out in the garden again for my next post at the end of the month. See you then and thanks for stopping by 🙂
Hello again. Before I moved to Scotland, I had never heard of a macaroni pie before. I soon learnt that, along with a whole range of other flavours, macaroni pies are familiar fayre in the hot cabinet of most Scottish baker’s shops as a popular takeaway treat. If you prefer to eat your pies at home, head for the chiller cabinet at the supermarket and you will find a wide selection of pastry pies to choose from. Traditionally made with a hot water crust pastry shell and filled with a thick, creamy macaroni and cheese sauce filling, the macaroni pie certainly makes a substantial and very tasty snack.
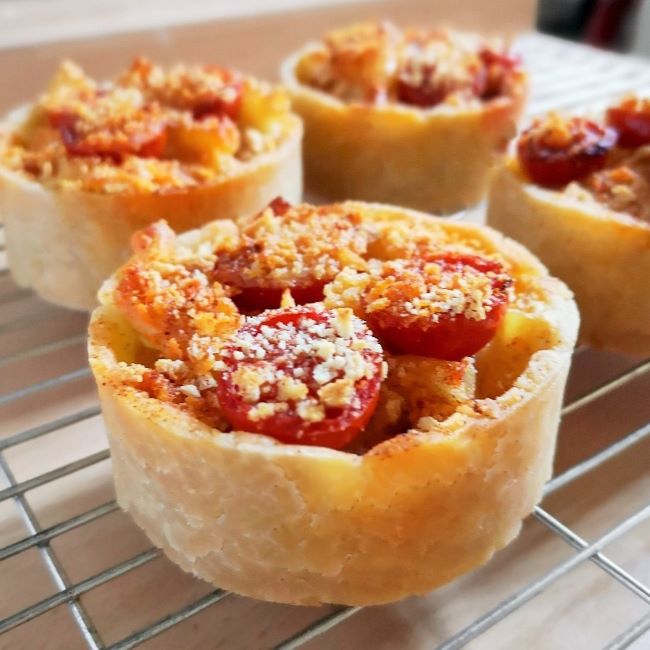
Macaroni pie up close. Image: Kathryn Hawkins
A few years ago, I wrote a pie book called Comfort Pie I made my own version of the macaroni pie as part of a collection of recipes influenced by pastry dishes from all over the world. Several years later, I thought it was about time I give my recipe a bit of an upgrade and I have developed a gluten-free and vegan version which I have to say is pretty tasty.
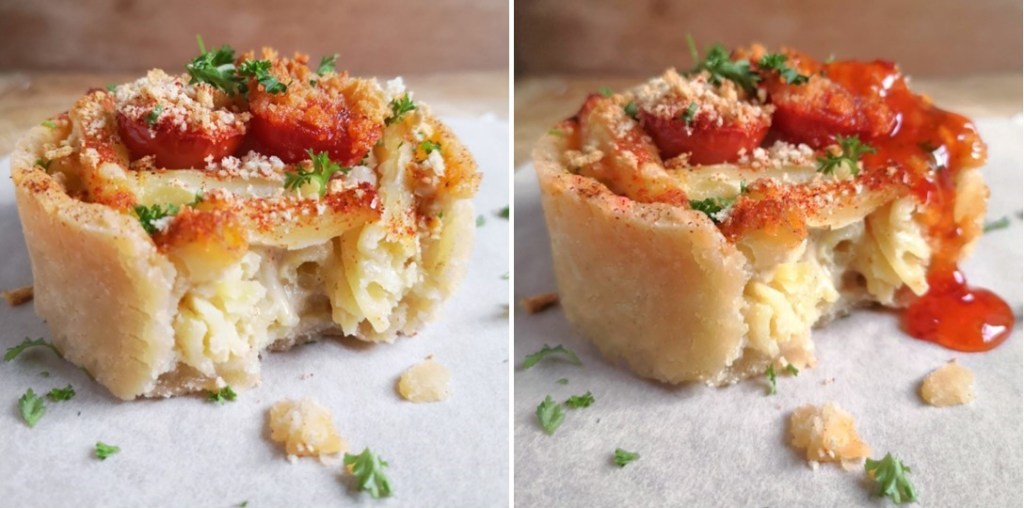
How do you like yours? With or without sauce? Images: Kathryn Hawkins
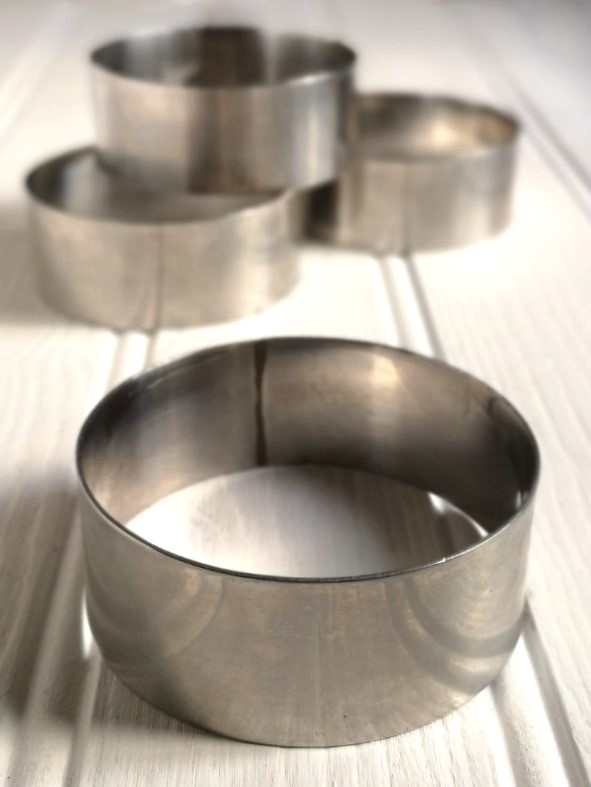
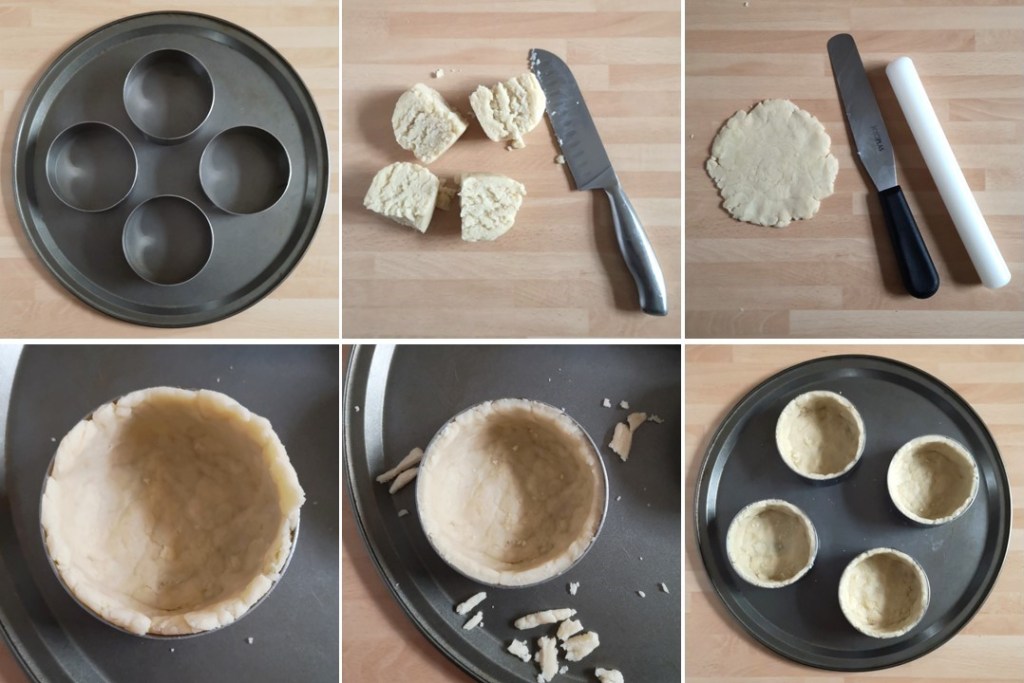
There are a few steps to the recipe, but it can be made in stages if you don’t have the time to get the pies made and baked on the same day. The pies are made in steel rings which I appreciate aren’t an everyday piece of kit but a great investment if you do like pie making. If you don’t have the rings, you could adapt the recipe to make smaller pies in muffin tins.
Steel baking rings. Image: Kathryn Hawkins
The recipe is broken into 3 different parts, and I have included a lot of pictures to help explain the different sections. I do hope you might give the recipe a try and, if you do, I hope enjoy them.
Makes: 4
Ingredients
115g free-from macaroni
For the sauce:
15g plant-based butter
15g gluten-free plain flour
200ml plant-based milk (I use oat milk)
4tsp yeast flakes
½ teasp onion salt
For the pastry:
25g plant-based butter
25g white vegetable fat (such as Trex)
215g gluten-free plain flour (I used Doves Farm Freee flour)
For the topping:
6 cherry tomatoes, halved
2tbsp free-from dry white breadcrumbs
½ teasp onion salt
½ smoked paprika
20g plant-based butter
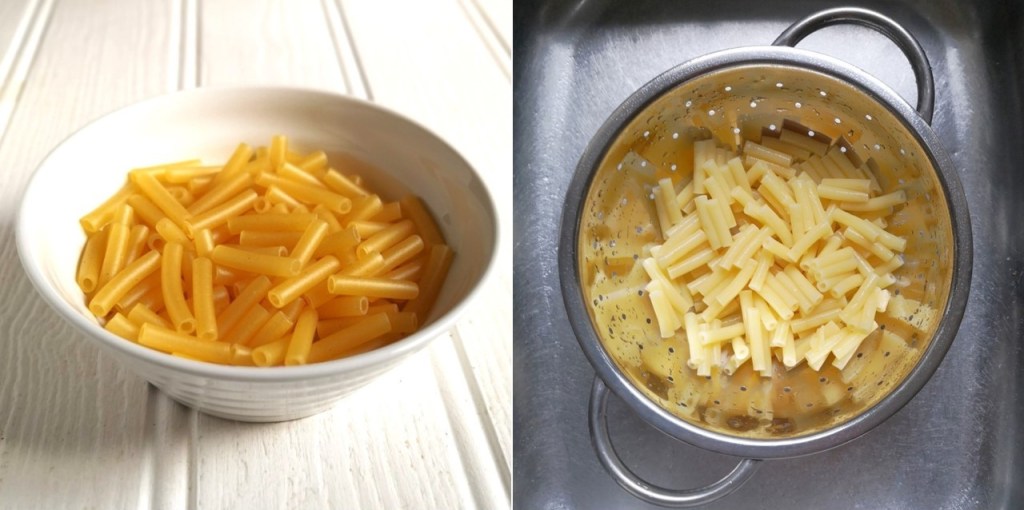
1.Bring a saucepan of water to the boil and cook the macaroni for 9-10 minutes – slightly under-cook the pasta so that it doesn’t go too mushy during baking later on. Drain well; leave aside.
Raw and cooked macaroni. Images: Kathryn Hawkins
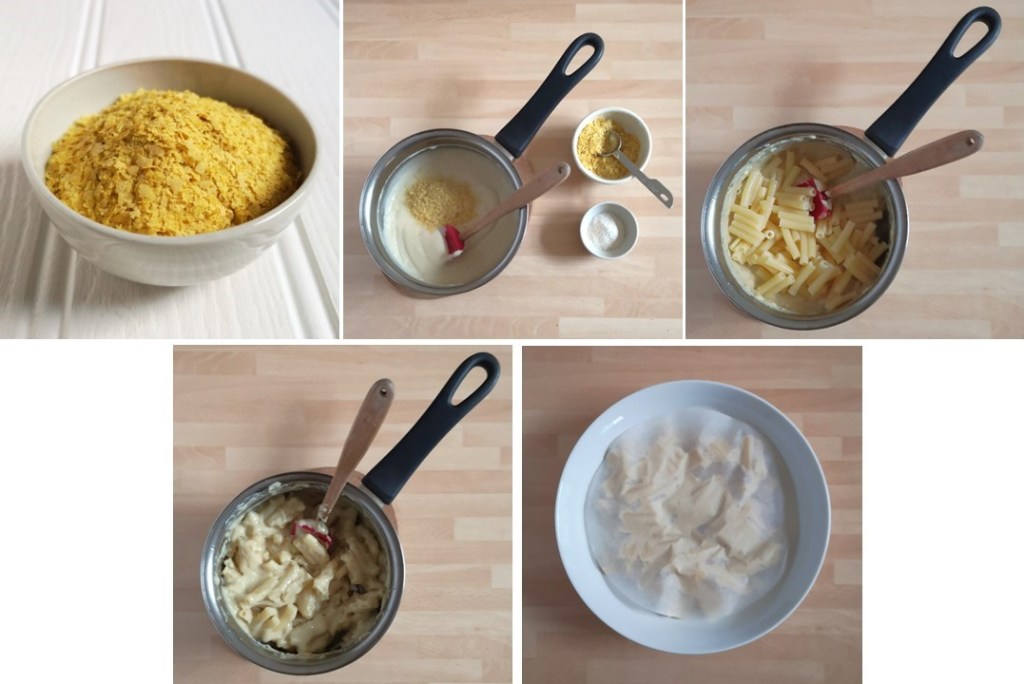
2. Next make the sauce. Melt the plant butter in a saucepan and stir in the flour. Remove from the heat and blend in the plant milk. Return to the heat, and cook, stirring, until the mixture boils and thickens. Simmer for 1 minute, then turn off the heat and stir in the yeast flakes and onion salt.
3. Stir the cooked macaroni into the sauce. Transfer to a bowl and cover the surface with a layer of baking parchment – this helps prevent a skin forming. Leave to cool, then chill until required.
Macaroni pie filling. Images: Kathryn Hawkins
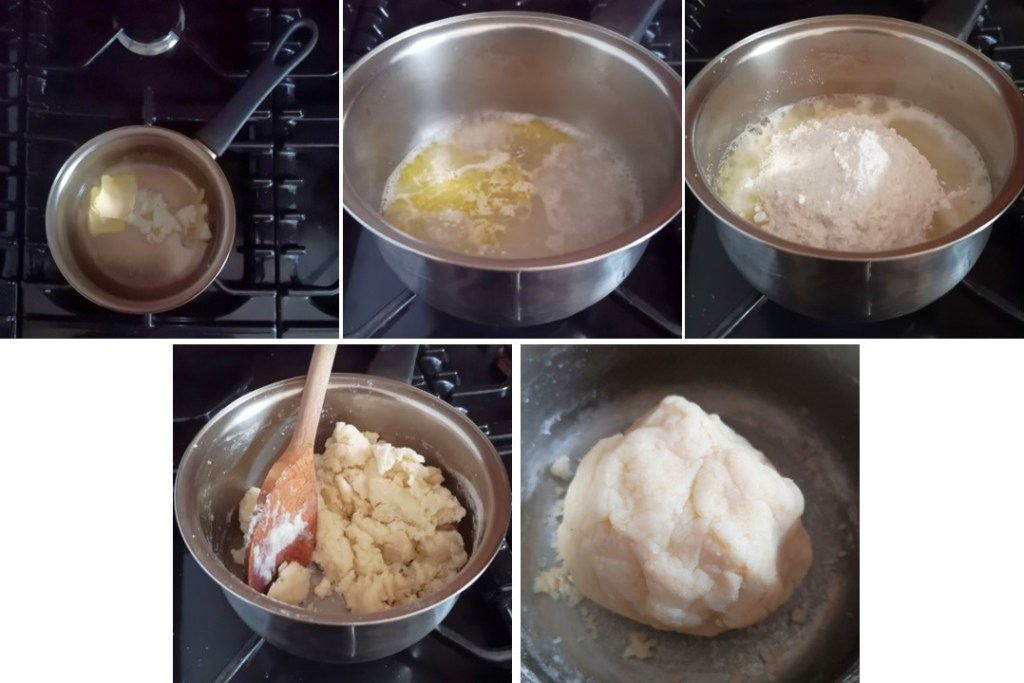
4. For the pastry, put the plant butter and vegetable fat in a saucepan and pour over 125ml water. Heat gently until melted, then bring to the boil and add the flour all in once go. Beat the mixture quickly, turn off the heat and continue to mix vigourously until a dough ball forms in the saucepan. You may find it easier to let the mixture cool slightly, then bring the pastry together with your hands.
Making hot water crust (pie) pastry. Images: Kathryn Hawkins
5. Arrange 4 x 9cm diameter, 4cm deep steel pastry rings on a baking tray. Divide the pastry into 4 equal pieces. Work on one piece at a time, keep the other portions covered in foil. Roll out a piece of pastry to an approx. 16cm round and carefully transfer to a pastry ring.
6. Mould the pastry to fit inside the ring, then trim away any excess to neaten the top edge. Continue to make 3 more pastry cases in the same way. Leave to cool before filling. You can chill the pastry at this stage, ready to cook at a later time. Use this pastry when it is warm. As it cools it becomes dry and brittle and will be impossible to mould. You can warm the pastry carefully, by heating for a very few seconds in the microwave to make it more pliable.
Making the pie cases. Images: Kathryn Hawkins
7. When you are ready to cook the pies, preheat the oven to 200°C, 180°C fan oven, gas 6. Spoon macaroni filling into each pastry case to fill them to the top.
8. Arrange cherry tomato halves on on top of each. Mix the crumbs, paprika and onion salt together and sprinkle a little over each. Dot the tops with a little plant butter. Bake for 35 minutes until thoroughly hot, crispy and golden.
9. Stand for 10 minutes before removing from the pastry rings. Serve the pies hot or warm, sprinkled with chopped parsley. Accompany with sweet chilli sauce or tomato ketchup. Alternatively, leave the pies to cool completely on a wire rack, then chill until you are ready to reheat them the next day. They will also freeze very well.
Filling and baking the pies. Images: Kathryn Hawkins
Pies on a cooling rack. Image: Kathryn Hawkins
I’m feeling rather peckish after writing up this week’s post. I do love a good pie, and I think this hot water crust pastry is one of the most successful gluten-free pastries. Until next time, I hope you have a good few days until my next post. Thanks and best wishes 🙂
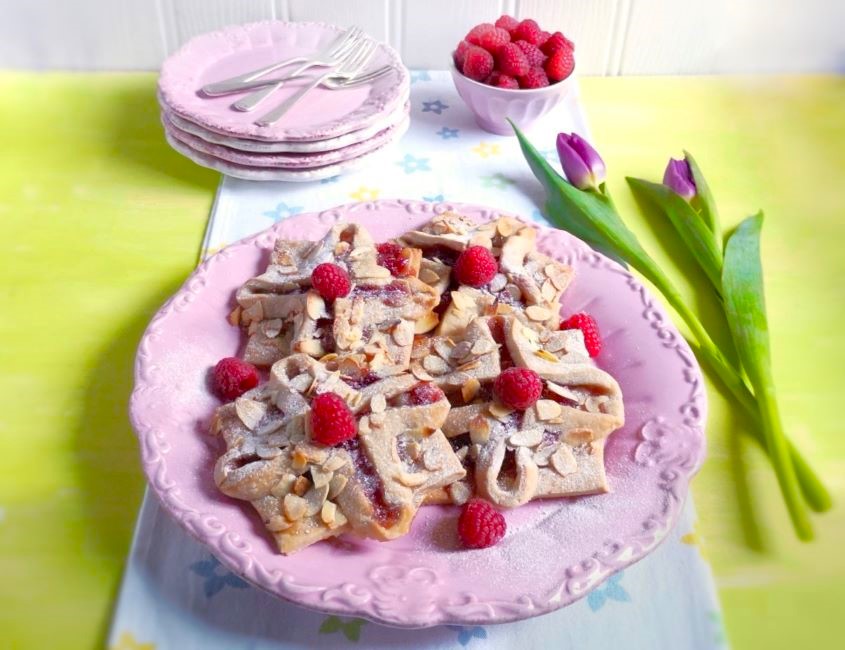
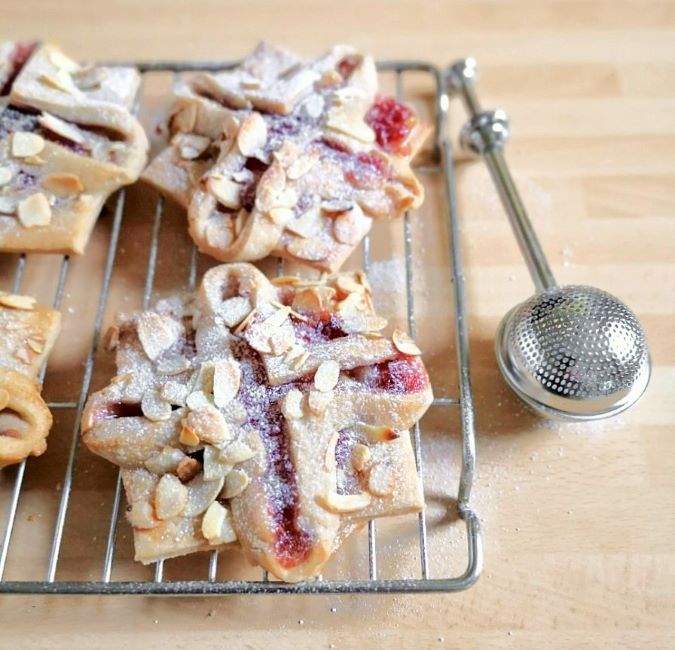
Homemade raspberry and almond pastries. Image: Kathryn Hawkins
Hello again. I hope you have had a good Easter holiday. I had intended to post this recipe before the holidays began, but time ran away with me. I have had a few days away visiting family and friends, and now I’m back home and ready to post again.
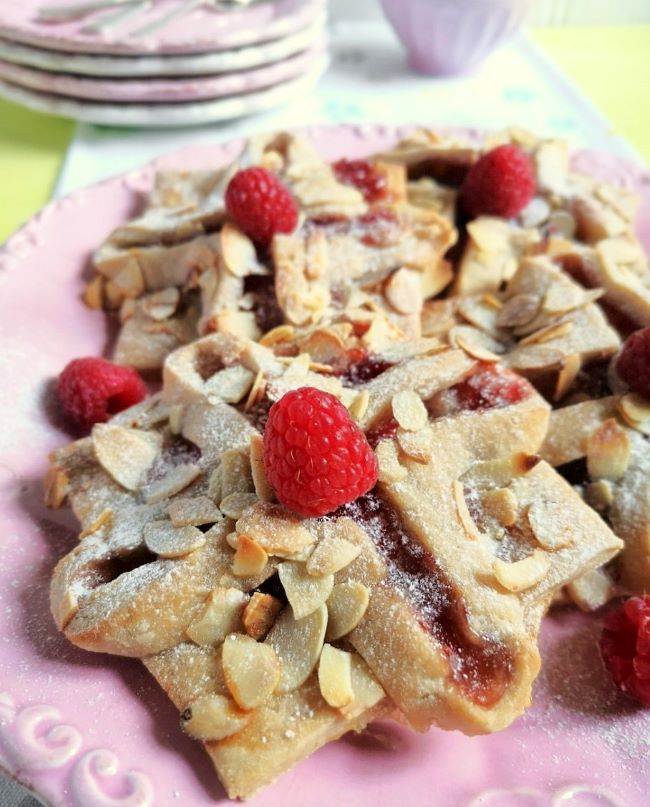
Up close on raspberry and almond pastries. Image: Kathryn Hawkins
One of my first blog posts was a recipe for gluten-free rough puff pastry. It has had many hits but I am always looking for ways to tweak the recipe. Here’s the original if you are a newcomer to my blog: Gluten-free rough puff pastry (with dairy-free & vegan variation) The latest version of the recipe uses my favourite combination of gluten-free flours and also adds psyllium husk to the dough. The latter makes a much more silky dough which is very much easier to roll and shape. If you don’t have the individual flours, just use a ready blended plain flour. I also use all plant butter in this version. However, whilst the dough is quite puffy and light, it has lost some of the flakiness of the original recipe. I guess it’s up to personal taste which version you prefer and for what purpose you want to use it.
Pastries with a light dusting of sugar. Image: Kathryn Hawkins
The pastries tasted pretty good though despite the lack of pastry layers. The texture of this latest pastry is crisp and chewy, and I am pleased with the flavour. If you do compare the 2 recipes yourself, let me know what you think, and which you prefer. By the way, the recipe makes twice as much pastry you need for making 4 pastries so you can freeze the other half to make something else at a later date.
Makes: approx. 625g pastry. Use half the pastry quantity to make 4 pastries
Ingredients
For the pastry dough:
70g cornflour (corn starch)
60g tapioca flour
60g white rice flour
60g glutinous rice flour
½tsp salt
2tsp psyllium husk powder
150g plant butter, cut into small pieces
For the pastries:
100g marzipan
60g raspberry jam
1tbsp oatmilk
1tsp carob syrup
20g flaked almonds
Icing sugar to dust
Fresh raspberries to serve
1.Put all flours in a large mixing bowl with the salt and psyllium husk powder, and mix together until well blended. Stir the butter into the flour to coat each piece in flour.
2. Gradually stir in between 260-275ml cold water until the mixture comes together to make a soft, very lumpy dough. Turn out on to a lightly floured work surface and roll the dough into a flat, roughly rectangular shape approx. 35cm x 12cm.
Pastry ingredients and making the dough. Images: Kathryn Hawkins
3. Now the rolling and folding begins. The aim is to consistently roll out the pastry to the same dimensions, and then to fold it, turn it and seal it in the same way each time; this is how the pastry layers form. Fold the top one third of the pastry down and the bottom one third up and over the top pastry; twist the pastry round so that the open edge is facing to the right, and gently press the 3 open edges of the pastry together with the rolling pin.
4. Repeat this rolling, folding, turning and sealing 3 more times and then chill the pastry for 30 minutes. The mixture will be sticky but try to refrain from dusting with too much flour as this will dry the texture of the pastry.
5. After chilling, repeat the rolling, folding, turning and sealing another 3 times, working the pastry each time in the same direction. You should now begin to feel that the fat is more blended into the flour. Chill the pastry for a further 30 minutes.
6. Repeat the process 3 more times and you should see that the fat pieces have practically disappeared. Wrap and chill for at least 1 hour before using. From start to finish, you should aim to roll and fold the pastry 10 times.
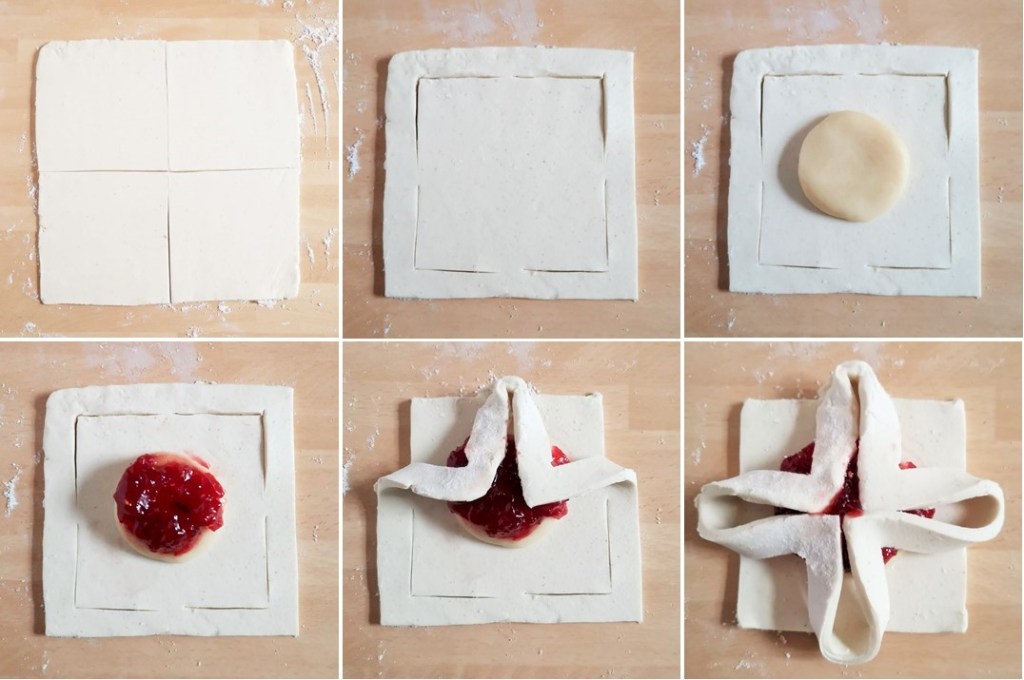
7. Cut the pastry in half, and use half to make the pastries – wrap and freeze the other half for later use. Roll out the pastry to make a 24cm square. Trim the edges as necessary.
Rolling and folding rough puff pastry. Images: Kathryn Hawkins
8. Cut the pastry into 4. Working on 1 square at a time, starting cutting 1cm inside the edge of one side as if about to cut out an inner square. Just before you reach the centre point, leave a 1cm space of uncut pastry then continue the cutting down the rest of the side. Repeat this cutting on the other 3 sides, and then cut the other pastry squares in the same way.
9. Knead the marzipan; cut into 4 and shape each piece into a small round to fit in the centre of each square. Top with jam. Bring the corners together in the centre of the pastry.
Shaping the pastries. Images: Kathryn Hawkins
10. Place on a lined baking tray. Chill for at least 1hr before baking.
11. When ready to cook, preheat the oven to 220°C, 200°C fan oven, gas 7. Mix the milk and syrup together and glaze the pastries. Sprinkle with flaked almonds and bake for about 20 minutes until risen and lightly golden. Dust with icing sugar and serve warm.
Glazing, sprinkling, baking and dusting. Images: Kathryn Hawkins
Single pastry. Images: Kathryn Hawkins
I hope you enjoy the pastries. It is a bit of a long recipe this week, but if you do have the time, the pastries certainly make a lovely treat. As the for pastry update, my jury is out on which version I prefer but I will keep adapting and reposting any progress I make. Until next time, take care and best wishes 🙂
Hello again. I was intending to post a frozen dessert recipe this week, so confident was I that spring had sprung and that the warmer days were here. However, these past few days have seen a return to winter. Much of the UK has been under a blanket of snow this week. So far, none of the white stuff here (fingers crossed), it has been dry, bright and clear, but it is far too chilly to be thinking about or eating cold food. Instead, I have been back in the kitchen cooking comforting recipes instead.
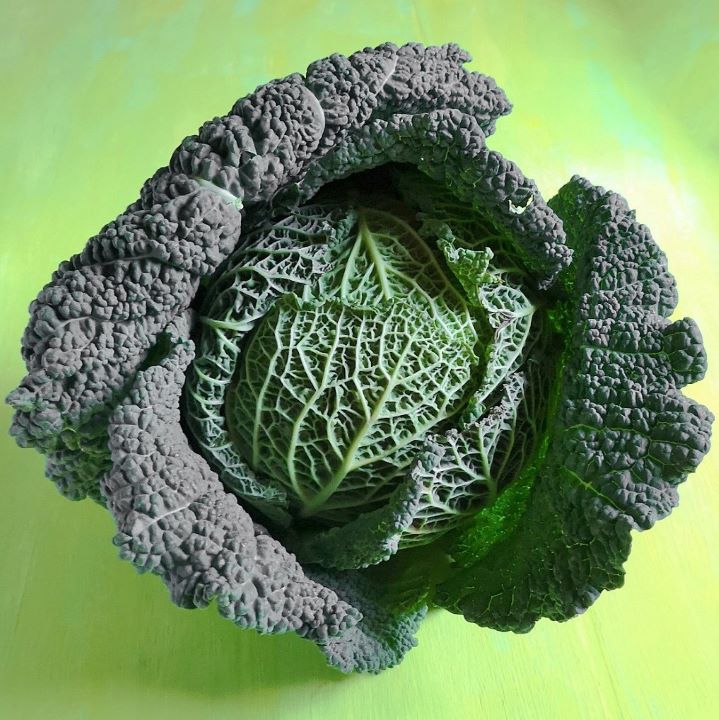
Magnificent Savoy cabbage. Image: Kathryn Hawkins
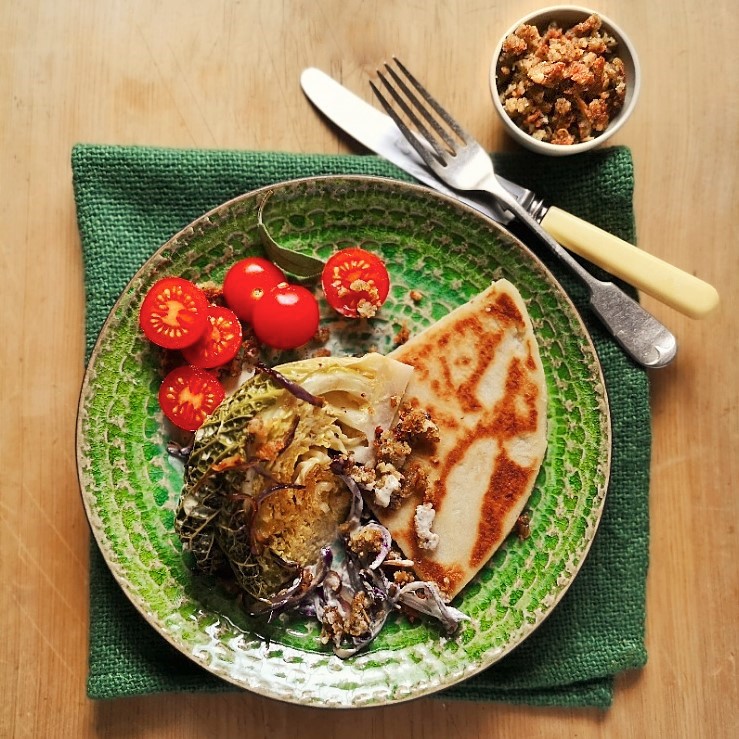
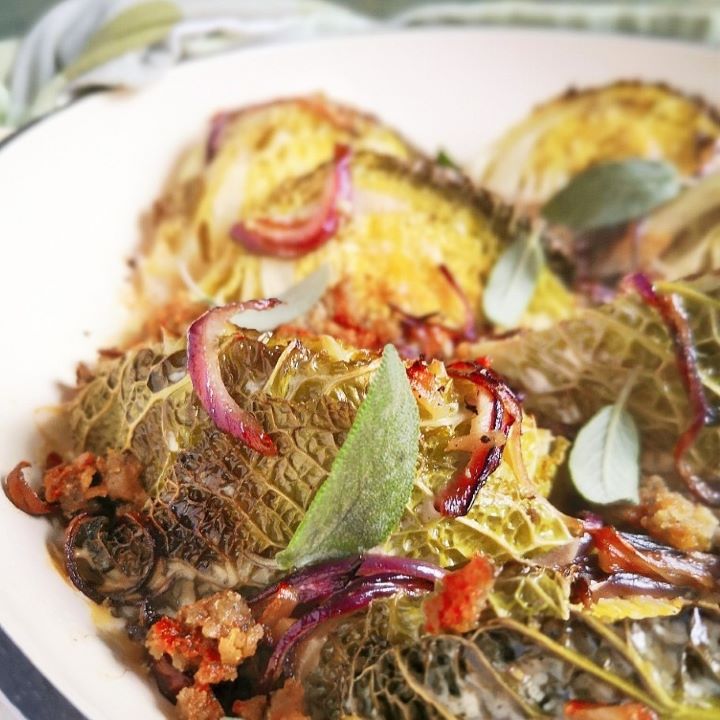
I am a huge fan of green veg, and this handsome specimen is one of my favourites. My recipe this week is a simple gratin of baked Savoy cabbage wedges with onion, a plant-based cream sauce and crispy crumbs of sage and onion to finish. Very hearty as a meal on its own, the gratin is also a great accompaniment to a stew or roast. I enjoyed mine with a pan-fried tattie scone (or two) – if you fancy making your own, here’s a link to my very easy recipe: Tattie scones (gluten-free; dairy-free; vegan)
Baked cabbage served with tattie scone. Image: Kathryn Hawkins
Serves: 4
Ingredients
1 whole Savoy cabbage
2tbsp vegetable oil + extra for greasing
1 large red onion
2 cloves garlic
50g plant butter
Salt and freshly ground black pepper
A few fresh sage leaves
350ml plant-based double cream
50g gluten-free sage and onion stuffing mix
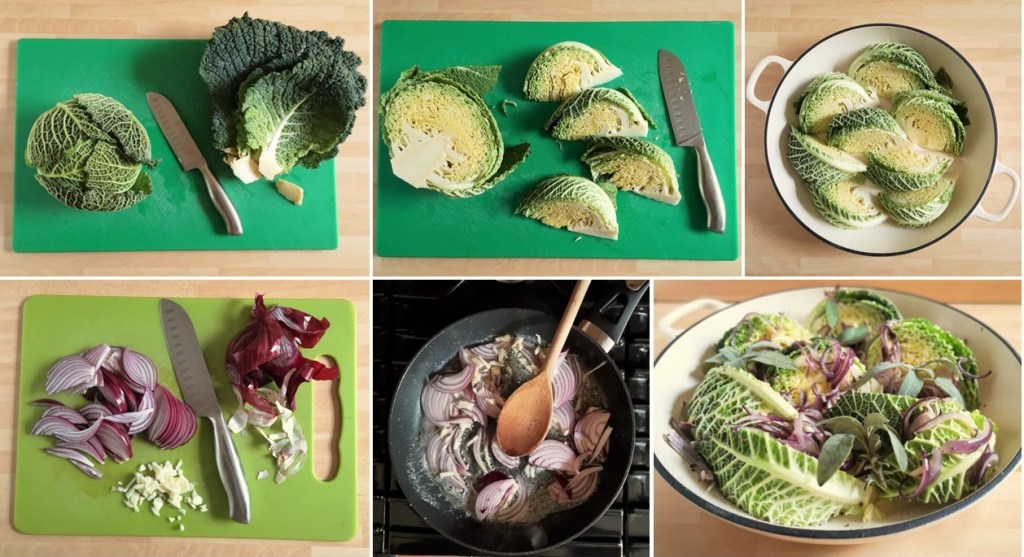
1. Trim the cabbage and remove the outer leaves, then cut into 8 wedges. Lightly oil a baking dish and arrange the cabbage in the dish in a single layer. Check out my other cabbage recipes for ways to use up the outer cabbage leaves here: One Savoy cabbage, three recipes (gluten-free; dairy-free; vegan)
2. Peel and slice the onion, and peel and finely chop the garlic. Melt half the butter with the oil and gently fry the onion and garlic for about 5 minutes to soften but not brown. Spoon over the cabbage and season well. Sprinkle with sage leaves.
Cabbage preparation. Images: Kathryn Hawkins
3. There is no need to preheat the oven for this recipe, just place the dish in the oven and set the temperature to 180°C, 160°C fan oven, gas 4. Bake for 30 minutes.
4. Pour over the plant cream and cover with a lid or foil and bake for a further 30 minutes until tender.
5. While the cabbage is cooking, soak the stuffing mix in 100ml boiling water until reconstituted. Melt the remaining butter and heat until bubbling, then break up the stuffing and add to the pan. Keep stirring and breaking up the stuffing until it forms clumps and starts to brown and crisp up; this takes about 6-7 minutes. Drain on kitchen paper and keep warm.
6. To serve, discard the sage leaves and sprinkle over the crispy crumbs. Garnish with fresh sage if liked.
Finishing the gratin. Images: Kathryn Hawkins
Baked cabbage with sage and crispy crumbs. Image: Kathryn Hawkins
Perhaps by the time I write my next post, spring will have returned and it will be more fitting to publish a recipe for warmer days. Until then, wrap up warm if you need to and enjoy the sights and sounds of the new season. Thanks for stopping by 🙂
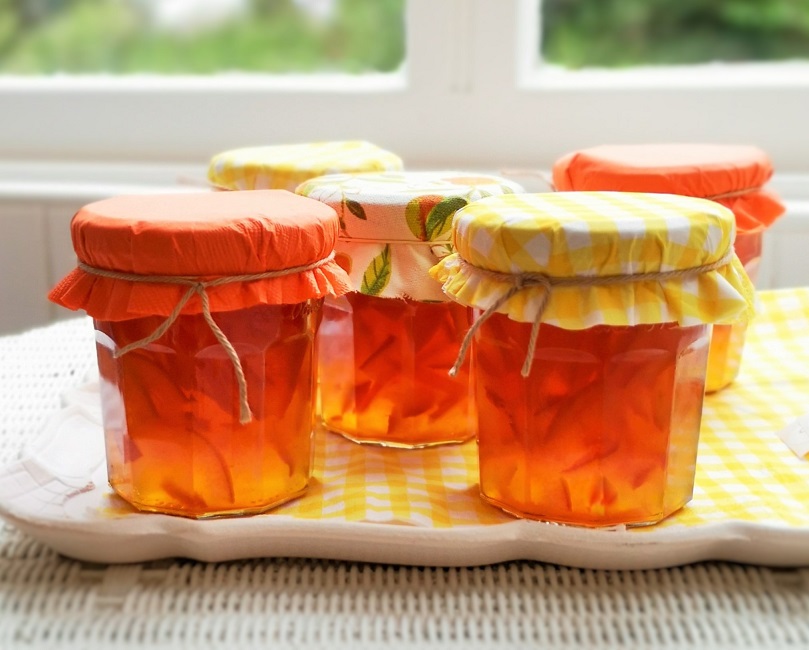
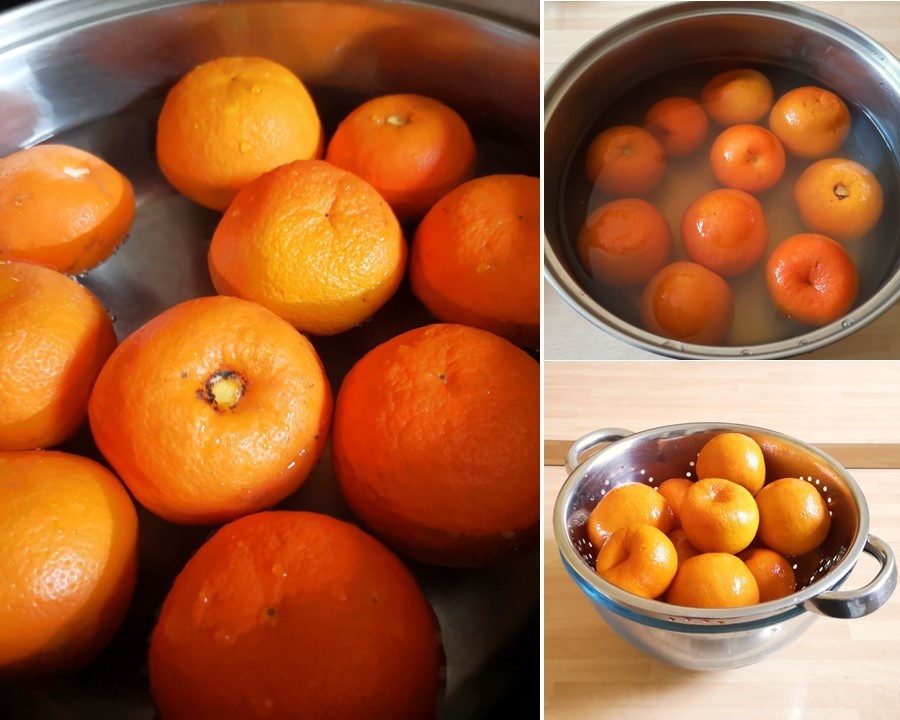
February 2023, marmalade making. Image: Kathryn Hawkins
Something bright and cheery to start the new month. It’s that time of year when the air is full of the scents of aromatic citrus and the sweet smell of sugar. Seville oranges are in season and marmalade-making is in full swing.
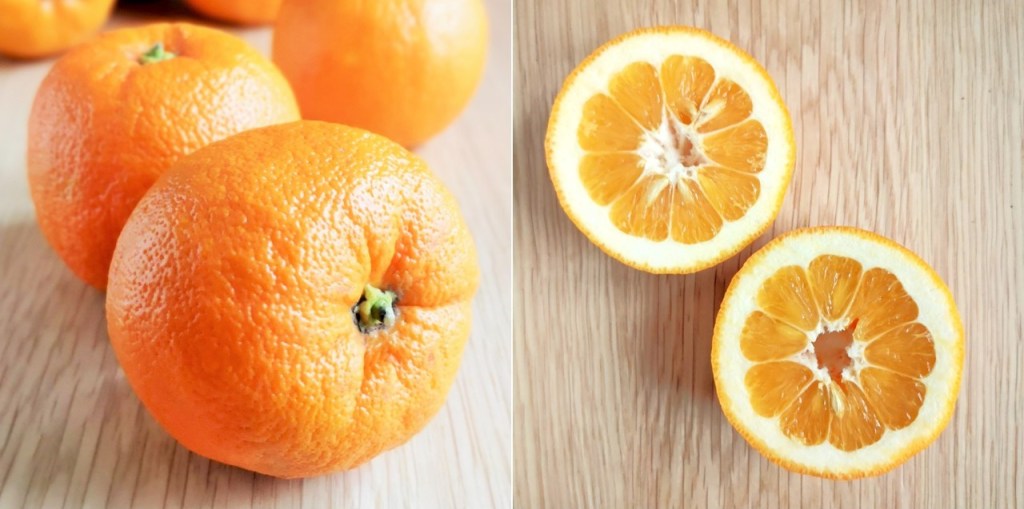
New season Seville oranges. Images: Kathryn Hawkins
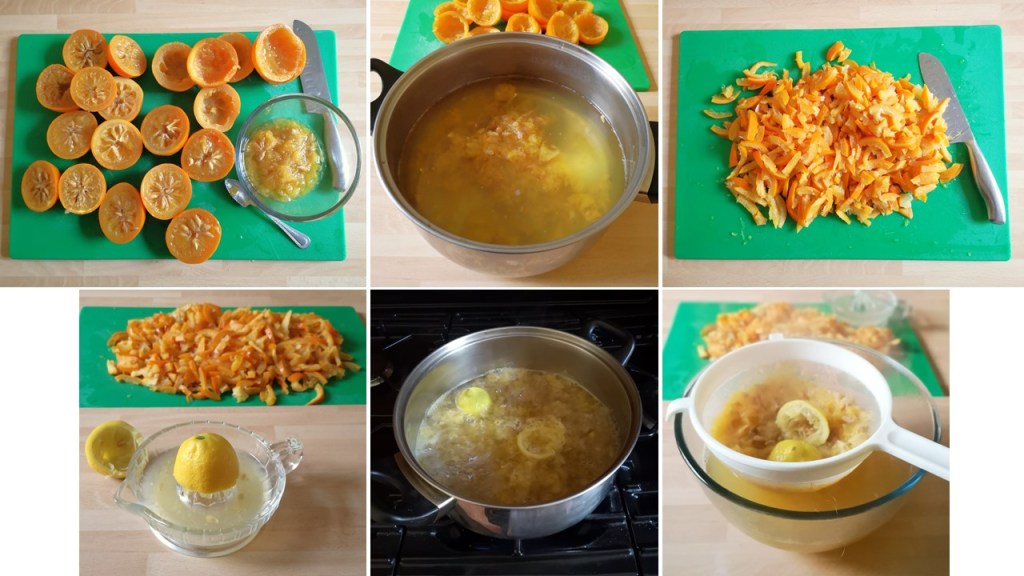
I do enjoy making preserves, but I find the peel-cutting for marmalade a bit of a chore. This time I made marmalade, I cooked the oranges whole, then once the oranges were cooked, I extracted the fruit pulp from the skin and was left with softer peel to slice. I found the cooked orange skin much easier to slice, and the resulting preserve tastes and looks pretty much the same, so I think this recipe will be my go-to marmalade recipe for the future.
New season marmalade ready to label. Images: Kathryn Hawkins
You may want to cut the quantities down to make a smaller amount – I had a fair few oranges to use up!
Makes: approx. 3kg
Ingredients
1kg Seville oranges, washed and left whole
2.4l water
1 unwaxed lemon + 60ml freshly squeezed lemon juice (the extra juice is optional but I find it helps with the set especially if the oranges have been stored for a while)
1.8kg granulated sugar
1. Put the whole fruit in a large saucepan with the water. Bring to the boil, then simmer gently for about 1½ hours until a skewer can be inserted into the fruit with ease. Drain the fruit using a draining spoon and leave aside until it is cool enough to handle. Keep the cooking water.
2. Cut the fruit in half, then scoop the seeds and pulp into the saucepan with the cooking liquid. Halve the lemon, extract the juice and add to the saucepan along with any seeds and the lemon shells. Bring to the boil and boil steadily for 10 minutes. Strain the liquid, discard the pulp, and return the liquid to the saucepan.
3. Meanwhile, cut up the orange shells into the size of shreds you prefer and put to one side. I kept the sliced peel quite chunky, hence my name for the marmalade.
4. Stir the shredded peel into the cooking liquid. Add the sugar and extra lemon juice if using. Stir over a low heat until the sugar is dissolved. Raise the heat and boil for about 25 minutes until setting point is reached – 105.5°C . Allow to cool a little in the saucepan until the mixture begins to firm slightly, then stir the marmalade to distribute the peel before spooning into clean jars and sealing whilst still hot.
I had a few spoonfuls of marmalade leftover once I had put the rest in jars; the “cook’s privilege” I call it. It made the perfect topping for a very indulgent bowl of porridge the next morning 🙂
Until next time, have a good few days and I look forward to posting again soon.
Chocolate porridge with homemade marmalade. Image: Kathryn Hawkins
It’s that time of year again when the Scottish nation gathers together to celebrate the birth of the poet Robert ‘Rabbie’ Burns. The celebration comes exactly one month after Christmas Day and it is a great way to help beat the January blues.
Over the years on my blog, I have posted several recipes which are traditionally served at this time of the year. Proper comfort food, guaranteed to warm you up on a cold day. This year, my recipe is very simple and combines a traditional Scottish pudding with a favourite sweet chocolate treat.
Last year I posted a recipe for a homemade clootie dumpling which you can find here Clootie dumpling (gluten-free; dairy-free; vegan). My recipe this week uses this traditional Scottish pudding as a base. You can use a light fruit cake mixed with a little oatmeal instead if you prefer.
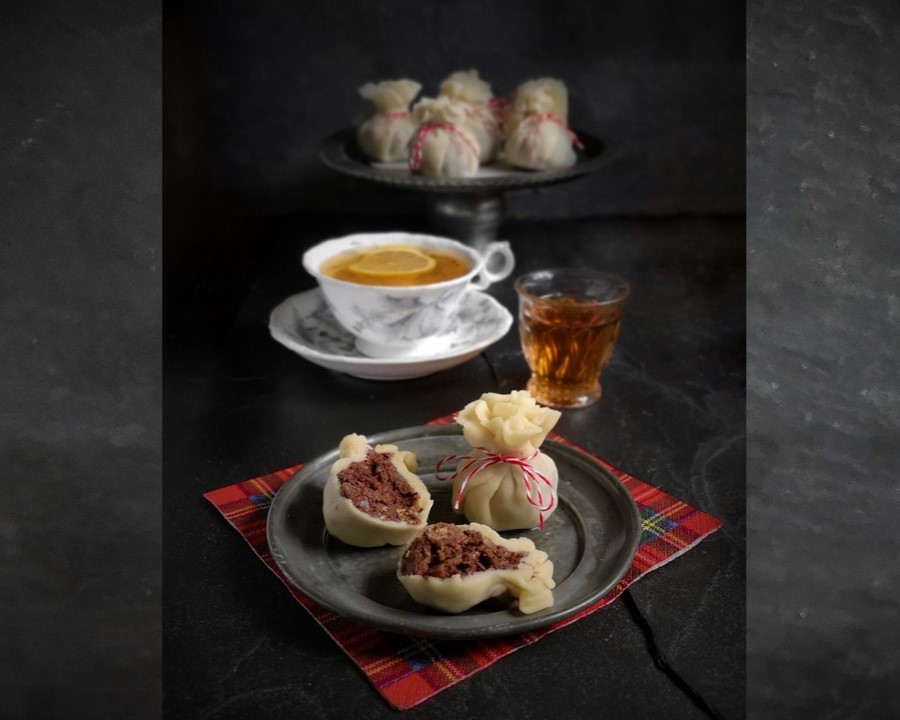
I flavoured my truffles with chopped stem ginger and ginger wine but ground spices and ginger syrup or orange juice will work fine as alternatives. The truffle mixture is simply wrapped in small rounds of marzipan or use a thin layer of ready-to-roll icing if you prefer.
Clootie truffles and ginger wine. Image: Kathryn Hawkins
So here’s the recipe. You can also use the same mix to make small haggis-shaped truffles.
Makes: 8
Ingredients
125g free-from clootie dumpling crumbs (or use 100g free-from light fruit cake crumbs combined with 25g toasted gluten-free oatmeal)
25g stem ginger, finely chopped
100g vegan dark chocolate, melted
2tbsp ginger wine, ginger syrup or orange juice
240g natural marzipan
1. Put the crumbs and ginger in a bowl and bind together with the melted chocolate and wine, syrup or juice. Form into 8 balls and chill for about 1hr until firm.
2. Divide the marzipan into 8 equal pieces and roll out thinly to make rounds large enough to encase each truffle. Scrunch together at the top to give the cloth effect. Tie with twine or ribbon if liked. Keep in a cool place or the fridge until ready to serve.
To make haggis truffles instead, divide into 10 portions and shape into small sausage lengths. You’ll need 300g marzipan to roll out into rounds and wrap around each one. Scrunch the marzipan at each end to give the classic haggis shape.
Same mixture, different shape. Images: Kathryn Hawkins
For easy reference, here are a few links to other recipe posts for traditional Scottish dishes with a free-from twist to serve up on January 25th:
Happy New Year! I hope you have had a good holiday. We find ourselves at the beginning of a brand new year, wondering what 2023 has instore for us all. Let’s hope it’s a good one.
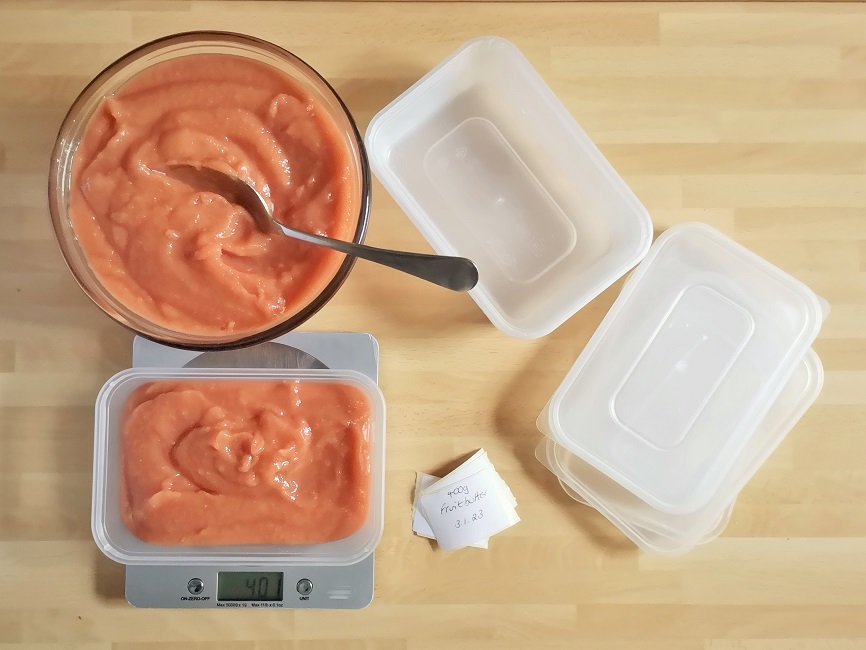
It’s been a chilly, frosty and snowy end of year here in central Scotland. I didn’t venture very far. I have been in the kitchen keeping cosy and have been trying new ways of using up what remains of the stored fruit from last Autumn. This week’s post is the result of one of my experiments, slow-cooked fruit butter. It keeps for about a week in the fridge but can be frozen for use later in the year.
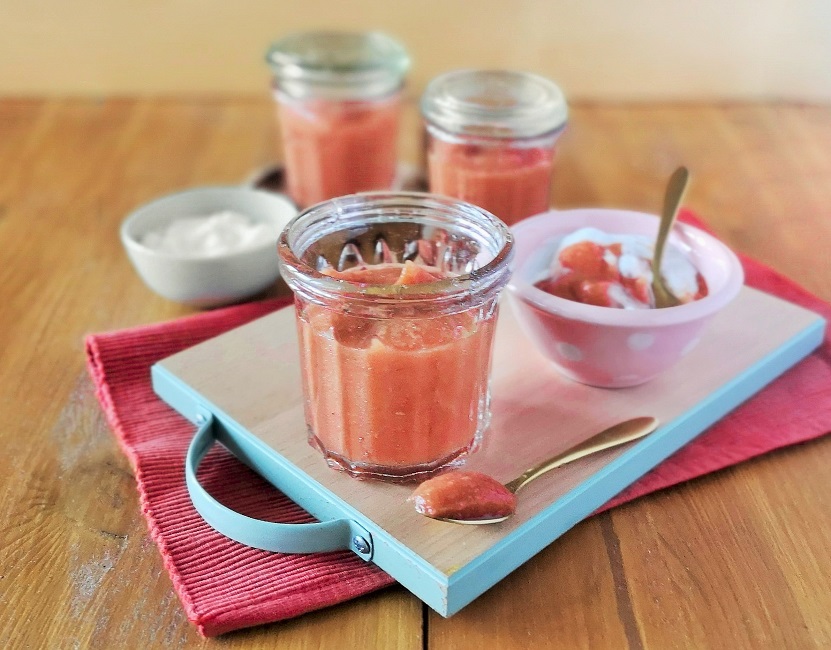
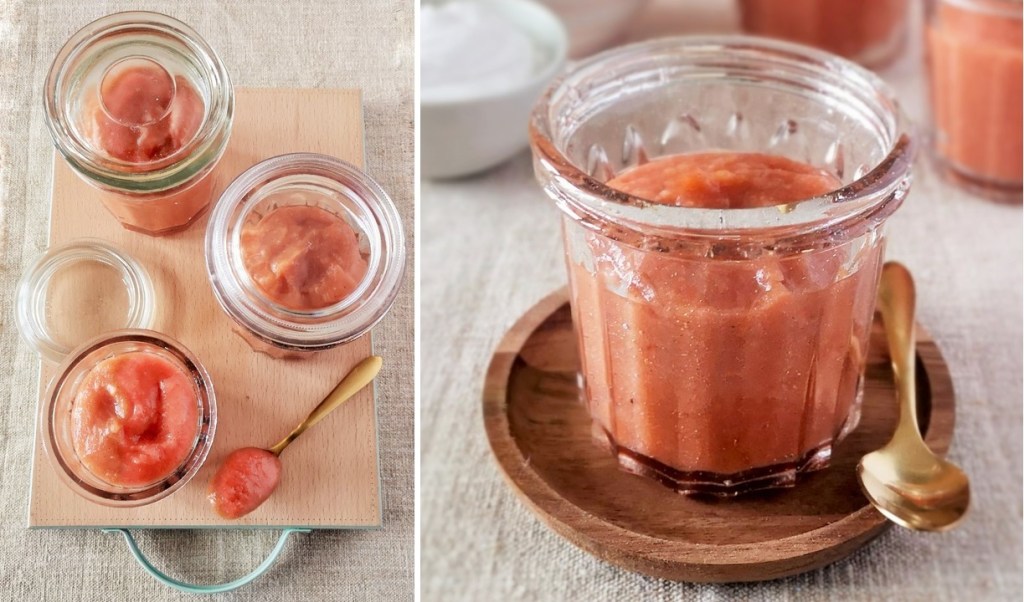
In the jar. Images: Kathryn Hawkins
Fruit butter has nothing to do with dairy butter. In fact, it is completely fat free. I guess it gets its name from the fact that it is silky smooth in texture. It tastes delicious and is very easy (and moreish!) to eat. You can use it like jam, spread on toast, or as a filling for pancakes, pastry cases and sponge cakes, or as a dessert with yogurt. It is delicious served with rice pudding, granola, porridge or as a topping for a cheesecake.
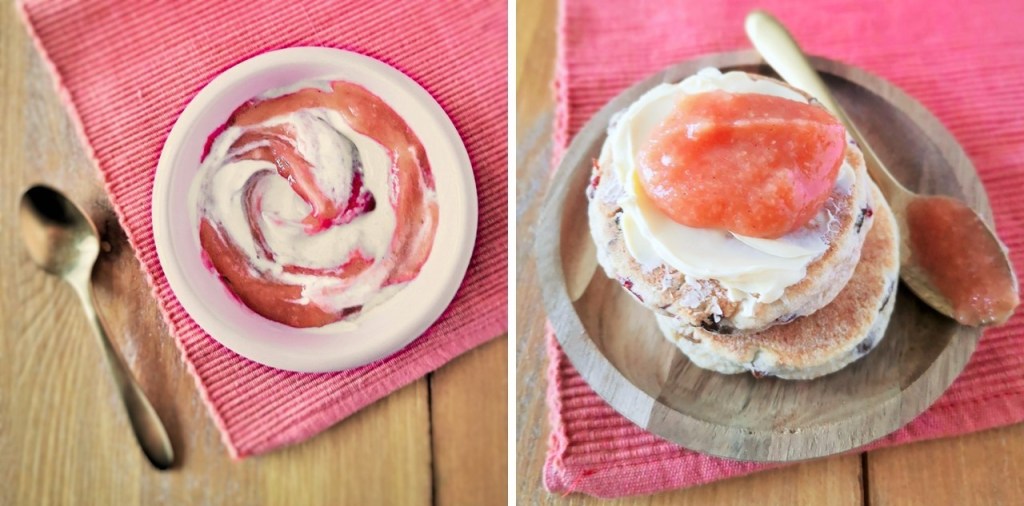
Fruit butter with coconut yogurt and on griddle scones. Images: Kathryn Hawkins
The sugar content is much lower than jam so you do need to keep it in the fridge. It freezes very well with no alteration in texture, colour or flavour. If you portion the butter up in small containers, it will defrost quickly and can be used up in a few days.
Ripe fruit and flavourings. Images: Kathryn Hawkins
I used a combination of quince, cooking pears and small cooking apples, but you can use the same method for a single fruit butter, although you may need to adjust the sugar content. And when it comes to flavouring, you can use whatever you fancy. For speed, ground spices are the easiest option because it saves time at the end of cooking. You can simply blitz the fruit and store. I prefer whole spices along with lemon rind, and as long as you know how many pieces you have added, then you know how many bits you need to fish out before your start blending. Cinnamon, allspice, cloves, ginger and orange would all work very nicely, it’s just personal preference.
On with the recipe. All the work is in the preparation of the fruit, then it’s a case of letting the slow-cooker do the rest of the work.
Makes:approx. 1.6kg
Ingredients
1 unwaxed lemon
2kg quince, cooking or firm pears, and cooking apples (dessert apples will also work, just adjust the sugar quantity accordingly)
125g caster sugar
1 vanilla pod, split
6 to 8 cadamom pods, split
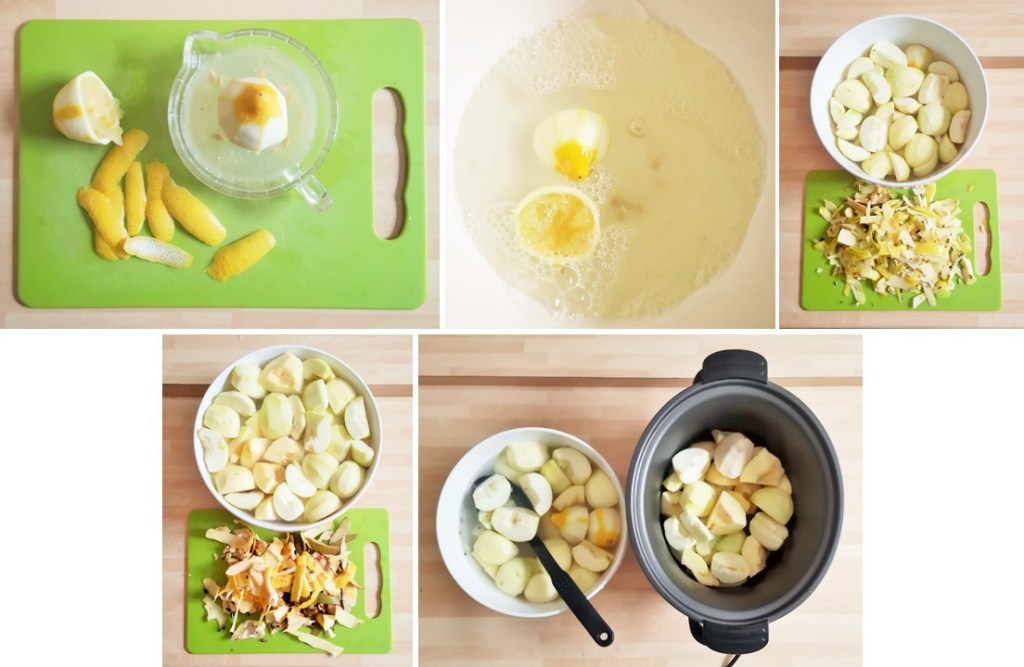
1. Pare the lemon rind in thick strips using a vegetable peeler, and extract the juice. Put the spent lemon shells in a large bowl, pour over the juice and top up with cold water to half fill the bowl. Keep the pared rind for the slow cooker.
2. Peel and core all the fruit, and cut into pieces – apple and pear will cook more quickly than quince if you are using a combination. Simply cut the quince (or any firmer pieces of fruit) into small pieces for even cooking. As you prepare the fruit, put it in the lemony water to reduce the deterioration of colour.
3. When you have prepared all the fruit, use a draining spoon to ladle it into your slow cooker. There is no need to drain the fruit too much as a little of the lemony water will help create steam as the fruit cooks. Discard the lemon shells.
Preparing fruit for slow cooking. Images: Kathryn Hawkins
4. Add the sugar, pared lemon rind and your other chosen flavourings and mix everything together, then cover with the lid and set the cooker to High for 5 to 6 hours, or Low for 10-12 hours. The exact cooking time will depend on how ripe the fruit is. After a couple of hours, give the fruit a stir then re-cover, and stir again after a further 2 hours. Continue cooking until the fruit is very soft.
Before and after cooking. Images: Kathryn Hawkins
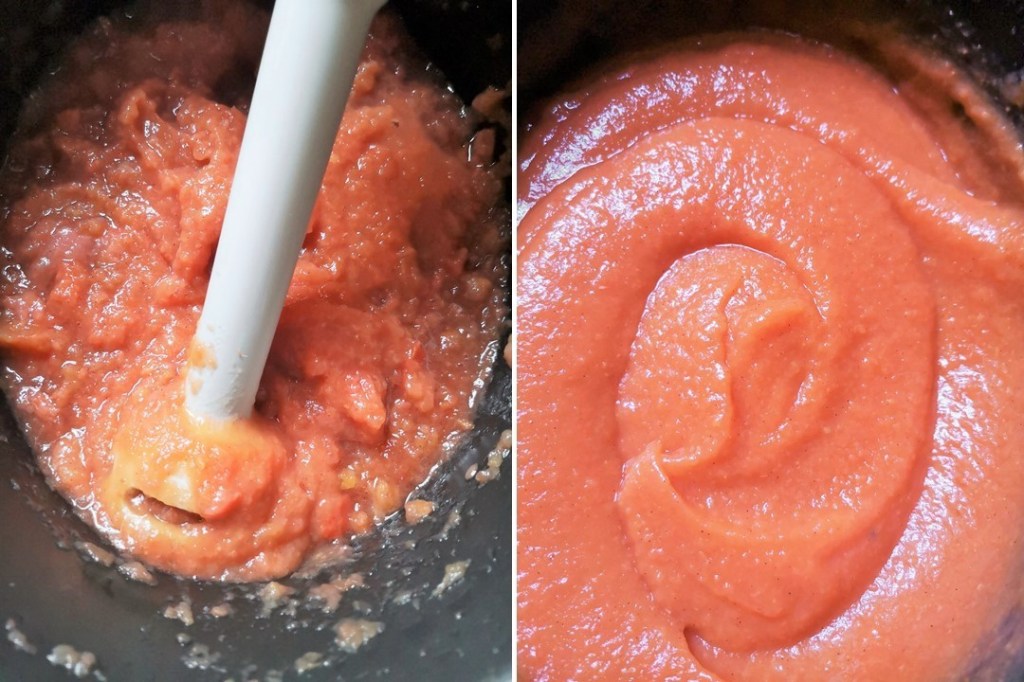
5. Switch off the cooker and leave the fruit, covered with the lid, to go cold. Remove the rind and whole spices if using and either use a stick blender to blitz the fruit or transfer to a standing blender. The fruit butter should be thick and beautifully smooth.
The final step to perfect fruit butter. Images: Kathryn Hawkins
6. Once you have your butter, either spoon it into clean, sealable jars or containers for keeping in the fridge, or pack it into cartons for freezing.
Ready for freezing. Image: Kathryn Hawkins
I hope you have enjoyed my post this week. I will be back with another recipe in a couple of weeks. Until then, take care and keep well. I will see you again soon 🙂
Scottish shortbread for Hogmanay 2022. Image: Kathryn Hawkins
It’s the last day of the year, and a time for reflection as well as looking ahead to whatever the coming year has instore. I am closing my blog for the year with a festive twist on Scotland’s most famous of bakes. No recipe as such this time but here are a couple of links to previous shortbread posts in case you do fancy making some for your own celebrations:
Lining the shortbread mould. Images: Kathryn Hawkins
However you are celebrating the end of this year and the beginning of the next, I send you my best wishes for a happy, healthy and successful year ahead. Thank you for visiting my blog and I hope to see you again in 2023. Happy New Year!
Slow-cooked quince in mulled wine. Image: Kathryn Hawkins
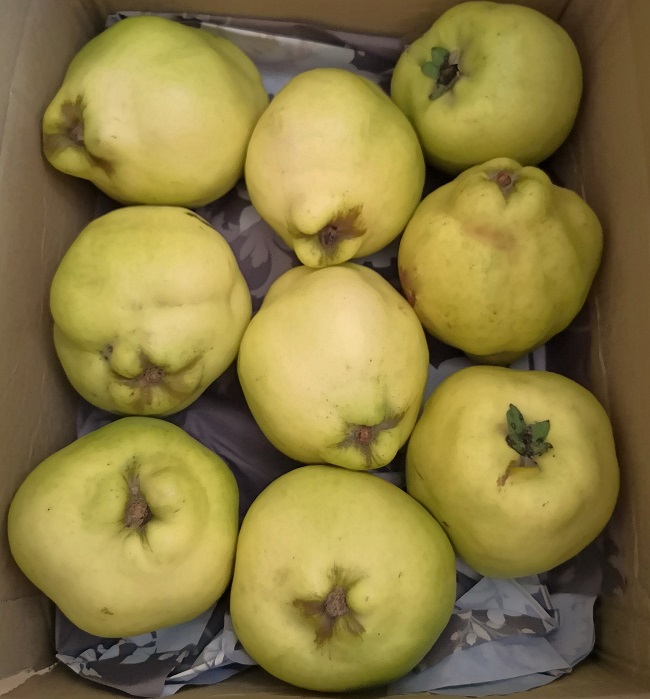
One of the delights of Autumn for me is that it is the season of the quince. In recent years, I haven’t managed to find any but this October I got hold of a box of 9 of the tempting fruit. Like apples and cherries this year, quince trees have also provided a bumper harvest.
Box of quince. Image: Kathryn Hawkins
Back in October the quinces were barely ripe. Very firm, pale yellowy-green in colour with little of their renown aroma. As the weeks passed, the skins turned waxy yellow and the spicy scent increased. Every time I opened the box, I inhaled a waft of their fruity smell. If you haven’t experienced the aroma, it is intensely appley with a hint of sweet aniseed.
Perfectly ripe quince. Images: Kathryn Hawkins
To be honest, I don’t think the flavour of the fruit is that pronounced, more like pear than apple, but the texture makes it very different to other tree fruits. There is a slightly granular, rich texture to the flesh and a much firmer, almost chewy bite. Quince holds up exceptionally well to prolonged cooking, making them a winner for the slow-cooker.
Perfectly cooked quince. Image: Kathryn Hawkins
Raw quince is too hard and dry to enjoy raw; it also discolours very quickly. If you peel and core the fruit and put it in a bowl of lemon juice and water this helps keep the discolouration to a minimum. However, if you want to enjoy the fruit “au natural”, hold back on the lemon and the fruit will take on a rich, rusty red colour as it cooks.
My recipe this week is simple but requires a little bit of preparation to start with. Once it’s all in the slow cooker you can sit back and enjoy the festive fruit and spice smells that are emitted as the quince cooks through. If you can’t get hold of quince, firm pears will work just fine.
Serves: 6
Ingredients
1 unwaxed lemon
1 unwaxed orange
3 large quince (approx. 1.5kg)
500ml fruity red wine
150g caster sugar
1 vanilla pod, split
1 cinnamon stick, broken
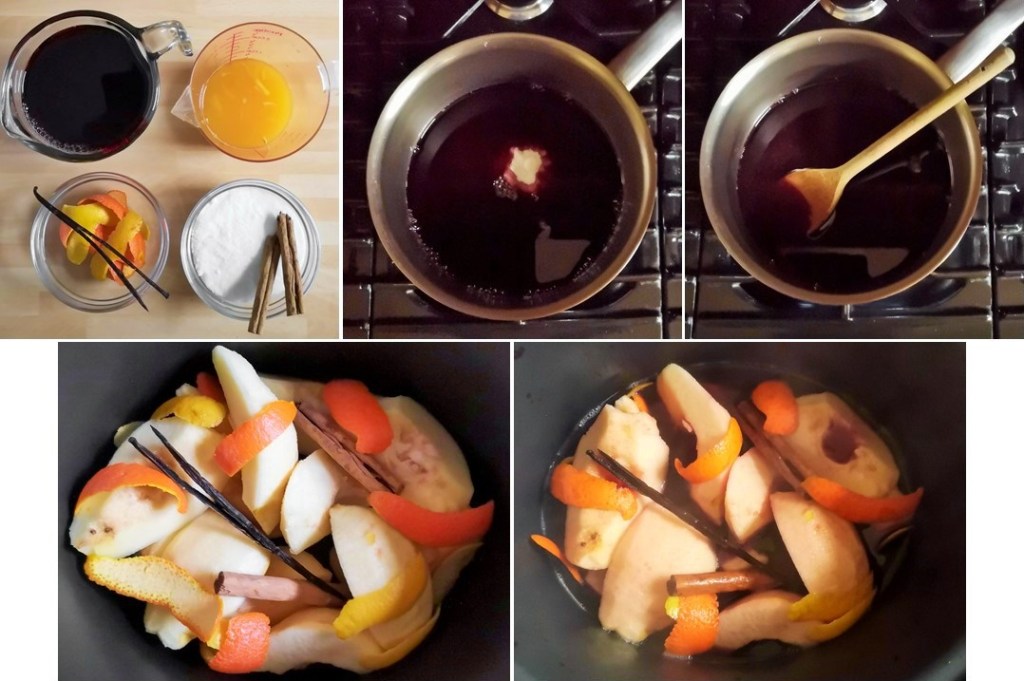
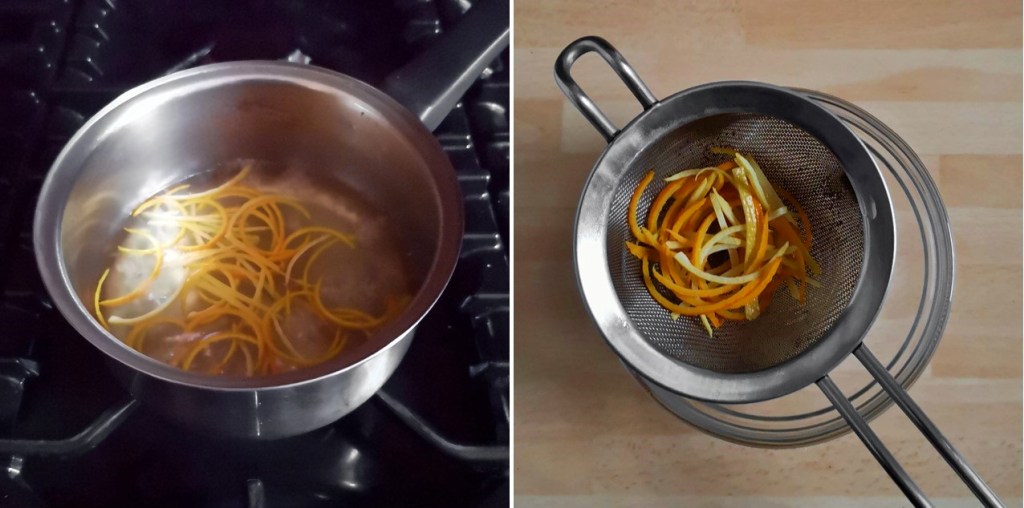
1. Use a vegetable peeler to pare the rind from the lemon and orange. Put 3/4 of the rind to one side for flavouring the wine, and cut the remainder into thin strips for decoration – if you don’t want to do this, you can use all the rind in the mulled wine.
2. Extract the lemon juice and pour into a mixing bowl. Add the empty lemon halves. Fill the bowl with water to to 2/3 full and set aside ready for the quince. Extract the juice from the orange and set aside for the wine.
Preparing quince and flavourings. Images: Kathryn Hawkins
3. Peel the quince thinly. Cut into quarters and slice out the core. As soon as you prepare each quarter, push down into the lemony water to help prevent discolouration.
4. Now prepare the mulled wine. Pour the wine and orange juice into a saucepan. Add the sugar and heat gently stirring until the sugar dissolves, then bring to the boil.
Making mulled wine for the slow-cooker. Images: Kathryn Hawkins
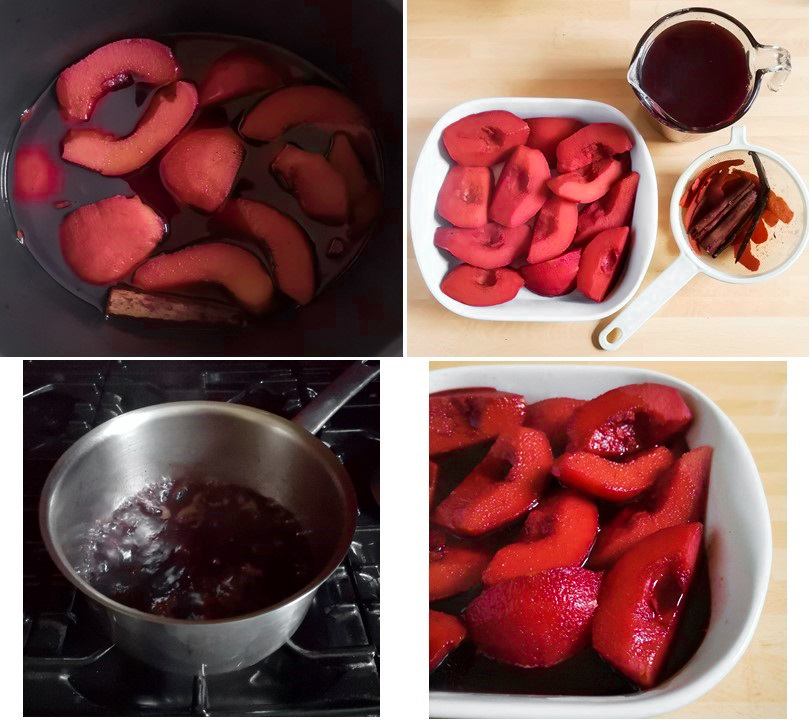
5. Drain the quince very well and place in the slow cooker dish. Add the pared rind, vanilla and cinnamon and pour over the hot mulled wine. Cover with the lid, switch the cooker on to High and cook for 3 hours, turning the fruit every hour to ensure even cooking, until the quince is tender.
6. Use a slotted spoon to transfer the quince to a heatproof dish. Cover loosely with foil. Strain the wine into a saucepan, bring to the boil and simmer for 10-12 minutes until reduced by half and slightly syrupy. Pour over the quince, mix gently, and leave to cool completely, then cover and chill until ready to serve.
Reducing mulled wine to syrup. Images: Kathryn Hawkins
7. While the quince is cooking or cooling, bring a small saucepan of water to the boil and cook the shreds of lemon and orange rind for 2-3 minutes to soften them. Drain well and leave to cool.
Orange and lemon zest decoration. Images: Kathryn Hawkins
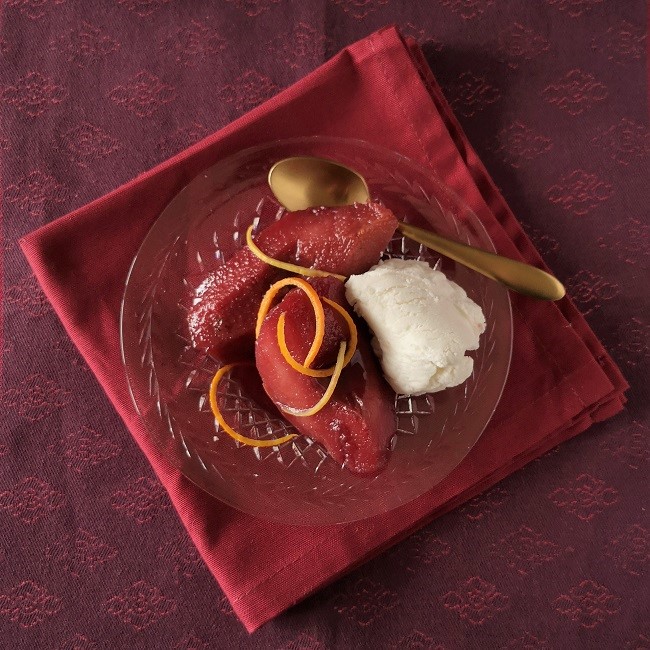
8. To serve, arrange the quince quarters in a serving dish and spoon over a little syrup. Sprinkle with citrus shreds if using and serve the quince with the remaining mulled wine syrup on the side. Delicious accompanied with vegan vanilla ice cream 🙂
Finishing touch, orange and lemon shreds, Image: Kathryn Hawkins
Quince served with vegan vanilla ice cream. Image: Kathryn Hawkins
I hope you have a very happy Christmas and I look forward to posting again for the new year. Seasonal best wishes to you and thank you for your interest in my blog.
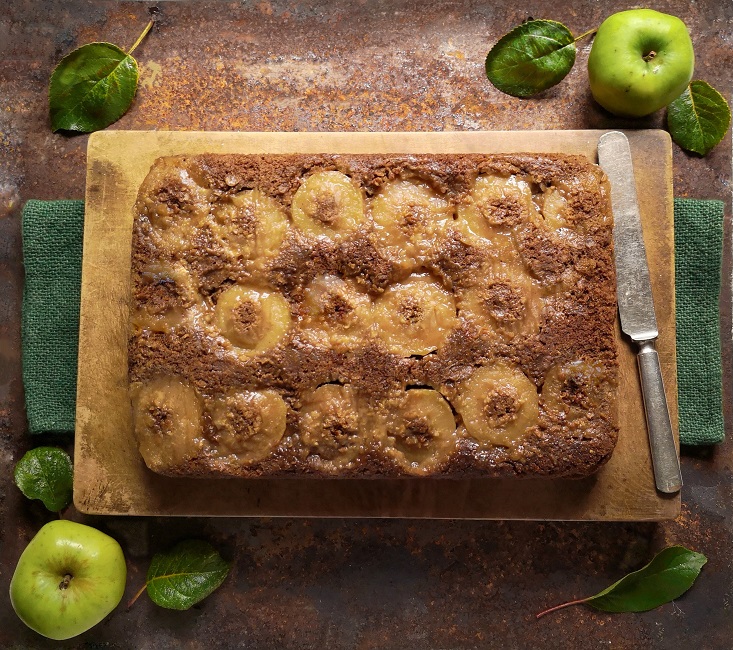
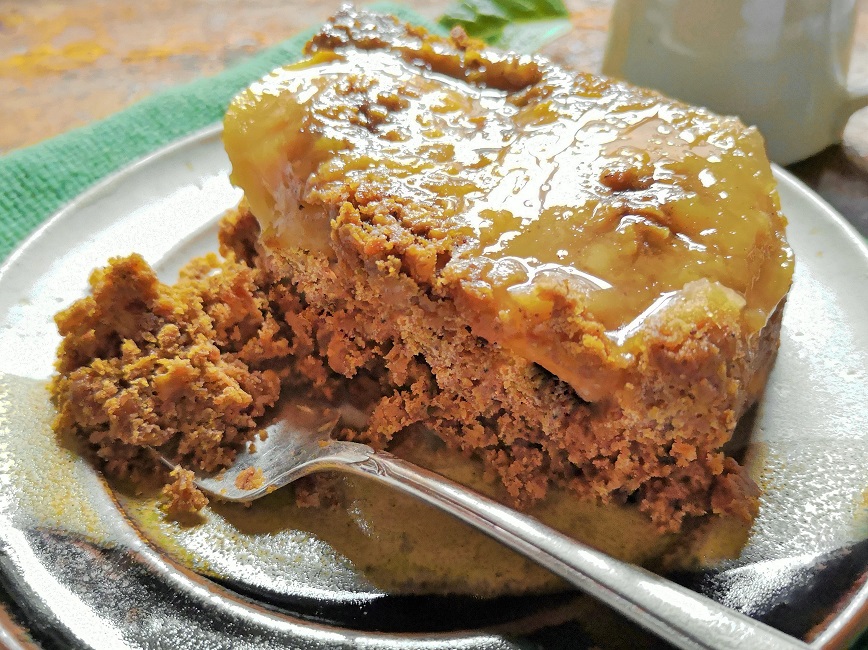
Upside-down ginger apple cake. Image: Kathryn Hawkins
Hello again. We’re well into the season of Autumn now, and it wouldn’t feel complete if I didn’t share an apple recipe with you. It has been a bumper year for apples in the UK. Back at the end of last month, the old apple tree in the garden was groaning with fruit, and on a dry, bright day, it was finally time to relieve the tree of all its fruit.
Lord Derby apple harvest 2022. Images: Kathryn Hawkins
With the very sunny and warm summer we enjoyed here, the apple crop was much sweeter than ever before, so as well as being used in cooking, the apples make good eaters this year. There were far too many for one household to cope with, I am pleased to say that several local families in the town were able to enjoy a bag full this year.
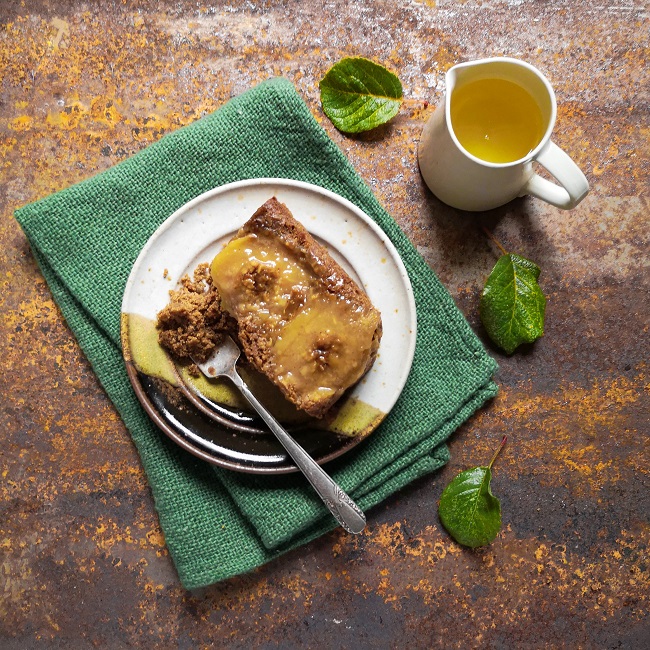
Ginger apple cake with ginger syrup. Images: Kathryn Hawkins
On with the recipe. The main preparation for the recipe is the apples, after that there is only a very simple cake batter to make. I picked out the smaller apples for my tin. If you have larger apples, you may want to slice them into quarters or thick rings rather than simply cutting them in half.
Make the cake the day before you want to serve it because it will benefit from a few hours keeping. The flavour and texture will improve greatly overnight. The recipe makes quite a large cake, but it freezes well so you’ll have plenty for another day. Serve warm as a pudding with custard, or cold as a comforting cake.
Serves: about 10
Ingredients
Finely grated rind and juice 1 lemon
approx. 9 small cooking or eating apples
2tbsp stem ginger syrup (I used the syrup from the jar)
125g plant butter
125g treacle
125g golden or corn syrup
125g light soft brown sugar
250g gluten free plain flour
250g gluten free porridge oats
1tsp bicarbonate of soda
4tsp ground mixed spice
75g chopped stem ginger
175ml oat milk or other plant-based milk
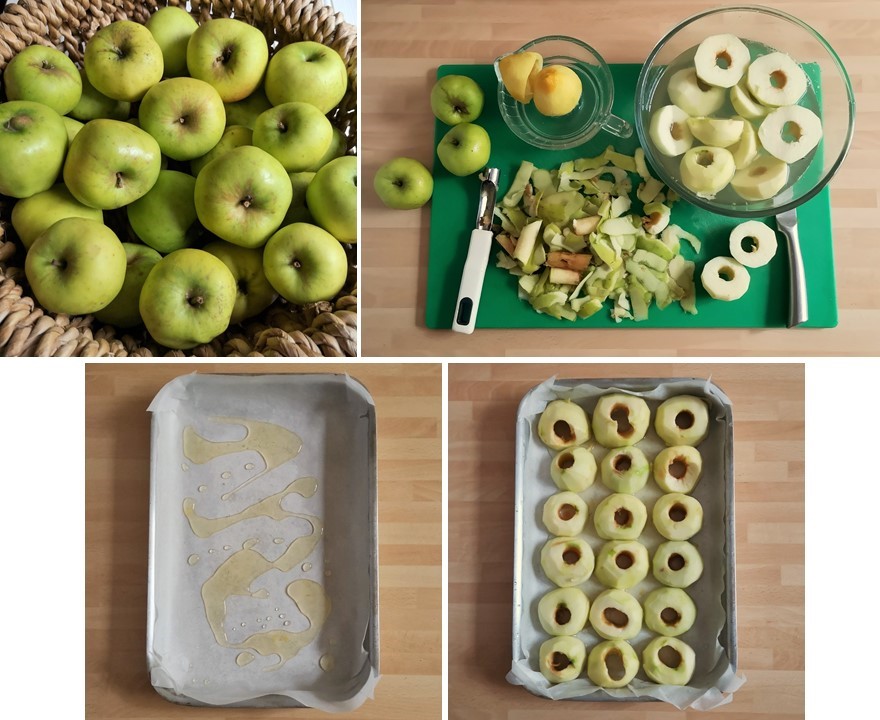
1.Put the lemon rind to one side. Add the juice to a bowl of cold water. Peel and core the apples; cut in half and place in the lemony water to help prevent browning. Leave aside until ready to assemble the cake.
Preparing the apples for cake making. Images: Kathryn Hawkins
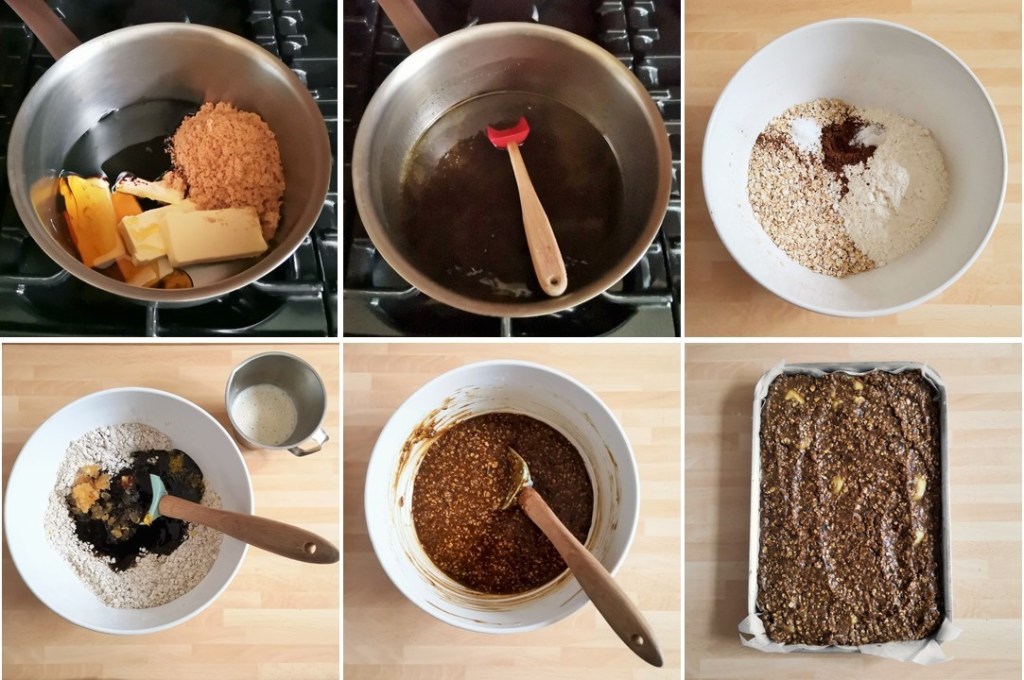
2. Put the butter, treacle, golden syrup and sugar in a saucepan, and heat gently to melt. Mix well then leave to cool for 10 minutes.
3. Preheat the oven to 180°C, 160°C fan oven, gas 4. Line a 20 x 30cm tin with baking parchment and drizzle the base with ginger syrup. Drain the apples, pat dry with kitchen paper and arrange over the bottom of the tin – see above.
4. Put the flour, oats, baking soda and spice in a bowl. Mix together and make a well in the centre.
5. Pour in the melted ingredients and add the reserved lemon rind and chopped ginger. Carefully mix everything together along with the milk, then spoon over the apples making sure they are covered.
Making the ginger cake batter. Images: Kathryn Hawkins
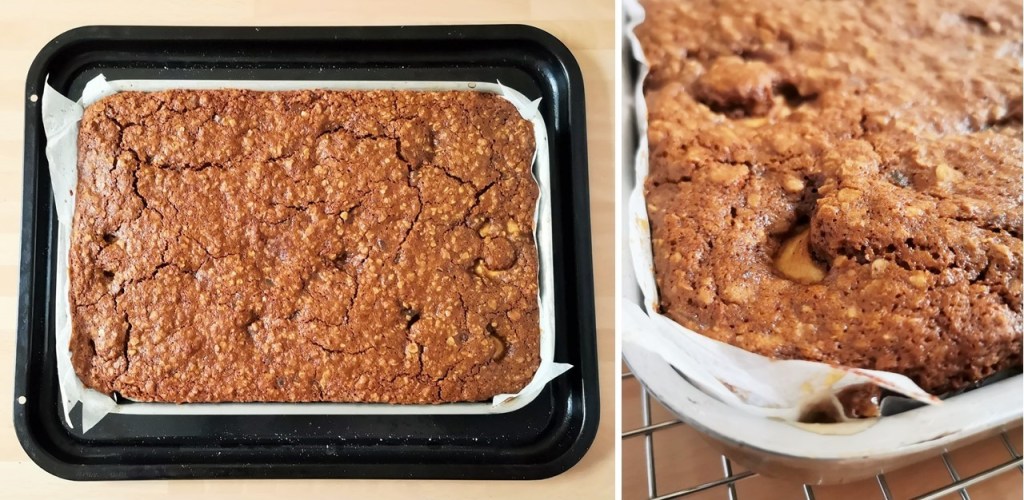
6. Stand the tin on a baking tray and bake for about 50 minutes until firm to the touch. Transfer the tin to a wire rack and leave to cool completely. Turn out on to a large sheet of baking parchment. Wrap carefully and store in an airtight container overnight to allow the flavours to develop.
Just out of the oven. Images: Kathryn Hawkins
I mixed some of the ginger syrup from the jar of stem ginger with plain carob syrup and drizzled it over the cake to serve.
Up close on ginger apple cake. Image: Kathryn Hawkins
That’s me for another week. Until next time, happy baking 🙂