Chocolate brownie candle cake (gluten-free; dairy-free; vegan)

Chocolate_brownie_candle_cake_for_Halloween
Spooktacular cake. Image: Kathryn Hawkins

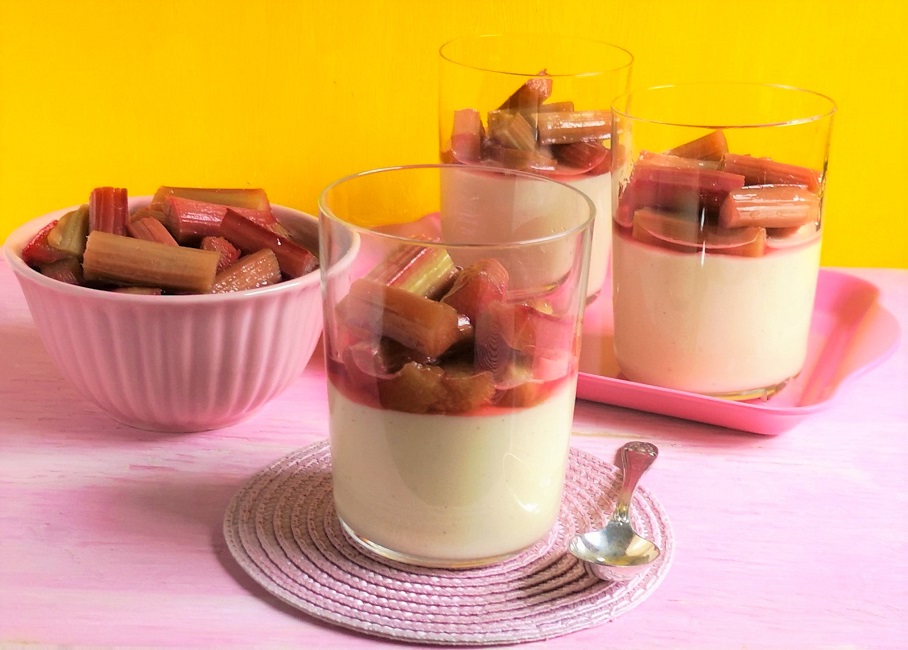
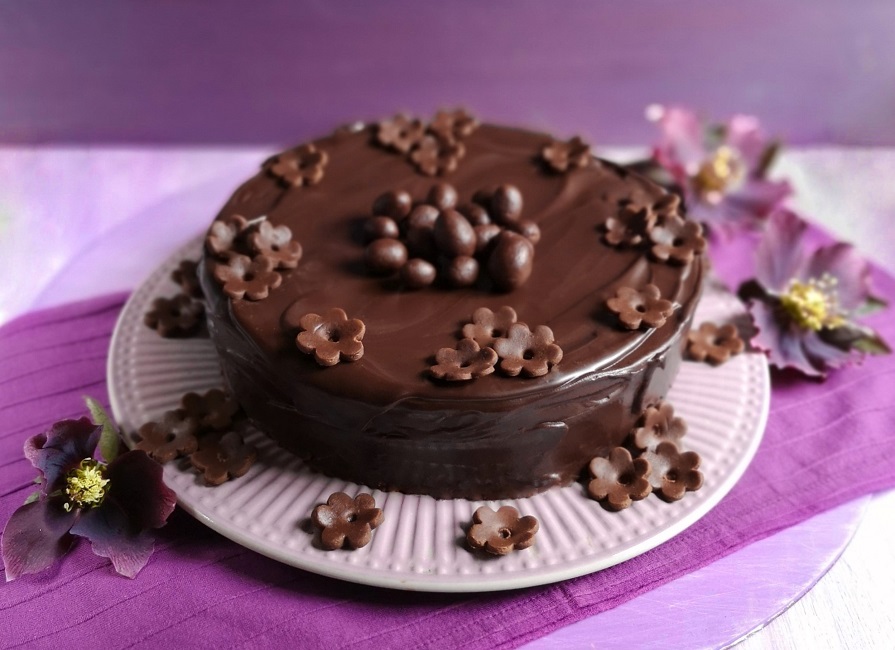
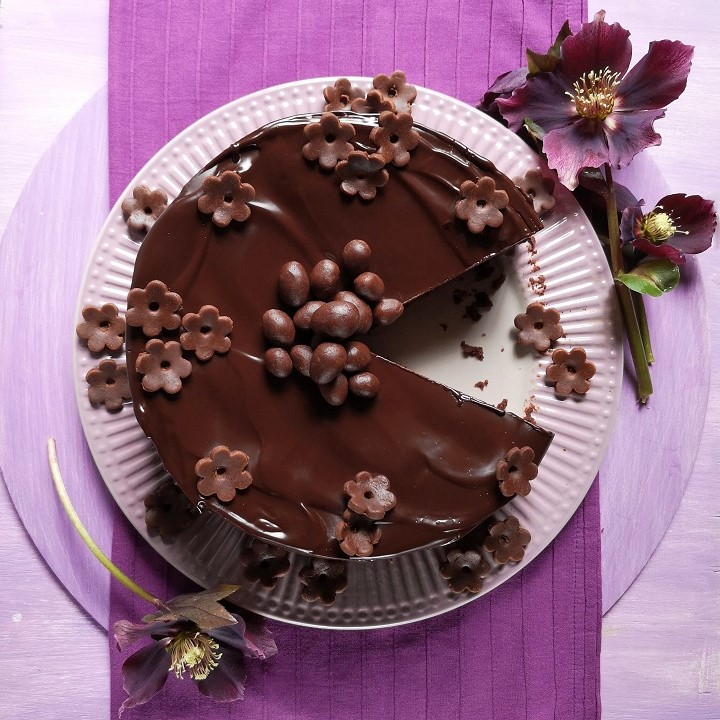
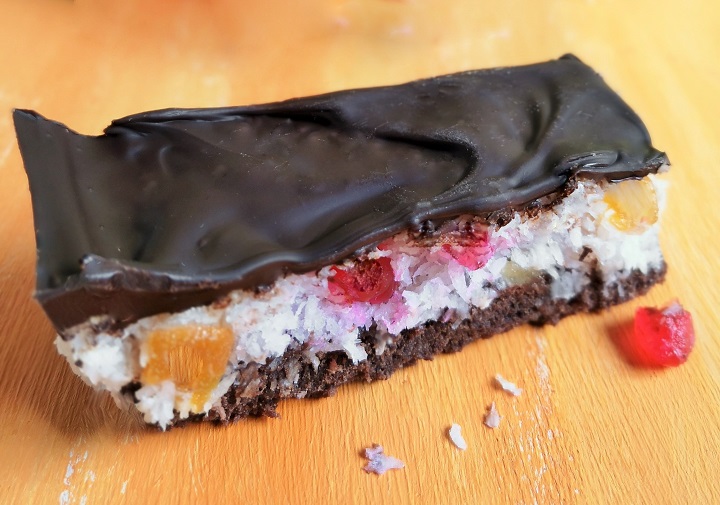
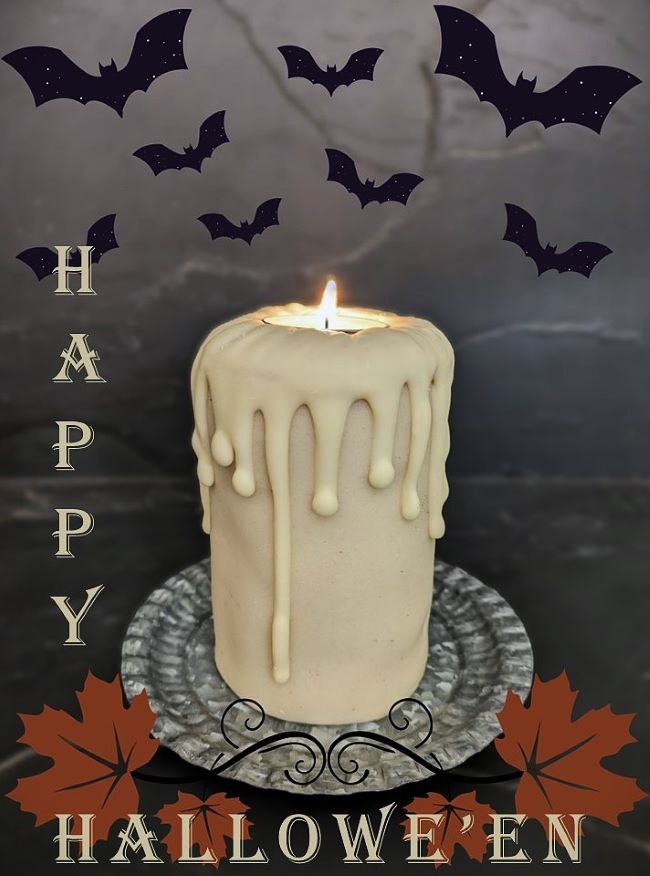
It’s almost the most spookiest time of the year, and to celebrate, I thought this recipe would make the perfect treat if you’re entertaining on 31st October. Layers of chocolate brownie mixture covered in marzipan, you could also serve it up as part of an edible table decoration for Christmas or New Year.

Gluten-free_dairy-free_vegan_chocolate_brownie_candle_cake_cut_in_half
The big chocolaty reveal. Image: Kathryn Hawkins

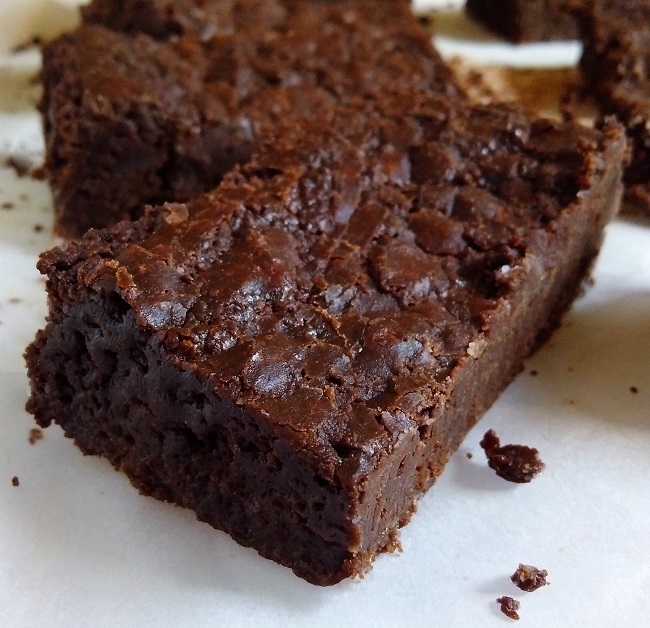
If you like the idea but time is short, you can use rounds of a readymade chocolate cake or chocolate Swiss roll. The brownie recipe alone is rich and delicious and makes a great bake by itself if you don’t want to make the candle. Time to bring on the cake recipe, I hope you like it 🙂

Serves: 8

Ingredients

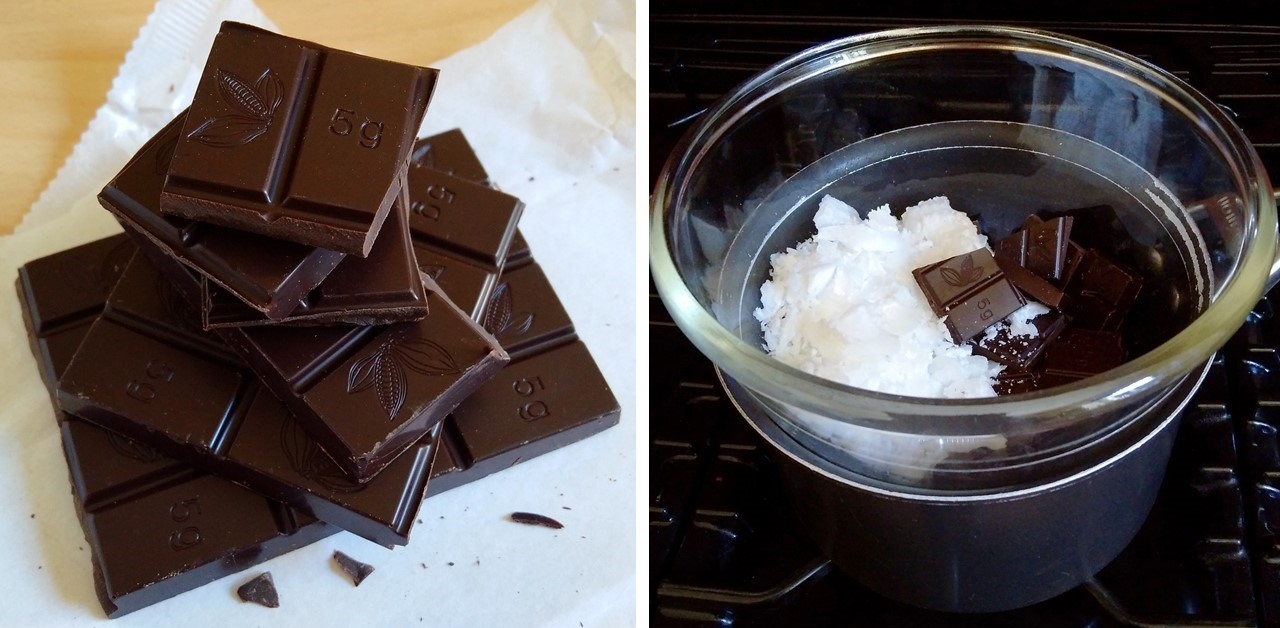
  • 100g free-from dark or plain chocolate
  • 100g lightly salted plant butter
  • 7tsp ground flax seed
  • 125g caster sugar
  • 1tsp natural vanilla extract
  • 125g gluten-free plain flour blend
  • ¼tsp xanthan gum
  • 75g free-from chocolate frosting or apricot jam, softened
  • 200g natural marzipan
  • 50g free-from white chocolate
  • 1 x tea-light candle

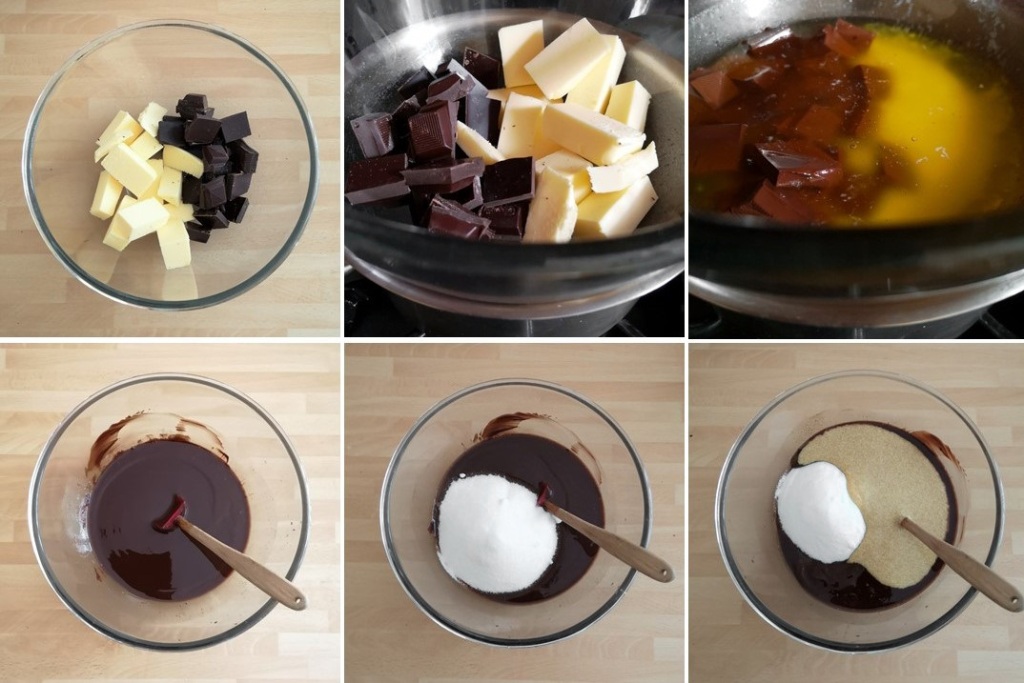
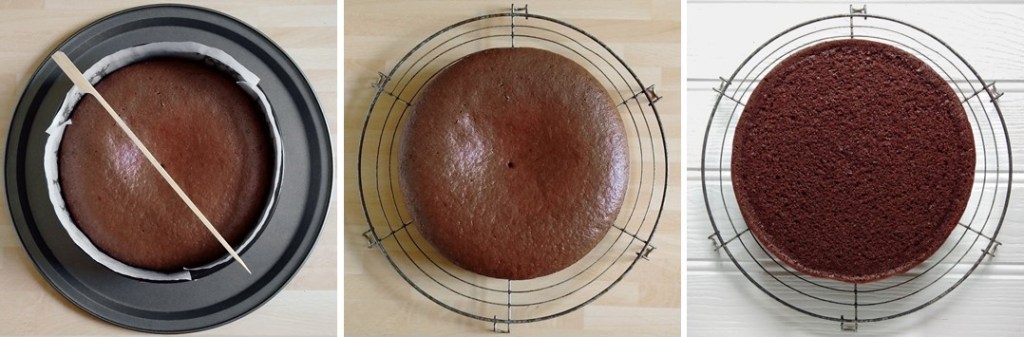
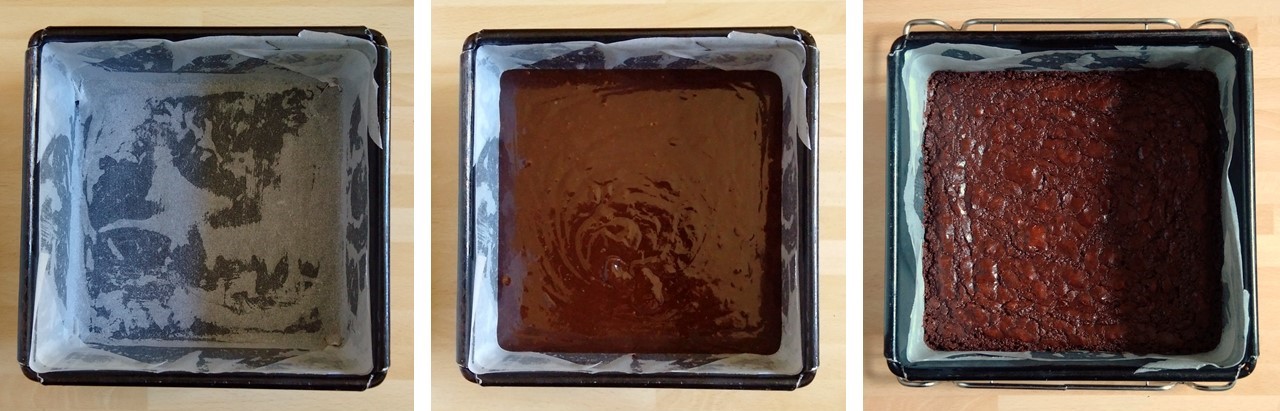
1. Grease and line an 18cm straight sided square cake tin. Melt the plain chocolate and butter together over a saucepan of barely simmering water. Remove from the water and leave to cool for 10 minutes.

2. Meanwhile, mix the ground flax seed with 110ml cold water and leave to stand for a few minutes until thickened. Preheat the oven to 180°C, 160°C fan, gas mark 4.

Melting_chocolate_and_making_flax_egg_for_gluten-free_dairy-free_vegan_chocolate_brownie
Preparing the ingredients for chocolate brownie. Images: Kathryn Hawkins

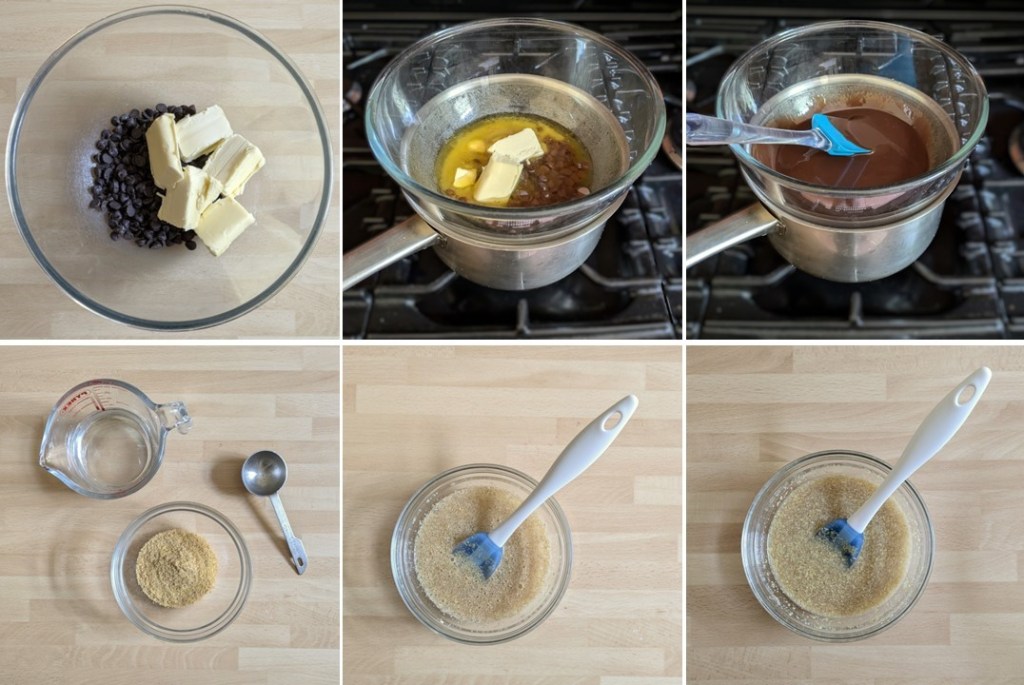
3. Stir the sugar and vanilla into the warm chocolate mixture, then mix in the flax “egg”. Add the flour and xanthan gum and mix well.

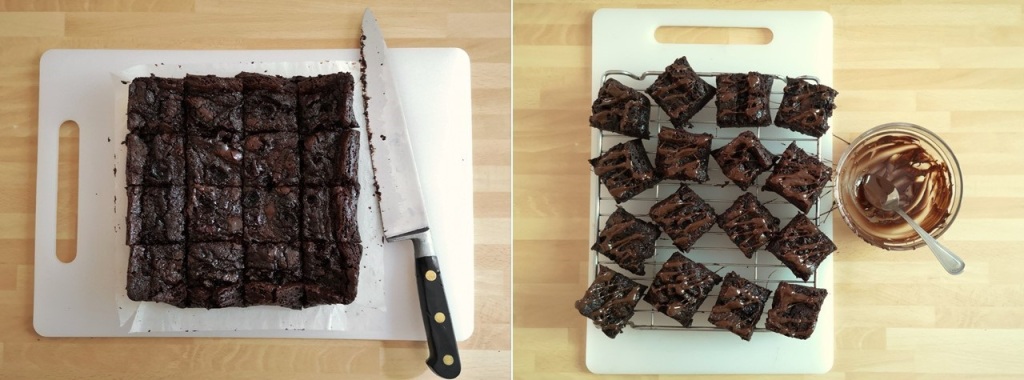
4. Spoon into the prepared tin and bake for about 45 minutes until the top looks papery and shiny and a skewer inserted into the centre comes out clean. Leave to cool in the tin before removing.

Mixing_gluten-free_dairy_free_vegan_chocolate_brownie_batter
Making and baking the brownie mix. Images: Kathryn Hawkins

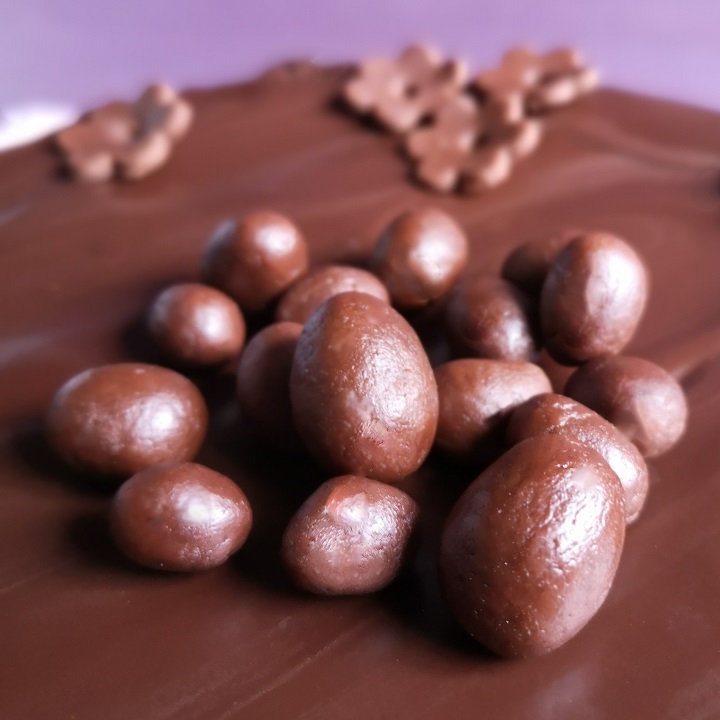
5. Use an 8 to 8.5cm round cookie cutter to cut out 4 neat rounds from the brownie square. Use a small round cutter the same size as the tea-light candle holder (approx.3.5cm) and cut out the centre from one round. Keep the trimmings to make truffles or cake pops.

Cutting_and_shaping_a_freshly_cooked_square_of_gluten-free_dairy-free_vegan_chocolate_brownie
Cutting brownie rounds. Images: Kathryn Hawkins

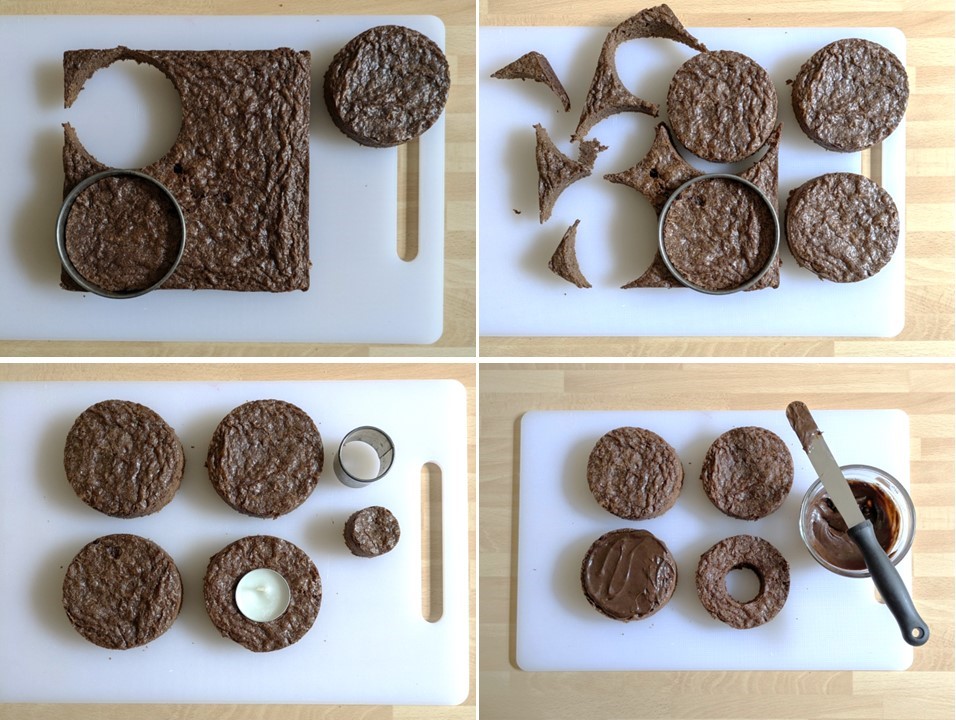
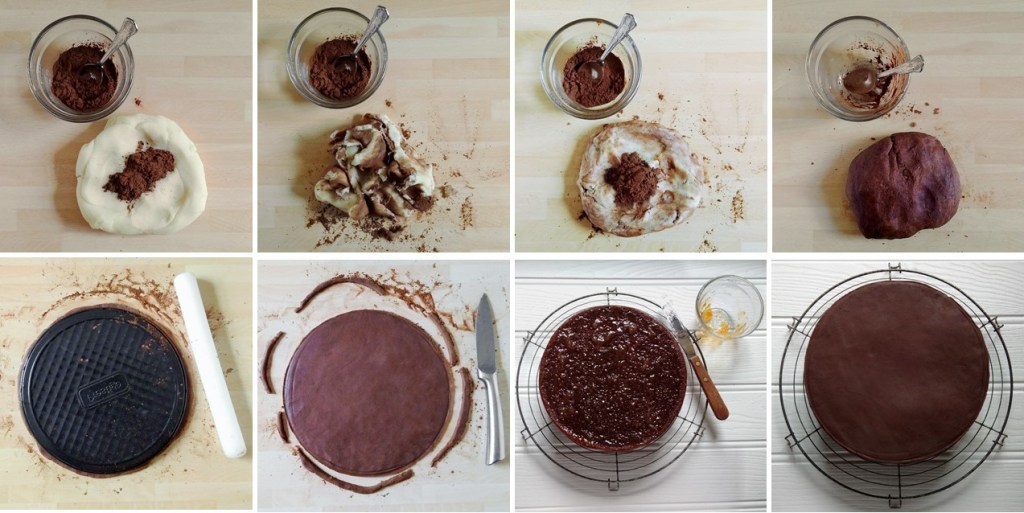
6. Spread a little frosting or jam on each round and stack them neatly on top of each other, putting the cut out round on top.

Assembling_the_layers_of_chocolate_brownie_to_make_a_candle_shape
Assembling the candle. Images: Kathryn Hawkins

7. Measure the height and circumference of the brownie stack. My cake was 9.5cm tall, and 27cm round the middle.

8. Knead the marzipan to make it more pliable, then roll out to a thickness of about 0.5cm and a little larger than the cake dimensions, then trim to the size of your cake. Gather up the marzipan trimmings, re-roll and cut out a ring of marzipan using the same cutters as before, to fit the top of the cake.

Rolling_marzipan_to_cover_a_stack_of_chocolate_brownie_rounds
Covering brownie with marzipan. Images: Kathryn Hawkins

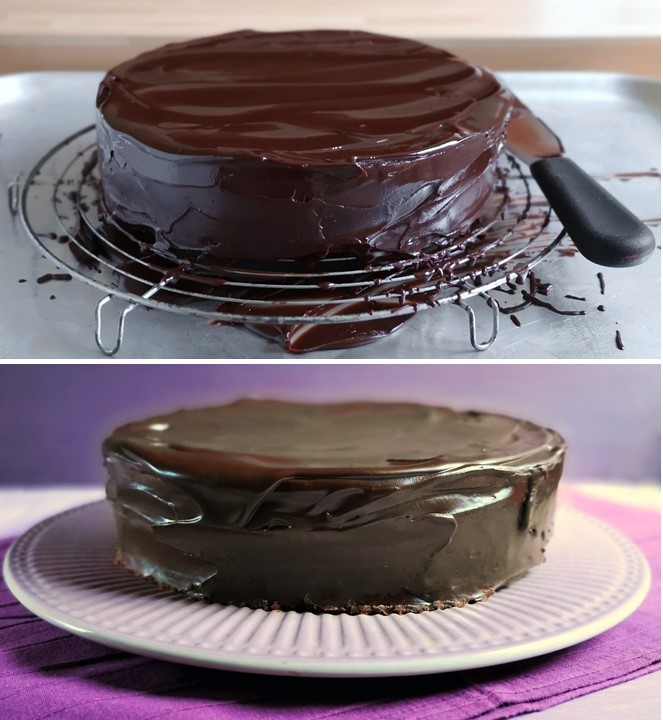
9. Spread the outside of the cake with a little more frosting or jam, then lay the cake on the marzipan and roll it up so that it is completely covered. Stand the cake upright and smooth the ends together. Spread the top with remaining frosting or jam and place the marzipan ring on top. Pop the candle holder inside. If the marzipan is a bit uneven, gently roll the cake back and forth on the work top to smooth.

Covering_chocolate_brownie_candle_cake_in_marzipan
Covering the brownie. Images: Kathryn Hawkins

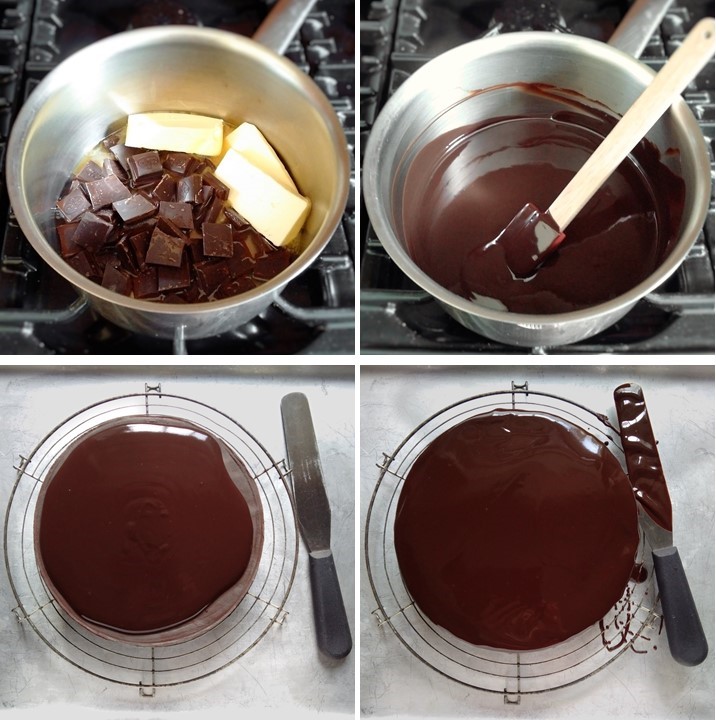
10. Melt the white chocolate. Put the candle into the holder and carefully spoon warm chocolate round the top of the cake, letting it drip down the sides to resemble melting wax. Try and keep the edge of the candle holder free from chocolate so that you are able to remove it with ease when you want to slice the cake. Leave the cake in a cool place to set. To serve, put the cake on a heat resistant plate and light the candle.

Spooning_chocolate_wax_on_a_candle_cake
White chocolate candle wax. Images: Kathryn Hawkins
Candle_cake_alight
Cosy candle cake light. Image: Kathryn Hawkins

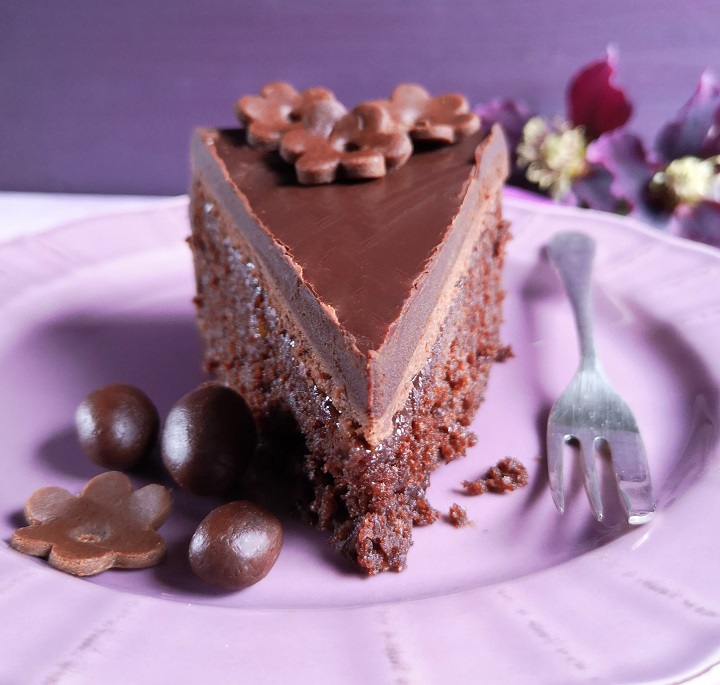
When you are ready to cut the cake, extinguish the flame and carefully remove the candle holder, remembering that the candle wax will be very hot – I used a pair of tweezers to grip the candle holder for easy removal. Cut the cake in half and then into smaller portions.

Chocolate_brownie_candle_cake_close-up
Brownie candle close-up. Image: Kathryn Hawkins

If you are celebrating this Hallowe’en, I hope you have a great time. I look forward to sharing some exciting news in my next post early in November. Until then, stay safe 😉

A marmalade-maker’s breakfast (gluten-free; dairy-free; vegan)

Single_serving_of_homemade_chocolate_porridge_toppped_with_yogurt_and_marmalade
Chocolate and marmalade porridge. Image: Kathryn Hawkins

Happy new year to you! 2024 has begun with chilly, frosty weather here in central Scotland and elsewhere in the UK. But it’s that time of year when the Seville oranges are in the shops, marmalade-making is underway and the sweet smell of citrus wafting round the kitchen makes me think of sunnier climes and warmer days.

Making_homemade_Seville_orange_marmalade_January_2024
Marmalade season. Images: Kathryn Hawkins

I’ve covered making marmalade in a couple of other posts over the years so if you want to have a go, here are the links to the recipes: Chunky Seville orange marmalade (naturally gluten-free; dairy-free; vegan) and Seville orange marmalade – traditional and dark (naturally gluten-free, dairy-free and vegan)

Even with the best planning, I always have leftover preserve once I have filled the jam jars I have cleaned and got ready. However, it does mean that I get to taste what I’ve made straight away without feeling guilty about opening a jar of freshly made preserve too soon. I call the surplus “The Cook’s Privilege”, after all the effort, you deserve the first pickings 🙂

Homemade_Seville_orange_marmalade_in_glass_jar_and_on_a_spoon
Marmalade leftovers for the cook. Images: Kathryn Hawkins

My recipe this week is a simple way to enjoy such spoils for your breakfast the day after your toils. The ingredients below make enough for one portion. I cook my porridge in the microwave, but you can just as easily pop everything in a saucepan and cook it on the stove top.

Chocolate porridge: put 40g gluten-free porridge oats in a large microwave-proof bowl. Sift 1½ teaspoons of cocoa on top and stir in 2 teaspoons maple syrup and a pinch of salt. Mix in 200ml plant-based milk. Cover and microwave on High for 2½ minutes (my microwave is 900W so adjust the cooking time accordingly if necessary). Stir well then cook for a further 1 minute on High. To serve, stir in extra plant milk (or plant cream for extra indulgence) if you prefer a thinner consistency and top with plant-based yogurt and a generous dollop of your leftover marmalade. Delish 🙂

3_steps_to_making_microwave_chocolate_porridge
Microwave chocolate porridge. Images: Kathryn Hawkins
Chocolate_porridge_with_yogurt_and_marmalade
Indulgence in a bowl. Image: Kathryn Hawkins

Until next time, happy marmalade making and enjoy your preserving spoils!

Edible holly garland (gluten-free; dairy-free; vegan)

Gluten-free_vegan_shortbread_holly_garland
Happy Christmas! Image: Kathryn Hawkins

Well the festive season is almost upon us, and it’s time to share a suitably Christmassy recipe with you. I’ve turned to an old favourite as the base for my edible holly garland: shortbread 🙂

Simple enough to make, shortbread is much loved by many and a staple bake at this time of year. I’ve flavoured my shortbread with cocoa powder and iced it with peppermint flavoured icing, which make these cute little nibbles a perfect treat to serve as an after dinner alternative to accompany coffee and liqueurs. If you don’t fancy peppermint, try adding orange or lime zest, or enhance the cocoa flavour by adding some cinnamon or vanilla.

After_dinner_coffee_and_cookies
After dinner coffee and nibbles. Images: Kathryn Hawkins

If you are going to display the leaves as a garland you’ll need to bake a good number, so my recipe makes 40, but cut the quantities in half if you just want a few nibbles to serve with coffee. The shortbread leaves can be made a couple of days in advance of serving, but I’d advise not to ice them more than a day before serving as the icing often softens the shortbread.

By the way, I couldn’t find the right shade of green for my biscuits, so I am including instructions for colouring white icing. If you do have ready prepared green icing, all you need do is add some flavour.

Makes: 40

Ingredients

  • 100g lightly salted plant or dairy butter
  • 50g caster sugar
  • 20g cocoa powder
  • 175g gluten-free plain flour blend plus extra for dusting
  • 225g white ready to roll icing
  • Green food colour gel
  • Icing sugar to dust
  • A few drops peppermint extract
  • 75g readymade royal icing or similar white pipeable icing
  • Red sugar balls or icing to decorate

1. Beat the butter and sugar together until light and creamy. Sift the cocoa powder and flour on top and mix well, then bring everything together with your hands to make a firm dough.

2. Lightly flour the surface and roll out the dough to a thickness of about ½cm. Use a 6cm holly-shaped cutter to stamp out shapes, re-rolling the dough as necessary, to make around 40 leaves.

3. Arrange on lined baking trays, prick the tops with a fork and chill for at least 30 minutes before baking.

4. Preheat the oven to 180°C, 160°C fan oven, gas 4. Bake the shortbread leaves for about 15 minutes until firm to the touch. Leave to cool on the trays.

Chocolate_shortbread_holly_leaves
Just out of the oven. Image: Kathryn Hawkins

5. For the icing, knead the white ready to roll icing to make it more pliable. Break it into smaller pieces and add a little green colouring to each piece. Work each batch of colouring into the icing before adding a little bit more. When you have a few pieces of the same colour, blend them altogether into one piece. Although this takes a bit of time, it is much easier than trying to colour a big piece of icing in one go. If things get a bit sticky, add a little icing sugar.

6. To add flavouring, flatten the icing and sprinkle with a few drops of peppermint extract, then work into the icing. Repeat until you have the desired amount of flavouring, adding a little icing sugar if the mixture becomes sticky.

Colouring_and_flavouring_icing_with_green_food_colouring_and_peppermint_extract
Making the icing. Images: Kathryn Hawkins

7. Add some colour and flavour to the royal icing and mix well to achieve an even colour. Now you are ready to decorate.

8. Dust the work surface with a little icing sugar and roll out the green icing thinly. Cut out holly shapes using the same cutter.

9. Spread a little smear of the green royal icing over each biscuit and fit a holly icing shape on top.

10. Spoon the remaining royal icing into a small piping bag fitted with a plain writing nozzle and pipe leaf detail. If piping is not your forte, you can score a leaf pattern on the icing using the blade of a small knife.

11. Pipe a little extra icing at the stalk end of the leaves and attach sugar balls or red icing berries. Leave for at least an hour to set before arranging.

Decorating_gluten-free_vegan_holly_shaped_shortbreads
Christmas decorating. Images: Kathryn Hawkins

12. To serve as a garland, choose a large board or flat serving plate and arrange a layer of the shortbread leaves at different angles in a circle, and arrange more shortbreads on top. Add a ribbon bow as a finishing touch just before serving.

Iced_chocolate_shortbread_holly_leaves
Chocolate shortbread holly leaves. Image: Kathryn Hawkins

This is my last recipe post of 2023. Thank you for stopping by and for all your nice comments over the past 12 months. I hope you have a lovely Christmas and I look forward to posting more throughout the new year ahead. Merry Christmas!

Burns Night 2023 – Clootie dumpling truffles (gluten-free; dairy-free; vegan)

Clootie_dumpling_truffles
Burns night treats. Image: Kathryn Hawkins

It’s that time of year again when the Scottish nation gathers together to celebrate the birth of the poet Robert ‘Rabbie’ Burns. The celebration comes exactly one month after Christmas Day and it is a great way to help beat the January blues.

Over the years on my blog, I have posted several recipes which are traditionally served at this time of the year. Proper comfort food, guaranteed to warm you up on a cold day. This year, my recipe is very simple and combines a traditional Scottish pudding with a favourite sweet chocolate treat.

Gluten-free_and_vegan_Scottish_clootie_dumpling_for_burns_night_2023
Homemade clootie dumpling. Images: Kathryn Hawkins

Last year I posted a recipe for a homemade clootie dumpling which you can find here Clootie dumpling (gluten-free; dairy-free; vegan). My recipe this week uses this traditional Scottish pudding as a base. You can use a light fruit cake mixed with a little oatmeal instead if you prefer.

I flavoured my truffles with chopped stem ginger and ginger wine but ground spices and ginger syrup or orange juice will work fine as alternatives. The truffle mixture is simply wrapped in small rounds of marzipan or use a thin layer of ready-to-roll icing if you prefer.

Inside_a_clootie_dumpling_truffle
Clootie truffles and ginger wine. Image: Kathryn Hawkins

So here’s the recipe. You can also use the same mix to make small haggis-shaped truffles.

Makes: 8

Ingredients

  • 125g free-from clootie dumpling crumbs (or use 100g free-from light fruit cake crumbs combined with 25g toasted gluten-free oatmeal)
  • 25g stem ginger, finely chopped
  • 100g vegan dark chocolate, melted
  • 2tbsp ginger wine, ginger syrup or orange juice
  • 240g natural marzipan

1. Put the crumbs and ginger in a bowl and bind together with the melted chocolate and wine, syrup or juice. Form into 8 balls and chill for about 1hr until firm.

2. Divide the marzipan into 8 equal pieces and roll out thinly to make rounds large enough to encase each truffle. Scrunch together at the top to give the cloth effect. Tie with twine or ribbon if liked. Keep in a cool place or the fridge until ready to serve.

Making_clootie_dumpling_truffles
Clootie dumpling truffle steps. Images: Kathryn Hawkins

To make haggis truffles instead, divide into 10 portions and shape into small sausage lengths. You’ll need 300g marzipan to roll out into rounds and wrap around each one. Scrunch the marzipan at each end to give the classic haggis shape.

Mini_chocolate_haggis_truffles
Same mixture, different shape. Images: Kathryn Hawkins

For easy reference, here are a few links to other recipe posts for traditional Scottish dishes with a free-from twist to serve up on January 25th:

Vegan haggis (dairy-free; gluten-free variation)

Mixed root “stovies” (gluten-free; dairy-free; vegan)

Rumbledethumps (gluten-free; dairy-free & vegan alternatives)

Tattie scones (gluten-free; dairy-free; vegan)For Burns Night,

Scottish shortbread (gluten-free; dairy-free; vegan)

Gingerbread cupcakes and cookies (gluten-free; dairy-free; vegan)

Chocolate Haggis for a Burns Night supper (gluten-free, dairy-free, vegan)

Gingerbread tablet for Burns Night 2022 (gluten-free; dairy-free; vegan)

That’s all from me this week. Until next time, thanks for stopping by and I hope you have a good few days ahead.

Chocolate cherry fudge brownies (gluten-free; dairy-free; vegan)

Cake_stand_of_chocolate_cherry_brownies
Homemade chocolate cherry fudge brownies. Image: Kathryn Hawkins

Hello there. I hope you are keeping well and managing to stay cool in this very hot summer. The temperatures have been exceptional here in the UK and all over Europe which is great if you’re on holiday but not so good if you’re working. The garden is looking quite different this year due to the heat; many of the flowers are fading much more quickly than in previous years.

Scottish_wild_cherry_trees_laden with_fruit
Scottish wild cherry trees. Images: Kathryn Hawkins

Last weekend, in an effort to stay cool and enjoy the outdoors at the same time, I went for a walk in some local woodland. I was looking to see how long it would be before the hedgerow blackberries (brambles) would be ripe enough to pick – I don’t think it’s going to be a good year for brambling sadly. Quite unexpectedly, I came across several wild cherries trees, completely untouched by birds, and laden with fruit as far as the eye could see.

Wild_cherry_harvest_August_2022
Wild cherry picking. Images: Kathryn Hawkins

I was completely unprepared for foraging. I had no bag other than the small holster bag I was using to carry a water bottle. Cherry trees are enormous in the wild, but there were quite a few fruits on the lowest branches and I was able to fill my bag with just under 1kg of fruit. The cherries were the sweetest, juiciest I have ever tasted. Such an unexpected treat. Apparently, it has been a bumper year for cherries because of the hot weather, but I am still amazed that the birds hadn’t been interested in them. If only I had gone walking with a ladder! 🙂

Ripe_wild_black_cherries_being_pitted
Pitting ripe cherries. Image: Kathryn Hawkins

Back at home, I pitted the cherries. The firmer ones were easier to pit using my faithful old Italian cherry pitter, but the ripe ones I sliced and pitted using the tip of a sharp knife. Some went in the freezer, others were cooked in a crumble for tea, and the rest went into this week’s recipe.

Chocolate_brownies_baked_with_wild_cherries
Wild cherry flavoured fudge brownies. Image: Kathryn Hawkins

Easy to make, just a bit of advanced prep – you need to line a cake tin and make up a flax seed egg replacement mixture. Then, you are good to go. The brownies keep well but in this warmth, I kept them in the fridge to stop them going too soft and sticky. They also freeze perfectly. Eat them as a sweet treat but they are also good served with more fresh cherries or compote and ice cream for dessert.

Portion_of_vegan_chocolate_cherry_brownie
Chocolate cherry brownies, gloriously fudgy. Image: Kathryn Hawkins

Makes: 16

Ingredients

  • 175g dairy-free dark chocolate (I used 54% cocoa – if you use darker chocolate, omit the cocoa powder and add an extra 25g flour)
  • 150g lightly salted plant butter, cut into pieces
  • 25g ground flax seed
  • 200g caster sugar
  • 1 tsp vanilla bean paste
  • 75g gluten-free plain flour
  • 25g cocoa powder
  • 140g pitted cherries, halved (approx. 170g whole)

1. Preheat the oven to 170°C, 150°C fan oven, gas 5. Line an 18cm square cake tin with baking parchment.

2. Put 150g chocolate in a heatproof bowl with the butter and melt gently over a saucepan of barely simmering water. Remove from the water and cool for 10 minutes.

3. Make up the flax egg by mixing the flax seed with 110ml cold water and leave to stand for 5 minutes until thickened.

Stages_in_making_flax_egg
Flax egg preparation. Images: Kathryn Hawkins
6_steps_to_making_chocolate_brownie_batter
Preparing chocolate brownie mixture. Images: Kathryn Hawkins

4. Mix the sugar and flax egg into the melted chocolate along with the vanilla paste, then add the flour and cocoa powder and stir well until everything is well blended.

5. Pour into the prepared tin and scatter the cherries on top. Bake for about 1 hour until the mixture is set in the middle – initially the mixture rises round the edges leaving the centre molten but after a longer time in the oven, the centre firms up. Leave to cool in the tin.

Baking_brownie_batter_in_6_steps
Baking brownie batter. Images: Kathryn Hawkins

6. Remove from the tin and peel away the lining paper. Cut into 16 squares – you may find it easier to chill the brownie before you cut it as the texture is quite soft at room temperature.

7. Melt the remaining chocolate. Put the brownie squares on a board and drizzle each piece with a little chocolate. Leave to set before serving. Best stored in the fridge.

Drizzling_chocolate_brownies_with_chocolate
Adding a chocolate drizzle. Images: Kathryn Hawkins

I’m off to enjoy another slice now. I’ll see you again towards the end of the month. Until then, keep well and stay cool 🙂

Pink_single_serving_plate_with_chocolate_brownie
Cherry brownies for tea. Image: Kathryn Hawkins

Spring rhubarb with white chocolate and coconut mousse (gluten-free; dairy-free; vegan)

White_chocolate_and_coconut_mousse_topped_with_cooked_spring_rhubarb
Rhubarb topped mousse. Image: Kathryn Hawkins

Hello again. How lovely it is to be well and truly in the season of spring, my favourite time of year. It is a joy to be out of doors and in among all the new growth and activity in the garden.

Homegrown_spring_rhubarb
May 2022, fist rhubarb harvest. Images: Kathryn Hawkins

Earlier in the month, I picked my first rhubarb of the season. It was a good harvest of tender, thin, colourful stems with a tangy, fruity flavour. My recipe this week is not so much about the rhubarb but about an indulgently, rich recipe to serve with this tasty seasonal treat.

Vegan_white_chocolate_vegan_cream_block_coconut_aqua_fava_and_vanilla_bean_paste
Mousse ingredients. Image: Kathryn Hawkins

My very simple combination of vegan white chocolate, plant-based cream, coconut and vanilla, lightened with aquafaba foam makes a very delicious mousse to serve with any acidic fruit. If you’re not vegan, dairy-based products will work fine. Leave out the foam if you want a denser more custardy texture. If you don’t want to use cream, replace the creamed coconut and plant-based cream with full fat or reduced fat coconut milk.

The mousse is very rich and can easily spread to 6 portions if you use small serving glasses. Here’s the recipe.

Serves: 4-6

Ingredients

  • 350g prepared rhubarb, cut into short lengths
  • 2-3tbsp caster sugar
  • 40g creamed or block coconut
  • approx. 60ml plant-based double cream
  • 1tsp vanilla bean paste
  • 300g free-from white chocolate
  • 100ml aquafaba (I used canned cannellini bean liquid)

1. Put the rhubarb in a shallow pan with 2tbsp sugar and 3tbsp water. Heat until steaming, then cover with a lid and cook gently for 10-15 minutes until tender. Cool slightly, taste and add more sugar if required. Leave to cool completely, then chill until ready to serve.

Cooking_freshly_picked_homegrown_rhubarb
May rhubarb on the hob. Images: Kathryn Hawkins

2. Shave the creamed coconut into thin pieces using a small sharp knife or vegetable peeler and put into a measuring jug. Spoon over 3tbsp boiling water and stir until dissolved. Make up to 100ml by adding sufficient plant-based cream. Stir in the vanilla paste.

3. Melt the chocolate in the microwave or in a bowl over barely simmering water. Keep warm.

4. In a clean, grease-free bowl, whisk the aquafaba for 4-5 minutes until thick and foamy – you should be able to leave a trace of the whisk in the foam when it is sufficiently whipped.

5. Mix the coconut cream into the warm melted chocolate until well blended and then gently fold in the whisked foam in several batches. The chocolate mixture will begin to thicken quite quickly once it starts to cool.

Making_vegan_white_chocolate_and_coconut_mousse
White chocolate and coconut mousse prep. Images: Kathryn Hawkins

6. Divide the mousse between 4 or 6 serving glasses and leave to cool completely before chilling until ready to serve.

White_chocolate_and_coconut_mousse_ready_to_set
Ready to set. Image: Kathryn Hawkins

Spoon cooked rhubarb on top of each mousse just before serving. Delicious 🙂

Close-up_of_single_dessert_glass_of_rhubarb_topped_white_chocolate_and_coconut_mousse
Fruity and creamy. Image: Kathryn Hawkins

That’s me for another week. I will be posting again at the end of the month. Until then, enjoy marvellous May!

Chocolate cake with an unlikely ingredient (gluten-free; dairy-free; vegan)

Chocolate_Easter_cake_with_unusual_ingredient
One serious chocolate cake. Image: Kathryn Hawkins

Happy Easter! I hope the sun is shining where you are this holiday weekend. I had intended to post this feature a little ahead of the weekend but time has run away with me this week. Actually, to be completely honest, I was ready to post it yesterday until I realised what the date was, and given the unusual ingredient, I thought that my recipe might not be taken seriously. So, here we are at the end of the week, and I’m ready to reveal all 🙂

Overhead_image_of_chocolate_Easter_cake
Easter on a plate. Image: Kathryn Hawkins

This is one of the easiest chocolate cake batter recipes you will come across, so even if you don’t have the time to make the chocolate ganache and other finishing touches, do keep the cake batter recipe for trying at a later date with your own icing and decorations. What makes this cake batter a bit alternative is the addition of plain vegan mayonnaise. But, it’s not that weird an addition when you think about it, mayonnaise is just an amalgam of fat and liquid which are 2 of the main ingredients in a cake batter.

Bottle_of_vegan_mayonnaise
The unlikely cake ingredient. Image: Kathryn Hawkins

However, I must emphasise the word “plain”. Please do check the ingredient list for mustard and/or garlic or anything else highly flavoured i.e. choose a mayonnaise with the least amount of flavouring possible. Taste the mayonnaise before you add it to the other ingredients, just to make sure. If you’re not vegan, a plain egg-based mayonnaise will work as well. The same goes for anyone who is not gluten-free, you can use ordinary plain white wheat flour.

Slice_of_Easter_chocolate_cake_2021
A very chocolaty slice. Image: Kathryn Hawkins

Because it’s Easter and I love marzipan, I have added an additional layer of chocolate marzipan before the ganache gets poured over, and I used some more to make the decorations. If you don’t like marzipan just pour the ganache directly over the cake, and decorate with readymade chocolate decorations. Or you add cocoa powder to ready-to-roll (fondant) white icing in the same way as in the recipe below, and use this to make flowers and eggs instead.

Close-up_of_chocolate_marzipan_eggs
Chocolate marzipan eggs. Image: Kathryn Hawkins

The cake is deliciously rich, moist and flavoursome. It freezes well if you have any left. Once cut, it is best stored in the fridge or at a cool room temperature for up to 5 days. I hope you enjoy it.

Serves: 10-12

Ingredients

  • 140g gluten free plain flour blend
  • 65g cocoa powder plus extra for dusting
  • 17g gluten-free baking powder
  • ¼ tsp xanthan gum (optional but it does help hold the crumb together)
  • 65g ground almonds
  • 175g soft light brown sugar
  • 190g plain vegan mayonnaise
  • 2 tsp vanilla extract
  • 300g marzipan
  • 2 tbsp smooth apricot jam
  • 250g dairy free dark chocolate (I use 54% cocoa chocolate but use darker if preferred)
  • 125g plant-based block margarine

1. Grease and line a deep 20cm round tin. Put the flour, 50g cocoa, baking powder, xanthan gum and almonds in a bowl and mix together until well blended. Stir in the sugar, and crush any lumps.

2. Make a well in the centre, and add 175ml cold water and the mayonnaise, then beat everything together until smooth and thoroughly blended. Spoon into the tin, smooth the top and put the tin on a baking tray.

3. Bake for about 1hr to 1hr 10 minutes until risen and firm to the touch – test the centre with a skewer, if it comes out clean, the cake is cooked. Leave for 10 minutes before turning on to a wire rack to cool completely. The cake may sink slightly in the middle. When the cake is cold, turn it upside down and peel away the lining paper.

Steps_1_to_6_making_Easter_chocolate_cake_with_unusual_ingredient
3_steps_showing_the_baked_chocolate_cake
Chocolate cake preparation. Images: Kathryn Hawkins

4. While the cake is cooling, make the marzipan. Knead the marzipan a few times to soften it. Flatten slightly then add 1tsp of the remaining cocoa powder. Fold the marzipan over the cocoa and keep kneading until the cocoa is distributed evenly in the marzipan. Repeat the process, adding the cocoa gradually, until it is used up.

5. Cut off a 75g piece and put to one side. Lightly dust the work top with more cocoa powder and roll out the remaining marzipan to fit the top of the cake. I use the tin base as a template to cut out a neat circle.

6. Brush the cake with apricot jam and sit the marzipan circle on top. Any marzipan trimmings can be added to the reserved piece and used to make decorations.

Making_and_using_chocolate_marzipan
Chocolate marzipan preparation. Images: Kathryn Hawkins

7. For the ganache, break up the chocolate and place in a saucepan with the margarine and 50ml water. Heat gently, stirring, until melted together. Remove from the heat, stir well, then leave to cool for about 20-30 minutes. You want the mixture to thicken sufficiently so that it doesn’t run straight off the cake when you pour it over.

8. Once thickened, sit the cake and wire rack over a tray or board. Slowly pour the ganache over the top of the cake from the middle, in a thin stream. If you want a completely smooth finish, continue pouring so that the ganache floods down the sides of the cake to coat them. Alternatively, pour and spread for a more textured appearance. Any ganache that sets on the tray underneath can be scooped up and remelted.

4_steps_showing_making_and_using_chocolate_ganache
Chocolate ganache preparation. Images: Kathryn Hawkins

Once the cake is covered, the ganache will set quite firmly if chilled, then you can prise the cake from the rack. If you have a cool kitchen, leave the cake to set naturally; the ganache will be slightly softer and it will be easier to remove it from the rack. Make the decorations while the cake is setting and then all you have to do is decorate the cake, serve it up and take in all the praise 🙂

Covering_a_chocolate_cake_with_dark_chocolate_ganache
Covering the cake. Image: Kathryn Hawkins

Have a good Easter break and see you again soon.

Tutti frutti coconut bars (gluten-free; dairy-free; vegan)

Slices_of_tutti_frutti_coconut_and_chocolate_cake
All fruits coconut bars. Image: Kathryn Hawkins

Hello again. Here in the UK, we are now in week 3 of lock-down, and whilst the weather has been wonderful this week and the garden has been very well attended to, I have also spent some time in the kitchen creating this week’s post.

I looked in the fridge at the weekend and noted a few bits and pieces that needed to be used up. The combination before me made me think of a sweet treat from yesteryear, Paradise Slice, which was a combination of dried fruit and sweet fudgy coconut mixture baked with a layer of chocolate underneath. And so, this week’s recipe was born.

New_take_on_Paradise_slice
Paradise slice revisited. Image: Kathryn Hawkins

You can use any dried fruit you have in the fridge or cupboard – sultanas, raisins, dried apricot, cranberries will all work fine. I had the remnants of a bag of Trail Mix and some glacé cherries to use up, and they have created a very colourful combination.

Overhead_close-up_on_2_slices_of_tutti_frutti_coconut_cake
A filling of candied papaya, mango, pineapple and cherries mixed with coconut. Image: Kathryn Hawkins

The original bake I remember contained eggs to bind the ingredients together, but in this recipe, I use a vegan meringue-style mixture which works very well and helps keep the coconut filling moist and pure white in colour. There are a few stages to the recipe, but if you haven’t got time to do it all in one go, you can bake the base first and then make the filling and topping later on. I hope you enjoy it.

Makes: 12 slices

Ingredients

For the base:

  • 100g white vegetable fat (such as Trex) or coconut oil, softened
  • 60g caster sugar
  • 175g gluten-free plain flour mix
  • 20g cocoa powder

For the filling and topping:

  • 90ml chickpea canning water
  • ¼ tsp cream of tartar
  • 75g caster sugar
  • ¼ tsp xanthan gum
  • 150g dried or candied fruit, chopped
  • 150g desiccated coconut
  • 1 tsp vanilla extract
  • 150g dark dairy-free chocolate
  1. First make the base. Grease and line a deep 20cm square tin. Beat together the fat and sugar until well blended and creamy. Sift the flour and cocoa on top and mix everything together well. Bring together with your hands to form a soft dough and then press into the bottom of the tin. Smooth with the back of a spoon, prick all over with a fork and chill for 30 minutes.
  2. Preheat the oven to 180°C, 160°C fan oven, gas 4. Bake the chocolate base for 20 minutes until just firm to the touch. Leave to cool, the cover until ready to make the filling.

    4_steps_to_making_chocolate_shortbread_base
    Making the chocolate base. Images: Kathryn Hawkins
  3. For the filling, pour the canning water into a large grease-free bowl and whisk until foamy. Add the cream of tartar and continue whisking for a full 5 minutes.
  4. Gradually add the sugar, tablespoon at a time, whisking well in between, and then add the xanthan gum. Continue whisking for a further 2 minutes to make a thick, glossy meringue.
  5. Add the fruit, coconut and vanilla and gently mix everything together. Pile on top of the chocolate base, smooth the top. Bake at 170°C, 150°C, gas 3 for about 40 minutes until just firm to the touch, puffed up and lightly browned – cover the top with foil if it browns too quickly. Leave to cool in the tin – it will deflate on cooling.

    6_steps_to_making_tutti_frutti_coconut_filling
    Making the fruit and coconut filling. Images: Kathryn Hawkins
  6. When the coconut layer is cool, melt the chocolate and spread it over the top of the filling, right to the edges. Leave in a cool place for a few minutes until the chocolate is just about to set, then score with a sharp knife into 12 bars – it is important to do this before the chocolate sets otherwise, without scoring, the chocolate will shatter when you come to cut the bars through.
  7. Leave to set completely. Chill if necessary. Note: I have kept the bars quite large for easier cutting (and because I’m greedy!), but you can score the chocolate with 2 more lines and cut into 24 for small portions.
  8. To serve, carefully remove the cake from the tin and peel back the lining paper. Use a large sharp knife to cut through the chocolate, filling and base to make 12 bars – it is quite a crumbly mixture but a good blade should get through it easily.

    Topping_tutti_frutti_coconut_bars_with_melted_chocolate
    Covering with chocolate and slicing. Images: Kathryn Hawkins

The slices keep well in a cake tin, but if the room temperature is warm, they are best stored in the fridge.

Up_close_on_a_slice_of_tutti_frutti_coconut_cake
A slice of paradise. Image: Kathryn Hawkins

That’s me for another week. My best wishes to you all until my next post. Keep healthy and stay safe 🙂

Salame al cioccolato (Chocolate salami) (gluten-free; dairy-free; vegan)

Chocolate_salami
Chocolate and orange treat. Image: Kathryn Hawkins

I thought it was time to deliver a little treat. This week, I’ve broken into the chocolate to make something deliciously decadent. Still feeling inspired by my culinary adventure with Sicilian red oranges in last week’s post, I used some to flavour this rich Italian confection which is traditionally served at the end of a meal with coffee and liqueurs, or in my case, Marsala wine.

Slices_of_chocolate_salami
Sliced Italian chocolate salami with coffee and Marsala wine. Image: Kathryn Hawkins

I was watching a travel programme about Sicily over the festive holidays. It really does seem like a food and drink paradise, and I hope to pay a visit some day. In the meantime, I tracked down some of the island’s Modica chocolate which is so very different from any other chocolate I have eaten or cooked with. It is naturally vegan as it is made with just cocoa, sugar and vanilla. The texture is grainy and slightly crunchy, with a flavour that is rich and intense. Modica chocolate is very like the chocolate the Aztecs would have been familiar with; it was introduced to Europe in the 16th century by the Spanish, and I’m delighted to have finally made its acquaintance.

Bar_of_Sicilian_Modica_chocolate
Sicilian Modica chocolate. Images: Kathryn Hawkins

You can add any flavourings you fancy to the basic salami recipe. I opted for all things Italian and went with pistachios, marzipan and the red orange. Candied peel is often added but I’m not a huge fan. Because I had the fresh red oranges to hand, I made my own non-candied peel which is much softer and much more zesty than the preserved variety. However, feel free to use the more traditional candied peel if you like it.

I put some red orange juice in the salami mixture as well. If you fancy something with more oomph, you can use 2 tbsp.  liqueur instead. I used a dairy-free margarine which has a lower fat content than a solid fat. The combination of the margarine and the added liquid gives a more fudgy texture to the salami. If you prefer a firmer set then leave out the liquid altogether and use something like coconut oil  (or unsalted butter if you eat it) which will give a much firmer set.

Red_orange_juice_and_rind_chopped_marzipan_and_shelled_pistachios
Italian flavours. Images: Kathryn Hawkins

Makes 16 slices

Ingredients

  • 2 medium oranges, red or other variety
  • 100g 50% cocoa Modica or similar free-from plain chocolate
  • 75g dairy-free margarine
  • 150g free-from ginger biscuits, lightly crushed (or use your favourite variety)
  • 50g natural pistachio nuts, roughly chopped
  • 75g natural marzipan, finely chopped
  • 15g each ground almonds and icing sugar
  1. First prepare the orange rind. Using a vegetable peeler, pare off the orange rind thinly. You need about 40g rind to achieve a rich orange flavour.
  2. Slice the pared rind into thin strips. Bring a small saucepan of water to the boil and cook the strips for 4-5 minutes until soft. Drain and cool under cold running water, then drain well and pat dry, before chopping finely. Extract 2 tbsp. juice from one of the oranges – and enjoy the rest of the juice at your leisure 🙂

    Steps_to_making_fresh_orange_peel
    Making fresh orange peel. Images: Kathryn Hawkins
  3. Break up the chocolate and place in a heatproof bowl. Add the dairy-free margarine and place the bowl over a saucepan of barely simmering water, and leave until melted. Remove from the water and allow to cool for 10 minutes.
  4. Put the biscuits, pistachios, marzipan, chopped orange rind and juice in a bowl and mix together, then stir in the melted chocolate. Leave in a cool place for about 30 minutes to firm up but not set completely.

    Mixing_up_the_chocolate_salami
    Chocolate salami mix. Images: Kathryn Hawkins
  5. Line the work top with a large double layer of cling film and pile the chocolate mixture in the centre to form a rough rectangular shape about 24cm long.
  6. Fold over the cling film and twist the ends closed to make a fat sausage-like shape with slightly tapering ends. Chill for at least 2 hours, preferably overnight until firm.

    Steps_t0_shaping_chocolate_salami
    Shaping chocolate salami. Images: Kathryn Hawkins
  7. To decorate, place a large sheet of baking parchment on the work top and sift the ground almonds and icing sugar down the centre to cover an area the same length as the salami.
  8. Carefully unwrap the salami and roll evenly in the sweet almond mixture to coat it lightly. Slice and serve. Store any remaining chocolate salami in the fridge – the sugary almond coating will start to dissolve in the fridge but this doesn’t affect the flavour or texture of the salami. Buon appetite!

    Close_up_of_chocolate_salami
    Delizioso. Image: Kathryn Hawkins


Dark chocolate brownie bites (gluten-free; dairy-free; vegan)

Small_sqaures_of_gluten-free_vegan_chocolate_brownie
Dark chocolate brownie bites. Image: Kathryn Hawkins

Something a little bit on the indulgent side for you this week. I am working my way through a hoard of classic baking recipes, converting them into vegan versions, and recently I got to a chocolate brownie recipe.

There are so many variations on this particular bake, and everyone has their own personal favourite. My version gives a texture which is soft and gooey when eaten warm, but when cold, it firms up to something more like chocolate fudge. I find it quite rich, and cut it into small squares, but that’s a question of personal taste.

Just_sliced_still_warm_vegan_dark_chocolate_brownie
Warm dark chocolate brownie. Image: Kathryn Hawkins

I use coconut oil now instead of the butter in my traditional recipe. This does give a slightly nutty flavour, so if you’re not a fan, use a solid vegetable fat such as Trex instead, or choose a vegan margarine with a high fat content. Other than that, it’s a very straightforward recipe, with a minimum amount of ingredients. I hope you like it.

Makes: 20 small squares

Ingredients

  • 150g 85% cocoa extra dark chocolate (dairy-free)
  • 150g extra virgin coconut oil
  • 140g silken tofu
  • 225g light Muscovado sugar
  • 2 teasp vanilla paste
  • 100g gluten-free plain flour (such as Dove’s Farm)

To decorate:

  • 50g 85% cocoa extra dark chocolate (dairy-free)
  • Freeze-dried raspberry pieces

1. Preheat the oven to 170°C (150°C fan oven, gas 3). Grease and line a 20cm square cake tin. Break up the chocolate and put in a heatproof bowl with the coconut oil. Place the bowl over a saucepan of barely simmering water until melted. Remove the bowl from the water and leave to cool for 10 minutes.

Still-life_of_dark_chocolate_and_melting_chocolate_with_coconut_oil
Melting dark chocolate with coconut oil. Images: Kathryn Hawkins

2. Whisk the tofu and sugar together until well blended and creamy and stir in the   vanilla paste. Mix in the melted chocolate and coconut oil, and gradually mix in the flour. Transfer to the prepared tin and bake for about 45 minutes until marbled and crackled on top, just set in the middle but still with a slight wobble underneath. Leave to cool completely before removing from the tin.

Baking_tin_to_raw_mixture_to_cooked_mixture_vegan_chocolate_brownie
Vegan chocolate brownies, from tin to bake. Image: Kathryn Hawkins

3. To decorate, carefully the bake remove from the tin and discard the lining paper. Cut into 20 bite-sized pieces and arrange on a sheet of baking parchment. Melt the chocolate as above and drizzle over each piece of brownie using a teaspoon. Scatter with raspberry pieces and leave for a few minutes to set before serving.

Drizzled_with_chocolate_and_scattered_with_raspberry_pieces_vegan_chocolate_brownies
Just decorated, vegan brownie bites. Image: Kathryn Hawkins