Seasonal eatings – Shortbread snow folk (gluten-free; dairy-free; vegan)

Gluten-free_dairy-free_vegan_Shortbread_snowfolk
Happy Christmas 2025. Image: Kathryn Hawkins

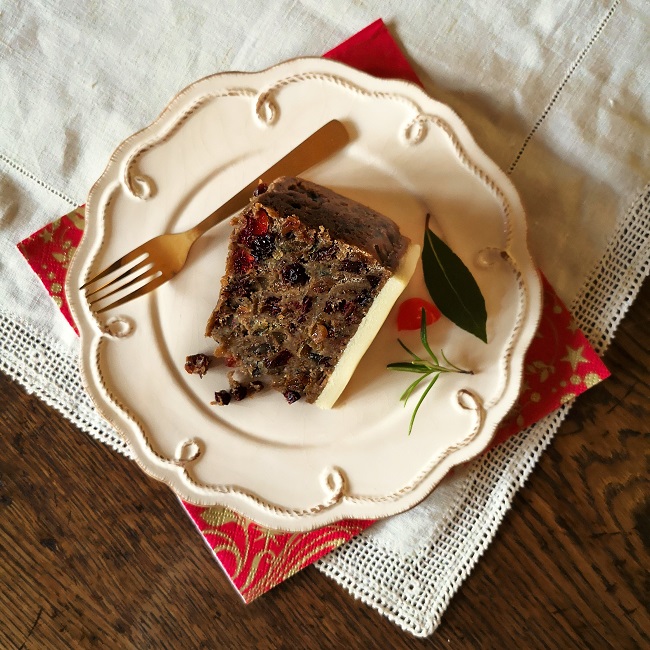
Hello there. I hope you are feeling festive and looking forward to Christmas. It’s such a busy time of the year, tying up lots of loose ends before the year is out as well as making all the preparations for the days ahead.

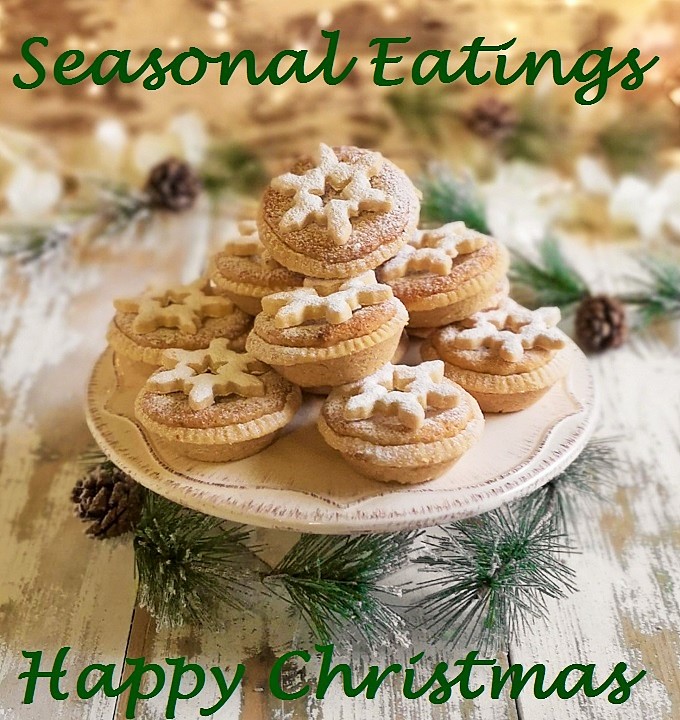
I have a simple, fun and very festive recipe for you this month, based around one of my favourite and most successful gluten-free and vegan bakes, shortbread.

If you’ve been following my blog for a while, you’ll have already seen a few variations on my shortbread recipe over the months. This recipe uses a plain mix to which you can add your own flavours if you wish. The snow folk figures are easy to make and assemble, and I’ll leave it up to you as to how creative you want to be when it comes to decorating them. The quantities below will be enough to make 2 basic figures.

Ingredients

  • 50g plant-based butter, softened
  • 30g caster sugar
  • 100g gluten-free plain flour plus extra for dusting
  • 1tsp vanilla extract or other flavouring of your choice
  • 150g white ready-to-roll icing
  • 25g icing sugar

1. Beat the butter and caster sugar together until creamy and well blended. Mix in the flour and vanilla until the ingredients start to come together, then bring the mix together with your hands to make a ball of dough.

Making_gluten-free_dairy-free_vegan_shrotbread_for_edible_Christmas_decorations
Mixing the shortbread base. Images: Kathryn Hawkins

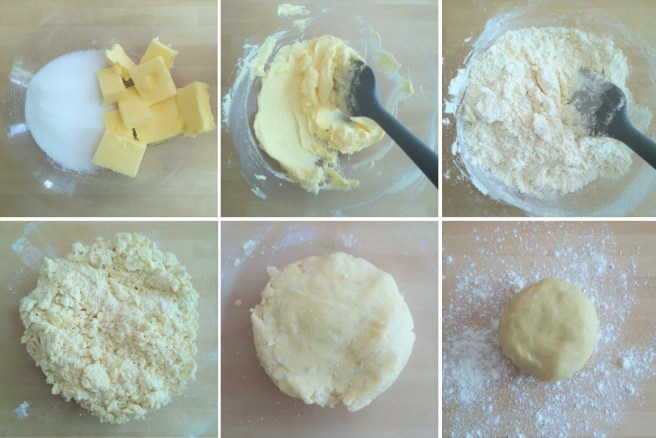
2. Lightly dust the work top with a little more flour and gently knead the dough until smooth.

Making_edible_shortbread_decorations
Making and baking. Images: Kathryn Hawkins

3. Roll out the dough to a thickness of 0.5cm and cut out 4 x 6.5cm, 4 x 5cm and 4 x 3.5cm rounds, re-rolling the dough as necessary. Arrange on a baking tray, prick with a fork and chill for 30 minutes.

4. Preheat the oven to 180°C, 160°C fan oven, gas 4, bake the shortbread rounds for about 15 minutes until lightly golden. Leave to cool on the baking tray.

5. When you are ready to decorate, roll out the white ready-to-roll icing thinly and use the same cutters to cut out 12 assorted rounds. Keep the trimmings for decorating. Mix the icing sugar with a little water to make a smooth, sticky paste.

6. Spread a little icing paste on each biscuit and stick a same size round on top. Smooth the icing round with your fingers to flatten and neaten, then stack the rounds on top of each other starting with the largest rounds at the bottom. To make them more stable, spread a little icing paste in between if liked.

Icing_and_assembling_shortbread_snow_folk
Icing and decorating. Images: Kathryn Hawkins

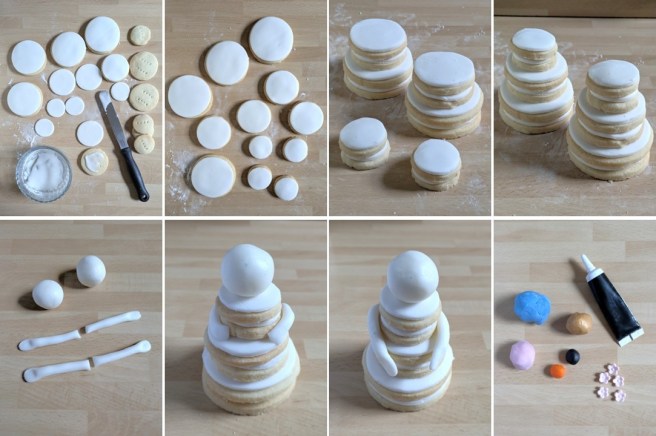
7. Use the trimmings to make arms and heads and stick in place with a little of the icing paste. Transfer to a serving plate or board.

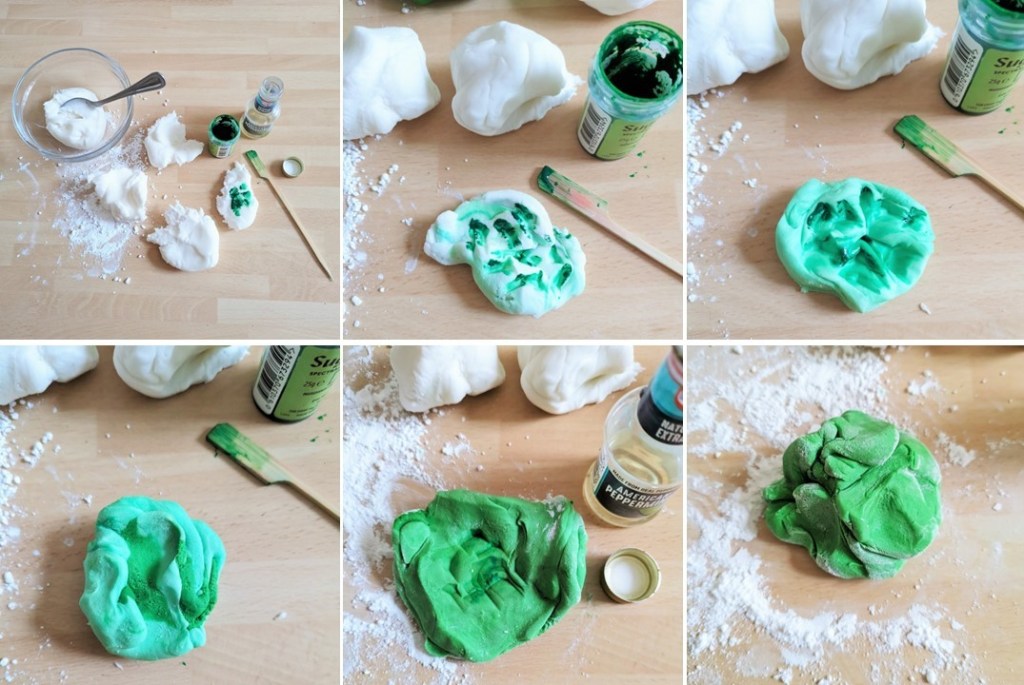
For the finishing touches, use small amount of different coloured ready-to-roll icing to make scalves, hats, noses and buttons. A black piping icing tube is an easy way to pipe on the facial features, and I used tiny sugar flowers to make the buttons on one of the figures. Stick all the extras in place using a little of the icing paste.

Decorated_shortbread_snowman_and_snowlady
Decorated and ready to serve.

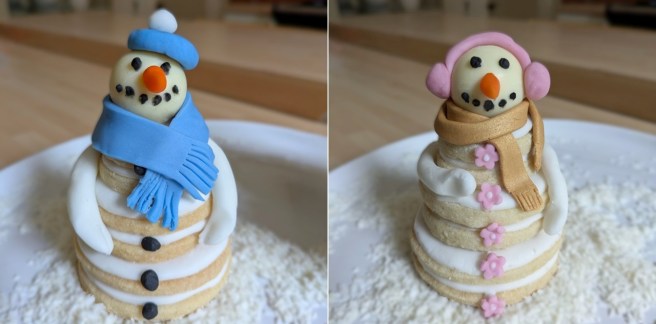
Sprinkle the serving plate with shredded coconut to resemble snow. Note: the shortbread will lose it’s crispness once iced but it tastes just as good 🙂

Cheeky_winking_shortbread_snowman
See you next year! Image: Kathryn Hawkins

That’s me for another year. I hope you have a happy Christmas. With best wishes for the new year, thanks for stopping by.

Chestnut rolls (gluten-free; dairy-free; vegan)

Close-up_vegan_gluten-free_chestnut_roll
Chestnut roll close up. Image: Kathryn Hawkins

Hello again. It’s my last recipe post of the year. How 2024 has flown by. It’s been a busy one for me, and I’ll admit to not feeling 100% festive as I sit down to write this post as there is always so much to do at this time. If you’re feeling the same, perhaps this simple, tasty recipe will help get you in the right frame of mind.

Vegan_gluten-free_chestnut_rolls_ready_for_Christmas
Festive chestnut rolls. Images: Kathryn Hawkins

These rolls make the perfect snack or party food. Easy to make from a combination of sage and onion stuffing mix, chopped chestnuts and chutney. You can vary the flavour by using your favourite chutney, I use tomato but an onion one or more fruity one would work just as well as would cranberry sauce. Here’s what to do…

Makes:16

Ingredients

  • 65g sage and onion stuffing mix
  • 225g cooked peeled chestnuts
  • 100g tomato or other flavour chutney plus extra to serve
  • 1tsp onion or plain salt
  • 280g vegan-friendly gluten-free puff pastry sheet
  • 10g soya flour
  • Fresh sage to garnish

1. Put 50g stuffing mix in a heatproof bowl and mix in 90ml freshly boiled water. Mix well and leave to cool completely.

2. Finely chop the chestnuts in a food processor or by hand and mix into the cold stuffing mixture along with the chutney and salt to make a firm paste.

Making_a_vegan_gluten-free_chestnut_filling
Making the filling. Images: Kathryn Hawkins

3. Unroll the pastry and use the lining paper to line a large baking tray. Cut the pastry lengthways and divide the stuffing mix between the 2 pastry strips, shaping the stuffing into a long sausage shape down the middle of each.

Vegan_gluten-free_puff_pastry_rolled_and_filled
Forming the chestnut rolls. Images: Kathryn Hawkins

4. Mix the soy flour with 5tsp water to make a glazing paste and brush a little down one side of each pastry strip. Roll the pastry over the filling and press down gently, then roll each pastry back and forth on the work top to neaten and seal.

Making_vegan_gluten-free_chestnut_rolls
Shaping the rolls. Images: Kathryn Hawkins

5. Cut each roll into 8 equal portions and arrange spaced apart on the lined baking tray. Brush the tops and sides with the soy paste and sprinkle with the remaining dry stuffing mix. Chill until ready to bake.

Cutting_and_glazing_vegan_gluten-free_chestnut_rolls_ready_for_baking
Ready for baking. Images: Kathryn Hawkins

6. To cook, preheat the oven to 200°C, 180°C fan, gas mark 6. Bake the rolls for about 20 minutes until golden and crisp. Transfer to a wire rack to cool. Best served slightly warm with extra chutney, garnished with sage.

Freshly_baked_vegan_gluten-free_chestnut_rolls
Fresh chestnut rolls just out of the oven. Image: Kathryn Hawkins

That’s a wrap from me for this year. I hope you all have a good festive season and wish you a happy and healthy time. Until next year, Merry Christmas 🙂

Edible holly garland (gluten-free; dairy-free; vegan)

Gluten-free_vegan_shortbread_holly_garland
Happy Christmas! Image: Kathryn Hawkins

Well the festive season is almost upon us, and it’s time to share a suitably Christmassy recipe with you. I’ve turned to an old favourite as the base for my edible holly garland: shortbread 🙂

Simple enough to make, shortbread is much loved by many and a staple bake at this time of year. I’ve flavoured my shortbread with cocoa powder and iced it with peppermint flavoured icing, which make these cute little nibbles a perfect treat to serve as an after dinner alternative to accompany coffee and liqueurs. If you don’t fancy peppermint, try adding orange or lime zest, or enhance the cocoa flavour by adding some cinnamon or vanilla.

After_dinner_coffee_and_cookies
After dinner coffee and nibbles. Images: Kathryn Hawkins

If you are going to display the leaves as a garland you’ll need to bake a good number, so my recipe makes 40, but cut the quantities in half if you just want a few nibbles to serve with coffee. The shortbread leaves can be made a couple of days in advance of serving, but I’d advise not to ice them more than a day before serving as the icing often softens the shortbread.

By the way, I couldn’t find the right shade of green for my biscuits, so I am including instructions for colouring white icing. If you do have ready prepared green icing, all you need do is add some flavour.

Makes: 40

Ingredients

  • 100g lightly salted plant or dairy butter
  • 50g caster sugar
  • 20g cocoa powder
  • 175g gluten-free plain flour blend plus extra for dusting
  • 225g white ready to roll icing
  • Green food colour gel
  • Icing sugar to dust
  • A few drops peppermint extract
  • 75g readymade royal icing or similar white pipeable icing
  • Red sugar balls or icing to decorate

1. Beat the butter and sugar together until light and creamy. Sift the cocoa powder and flour on top and mix well, then bring everything together with your hands to make a firm dough.

2. Lightly flour the surface and roll out the dough to a thickness of about ½cm. Use a 6cm holly-shaped cutter to stamp out shapes, re-rolling the dough as necessary, to make around 40 leaves.

3. Arrange on lined baking trays, prick the tops with a fork and chill for at least 30 minutes before baking.

4. Preheat the oven to 180°C, 160°C fan oven, gas 4. Bake the shortbread leaves for about 15 minutes until firm to the touch. Leave to cool on the trays.

Chocolate_shortbread_holly_leaves
Just out of the oven. Image: Kathryn Hawkins

5. For the icing, knead the white ready to roll icing to make it more pliable. Break it into smaller pieces and add a little green colouring to each piece. Work each batch of colouring into the icing before adding a little bit more. When you have a few pieces of the same colour, blend them altogether into one piece. Although this takes a bit of time, it is much easier than trying to colour a big piece of icing in one go. If things get a bit sticky, add a little icing sugar.

6. To add flavouring, flatten the icing and sprinkle with a few drops of peppermint extract, then work into the icing. Repeat until you have the desired amount of flavouring, adding a little icing sugar if the mixture becomes sticky.

Colouring_and_flavouring_icing_with_green_food_colouring_and_peppermint_extract
Making the icing. Images: Kathryn Hawkins

7. Add some colour and flavour to the royal icing and mix well to achieve an even colour. Now you are ready to decorate.

8. Dust the work surface with a little icing sugar and roll out the green icing thinly. Cut out holly shapes using the same cutter.

9. Spread a little smear of the green royal icing over each biscuit and fit a holly icing shape on top.

10. Spoon the remaining royal icing into a small piping bag fitted with a plain writing nozzle and pipe leaf detail. If piping is not your forte, you can score a leaf pattern on the icing using the blade of a small knife.

11. Pipe a little extra icing at the stalk end of the leaves and attach sugar balls or red icing berries. Leave for at least an hour to set before arranging.

Decorating_gluten-free_vegan_holly_shaped_shortbreads
Christmas decorating. Images: Kathryn Hawkins

12. To serve as a garland, choose a large board or flat serving plate and arrange a layer of the shortbread leaves at different angles in a circle, and arrange more shortbreads on top. Add a ribbon bow as a finishing touch just before serving.

Iced_chocolate_shortbread_holly_leaves
Chocolate shortbread holly leaves. Image: Kathryn Hawkins

This is my last recipe post of 2023. Thank you for stopping by and for all your nice comments over the past 12 months. I hope you have a lovely Christmas and I look forward to posting more throughout the new year ahead. Merry Christmas!

Slow-cooked quince in mulled wine (naturally gluten-free; diary-free and vegan)

Slow-cooked_quince_in_mulled_wine_in_glass_compote_dish
Slow-cooked quince in mulled wine. Image: Kathryn Hawkins

One of the delights of Autumn for me is that it is the season of the quince. In recent years, I haven’t managed to find any but this October I got hold of a box of 9 of the tempting fruit. Like apples and cherries this year, quince trees have also provided a bumper harvest.

Fresh_quince_delivered_in_a_box
Box of quince. Image: Kathryn Hawkins

Back in October the quinces were barely ripe. Very firm, pale yellowy-green in colour with little of their renown aroma. As the weeks passed, the skins turned waxy yellow and the spicy scent increased. Every time I opened the box, I inhaled a waft of their fruity smell. If you haven’t experienced the aroma, it is intensely appley with a hint of sweet aniseed.

Whole_and_halved_ripe_quince
Perfectly ripe quince. Images: Kathryn Hawkins

To be honest, I don’t think the flavour of the fruit is that pronounced, more like pear than apple, but the texture makes it very different to other tree fruits. There is a slightly granular, rich texture to the flesh and a much firmer, almost chewy bite. Quince holds up exceptionally well to prolonged cooking, making them a winner for the slow-cooker.

Slow-cooker_poached_quince_in_mulled_wine
Perfectly cooked quince. Image: Kathryn Hawkins

Raw quince is too hard and dry to enjoy raw; it also discolours very quickly. If you peel and core the fruit and put it in a bowl of lemon juice and water this helps keep the discolouration to a minimum. However, if you want to enjoy the fruit “au natural”, hold back on the lemon and the fruit will take on a rich, rusty red colour as it cooks.

My recipe this week is simple but requires a little bit of preparation to start with. Once it’s all in the slow cooker you can sit back and enjoy the festive fruit and spice smells that are emitted as the quince cooks through. If you can’t get hold of quince, firm pears will work just fine.

Serves: 6

Ingredients

  • 1 unwaxed lemon
  • 1 unwaxed orange
  • 3 large quince (approx. 1.5kg)
  • 500ml fruity red wine
  • 150g caster sugar
  • 1 vanilla pod, split
  • 1 cinnamon stick, broken

1. Use a vegetable peeler to pare the rind from the lemon and orange. Put 3/4 of the rind to one side for flavouring the wine, and cut the remainder into thin strips for decoration – if you don’t want to do this, you can use all the rind in the mulled wine.

2. Extract the lemon juice and pour into a mixing bowl. Add the empty lemon halves. Fill the bowl with water to to 2/3 full and set aside ready for the quince. Extract the juice from the orange and set aside for the wine.

4_steps_to_preparing_fresh_quince_and_flavourings
Preparing quince and flavourings. Images: Kathryn Hawkins

3. Peel the quince thinly. Cut into quarters and slice out the core. As soon as you prepare each quarter, push down into the lemony water to help prevent discolouration.

4. Now prepare the mulled wine. Pour the wine and orange juice into a saucepan. Add the sugar and heat gently stirring until the sugar dissolves, then bring to the boil.

Making_mulled_wine_and_cooking_quince_in_the_slow-cooker
Making mulled wine for the slow-cooker. Images: Kathryn Hawkins

5. Drain the quince very well and place in the slow cooker dish. Add the pared rind, vanilla and cinnamon and pour over the hot mulled wine. Cover with the lid, switch the cooker on to High and cook for 3 hours, turning the fruit every hour to ensure even cooking, until the quince is tender.

6. Use a slotted spoon to transfer the quince to a heatproof dish. Cover loosely with foil. Strain the wine into a saucepan, bring to the boil and simmer for 10-12 minutes until reduced by half and slightly syrupy. Pour over the quince, mix gently, and leave to cool completely, then cover and chill until ready to serve.

4_prep_shots_showing_reducing_mulled_wine_to_syrup
Reducing mulled wine to syrup. Images: Kathryn Hawkins

7. While the quince is cooking or cooling, bring a small saucepan of water to the boil and cook the shreds of lemon and orange rind for 2-3 minutes to soften them. Drain well and leave to cool.

Making_shredded_orange_and_lemon_zest_decoration
Orange and lemon zest decoration. Images: Kathryn Hawkins

8. To serve, arrange the quince quarters in a serving dish and spoon over a little syrup. Sprinkle with citrus shreds if using and serve the quince with the remaining mulled wine syrup on the side. Delicious accompanied with vegan vanilla ice cream 🙂

Mulled_wine_quince_with_shreds_of_orange_and_lemon_zest
Finishing touch, orange and lemon shreds, Image: Kathryn Hawkins
Serving_of_mulled_wine_poached_quince_with_vegan_vanilla_ice_cream
Quince served with vegan vanilla ice cream. Image: Kathryn Hawkins

I hope you have a very happy Christmas and I look forward to posting again for the new year. Seasonal best wishes to you and thank you for your interest in my blog.

Snowflake pies (gluten-free; dairy-free; vegan)

Very Christmassy, snowflake pies. Image: Kathryn Hawkins

Hello again. With the Christmas break just a few days away, my post this week is a very simple and very seasonal dessert recipe which is easy to make and pretty to look at. With little snow in the forecast for the UK this year so far, this sweet treat is probably the closest I will come to experiencing a White Christmas.

Close-up_on_snowflake_pie
Light and fluffy, snowflake pie. Image: Kathryn Hawkins

Assembled in paper cupcake cases, the pies have a biscuit crumb base, and a topping simply made from vegan marshmallows and plant-based double cream. All very straightforward. I flavoured the topping with vanilla extract but you could add some citrus zest or Christmas spice. As you can image, the pies are quite sweet, but I found they paired perfectly with cooked cranberries. I think orange, rhubarb or raspberries would also work very well – something with a bit of acidity is ideal. OK, on with the recipe…..

Makes: 8

Ingredients

  • 115g free-from Digestive biscuits
  • 65g plant-based butter
  • 175g white vegan marshmallows
  • 400ml plant-based double cream, at room temperature
  • 1tsp good quality vanilla extract
  • Icing snowflakes and edible silver glitter to decorate

1. Line 8 muffin tins with plain cupcake paper cases – you don’t need to use anything fancy; the cases are being used as tin liners to help you turn the pies out more easily. Put the biscuits in a clean bag and crush finely with a rolling pin.

2. Melt the butter, remove from the heat and stir in the crumbs until evenly coated. Divide the mixture between the cases; press down well and chill until required.

How_to_make_snowflake_pie_bases
Making the bases. Images: Kathryn Hawkins

3. For easier melting, cut the marshmallows into small pieces – kitchen scissors are good for this. Place in a saucepan and pour over 100ml of the cream and add the vanilla.

4. Heat very gently, stirring occasionally, until the marshmallows melt into the cream. This will take about 5-8 minutes. Keep the heat as low as possible to avoid boiling. Then whisk until smooth.

Melting_vegan_marshmallows_with_plant-based_cream_to_make_snowflake_pies_filling
Making the filling. Images: Kathryn Hawkins

5. While the marshmallows are melting, whip a further 225ml cream until just peaking.

6. Working quickly, scrape the molten marshmallows mixture on top of the cream and gently mix the 2 together to make a fluffy, light mixture. The marshmallows will start to set again as soon as they meet the cream, so make sure the cream isn’t too cold.

7. Divide between the cases and chill for about 2hr until completely set, then remove from the tins and peel away the paper cases.

5_steps_showing_the_assembly_of_snowflake_pies
Assembling the pies. Images: Kathryn Hawkins.

8. To serve, whip the remaining cream and spoon a little on top of each pie. Decorate with snowflakes and glitter. Delicious accompanied with a cranberry, or other fruit, compote.

Single_serving_snowflake_pie_with_cranberry_compote
Cranberry compote. Image: Kathryn Hawkins

This is my last recipe post of the year. Thank you for your continued interest in my blog. I hope you have a very happy and healthy Christmas and I look forward to returning to my blog in the new year.

Sweet chilli jelly (naturally gluten-free; dairy-free; vegan)

Homemade_sweet_chilli_jelly_for_Christmas
Sweet chilli jelly. Image: Kathryn Hawkins

Hello again. I hope you are keeping well. Are you beginning to feel Christmassy yet? We’ve had some snowfall here, not very much but it certainly feels like winter is upon us.

I haven’t had much time for making preserves this year and most of my harvested garden produce is still buried deep in the freezer waiting for me to get cooking. However, I did find some time a few days ago to make one of my favourites. I love the combination of sweet and smoke with a hint of chilli spice in this savoury jelly. It’s one of those preserves that goes with lots of things and makes a great gift for a food lover. It’s also ready to eat immediately or will store for up to a year.

You might want to scale back the recipe to make a smaller quantity but I wanted a few jars for myself as well as a couple to give away. Add more chillies for a spicy-hot jelly or use hot smoked paprika instead.

Makes: approx. 1.4kg

Ingredients

  • Approx. 1.5kg cooking apples, washed and left whole
  • Approx. 750g red (bell) peppers or capsicum, washed and stalks removed
  • 50-100g red chillies, washed and stalks removed
  • 6-8 garlic cloves, peeled
  • 2 large sprigs of fresh sage
  • 5 bay leaves
  • approx. 1.1kg granulated white sugar
  • 175ml cider vinegar
  • 2tsp smoked paprika
  • 1½tsp salt
  • 1-2tsp dried chilli flakes

1. Chop the apples and place in a large preserving pan – seeds, core, skin, everything. Do the same with the peppers and chillies, then add to the pan along with the garlic, sage and bay leaves.

Prepared_fruit_and_veg_for_smoky_apple_jelly
Main ingredients: apples, peppers, chillies and garlic. Images: Kathryn Hawkins

2. Pour over 1.7l water, bring to the boil, cover and simmer for about 40 minutes, mashing with a spoon occasionally, until everything is soft and pulpy. Leave to cool for 30 minutes.

3. Carefully ladle the pulp into a jelly bag suspended over a bowl and leave in a cool place to drip over night. Discard the pulp and measure the juice.

Jelly_bag_showing_straining_collected_juice_from_cooking_apples_and_vegetables
Making and straining the cooked fruit and veg. Images: Kathryn Hawkins

4. Pour the juice into a clean preserving pan and heat until hot. Add 450g sugar for every 650ml juice collected – I had 1.6l juice and added 1.1kg sugar. Pour in the vinegar and stir until the sugar dissolves, then raise the heat and boil rapidly until setting point is reached – 105°C on a sugar thermometer. Turn off the heat and stir in the salt, paprika and chillies. Leave to stand for 10 minutes.

Cooking_smoky_apple_jelly_and_flavouring_with_vinegar_smoked_paprika_and_chillies
Cooking and flavouring the jelly. Images: Kathryn Hawkins

4. Stir the jelly mixture and ladle into sterilized jam jars. Seal tightly while hot, then leave to cool before labelling. Store in a cool, dry, dark cupboard for up to 1 year.

Small_kilner_jars_of_homemade_sweet_chilli_jelly
Freshly cooked sweet chilli jelly in the jar and on the spoon. Images: Kathryn Hawkins

That’s me for another week. One more recipe post before the holidays. I’ll see you again in a few days. All the best until then 🙂

Almond-topped, spiced mince pies (gluten-free; dairy-free; vegan)

Pile_of_almond_topped_mince_pies_with_festive_greetings
My almond-topped mince pies. Image: Kathryn Hawkins

So here we are, almost at the end of another year, and what a year! I hope you are all well and staying safe at this time. For my final post of the year, I thought it was high time for some festive cheer, and settled on a seasonal treat that I find utterly delicious and hope you will too.

Open_mince_pie_in_front_of_stand_of_freshly_baked_pies
Sugar and spice and all things nice. Image: Kathryn Hawkins

I love mince pies, and if you make your own pastry, they taste even better. I use readymade mincemeat but you can put your own spin on the recipe by using your own or just a selection of minced dried fruit – soak in some booze or fruit juice so that it stays juicy during cooking. I like to add a little mixed spice or pudding spice to the mincemeat to give it a really Christmassy flavour. This year I used some homemade chai masala – recipe here – which works very well. The topping is an old favourite of mine, almond frangipane, a rich, crumbly sponge flavoured with almond extract. Delicious 🙂

Close-up_image_of_pastry_snowflake_decoration_on_mince_pie
Pastry snowflake decoration. Image: Kathryn Hawkins

The pastry trimmings can be used to make a finishing touch decoration for the pies if you like, and my recipe allows for extra pastry to do this. If you want to make sufficient pastry to make the cases only, reduce the recipe by one third, or for convenience, use 300g readymade shortcrust pastry (450g if you want to make the decorations on top).

The pies will keep in a sealed container for 3-4 days (if you can leave them alone!), and they freeze well too.

Makes: 12

Ingredients

For the pastry:

  • 75g white vegetable fat, softened
  • 60g dairy-free margarine, softened
  • 60g caster sugar
  • 260g gluten-free plain flour blend such as Dove’s Farm
  • 1/4 tsp xanthan gum (not essential but it does make the pastry easier to work with and slightly crisper)
  • 1/4 tsp salt
  • 1 tsp vanilla extract

For the filling and topping:

  • 200g vegan mincemeat
  • 1 tsp chai masala or mixed spice
  • 80g dairy-free margarine, softened
  • 80g caster sugar
  • 80g ground almonds
  • 15g gluten-free plain flour
  • 1/2 tsp almond extract
  • 15g ground linseeds
  • Icing sugar to dust
  1. First make the pastry. Beat together the fats until smooth and creamy, then whisk in the sugar until well blended. Add the remaining pastry ingredients and carefully stir everything together to make a crumbly mixture.
  2. Bring the crumble together with your hands and knead gently to make a smooth, firm ball of dough. Wrap and chill for at least 1 hour. This pastry doesn’t firm up very much but it is easier to handle if you do refrigerate it before rolling out.
  3. Lightly dust the work surface with more flour and roll out the pastry to a thickness of 1/2 cm – any thinner and the pastry tears easily. Cut out 12 x 8cm rounds, re-rolling the dough as necessary.
  4. Lightly grease a 12-cup jam tart tin (approx. 7cm x 2cm cups), and gently press a circle of pastry into each, remoulding if it cracks. Chill for 30 minutes whilst making the filling and topping.
  5. Gather up the trimmings if you want to make the decoration, and roll out to the same thickness as the pastry cases. Use a 7cm diameter snowflake or star cutter to stamp out 12 decorations. Arrange on a lined baking tray and chill for 30 minutes.
6_steps_showing_making_rolling_and_shaping_of_sweet_shortcrust_pastry
12_cup_tart_tin_greased_and_lined_with_pastry_circles
Pastry_snowflakes_from_leftover_pastry
Making the pastry, cases and decorations. Images: Kathryn Hawkins

6. Mix the mincemeat and spice together. In another bowl, mix the margarine, sugar, almonds, flour and almond extract together until well blended. Mix the linseeds with 45ml cold water and stand for 5-10 minutes until thickened, then mix into the almond mixture.

5_steps_to_making_almond_topping_for_mince_pies
Making the almond topping. Images: Kathryn Hawkins

7. Preheat the oven to 190°C, 170°C fan oven, gas 5. Divide the mincemeat between the pastry cases and top with the almond mixture. Smooth the topping to seal in the mincemeat and bake for about 40 minutes until lightly golden and firm to the touch. Bake the pastry decorations for about 15 minutes and leave to cool on the baking tray.

Flavouring_mincemeat_with_chai_masala
Mince_pies_with_almond_topping_before_baking
Assembling the pies. Images: Kathryn Hawkins

8. Leave the pies to cool in the tins for 10 minutes, then carefully loosen them. Leave them for a further 10-15 minutes to firm up before removing from the tins and placing on a wire rack to cool. Just before serving, dust with icing sugar and top with a sugar dusted pastry decoration.

Close-up_of_opened_mince_pie_with_crumbling_topping_and_juicy_fruit_filling
Crumbly and fruit-filled with a hint of spice. Image: Kathryn Hawkins

Thank you for following my blog for another year and for all your lovely comments. I send you my best wishes for a happy, healthy and safe Christmas, and I look forward to returning to my blog in the new year.

The icing on the cake (gluten-free; dairy-free; vegan)

Vegan_gluten-free_fruit_cake_topped_with_marzipan_decorated_for_Christmas
Vegan and gluten-free, fruit cake for Christmas. Image: Kathryn Hawkins

Well, I admit, not quite “icing” on top of my Christmas cake this year, but a delicious layer of marzipan instead. If you’re not a fan of almond paste, then a layer of ready-to-roll white icing will do the trick just as well.

Overhead_image_of_a_marzipanned_vegan_fruit_cake_decorated_simply_for_Christmas
Cherries and fresh herbs make a simple festive decoration. Image: Kathryn Hawkins

This is the sugar and spice fruit cake I made back in November – recipe here. It’s turned out ok and smells divine. I can’t wait to tuck in.

If you want to marzipan or ice the top of a cake, it’s quite straightforward. For an 18cm round cake like this one, you’ll need 250g marzipan or ready-to-roll icing for a reasonably thick layer. Knead it gently to soften a little (this will make it easier to roll), then dust the work top lightly with icing sugar and roll out the marzipan or icing to form a rough 19cm circle. Use the base of the tin that you cooked your cake in as a template to cut yourself a neat round.

Using_a_round_tin_base_to_cut_a_marzipan_circle
Making a marzipan round. Images: Kathryn Hawkins

Unwrap your cake, turn it upside down to give a smooth surface and brush with some smooth apricot jam – I like to add a splash of rum to the jam for an extra kick. Carefully transfer the marzipan or icing circle to the top of the cake and smooth it in place.

Brush_a_fruit_cake_with_jam_and_topping_with_marzipan
Covering the cake. Images: Kathryn Hawkins

Now your cake is ready to decorate and tie with ribbon for a finishing touch. I have used glacé cherries with fresh bay leaves and rosemary sprigs for a very simple yet festive decoration, but I’m sure you will have your own ideas.

This is my last post before Christmas. Thank you all for stopping by over the past 12 months and for your lovely comments. I hope you have a good time over the holidays and I send you my best wishes for a happy and healthy festive time. I look forward to posting again in the new year.

Home-made_vegan_gluten-free_Christmas_cake_slice
Christmas on a plate. Image: Kathryn Hawkins

My favourite nut loaf (gluten-free; dairy-free; vegan)

Whole_nutloaf_with_slice_on_board_with_roast_veg_and_gravy
Super-easy nut loaf. Image: Kathryn Hawkins

If you’re planning a meat-free Christmas menu for yourself or guests this year then my recipe this week maybe one to consider. Time to post my favourite nut loaf recipe. It is very easy to assemble, can be made in advance, and freezes well. What’s more, you can use any combination of nuts and seeds you fancy – it’s the perfect recipe to use up any nuts or seeds that you have already opened. And above all else, it’s very tasty 🙂

Overhead_image_of_homemade_nut_loaf_with_a_bow_of_roast_vegetables_and_vegetable_gravy
Serve with roast veg and veggie gravy. Image: Kathryn Hawkins

I prefer to use roasted peanuts and cashews if I have them, but pecans and almonds are favourites too. The mixture is bound together with lentils, flax seed “egg” and nut butter – choose whichever cooked pulses or nut butter you fancy to suit your taste. If you fancy some extra crunch, toast a handful of your favourite seeds and add to the mixture when you bind everything together.

Food_processor_with_peanuts_and_cashew_nuts_being_ground
Ground peanuts and cashews. Image: Kathryn Hawkins

When grinding or chopping the nuts, I like to keep some bigger pieces amongst the finer grinds so that the loaf has some texture but you may prefer something smoother.

On with the recipe, and then on with the festive countdown.

Serves: 4 to 6

Ingredients

  • 2 tbsp. olive oil + extra to drizzle
  • 1 stick celery, trimmed and chopped
  • 1 small onion, peeled and chopped
  • 2 garlic cloves, peeled and chopped
  • 115g grated carrot
  • 115g cooked green lentils (cooked and mashed cannellini, butter or haricot beans work well too)
  • 200g roasted peanuts and cashews (or your favourite nut and seed combination)
  • 40g gluten-free sage and onion stuffing mix
  • 1 tsp dried sage
  • 1 tsp salt
  • 125g whole nut peanut or other nut butter, softened
  • 1 tbsp. flax seeds
  • Chopped parsley to garnish
  1. Heat the oil in a small frying pan and add the celery, onion and garlic, mix well, cover, and cook gently for 10 minutes until softened. Cool for 20 minutes.
  2. Preheat the oven to 200°C, 180°C fan oven, gas 6. Line a 1kg loaf tin with a paper liner or baking parchment. Put the remaining ingredients, except the flax seeds and parsley, in a bowl and stir in the softened mixture.
  3. Now make the flax egg. Grind the flax seeds until powdery – I use a coffee grinder. Put in a small bowl and mix in 3 tbsp. water. Leave for about 5 minutes to thicken then stir into the nutty vegetable mixture to bind everything together.

    6_Steps_to_making_a_flax_egg
    Making flax “egg”. Images: Kathryn Hawkins
  4. Spoon the loaf mixture into the prepared tin, smooth the top and drizzle with a little olive oil. Cover with foil and bake for 30 minutes, then remove the foil and bake for a further 25-30 minutes until lightly crusty on top.

    Home-made_nut_loaf_before_and_after_cooking
    Before and after baking. Images: Kathryn Hawkins
  5. To serve, carefully remove the loaf from the tin. Discard the lining paper and transfer to a warmed serving plate or serving board. Sprinkle with parsley and serve immediately, sliced thickly and accompanied with roasted vegetables and vegetable gravy or a fresh tomato sauce.

    Plate_of_homemade_nut_loaf_and_roast_vegetables
    Nut loaf serving suggestion. Image: Kathryn Hawkins

    I hope you have a good few days  and I look forward to seeing you again just before Christmas!


Sweet and spicy mango chutney (naturally gluten-free; dairy-free and vegan)

Small_kilner_jar_of_homemade_mango_chutney_with_spices
Homemade mango chutney. Image: Kathryn Hawkins

It’s the time of year when you might be thinking about making something edible for giving as a Christmas present so my post this week may be an idea for you. Last week I found large fresh mangoes for sale in the supermarket at a very reasonable price and decided to make mango chutney. This is a favourite preserve in our house; we get through lots of it, but I hardly ever get round to making it.

Whole_fresh_mango_fruit
Fresh mango fruit. Image: Kathryn Hawkins

Choose slightly under-ripe mangoes for chutney so that you end up with some texture in your preserve. Very ripe mango will go very soft and will also increase the sweetness of the final chutney.

An_array_of_whole_spices_and_seasonings_on_a_wooden_tra_ready_to_flavour_mango_chutney
Spice and seasoning tray. Image: Kathryn Hawkins

You can go one of two ways when you make mango chutney: the spicy route, whilst or the smooth, sweet and jam-like. If you prefer the latter, you don’t need to add the spice bag or the chillis and onion seeds from the recipe below, but I do recommend keeping the ginger, bay and garlic as well as salt and pepper . Blend or mash the mango finely before you start, and for a more vibrant colour, add some paprika.

Toasting_spices_then_grinding_in_a_pestle_and_mortar_and_tying_in_a_spice_bag
Toasting and grinding spices ready for a spice bag. Images: Kathryn Hawkins

For a spicy version, I prefer to keep the chutney as clear as possible so I avoid ground spices as these can give a murky result. Instead I opt for making a spice bag. It’s a bit of a faff but worth it to achieve a more “professional” appearance. Toast the cumin, coriander and black mustard seeds first in a dry frying pan for a couple of minutes. Cool and then grind them with the cardamom pods. Pile on to a small square of clean muslin and add the ground pepper. Tie up with a strip of muslin or clean cook’s string and you’re ready to go.

Homemade_mango_chutney_with_a_fstive_touch_ready_for_gifting
Ready for gifting. Image: Kathryn Hawkins

If you can bear to part with your preserve, it does make a lovely and impressive gift for any curry or Indian food lover. Make it now and it will be just about ready to eat at Christmas, but perfect for keeping into the new year.  I haven’t decided what to do with my 3 jars yet – keep or gift? Probably the former 🙂

Jar_of_homemade_mango_chutney_ready_for_storing
Homemade mango chutney ready for storage until Christmas. Image: Kathryn Hawkins

Makes: approx. 525g

Ingredients

  • ½ tsp each cumin, coriander and black mustard seeds
  • 4 cardamom pods
  • ½ tsp coarse ground black pepper
  • 2-3 large slightly under-ripe mangoes – see below
  • 2 garlic cloves, peeled and finely chopped
  • 20g piece root ginger, peeled and finely chopped
  • 2 bay leaves
  • 1 tsp dried chilli flakes
  • 150ml cider vinegar
  • 225g granulated sugar
  • 2 tbsp. fresh lemon juice
  • 1 tsp black onion seeds
  • ½ tsp salt
  1. First make up the spice bag as described above and put to one side. Next prepare the mango. Slice down either side of the large smooth, flat central stone. Peel off the skin and chop the flesh, then slice off the remaining flesh from around the edge of the stone. You will need 600g prepared fruit for this recipe.

    2_images_showing_how_to_prepare_fresh_mango
    Fresh mango preparation. Images: Kathryn Hawkins
  2. Put the mango flesh in a large saucepan and add the spice bag, garlic, ginger, bay leaves and chilli. Pour over the vinegar, bring to the boil, cover and gently simmer for about 10 minutes until softened.
  3. Stir in the sugar until dissolved, then add the lemon juice. Bring to the boil and cook for about 15 minutes until thick and jam-like, stirring occasionally as it may start to stick on the bottom of the saucepan. Turn off the heat, stir in the onion seeds and salt, cover and stand for 10 minutes, then discard the bay leaves and spice bag.

    4_cooking_stages_in_making_mango_chutney
    The 4 stages of chutney. Images: Kathryn Hawkins
  4. Stir the mixture  before spooning into hot, sterilised jars and sealing immediately. Leave to cool, then label and store in a cool, dry cupboard for at least a month to mature before serving.

That’s all for this month. I wish you a good few days. I’ll see you again in December on the run up to Christmas 🙂

Brass_spoonful_of_homemade_mango_chutney
A spoonful of sweet and spicy homemade mango chutney. Image: Kathryn Hawkins