Edible holly garland (gluten-free; dairy-free; vegan)

Gluten-free_vegan_shortbread_holly_garland
Happy Christmas! Image: Kathryn Hawkins

Well the festive season is almost upon us, and it’s time to share a suitably Christmassy recipe with you. I’ve turned to an old favourite as the base for my edible holly garland: shortbread 🙂

Simple enough to make, shortbread is much loved by many and a staple bake at this time of year. I’ve flavoured my shortbread with cocoa powder and iced it with peppermint flavoured icing, which make these cute little nibbles a perfect treat to serve as an after dinner alternative to accompany coffee and liqueurs. If you don’t fancy peppermint, try adding orange or lime zest, or enhance the cocoa flavour by adding some cinnamon or vanilla.

After_dinner_coffee_and_cookies
After dinner coffee and nibbles. Images: Kathryn Hawkins

If you are going to display the leaves as a garland you’ll need to bake a good number, so my recipe makes 40, but cut the quantities in half if you just want a few nibbles to serve with coffee. The shortbread leaves can be made a couple of days in advance of serving, but I’d advise not to ice them more than a day before serving as the icing often softens the shortbread.

By the way, I couldn’t find the right shade of green for my biscuits, so I am including instructions for colouring white icing. If you do have ready prepared green icing, all you need do is add some flavour.

Makes: 40

Ingredients

  • 100g lightly salted plant or dairy butter
  • 50g caster sugar
  • 20g cocoa powder
  • 175g gluten-free plain flour blend plus extra for dusting
  • 225g white ready to roll icing
  • Green food colour gel
  • Icing sugar to dust
  • A few drops peppermint extract
  • 75g readymade royal icing or similar white pipeable icing
  • Red sugar balls or icing to decorate

1. Beat the butter and sugar together until light and creamy. Sift the cocoa powder and flour on top and mix well, then bring everything together with your hands to make a firm dough.

2. Lightly flour the surface and roll out the dough to a thickness of about ½cm. Use a 6cm holly-shaped cutter to stamp out shapes, re-rolling the dough as necessary, to make around 40 leaves.

3. Arrange on lined baking trays, prick the tops with a fork and chill for at least 30 minutes before baking.

4. Preheat the oven to 180°C, 160°C fan oven, gas 4. Bake the shortbread leaves for about 15 minutes until firm to the touch. Leave to cool on the trays.

Chocolate_shortbread_holly_leaves
Just out of the oven. Image: Kathryn Hawkins

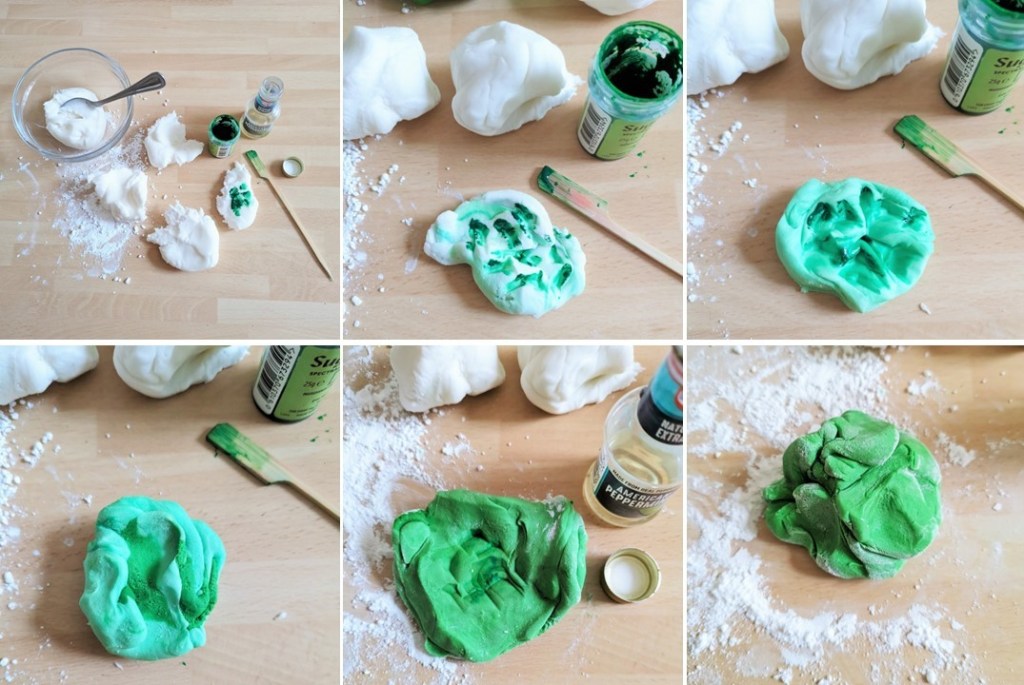
5. For the icing, knead the white ready to roll icing to make it more pliable. Break it into smaller pieces and add a little green colouring to each piece. Work each batch of colouring into the icing before adding a little bit more. When you have a few pieces of the same colour, blend them altogether into one piece. Although this takes a bit of time, it is much easier than trying to colour a big piece of icing in one go. If things get a bit sticky, add a little icing sugar.

6. To add flavouring, flatten the icing and sprinkle with a few drops of peppermint extract, then work into the icing. Repeat until you have the desired amount of flavouring, adding a little icing sugar if the mixture becomes sticky.

Colouring_and_flavouring_icing_with_green_food_colouring_and_peppermint_extract
Making the icing. Images: Kathryn Hawkins

7. Add some colour and flavour to the royal icing and mix well to achieve an even colour. Now you are ready to decorate.

8. Dust the work surface with a little icing sugar and roll out the green icing thinly. Cut out holly shapes using the same cutter.

9. Spread a little smear of the green royal icing over each biscuit and fit a holly icing shape on top.

10. Spoon the remaining royal icing into a small piping bag fitted with a plain writing nozzle and pipe leaf detail. If piping is not your forte, you can score a leaf pattern on the icing using the blade of a small knife.

11. Pipe a little extra icing at the stalk end of the leaves and attach sugar balls or red icing berries. Leave for at least an hour to set before arranging.

Decorating_gluten-free_vegan_holly_shaped_shortbreads
Christmas decorating. Images: Kathryn Hawkins

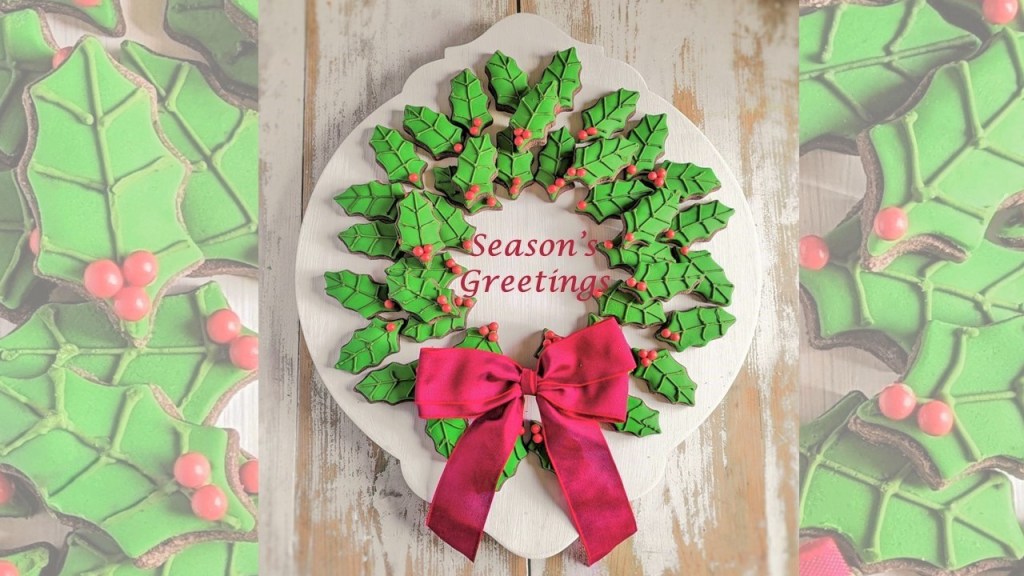
12. To serve as a garland, choose a large board or flat serving plate and arrange a layer of the shortbread leaves at different angles in a circle, and arrange more shortbreads on top. Add a ribbon bow as a finishing touch just before serving.

Iced_chocolate_shortbread_holly_leaves
Chocolate shortbread holly leaves. Image: Kathryn Hawkins

This is my last recipe post of 2023. Thank you for stopping by and for all your nice comments over the past 12 months. I hope you have a lovely Christmas and I look forward to posting more throughout the new year ahead. Merry Christmas!

Early December in the garden

A_Scottish_garden_in_December_under_a_blue_sky
Blue-sky December day. Image: Kathryn Hawkins

As I sat down to write this post last night, we were awaiting the arrival of the first major storm of the season. Nothing has materialised overnight, but it is suddenly feeling much colder. There is a thick frost this morning, and it is bright and clear again, the wind has dropped, and all is calm.

On the whole, the first few days of the month have been quite kind to the gardeners amongst us here in central Scotland. Whilst the east coast did have more seasonal weather, we were blessed with several blue sky days, milder temperatures, and some glorious sun rises.

To be honest, I haven’t been outside much recently – work has kept me inside. The garden is looking a bit tired now, and ready for a rest. I cleared a lot of the autumn debris a couple of weeks ago and it’s beginning to look a bit bare in places. However, the evergreens provide shape and colour and look very vibrant on a fine day, and the Cotoneaster hedge is laden with berries, as it is every year.

Cotoneaster_hedge_laden_with_red_berries
Berry-laden Cotoneaster hedge. Image: Kathryn Hawkins

The best value plants in the garden this year have been the carnations I planted last year – taken as cuttings from a birthday bouquet. They began flowering in August, and are still producing blooms at the moment. I’m sure the winter weather will get to them eventually, but the south-facing wall seems to be providing them with sufficient shelter to have kept them going this far into the year.

Orange-red_carnations_in_bloom_in_December
Carnations enjoying the winter sunshine. Image: Kathryn Hawkins

Elsewhere in the garden, the colours have faded. The Hydrangeas have taken on a beautiful “vintage” look, and the blooms of Echinops and white Japanese Anemones have left behind interesting seed-heads which are slowly weathering away.

Faded_colour_of_a_blue_Hygrangea_flower
Faded beauty: Blue Hydrangea. Image: Kathryn Hawkins

Seed-heads_of_Echinops_and_Japanese_Anemones
Globe thistle and Japanese Anemone seed heads. Images: Kathryn Hawkins

The last of my garden features this month is this wee fellow, a perennial primrose. Just one solitary bloom at the moment, hidden away in a sheltered, damp part of the garden. A small flash of pale yellow which acts to remind me that spring will be here again in just a few weeks. Have a good week 🙂

December_bloom_of_a_perennial_primrose
Perennial primrose. Image: Kathryn Hawkins


Brussels sprouts

Homegrown_Brussels_sprouts_and_sprout_tops
Home-grown Brussels sprouts. Images: Kathryn Hawkins

Love them or loathe them, you can’t get away from Brussels sprouts at this time of year. Believed to be a descendent of the wild cabbage, we have been eating these tasty and nutritious winter greens since the 18th century.

I planted several seedlings (variety Brodie F1) back in early June, but sadly most succumbed to pests and the plants have been dwindling as the months have gone by. However, I managed to keep a few plants unscathed, ready for the Christmas table and a couple more meals on top of that. Some of the stems have lovely tops which have developed into small cabbages with pretty pink veining, so I have them to cook as well.

Brussels_sprouts_on_the_stem
A fine stem of “fairy cabbages”. Image: Kathryn Hawkins

I was told a story a few years ago by a lady who had been struggling to get her little daughter to try a Brussels sprout. There was something about the humble sprout that her daughter wouldn’t entertain even though she would eat every other green vegetable without hesitation. Her mother, in exasperation, said that they were simply tiny cabbages grown by the fairies, and from then on, her daughter ate them with gusto!

Freshly_picked_homegrown_Brussels_sprouts_and_tops
Still life of Brussels sprout stems and tops. Images: Kathryn Hawkins

Pick sprouts when they are small and firm as larger sprouts have less flavour. Smaller sprouts will be crisper in texture and have a sweeter, nuttier taste. Don’t forget the tops – these can be cooked just liked cabbage. Ideally pick sprouts just before cooking, trim away any loose leaves and leave whole if small, or halve if bigger. Rinse in cold water, and then cook in a little lightly salted, boiling, water for a few minutes until just tender – they should have some texture when cooked, and not be slime-green coloured, full of water and soggy like the ones I remember from my school dinners – yuk!

Ready_to_cook_fresh_Brussels_sprouts
Picked sprouts ready for cooking. Image: Kathryn Hawkins

Here are a few of my favourite ways to serve fresh Brussels sprouts:

  • Brussels sprouts go well with blue cheese, goat’s cheese, chopped nuts and seeds, crisp bacon, chorizo, chilli, sage, thyme, garlic, onion, orange, wholegrain mustard, Worcestershire sauce, soy sauce and balsamic vinegar.
  • Serve small cooked sprouts on a bed of crushed, seasoned peas in Yorkshire puddings and flood with gravy or a tasty cheese sauce.
  • Shred or roughly chop sprouts and stir fry with shredded leeks and very finely sliced white cabbage. Finish with a few dashes of Worcestershire sauce and some melted redcurrant jelly.
  • Stir fry chopped sprouts with finely chopped garlic and add sultanas, a pinch of chilli, cinnamon and cumin, and a drizzle of honey or maple syrup.
  • Blanch 300g prepared larger sprouts in boiling water for 1 minute and cool quickly in cold running water. Drain well, cut in half or quarter, and mix with wedges of eating apple, fresh sage leaves and finely chopped onion. Toss in 1 tbsp each of olive oil, balsamic vinegar and honey or maple syrup. Spread across a lined baking tray, season well and cover with foil. Bake at 200°C (180°C fan oven, gas mark 6) for 15 minutes, then remove the foil and cook for a further 10 minutes until tender.

    Tray_of_sprouts_apple_sage_and_onion
    Ready to bake, sprouts with apple, sage and onion. Image: Kathryn Hawkins

My garden in December

Winter_sunrise_over_a_Scottish_garden
Early Winter sunrise over a Scottish garden. Image: Kathryn Hawkins

It’s been a busy month of work for me. I haven’t been around at home for more than a few days at a time, so subsequently, I haven’t had any gardening opportunities.

We haven’t had any snow yet in this part of Scotland, but there have been a couple of very heavy frosts which put pay to most of the flowering shrubs in the garden – I took this picture a few days ago when the temperature had dropped well below zero overnight, the ice beautiful patterns are on the inside of the window!

Ice_patterns_on_inside_of_window
Icy window. Image: Kathryn Hawkins

Today, I have been able to get outside for a couple of hours – hoorah! There is lot as of clearing up to do after the frosts: plenty of bedraggled shrubs with drooping leaves which make the garden look very sad and now need cutting back. The weather forecasters are saying that we are due some milder weather this coming week, so I should get some out-of-doors tidying up done.

I was happy to see that there is still some colour, here and there, in the more sheltered parts of the garden. A shrub that grows well in several places in the garden is Cotoneaster horizontalis, but usually by now the berries have dropped off or have been eaten by the birds. This one is still covered with fruit and gives a welcome blaze of colour growing up against a small outbuilding wall.

Cotoneaster_horizontalis_red_berries_in_Winter
Cotoneaster horizontalis. Images: Kathryn Hawkins

By next month, the sprawling Winter Jasmine, which grows outside the back door, will be in full bloom. Today there are a few buds breaking open to reveal the cheery yellow blooms I love. It is one of my favourite plants of the season, so delicate and pretty.

Just_in_bloom_Winter_Jasmine
Winter Jasmine flower and bud. Image: Kathryn Hawkins

Another favourite is the Snowberry. I see them each Winter growing in other people’s gardens and in the hedgerows, but never get round to planting one for myself. This year, a few straggly branches have appeared growing through an old Camellia bush in the back garden. I will take care now I know it’s there, and see if I can get a better crop next year.

Snowberries
Snowberries. Image by Kathryn Hawkins

I like to end my monthly garden report with something quirky and unseasonal. I found this wee fellow growing at the top of the rockery, under a big conifer tree, in the back garden. Not sure how he’s managed to remain unscathed from the effects of the frosts, but he was looking very healthy and strong, and truly magnificent in bright blue bloom.

Winter_flowering_Periwinkle
Solitary Periwinkle in bloom in early December. Image: Kathryn Hawkins