Aubergine (egg plant) in spicy tomato sauce (gluten-free; dairy-free; vegan)

Serving_dish_of_freshly_cooked_aubergines_in_spiced_tomato_sauce
Aubergine in spicy tomato sauce with green chilli sprinkle. Image: Kathryn Hawkins

With a nod to the widely adopted new name for the first month of the year, Veganuary, I have for you this week a tasty, warming and comforting dish which fits the season very well. Aubergine (egg plant) is one of my favourite vegetables and I especially like eating it in a garlicky tomato or curried sauce. In this recipe, I combine these two flavours in one sauce to make a dish that can be served as a main meal or as a side to go with other spicy foods. It’s tasty cold as a salad as well.

Close-up_on_aubergines_in_spiced_tomato_sauce
Up close on spiced aubergine (egg plant). Image: Kathryn Hawkins

November seems like a long time ago now, but that is when I harvested my homegrown aubergines (egg plants). I grew the variety Slim Jim in my greenhouse; just a couple of plants as a trial. They got off to a slow start but by the autumn both plants were doing well, and produced several small and neat, very pretty, lilac-coloured fruits.

November_harvest_of_Slim_Jim_aubergines_(egg plant)
Home-grown Slim Jim aubergines (egg plant). Images: Kathryn Hawkins

You can use any variety of aubergine for this recipe. I always salt before cooking, regardless of variety. I find that drawing out some of the water before cooking helps to soften it so that it cooks to a melting tenderness. By the way, replace the mushrooms with more aubergine if you prefer. I hope you enjoy the recipe.

Serves: 2 as a main meal or 4 as a side dish

Ingredients

  • 1tsp each of cumin and coriander seeds
  • ½tsp ground fenugreek
  • ¼tsp ground black pepper
  • 5tbsp vegetable oil
  • 1 onion, peeled and chopped
  • 2 cloves garlic, peeled and finely chopped
  • 1tsp freshly grated root ginger
  • 1 bay leaf
  • 400g tomatoes, canned or fresh, chopped
  • 2tbsp tomato purée
  • Salt
  • 250g aubergines (egg plant), chopped or sliced
  • 200g brown (chestnut) mushrooms, wiped and quartered
  • 1tsp black onion seeds
  • Chopped green chilli and fresh mango to serve

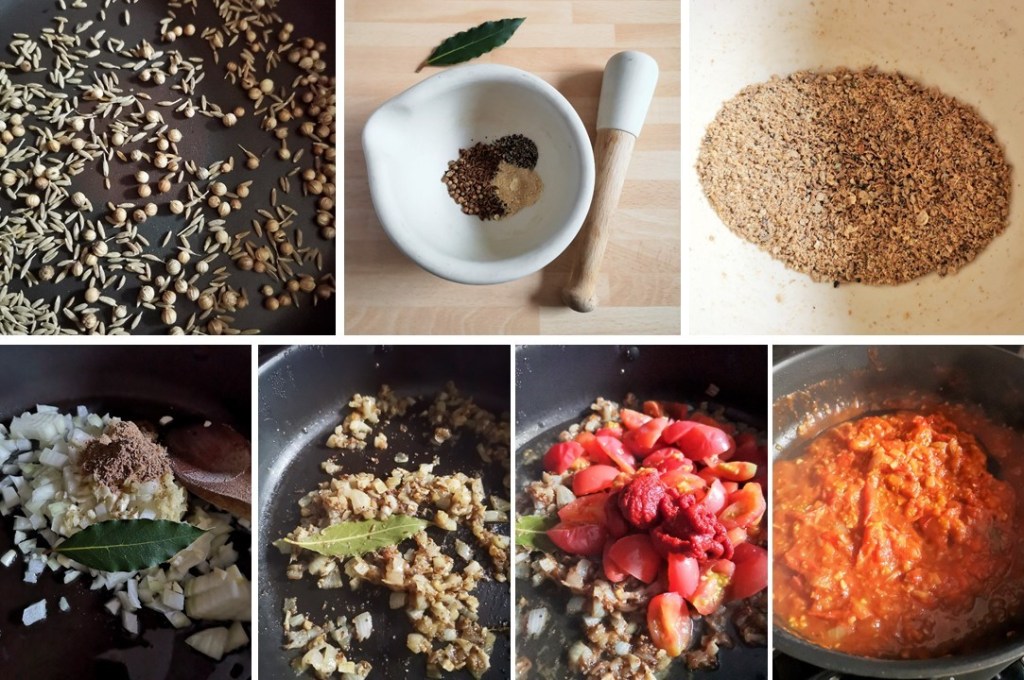
1. Toast the spice seeds lightly in a small hot, dry frying pan for 2-3 minutes until lightly golden. Cool, then grind finely with the fenugreek and black pepper.

2. Heat 2tbsp oil in a frying pan and stir fry the onion, garlic, ginger and spices with the bay leaf for 1-2 minutes, then cover with a lid and cook gently for 20 minutes until soft.

3. Add the tomatoes, purée and a pinch of salt, bring to the boil, cover and simmer gently for about 15 minutes until soft. Leave aside.

Making_spiced_tomato_sauce
Preparing spiced tomato sauce. Images: Kathryn Hawkins

4. Meanwhile, stand a colander or strainer on a plate or over a bowl. Layer the aubergine, sprinkling generously with salt as you go, and leave to stand for 30 minutes. Drain and rinse very well, then pat dry with kitchen paper.

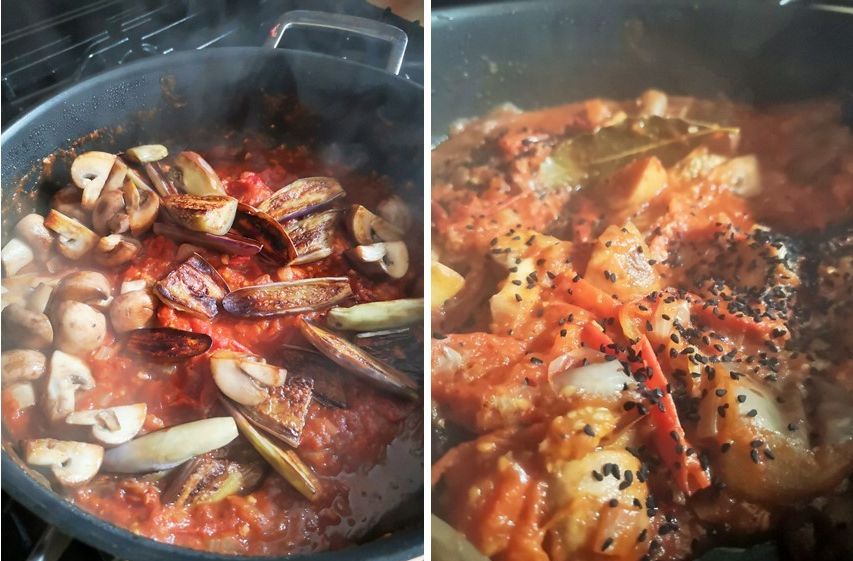
5. Heat 2tbsp oil in a frying pan until hot and stir fry the aubergine pieces for 2-3 minutes until lightly browned. Drain on kitchen paper. Heat the remaining oil and cook the mushrooms in the same way. Drain.

Salting_aubergine_(egg_plant)_before_cooking
Preparing aubergine (egg plant). Images: Kathryn Hawkins

6. Add the vegetables to the spiced tomato sauce, mix well and bring to the boil. Cover and simmer gently for 20-30 minutes until tender and cooked through. Turn off the heat, sprinkle with black onion seeds then cover and stand for 10 minutes. Discard the bay leaf.

Cooked_mushrooms_and_aubergine_in_spiced_tomato_sauce
Cooking the vegetables in the sauce. Images: Kathryn Hawkins

Serve sprinkled with freshly chopped green chilli and accompanied with fresh mango. Delicious over rice or with naan breads with a sprinkling of roasted cashew nuts for crunch.

Overhead_image_of_aubergine_and_mushrooms_in_spiced_tomato_sauce
A spicy feast. Image: Kathryn Hawkins

That’s all from me this week. I’ll be back towards the end of the month with something suitably Scottish to celebrate Burns Night. Until then, best wishes and keep safe.

Clootie dumpling (gluten-free; dairy-free; vegan)

Whole_clootie_dumpling_ready_to_serve_for_Burns_night_2021
Clootie dumpling. Image: Kathryn Hawkins

Hello again. I hope you are keeping well and safe, and if you are in a cooler part of the world right now, I hope it’s not too cold at the moment. It’s certainly been chilly here in central Scotland. As I type, the garden is very snow-laden and there is not much sign of it melting for the time being.

Scenes_of_a_snowy_Scottish_garden_in_January_2021
Snowy January 2021. Images: Kathryn Hawkins

I am, therefore, still feeling the need for comfort food. My recipe post this week is a traditional Scottish pudding that definitely falls into the aforementioned category. This coming Monday marks the annual celebration of Burns Night on the calendar, when the birth of Scotland’s national poet, Robert (Rabbie) Burns, is remembered. Usually a chance to meet up with friends and family and enjoy a dram of whisky or two, this year will inevitably be a much quieter affair.

Spooned_out_clootie_dumpling
The serving of the pudding. Image: Kathryn Hawkins

The recipe gets its name from the way this pudding is cooked. The fruity, oaty mixture is wrapped in a floured cloth or cloot and boiled. The perfect dumpling should have a firm texture on the outside with a soft, fruity and mildly spiced interior, so when the pudding has been boiled, it is popped in the oven to dry out for a few minutes and thus a shiny coating or skin forms on the outside.

Portion_of_clootie_dumpling_with_custard_and_a_wee_dram
Clootie dumpling with custard and a wee dram on the side. Image: Kathryn Hawkins

Serve the dumpling with custard and enjoy it hot with a wee nip of whisky or ginger wine to wash it down. Delicious. Here’s the recipe if you fancy giving it a go.

Serves: 6

Ingredients

  • 125g gluten-free self raising flour (such as Doves Farm) + extra for dusting
  • 75g vegetable suet
  • 50g oatmeal (do check that this is certified gluten-free if you are Coeliac)
  • 50g dark soft brown sugar
  • ¾ tsp ground ginger
  • ½ tsp ground cinnamon
  • Pinch of grated nutmeg
  • ½ tsp salt
  • 125g mixed dried fruit (currants, sultanas and raisins)
  • 1 tbsp treacle
  • 1 tbsp ground flax seed mixed with 45ml cold water (flax egg)
  • 90ml dairy-free milk (I used oat milk)

1. First prepare the cloth. You’ll need a large square of cheesecloth or muslin for this – or you could use a clean tea towel. My cloth is 42cm square. Bring a saucepan of water to the boil and scald the cloth in the water for a few seconds. Drain well – I use tongs and a colander to help with this – and when cool enough to handle, wring out the excess water.

2. Lay the damp cloth flat on a tray or directly on the work surface and lightly dust all over with flour – about 25g will be sufficient. Use a sieve to keep the flour evenly sprinkled in order to achieve a smooth finish on the dumpling. Cut a length of string to tie it up, and put to one side along with the prepared cloth.

How_to_prepare_the_cloth_or_cloot_for_clootie_dumpling
Preparing the cloth or cloot. Images: Kathryn Hawkins

3. Sift the flour into a bowl and add the suet, oatmeal, sugar, spices and salt, and mix together. Stir in the fruit and treacle, and then bind everything together with the flax egg and milk to make a softish batter mix.

4. Spoon the mixture on to the centre of the cloth. Draw up the sides and tie together securely with the string. Don’t tie the cloth too tightly around the mixture, keep it baggy to allow the dumpling to expand during cooking.

Making_the_dumpling_mix_and_tying_up_in_cloth
Preparing and assembling the dumpling. Images: Kathryn Hawkins

5. Place an upturned saucer or trivet in the bottom of a saucepan – choose a pan that neatly fits the saucer or trivet so that the dumpling doesn’t move around too much during cooking. Sit the dumpling on top and fill the pan with boiling water to come about halfway up the sides of the dumpling. Bring to the boil, then cover with a tight fitting lid and simmer gently for 2 horrs. You may need to top up the water during cooking.

6. Towards the end of the cooking time, half fill a bowl with cold water, and preheat the oven to 180°C, 160°C fan oven, gas 4. When the dumpling is cooked, carefully lift it out and dip in the cold water for 10 seconds – this helps you to remove the cloth more cleanly.

7. Drain the dumpling in a colander and open out the cloth. Put a heatproof dish over the bowl and carefully flip the dumpling on to the dish. Gently peel away the cloth, keeping the outer edge intact, and bake for 15 minutes to dry off. Serve the dumpling as soon as possible after cooking, and accompany with custard. You can reheat any leftovers in the microwave, or leave to cool and then wrap and freeze.

How_to_cook_clootie_dumpling
Cooking the dumpling. Images: Kathryn Hawkins
Close-up_of_spoonful_homemade_clootie_dumpling
Clootie dumpling close-up. Image: Kathryn Hawkins

That’s me for another week. Until my next post, enjoy Burns Night if you are celebrating. Take care and keep safe 🙂

Winter garden round-up

Fuchsia-pink_Winter_blooming_Rhododendron
A splash of much-appreciated Winter colour, early Rhododendron. Image: Kathryn Hawkins

So far this year, Mother Nature has provided 4 seasons in 1 month. There have been several mild days; a few blue-sky, frosty days; a couple of snow-laden days, and in between, grey skies, rain and gusty winds. The poor bulbs and bushes don’t know whether they are on the way up or whether they should still be hibernating.

Snow-scene_Perthshire_back_garden_in_late_January_2020
Earlier this week. Image: Kathryn Hawkins

Old_bare_apple_tree_covered_in_snow
Snow-covered apple tree. Image: Kathryn Hawkins

The snow has now gone, and the temperature has gone up several degrees. I’m happy to say that plants and bulbs that were covered at the beginning of the week, have survived and are blooming again.  The crocus were a couple of weeks early this year, so they must have had one hell of a shock on Monday night when the weather changed. The rhubarb shoots have begun to unfurl since the snow melted. I think I will pop a large pot over this clump at the weekend, and force a few stems for spring.

Yellow_crocus_covered_in_snow_in_late_January
Yellow crocus, snow-covered and snow-survivors. Images: Kathryn Hawkins

First_shoots_of_new_season_rhubarb_growth
New rhubarb shoots. Image: Kathryn Hawkins

At the beginning of the week, all the snowdrops in the garden were still tightly closed, but as the thaw took hold and the temperature rose again, many of the buds have opened. These are such pretty, dainty little flowers, and are a sure sign that spring isn’t too far away. Have a good few days whatever the weather brings with it 🙂

Flowering_in_late_January_delicate_snowdrops
New season snowdrops. Images: Kathryn Hawkins


Burns Night 2020

Tartan-clad_gingerbread_man_Burns_night_2020
Happy Burns Night! Image: Kathryn Hawkins

January 25th is a national celebration here in Scotland. The day commemorates the birthday of the famous Scottish poet, Robert (Rabbie) Burns. All over the country, parties and gatherings will be held in honour of Mr Burns, based around a traditional meal of haggis, neeps (mashed turnip or swede) and tatties (mashed potato), washed down with a wee dram or two of whisky.

I have noticed from the stats on my site, that from the end of December onwards, my tattie scones recipe gets lots of hits from all over the world. I think, in fact, that this is the most popular recipe I have ever posted. The chocolate haggis is a close second. Vegan_haggis_and_tattie_scones_traditional_Scottish_Burns_night_food

Scottish_shortbread_rounds_alongside_chocolate_haggis_covered_in_marzipan
Vegan haggis, tattie scones, shortbread and chocolate haggis. Images: Kathryn Hawkins

The recipes for my vegan haggis and my old favourite, shortbread , as well as the aforementioned, can be found by clicking on the (pink) links.

Whatever you’re doing this January 25th, I hope you have a good time. I raise a glass to you and say “Slàinte”.

PS. A recipe for the (naked) gingerbread men will follow shortly 🙂

Small_gingerbread_man_with_icing_kilt_and_Highland_regalia
A wee highland gingerbread man decorated for Burns Night. Image: Kathryn Hawkins

Seville orange marmalade – traditional and dark (naturally gluten-free, dairy-free and vegan)

Large_confiture_jar_of_homemade_Seville_orange_marmalade
Homemade Seville orange marmalade. Image: Kathryn Hawkins

Seville orange marmalade-making comes but once a year, and that time is now. The bitter Spanish oranges are only in the shops between January and mid February. They are the best citrus fruit to achieve a classic tartly-flavoured orange marmalade, the favourite preserve of one Paddington Bear 🙂

Whole_and_halved_Seville_oranges
In season, Seville oranges. Images: Kathryn Hawkins

There’s no getting away from it, making marmalade is labour-intensive if you make it the traditional way, but I enjoy it, and to me, the reward is greater than the effort involved. I have 2 versions of the same recipe to post this week. The first is the traditional, bright orange, softly set breakfast staple that we’re all familiar with. The second is a dark version which includes dark brown sugar to give a treacly flavour; it  is also my personal favourite – delicious over porridge or rice pudding. However, it doesn’t photograph that well in the jar as you may imagine, so I am only posting “selective” images!

Open_confiture_jars_of_traditional_Seville_orange_marmalade_alongside_a_brown_sugar_version
Traditional and dark Seville orange marmalade. Images: Kathryn Hawkins

How you prepare the peel is up to you. I like chunky (which is easier to prepare!). Get yourself organised and soak the peel overnight as this helps soften it, and make sure you cook it properly before adding the sugar to the pan – once the sugar is added, the peel won’t soften any more.

Spoonfuls_of_Seville_orange_marmalade_traditional_and_dark_recipes
Marmalade spoonfuls. Images: Kathryn Hawkins

On with the recipe, and happy marmalade making if you fancy having a go 🙂

Makes: approx. 3kg

Ingredients

  • 750g Seville oranges (approx. 5 large fruit), washed
  • 2.5 litres cold water
  • 2kg granulated sugar
  • 100ml freshly squeezed lemon juice
  1. The day before, juice the oranges, keeping all the pips and membrane that remain on the juicer. Cover the juice and refrigerate.
  2. I use a serrated grapefruit spoon to scrape out the fleshy bits that remain inside the orange shells, leaving just the skin and pith of the oranges ready for slicing.
  3. Pile all the pips, membrane and scrapings from inside the orange shells onto a large piece of clean muslin, and tie in a bundle securely with string. Put to one side. Halve the orange shells and slice as thinly and as small as you like.

    4_stages_to_preparing_Seville_orange_peel_for_soaking
    Preparing the orange peel. Images: Kathryn Hawkins
  4. Place the sliced orange in a large bowl, pour over the water and add the muslin bag. Cover loosely, put in a cool place and leave to soak overnight.
  5. The next day, carefully transfer the contents of the bowl into a large preserving pan. Bring to the boil, then reduce the heat to simmer the peel gently until very soft. This takes around 45 – 55 minutes depending on how thick you cut the peel.
  6. Carefully remove the muslin bag and place in a sieve over a jug. Squeeze out as much of the liquid as you can, and pour back into the saucepan. Discard the bag.

    4_images_showing_the_soaking_and_cooking_of_orange_peel_for_marmalade_making
    Soaking and cooking the peel. Images: Kathryn Hawkins
  7. Pour the orange juice into the saucepan and stir in the sugar and lemon juice. Mix well and heat gently until the sugar dissolves. Raise the heat and let the mixture come to a rapid boil, then cook the marmalade for about 20 minutes until the temperature reaches 105-106°C – spoon a little on to a cold plate from time to time as the temperature rises to check setting point is reached; once it cools, the pool of marmalade should wrinkle when pushed gently with your finger.
  8. Turn off the heat and leave the contents of the pan to stand for about 15 minutes – this enables the mixture to thicken a little and helps keep the citrus peel evenly suspended in the jelly when transferred to the jars.
  9. Stir the marmalade well before spooning into clean jars whilst hot, and seal well. Leave to cool, then label and store in the usual way.

    Jars_of_freshly_made_Seville_orange_marmalade
    This year’s haul of homemade marmalade. Image: Kathryn Hawkins

    For the dark version, replace 500g of the granulated sugar with dark brown sugar and cook as above. If you use a very dark Muscovado sugar you may find the setting point more difficult to achieve (as I did this year!). I added a 250ml bottle of liquid pectin to the mixture to help things along, and a good set was achieved. I have no idea why this happened, the same recipe worked fine last year, the only change was a darker variety of sugar. One of life’s little mysteries…..Have a good week 🙂

    Jars_of_homemade_dark_Seville_ orange_marmalade
    Brown sugar Seville orange Marmalade. Image: Kathryn Hawkins


For Burns Night, Scottish shortbread (gluten-free; dairy-free; vegan)

Aluminium_tin_with_Scottish_shortbread_rounds
Scottish shortbread. Image: Kathryn Hawkins

Happy Burns Night, or Day, depending on when you are reading this!

When I started my blog several months ago, my very first recipe was for an old favourite of mine, shortbread. Looking back recently, I thought that the recipe could do with a bit of an update. Now I have a dairy-free version which I am very happy with and so, I have updated my original recipe, timing it for this year’s January 25th celebration.

For a couple of weeks now, I’ve noticed that my Scottish recipe posts have been receiving quite a few views, so here are links to other recipes you might like to try this January 25th: tattie scones, chocolate haggis, vegan haggis and Burns Night mini chocolate haggis.

Aluminium_thistle_embossed_cake_tin
Vintage thistle cake tin. Image: Kathryn Hawkins

On with the recipe. I have given my shortbread rounds a suitably Scottish flourish by embossing them with a thistle on the top. If you don’t have a traditional shortbread mould, then simply roll out the dough and cut out rounds using a plain or fluted edge cookie cutter. Prick the tops and press the edges with the fork before baking.

Thistle_embossed_shortbread_rounds_with_whisky_tumblers
Shortbread and whisky, Image: Kathryn Hawkins

Here’s the link back to the updated original shortbread recipe – now dairy-free and vegan as well as gluten-free – and if you are using a shortbread mould, there are some step by steps images to help you.

That’s all for this week. I’m off for a wee dram; I’ll be posting again soon. Sláinte!

Whisky_and_shortbread_for_Burns_Night_2019
Sláinte! Image: Kathryn Hawkins


Vegan haggis (dairy-free; gluten-free variation)

Whole_vegan_haggis_with_mashed_turnips_(swede)_and_potatoes
Haggis, neeps and tatties the vegan way. Image: Kathryn Hawkins

Hello again. I hope 2019 is going well for you so far. There’s a wee bit of forward planning gone into  this week’s recipe. Next Friday, January 25th, is the Scottish feast of Burns Night, which is traditionally celebrated in a very meaty way with the dish of haggis accompanied with the only vegetarian part of the meal: “neeps and tatties” (mashed turnip (swede) and potatoes). I’ve been working on a meat-free version for a while, and finally I think I’ve cracked it this year. The flavour and texture is not that far off the traditional version and much nicer than any commercially made veggie haggis I have tried. I hope I might tempt you into making one for yourself.

You’ll need to allow at least a day in advance before you cook the haggis, but it will keep wrapped up in the fridge for 3 or 4 days before cooking if you want to prepare ahead.

Single_portion_of_haggis_neeps_and_tatties
Burns supper. Image: Kathryn Hawkins

Without going into the grim details of what’s in a traditional haggis, I’ve replaced the meat, etc. with mushrooms, red lentils and pearl barley which give the texture in the dish. Other than that, the bulk of the haggis is made up in the traditional way with toasted oatmeal. For a completely gluten-free version, replace the pearl barley with well-cooked white or brown rice, and use certified free-from oatmeal. I’ve stuck to the traditional haggis seasonings of plenty of black pepper, nutmeg and salt.

Coarse_salt_ground_black_pepper_whole_nutmeg
Traditional haggis seasoning: salt, pepper and nutmeg. Image: Kathryn Hawkins

Because there is no outer “skin” to contain  the vegan haggis mixture, the assembly method is quite long, however the recipe itself is pretty straightforward. I’ve included plenty of step-by-step images to help with the assembly. Let me know how you get on 🙂

Serves: 3-4

Ingredients

  • 1 tbsp. vegetable oil
  • 1 medium onion, peeled and finely chopped
  • 1 bay leaf
  • 225g large flat mushrooms. peeled and chopped
  • 100g pinhead oatmeal or groats (use certified gluten-free if Coeliac)
  • 150g cooked, well-drained red lentils
  • 150g cooked, well-drained pearl barley (use well-cooked brown or white rice to make completely gluten-free)
  • 1 tsp salt
  • ½ tsp ground black pepper + extra to serve
  • A large pinch grated nutmeg
  • Approx. 4 tbsp. cold vegetable stock
  • 50g vegetable suet
  1. Heat the oil in a lidded frying pan and gently fry the onion with the bay leaf, stirring, for 2 minutes. Cover with the lid, reduce the heat to low and cook for 15 minutes until soft. Add the mushrooms, raise the heat and stir fry for 2 minutes. Cover again,  reduce the heat and cook gently for 10 minutes until tender. Leave to cool completely. Discard the bay leaf.

    Large_flat_muishrooms_whole_chopped_and_cooked
    Cooking mushrooms for vegan haggis. Images: Kathryn Hawkins
  2. Meanwhile, heat a dry frying pan until hot. Sprinkle over the oatmeal, and cook, stirring the oatmeal over a medium heat, for 7-8 minutes, to “toast”, without over-browning. Leave to cool.

    Scottish_oatmeal_in_a_tin;_toasting_oatmeal,_and_toasted_oatmeal
    Cooking oatmeal. Images: Kathryn Hawkins
  3. To assemble the haggis, mix the oatmeal, lentils and barley or rice into the cold mushroom mixture. Add the seasoning, and sufficient stock to bind the mixture together without making it too wet – how much you need will depend on how juicy the mushrooms are – then mix in the suet – it is important that everything is cold otherwise the suet will melt.

    3_stages_of_combining_the_haggis_ingredients
    Mixing the haggis ingredients. Images: Kathryn Hawkins
  4. Lay 3 large  sheets of cling film, approx. 44 x 32cm, on top of each other on a tray or work surface. Pile the haggis mixture in the centre. Fold the longest sides of cling film tightly over the mixture and then twist the ends tightly closed to form a chunky haggis shape, approx. 16cm long. Put in the fridge to firm up overnight.

    4_steps_to_shaping_a_vegan_haggis
    Shaping the haggis. Images: Kathryn Hawkins
  5. To cook the haggis, Lay a sheet of foil on a tray or work surface (same size as the cling film) and then place a sheet of baking parchment on top. Carefully unwrap the haggis and carefully place it in the centre of the parchment. It should its hold shape but won’t be completely solid. Fold the parchment over the haggis as you did with the cling film; scrunch the ends gently together and fold the parchment underneath the haggis. Wrap the foil over and twist the ends tightly to retain the haggis shape.

    4_steps_to_preparing_vegan_haggis_for_cooking
    Preparing vegan haggis for cooking. Images: Kathryn Hawkins
  6. Pour a 1cm depth of water into the bottom of a deep, lidded frying pan or a large saucepan. Bring to the boil, then place the haggis in the water, seam-side up; cover with the lid, reduce to a gentle simmer and cook for 1 ¼ hours until piping hot – if you have a food probe, test the centre, it should be at least 75°C to serve.

    Large_pan_with_simmering_water_and_a_vegan_haggis_cooking
    Cooking the haggis. Images: Kathryn Hawkins
  7. Carefully drain the haggis and leave to stand for 10 minutes. Remove the foil and place the haggis, still in the parchment, on a warmed serving platter. Open out the parchment and serve straight away, accompanied with mashed turnip and potatoes, and more black pepper if liked.

    Unwrapped_and_ready_to_serve_vegan_haggis
    Freshly cooked vegan Haggis. Image: Kathryn Hawkins

Note: if you have any haggis leftover, let it cool and chill it down for the next day. Cut into chunky slices and fry for a few minutes on each side until crisp, brown and hot. Serve with tomatoes and oatcakes. This is my favourite way of serving and eating haggis, the oatmeal becomes crunchy and deliciously nutty when fried. Have a good week!

Chunky_fried_vegan_haggis_slices
Vegan haggis, even better the next day. Image: Kathryn Hawkins


New year, new cake – Coffee and pecan loaf (gluten-free; dairy-free; vegan option)

G;uten-free_dairy-free_ coffee_and_pecan_loaf_cake
Coffee and pecan loaf cake. Image: Kathryn Hawkins

I had planned that my first recipe post of the year would be a recipe bursting with nutrition and vitality – new year, fresh start, etc. However, it’s been so cold these past few days, when it came to it, I simply couldn’t face anything too healthy. Instead, I’ve been in the kitchen keeping warm by baking, and thus, my first recipe of 2018 is one of my favourite cakes.

Heavy_garden_frost_in_Scotland_in_early_January
Sun-up on a frosty January morning. Image: Kathryn Hawkins

I took this shot of the garden from an open window about 9am yesterday morning, just as the sun was rising. The image below is the window adjacent to the one I opened – the beautiful ice pattern is on the inside!

Ice_on_the_inside_of_the_window
Window pane iced-up on the inside. Image: Kathryn Hawkins

So, in my books, cold weather is enough justification for cake, and I start my new year blog posts with one of my “desert island” cakes: a coffee one.

I’ve been using a heritage brand of coffee and chicory essence as a coffee flavouring in baking for as long as I can remember. It was our “turn to” flavouring long before decent barista-style instant coffee and espresso shots came to British shores. Sadly, the glass bottle packaging of old has been replaced by a plastic version (making it look less authentic), but the old-fashioned label is practically unchanged in design and the product within tastes just as good as always. I haven’t found anything that comes close to the concentrated flavour it offers in baking. In summer, I use it to make a base for a deliciously smooth and well-rounded iced coffee, ice-creams and chilled custards.

Camp_coffee_essence_and_ground_pecan_nuts
My favourite coffee flavouring, and finely ground pecan nuts. Images: Kathryn Hawkins

The sweet, nutty flavour of pecans goes particularly well with coffee. You can use walnuts if you prefer, but I find them a bit overpowering if you really want the taste  of coffee to dominate your bake. For this recipe, grind up some of the pecans very finely to make a “flour” for a better formed cake crumb, and then add the remainder as finely chopped pieces for extra nutty texture. I add a little arrowroot to help bind the mixture but you can leave it out if you prefer. I hope you enjoy the flavours as much as I do 🙂

Serves: 10

Ingredients

  • 225g pecan halves
  • 125g gluten-free plain flour (such as Dove’s Farm)
  • 8g arrowroot
  • 2 level teaspoons gluten-free baking powder (such as Dr Oetker)
  • 175g light brown soft sugar
  • 3 large eggs (or, for a vegan cake, use 180g silken tofu)
  • 175ml sunflower oil
  • 4 tsp Camp coffee essence or similar
  • 50g Demerara sugar
  1. Preheat the oven to 180°C (160°C fan oven, gas 4). Grease and line a 1kg loaf tin. Put 125g pecans in a blender or food processor and blitz until very finely ground. Chop the remaining pecan nuts finely.
  2. Sift the flour and arrowroot into a bowl and stir in both lots of pecans along with the sugar. Beat the eggs (or tofu) with the oil until well blended, and then thoroughly mix into the dry ingredients.
  3. Transfer to the prepared tin. Smooth the top and put the tin on a baking tray. Scatter the top of the cake with the Demerara sugar. Bake for about 1 hour 10 minutes until risen, lightly cracked, and firm to the touch. A skewer inserted into the centre will come out clean when the cake is cooked. Leave to cool in the tin for 30 minutes, then turn on to a wire rack to cool completely. Wrap and store for 24 hours for better flavour and texture.

    Freshly_baked_coffee_and_pecan_loaf_cake
    Dense, moist textured coffee and pecan loaf cake. Image: Kathryn Hawkins

    Overhead_sliced_coffee_and_pecan_loaf_cake
    Coffee and pecan loaf cake, ready to serve. Image: Kathryn Hawkins


Happy new year!

Winter_flowering_Scottish_heather
Hogmanay heather. Image: Kathryn Hawkins

Happy new year to you all. My very best wishes to my blogging friends for a happy, healthy and peaceful year ahead.

It’s been a quiet start to the year. After a milder, rain-soaked, grey morning, the afternoon brought with it much calmer and brighter weather, with a glorious blue sky, sunshine, and crisp, fresh air.

Low_winter_sun_Jan_1st_2018
The glow of fading sunshine on the first day of the year. Image: Kathryn Hawkins

Enjoy the rest of the holiday. I look forward to starting my regular posts again soon 🙂

Scottish_garden_robin
A first-footing robin. Image: Kathryn Hawkins

Chocolate Haggis for a Burns Night supper (gluten-free, dairy-free, vegan)

Chocolate_biscuit_cake_wrapped_in_marzipan_shaped_like_a_haggis
Chocolate haggis wrapped in marzipan. Image: Kathryn Hawkins

January 25th is a Scottish celebration day, commemorating the birth of Scotland’s National poet, Robert Burns. Not wanting to offend my non meat-eating friends, I thought better of posting anything about the traditional savoury supper served on this day, and instead turned my thoughts to something I devised a few years ago, the Chocolate haggis. Much more appealing to all, I think, and perhaps, a wee bit more fun.

My recipe is simply a twist on the classic biscuit or refrigerator cake. You can add any combination of biscuit, fruit and nuts that you fancy. I use Scottish heather honey for the sweetness and flavour, but golden syrup or maple syrup will work just as well for my vegan friends. If you eat butter, you can use this instead of coconut oil. It’s a very versatile mix. Adding a wee tot of whisky is for the celebration; it’s fine without, so I’ll leave that up to you! By the way, I love marzipan, but if it’s not for you, you can achieve a similar effect by using an ivory coloured fondant icing.

Makes 1 haggis – 12 generous slices

  • 125g free from plain chocolate
  • 75g coconut oil (or butter)
  • 2 tbsp golden or maple syrup (or heather honey)
  • 150g free from plain granola or coarse oatcakes, crushed
  • 150g free from shortbread or plain biscuits, crushed
  • 75g currants
  • 2 tbsp whisky (optional)
  • Icing sugar to dust
  • 250g natural marzipan

1. Break the chocolate into a heatproof bowl and add the coconut oil and syrup. Sit the bowl over a saucepan of barely simmering water until melted. Remove from the water and cool for 10 minutes.

2. Mix the granola, shortbread and currants into the melted chocolate and stir in the whisky, if using. Leave in a cool place for about 45 minutes to firm up, but not set completely.

How_to_make_a_chocolate_haggis
Chocolate haggis preparation. Images: Kathryn Hawkins

3. Line the work top with a large, double-thickness, square of cling film and pile the chocolate mixture into the centre. Mound it up it to form a fat oval shape about 12cm long. Wrap the cling film round the mix tightly and twist the ends to seal, making a fat sausage shape. Chill for at least 2 hours until very firm.

4. Lightly dust the work surface with icing sugar. Roll out the marzipan to a rectangle approx. 18 x 28cm, and neaten the edges. Unwrap the chocolate haggis and place in the centre of the marzipan. Fold the marzipan over the top to cover the chocolate haggis completely, and then pinch at either end to make the distinct haggis shape. Tie the ends with twine if liked.

Freshly_made_chocolate_haggis
Chocolate haggis, ready to slice. Image: Kathryn Hawkins

5. Cover loosely with cling film and leave at room temperature for about an hour before slicing to serve, accompanied with a wee dram or two. Slàinte!

Sliced_chocolate_haggis
Chocolate haggis, sliced and ready to serve. Image: Kathryn Hawkins

Chocolate_haggis_for_Burn's_Night_supper
Happy Burns Night! Image: Kathryn Hawkins