Welcome to my blog all about the things I love to grow and cook. You'll find a collection of seasonal gluten-free, dairy-free and vegan-friendly recipe posts, as well as a round up of my gardening throughout the year. I wish you good reading, happy cooking and perfect planting!
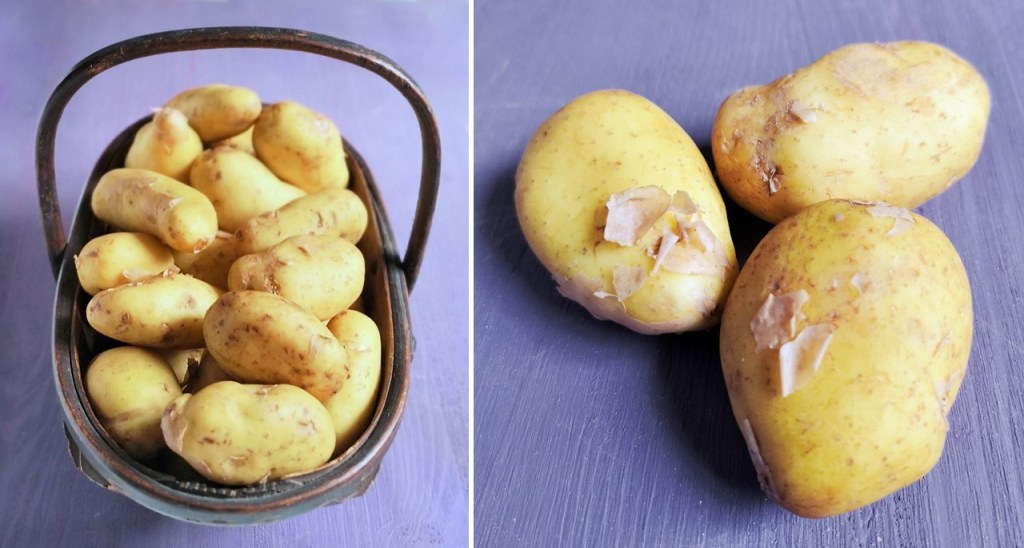
It has turned much colder here since my last post. Frosty mornings and an increasing number of sub-zero nights. Back in late August, I planted a few Arran Pilot seed potatoes in the green house. With the wintry feel in the air and knowing potatoes are not frost-hardy, I decided it was time to dig them up.
Late season greenhouse-grown potatoes. Images: Kathryn Hawkins
The foliage had all but withered away over the month, but under ground a few little potatoes had formed. I was a couple of weeks later planting them than usual and subsequently, the plants hadn’t had time to develop properly before the days got shorter and the temperature lower. No matter, there were enough to make one of my favourite potato dishes, and they tasted just as delicious as the potatoes grown earlier in the year.
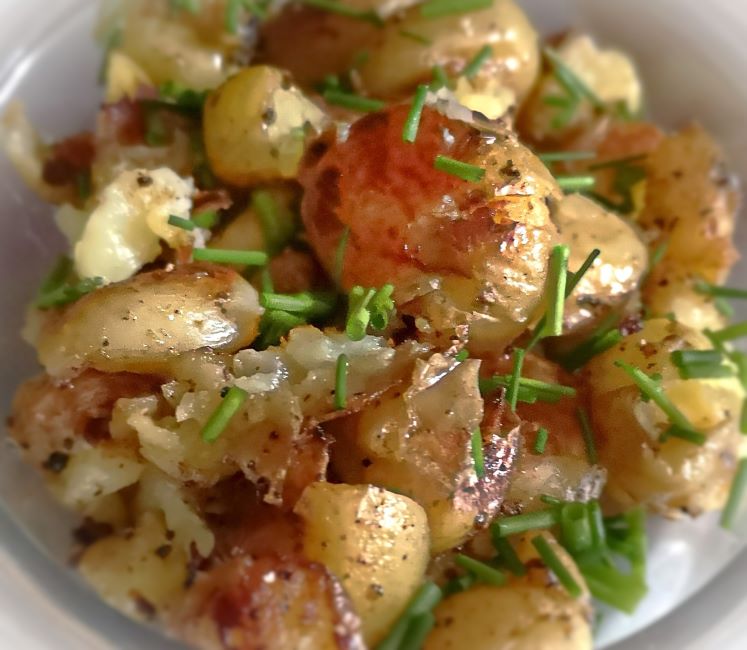
Smashed new potatoes sprinkled with chives. Image: Kathryn Hawkins
I took a few images of the preparation of this potato dish back in the late summer when I had some pink fir potatoes. Choose a waxy or floury textured potato for best results. Scrub the potatoes and boil them in their skins until tender, then drain well and cool for about 10 minutes. Transfer them to a board and squish them with a masher or large fork.
Smashed pink fir potatoes. Images: Kathryn Hawkins
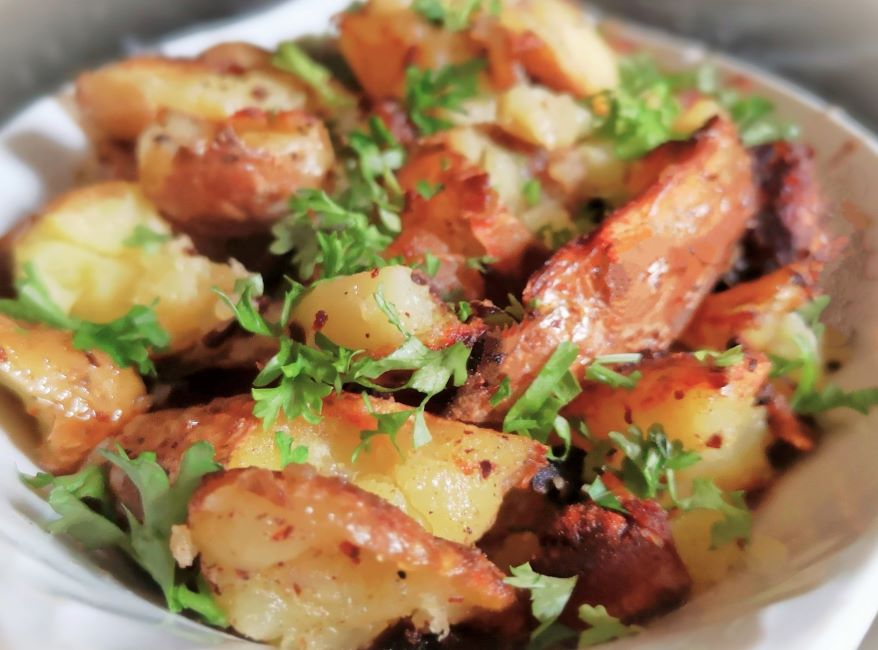
I usually melt butter with some olive oil in a pan and heat until bubbling – either will work on their own, it’s personal taste which you use. Add the potatoes and seasoning and cook over a fairly high heat, turning them until they are crispy. Towards the end of cooking, I add chopped garlic and cook it for a couple of minutes until just cooked through. Serve straight from the pan, sprinkled with chopped parsley or chives.
Smashed pink fir potatoes with garlic and parsley. Image: Kathryn Hawkins
Well there’s just one more post before Christmas – I can’t believe it will all be over by this time next month. Until then, take care and thanks for stopping by 🙂
Hello again everyone. I hope you are keeping well. We have been suffering another down-turn in the weather since my last post. Very unseasonal hail storms, winds and heavy rain. It’s been chilly too. The lack of heat has helped keep some of the spring flowers going but delayed later ones like the bluebells, and some of the trees are still bare.
I have been busy with work since my last post and haven’t been able to spend much time in the kitchen. The poor weather has put pay to spending much time out of doors. However, May is my favourite month of the year and I have been eating some fine seasonal produce. And today, I ventured out into the garden to take a few images of some of the best May flowers.
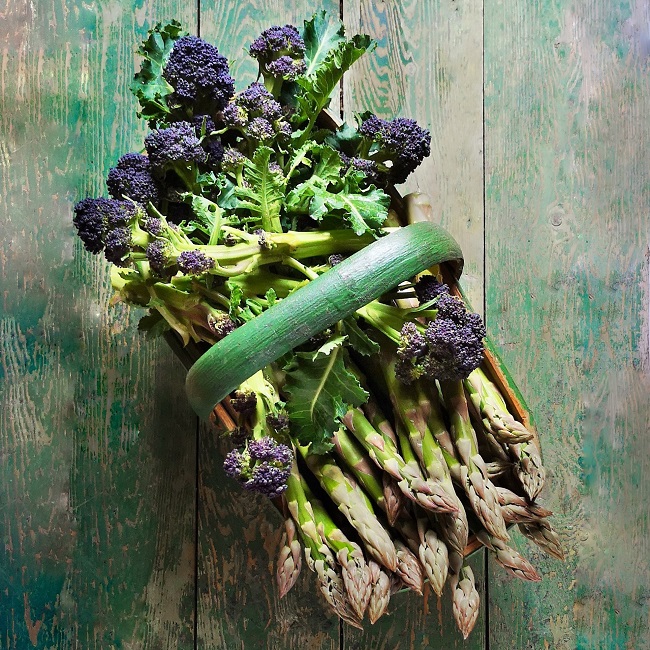
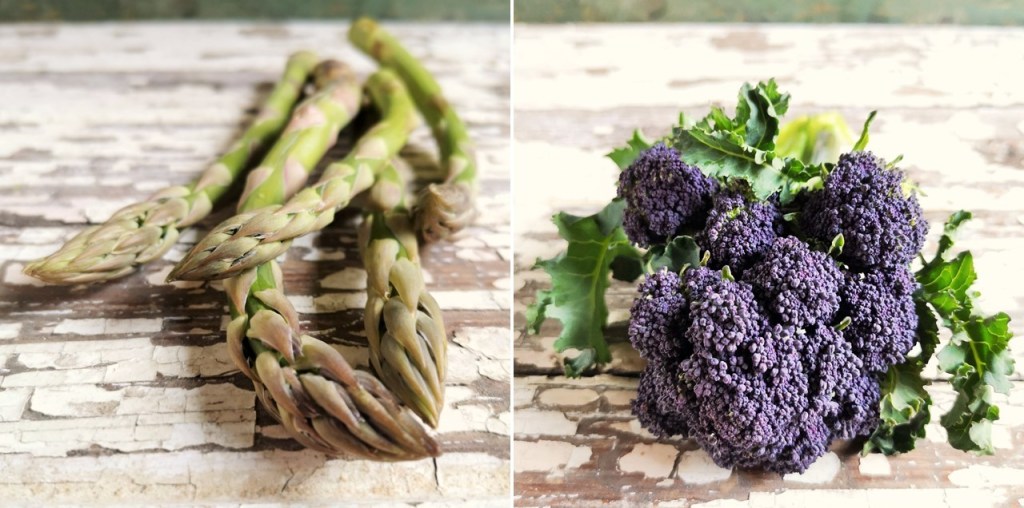
British asparagus and purple sprouting broccoli, and Jersey Royal potatoes. Images: Kathryn Hawkins
When vegetables taste as good as this selection, I rarely do anything adventurous with them. The asparagus and broccoli get trimmed, brushed with oil and lightly seasoned, then roasted on a tray for a few minutes in a hot oven. As for Jersey Royals, I just steam or boil them and eat them dressed with seasoned oil or a dot or 2 of plant-butter. Simple but delicious.
Roasted asparagus and purple sprouting broccoli. Image: Kathryn Hawkins
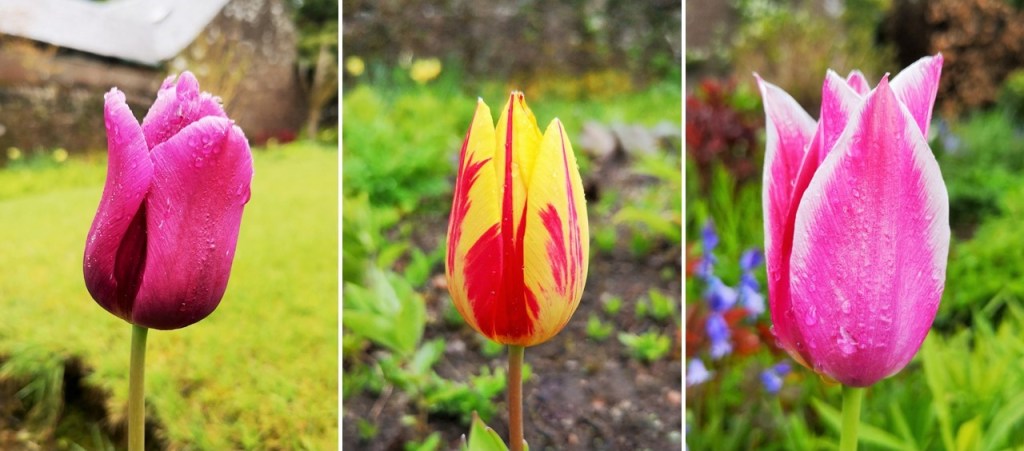
Most of my flowery images are a little bit rain-soaked this month. The tulips started flowering early this year and many have been out for 3 or 4 weeks. With the heaviness of the downpours, some have started growing horizontally.
Vertical and horizontal tulips in the rain. Images: Kathryn Hawkins
This beautiful purple tulip was actually filling up with water as I took the photo.
Rain-filled tulip. Image: Kathryn Hawkins
There are now bluebells in the garden, but the lack of sun is slowing down the opening of the flower-heads, and the rain is holding back the scent in the air which is something I love about this time of year. The forecast for the week ahead is for more of the same, so it may be a while before I am able to enjoy their sweet heady fragrance.
Bluebells springing up all over the garden. Images: Kathryn Hawkins
Raindrops on bluebells. Image: Kathryn Hawkins
More blue flowers. The forget-me-nots are growing in abundance in one of the raised beds and provide quite a carpet of blue until other flowers take over. I spotted the first Centaurea or Mountain Cornflower in bloom today. These robust, thistle-like, flowers will continue multiplying and flowering well into the autumn. They are a great value garden plant and their vivid blue colour is very striking in the borders.
Usually in my May garden posts I am able to share pictures of abundantly flowering vivid pink and red Azaleas, but at the moment they remain stubbornly in bud. The scarlet rhododendron has come into flower this last week and is putting on a lovely display. It sits next to one of my favourite rhododendrons in the garden, a rich, candy-pink variety. Sadly the frost caught the other side of this mature shrub. These blooms are on the sheltered side and thankfully remain untouched.
Red and candy-pink rhododendrons. Images: Kathryn Hawkins
That’s all for now. I’m off to start practicing my sun-dance which I hope I can perfect in order to drive the rain away for a while 🙂 Until next time, take care and keep safe.
Hello everyone. I hope you are well and have enjoyed whatever the festive season brought your way. Like so many, I had a quiet one at home, unable to travel to see my family. Hogmanay and New Year celebrations are also cancelled. There has been plenty of time to reflect on what has happened this year, and also to think about new projects for the year ahead.
Three glorious morning views. Images: Kathryn Hawkins
We have been treated to some bright, crisp days here in central Scotland this year end, with some spectacular sunrises, and the first snow of the winter falling a couple of days after Christmas.
Snow-covered seat. Image: Kathryn Hawkins
It seems like a long time ago since I was able to take a rest on my favourite seat and enjoy the peace, quiet and colours of a spring and summer garden, but even now there are some signs of new growth to gladden the soul. I took these images on Boxing Day of a primrose and one of my rhubarb plants. The poor things must have had a bit of a shock waking up the next day to a covering of snow.
New shoots. Images: Kathryn Hawkins
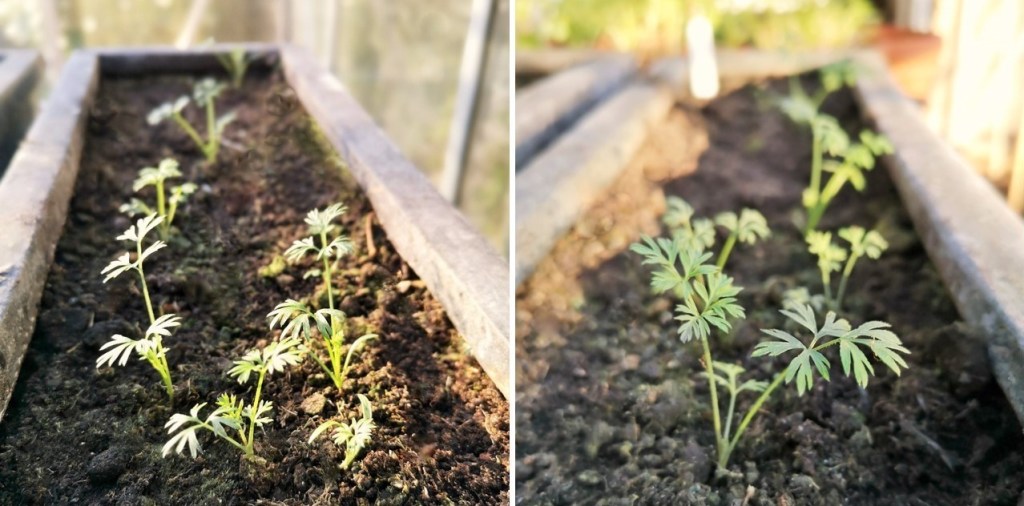
Back in September, once the cucumbers had ceased fruiting, I cleared some space in one of the greenhouse beds and planted 6 seed potatoes. It was an experiment to see if I could harvest fresh new potatoes for Christmas. I’m delighted with the results. All 6 plants produced, and I was able to enjoy freshly dug Maris Peer potatoes over Christmas, with a second harvest for the new year. At the same time, I sowed some carrot seeds, but these are much slower to grow, and I am beginning to doubt that they will ever root properly, but you never know. I will report back if they do develop to an edible size.
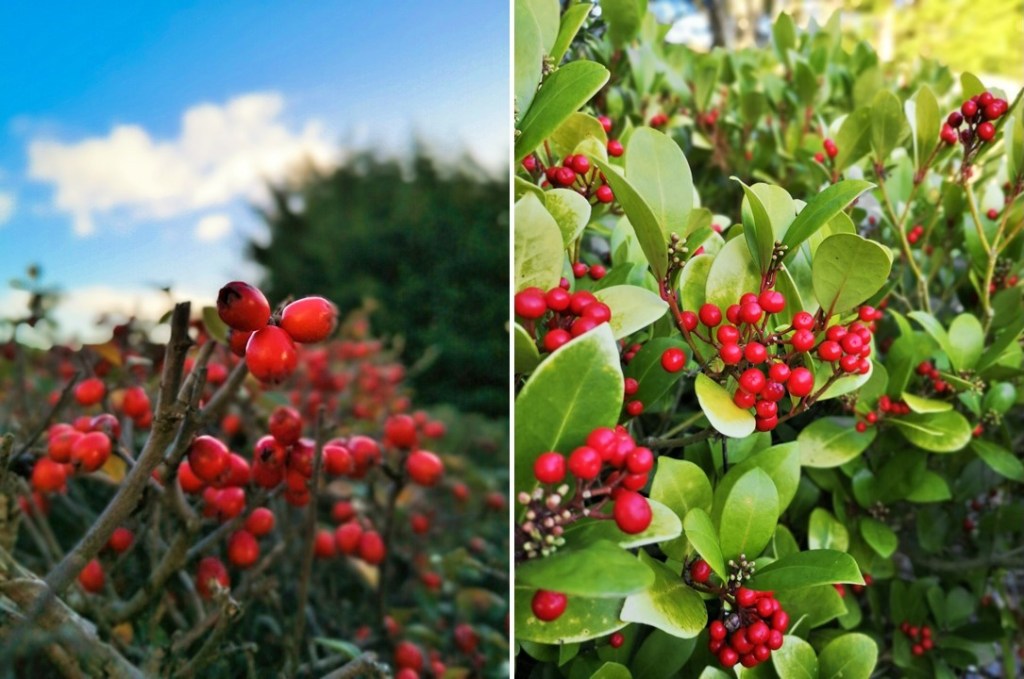
There were lots of berries in the garden over Autumn and early Winter this year, but by now, most of them have been eaten by the birds. However, our feathered friends never seems to dine out on Cotoneaster or Skimmia berries, so I am grateful to be left with these festive colours to admire.
Festive berries. Images: Kathryn Hawkins
Like so many, I am looking forward to a fresh start in a brand new year. I am ever hopeful that we will be able to return to some semblance of normality in the not too distant future. Until then, thank you for following my blog for another year, and I send you my very best wishes for the year ahead. Stay safe and healthy, and a Happy New Year to you all 🙂
Early flowering Rhododendron. Image: Kathryn Hawkins
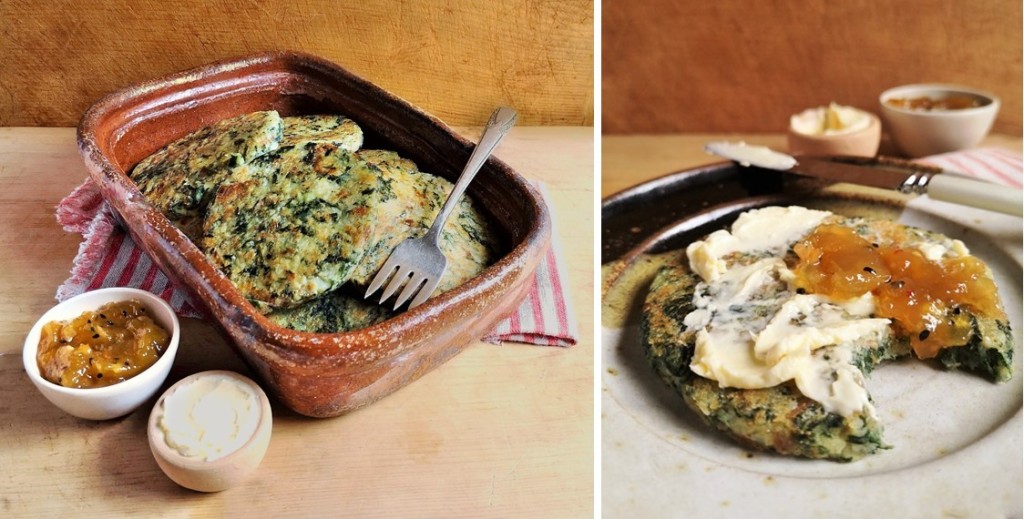
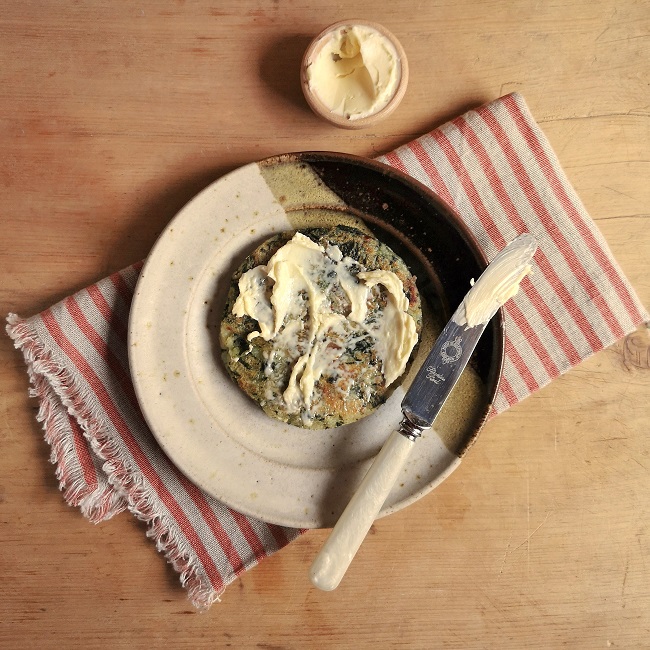
Lightly spiced spinach and potato scones served with mango chutney. Images: Kathryn Hawkins
Hello everyone. I hope all is well with you this week. With tighter restrictions entering many of our lives for the foreseeable future, I have turned to another comforting recipe this week. I am revisiting a Scottish classic, and also the most popular recipe on my blog to date, the humble tattie (or potato) scone.
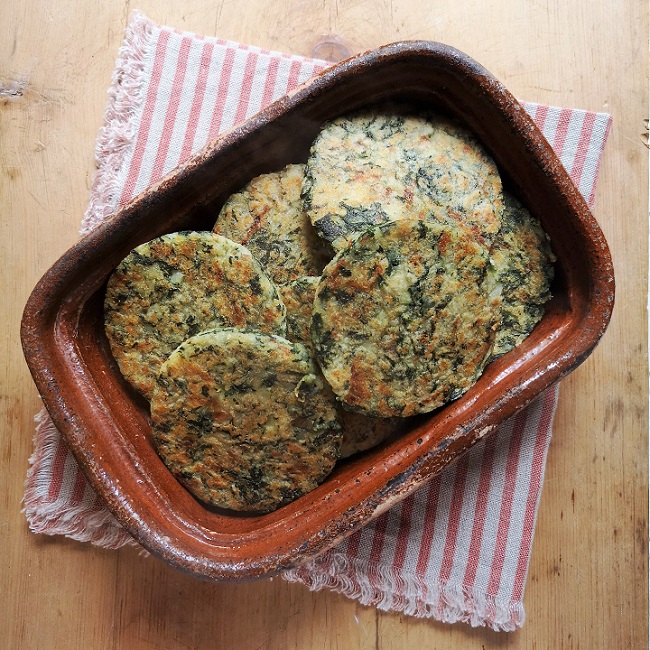
Freshly cooked and ready to serve. Image: Kathryn Hawkins
You can read my original recipe here but this time I have given the basic ingredients a spicy twist, inspired by one of my favourite Indian dishes, Saag aloo.
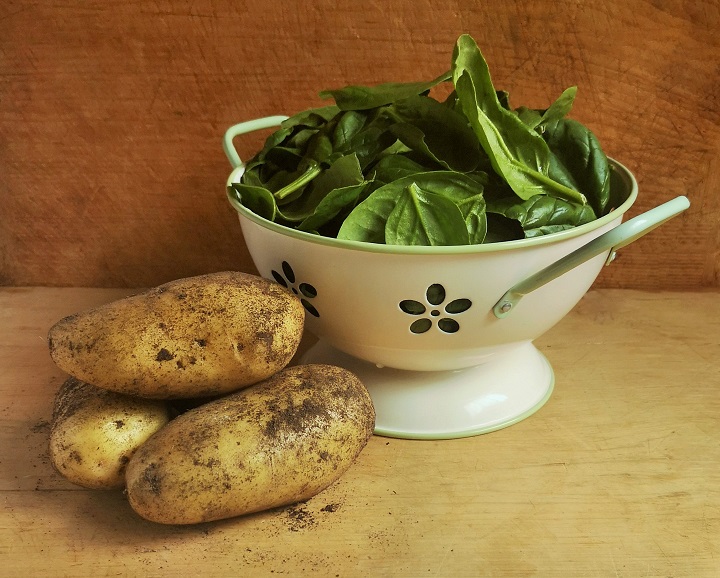
Classic combination, spinach and potatoes. Image: Kathryn Hawkins
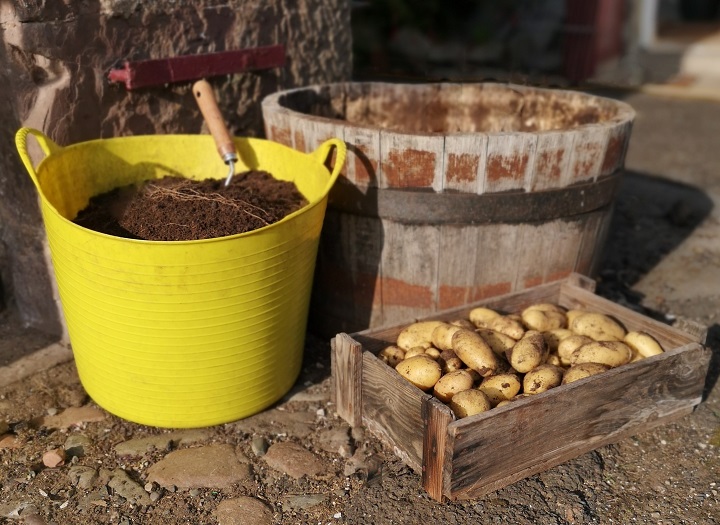
I have grown a lot of potatoes this year. At the beginning of lockdown back in March, I struggled to find any seed potatoes to buy, and ended up with a variety called Nicola which has turned out to be a very tasty and very high-yielding potato. I planted mostly in pots and the old barrel below. I am storing the leftover crop in dry soil in the greenhouse for winter use.
The recipe is very simple, with just a few ingredients. I have a couple of tips for guaranteed success: use a dry-textured potato for good results and also drain and dry off the cooked spinach as much as possible to avoid soggy scones. When you cook the scones, only brush the pan with oil so that you give them a little colour without making them crispy.
I use a garam masala spice blend for a mild, fragrant spiciness, but try using your favourite curry powder if you prefer something more defined.
Makes: 8
Ingredients
425g potatoes, peeled and chopped
Salt
5 tsp vegetable oil
1 medium onion, peeled and chopped
1 garlic clove, peeled and crushed
4 tsp garam masala
300g baby spinach
60g gluten-free plain flour blend
1 tsp gluten-free baking powder
1. Put the potatoes in a saucepan with a pinch of salt. Cover with water, bring to the boil and cook for 7-10 minutes until completely tender. Drain well; leave to air dry, then push through a ricer to make smooth. Leave to cool.
Boiled potatoes put through a ricer. Images: Kathryn Hawkins
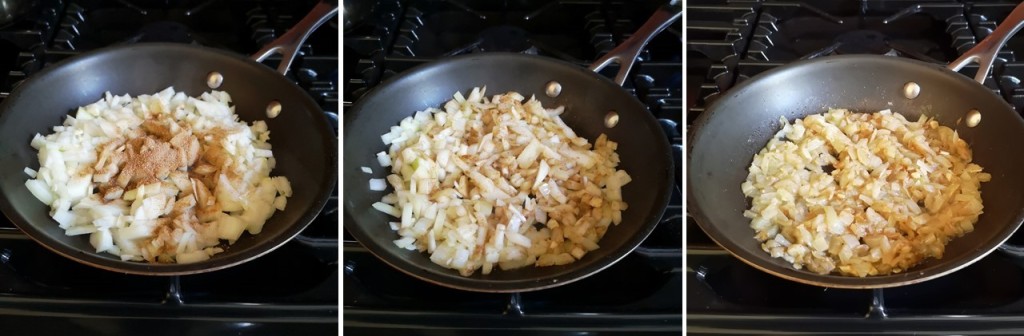
2. Heat 1 tbsp oil in a small frying pan and gently fry the onion, garlic and spices for 2-3 minutes. Cover with a lid, reduce the heat and leave to cook gently in its own steam for about 15 minutes until very soft. Leave to cool.
Cooking down the onion and spices. Images: Kathryn Hawkins
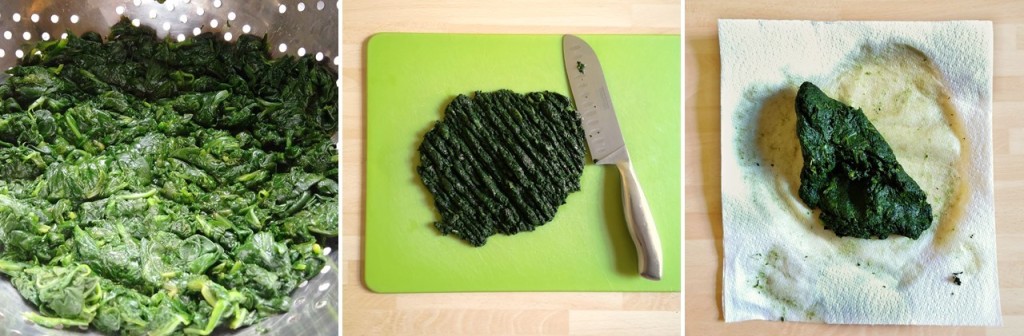
3. Rinse the spinach and pack into a saucepan whilst wet. Heat until steaming, then cover with a lid, reduce the heat, and cook for about 5 minutes until wilted. Drain well, pressing against the sides of the colander or strainer to remove as much excess water as possible. Leave to cool.
Preparing the spinach. Images: Kathryn Hawkins
4. Once the spinach is cold, chop it up and then blot well with kitchen paper to remove any excess water that remains in the mix.
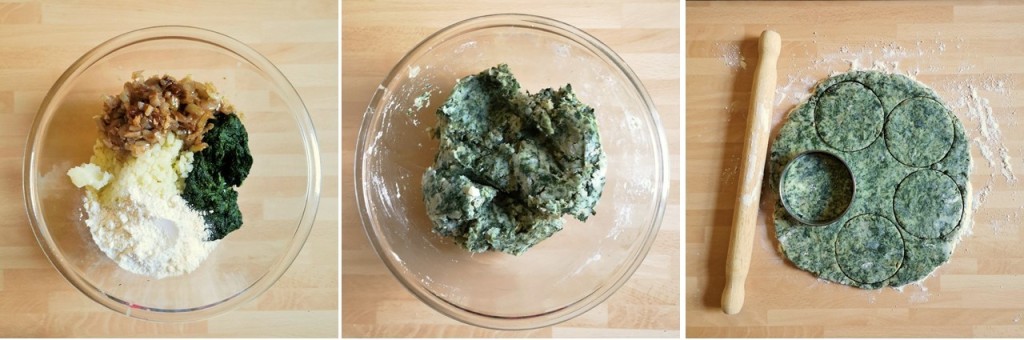
5. To make the dough, put the potatoes, onion and spinach in a bowl. Add the flour, baking powder and some salt. Mix together to form a ball, and roll out on a lightly floured work top to a thickness of about 1cm. Use an 8-9cm round cutter to make 8 scones, re-rolling the dough as necessary. Cover and chill until required.
Making the scone dough. Images: Kathryn Hawkins
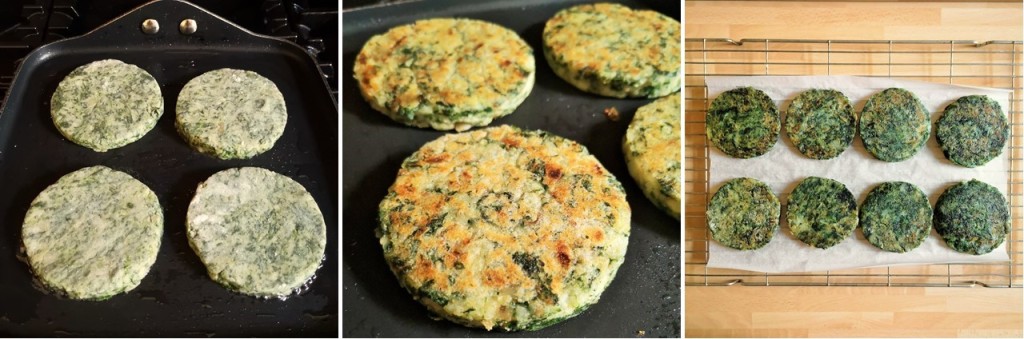
6. When you are ready to cook, brush a frying pan lightly with oil, heat until hot then cook the scones gently for about 3 minutes on each side until lightly golden. Drain and keep warm. If you want to store them, cool them on a wire rack, then cover and chill. They will keep for about 5 days in the fridge and also freeze well.
To reheat, either give them a quick blast in the microwave for a few seconds, or gently toast on a dry frying pan for a a couple of minutes on each side.
They make a delicious accompaniment to a bowl of soup just as they are, or spread with butter or margarine and topped with mango chutney 🙂
Buttered-up and ready to eat. Image: Kathryn Hawkins
That’s all from me this week. Until next time, take care and keep safe.
When I was planning what to put on my blog this week, it was snowing, and inevitably my thoughts turned to comfort food. This week’s recipe has a double dose of carbs, guaranteed to satisfy even the most hearty of appetites. It is a fragrant, fruity pilau rice cooked in a pan with thinly sliced potatoes. I ask you, what’s not to like?
A double dose of carb-comfort. Image: Kathryn Hawkins
The basmati rice is flavoured with the warming spices straight from the souks of Persia: cumin, coriander and cardamom. I always lightly toast cumin and coriander seeds before grinding them in a pestle and mortar; this helps release their inmost aromatic essences. Split the cardamom pods and either leave whole in the rice or pick out the tiny black seed from the green casing and crush into the mixture for a more intense flavour. If you are leaving them whole, remember to warn your fellow diners in case they come across one of the pods when the dish is served. Forewarned is forearmed!
Preparing the spices. Images: Kathryn Hawkins
Staying with the Persian theme, I added some dried barberries to the rice. These reddish-orange small dry berries are tart and tanniny – they remind me of rose-hip – and are a classic ingredient in Persian cooking. If you can’t find them, chop some dried cranberries or dried sour cherries to use instead. When combined with sweet, juicy sultanas, you get the perfect balance of sweet and sour to flavour your pilau.
Sour and sweet, barberries and sultanas. Images: Kathryn Hawkins
There is a bit of preparation to do before you start cooking, but the dish reheats very well if you want to make it up in advance, and will also freeze too. The pilau cake makes a substantial main meal served with fresh veg or a crisp salad, or serve in smaller wedges as an accompaniment.
Serves: 4 to 6
Ingredients
200g basmati rice
1 tsp salt
¾ tsp each coriander seeds and cumin seeds, lightly toasted and crushed
6 green cardamom pods, split (or seeds removed and finely crushed)
½ tsp freshly ground black pepper
10g dried barberries
40g sultanas
350g firm-fleshed salad potatoes such as Charlotte, scrubbed
3 tbsp. cold-pressed rapeseed oil (or olive or sunflower oil)
2 garlic cloves, peeled and finely chopped
Fresh coriander to serve
Put the rice in a bowl and cover with cold water. Leave to soak for 2 hours, then drain and rinse well. Bring a large saucepan of water to the boil, add the salt and spices and then add the rice. Bring back to the boil and cook uncovered for 2 minutes until the rice is very slightly tender and opaque.
Drain and rinse the rice in cold running water to remove the excess starch. Shake off the excess water and return to the saucepan. Stir in the dried fruit.
Preparing the spiced basmati rice. Images: Kathryn Hawkins
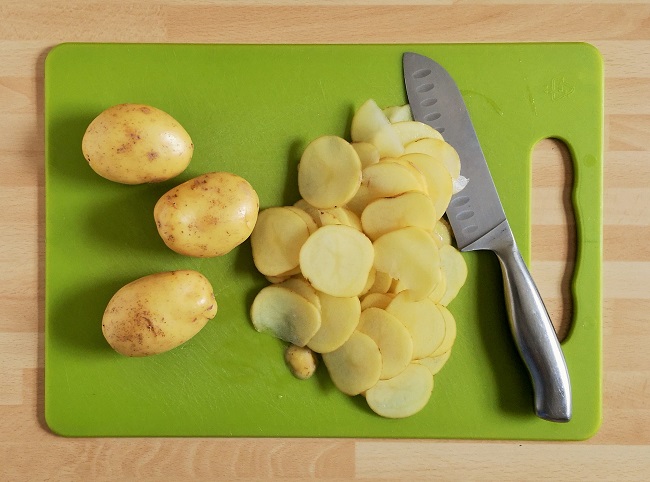
Preparing Charlotte potatoes. Image: Kathryn Hawkins
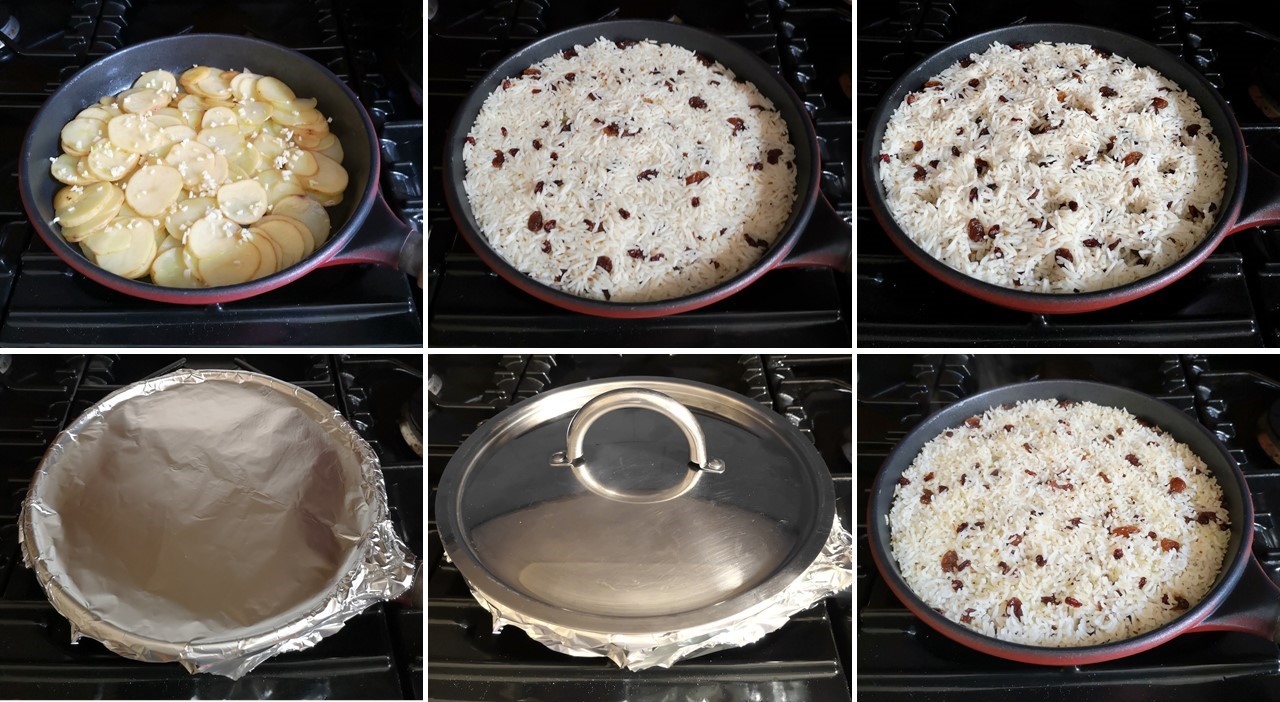
Meanwhile, very thinly and evenly slice the potatoes. Heat 2 tbsp. oil in a 22cm diameter frying pan and gently fry the potatoes for 2 – 3 minutes, stirring, to coat them in the oil. Remove from the heat and arrange the potatoes in a neat layer over the bottom of the frying pan. Sprinkle with the garlic.
Pack the rice mixture on top. Make indents in the rice using the end of a wooden spoon and drizzle over the remaining oil.
Pan-cooking the potatoes and rice. Images: Kathryn Hawkins
Cover with a layer of foil and then place a lid on top of the pan. Cook over a very low heat, undisturbed, for 30 minutes. Remove the lid and foil, check that the rice and potatoes are tender, then raise the heat and cook uncovered for 4-5 minutes to brown the potatoes. Turn off the heat, cover loosely, and stand for 10 minutes.
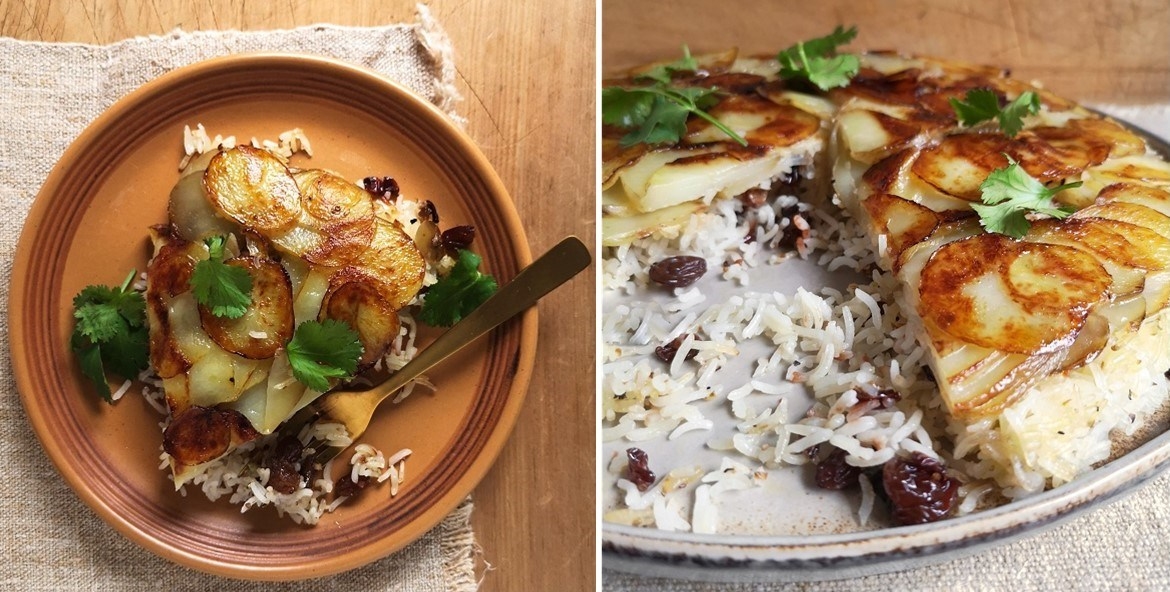
To serve, place a large serving plate over the frying pan and carefully flip the pan over to turn the contents on to the plate. Leave the pan in place for a couple of minutes before removing to allow the potato and rice to settle. Serve immediately, potato-side up, sprinkled with fresh coriander.
Sliced and ready to enjoy. Images: Kathryn Hawkins
To freeze, turn the cooked rice cake on to a freezer-proof plate or board, allow to cool, wrap and freeze for up to 3 months. Defrost overnight in the fridge.
To reheat, transfer to a baking tray lined with baking parchment, cover with foil and reheat in a preheated oven at 180°C, 160°C fan oven, gas 4, for about 30 minutes until piping hot. Serve as above.
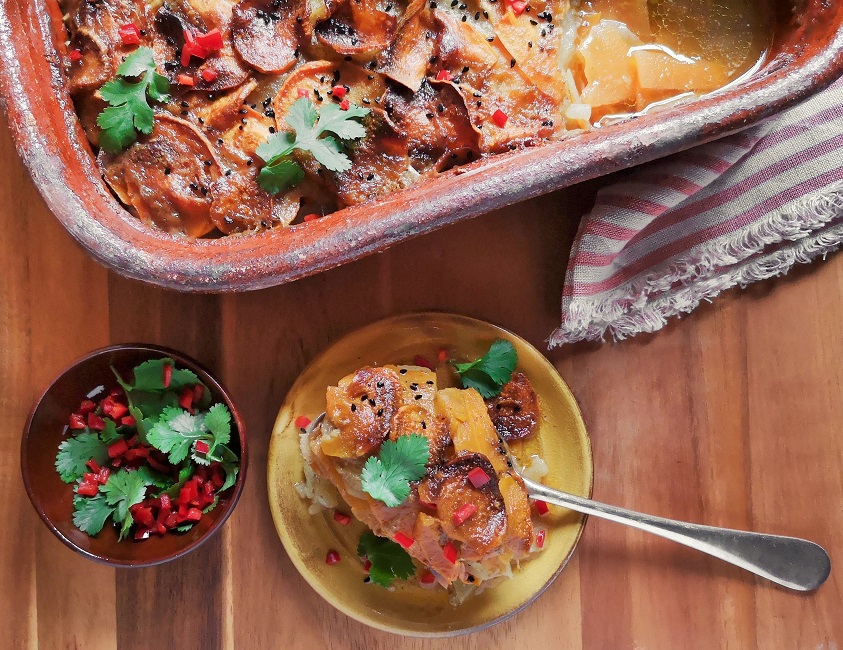
A comforting winter-warmer recipe for you this week, although the weather is unseasonably mild here at the moment, it seems less appropriate to write that now.
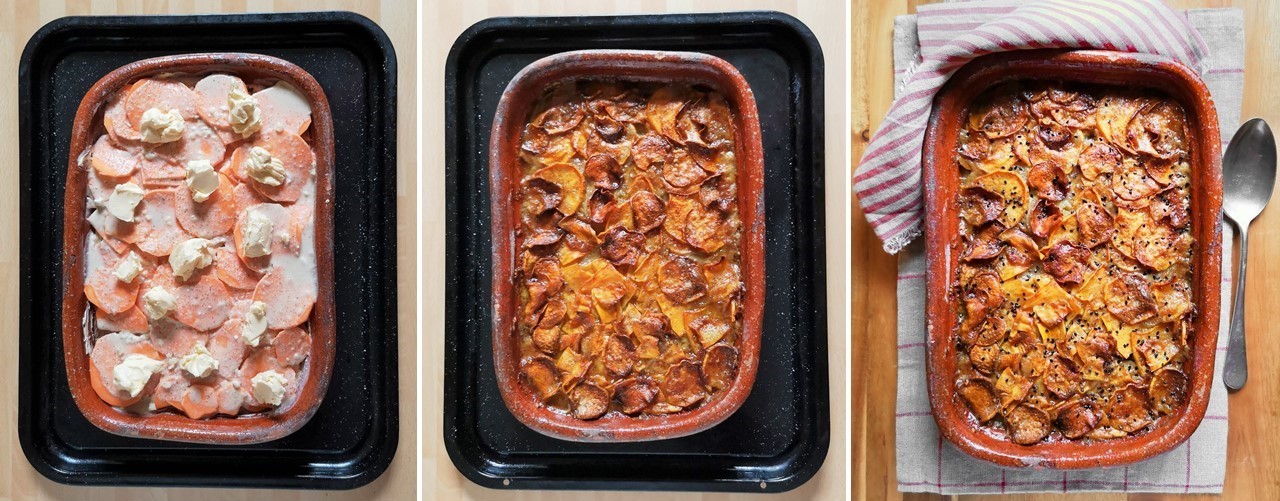
I used to really enjoy eating potato dauphinoise, but the heavy dairy content of the dish just doesn’t agree with me any more. After a few try-outs, this is my deliciously spicy and pleasantly creamy alternative. The recipe is light enough to enjoy at any time of the year. You can use any combination of root vegetables, and it works well with other spice combinations like a Thai curry paste or Chinese curry powder. I simply replaced the cream content with coconut milk.
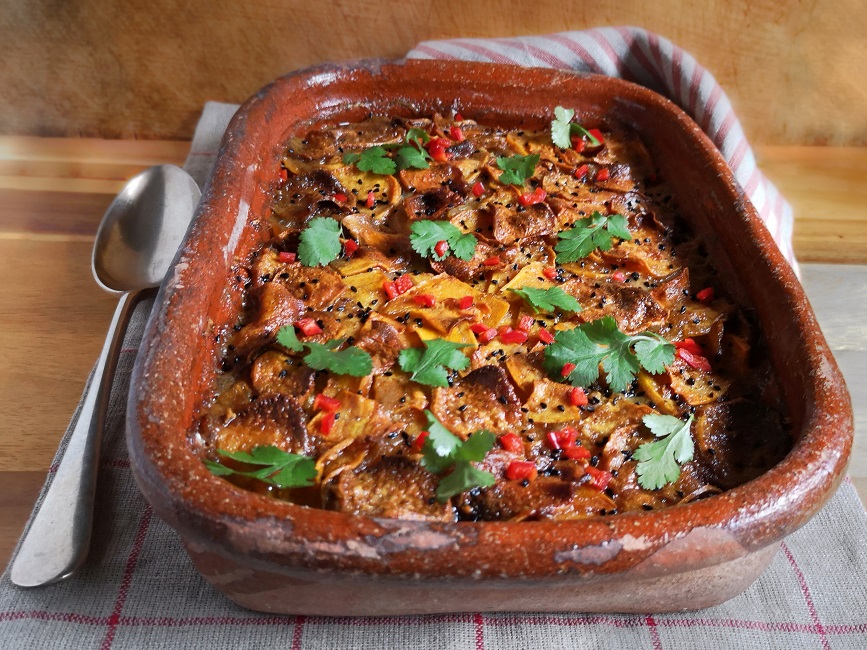
Comfort in a spoonful. Image: Kathryn Hawkins
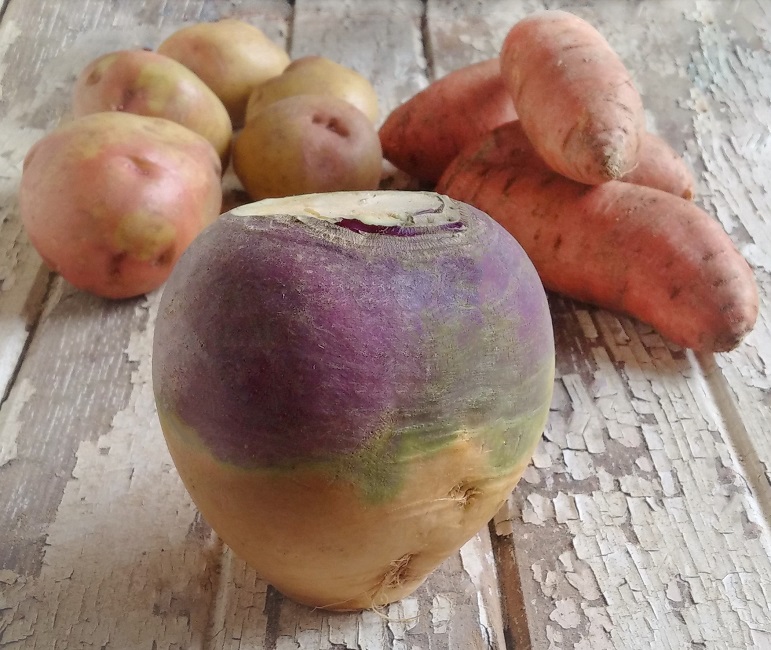
I chose turnip (swede), sweet potatoes and potatoes for my bake, and opted for a medium curry powder. As with any layered root vegetable dish, make sure you slice up the roots as thinly as possible and arrange them in the dish neatly so that everything cooks evenly. Once the vegetable preparation is out of the way, the rest of the assembly is very simple.
Turnip, potatoes and sweet potatoes. Image: Kathryn Hawkins
So without further delay, on with the recipe. By the way, it tastes just as good (if not better) reheated the next day, and freezes well too. I hope you enjoy it 🙂
Serves: 4 to 6
Ingredients
75g dairy-free margarine, softened
1kg mixed roots such as turnip (swede), sweet potato, potato, parsnip, carrot, etc.
1 ½ tsp salt
400ml can coconut milk
3 garlic cloves, peeled and crushed
3-4 tsp medium curry powder (depending on your taste)
1 tsp black onion seeds
Fresh coriander and chopped chilli to sprinkle
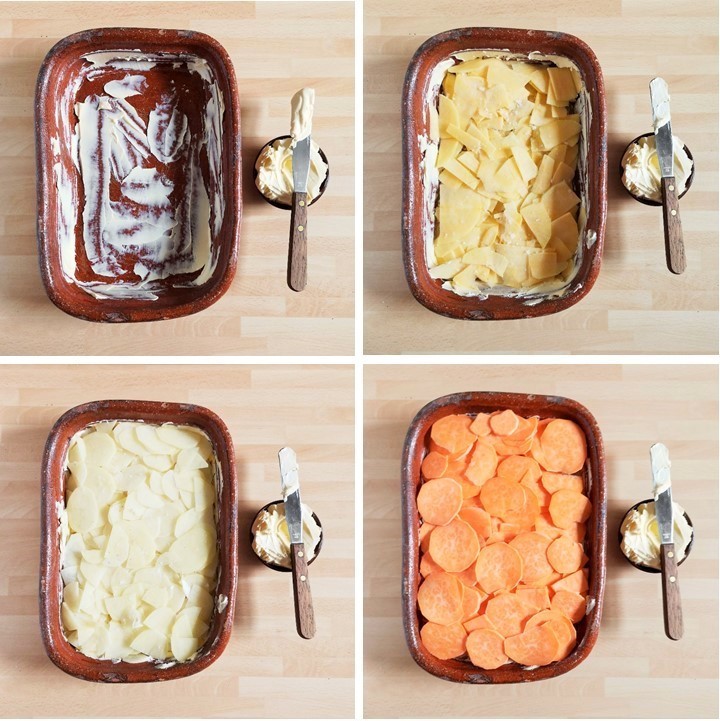
Preheat the oven to 170°C, 150°C fan oven, gas 3. Use half of the margarine to thickly smear round the inside of an approx. 1.8l baking dish.
Peel all the root vegetables and slice very thinly. Either mix all the vegetables together and arrange neatly in the dish, or arrange in individual layers, sprinkling with salt as you go.
Layering the roots. Images: Kathryn Hawkins
Mix the coconut milk, garlic and curry powder together and pour over the vegetables.
Dot the top with the remaining margarine, place the dish on a baking tray and cover with foil. Bake for 2 hours. Remove the foil and continue to cook for a further 30 minutes until golden and all the vegetables are meltingly tender.
Ready, steady, baked. Images: Kathryn Hawkins
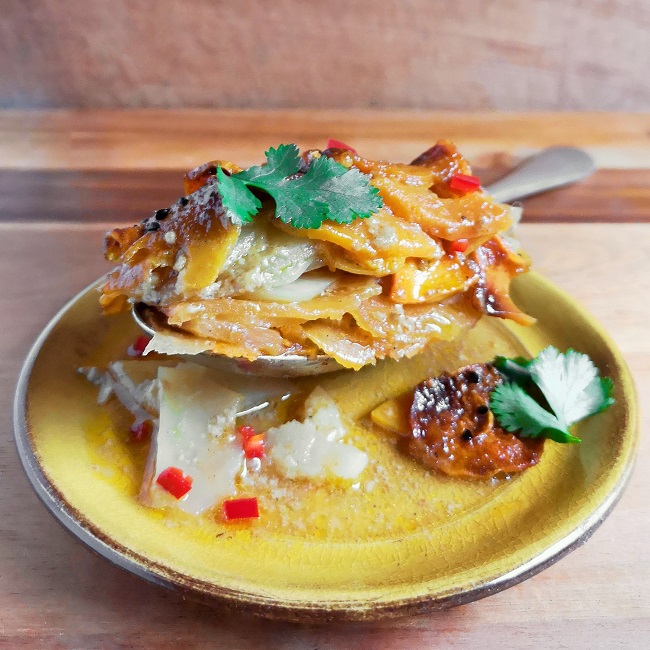
Remove from the oven and sprinkle over the black onion seeds. Leave to stand for 10 minutes before serving sprinkled with coriander and fresh chilli. To freeze, omit the coriander and chilli sprinkle. Allow the dauphinoise to cool completely, and then either freeze whole (if the dish is freezer-proof) or divide into portions. Wrap well, label and freeze for up to 6 months. To reheat, defrost in the fridge overnight, then cook, covered in foil, at 180°C, 160°C fan oven, gas 4 for 25-35 minutes depending on portion size, until piping hot.
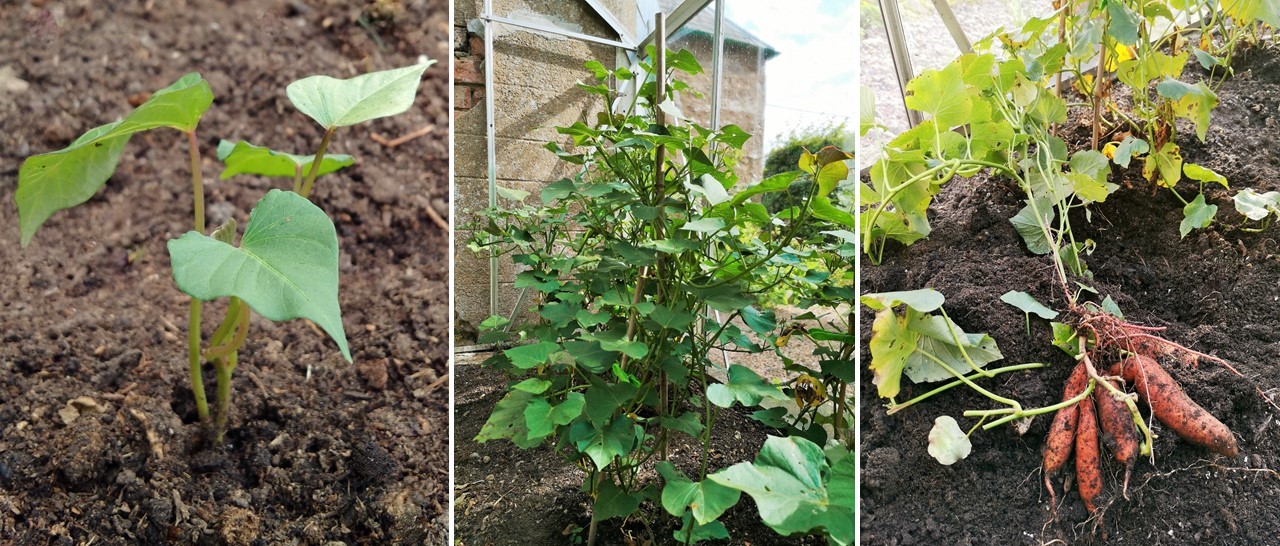
I’m feeling a bit pleased with myself this week. I have just dug up the first couple of sweet potato plants and harvested a reasonable crop. I planted the “slips” back in early June in my unheated greenhouse, and with the wonderful summer we had this year along with plenty of watering, the plants flourished.
To be honest, the sweet potatoes did better than the regular potatoes I planted outside. I grew my favourite variety, Pink Fir, which have knobbly pink skins and a delicious flaky texture inside. I had a fair crop, but I think the lack of natural rain water did inhibit their growth.
Final crop of Pink Fir potatoes. Image: Kathryn Hawkins
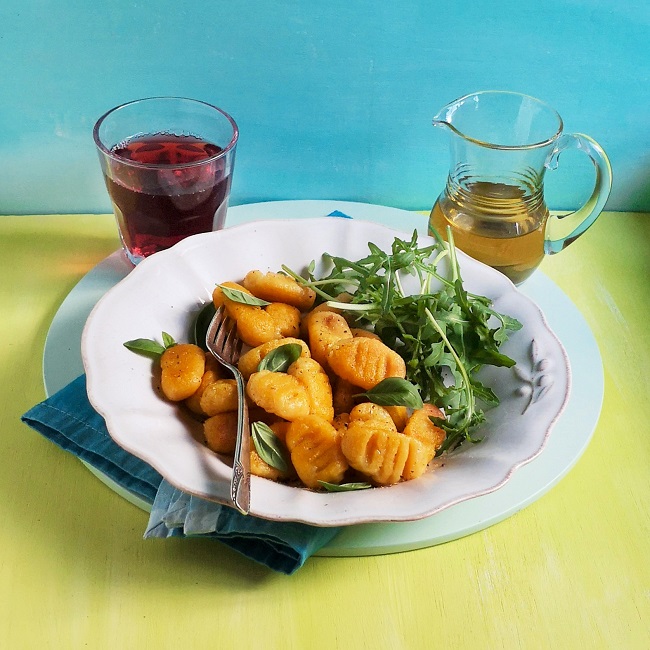
This week’s recipe combines the two varieties to make one of my favourite Italian meals, the floury potato dumplings known as gnocchi. Adding sweet potato in the mix gives the dumplings a light golden colour, and subtle sweet flavour.
Freshly cooked two potato gnocchi. Image: Kathryn Hawkins
Choose a dry textured white potato to mix with the sweet potato, and you’ll have the perfect textured gnocchi. Because my sweet potatoes were home-grown, they were quite small in comparison to ones I can buy. To make the perfect gnocchi, you cook the potato whole, in the skin, so you may need to cut up the potatoes if they are very large to make sure both varieties cook evenly and in a reasonable time.
Scrubbed and ready for cooking. Image: Kathryn Hawkins
Once the dumplings are cooked through, I like to pop them in a heated pan with some melted dairy-free margarine and olive oil, and stir fry them for a few minutes to crisp up the outsides. The more traditional way of serving gnocchi is simply freshly boiled, seasoned, and then accompanied with the dressing of your choice – I like to dress freshly cooked gnocchi with extra virgin olive oil, some fresh basil and wild rocket leaves. I hope you enjoy the recipe.
Ingredients
Serves: 3 to 4
450g same-size sweet and white potatoes, scrubbed
Approx. 100g gluten-free plain flour blend (I use Dove’s Farm)
Salt
25ml good quality olive oil
Put the whole potatoes, unpeeled, in a saucepan and cover with water. Bring to the boil and cook until tender – mine took about 15 minutes. Drain well, and leave to cool for about 10 minutes until just cool enough to handle, then slip off the skins.
For perfectly smooth gnocchi, process the cooked potatoes by pushing through a ricer or wide meshed metal sieve, directly on to the work top, then work in sufficient flour, along with ½ tsp salt and the olive oil to make a smooth, firm dough.
Cooking and ricing potatoes for gnocchi. Images: Kathryn Hawkins
Leave the dough to rest for 15 minutes on the work top, then divide into 4 pieces. Roll each piece into long rolls about 2cm thick, and cut each roll into 2cm wide chunks. You should be able to make about 50 pieces in total.
To achieve the distinctive shape of the dumplings, roll the potato pieces into a balls and gently press your finger into the centre of each to make an indent, then roll onto the prongs of a fork to make the pattern. Spread out the prepared gnocchi on a clean floured tea-towel.
Shaping gnocchi. Images: Kathryn Hawkins
To cook, bring a large pan of lightly salted water to the boil and cook the dumplings gently, in 2 batches, for 2-3 minutes until they float to the surface, then remove from the saucepan using a slotted spoon and place them in a warm serving dish. Cover and keep warm while you prepare the remaining gnocchi in the same way. Serve immediately with your favourite accompaniment. Buon Appetito!
Freshly cooked gnocchi with fresh basil, black pepper and wild rocket. Image: Kathryn Hawkins
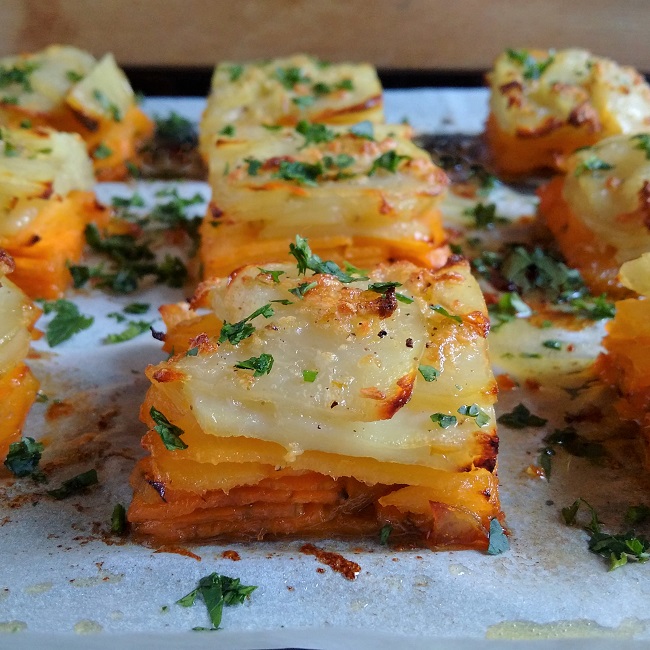
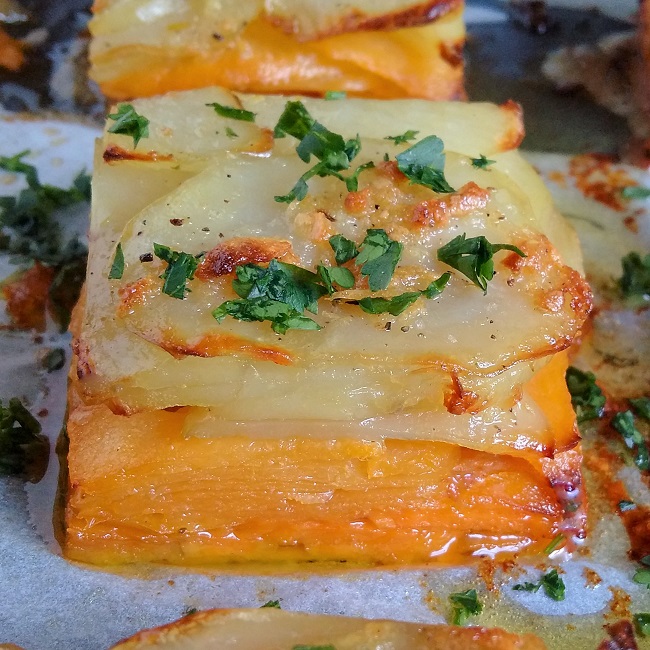
I like all root vegetables, but sadly I struggle to grow anything other than potatoes. Fortunately, I am able to buy a good variety from local farm shops and this feels like the next best thing to growing them myself. This week’s recipe can be made with any root you have to hand. The cooking method bakes the different vegetable layers to a melting-tenderness and is a perfect choice if you want a vegetable dish suitable for preparing ahead. Once the basic layering and baking is done, the cooked vegetables will sit quite happily in the fridge for a couple of days before baking again to serve. You can scale the recipe up easily if you’re feeding a crowd and mix and match the vegetables you use.
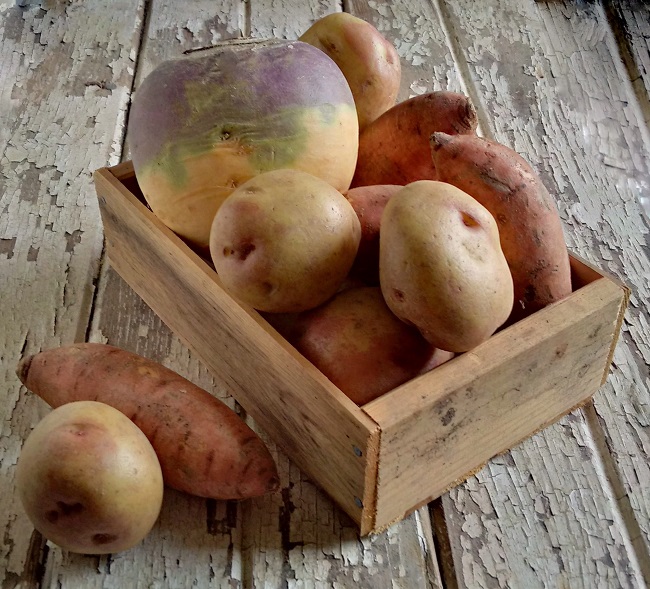
Turnip, sweet potatoes and King Edward potatoes ready for preparation. Image: Kathryn Hawkins
My version makes an 18cm square layer which cuts neatly into 9 portions and uses sweet potatoes, turnip (or swede, depending on where you come from) and potatoes, but carrots, parsnips and celeriac work fine as well, and you can also use just 1kg of your favourite root, if you prefer. The most important things to remember are to slice the vegetables thinly and evenly (preferably use a food processor or mandolin) and make sure you cook the vegetables until completely tender during the first baking – test with a skewer to be completely sure.
400g main crop potatoes such as King Edward or Maris Piper
75ml vegetable stock
3 tbsp. olive oil
40g dairy-free margarine (or butter if you eat it)
1 large clove garlic, peeled and crushed
Salt and freshly ground black pepper
Freshly chopped parsley
Preheat the oven to 180°C (160°C fan oven, gas 4). Grease and line a straight-sided, deep 18cm square cake tin with baking parchment.
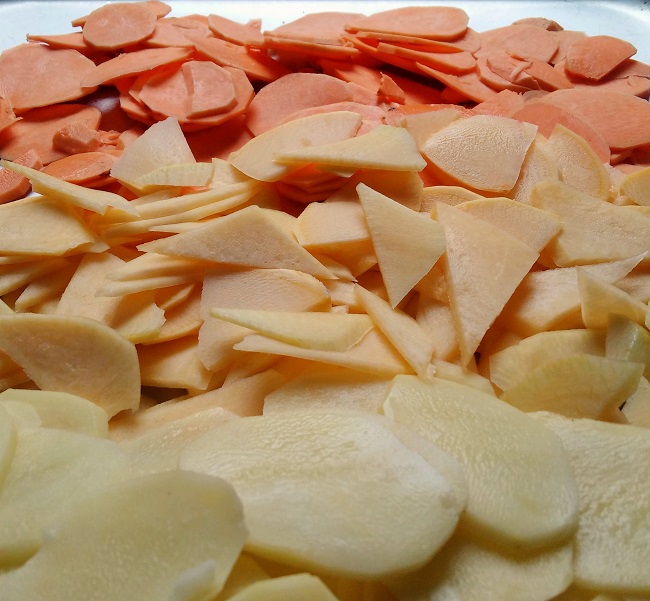
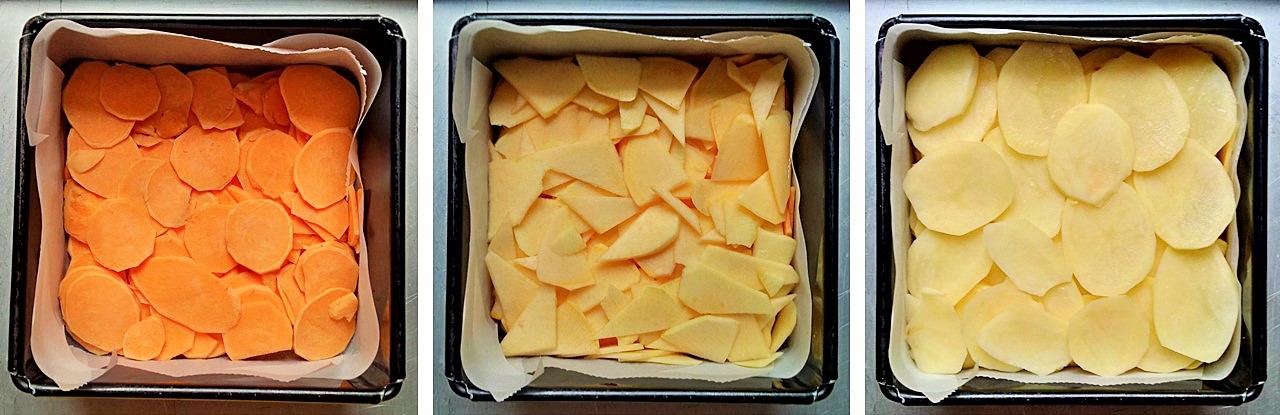
Peel and thinly slice all the vegetables – I use a food processor for this. Either layer in the tin individually or mix all the vegetables together and arrange evenly in the tin.
Layering the root vegetables in individual layers. Images: Kathryn Hawkins
Pour over the stock and drizzle with the oil. Cover the top of the tin with foil and bake for at least an hour until completely tender. Remove the foil and leave to cool completely.
Cut a square of firm cardboard the same size as the inside of the tin and wrap in a layer of foil. Place a sheet of baking parchment over the vegetables and sit the foil-wrapped board on top. Weigh down the vegetables evenly using 3 or 4 same-weight cans or jars and chill overnight or for up to 2 days before serving.
Pressing the vegetable layer. Images: Kathryn Hawkins
When ready to cook, preheat the oven to 200°C (180°C fan oven, gas 6). Remove the weights, foil board and baking parchment and carefully remove the pressed vegetable square from the tin.
Cut into 9 squares and arrange on a lined baking tray. Melt the margarine (or butter) and mix in the garlic and seasoning. Brush the mixture generously over the vegetable squares.
Ready for baking. Images: Kathryn Hawkins
Bake the squares for about 30 minutes until golden and hot. Serve immediately sprinkled with chopped parsley. A great accompaniment to any kind of roast.
Just baked root vegetable squares. Image: Kathryn Hawkins
Root vegetables: meltingly tender and packed full of flavour. Image: Kathryn Hawkins
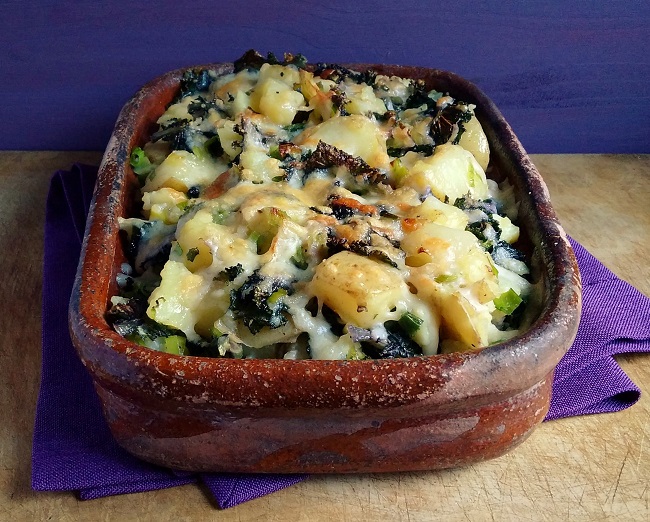
Great name for a recipe eh? What’s more, I haven’t made it up. This is a Scottish classic, and I’ve chosen to post it now for 2 reasons. It’s been very cold here this week and this is fabulous comfort food, and also with the festive season nearly upon us, it is an excellent recipe for using up leftovers. It uses 2 of my favourite vegetables, potatoes and kale (or cabbage).
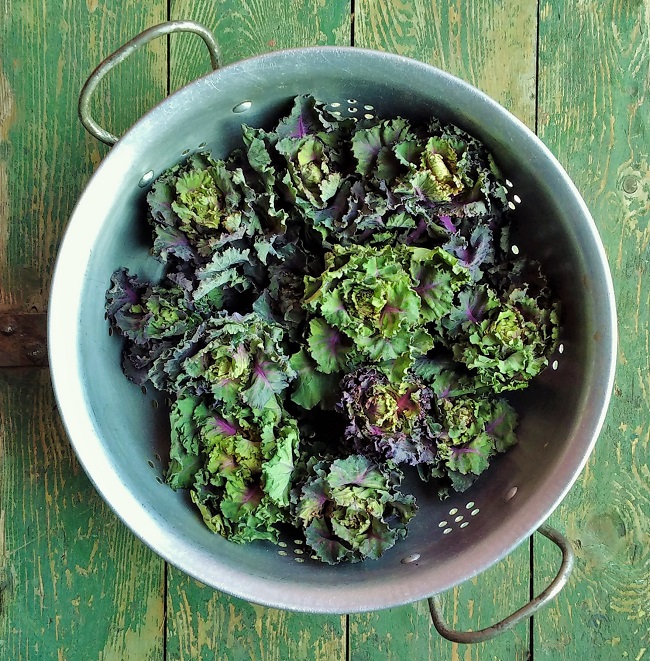
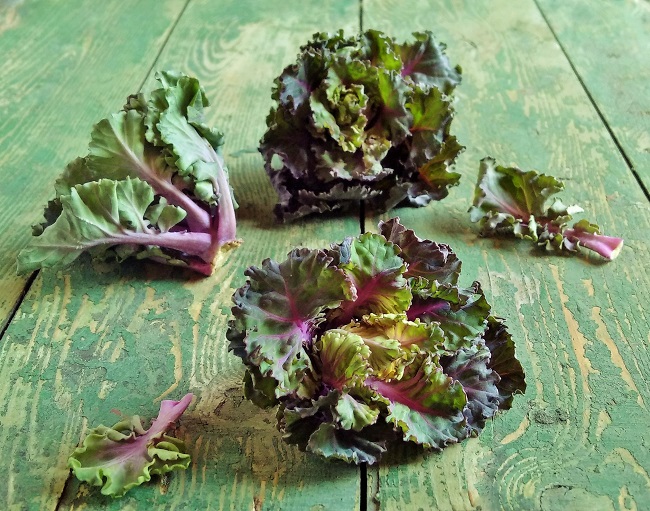
I love kale. So much flavour and texture, I think it out-strips cabbage and other greens in every way. Up until a couple of years ago, Cavelo Nero, Italian black kale, was my favourite variety, but then along came mini kale and my mind was changed. Very quick to cook, simple to prepare, with a milder, slightly sweet and nutty flavour, it looks very pretty too. The small leaves are also excellent raw in winter salads.
Mini kale. Image: Kathryn Hawkins
Heads of mini kale, up close. Image: Kathryn Hawkins
So on with the recipe. Traditionally, this is a very simple combination of leftover cooked potatoes and cabbage fried with onion and then grilled with cheese on top. What’s not to like? The name, by the way, is believed to come from the combination of the “thumping” sound associated with mashing potato and the mixing together of the ingredients (a “rumble”). Here’s my version.
Serves: 3 to 4 as a side dish
Ingredients
150g mini kale, kale, cabbage or other greens (if you have leftovers, you’re halfway there with the recipe already)
500g cooked potatoes (I had some boiled small potatoes with skins on to use up)
25g butter or dairy-free margarine
1 tbsp. vegetable oil
1 leek, trimmed and shredded (or use thinly sliced onion if you prefer)
Salt and freshly ground black pepper
50g grated Scottish Cheddar or dairy-free/vegan grated cheese
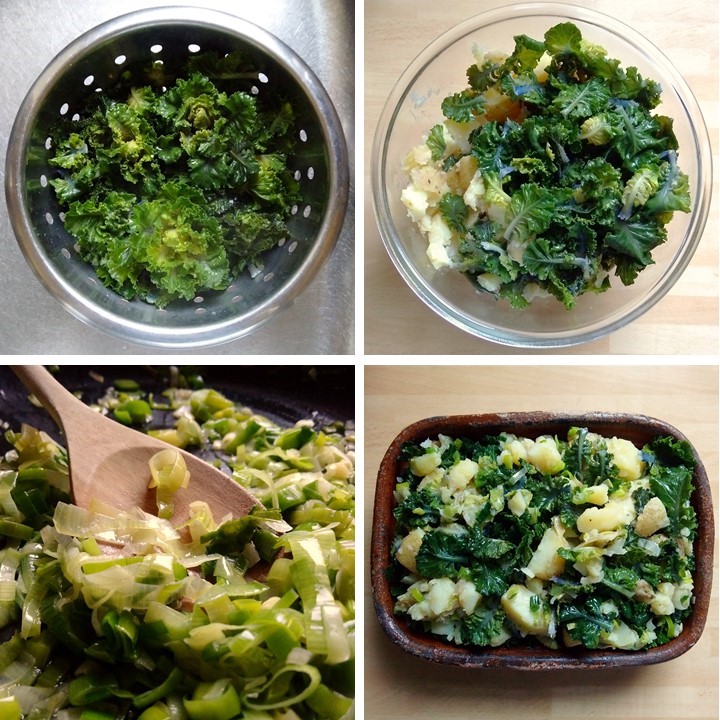
If you are starting from scratch, prepare the greens and cook them in lightly salted water for 3-5 minutes until just tender. Drain well.
Put the potatoes in a bowl and mash them to crush slightly.
In a large frying pan, melt the butter with the oil and gently fry the leek for 3-4 minutes until softened (if you’re using onion, cook it gently for longer, until tender).
Stir in the potatoes and greens, and stir fry the vegetables gently together for 5-6 minutes until thoroughly heated. Season well and transfer to a heatproof dish.
Basic preparation of Rumbledethumps. Image: Kathryn Hawkins
Preheat the grill to medium/hot. Sprinkle the vegetables with grated cheese and grill for about 5 minutes until golden and bubbling. Serve immediately.
Comfort with every spoonful. Image: Kathryn Hawkins
The best things in life are often the simplest. These wise words certainly apply to my recipe this week. There aren’t many dishes more straightforward than a tattie scone. Just 3 ingredients, plus some oil to cook them in, and that’s it.
The tattie (potato) scone is synonymous with Scotland. Just about every self-respecting baker makes his or her own, and no supermarket bakery aisle is complete without them. The scones are a good way of using up leftover boiled potato which is mashed and bound with wheat flour, but gluten-free works fine. Tattie scones are usually quite thin, but I make mine a bit thicker (about 1cm) as I find the mixture easier to work with. Eat them warm as part of a savoury meal (often served as part of a hearty breakfast) or as a snack spread with butter and jam. The scones make a great alternative to bread as an accompaniment to a soup or stew as they are perfect for mopping up gravy or a sauce.
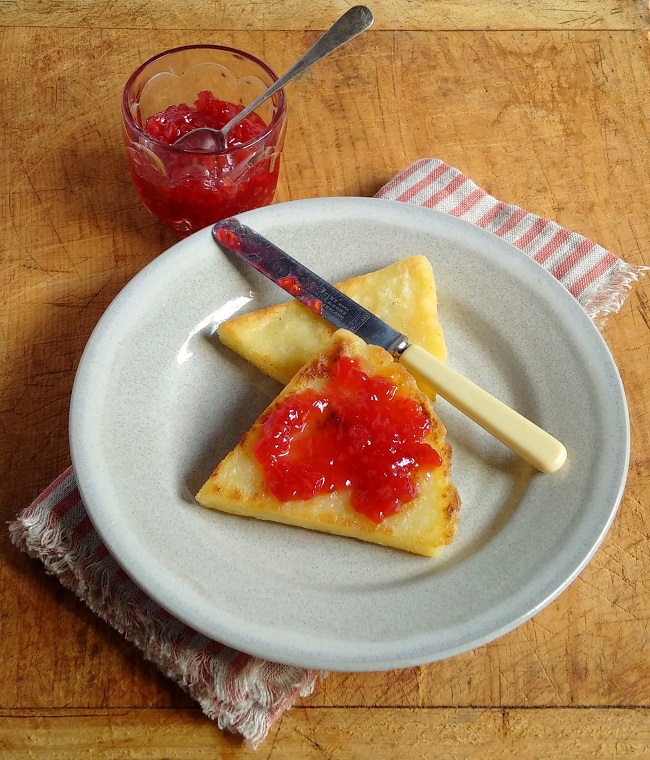
A tea-time favourite: tattie scones and jam. Image: Kathryn Hawkins
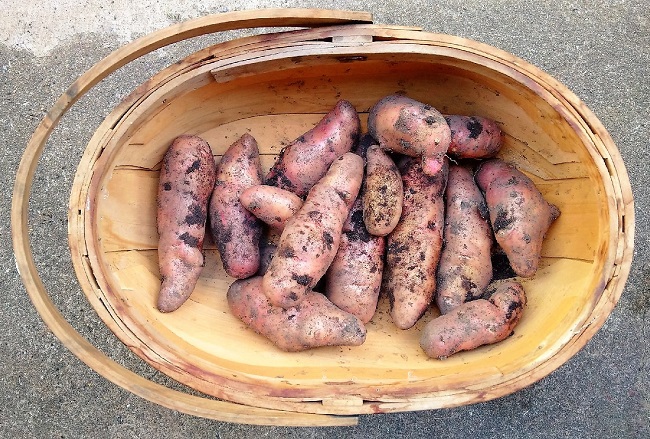
I dug up the last of my home-grown potatoes this week, and decided that there was no better way to enjoy them, than by making up a batch of my own scones. I’ve been growing the same main crop variety (Pink Fir Apple) for a few years now, and haven’t found any other to rival it in texture or flavour. The potatoes are pink-skinned and can be very knobbly indeed. The flesh is creamy-yellow in colour, sometimes flecked or ringed with pink, and when cooked, it becomes dry and floury in texture. The flavour is slightly sweet and earthy. Pink Fir Apples potatoes are perfect for crushed or mashed potato. and also roast well. They can be cooked and eaten peeled or unpeeled.
My last harvest of Pink Fir Apple potatoes. Image: Kathryn Hawkins
Here’s my recipe.
Makes: 6
Ingredients
400g main crop potatoes
1 tsp salt
40g gluten-free self-raising flour blend (such as Dove’s Farm)
Vegetable oil for frying
Peel the potatoes thinly, cut into small pieces, and place in a saucepan. Cover with water and add half the salt. Bring to the boil and cook for 8-10 minutes or until completely tender. Drain well through a colander or strainer, and leave to air-dry for 10 minutes.
Return the potatoes to the saucepan and mash finely with a potato masher. If you have a ricer, use this to achieve a super-smooth texture.
While the mash is still fairly hot, add the remaining salt and sift the flour on top. Gently work the ingredients together to make a pliable dough.
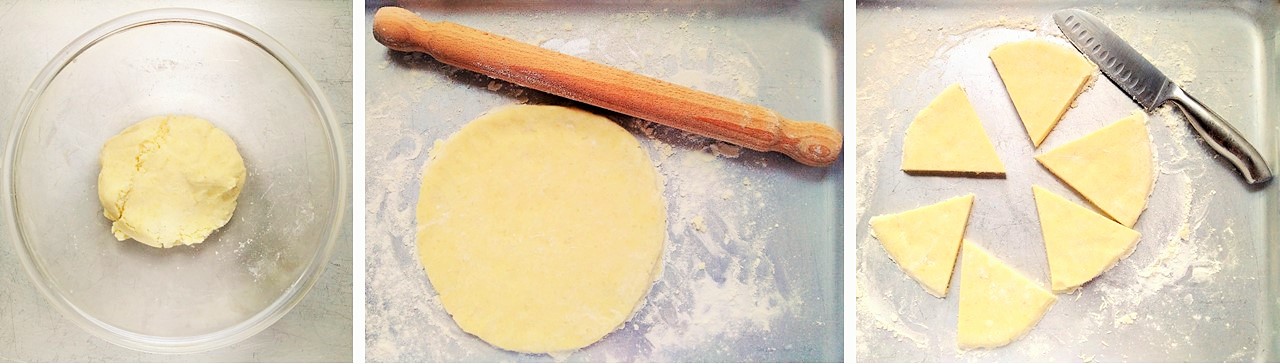
Ricing the potatoes. Images: Kathryn Hawkins
Making and rolling the potato dough. Images: Kathryn Hawkins
Turn the dough on to a lightly floured work surface and roll to form a round about 18cm diameter – roll to 20cm for slightly thinner scones. Cut into 6 triangular wedges.
Brush a large frying pan or flat griddle pan generously with oil and heat until hot. Cook the scones for 2-3 minutes on each side until lightly golden. Drain and serve warm. You can reheat the scones successfully, by either popping them in the frying pan again or under the grill to lightly toast them.
Straight out of the pan and spread with my favourite topping: homemade raspberry jam. Image: Kathryn Hawkins