Welcome to my blog all about the things I love to grow and cook. You'll find a collection of seasonal gluten-free, dairy-free and vegan-friendly recipe posts, as well as a round up of my gardening throughout the year. I wish you good reading, happy cooking and perfect planting!
Zesty and crunchy, microwave flapjacks. Image: Kathryn Hawkins
Hello again. I hope you are keeping well. Winter is upon us here in central Scotland with a sharp decline in the temperature and a light dusting of snow on the hills. This gives me the perfect excuse to do some comfort baking:)
Just 5 basic ingredients. Image: Kathryn Hawkins
I’ve been using my microwave oven a lot more this year in an effort to reduce energy consumption and have been experimenting with some of my traditional baking recipes which I would usually cook in the big electric oven.
Whilst you won’t get the same caramelisation and rich golden colour by cooking flapjacks in a microwave, the texture is chewy and the flavour is pretty much the same. You only need 5 ingredients to make this recipe, plus some icing sugar if you want to add more lemony flavour with a drizzle icing. The timings are for a 900w microwave oven so you may need to adjust them if your machine has a different output. Here’s what to do……
Makes: 12 portions
Ingredients
115g plant based butter
115g golden syrup
175g gluten-free oats (I used “jumbo” oats but porridge oats will work fine)
30-40g poppyseeds
Finely grated rind and juice 1 lemon
45g icing sugar
Yellow cake sprinkles if liked
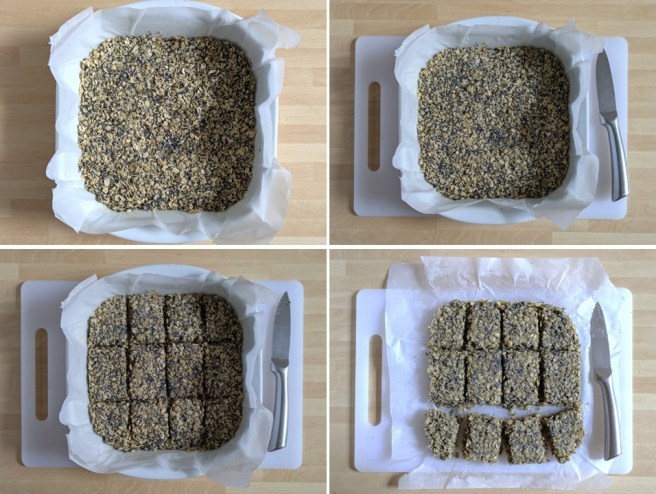
1. Line a 20cm square (internal measurement) microwave-proof dish with baking parchment. Put the butter and syrup in a microwave-proof bowl, cover and cook on High for about 2 minutes, stirring occasionally, until melted.
2. Stir in the oats, poppyseeds to taste and lemon rind along with all but 1½ teaspoons lemon juice and mix well.
Making flapjacks in the microwave. Images: Kathryn Hawkins
3. Press into the prepared dish and flatten the surface with the back of a spoon. Cook in the microwave on Medium for 7 minutes. Mark into 12 pieces and leave to cool in the dish.
4. When completely cold, transfer the flapjack to a board and cut the pieces all the way through.
Cooking, cooling and slicing flapjacks. Images: Kathryn Hawkins
5. Mix the icing sugar and reserved lemon juice together and drizzle over each piece. Scatter with sprinkles if liked.
Finishing the flapjacks with lemon icing. Images: Kathryn Hawkins
Lemon and poppyseed flapjack up close. Image: Kathryn Hawkins
Store in an air tight container or freeze – for best results store or freeze uniced.
I hope to have something festive for you next month. In the meantime, enjoy the run up to Christmas. Take care and thanks for stopping by:)
My top 4 natural calcium boosters. Images: Kathryn Hawkins
Hello again. I hope you are keeping well and enjoying the Summer season. My post is a little different this month but hopefully helpful to anyone whose diet contains no gluten, dairy or animal products.
I had a bit of a dietary come-uppance a few weeks ago. Having a background in food and nutrition, I know what I should be eating to keep me fit and healthy. It happened when I switched from my regular plant-milk to an organic version. After a few days I Happened to notice that the organic milk was not fortified. This raised my concern as fortified plant milk was one of the main sources of calcium in my diet. Once I had reviewed the other foods I regularly consume, I realised that my daily intake of this vital mineral was coming up short.
As part of my work as a recipe writer, I am used to working out the calories and other nutritional content of my recipes, and I have some comprehensive nutritional books and tables to help me do this. I studied the calcium content for lots of foods and worked out some useful dietary calcium boosters which are easy to include in my meals on a daily basis.
Poppy seeds
1580mg calcium/100g
Sesame seeds
670mg calcium/100g
Chia seeds
631mg calcium/100g
Flax seeds
255mg calcium/100g
Whole almonds
269mg calcium/100g
Brazil nuts
170mg calcium/100g
Source: McCance and Widdowson’s: The Composition of Foods
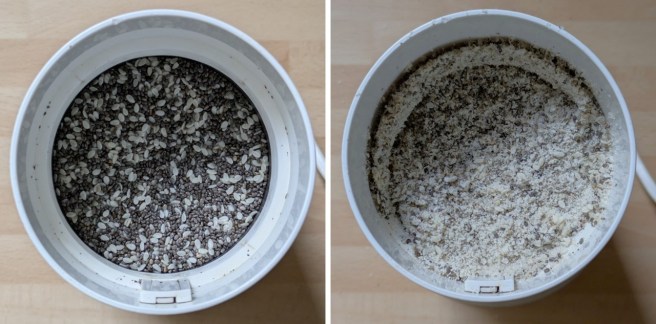
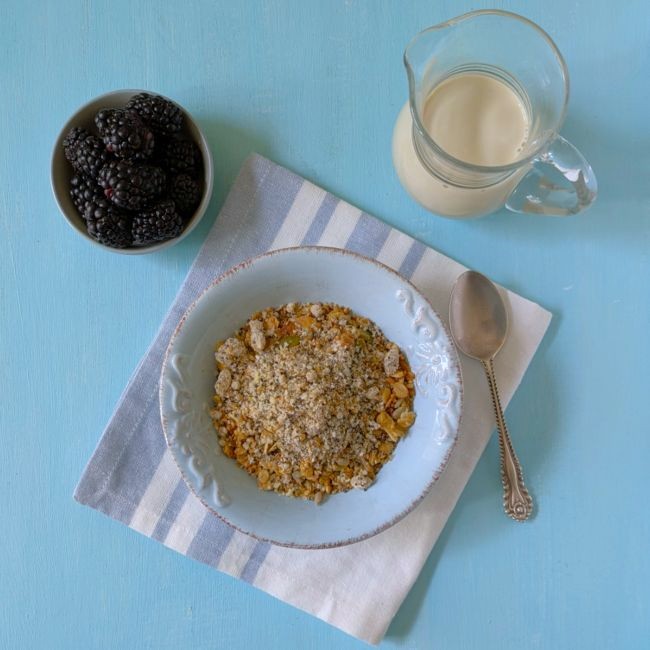
As you can see from the chart above, poppy seeds are by far the super-hero of the calcium world but like other small seeds, not necessarily the easiest of foods to eat, so I ground them up in my coffee grinder to make a fine “flour”.
Grinding poppy seeds. Images: Kathryn Hawkins
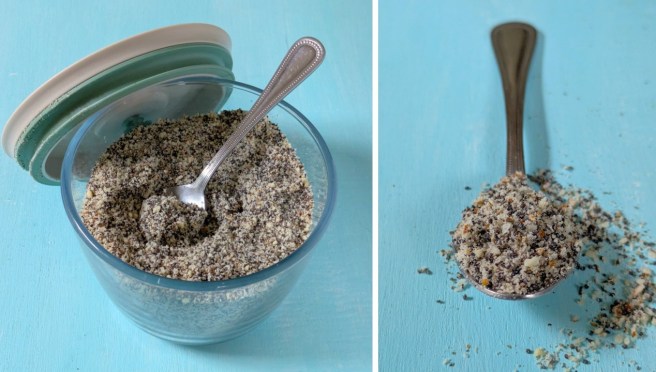
Combined with ground sesame seeds, chia seeds and unblanched almonds the resulting “flour” makes a perfect sprinkle over breakfast cereals and salads and as a nutrient-rich addition to smoothies and baking mixes.
A perfect calcium-rich sprinkle. Images: Kathryn Hawkins
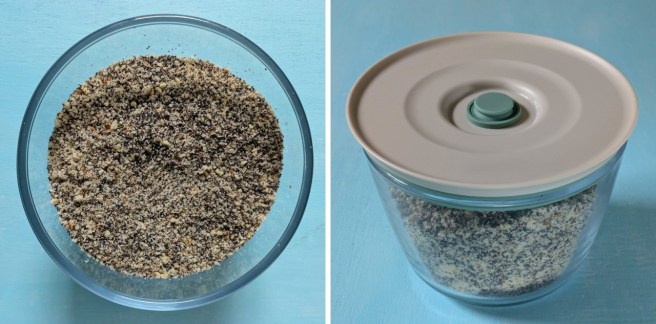
The blend is made up with 50g poppy seeds, 25g each sesame and chia seeds plus 75g unblanched almonds to make 11-12 servings. One heaped tablespoon or 15g of this mix will give you a very useful 115mg calcium (81 calories). Don’t be tempted to make up too much in one go, it is better to consume the mix as fresh as possible; keep it in an airtight container, in the fridge for maximum freshness.
Store in an airtight container, in the fridge. Images: Kathryn Hawkins
I have gone back to fortified plant milk (around 120mg calcium/100ml) for the time being, so with the smaller amounts of calcium in my breakfast cereal and some fresh berries (blackberries contain a useful 33mg calcium/100g) my breakfast now gives me over one third of my daily recommended intake (700mg) 🙂
Calcium-rich breakfast. Image: Kathryn Hawkins
I’ll be making up some more calcium-boosting recipes in the future so watch this space if your interested. Thanks for stopping by and see you again next time.
New season asparagus on sesame toast. Image: Kathryn Hawkins
Hello again. It’s that time of year again when I welcome the arrival of the British asparagus season. From around the middle of April to the end of May/beginning of June, I have just a few weeks to feast on my favourite green vegetable.
New season British asparagus. Image: Kathryn Hawkins
I have suggested a few accompaniments to this delicious vegetable over the years. I like to keep it simple and enjoy the stems for their own unique flavour, and this year’s offering is no exception. Delicious crispy fried toasts dipped in a sesame batter and served with a sesame flavoured mayo dressing.
Tip top British asparagus. Image: Kathryn Hawkins
When the asparagus season is over, make and cut the toasts into triangles and serve as a crunchy and very moreish snack – they really are very tasty.
Crisp and crunchy sesame triangles. Image: Kathryn Hawkins
Makes: 4 servings of asparagus on toast, or 16 sesame triangles
Ingredients
2tbsp chickpea canning water (aquafaba)
20g gram (chickpea) flour
20g ground flaxseeds
Pinch of salt
4tbsp plant milk
4 slices free-from bread
40g toasted sesame seeds
Vegetable oil for shallow frying
6tbsp vegan mayonnaise
1tbsp Teriyaki marinade
2tsp sesame oil
Chopped spring onion to serve
300g new season fine asparagus spears
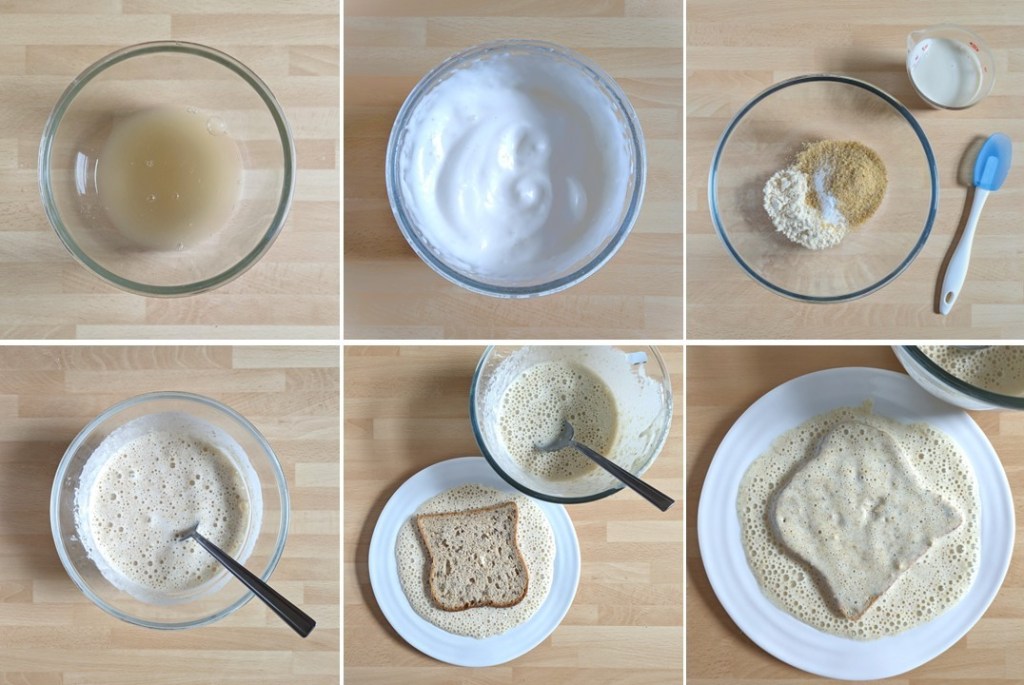
1. Put the chickpea water in a bowl and whisk with an electric mixer until very thick and foamy.
2. Mix the flours and salt in a bowl. Make a well in the centre and add the milk. Gradually mix everything together then fold in the chickpea foam.
3. Put some of the batter on a plate or in a shallow dish. Working on one piece of bread at a time, dip the bread on both sides and sprinkle the top with a few seeds.
Making the sesame toast batter. Images: Kathryn Hawkins
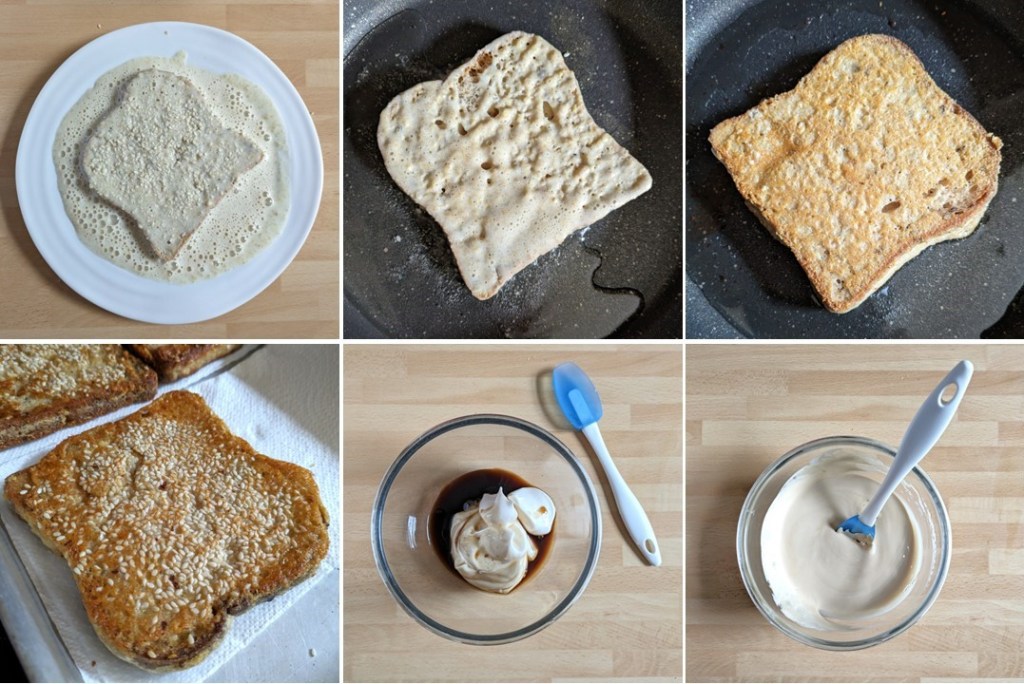
4. Pour sufficient vegetable oil to just cover the base of a large frying pan and heat until hot. Cook the battered bread over a medium to low heat for about 2-3 minutes on each side until crisp and golden. Drain and keep warm whilst coating and cooking the other 3 slices.
Cooking the toasts and making the dip. Images: Kathryn Hawkins
5. For the dip, mix the mayonnaise with the marinade and 1tsp sesame oil. Cut the toasts into triangles, sprinkle with spring onion and serve warm with the mayo to dip.
Sesame toasts with freshly chopped spring onion. Image: Kathryn Hawkins
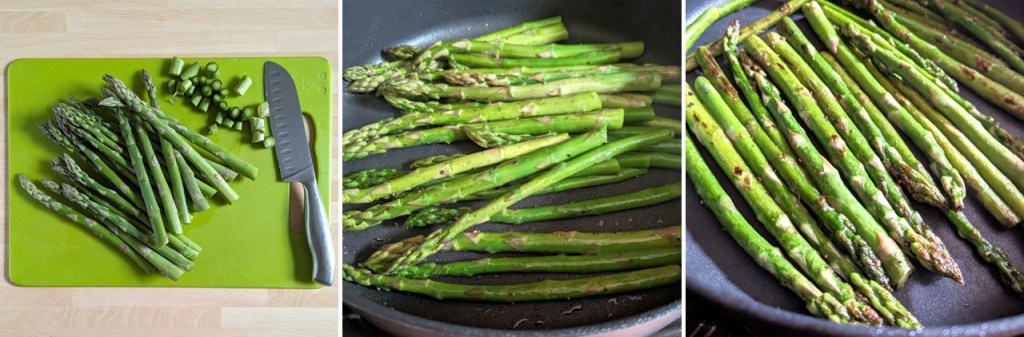
To serve topped with asparagus, trim a little from the ends of the asparagus stems. Heat a little vegetable oil in a large frying pan until hot and stir fry the stems for about 5 minutes until just tender and lightly browned.
Pan-frying new season asparagus. Images: Kathryn Hawkins
Turn off the heat, season with a little salt and drizzle over a little sesame oil. Stand for 5 minutes before serving on sesame toast with a drizzle of the sesame mayo.
Dressed and ready for eating. Image: Kathryn Hawkins
Thanks for stopping by. I hope to see you again in a couple of weeks. Until then, take care and enjoy the season 🙂
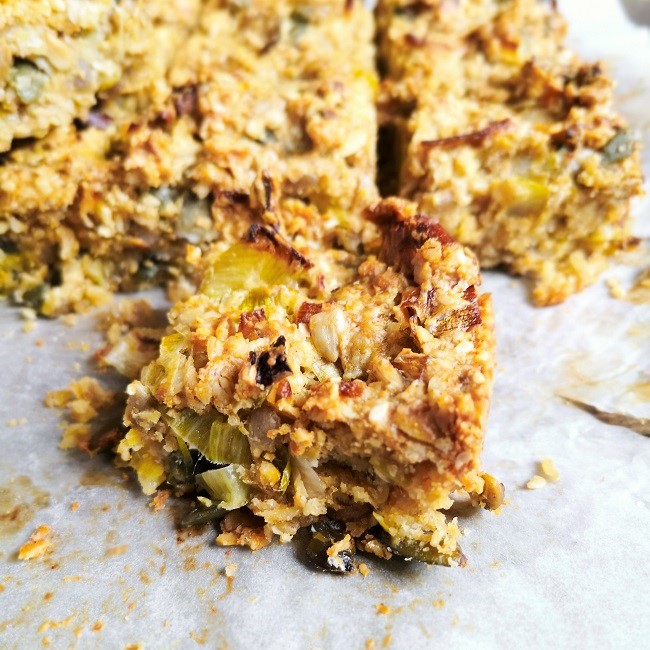
Oaty, seedy and packed full of flavour. Image: Kathryn Hawkins
Welcome to my first post of 2021. I hope you are all keeping well. Like so many, I have been doing quite a lot of baking over the past few months. I find it comforting and relaxing, as well as being rewarded with something delicious to eat at the end. This week I would like to share a favourite savoury bake with you. It’s my sugar-free version of a flapjack recipe I posted a few months ago – you can find that original recipe by clicking here. This version is also packed full of seeds and oats; it is wholesome as well as incredibly tasty. Good as a snack on its own or as an accompaniment to a bowl of soup.
Crumbly and delicious. Image: Kathryn Hawkins
In a traditional flapjack recipe, the sugar and syrup help hold the mixture together by caramelising during baking; when the mixture cools the consistency of the bake becomes firm as the sugars set. My savoury version is much crumblier underneath but has a nice crunchy top. I bound the ingredients together using nut butter (I used peanut, but any nut butter will work) and flax egg.
Making flax egg. Images: Kathryn Hawkins
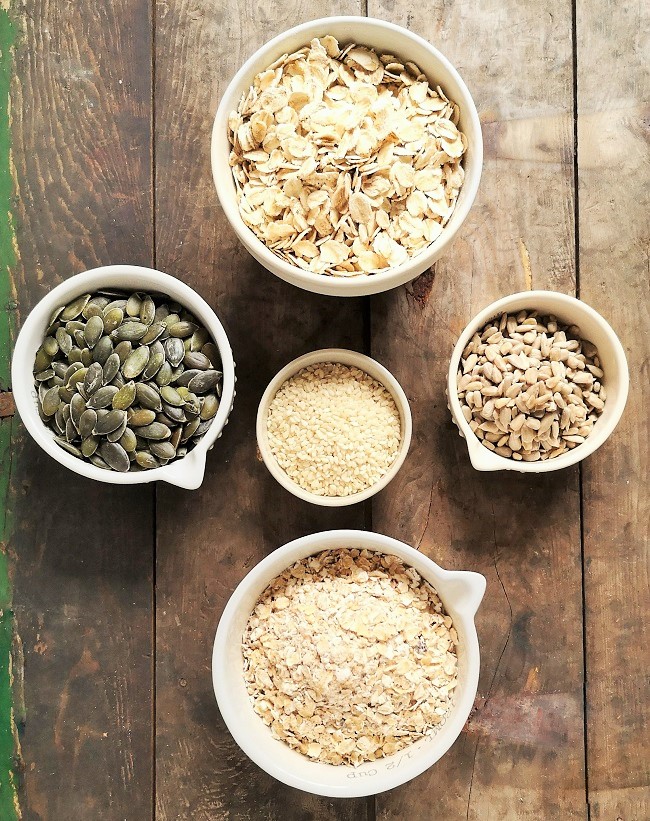
The combination of seeds and oats you use is up to personal taste. I used pumpkin, sunflower and sesame seeds, along with jumbo oats and regular porridge oats. Other combinations including chopped nuts and oatmeal will also work. Toast seeds and nuts lightly before adding to the mixture for extra flavour.
Oats and seeds. Image: Kathryn Hawkins
And finally, the extra flavourings. You could add vegan or dairy-based grated cheese to the recipe to achieve a tangy flavour, but I opted for cooked leek (or use spring onion or softly cooked onion or shallot) and yeast flakes which give the bake that extra “umami” flavour. If you don’t have yeast flakes, you could use some yeast extract to taste. For a sweet and savoury bake, replace the leek with grated carrot and add a handful of sultanas or raisins.
Yeast flakes. Image: Kathryn Hawkins
On with the recipe. There’s a little bit of prep to do before you put the mixture together ready for baking, but once that’s done, it’s all very straightforward.
Makes: 16 squares
Ingredients
125g mixed seeds
150g dairy-free margarine
75g nut butter
1 large leek, trimmed and shredded
2 tbsp ground flax seeds
100g jumbo oats
100g porridge oats
50g gluten-free plain flour
5 tbsp yeast flakes
1 tsp salt (if you use yeast extract, you probably won’t need to add salt)
Toasted seeds to sprinkle, optional
1. Heat a small frying pan until hot. Add the seeds and cook, stirring, for 1-2 minutes until starting to toast or lightly brown. Remove from the heat, turn on to a place and leave to cool. Put 125g margarine in a saucepan with the nut butter and heat gently, stirring, until melted and smooth. Leave to cool.
2. Melt the remaining margarine in a frying pan and and gently cook the leek, stirring, for 3-4 minutes until softened but not browned. Drain and leave to cool.
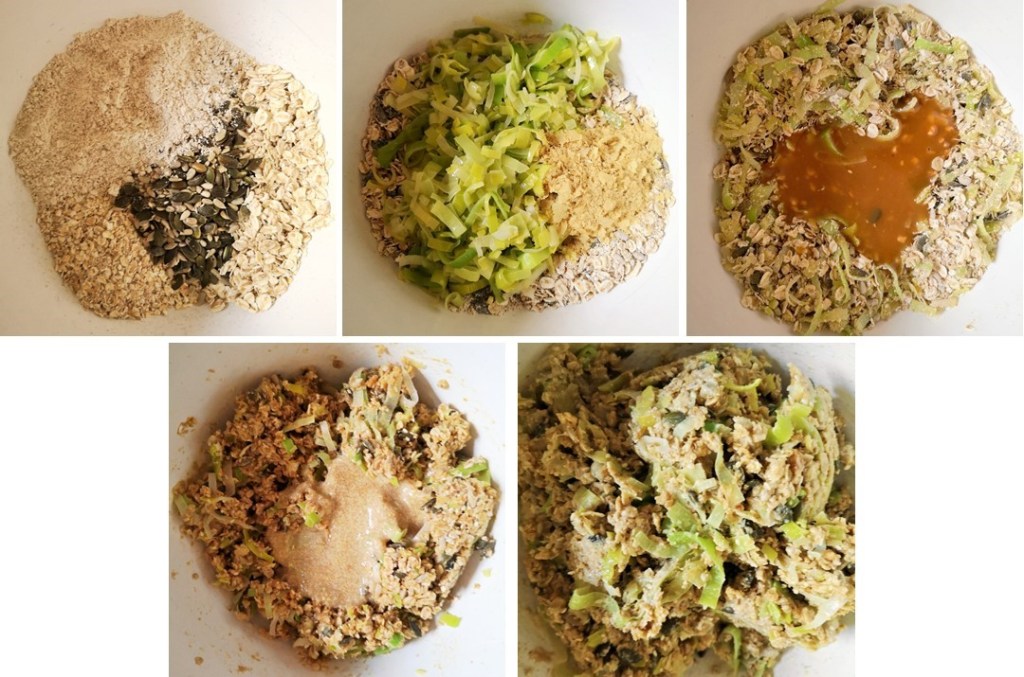
Getting organised before baking. Images: Kathryn Hawkins
3. Preheat the oven to 200°C, 180°C fan oven, gas 6. Line a 21cm square cake tin with baking parchment. Mix the flax seeds with 90ml cold water and set aside to thicken for 5 minutes.
4. Put the oats, flour, salt and seeds in a bowl. Add the leek and yeast flakes and mix together. Make a well in the centre and add the melted nut butter mixture. Mix everything together then add the flax egg and stir well until thoroughly combined.
Assembling the oat and seed mixture. Images: Kathryn Hawkins
5. Spread evenly in the prepared tin and smooth the top. Stand the tin on a baking tray and cook for about 1 hour until golden and crunchy – cover the top with foil if the mixture begins to brown too quickly. Leave to cool for 30 minutes, then remove from the tin and cool on a wire rack.
Before and after baking. Images: Kathryn Hawkins
6. When cool, transfer to a board, and cut into 16 squares using a sharp knife. Store in a cool place, in a sealed container for 4-5 days, or freeze. For extra crunch, sprinkle with toasted seeds to serve.
Out of the tin and cut into squares. Image: Kathryn Hawkins
Savoury oat squares with seeds and leeks. Image: Kathryn Hawkins
I hope you enjoy the recipe. I’ll be back posting in a couple of weeks or so, until then, keep well and stay safe 🙂
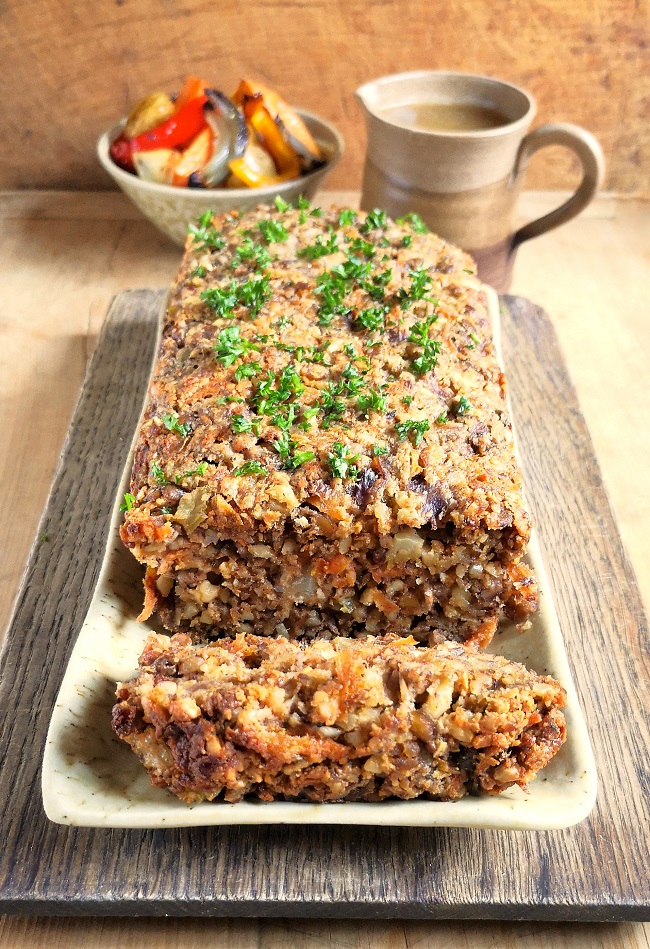
If you’re planning a meat-free Christmas menu for yourself or guests this year then my recipe this week maybe one to consider. Time to post my favourite nut loaf recipe. It is very easy to assemble, can be made in advance, and freezes well. What’s more, you can use any combination of nuts and seeds you fancy – it’s the perfect recipe to use up any nuts or seeds that you have already opened. And above all else, it’s very tasty 🙂
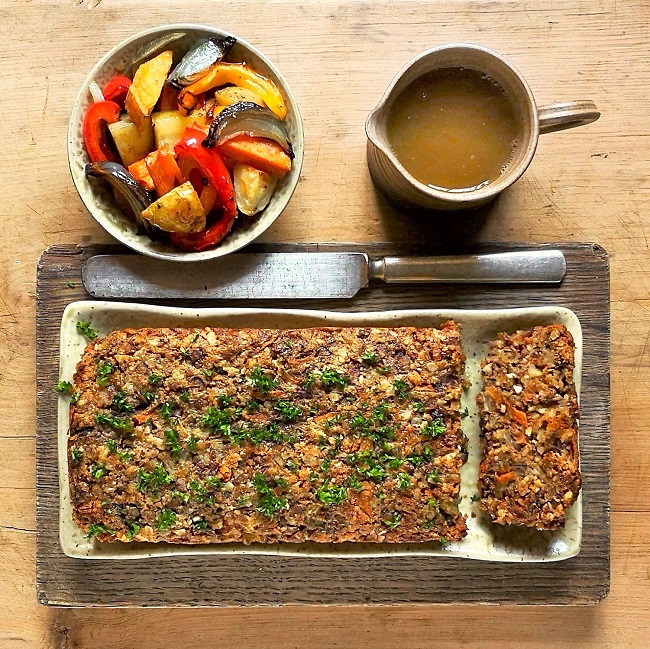
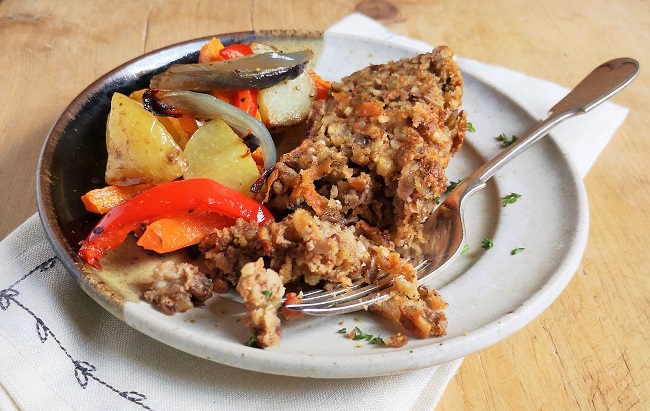
Serve with roast veg and veggie gravy. Image: Kathryn Hawkins
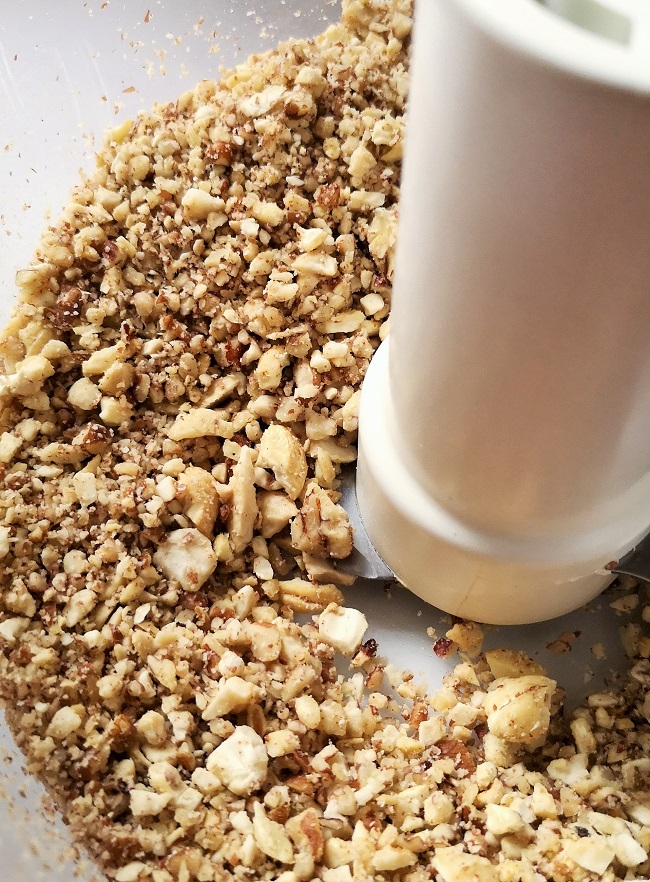
I prefer to use roasted peanuts and cashews if I have them, but pecans and almonds are favourites too. The mixture is bound together with lentils, flax seed “egg” and nut butter – choose whichever cooked pulses or nut butter you fancy to suit your taste. If you fancy some extra crunch, toast a handful of your favourite seeds and add to the mixture when you bind everything together.
Ground peanuts and cashews. Image: Kathryn Hawkins
When grinding or chopping the nuts, I like to keep some bigger pieces amongst the finer grinds so that the loaf has some texture but you may prefer something smoother.
On with the recipe, and then on with the festive countdown.
Serves: 4 to 6
Ingredients
2 tbsp. olive oil + extra to drizzle
1 stick celery, trimmed and chopped
1 small onion, peeled and chopped
2 garlic cloves, peeled and chopped
115g grated carrot
115g cooked green lentils (cooked and mashed cannellini, butter or haricot beans work well too)
200g roasted peanuts and cashews (or your favourite nut and seed combination)
40g gluten-free sage and onion stuffing mix
1 tsp dried sage
1 tsp salt
125g whole nut peanut or other nut butter, softened
1 tbsp. flax seeds
Chopped parsley to garnish
Heat the oil in a small frying pan and add the celery, onion and garlic, mix well, cover, and cook gently for 10 minutes until softened. Cool for 20 minutes.
Preheat the oven to 200°C, 180°C fan oven, gas 6. Line a 1kg loaf tin with a paper liner or baking parchment. Put the remaining ingredients, except the flax seeds and parsley, in a bowl and stir in the softened mixture.
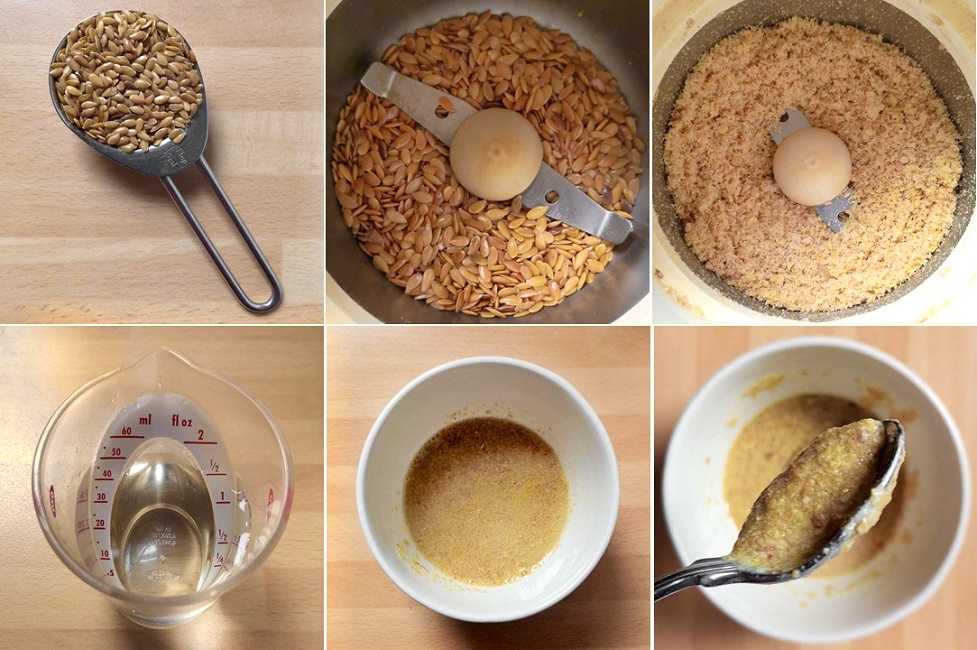
Now make the flax egg. Grind the flax seeds until powdery – I use a coffee grinder. Put in a small bowl and mix in 3 tbsp. water. Leave for about 5 minutes to thicken then stir into the nutty vegetable mixture to bind everything together.
Making flax “egg”. Images: Kathryn Hawkins
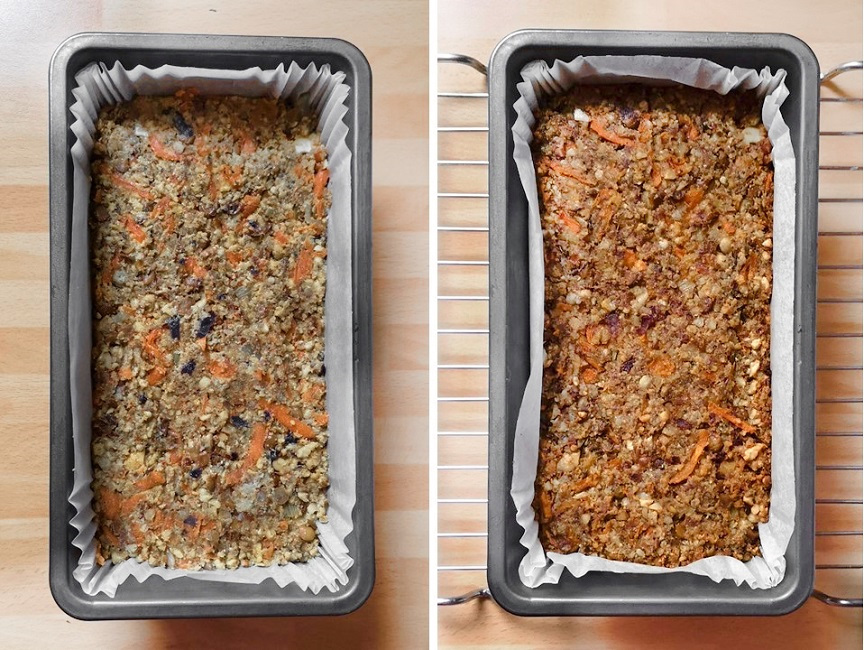
Spoon the loaf mixture into the prepared tin, smooth the top and drizzle with a little olive oil. Cover with foil and bake for 30 minutes, then remove the foil and bake for a further 25-30 minutes until lightly crusty on top.
Before and after baking. Images: Kathryn Hawkins
To serve, carefully remove the loaf from the tin. Discard the lining paper and transfer to a warmed serving plate or serving board. Sprinkle with parsley and serve immediately, sliced thickly and accompanied with roasted vegetables and vegetable gravy or a fresh tomato sauce.
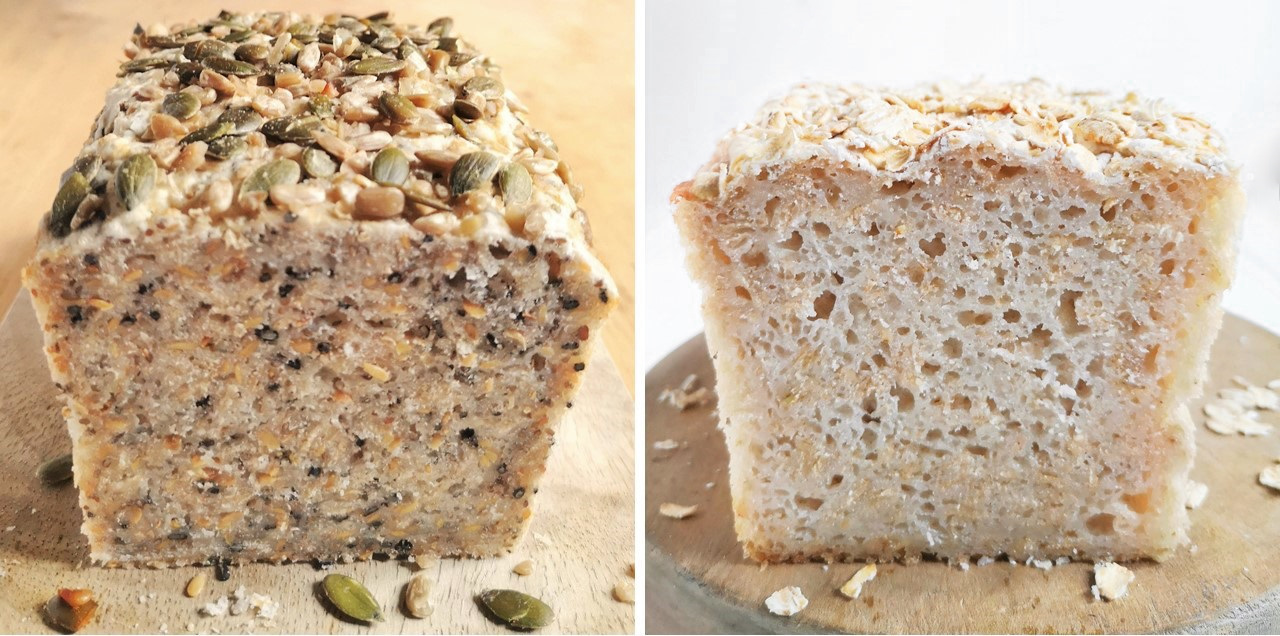
I’ve been trying to make a decent gluten-free loaf for some time. Whilst I still haven’t mastered the light and airy consistency of the ready-made loaves I sometimes buy, I am very pleased with the chewy texture and flavour of this loaf recipe. I combined starchy tapioca and rice flours with jumbo oats and a little xanthan gum which all go together to create a dense loaf with a springy bite that tastes good untoasted. The texture (not the flavour) reminds me of the dense German pumpernickel-style breads.
Gluten-free rice and tapioca flours; xanthan gum, and jumbo oats. Images: Kathryn Hawkins
Bread and jam. Image: Kathryn Hawkins
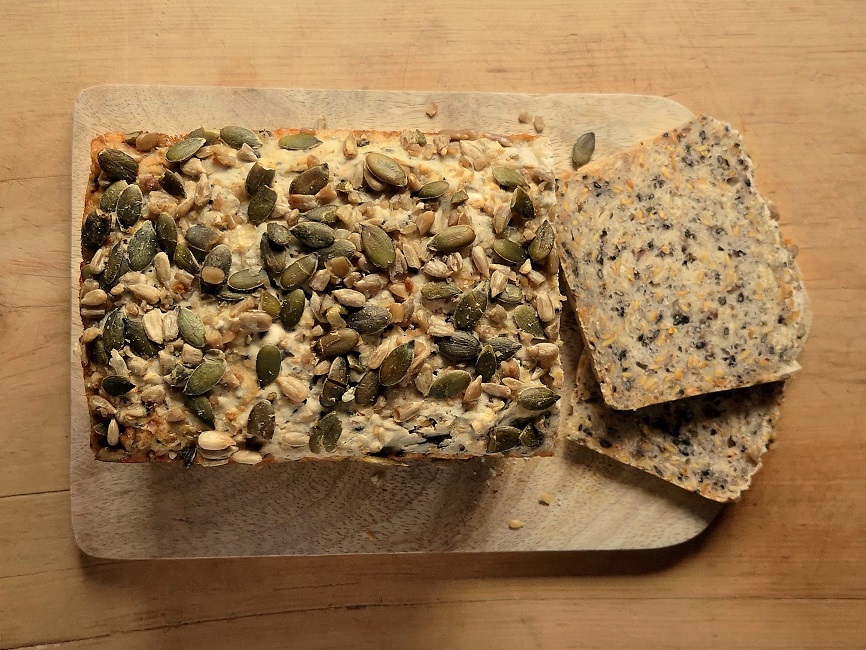
I made 2 variations of the same recipe, one with small seeds added – flax, black sesame and chia – and the other I kept plain and added a few more oats to the mixture to increase the fibre content. The method and ingredients are the same for both loaves.
Small seeded and plain white gluten-free loaves. Images: Kathryn Hawkins
Because there is no gluten to develop, bread-making the gluten-free way is a doddle. No kneading, just a quick mix and then you can get on with your life for a couple of hours or so, until the yeast has done the rest of the work for you. Here’s the recipe 🙂
Makes: 1 small loaf
Ingredients
125g tapioca flour
125g white rice flour
50g jumbo oats (for plain white loaf, use 65g)
75g mixed small seeds, optional
½ tsp salt
12g light brown sugar
1 tsp xanthan gum
1 tsp easy blend dried yeast
1 tbsp. sunflower oil
275ml tepid water
5ml unsweetened soya milk + ½ tsp maple syrup, to glaze
15g crushed sunflower and pumpkin seeds or extra oats, to sprinkle
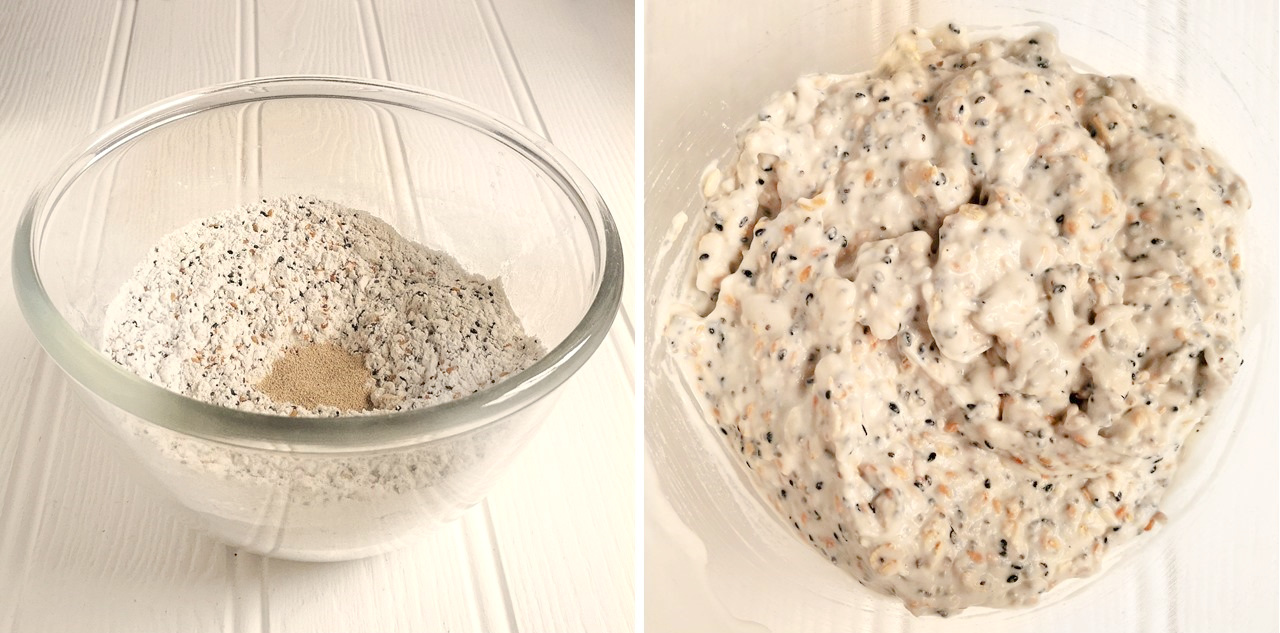
Lightly grease a 500g loaf tin. Mix the flours, oats, seeds (if using), salt and sugar in a bowl. Add the yeast and stir in completely.
Make a well in the centre of the dry ingredients and stir in the oil and water to make a thick batter.
Mixing up the bread batter. Images: Kathryn Hawkins
Transfer the mixture to the greased loaf tin, smooth the top and place in a large, clean food bag. Secure the bag closed making sure there is enough room for the bag to expand. Leave to rise in a coolish room temperature, out of draughts, for about 2 ½ hours until slightly risen and a few bubbles appear on the top.
Preheat the oven to 200°C, 180°C fan oven, gas 6. Brush the top of the loaf lightly with the soya and maple glaze and sprinkle with seeds or oats. Bake for 40-45 minutes until golden and crusty – the loaf should sound hollow when tapped on the base. Remove from the tin and leave to cool on a wire rack.
The loaf will keep lightly wrapped or in a tin, at room temperature for about a week, or you can slice it and freeze it for longer storage. I have toasted the bread; it becomes denser and for some reason doesn’t brown all over, but it still tastes good. Have a good week 🙂
2 gluten-free loaves, one recipe. Image: Kathryn Hawkins
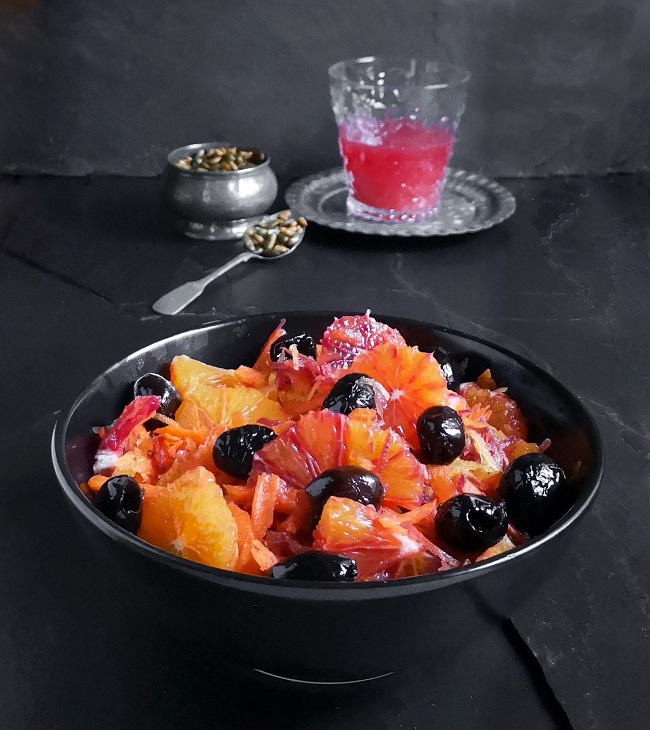
A seasonal salad to banish the winter blues. Image: Kathryn Hawkins
This is a great time of the year for oranges. Last weekend, I bought a bag of Seville oranges and made some marmalade, something I haven’t done for many years. It took me much longer than I remembered, but the effort was worthwhile as I have 12 large jars to see me through the year. The other citrus fruit that caught my eye this week comes from Sicily. Beautiful, blushing red oranges (or “Blood oranges” as I remember them being called). They look as lovely on the outside as they do on the inside.
Sicilian red oranges. Image: Kathryn Hawkins
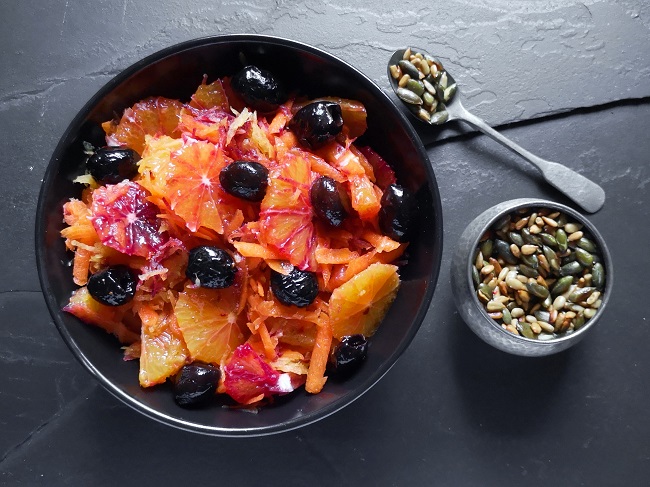
It may not seem the right time of year to be serving up a salad, but my recipe this week is a good choice for eating now, it oozes health and vitality, is robust in flavour with a crunchy texture, and makes a great accompaniment to pulse, rice or grain dishes or can be served on its own as a simple light lunch with bread and a dollop of hummus. The flavours and colours of this salad are the perfect tonic to pick you up if, like me, you are suffering from the winter blues.
Robust flavours and crunchy textures. Image: Kathryn Hawkins
The salad is dressed with a simple combination of olive oil and freshly squeezed orange juice flavoured with the warming, earthy spices toasted cumin seeds and dried chilli. I also fried some sunflower seeds and pumpkin seeds for 4-5 minutes in a little olive oil with some sea salt, to add bite and nuttiness as a sprinkle on top. I hope you enjoy the recipe, and if you can’t find red oranges, any orange or even pink grapefruit would work.
Salad dressing and toasted, salted seeds. Images: Kathryn Hawkins
Serves: 2 to 4 (lunch or accompaniment)
Ingredients
250g carrots (for extra colour I used a heritage variety which were purple, orange and yellow)
3 red oranges
Red orange juice (you should have sufficient leftover from peeling the 3 oranges)
Approx. 25ml extra virgin olive oil
1 – 2 tsp caster sugar or maple syrup (or honey if you eat it), optional
Pinch of sea salt
½ tsp toasted cumin seeds, ground
½ tsp dried chilli flakes
100g pitted black olives
Fried, salted sunflower and pumpkin seeds to sprinkle
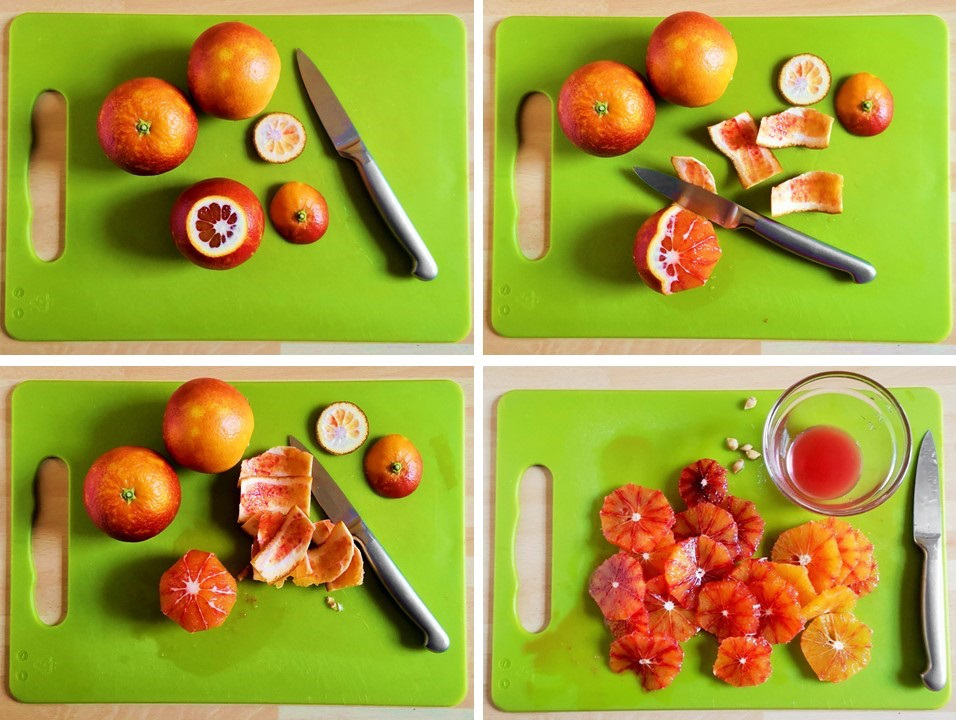
Peel and grate the carrots. Place in a bowl and put to one side. Slice the top and bottom off each orange, then using a small sharp knife, slice off the skin, taking away as much of the white pith as you can – see images below. Slice each orange into thin rounds and remove any pips.
Heritage carrots. Images: Kathryn Hawkins
Preparing red oranges. Images: Kathryn Hawkins
Drain the orange slices, reserving the juice – any pieces of orange skin that have orange flesh attached can also be squeezed to obtain precious drops of juice.
Measure the juice and mix with the same amount of olive oil, then stir in the salt, spices and sugar, if using. Toss the dressing into the grated carrots.
Carefully fold in the orange slices (you may prefer to cut the orange into smaller pieces) along with the olives. Cover and chill until ready to serve, but allow to stand at room temperature for 30 minutes for the flavours to develop.
Ready to eat. Image: Kathryn Hawkins
I’ve been enjoying freshly squeezed red orange juice for breakfast this week as well. Such a pretty colour, and a super-zingy start to the day.
Freshly squeezed red orange juice. Images: Kathryn Hawkins
I have another Sicilian inspired recipe lined up for next week, so until then, I hope you have a good few days 🙂
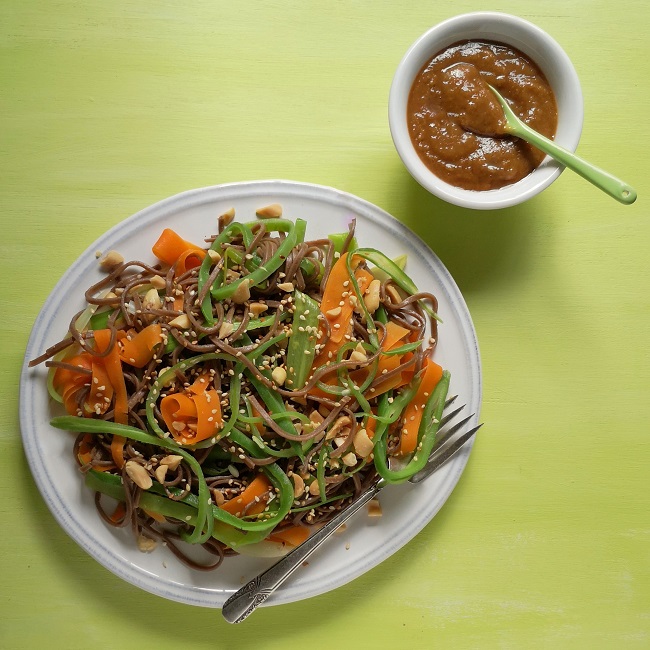
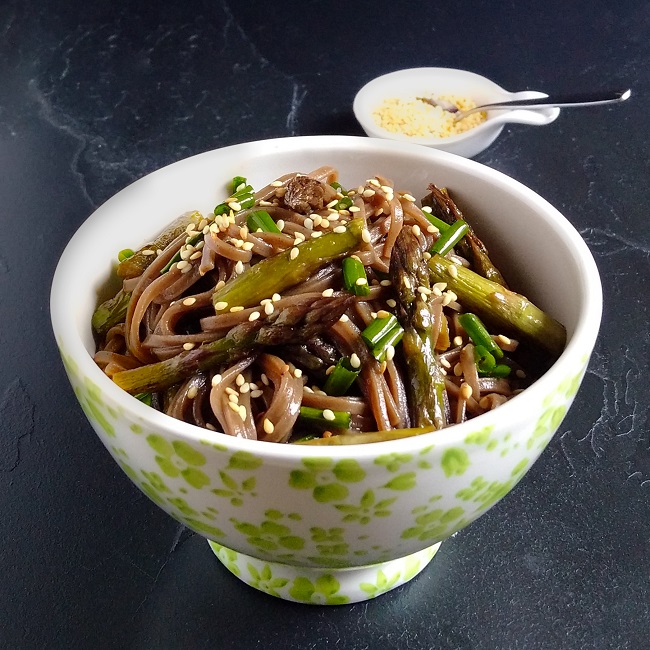
Runner bean and peanut soba noodles. Image: Kathryn Hawkins
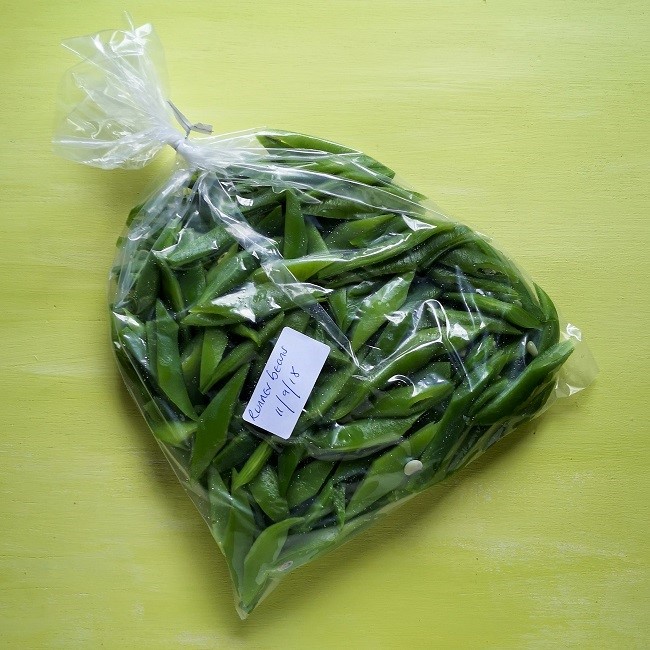
Over the past week or so, I’ve picked more runner beans from my 3 plants than I can possibly eat. The beans do keep well for a few days in a container of water in the fridge, but even so, this year, I have resorted to freezing some down. Not ideal as they do lose some texture, but it’s a good way of eking them out a while longer.
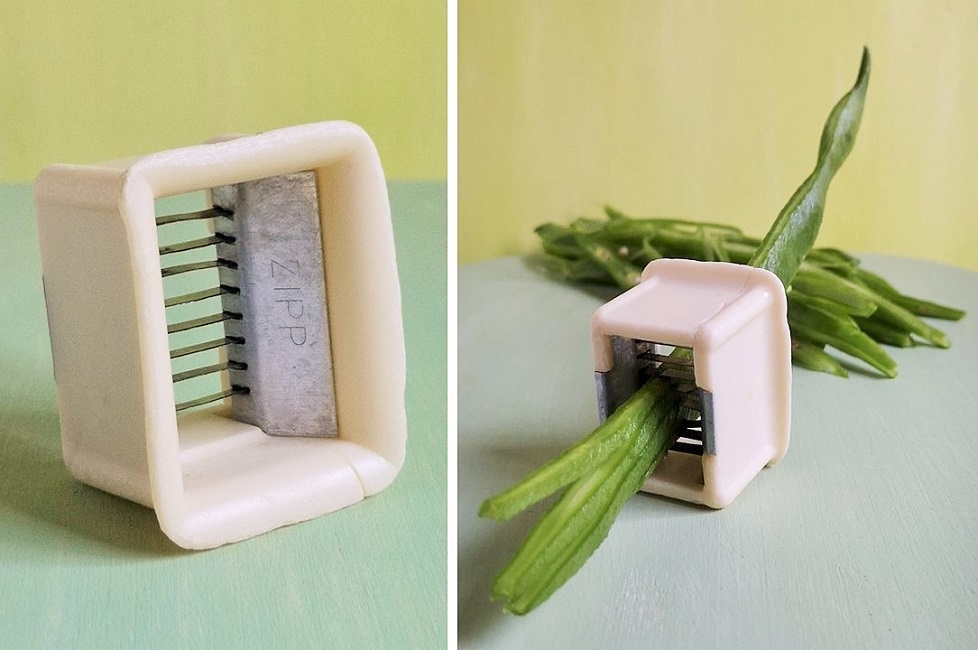
My late summer harvest of runner beans. Images: Kathryn Hawkins
I like my runner beans cut thinly in fine ribbons. I inherited a tiny, wee gadget from my grandmother which is perfect for this. If the beans are very fresh, you can whip them through the fine, grill-like slicing plate in next to no time, and sliced this way, they take just a few minutes to cook.
For freezing, it helps preserve texture if you cut the runner beans into chunkier pieces, and that’s what I did with the majority of these beans. I blanched the prepared beans in rolling, boiling water for about 1 ½ minutes, then drained them and cooled them completely in cold running water. Before bagging your prepared vegetables, shake off the excess water, pat dry with kitchen paper and then pack into freezer bags. Make sure the bag is free of as much air as possible. I do this by screwing the bag closed, and then sucking out the excess air via a straw inserted into the top. It’s very effective. Seal the bag tightly with a wire bag tie or clip, and don’t forget to label – remember how time flies! Blanched vegetables should keep perfectly fresh in the freezer for at least 6 months. If you don’t do the blanching, use them up in a couple of months.
Blanched and ready for the freezer. Image: Kathryn Hawkins
This week’s recipe is a tasty vegetable noodle dish that can be eaten hot but I usually enjoy the dish served cold as a light lunch. Try and cut all the vegetables thinly and evenly so that they cook to the same texture. If you don’t have a bean slicer, cut the beans into short lengths and then slice thinly lengthways. For the dressing, if peanuts aren’t to your taste, use cashews or almonds and the associated nut butters instead.
Vegetable noodles served cold with peanut dressing. Image: Kathryn Hawkins
Serves: 4
Ingredients
225g runner beans
1 large carrot
1 medium leek
200g soba noodles (or use your favourite variety and cook accordingly)
1 tsp sesame oil
2 tbsp. toasted sesame seeds
40g roasted peanuts, crushed
For the dressing:
50g smooth peanut butter
1 tsp sesame oil
25ml gluten-free soy sauce
1 tbsp. white rice vinegar
15g light soft brown sugar
Trim the beans. Peel the sides of the beans using a vegetable peeler and slice into thin shreds. Peel and trim the carrot; slice into thin ribbons using a vegetable peeler. Trim the leek. Slice down the centre and run under cold running water to flush out any trapped soil. Shake well to remove excess water, then cut in half, and slice into ribbon-like strips. Arrange all the vegetables in a steamer, colander or large sieve.
Preparing the ribbon vegetables. Images: Kathryn Hawkins
Bring a saucepan of water to the boil (unsalted if you’re using soba noodles). Put the vegetables on top, cover and cook for 2 minutes. Add the noodles to the boiling water, bring back to the boil, put the vegetables back on top, and cook everything for a further 5 minutes, until the noodles are tender and the vegetables are just cooked through. Drain the noodles well, and return to the saucepan. Toss in the sesame oil and then the vegetables. Mix well and either leave to cool if serving as a salad, or cover to keep warm.
For the dressing, put all the ingredients in a small screw-top jar. Seal and shake well to mix into a thick, dressing.
Making peanut dressing. Images: Kathryn Hawkins
To serve, pile the hot or cold vegetable noodles on to a serving platter and sprinkle with sesame seeds and peanuts. Serve with the peanut dressing.
Ready to eat, ribbon vegetable and soba noodle salad. Image: Kathryn Hawkins
Golden flax and polenta cake. Image: Kathryn Hawkins
I fancied a spot of baking this week especially as it seemed to be a while since I baked a cake for my blog. This recipe is extremely easy to make, even if you’re an inexperienced baker, there is little to go wrong here. The cake is naturally dense in texture so you haven’t got to worry about whisking for a specific length of time or getting a good rise. The decoration is optional, the cake tastes just as good with or without icing. The mixture is not particularly sweet and makes a good alternative dessert topped with fruit, accompanied with free-from cream or ice-cream.
Easy to make cake. Image: Kathryn Hawkins
The cake gets its rich yellow colour from polenta and cold pressed rapeseed oil. I’m very fortunate to have an excellent local supply of this amber coloured oil called Summer Harvest. The rapeseed is harvested just down the road from my house. The oil has an earthy, nutty flavour and makes an excellent addition to any recipe with nuts and seeds added to it. If you prefer to use an alternative oil, us sunflower oil which adds little extra flavour but the cake will also be paler in colour.
Polenta and locally produced cold pressed rapeseed oil. Images: Kathryn Hawkins
I usually use just ground almonds and polenta in this recipe, but for a change, I ground up flax seed with whole almonds to make a fine meal. As long as you grind the seeds or nuts finely, you should be able to use any combination with polenta in this recipe. I use an electric coffee grinder to make my own seed and nut flours, I find the sturdier blade is able to blitz more finely than the food processor or blender.
Flax seeds and whole almonds ground to make a flour. Images: Kathryn Hawkins
Serves: 8
Ingredients
150ml cold pressed rapeseed oil
1 tsp good quality natural vanilla extract
150g unbleached caster sugar
100g silken tofu
50g each flax seeds and whole almonds, finely ground
125g polenta
5g gluten-free baking powder (such as Dr Oetker)
10g arrowroot
To decorate:
100g ready to roll white icing
½ tsp good quality natural vanilla extract
A handful of fresh berries
Preheat the oven to 180°C (160°C fan oven, gas 4). Grease and line an 18cm a round cake tin. Pour the oil into a bowl. Add the vanilla and sugar and whisk together until creamy and well blended. Add the tofu and whisk again until smooth.
Add the seed mix, polenta, baking powder and arrowroot, and gently mix all the ingredients together until well blended. Scrape into the tin. Stand the tin on a baking tray and bake for an hour – test the centre of the cake with a wooden skewer, it should come out clean when the cake is properly cooked through. Leave to cool completely in the tin.
Making and baking the cake. Images: Kathryn Hawkins
To decorate the cake, remove the cake from the tin and place on a wire rack. Cut up the white icing into pieces and put in a small saucepan. Add 1 tsp water and heat the mixture very gently, stirring, until it begins to melt and form a paste. Stir in the vanilla, then drizzle the icing all over the top of the cake using a dessert spoon, letting it drip down the sides. As the icing cools, it will set firm again.
Icing the cake. Images: Kathryn Hawkins
Leave the icing to cool and scatter, then scatter the top with berries before serving. I used my latest precious harvest of blueberries. Not a very good year for them in my garden, but the berries do have a good flavour none the less. Have a good week 🙂
Home-grown blueberries. Images: Kathryn Hawkins
Rich in texture and colour, flax and polenta cake. Images: Kathryn Hawkins
Soba noodles with asparagus. Image: Kathryn Hawkins
It is the height of the home-grown British asparagus season right now, and I’m eating as much as I can while these fresh, green, juicy stems are available to buy. I rarely do anything fancy with asparagus, just enjoy it on its own, steamed, griddled, or baked in the oven, and seasoned simply with a little salt and pepper. Delicious.
In season. British asparagus. Image: Kathryn Hawkins
This is a very simple, yet very tasty, combination that makes a lovely light lunch or quick supper dish. If you want to make it in advance, it’s just as good eaten cold as a salad, or boxed up for a picnic or packed lunch.
Three favourite seasonings for soba noodles. Images: Kathryn Hawkins
To serve 2: prepare 200g fresh asparagus spears by trimming away about 3cm of the stem – this is usually a bit woody and tough to eat. Then cut the rest of the stems into short lengths. Brush a non-stick frying pan with a little sunflower oil and heat until hot. Stir fry the asparagus for 3-4 minutes until just tender. Turn off the heat and add a good glug of gluten-free teriyaki marinade. Immediately cover with a lid and leave to stand. Leave to one side while you cook the noodles, or leave to cool completely for serving as a salad.
Trimming fresh asparagus, and stir-frying. Images: Kathryn Hawkins
Meanwhile, bring a large saucepan of unsalted water to the boil and add 100g soba (buckwheat) noodles. Cook for about 5 minutes until tender, then drain well and place in a heatproof bowl, or rinse in cold running water, and leave to drain and cool completely.
When ready to serve, toss the asparagus and pan juices into the noodles along with 4 tbsp. freshly chopped chives, 2 teasp sesame oil and 1 tbsp. mirin. Pile into serving bowls and sprinkle with toasted sesame seeds. Enjoy 🙂