Welcome to my blog all about the things I love to grow and cook. You'll find a collection of seasonal gluten-free, dairy-free and vegan-friendly recipe posts, as well as a round up of my gardening throughout the year. I wish you good reading, happy cooking and perfect planting!
A very belated happy new year to you. The first month of 2026 has flown by. I hope you had a good festive break and I send you my best wishes for the year ahead.
We’ve had a mixed bag of weather since Christmas. A few cold, dry and bright days alongside some very wet and grey ones. Only a light dusting of snow mid month, although I’m sure there will be more to come.
There are quite a few signs of the garden emerging from hibernation. Lots of bulb foliage poking through the soil as well as some nice surprises like the primrose and periwinkle.
Early January primrose. Image: Kathryn Hawkins
January blues. Image: Kathryn Hawkins
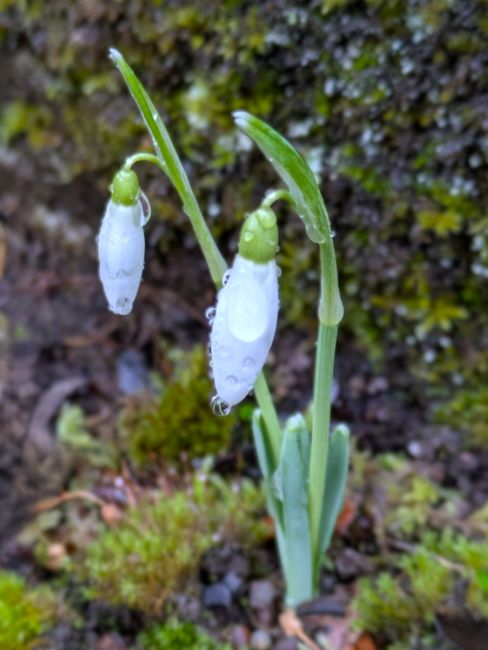
And now the snowdrops are up and just about to bloom, it feels like there is a definite hint of spring in the air – fingers crossed. Until next time, thanks for stopping by 🙂
Hello there. I hope you are feeling festive and looking forward to Christmas. It’s such a busy time of the year, tying up lots of loose ends before the year is out as well as making all the preparations for the days ahead.
I have a simple, fun and very festive recipe for you this month, based around one of my favourite and most successful gluten-free and vegan bakes, shortbread.
If you’ve been following my blog for a while, you’ll have already seen a few variations on my shortbread recipe over the months. This recipe uses a plain mix to which you can add your own flavours if you wish. The snow folk figures are easy to make and assemble, and I’ll leave it up to you as to how creative you want to be when it comes to decorating them. The quantities below will be enough to make 2 basic figures.
Ingredients
50g plant-based butter, softened
30g caster sugar
100g gluten-free plain flour plus extra for dusting
1tsp vanilla extract or other flavouring of your choice
150g white ready-to-roll icing
25g icing sugar
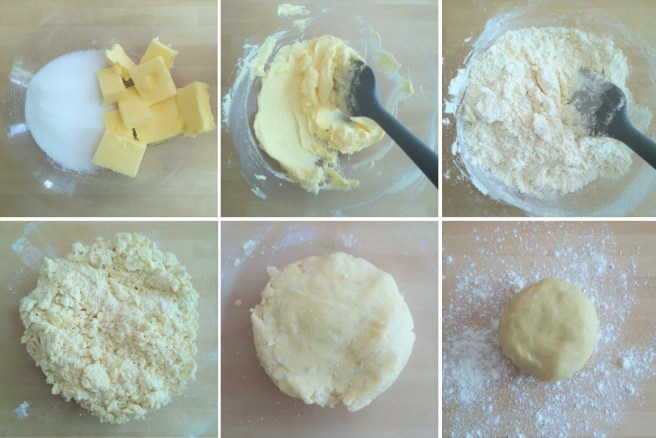
1. Beat the butter and caster sugar together until creamy and well blended. Mix in the flour and vanilla until the ingredients start to come together, then bring the mix together with your hands to make a ball of dough.
Mixing the shortbread base. Images: Kathryn Hawkins
2. Lightly dust the work top with a little more flour and gently knead the dough until smooth.
Making and baking. Images: Kathryn Hawkins
3. Roll out the dough to a thickness of 0.5cm and cut out 4 x 6.5cm, 4 x 5cm and 4 x 3.5cm rounds, re-rolling the dough as necessary. Arrange on a baking tray, prick with a fork and chill for 30 minutes.
4. Preheat the oven to 180°C, 160°C fan oven, gas 4, bake the shortbread rounds for about 15 minutes until lightly golden. Leave to cool on the baking tray.
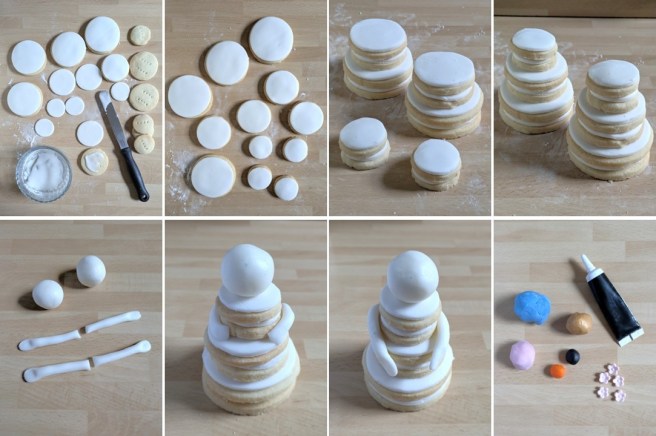
5. When you are ready to decorate, roll out the white ready-to-roll icing thinly and use the same cutters to cut out 12 assorted rounds. Keep the trimmings for decorating. Mix the icing sugar with a little water to make a smooth, sticky paste.
6. Spread a little icing paste on each biscuit and stick a same size round on top. Smooth the icing round with your fingers to flatten and neaten, then stack the rounds on top of each other starting with the largest rounds at the bottom. To make them more stable, spread a little icing paste in between if liked.
Icing and decorating. Images: Kathryn Hawkins
7. Use the trimmings to make arms and heads and stick in place with a little of the icing paste. Transfer to a serving plate or board.
For the finishing touches, use small amount of different coloured ready-to-roll icing to make scalves, hats, noses and buttons. A black piping icing tube is an easy way to pipe on the facial features, and I used tiny sugar flowers to make the buttons on one of the figures. Stick all the extras in place using a little of the icing paste.
Decorated and ready to serve.
Sprinkle the serving plate with shredded coconut to resemble snow. Note: the shortbread will lose it’s crispness once iced but it tastes just as good 🙂
See you next year! Image: Kathryn Hawkins
That’s me for another year. I hope you have a happy Christmas. With best wishes for the new year, thanks for stopping by.
Fiery sunrise over icy hills. Image: Kathryn Hawkins
A very belated happy new year to you. This month has flown by. All the festivities of a few weeks ago seem like a long time away already.
It’s a quiet time out of doors in terms of gardening. The weather has been quite kind so far. Little snow and rain, some stormy winds, and some very cold nights, but nothing extraordinary. The days are slowly drawing out again and there have been some beautiful sunrises.
End of the night, beginning of the day. Image: Kathryn Hawkins
Sun up on a chilly day. Image: Kathryn Hawkins
Whilst there have been lots of lovely starts to the day, I haven’t seen much happening in the skies at the other end of the day, apart from this sunset which is punctuated with puffs of white cloud which look like plumes of steam.
Early new year sunset. Image: Kathryn Hawkins
There have been many postings on social media of the Northern Lights here in central Scotland. It usually means getting up in the middle of the night to look, and to be honest, when it’s so cold, I am not motivated enough to do it. However, earlier in the month, there was an alert that the lights were visible at a much more sociable time. So I ventured outside in the back garden on a wonderfully clear, crisp night and saw…….absolutely nothing! However, pointing my camera at various points in the sky, the lens picked up this faint purple glow in the north-east sky. To the eye, the sky was almost black except for the stars.
Purple night sky. Image: Kathryn Hawkins
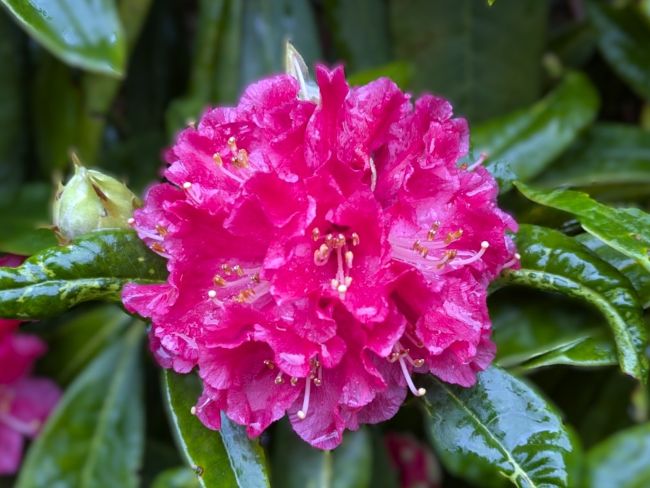
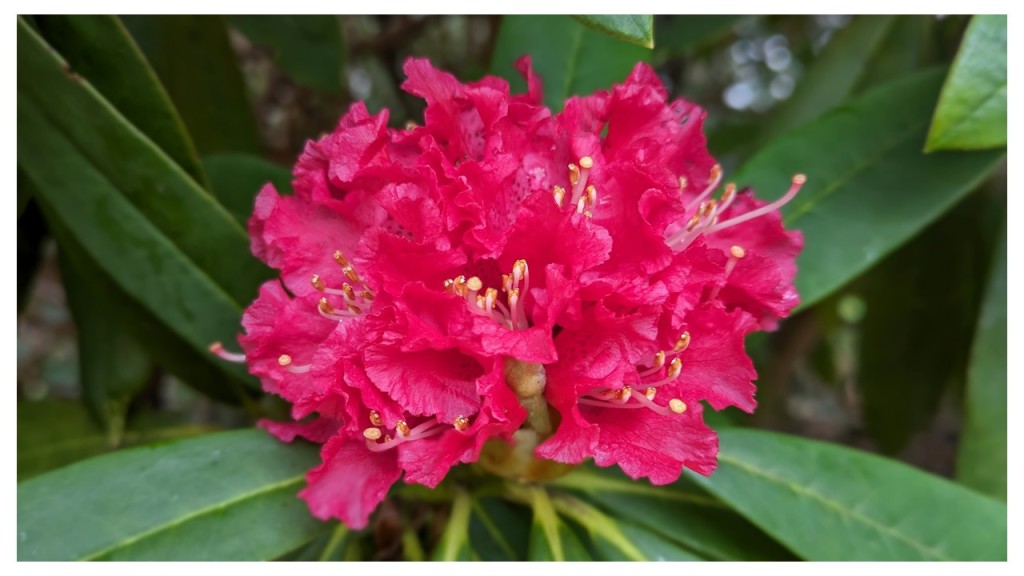
To finish this short post, there are a few flowery delights in the garden at the moment. I just hope the Periwinkle, Rhododendrons and snowdrop survive any cold weather that’s heading out way in the next few weeks.
Early bloomers. Images: Kathryn Hawkins
Have a good rest of the month and I’ll be back posting some time in February. Thanks for stopping by 🙂
Hello again. It’s my last recipe post of the year. How 2024 has flown by. It’s been a busy one for me, and I’ll admit to not feeling 100% festive as I sit down to write this post as there is always so much to do at this time. If you’re feeling the same, perhaps this simple, tasty recipe will help get you in the right frame of mind.
Festive chestnut rolls. Images: Kathryn Hawkins
These rolls make the perfect snack or party food. Easy to make from a combination of sage and onion stuffing mix, chopped chestnuts and chutney. You can vary the flavour by using your favourite chutney, I use tomato but an onion one or more fruity one would work just as well as would cranberry sauce. Here’s what to do…
Makes:16
Ingredients
65g sage and onion stuffing mix
225g cooked peeled chestnuts
100g tomato or other flavour chutney plus extra to serve
1tsp onion or plain salt
280g vegan-friendly gluten-free puff pastry sheet
10g soya flour
Fresh sage to garnish
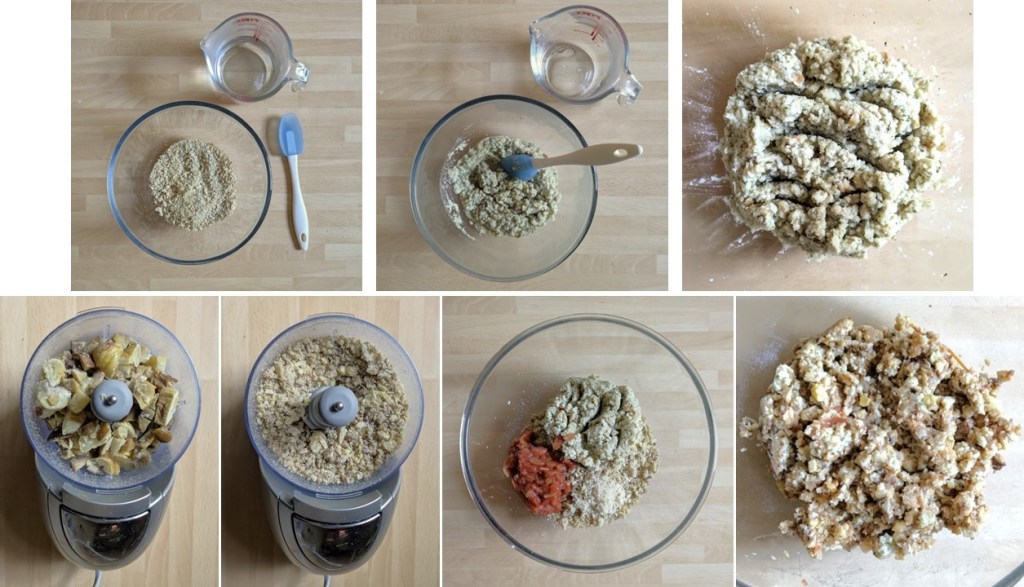
1. Put 50g stuffing mix in a heatproof bowl and mix in 90ml freshly boiled water. Mix well and leave to cool completely.
2. Finely chop the chestnuts in a food processor or by hand and mix into the cold stuffing mixture along with the chutney and salt to make a firm paste.
Making the filling. Images: Kathryn Hawkins
3. Unroll the pastry and use the lining paper to line a large baking tray. Cut the pastry lengthways and divide the stuffing mix between the 2 pastry strips, shaping the stuffing into a long sausage shape down the middle of each.
Forming the chestnut rolls. Images: Kathryn Hawkins
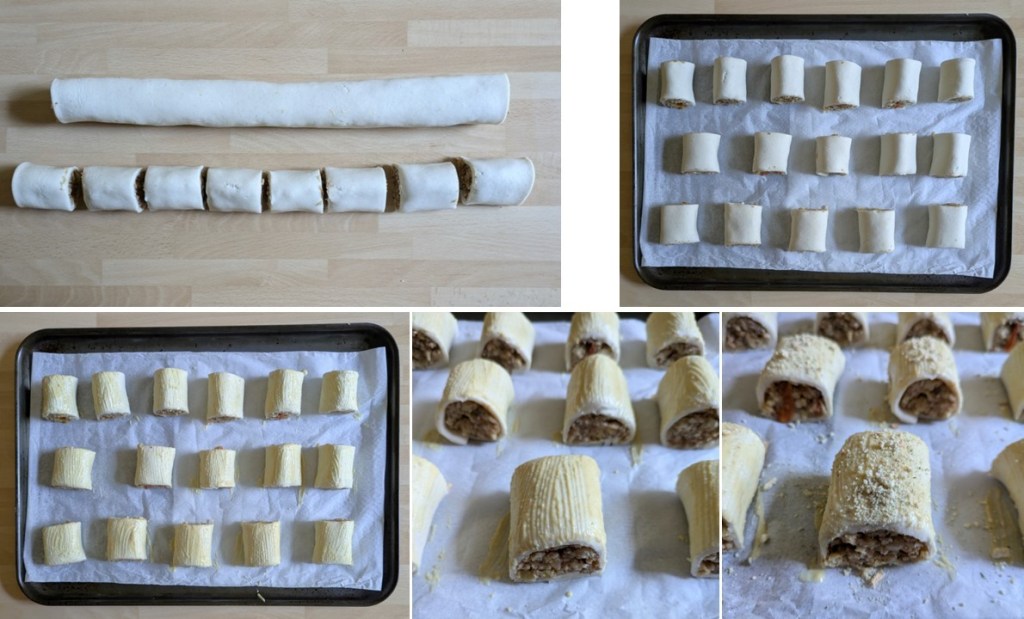
4. Mix the soy flour with 5tsp water to make a glazing paste and brush a little down one side of each pastry strip. Roll the pastry over the filling and press down gently, then roll each pastry back and forth on the work top to neaten and seal.
Shaping the rolls. Images: Kathryn Hawkins
5. Cut each roll into 8 equal portions and arrange spaced apart on the lined baking tray. Brush the tops and sides with the soy paste and sprinkle with the remaining dry stuffing mix. Chill until ready to bake.
Ready for baking. Images: Kathryn Hawkins
6. To cook, preheat the oven to 200°C, 180°C fan, gas mark 6. Bake the rolls for about 20 minutes until golden and crisp. Transfer to a wire rack to cool. Best served slightly warm with extra chutney, garnished with sage.
Fresh chestnut rolls just out of the oven. Image: Kathryn Hawkins
That’s a wrap from me for this year. I hope you all have a good festive season and wish you a happy and healthy time. Until next year, Merry Christmas 🙂
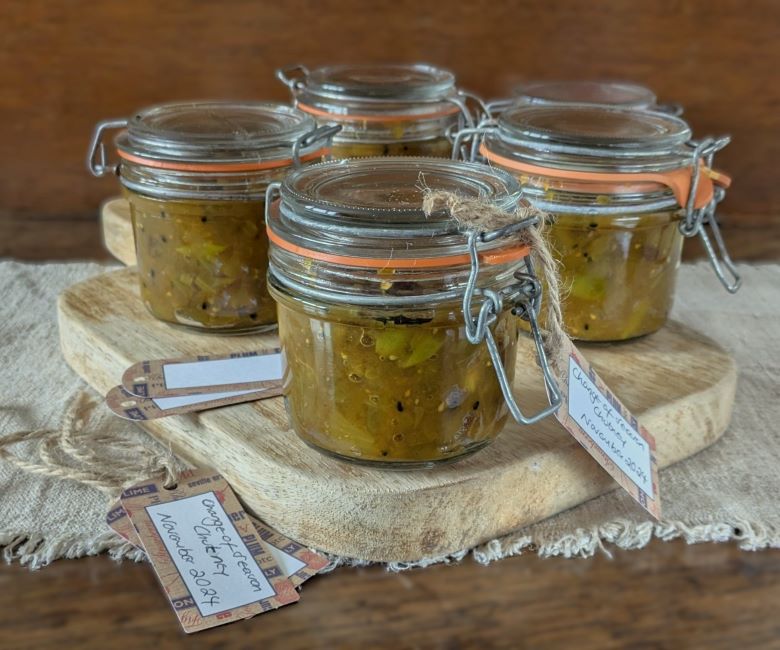
Last of the Autumn produce preserved. Image: Kathryn Hawkins
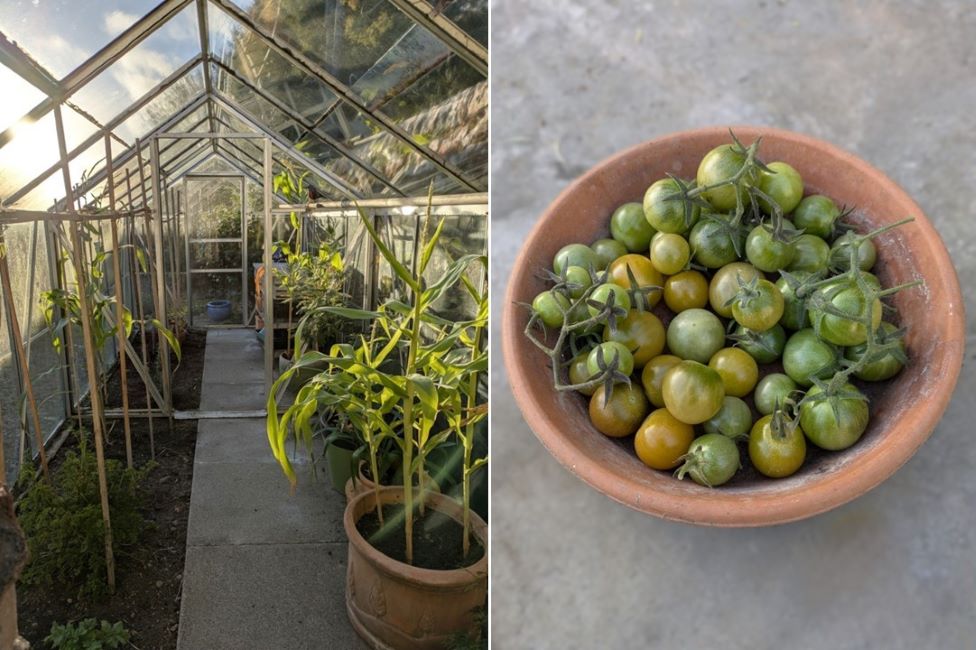
Hello there. When I planned to make this chutney a couple of weeks ago, it was very much still Autumn. I picked off the last of the tomatoes and put the greenhouse to bed during a lovely sunny afternoon. I was going to call the chutney “End of Autumn”.
Last of the greenhouse tomatoes, mid-November 2024. Images: Kathryn Hawkins
However, when I came to make the chutney last weekend, snow was falling very heavily and suddenly we were in winter. And so I thought “Change of Season” chutney would be more appropriate 🙂
November snowy garden. Image: Kathryn Hawkins
I made the chutney in my slow cooker. It is ready to eat as soon as it cools and tastes delicious. I used up the last of this year’s apple harvest along with some black-skinned tomatoes that I had frozen down a few weeks ago. The spices I used give a mild curry flavour but you can change them if you prefer – cinnamon, cumin and coriander for a more earthy flavour would work well.
If you haven’t made a preserve in your slow cooker before, the technique is slightly different in that you can’t boil the preserve down like you would in a saucepan on the stove. The chutney is also cooled before putting in jars, and as such needs to be kept in the fridge. It will however keep for a few weeks or can be frozen for longer term storage.
Makes: approx. 1kg
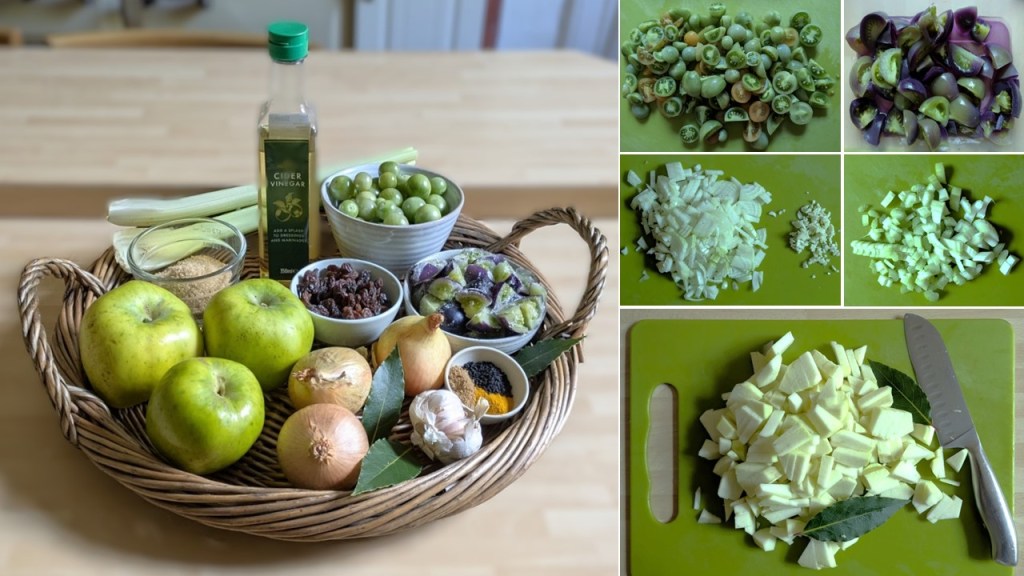
Ingredients
400g green tomatoes, chopped
2 medium onions, peeled and chopped (about 180g prepared weight)
2 garlic cloves, peeled and chopped
2 sticks celery, trimmed and chopped (about 110g prepared weight)
2 large cooking apples, peeled and chopped (about 300g prepared weight)
2 bay leaves
100ml cider vinegar
75g sultanas or chopped dried apricots
2tsp garam masala
1tsp each nigella seeds, turmeric and salt
150g demerara or light brown sugar (or you can use granulated white sugar)
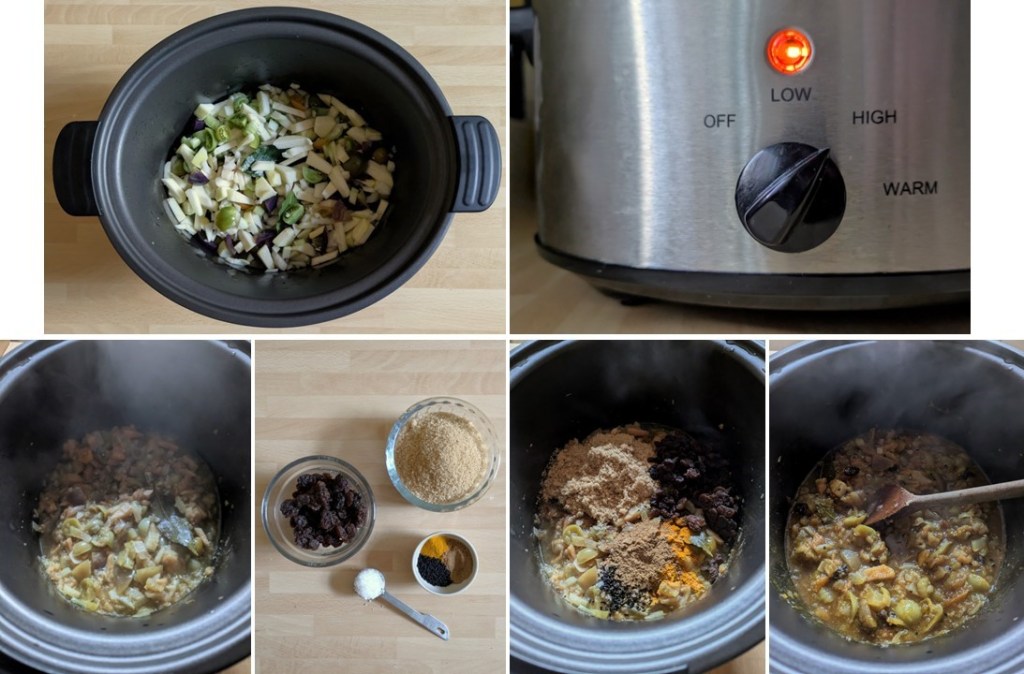
1. Put all the vegetables in the slow cooker with the bay leaves and mix well. Pour over the vinegar, cover with the lid and cook on High for 4 hours.
2. Add the remaining ingredients, mix well, re-cover and cook for 30 minutes to dissolve the sugar.
Slow cooking and seasoning chutney. Images: Kathryn Hawkins
3. Remove the lid, stir well and cook uncovered for a further 2 hours, stirring occasionally until reduced down and jam-like.
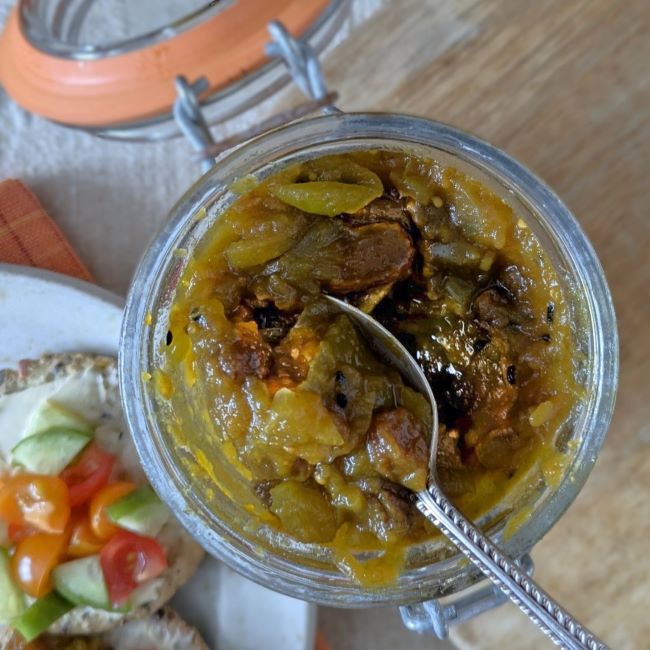
4. Switch off the cooker and leave the chutney to cool completely. Discard the bay leaves and spoon into clean jars. Seal, label and store in the fridge for up to 3 months. Once opened, use within a month. Alternatively, freeze the chutney in containers and defrost when required.
Reducing the chutney down ready for storing. Images: Kathryn Hawkins
A sweet and spicy spoonful. Image: Kathryn Hawkins
That’s me for another month. I have one more post before Christmas, so until then take care and keep warm 🙂
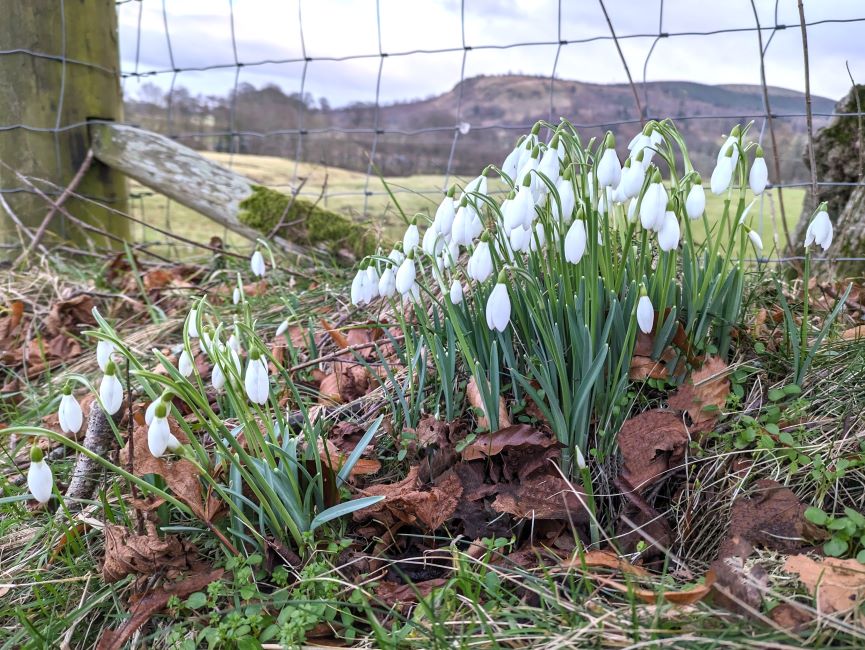
Hello again. It’s good to see that the garden and surrounding countryside are slowly coming to life here in central Scotland after some wild and wintry weather these past few weeks. I took a short trip out to my favourite local spot in search of snowdrops on one of the brighter days this month and am happy to report that there is an abundance of these pretty little white flowers all along the roadside and verges, a little earlier than recent years.
Roadside snowdrops. Image: Kathryn Hawkins
In the garden as well, right on cue, on the first day of the month, the first snowdrops opened up in the weak, wintry sunshine.
The first of this year’s garden snowdrops. Images: Kathryn Hawkins
We’ve had some heavy frosts, a little snow and plenty of wind and rain since then, and subsequently some of the other flowers in the garden have become a bit bedraggled.
Light dust of early February snow. Image: Kathryn Hawkins
Rain-soaked February flowers. Images: Kathryn Hawkins
I took this photo of the glorious red Rhododendron in the garden when it first opened at the beginning of the month. Sadly it looks a bit less radiant now it has been rained on and frosted all over.
Red Beauty. Image: Kathryn Hawkins
There have been survivors of all this bad weather I’m pleased to say. The first Hellebore is up and open, and this little Periwinkle was a surprising find last week. The rhubarb is looking healthy as well.
The first flowerings. Images: Kathryn Hawkins
This year’s rhubarb is on its way. Image: Kathryn Hawkins
To brighten up this gloomy month, I recently acquired a new houseplant, a Mimosa, and in the last week it has opened up it’s tiny tight buds into fluffy, bright yellow balls of sunshine. I have everything crossed that it is hardy enough to survive until the temperature and sunshine levels increase later in the year.
Indoor sunshine. Image: Kathryn Hawkins
I’ll see you again at the end of the month when I will be back in the kitchen. Thanks for stopping by 🙂
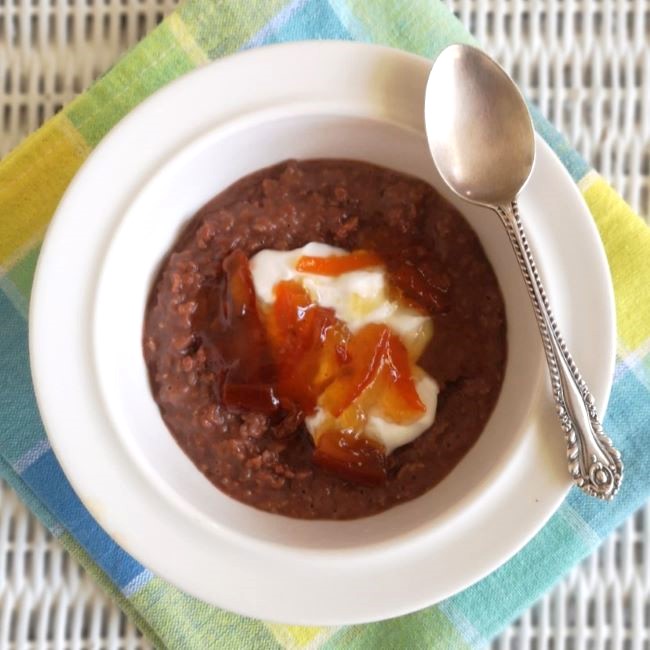
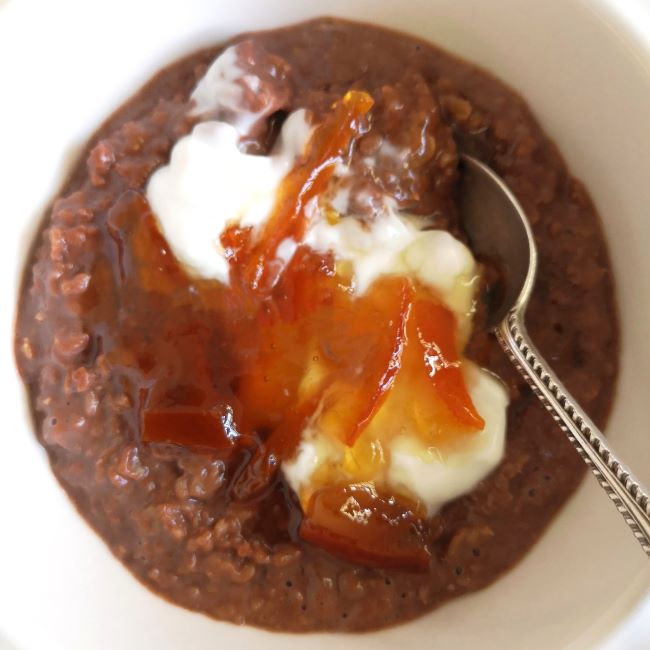
Chocolate and marmalade porridge. Image: Kathryn Hawkins
Happy new year to you! 2024 has begun with chilly, frosty weather here in central Scotland and elsewhere in the UK. But it’s that time of year when the Seville oranges are in the shops, marmalade-making is underway and the sweet smell of citrus wafting round the kitchen makes me think of sunnier climes and warmer days.
Even with the best planning, I always have leftover preserve once I have filled the jam jars I have cleaned and got ready. However, it does mean that I get to taste what I’ve made straight away without feeling guilty about opening a jar of freshly made preserve too soon. I call the surplus “The Cook’s Privilege”, after all the effort, you deserve the first pickings 🙂
Marmalade leftovers for the cook. Images: Kathryn Hawkins
My recipe this week is a simple way to enjoy such spoils for your breakfast the day after your toils. The ingredients below make enough for one portion. I cook my porridge in the microwave, but you can just as easily pop everything in a saucepan and cook it on the stove top.
Chocolate porridge: put 40g gluten-free porridge oats in a large microwave-proof bowl. Sift 1½ teaspoons of cocoa on top and stir in 2 teaspoons maple syrup and a pinch of salt. Mix in 200ml plant-based milk. Cover and microwave on High for 2½ minutes (my microwave is 900W so adjust the cooking time accordingly if necessary). Stir well then cook for a further 1 minute on High. To serve, stir in extra plant milk (or plant cream for extra indulgence) if you prefer a thinner consistency and top with plant-based yogurt and a generous dollop of your leftover marmalade. Delish 🙂
New year’s eve morning 2023. Image: Kathryn Hawkins
It’s the last day of the year, and a time both for reflection and looking forward to whatever the next year has in wait. It’s been a busy month and now I have a little time to rest and relax before 2024 begins. We had our first proper snow of the winter yesterday. Once more the garden was transformed into Narnia for a few hours before the rain washed most of it away.
Snowfall 30th December 2023. Images: Kathryn Hawkins
There have been a few frosty mornings this December but on the whole, it’s been reasonably mild with lots of rain and some strong stormy winds.
Frosty garden, windows, flowers and seeds. Images: Kathryn Hawkins
When the sky has been clear enough, there have been some lovely sunrises and sunsets again this month.
Sunrise on the shortest day of the year. Images: Kathryn Hawkins
The garden has recently welcomed another new visitor. This magnificent pheasant (christened Phil) has been strutting his stuff along the garden wall to get his lunch at one of the bird feeders. He has become a garden regular and seems to making himself well and truly at home.
Plucky Mr Pheasant. Images: Kathryn Hawkins
I hope you have a good time however you are celebrating this new year’s eve. I’ll be keeping cosy, with my feet up, having a slice of fruity ginger cake and a raising a glass of ginger wine to welcome in 2024. My best wishes to you all. Happy New Year:)
Toasting Hogmanay with ginger cake and wine. Images: Kathryn Hawkins
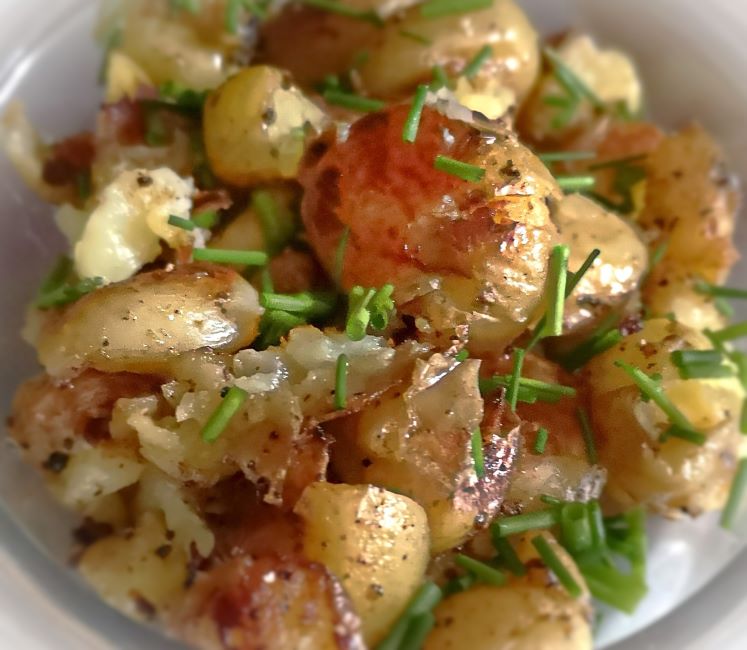
It has turned much colder here since my last post. Frosty mornings and an increasing number of sub-zero nights. Back in late August, I planted a few Arran Pilot seed potatoes in the green house. With the wintry feel in the air and knowing potatoes are not frost-hardy, I decided it was time to dig them up.
Late season greenhouse-grown potatoes. Images: Kathryn Hawkins
The foliage had all but withered away over the month, but under ground a few little potatoes had formed. I was a couple of weeks later planting them than usual and subsequently, the plants hadn’t had time to develop properly before the days got shorter and the temperature lower. No matter, there were enough to make one of my favourite potato dishes, and they tasted just as delicious as the potatoes grown earlier in the year.
Smashed new potatoes sprinkled with chives. Image: Kathryn Hawkins
I took a few images of the preparation of this potato dish back in the late summer when I had some pink fir potatoes. Choose a waxy or floury textured potato for best results. Scrub the potatoes and boil them in their skins until tender, then drain well and cool for about 10 minutes. Transfer them to a board and squish them with a masher or large fork.
Smashed pink fir potatoes. Images: Kathryn Hawkins
I usually melt butter with some olive oil in a pan and heat until bubbling – either will work on their own, it’s personal taste which you use. Add the potatoes and seasoning and cook over a fairly high heat, turning them until they are crispy. Towards the end of cooking, I add chopped garlic and cook it for a couple of minutes until just cooked through. Serve straight from the pan, sprinkled with chopped parsley or chives.
Smashed pink fir potatoes with garlic and parsley. Image: Kathryn Hawkins
Well there’s just one more post before Christmas – I can’t believe it will all be over by this time next month. Until then, take care and thanks for stopping by 🙂
Hello again. I was intending to post a frozen dessert recipe this week, so confident was I that spring had sprung and that the warmer days were here. However, these past few days have seen a return to winter. Much of the UK has been under a blanket of snow this week. So far, none of the white stuff here (fingers crossed), it has been dry, bright and clear, but it is far too chilly to be thinking about or eating cold food. Instead, I have been back in the kitchen cooking comforting recipes instead.
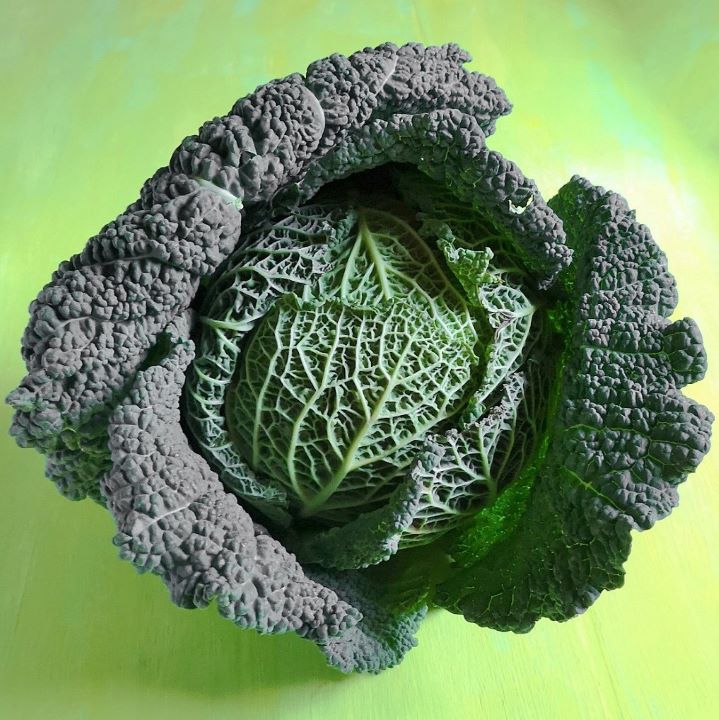
Magnificent Savoy cabbage. Image: Kathryn Hawkins
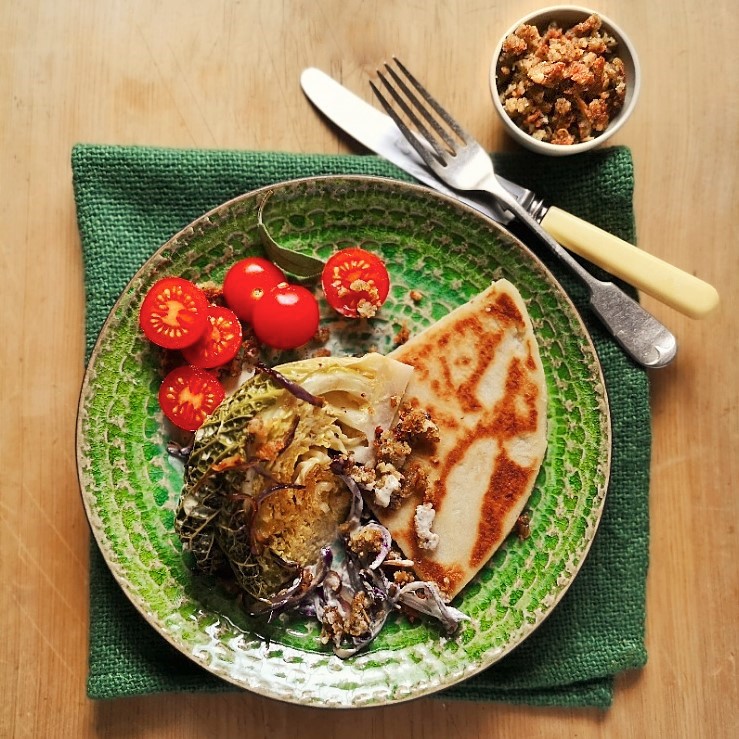
I am a huge fan of green veg, and this handsome specimen is one of my favourites. My recipe this week is a simple gratin of baked Savoy cabbage wedges with onion, a plant-based cream sauce and crispy crumbs of sage and onion to finish. Very hearty as a meal on its own, the gratin is also a great accompaniment to a stew or roast. I enjoyed mine with a pan-fried tattie scone (or two) – if you fancy making your own, here’s a link to my very easy recipe: Tattie scones (gluten-free; dairy-free; vegan)
Baked cabbage served with tattie scone. Image: Kathryn Hawkins
Serves: 4
Ingredients
1 whole Savoy cabbage
2tbsp vegetable oil + extra for greasing
1 large red onion
2 cloves garlic
50g plant butter
Salt and freshly ground black pepper
A few fresh sage leaves
350ml plant-based double cream
50g gluten-free sage and onion stuffing mix
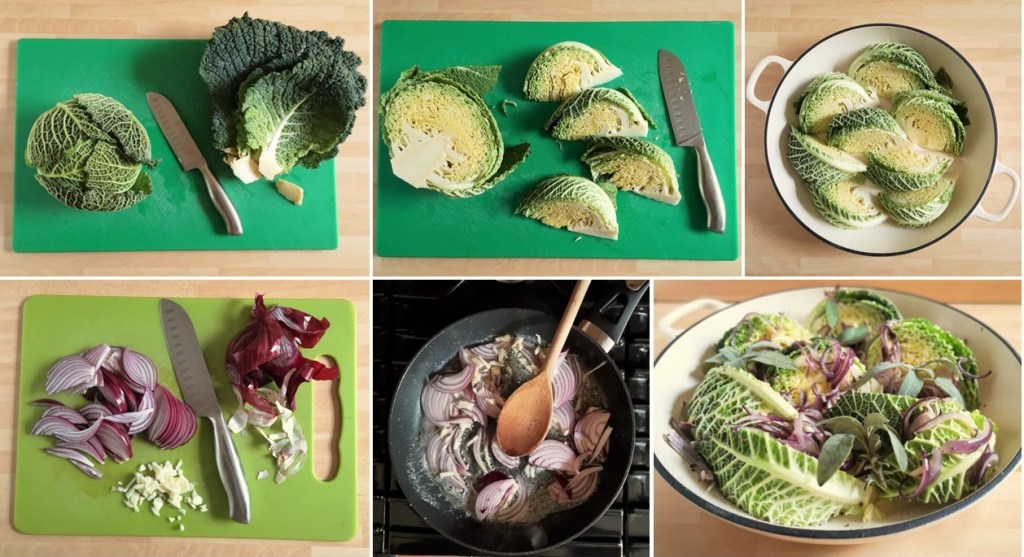
1. Trim the cabbage and remove the outer leaves, then cut into 8 wedges. Lightly oil a baking dish and arrange the cabbage in the dish in a single layer. Check out my other cabbage recipes for ways to use up the outer cabbage leaves here: One Savoy cabbage, three recipes (gluten-free; dairy-free; vegan)
2. Peel and slice the onion, and peel and finely chop the garlic. Melt half the butter with the oil and gently fry the onion and garlic for about 5 minutes to soften but not brown. Spoon over the cabbage and season well. Sprinkle with sage leaves.
Cabbage preparation. Images: Kathryn Hawkins
3. There is no need to preheat the oven for this recipe, just place the dish in the oven and set the temperature to 180°C, 160°C fan oven, gas 4. Bake for 30 minutes.
4. Pour over the plant cream and cover with a lid or foil and bake for a further 30 minutes until tender.
5. While the cabbage is cooking, soak the stuffing mix in 100ml boiling water until reconstituted. Melt the remaining butter and heat until bubbling, then break up the stuffing and add to the pan. Keep stirring and breaking up the stuffing until it forms clumps and starts to brown and crisp up; this takes about 6-7 minutes. Drain on kitchen paper and keep warm.
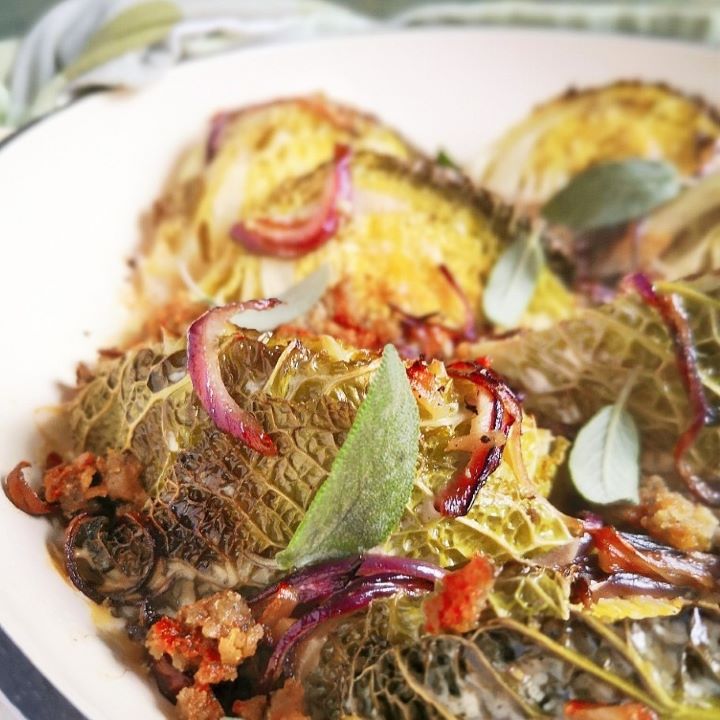
6. To serve, discard the sage leaves and sprinkle over the crispy crumbs. Garnish with fresh sage if liked.
Finishing the gratin. Images: Kathryn Hawkins
Baked cabbage with sage and crispy crumbs. Image: Kathryn Hawkins
Perhaps by the time I write my next post, spring will have returned and it will be more fitting to publish a recipe for warmer days. Until then, wrap up warm if you need to and enjoy the sights and sounds of the new season. Thanks for stopping by 🙂