Welcome to my blog all about the things I love to grow and cook. You'll find a collection of seasonal gluten-free, dairy-free and vegan-friendly recipe posts, as well as a round up of my gardening throughout the year. I wish you good reading, happy cooking and perfect planting!
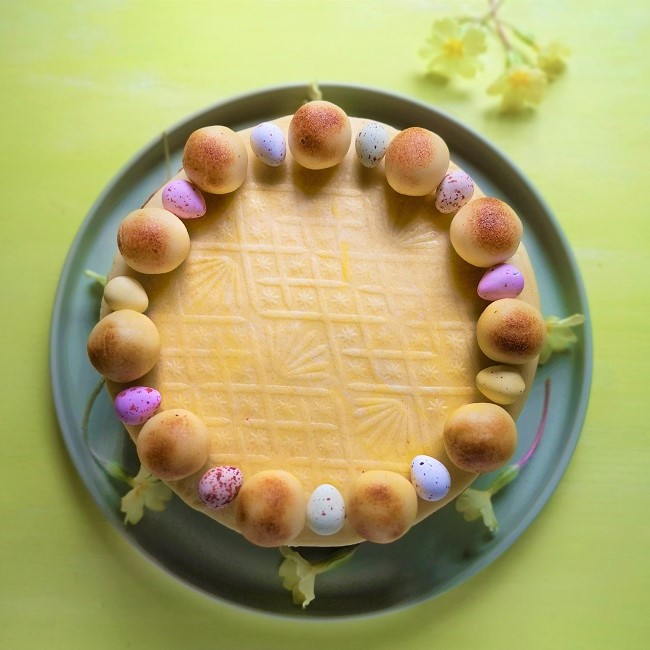
Happy Easter everyone. I hope you have a good Easter holiday. I’ve had a busy few weeks so Easter has crept up on me and caught me ill-prepared this year. Even though I am having a quiet one at home, I still wanted to do something to mark the occasion. Having no time to bake afresh, I set to this afternoon and transformed my stored and completely forgotten Christmas cake into a Simnel cake, ready to serve this weekend. And very successful it was to.
Last minute Easter cake. Image: Kathryn Hawkins
If you fancy having a go yourself, this is what I did.
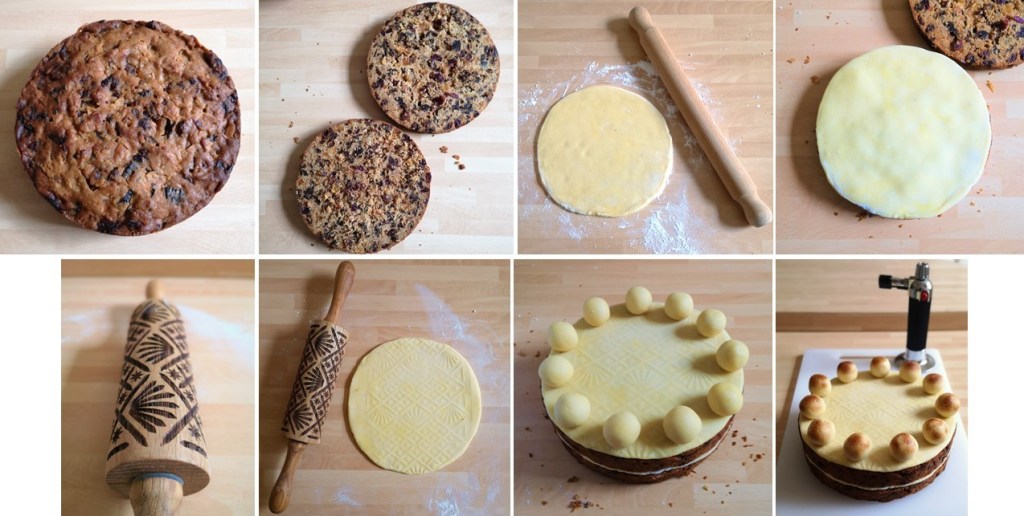
Transforming Christmas into Easter. Images: Kathryn Hawkins
Slice a 20cm gluten-free, dairy-free, vegan fruit cake in half and brush both sides with a little apricot jam. Roll out 200g marzipan to fit the cake and place on one half.
Sandwich together with the other piece of cake. Turn the cake upside down and brush with more jam. Roll out a further 200g marzipan to fit the top. I embossed the top using an engraved rolling pin before laying on top of the cake.
Roll 11 x 15g marzipan balls for the top of the cake and either brown lightly under the grill or with a kitchen blow torch. Arrange on top of the cake and serve decorated with mini eggs and fresh primroses.
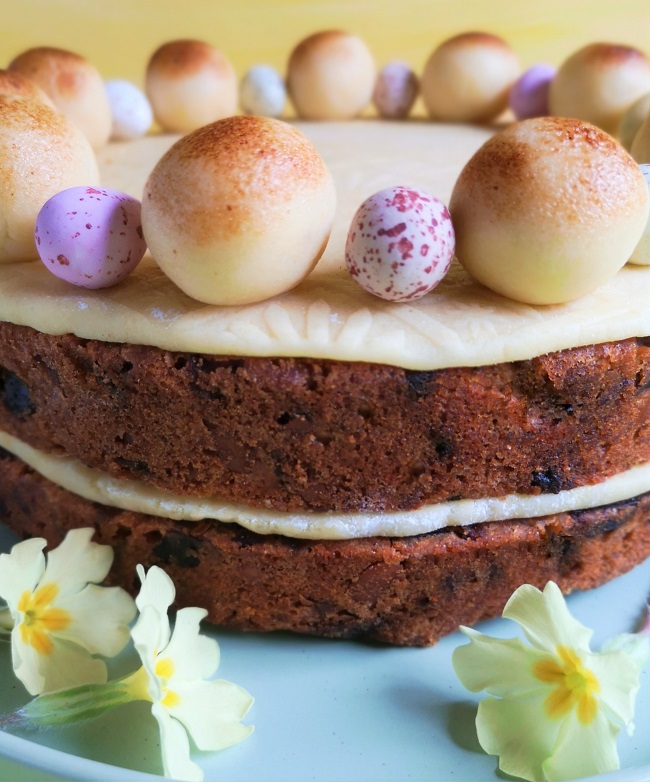
My Cheat’s Simnel cake close-up. Image: Kathryn Hawkins
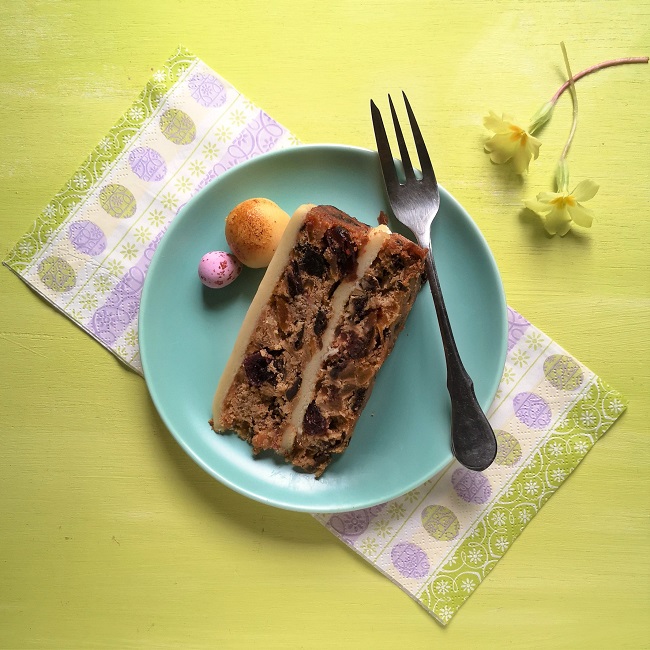
Easter in a slice. Image: Kathryn Hawkins
Until next time, enjoy the colours and flavours of this wonderful season. See you again soon 🙂
Easter primroses from my garden. Image: Kathryn Hawkins
I’ve been wanting to have a go at making my own sushi-style sticky rice rolls for some time, but have never quite got round to it. But having the right combination of ingredients at last, I have finally been able to experiment, and I am very pleased with the results. Sushi Master I am not, but hopefully good enough to tempt you into giving my easy recipe and method a try.
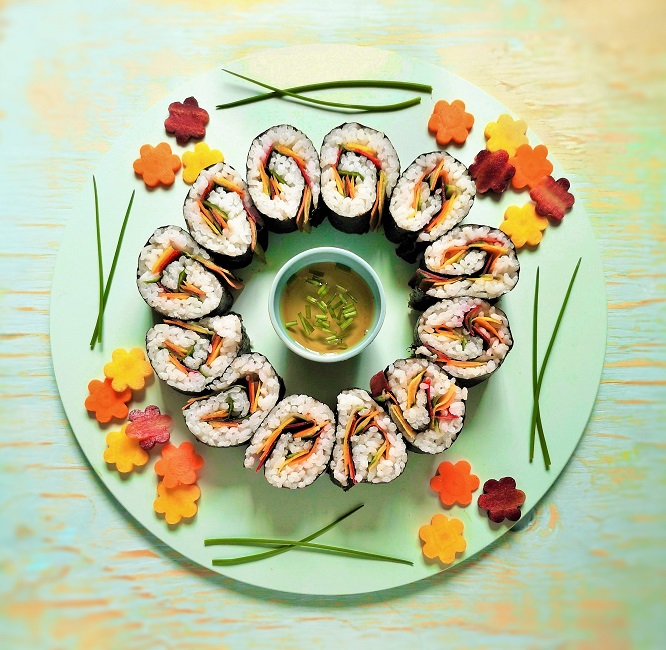
Rainbow rice rolls. Image: Kathryn Hawkins
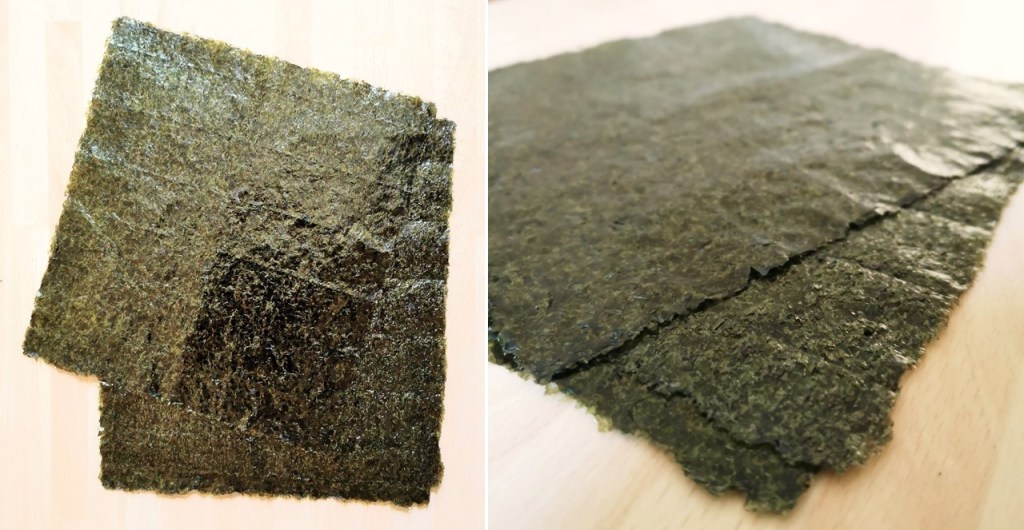
The basic “must-have” ingredients are sheets of dried seaweed called Sushi Nori – I used 19 x 21cm sheets made by Clearspring. They have a rougher-textured side and a shiny side. Shiny side faces down when you make up the rolls. The sheets are dry and fairly crisp until you put the rice and filling on them, and then they soften and form a tasty edible wrapping for the rolls.
Dried nori seaweed sheets. Images: Kathryn Hawkins
For the filling, you need sushi rice or sticky rice. This is a short-grain variety which is very starchy so when it is cooked it clumps together. You can use other grains but they probably won’t cling together enough for neat slicing. I should imagine that Chinese glutinous rice and Arborio rice might also work but you’d need to do some experimenting with cooking times to make sure they don’t overcook and become mushy.
Sushi rice in the raw. Images: Kathryn Hawkins
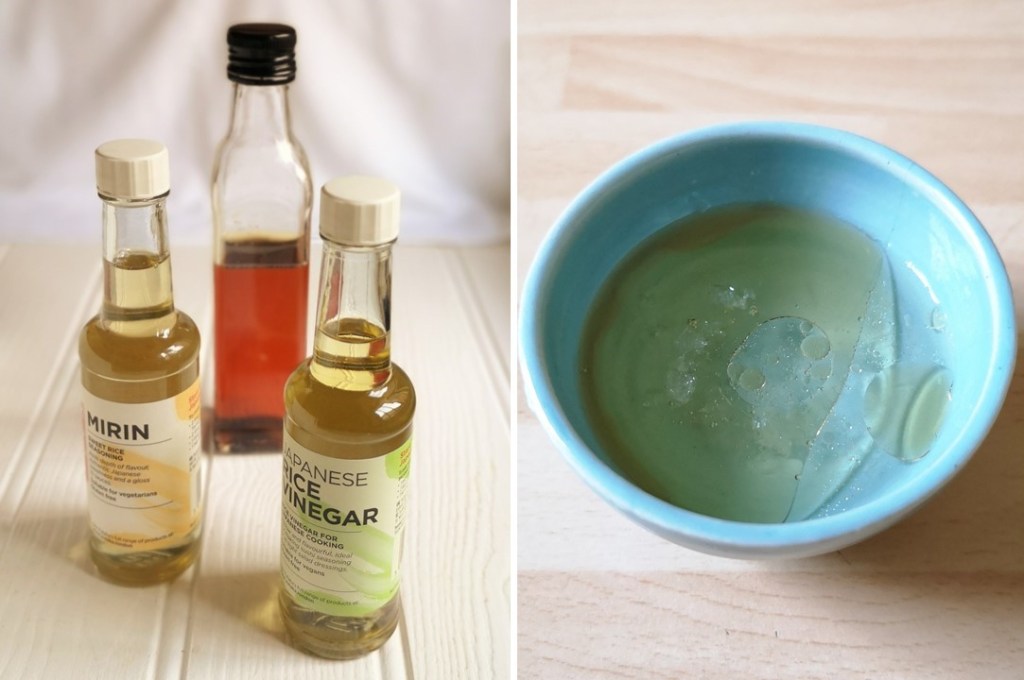
How you season the freshly cooked rice is up to personal taste. I do like the traditional subtle Japanese flavours of mirin and white rice vinegar. I also added a little sesame oil for some nuttiness, and of course a little salt and sugar for classic seasoning.
Seasonings for sticky rice. Images: Kathryn Hawkins
And finally, the filling. This needs to be thinly sliced and quite flexible for easy rolling. The key to a good roll is not to overfill it and to keep the covering nice and even. I went for thin ribbons of vegetables which I prepared with a vegetable peeler. Grated vegetables would also work in a thin layer. Other things to try could be a sprinkling of toasted seeds; some thinly sliced or grated smoked tofu, or mashed avocado.
Rainbow carrots. Images: Kathryn Hawkins
Makes: 12
Ingredients
125g raw sushi rice
1 tbsp mirin
1 tsp white rice vinegar
1 tsp caster sugar
½ tsp sesame oil
½ tsp sea salt
2 sheets sushi nori
A few thin strips of rainbow carrots and cucumber (approx. 22 carrot and 8 cucumber)
Dipping sauce to serve – I mixed sesame oil with mirin, a little salt and sugar and freshly chopped chives
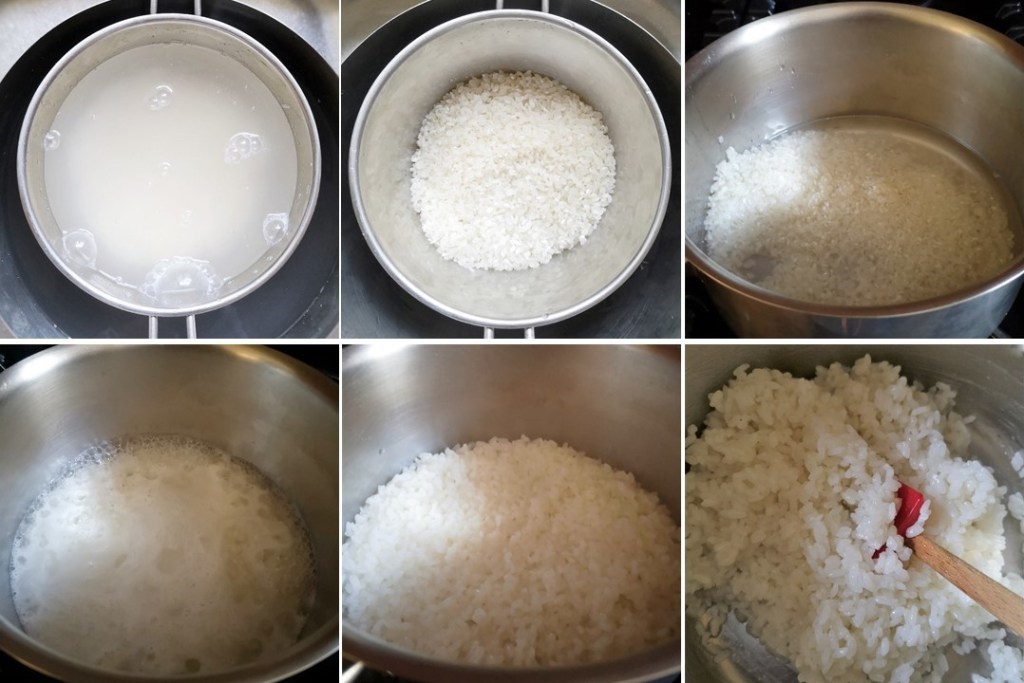
First prepare the rice. Rinse the rice several times in cold water. Drain and put in a saucepan with 200ml cold water. Bring to the boil, cover and simmer gently for 10 minutes until the water is absorbed. Turn off the heat and leave to stand for 15 minutes.
2. Mix together the mirin, vinegar, sugar, oil and salt. Stir into the rice and leave to cool.
Sticky rice preparation and cooking. Images: Kathryn Hawkins
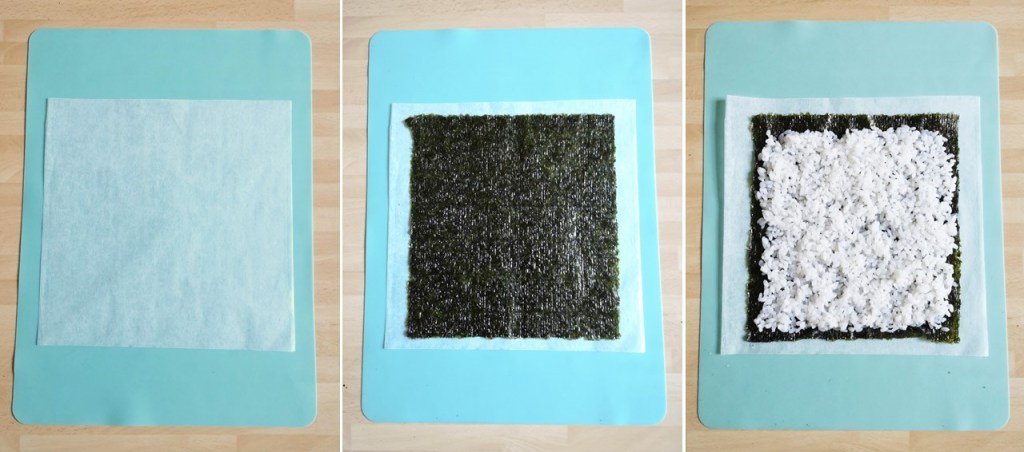
3. Lay a piece of parchment just bigger than the nori sheet on a dry silicone mat or chopping board. Lay the nori, shiny-side down, on top and spoon over half the rice.
4. Carefully spread the rice over the seaweed, leaving 1cm clear at one end and at both sides. At the other end, leave a 2cm gap where the roll will finish. Make sure that the rice is evenly spread and flattened.
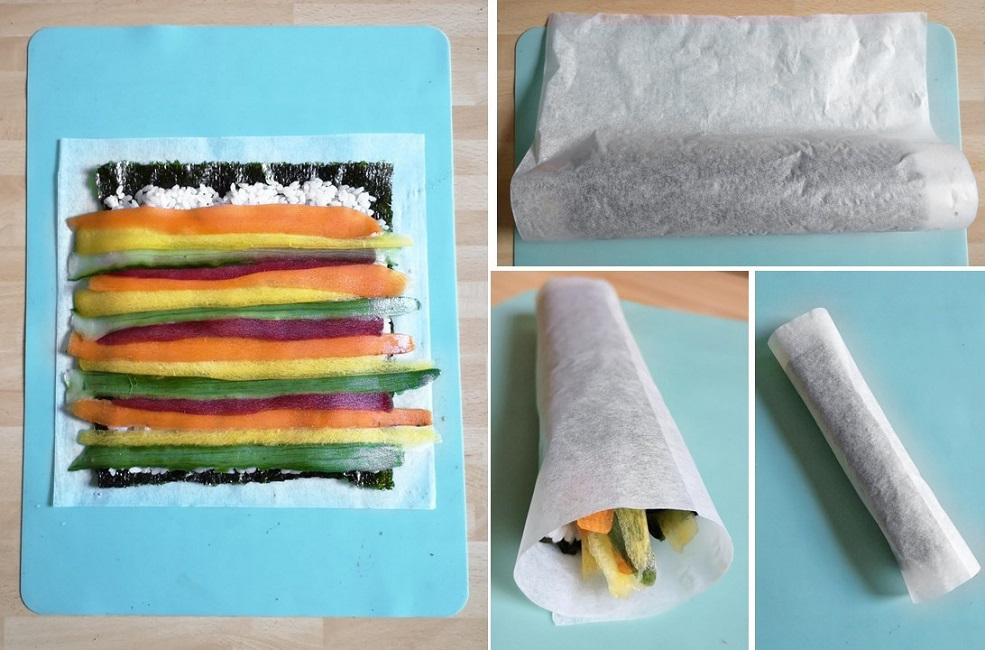
Ready to roll. Images: Kathryn Hawkins
5. Lay the filling neatly on top. Using the parchment to help you, begin rolling from the near edge, keeping the filling in place with your fingers. Roll firmly without pressing to avoid squashing the filling. Once rolled, wrap the parchment around the roll completely and chill for at least an hour before slicing. Repeat with the remaining ingredients to make up another roll.
Sticky rice roll filling and rolling. Images: Kathryn Hawkins
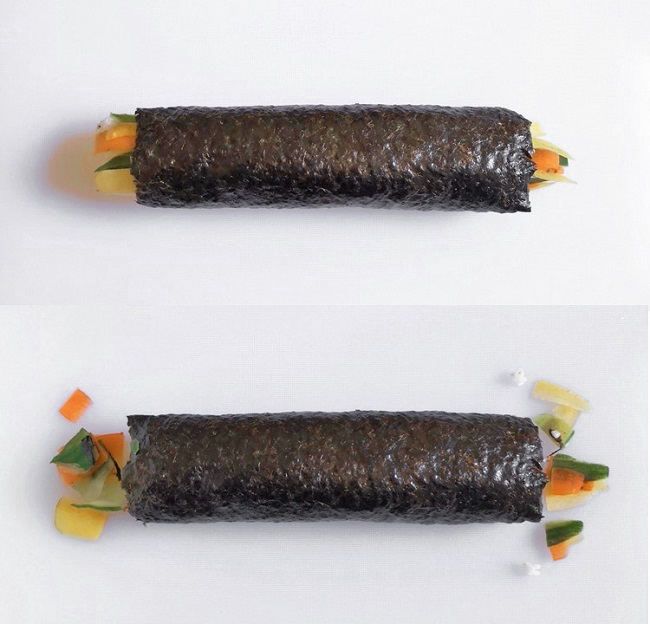
6. When ready to serve, unwrap the rolls and discard the parchment. Slice off any overhanging vegetables from each end to neaten, then ussing a sharp knife, cut each roll into 6 slices.
Rolled rolls before and after trimming. Images: Kathryn Hawkins
Your sticky rice rolls are now ready to serve. I arranged mine on a serving platter with the dipping sauce in the middle. I cut out some flower shapes from thin carrot slices and added a few chives to garnish.
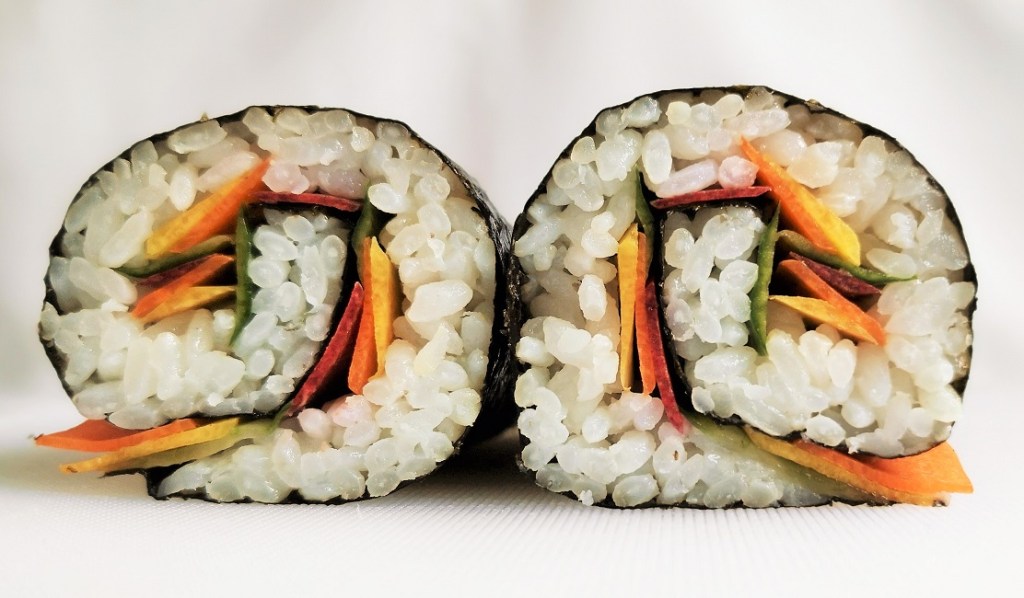
Rice roll sliced in half. Image: Kathryn Hawkins
I love the colours of the rainbow carrot and cucumber combination, very cheery for the soul, healthy and delicious to eat on a spring day for or a picnic.
That’s me for another month. Until next time, take care and keep safe.
Cauliflower greens with creamy, wild garlic sauce. Image: Kathryn Hawkins
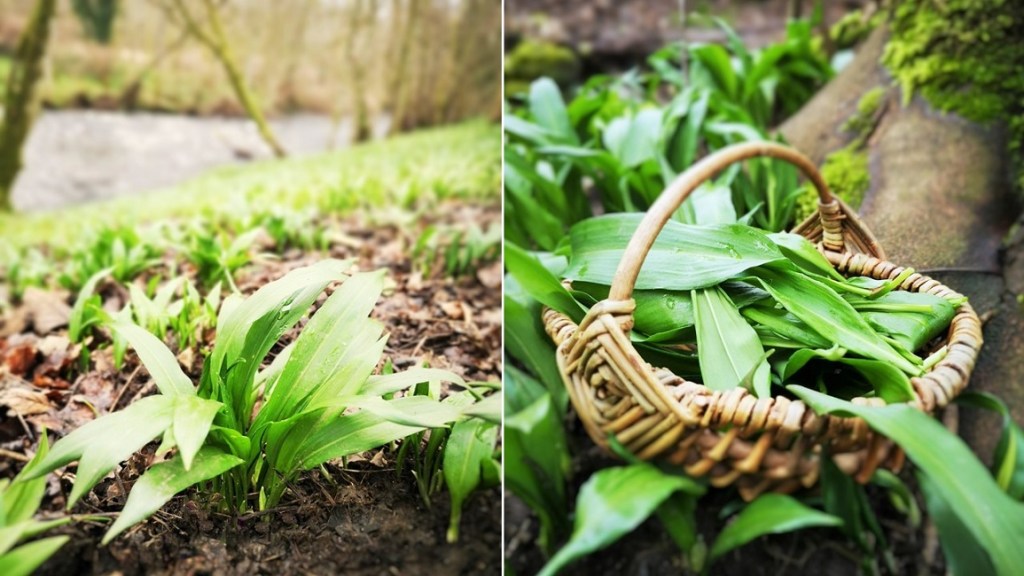
It really does feel like spring has sprung. This week, I have been out picking my first wild garlic of the season from the banks of the River Earn here in Perthshire. And what better way to use this wonderful natural freebie, than a thrifty recipe idea which helps you reduce food waste as well. If you are out picking wild garlic over the next few weeks, only pick 1 or 2 leaves from well established plants, and only in an area where there are plenty of plants growing.
New season Scottish wild garlic. Images: Kathryn Hawkins
Since I realised how delicious cauliflower greens are, I have been choosing the vegetable untrimmed and with as much foliage as possible. The leaves often look a bit wilted and sad, but after popping them in a bowl of cold water, they plump up again in no time. Rinse and drain, and then they are ready to use just like spring greens or cabbage.
Preparing cauliflower stalks and leaves. Images: Kathryn Hawkins
Once you have revived the cauliflower greens, slice or rip the leafy part from the stalks. Trim the stalks and get rid of any damaged bits, then chop finely. Shred up the leaves and set aside. I ended up with 270g leaves and stalks from one smallish cauliflower.
Washing and prepping wild garlic leaves. Images: Kathryn Hawkins
Always wash wild garlic very well in plenty of cold water. Drain and shake dry – I find my salad spinner useful for this. Trim and shred the leaves for immediate use, or put whole washed leaves in a food bag or sealable container in the fridge for up to 4-5 days.
Celery and leek for extra flavour. Images: Kathryn Hawkins
The other ingredients for the base of the sauce are some chopped celery stalks – you can see that this one had been in the bottom of my fridge for a while ! (By the way, I ate the celery leaves in a salad) Once trimmed and chopped, I had about 90g celery stalks. I also sliced up a large leek.
Here’s the very simple recipe method to make enough sauce for 3-4 portions:
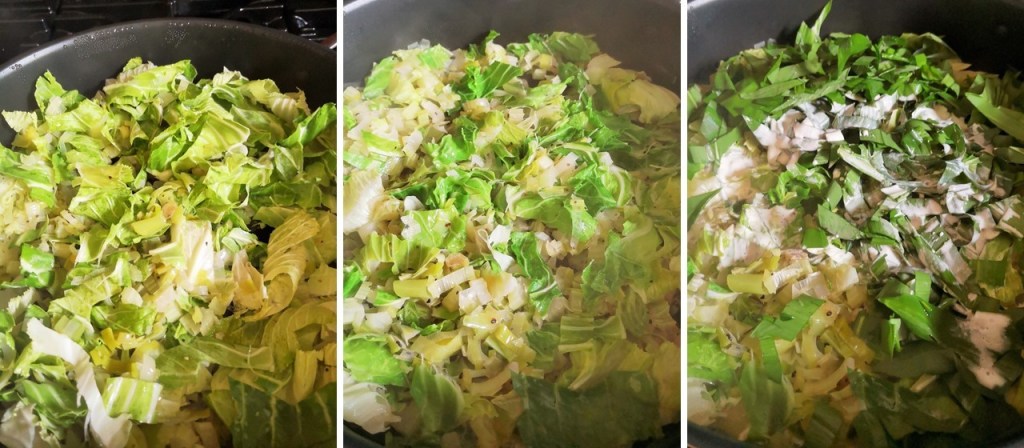
Melt 25g plant butter with 1tbsp olive oil or other vegetable oil until bubbling, then add the chopped cauliflower stems, celery and leek; season with salt and ground black pepper and stir for 1 minute until well mixed. Turn the heat down to low, cover and cook gently for 10 minutes to soften
Mix in the cauliflower leaves, re-cover and cook gently for 5 more minutes.
Finally, add about 40g chopped wild garlic leaves and 150ml plant-based double cream – add more if you want a looser consistency. Stir over a low heat for 3-4 minutes until wilted down, then cover, turn off the heat and let stand for 10 minutes before serving.
This 6 stages of sauce. Images: Kathryn Hawkins
Creamy greens ready to serve. Image: Kathryn Hawkins
And that’s it. A delicious green sauce for serving over pasta or rice, or as an accompaniment to griddled cauliflower steaks or roast cauliflower florets. If you don’t have access to wild garlic, add a couple of crushed garlic cloves to the sauce base at the beginning.
Until next time, enjoy Spring, happy foraging, and take care 🙂
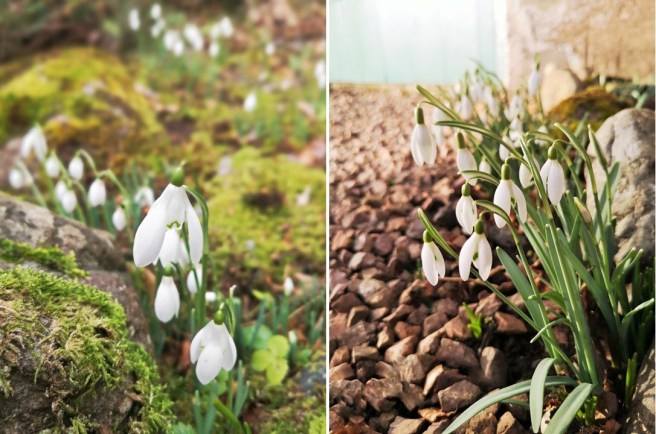
Garden snowdrops in the February sunshine. Image: Kathryn Hawkins
It has been a lovely sunny day here today, so different to the weather we experienced in the middle of the week. My post to round off the month is one that I had intended to write last year but never quite got all the images together in time. Now more than ever, it seems very fitting to write about this peaceful-looking, delicate little flower, a symbol of hope for many, and one that brings signs of new life and spring at this time of year.
Snow-fall earlier this week. Image: Kathryn Hawkins
The snowdrop (Galanthus nivalus) is one of the first signs of spring for many of us. Although they look so fragile and vulnerable, they are very hardy, and I can prove it. After several centimetres of snowfall this week, every single one in the garden has bounced back completely unharmed.
The pure white flowers with their bright green flashes can be found all over Europe from the beginning of the year onwards. They are native to southern Europe. In the UK, their history is a bit unclear but they have been noted in garden journals for a few hundred years, escaping to the wild some time later. During the Crimean War of the 1850’s, the hills surrounding the battlefields were reportedly covered in snowdrops. Soldiers returning from this war brought the bulbs back to their wives and sweethearts in the UK, and the Crimean snowdrop (Galanthus plicatus) took up its residence as part of the British landscape. There are over 2000 varieties of snowdrop, and the national collection of 350 varieties are grown on the Cambo Estate in Fife, East Scotland.
Snowdrops in my garden today. Images: Kathryn Hawkins
In February last year, I was taking a walk around some nearby country roads, admiring the scenery and enjoying the peace. Monzie is a small hamlet at the foothills of the Highlands, right behind the town where I live. I had never done the walk at this time of the year so it was a lovely surprise to round the corner in the road and come across so many wild snowdrops growing over the banks, over the old stone bridge and in the grounds of the local church, Monzie Kirk.
When I was taking the photographs today in the garden, I noticed a couple of flower-heads had upturned. This is the first time I have seen the underside of the petals. Very pretty they are too.
We’ve certainly had a lot of weather here in central Scotland since my last post. Sunshine, strong winds, heavy rain, snow and frosts. Yet I am happy to report that the garden is slowly coming to life; the birds are feeding constantly and singing ever louder, and at times it does feel that spring is on its way.
February sunshine, snow and frost. Images: Kathryn Hawkins
This is the month when the first proper spring flowers appear in the garden, the snowdrops. There are a few clumps here and there already, but towards the end of the month is when they will really takeover. At the moment, many are still in bud, with just one or two opened up to see the tiny green markings on the inside petals. So pretty and delicate, yet strong enough to stand up to all sorts of weather.
Snowdrops in the shade and in the sun. Images: Kathryn Hawkins
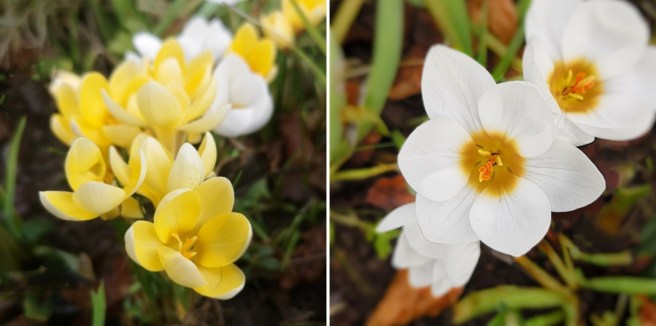
Another sign of spring for me is when the crocus appear. I just managed to capture these beauties before they got crushed by a heavy downpour of rain. I hope they bounce back again.
The first crocus of 2022. Images: Kathryn Hawkins
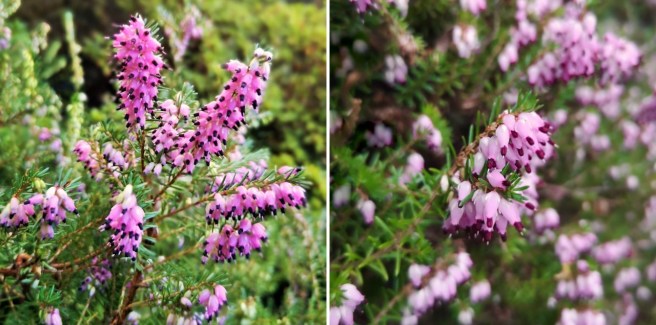
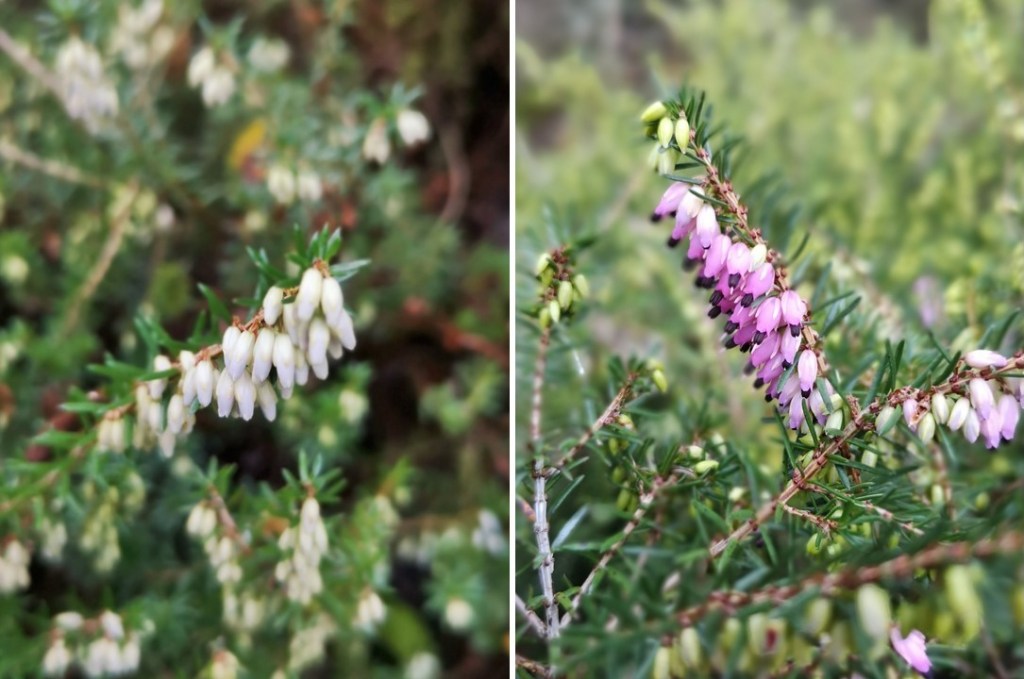
The winter heathers started flowering at the very end of last year and are now looking very healthy, adding splashes of pink and white to the flower beds.
Pink and white winter heathers. Images: Kathryn Hawkins
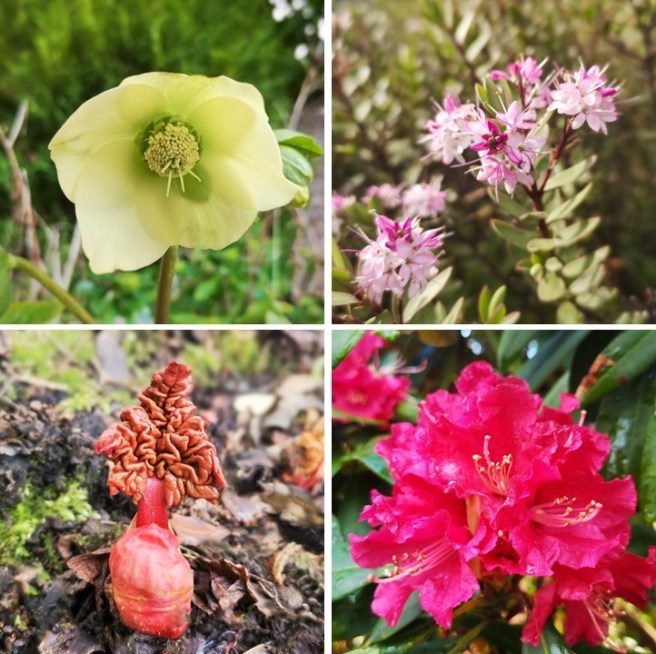
The first Hellebore is fully open now with others not far behind. The Hebe that started flowering in December is still producing blooms. I am delighted to see the first bright red shoots of rhubarb up and coming, promising delicious rewards later in the year, and the deep pink Rhododendron is slowly opening up – a bit later than in other years.
Blooms and shoots: Hellebore, Hebe, Rhubarb and Rhododendron. Images: Kathryn Hawkins
There are more storms and wintry weather on the horizon for the UK in the week ahead so perhaps it is just as well that the garden isn’t too far advanced at the moment. Until next time, thanks for stopping by and my best wishes to you.
Hello again. It’s the time of year for me when I try and use up as much from the freezer as I can, both for reasons of economy and also to make sure there is room for any new season produce that comes along. In the past few days, the freezer fruit drawer has attracted my attention; the jam pan came out of the cupboard and another cooking session began.
Frozen Summer berries from 2021. Images: Kathryn Hawkins
I wasn’t that sure how the jam would taste if I put all the berries I had in one pot. I always have lots of raspberries from the garden but last year also produced some great hedgerow blackberries as well as homegrown salal berries and a few strawberries I decided to freeze down. I settled on 2 combinations: raspberry, strawberry and blackberry, and raspberry with salal berries. I made 2 separate batches of the recipe below.
The vital ingredient. Image: Kathryn Hawkins
When raspberries are fresh they have a lot of the setting agent pectin present, and any jam made with the fresh berries sets very quickly. However, freezing fruit destroys some of the pectin, so it is important to add freshly squeezed, pectin-rich lemon juice to any frozen fruit mix to compensate for the loss – redcurrant juice will also work. Otherwise, jam-making with frozen fruit is exactly the same as with fresh.
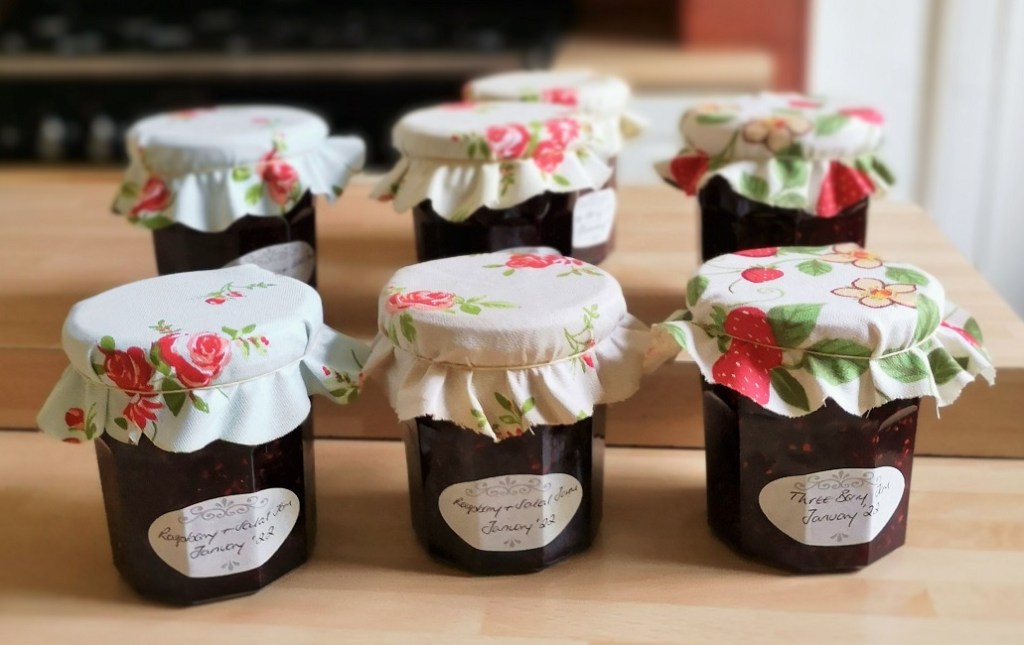
Jars ready for jam. Image: Kathryn Hawkins
Make sure your jars and lids are sound – no signs of corrosion on the lids if you are recycling – and thoroughly clean them in hot soapy water. This should mean that your jams, jellies and other preserves will store in perfect condition for many months ahead.
I have reduced the sugar content slightly in the recipe. Usually berry-based jam recipes suggest equal sugar to fruit, but I have found you can reduce the quantity slightly and still maintain a good set and a lengthy period of storage time.
Makes: approx. 1.2-1.4kg
Ingredients
900g frozen berries – I used 300g each frozen raspberries, blackberries and strawberries, and then for the second batch, 450g each of raspberries and salal berries
750g granulated white sugar
2tbsp freshly squeezed lemon juice
Put the berries in a large saucepan or preserving pan and allow them to semi-defrost so that the juices begin to run. When slushy, heat the fruit gently until steaming, cover with a lid and simmer for about 10 minutes or until very soft and pulpy.
2. Add the sugar and lemon juice, and stir over a low heat until the sugar dissolves.
Cooking the fruit. Images: Kathryn Hawkins
3. Raise the heat, bring to the boil and cook the fruit uncovered until the temperature reaches 104 – 105°C on a sugar thermometer. If you don’t have a thermometer, check the jam after about 5 minutes of rapid boiling by spooning a small amount on to a cold plate. If you can push the jam with your finger and see wrinkles on the surface, the jam has reached setting point.
4. Turn off the heat and let the jam settle for 5 minutes. Stir and skim away any scum from the surface of the jam. Spoon into clean jars and seal with the lids while the jam is still very hot.
Testing for setting point and spooning into jars. Images: Kathryn Hawkins
Homemade jam sealed properly and stored in a cool, dry cupboard should keep for many months. If you have insufficient jam to fill a jar completely, let the jam cool before putting the lid on and then keep in the fridge for up to 6 weeks. I had some jam leftover from both batches which meant I could taste the fruits of my jam-making labours instantly 🙂
Ready to enjoy, three berry jam. Images: Kathryn Hawkins
Homemade raspberry and salal berry jam. Images: Kathryn Hawkins
Great set, lovely rich colours, and above all else, delicious homegrown berry flavours in the depth of winter.
It looks like a wintry week ahead for this part of Scotland so I may just have to tuck into another jar to remind me of the summer just gone. All the best for now. Until next time, take care.
It’s coming up for the time of year again when we celebrate the birth of Scotland’s national poet, Rabbie Burns. Last year was a subdued affair due to the pandemic, but this year I’m sure will see more celebrations this coming Tuesday 25th as restrictions are eased.
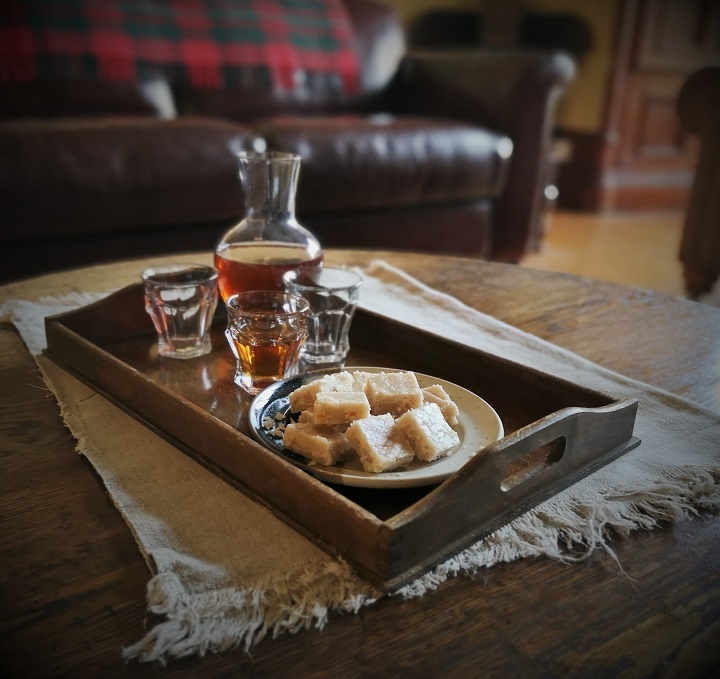
Gingerbread tablet and ginger wine. Image: Kathryn Hawkins
I thought I would share a well known Scottish sweetie recipe with you. It’s easy to make and makes the perfect treat to serve with after dinner coffee or a wee dram of whisky or ginger wine. Traditionally made with dairy condensed milk and butter, I have simply switched to vegan alternatives, but the recipe will also work with dairy products if you so wish.
Vegan tablet ingredients. Image: Kathryn Hawkins
Tablet is a bit like fudge but is less creamy and has a more sugary, firmer texture. I guarantee one piece will not be enough. I have added some chopped preserved ginger and mixed spice to a basic recipe to give a classic gingerbread flavour, but really any flavouring goes from vanilla extract or fruit zest to salted caramel or whisky. I’ll leave you to come up with your own versions, and in the meantime, here’s the recipe.
Makes: 36 squares
Ingredients
50g plant butter
150ml water
450g granulated sugar
115g vegan condensed milk
50g chopped preserved ginger
1tsp ground mixed spice
A large pinch of salt
1. Line an ungreased 18cm square tin with waxed paper or silicone parchment. Put the plant butter and water in a large saucepan and heat to melt. Add the sugar and stir over a low heat until completely dissolved.
2. Bring to the boil, stir in the condensed milk and simmer for between 5-10 minutes to reach 115°C on a sugar thermometer. Stir the mixture frequently to prevent the mixture sticking to the pan and burning. If you don’t have a thermometer, after about 5 minutes drop a small amount of the mixture into a glass of cold water and if it forms a soft ball it is ready.
3. Remove from the heat, add the ginger, spice and salt and continue to stir until the mixture begins to become grainy – this will take around 5 minutes. Don’t let it get too thick, you should still be able to pour it. Pour into the prepared tin and smooth the top.
Making tablet. Images: Kathryn Hawkins
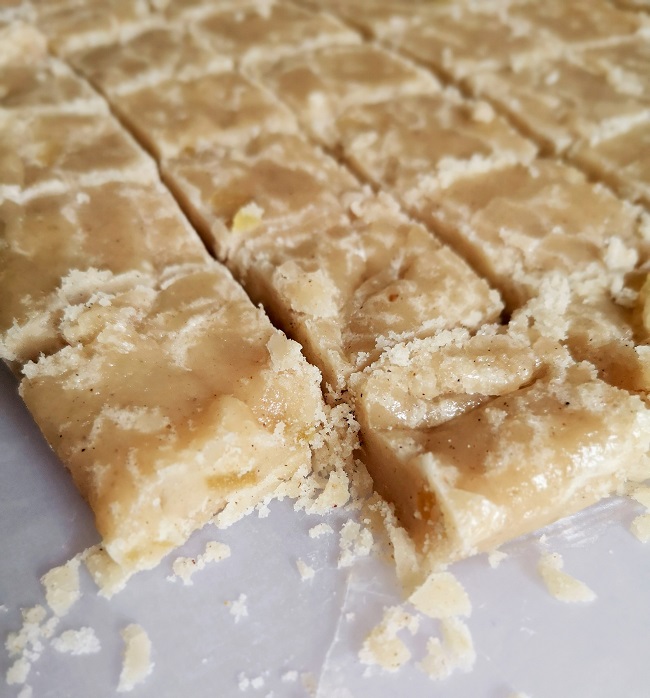
5. Leave the tablet to cool sufficiently to allow you to score the top into 36 squares, then leave to cool completely.
6. When it hard, use the paper to help lift out the tablet, and peel away the paper edges. Cut the squares through completely.
Freshly cut squares. Images: Kathryn Hawkins
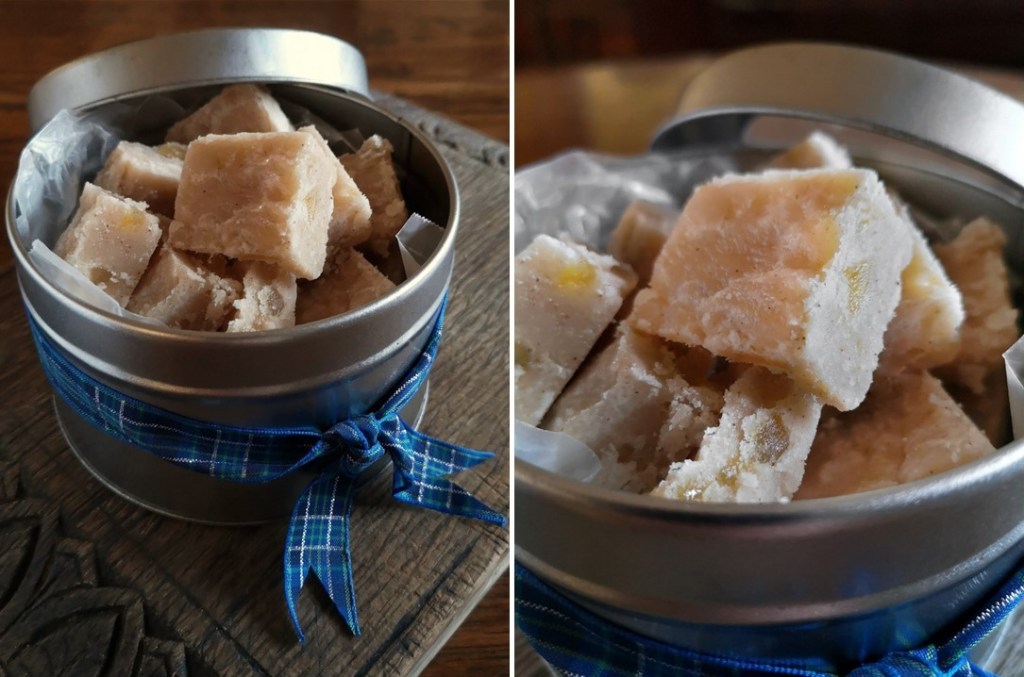
If you can leave it alone long enough, tablet stores for at least 2 weeks in an air-tight tin or container. It makes a lovely edible gift at any time of the year.
Store tablet in an air-tight tin. Images: Kathryn Hawkins
Whatever you’re up to on January 25th or for the rest of the month, I hope you have a good time. I raise a glass to you and say “Slàinte” 🙂
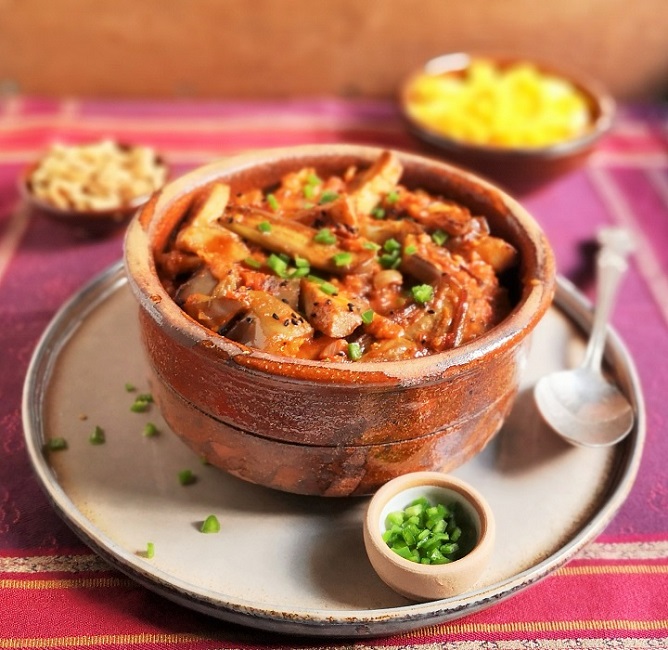
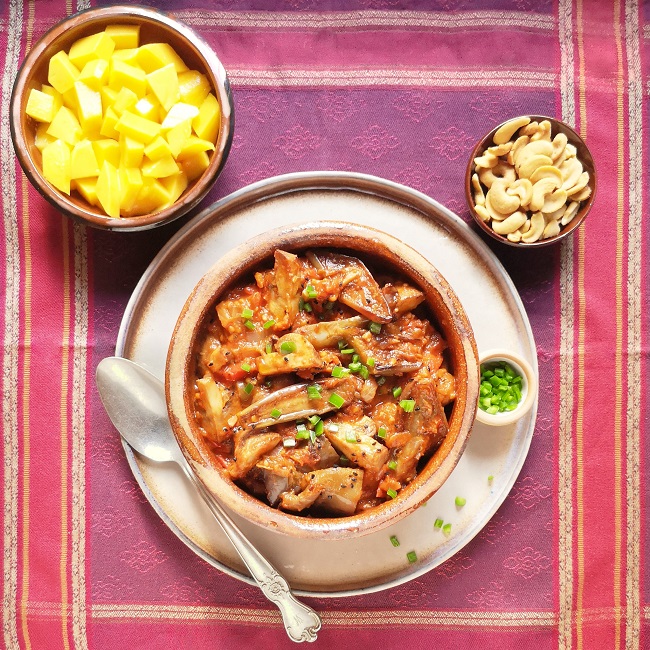
Aubergine in spicy tomato sauce with green chilli sprinkle. Image: Kathryn Hawkins
With a nod to the widely adopted new name for the first month of the year, Veganuary, I have for you this week a tasty, warming and comforting dish which fits the season very well. Aubergine (egg plant) is one of my favourite vegetables and I especially like eating it in a garlicky tomato or curried sauce. In this recipe, I combine these two flavours in one sauce to make a dish that can be served as a main meal or as a side to go with other spicy foods. It’s tasty cold as a salad as well.
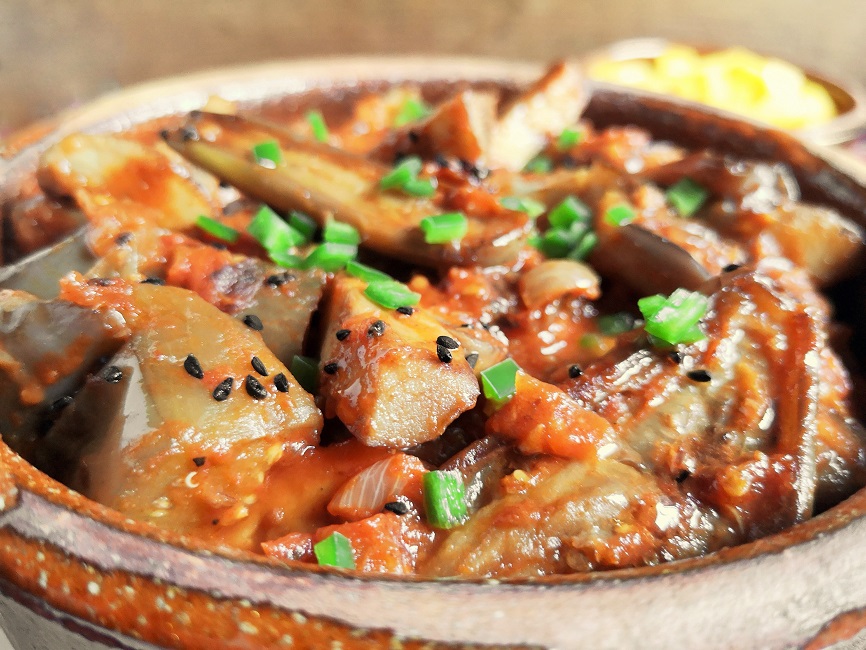
Up close on spiced aubergine (egg plant). Image: Kathryn Hawkins
November seems like a long time ago now, but that is when I harvested my homegrown aubergines (egg plants). I grew the variety Slim Jim in my greenhouse; just a couple of plants as a trial. They got off to a slow start but by the autumn both plants were doing well, and produced several small and neat, very pretty, lilac-coloured fruits.
Home-grown Slim Jim aubergines (egg plant). Images: Kathryn Hawkins
You can use any variety of aubergine for this recipe. I always salt before cooking, regardless of variety. I find that drawing out some of the water before cooking helps to soften it so that it cooks to a melting tenderness. By the way, replace the mushrooms with more aubergine if you prefer. I hope you enjoy the recipe.
Serves: 2 as a main meal or 4 as a side dish
Ingredients
1tsp each of cumin and coriander seeds
½tsp ground fenugreek
¼tsp ground black pepper
5tbsp vegetable oil
1 onion, peeled and chopped
2 cloves garlic, peeled and finely chopped
1tsp freshly grated root ginger
1 bay leaf
400g tomatoes, canned or fresh, chopped
2tbsp tomato purée
Salt
250g aubergines (egg plant), chopped or sliced
200g brown (chestnut) mushrooms, wiped and quartered
1tsp black onion seeds
Chopped green chilli and fresh mango to serve
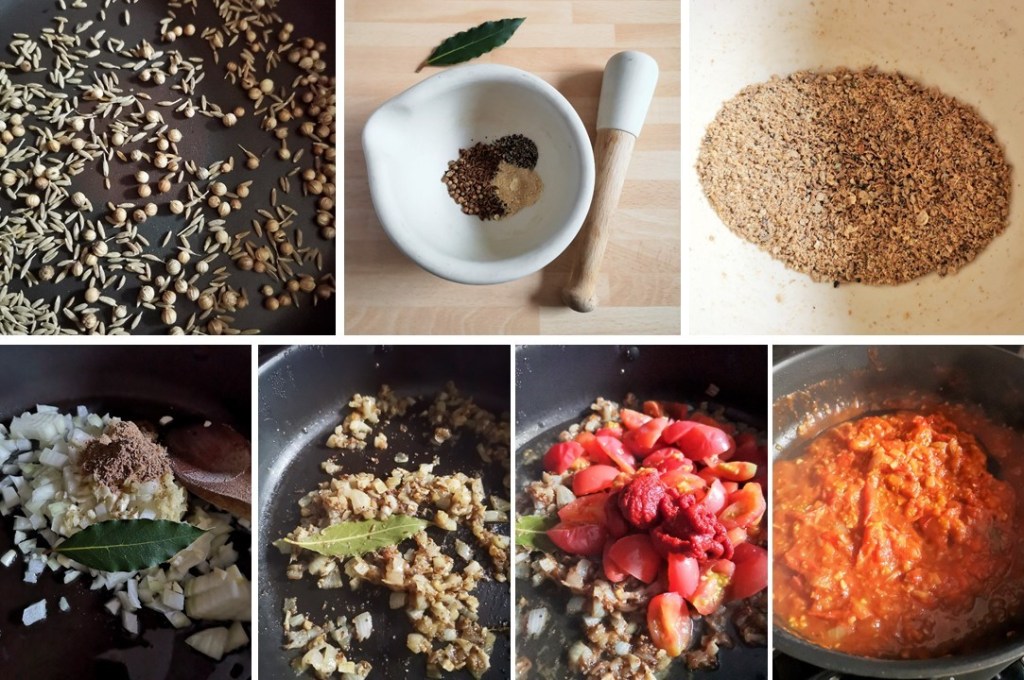
1. Toast the spice seeds lightly in a small hot, dry frying pan for 2-3 minutes until lightly golden. Cool, then grind finely with the fenugreek and black pepper.
2. Heat 2tbsp oil in a frying pan and stir fry the onion, garlic, ginger and spices with the bay leaf for 1-2 minutes, then cover with a lid and cook gently for 20 minutes until soft.
3. Add the tomatoes, purée and a pinch of salt, bring to the boil, cover and simmer gently for about 15 minutes until soft. Leave aside.
4. Meanwhile, stand a colander or strainer on a plate or over a bowl. Layer the aubergine, sprinkling generously with salt as you go, and leave to stand for 30 minutes. Drain and rinse very well, then pat dry with kitchen paper.
5. Heat 2tbsp oil in a frying pan until hot and stir fry the aubergine pieces for 2-3 minutes until lightly browned. Drain on kitchen paper. Heat the remaining oil and cook the mushrooms in the same way. Drain.
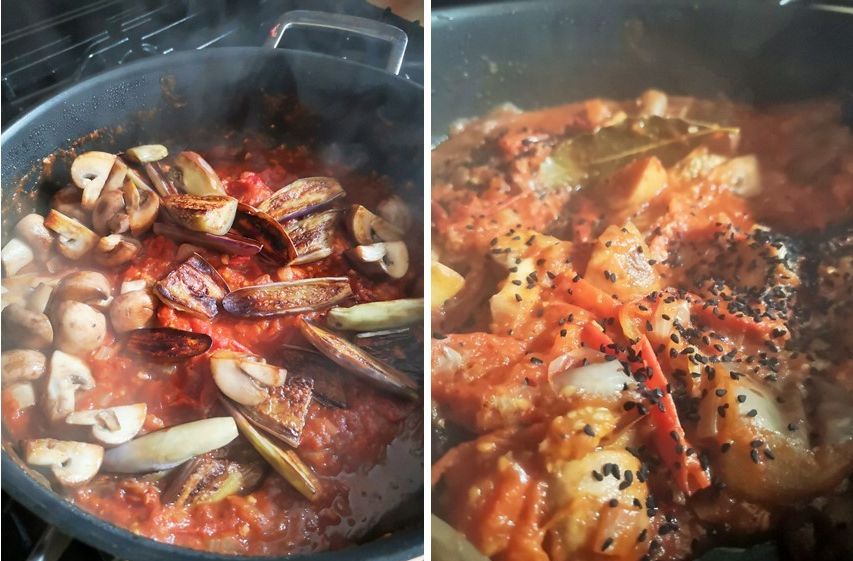
6. Add the vegetables to the spiced tomato sauce, mix well and bring to the boil. Cover and simmer gently for 20-30 minutes until tender and cooked through. Turn off the heat, sprinkle with black onion seeds then cover and stand for 10 minutes. Discard the bay leaf.
Cooking the vegetables in the sauce. Images: Kathryn Hawkins
Serve sprinkled with freshly chopped green chilli and accompanied with fresh mango. Delicious over rice or with naan breads with a sprinkling of roasted cashew nuts for crunch.
A spicy feast. Image: Kathryn Hawkins
That’s all from me this week. I’ll be back towards the end of the month with something suitably Scottish to celebrate Burns Night. Until then, best wishes and keep safe.
Happy New Year! I hope you have enjoyed a good Christmas and new year holiday. Now it’s time to get on with 2022. Let’s hope it’s a good year for all of us.
It’s been very mild here in the UK all over the holiday period. I believe the warmest UK New Year’s Day temperature on record was recorded. Sadly it’s also been mostly damp, misty and wet, so not much fun being outside. However, it’s all set to change, with colder air moving in, clearer skies on the horizon, and snow and ice in the forecast. Brrrrrr…………
I haven’t spent much time that much time out in the garden recently, but I have noticed a few changes this year compared to other years. I expected to have some nice images of snowdrops or the perennial primrose to show you, but no sign so far. No rhododendron blooms nor hellebore buds either. Instead, I found a few surprises.
New year poppy. Images: Kathryn Hawkins
This poppy was in flower at the beginning of December and you can see the buds of flowers yet to come. The second image was take on New Year’s Eve when the last of the buds opened.
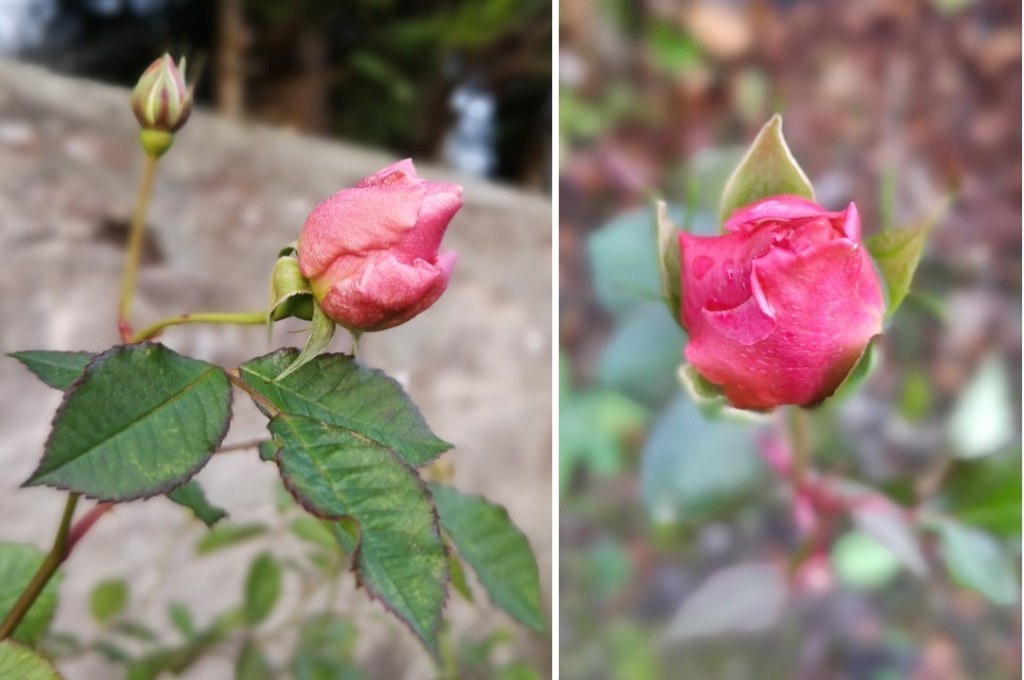
January rose-buds. Images: Kathryn Hawkins
These buds are on 2 different rose bushes in different locations in the garden. I had thought that the buds might open up, but I suspect that the lack of sunshine and shorter daylight hours have kept them closed tight. With the temperature on the way down now, I picked them today and now have a delightfully fragrant, home-grown posy on my desk 🙂
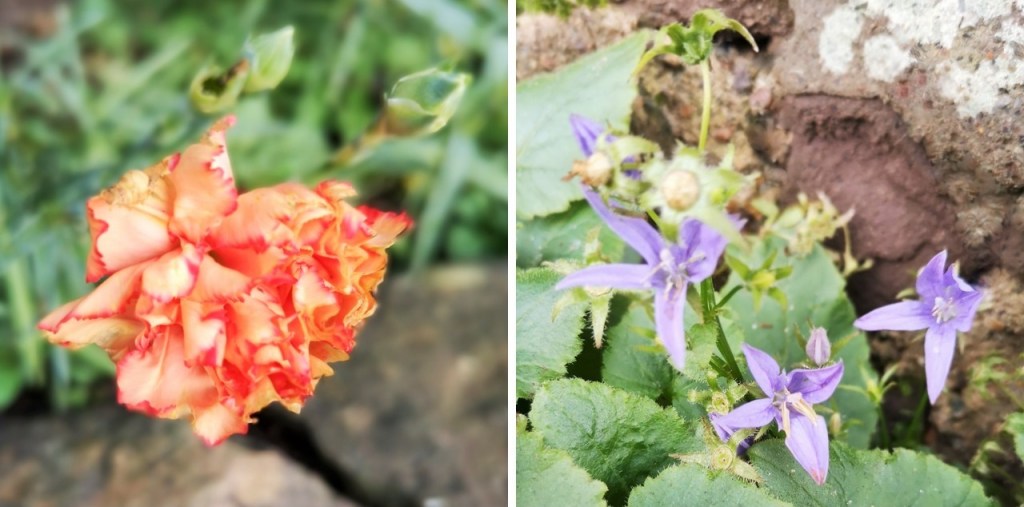
New year roses. Image: Kathryn Hawkins
Looking a wee bit sad now, this is the last of the carnations. The plants have been in flower since early September so I think they deserve a rest now. And, flowering on and off for many weeks now, the trailing campanula is still producing fresh flowers in the more sheltered parts of the garden.
January Carnation and Campanula. Images: Kathryn Hawkins
Something more seasonal to end my post with, the winter-flowering heathers have started to open up. Usually, the plants are covered in flowers by now, but this year, there are only a few sprigs in bloom at the moment.
I will be in the kitchen again for my next post, so until then, I hope you keep well and stay safe, and I send you my very best wishes for the year ahead.
Very Christmassy, snowflake pies. Image: Kathryn Hawkins
Hello again. With the Christmas break just a few days away, my post this week is a very simple and very seasonal dessert recipe which is easy to make and pretty to look at. With little snow in the forecast for the UK this year so far, this sweet treat is probably the closest I will come to experiencing a White Christmas.
Light and fluffy, snowflake pie. Image: Kathryn Hawkins
Assembled in paper cupcake cases, the pies have a biscuit crumb base, and a topping simply made from vegan marshmallows and plant-based double cream. All very straightforward. I flavoured the topping with vanilla extract but you could add some citrus zest or Christmas spice. As you can image, the pies are quite sweet, but I found they paired perfectly with cooked cranberries. I think orange, rhubarb or raspberries would also work very well – something with a bit of acidity is ideal. OK, on with the recipe…..
Makes: 8
Ingredients
115g free-from Digestive biscuits
65g plant-based butter
175g white vegan marshmallows
400ml plant-based double cream, at room temperature
1tsp good quality vanilla extract
Icing snowflakes and edible silver glitter to decorate
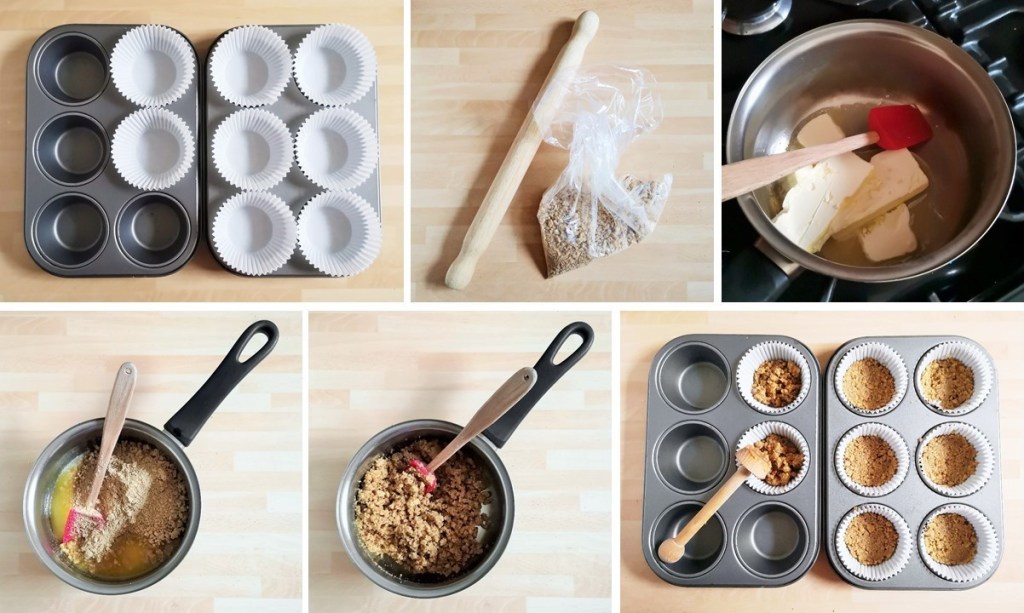
1. Line 8 muffin tins with plain cupcake paper cases – you don’t need to use anything fancy; the cases are being used as tin liners to help you turn the pies out more easily. Put the biscuits in a clean bag and crush finely with a rolling pin.
2. Melt the butter, remove from the heat and stir in the crumbs until evenly coated. Divide the mixture between the cases; press down well and chill until required.
Making the bases. Images: Kathryn Hawkins
3. For easier melting, cut the marshmallows into small pieces – kitchen scissors are good for this. Place in a saucepan and pour over 100ml of the cream and add the vanilla.
4. Heat very gently, stirring occasionally, until the marshmallows melt into the cream. This will take about 5-8 minutes. Keep the heat as low as possible to avoid boiling. Then whisk until smooth.
Making the filling. Images: Kathryn Hawkins
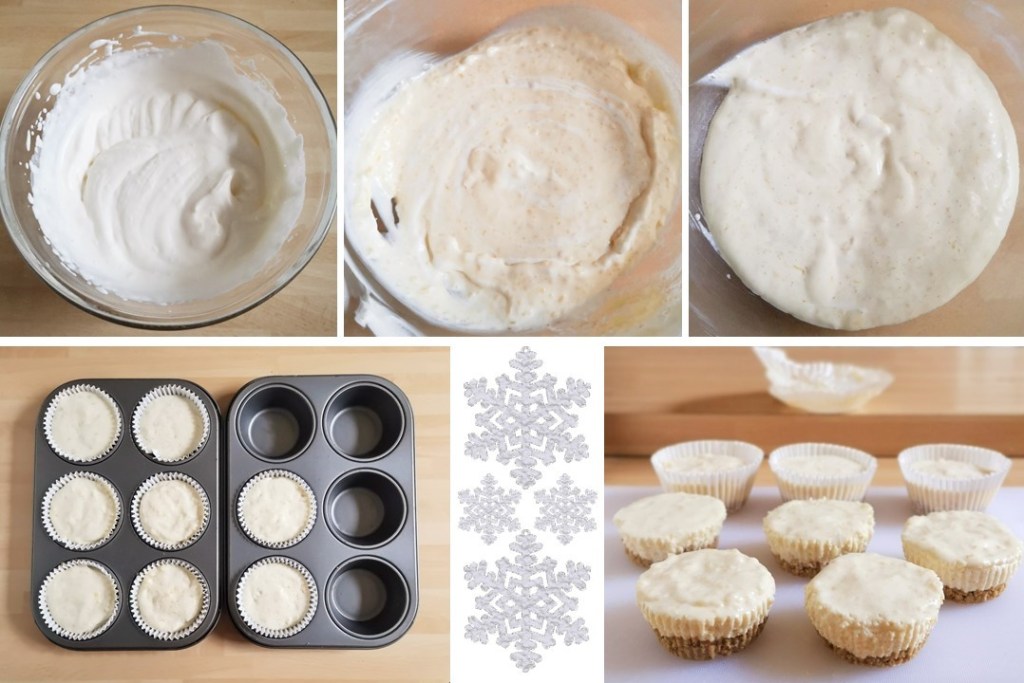
5. While the marshmallows are melting, whip a further 225ml cream until just peaking.
6. Working quickly, scrape the molten marshmallows mixture on top of the cream and gently mix the 2 together to make a fluffy, light mixture. The marshmallows will start to set again as soon as they meet the cream, so make sure the cream isn’t too cold.
7. Divide between the cases and chill for about 2hr until completely set, then remove from the tins and peel away the paper cases.
Assembling the pies. Images: Kathryn Hawkins.
8. To serve, whip the remaining cream and spoon a little on top of each pie. Decorate with snowflakes and glitter. Delicious accompanied with a cranberry, or other fruit, compote.
Cranberry compote. Image: Kathryn Hawkins
This is my last recipe post of the year. Thank you for your continued interest in my blog. I hope you have a very happy and healthy Christmas and I look forward to returning to my blog in the new year.